2019 Biennium Executive Planning Process (EPP) …budget.mt.gov/Portals/29/IBARS EPP Manual...
14
1 2019 Biennium Executive Planning Process (EPP) IBARS Training Manual Room 250 of the State Capitol Thursday, April 21 and Friday, April 22 9 A.M., 10 A.M., and 2 P.M.
Transcript of 2019 Biennium Executive Planning Process (EPP) …budget.mt.gov/Portals/29/IBARS EPP Manual...
1
2019 Biennium Executive Planning Process (EPP)
IBARS Training Manual
Room 250 of the State Capitol
Thursday, April 21 and Friday, April 22
9 A.M., 10 A.M., and 2 P.M.
2
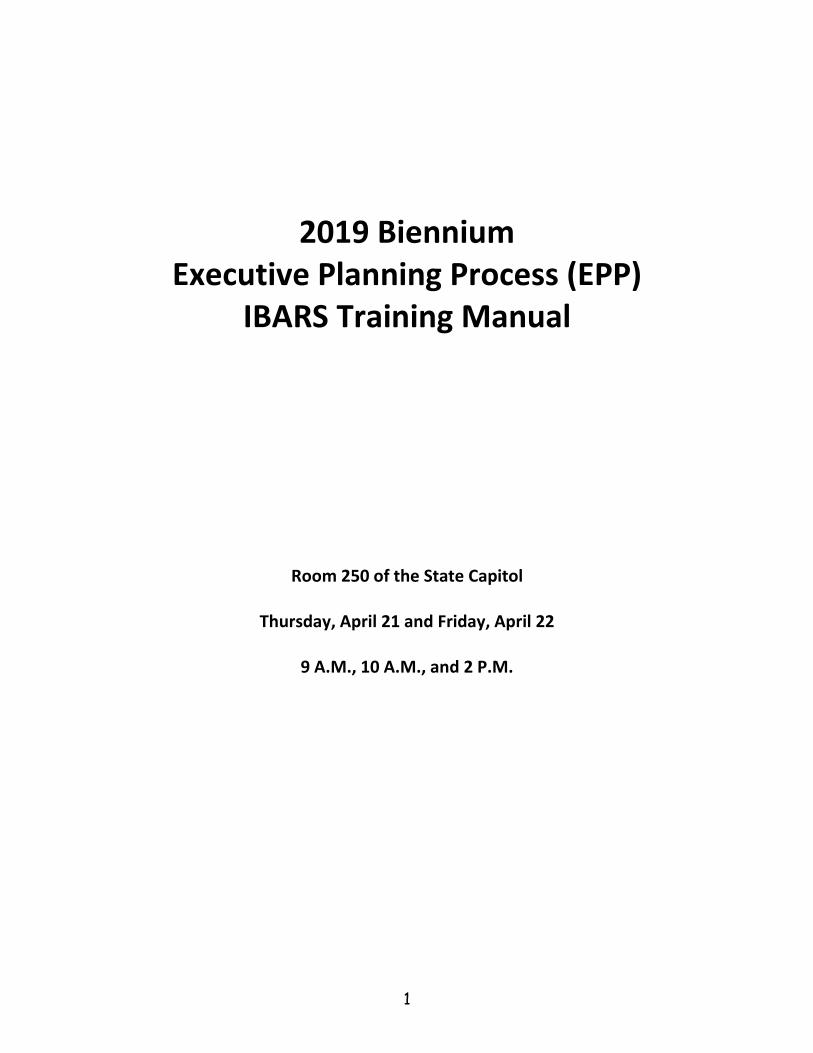
Table of Contents (Click on the section heading or page number to go to that area).
1. Logging on to IBARS 3 2. Creating and Saving EPP Requests 4 3. EPP Request Narrative 5 4. EPP Expenditures and Funding 5 5. Creating EPP Positions and Posting Position Costs 8 6. EPP Reports 13 7. EPP Data Extract 13 8. Mark Complete 13 9. Available Resources 14

3
1. LOGGING ON TO IBARS AND SELECTING THE AGENCY EPP REQUEST VERSION If you need to get an IBARS User ID/password, contact your agency’s security officer.
To logon to IBARS:
From the MINE page, click on “IBARS” Enter your User ID and password. Click on the ‘Logon’ button. User ID must be in CAPS. To change your password, click on ‘Administration’, ‘Password Configuration’, ‘Change Password.’ Note that IBARS will automatically prompt you to change your password every 60 days. If you are having technical difficulties or need a password reset, contact the IBARS Helpdesk at 5795.
The general IBARS Navigation and Reporting Manual (distributed in October of 2014) is available here: http://mine.mt.gov/content/documentation/sabhrs/mbars/ibars_nav_rptng
Select the Agency EPP Version (A01 Version)
The Version Control screen allows a user to select the data they want to view or work on in all subsequent screens.
Click on the ‘Versions’ tab on the upper left portion of the screen. The ‘Versions’ screen will appear. Make sure to change the ‘Bien’ dropdown to 2019.
Select the ‘2019A01#####’ version for your agency (A05 if you are part of the University system). This
will open the ‘Checklist’ tab. Select the ‘EPP Requests’ item from the checklist.
Overview of EPP tabs:
EPP Requests Select = List of all EPP Requests for the agency Request Details = Further Information for each EPP Request Summary = EPP Expenditure, Funding, and FTE totals Detail = Expenditure and Funding Data Entry area of EPP Narr = EPP Request Narrative. Must click on ‘Request Details’ tab before clicking on ‘Narr’ tab.
4
2. CREATING AND SAVING EPP REQUESTS NAVIGATION: Versions/2019A01#####/EPP Requests
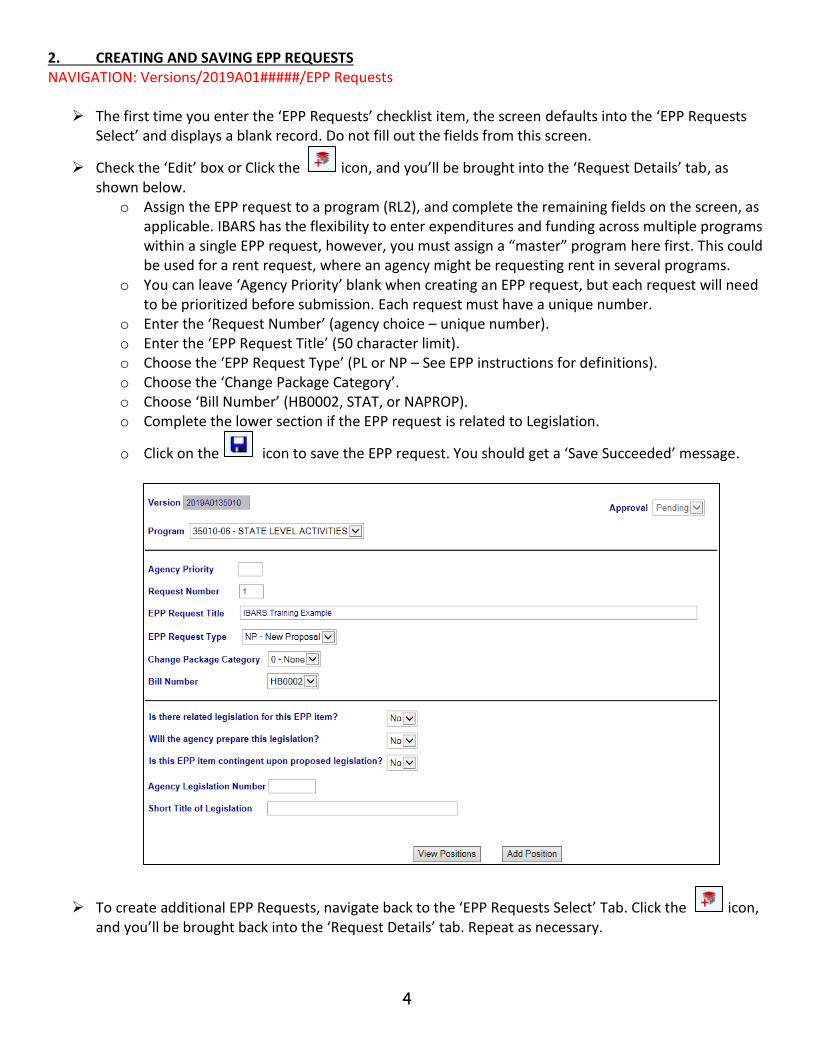
The first time you enter the ‘EPP Requests’ checklist item, the screen defaults into the ‘EPP Requests Select’ and displays a blank record. Do not fill out the fields from this screen.
Check the ‘Edit’ box or Click the icon, and you’ll be brought into the ‘Request Details’ tab, as shown below.
o Assign the EPP request to a program (RL2), and complete the remaining fields on the screen, as applicable. IBARS has the flexibility to enter expenditures and funding across multiple programs within a single EPP request, however, you must assign a “master” program here first. This could be used for a rent request, where an agency might be requesting rent in several programs.
o You can leave ‘Agency Priority’ blank when creating an EPP request, but each request will need to be prioritized before submission. Each request must have a unique number.
o Enter the ‘Request Number’ (agency choice – unique number). o Enter the ‘EPP Request Title’ (50 character limit). o Choose the ‘EPP Request Type’ (PL or NP – See EPP instructions for definitions). o Choose the ‘Change Package Category’. o Choose ‘Bill Number’ (HB0002, STAT, or NAPROP). o Complete the lower section if the EPP request is related to Legislation.
o Click on the icon to save the EPP request. You should get a ‘Save Succeeded’ message.
To create additional EPP Requests, navigate back to the ‘EPP Requests Select’ Tab. Click the icon, and you’ll be brought back into the ‘Request Details’ tab. Repeat as necessary.
5
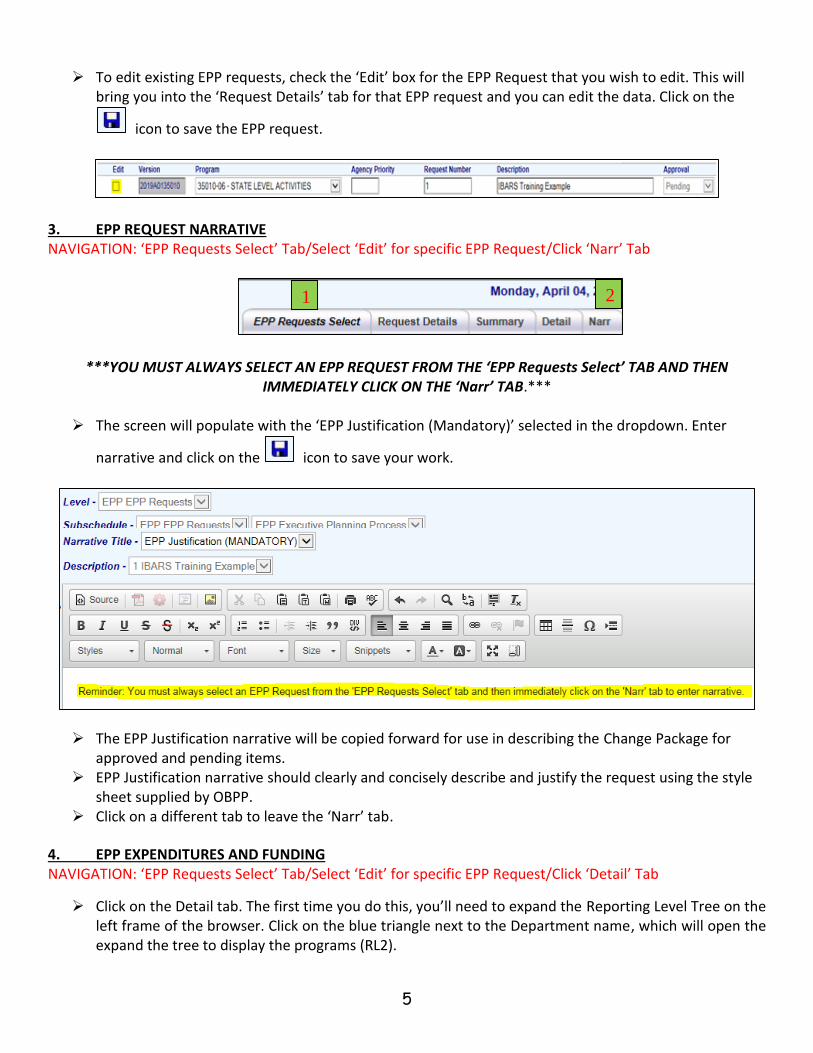
To edit existing EPP requests, check the ‘Edit’ box for the EPP Request that you wish to edit. This will
bring you into the ‘Request Details’ tab for that EPP request and you can edit the data. Click on the
icon to save the EPP request.
3. EPP REQUEST NARRATIVE NAVIGATION: ‘EPP Requests Select’ Tab/Select ‘Edit’ for specific EPP Request/Click ‘Narr’ Tab
***YOU MUST ALWAYS SELECT AN EPP REQUEST FROM THE ‘EPP Requests Select’ TAB AND THEN IMMEDIATELY CLICK ON THE ‘Narr’ TAB.***
The screen will populate with the ‘EPP Justification (Mandatory)’ selected in the dropdown. Enter
narrative and click on the icon to save your work.
The EPP Justification narrative will be copied forward for use in describing the Change Package for approved and pending items.
EPP Justification narrative should clearly and concisely describe and justify the request using the style sheet supplied by OBPP.
Click on a different tab to leave the ‘Narr’ tab.
4. EPP EXPENDITURES AND FUNDING NAVIGATION: ‘EPP Requests Select’ Tab/Select ‘Edit’ for specific EPP Request/Click ‘Detail’ Tab
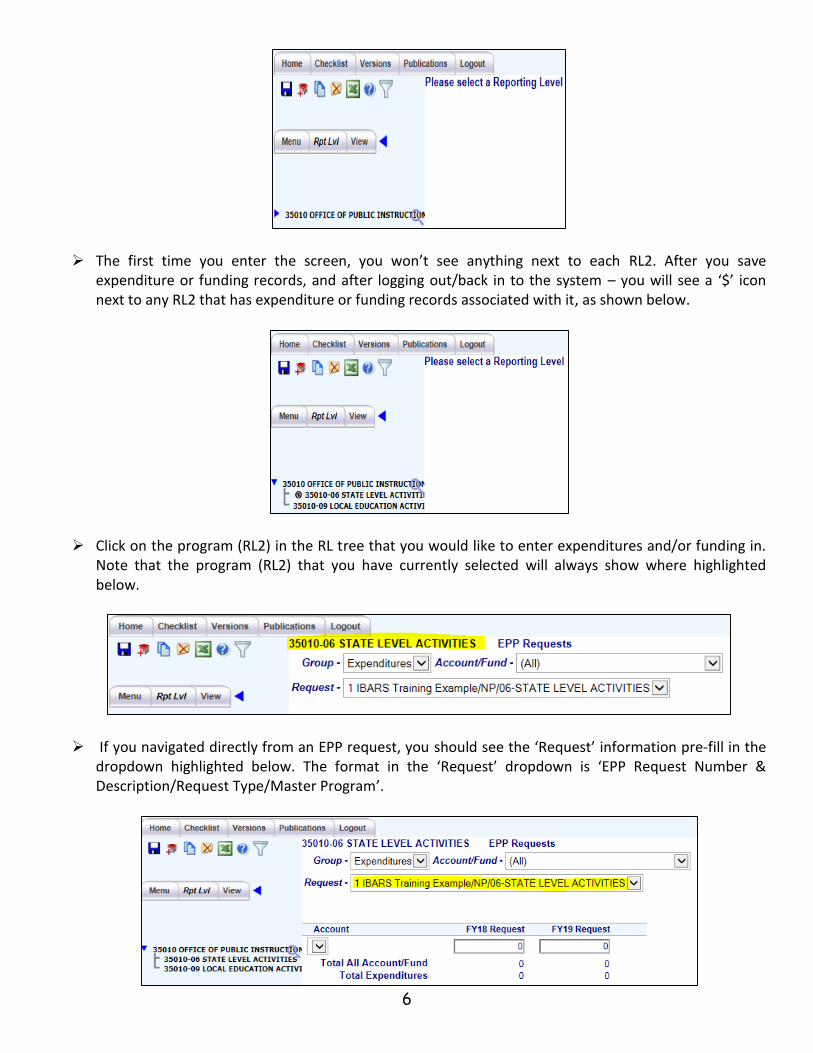
Click on the Detail tab. The first time you do this, you’ll need to expand the Reporting Level Tree on the left frame of the browser. Click on the blue triangle next to the Department name, which will open the expand the tree to display the programs (RL2).
1 2
6
The first time you enter the screen, you won’t see anything next to each RL2. After you save expenditure or funding records, and after logging out/back in to the system – you will see a ‘$’ icon next to any RL2 that has expenditure or funding records associated with it, as shown below.
Click on the program (RL2) in the RL tree that you would like to enter expenditures and/or funding in. Note that the program (RL2) that you have currently selected will always show where highlighted below.
If you navigated directly from an EPP request, you should see the ‘Request’ information pre-fill in the dropdown highlighted below. The format in the ‘Request’ dropdown is ‘EPP Request Number & Description/Request Type/Master Program’.
7
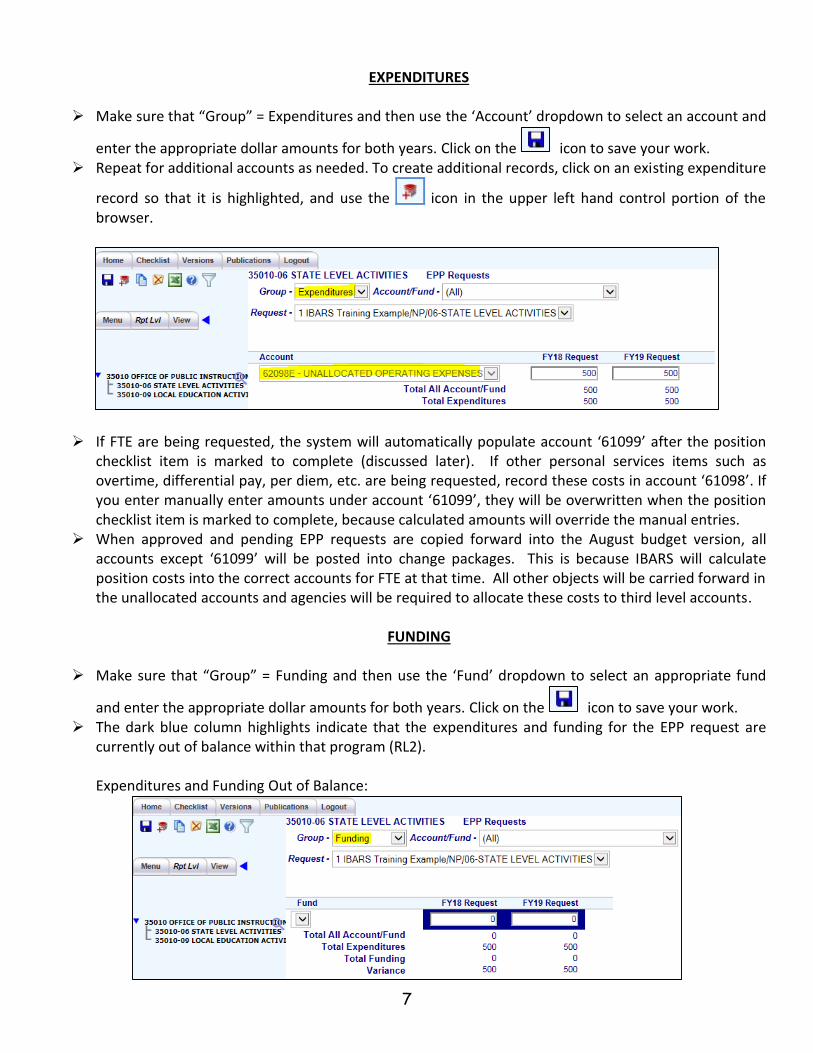
EXPENDITURES
Make sure that “Group” = Expenditures and then use the ‘Account’ dropdown to select an account and
enter the appropriate dollar amounts for both years. Click on the icon to save your work. Repeat for additional accounts as needed. To create additional records, click on an existing expenditure
record so that it is highlighted, and use the icon in the upper left hand control portion of the browser.
If FTE are being requested, the system will automatically populate account ‘61099’ after the position checklist item is marked to complete (discussed later). If other personal services items such as overtime, differential pay, per diem, etc. are being requested, record these costs in account ‘61098’. If you enter manually enter amounts under account ‘61099’, they will be overwritten when the position checklist item is marked to complete, because calculated amounts will override the manual entries.
When approved and pending EPP requests are copied forward into the August budget version, all accounts except ‘61099’ will be posted into change packages. This is because IBARS will calculate position costs into the correct accounts for FTE at that time. All other objects will be carried forward in the unallocated accounts and agencies will be required to allocate these costs to third level accounts.
FUNDING
Make sure that “Group” = Funding and then use the ‘Fund’ dropdown to select an appropriate fund
and enter the appropriate dollar amounts for both years. Click on the icon to save your work. The dark blue column highlights indicate that the expenditures and funding for the EPP request are
currently out of balance within that program (RL2).
Expenditures and Funding Out of Balance:

8
Expenditures and Funding In Balance:
Repeat for additional funds as needed. To create additional records, click on an existing funding record
so that it is highlighted, and use the icon in the upper left hand control portion of the browser. Use the ‘Summary’ tab to view information that you have entered at a higher level.
5. CREATING EPP POSITIONS AND POSTING POSITION COSTS NAVIGATION: Versions/2019A01#####/Position Detail Data or Checklist/Position Detail Data
Navigate to the Position Detail Data checklist item. You will be required to enter information in the three tabs highlighted below.
Expand the reporting level tree and choose the program (RL2) that the position belongs in. This will open the ‘Pos List’ tab, which will be empty until you create positions.
Use the icon in the upper left hand control portion of the browser. This will open the ‘Pos Info’ tab. You will be required to complete the highlighted fields.
9
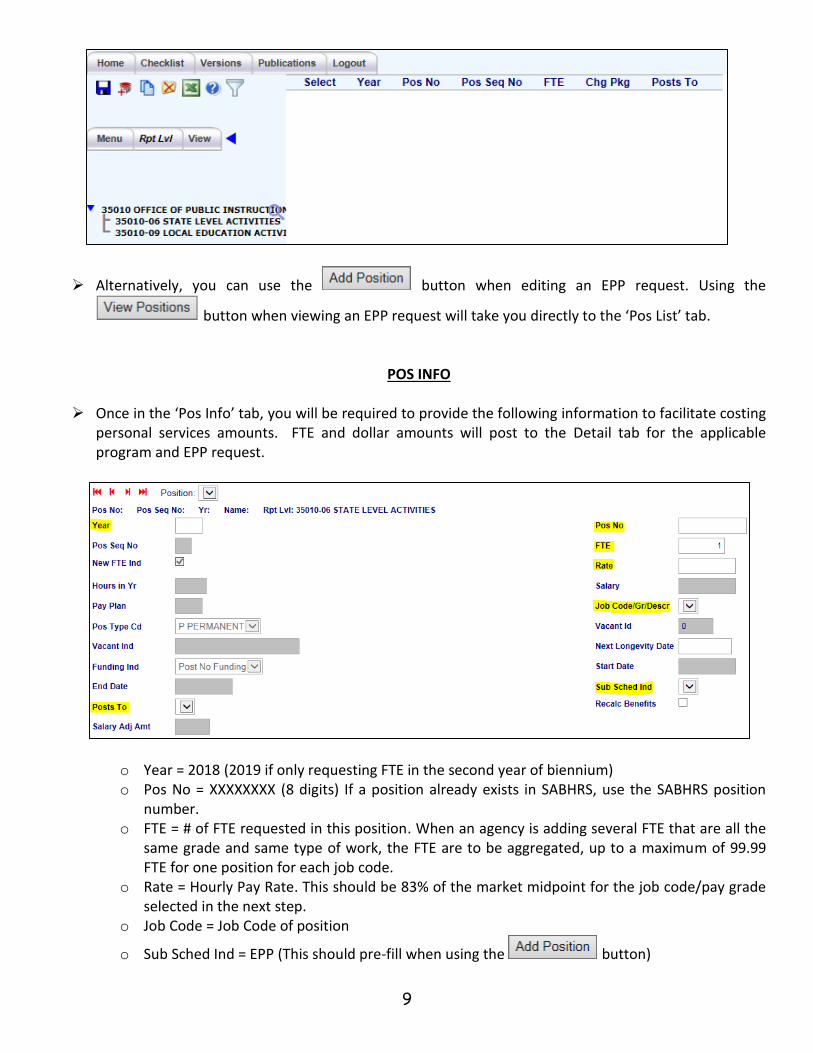
Alternatively, you can use the button when editing an EPP request. Using the
button when viewing an EPP request will take you directly to the ‘Pos List’ tab.
POS INFO
Once in the ‘Pos Info’ tab, you will be required to provide the following information to facilitate costing
personal services amounts. FTE and dollar amounts will post to the Detail tab for the applicable program and EPP request.
o Year = 2018 (2019 if only requesting FTE in the second year of biennium) o Pos No = XXXXXXXX (8 digits) If a position already exists in SABHRS, use the SABHRS position
number. o FTE = # of FTE requested in this position. When an agency is adding several FTE that are all the
same grade and same type of work, the FTE are to be aggregated, up to a maximum of 99.99 FTE for one position for each job code.
o Rate = Hourly Pay Rate. This should be 83% of the market midpoint for the job code/pay grade selected in the next step.
o Job Code = Job Code of position
o Sub Sched Ind = EPP (This should pre-fill when using the button)
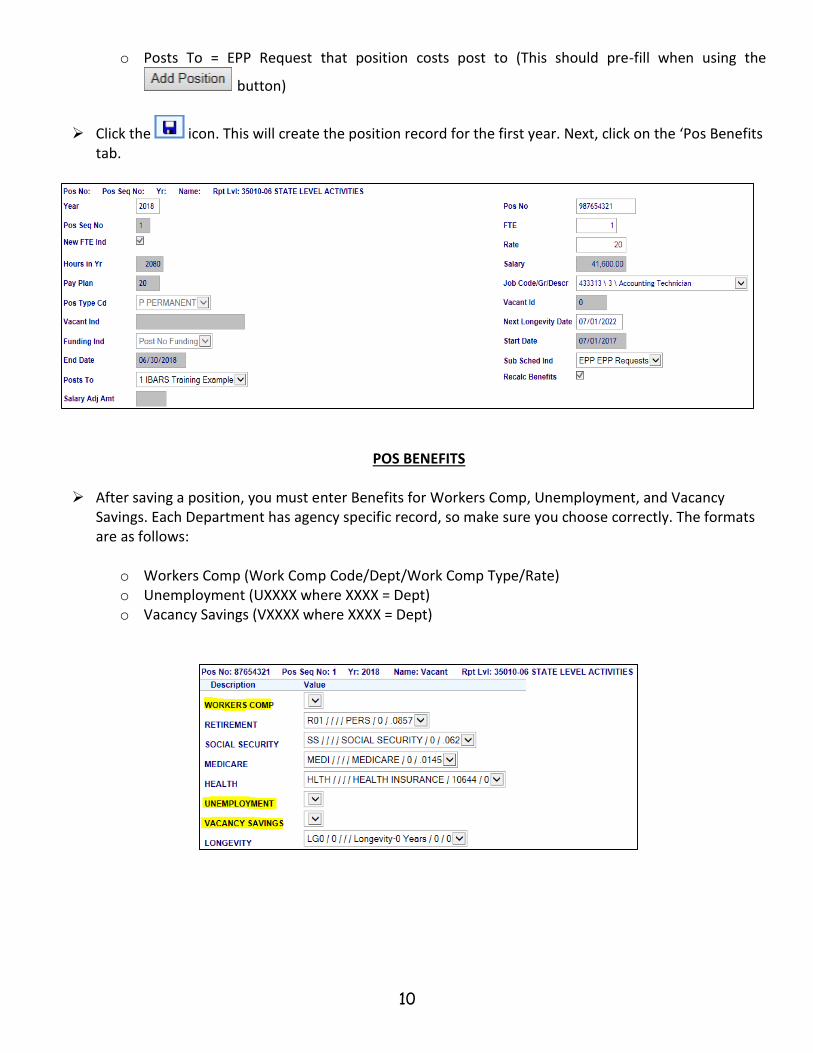
10
o Posts To = EPP Request that position costs post to (This should pre-fill when using the
button)
Click the icon. This will create the position record for the first year. Next, click on the ‘Pos Benefits tab.
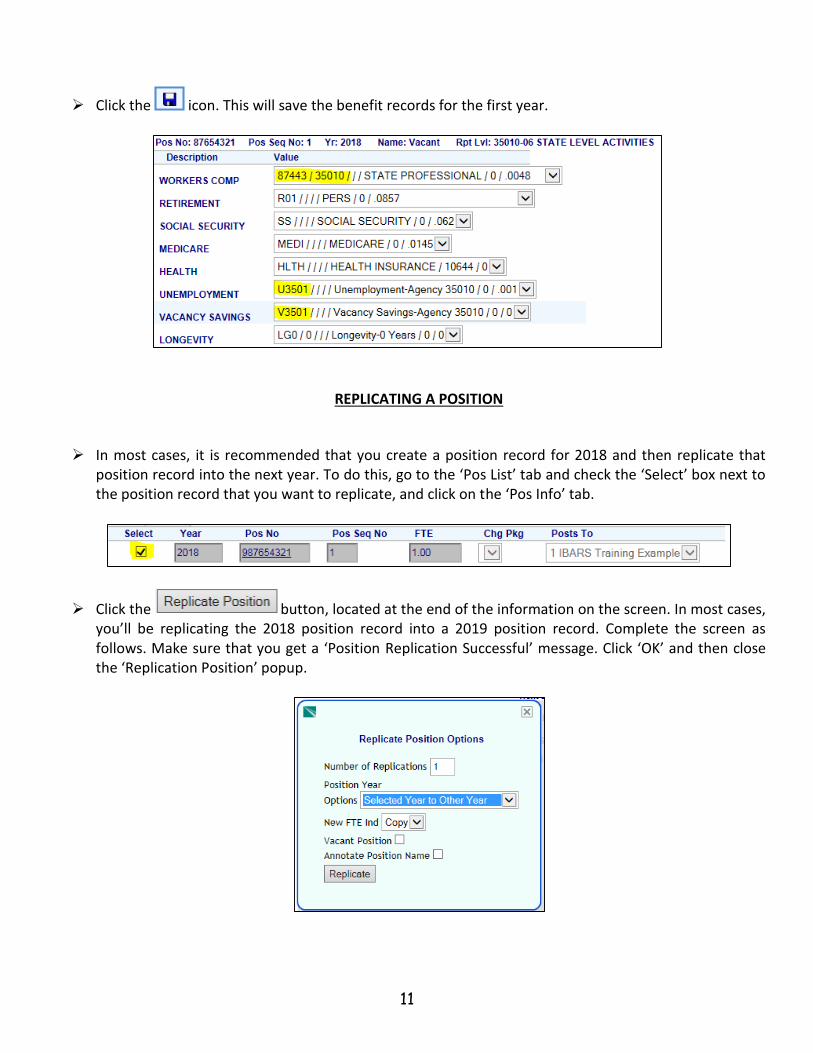
POS BENEFITS
After saving a position, you must enter Benefits for Workers Comp, Unemployment, and Vacancy Savings. Each Department has agency specific record, so make sure you choose correctly. The formats are as follows:
o Workers Comp (Work Comp Code/Dept/Work Comp Type/Rate) o Unemployment (UXXXX where XXXX = Dept) o Vacancy Savings (VXXXX where XXXX = Dept)
11
Click the icon. This will save the benefit records for the first year.
REPLICATING A POSITION
In most cases, it is recommended that you create a position record for 2018 and then replicate that position record into the next year. To do this, go to the ‘Pos List’ tab and check the ‘Select’ box next to the position record that you want to replicate, and click on the ‘Pos Info’ tab.
Click the button, located at the end of the information on the screen. In most cases, you’ll be replicating the 2018 position record into a 2019 position record. Complete the screen as follows. Make sure that you get a ‘Position Replication Successful’ message. Click ‘OK’ and then close the ‘Replication Position’ popup.
12
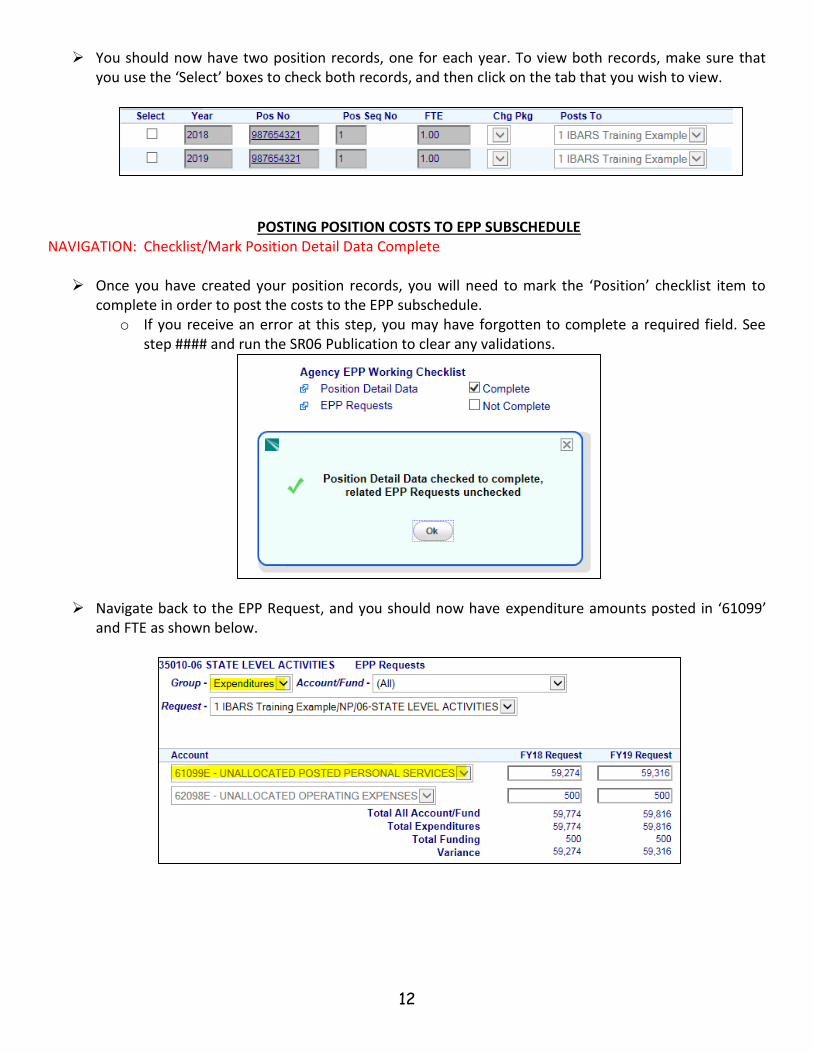
You should now have two position records, one for each year. To view both records, make sure that you use the ‘Select’ boxes to check both records, and then click on the tab that you wish to view.
POSTING POSITION COSTS TO EPP SUBSCHEDULE NAVIGATION: Checklist/Mark Position Detail Data Complete
Once you have created your position records, you will need to mark the ‘Position’ checklist item to complete in order to post the costs to the EPP subschedule.
o If you receive an error at this step, you may have forgotten to complete a required field. See step #### and run the SR06 Publication to clear any validations.
Navigate back to the EPP Request, and you should now have expenditure amounts posted in ‘61099’ and FTE as shown below.
13
Navigate back to the EPP Request, and you should now have amounts posted in ‘61099’ and FTE as shown below.
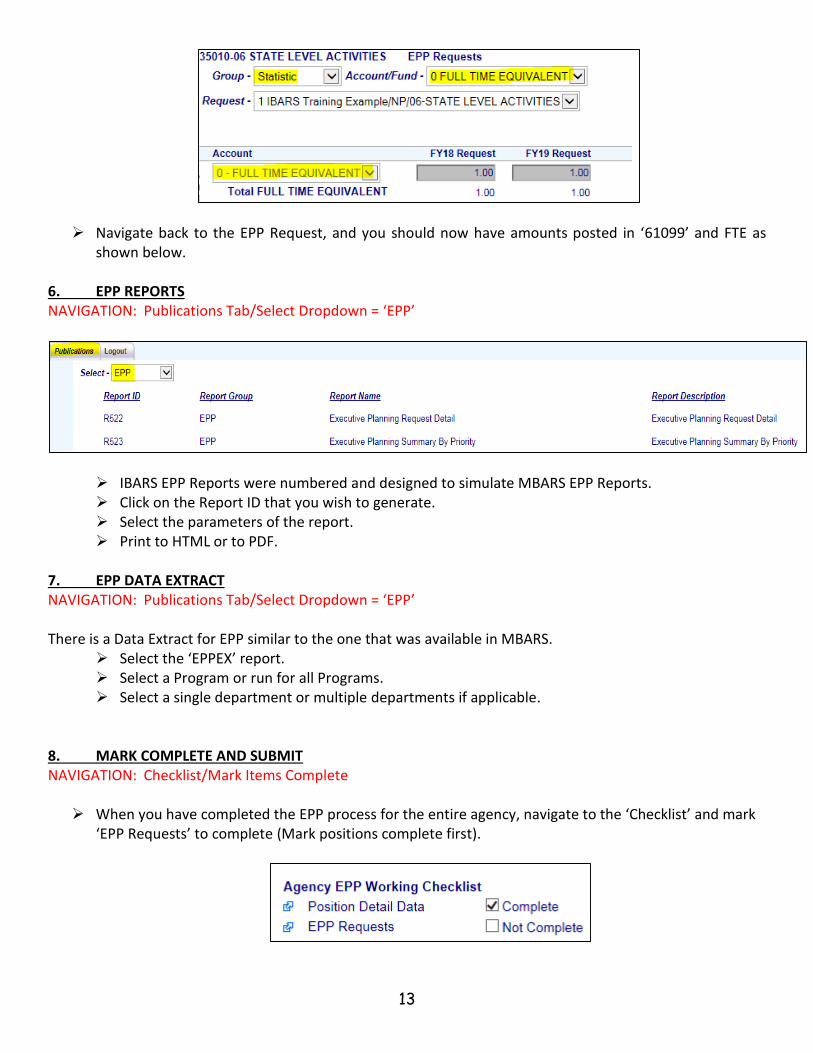
6. EPP REPORTS NAVIGATION: Publications Tab/Select Dropdown = ‘EPP’
IBARS EPP Reports were numbered and designed to simulate MBARS EPP Reports. Click on the Report ID that you wish to generate. Select the parameters of the report. Print to HTML or to PDF.
7. EPP DATA EXTRACT NAVIGATION: Publications Tab/Select Dropdown = ‘EPP’ There is a Data Extract for EPP similar to the one that was available in MBARS.
Select the ‘EPPEX’ report. Select a Program or run for all Programs. Select a single department or multiple departments if applicable.
8. MARK COMPLETE AND SUBMIT NAVIGATION: Checklist/Mark Items Complete
When you have completed the EPP process for the entire agency, navigate to the ‘Checklist’ and mark ‘EPP Requests’ to complete (Mark positions complete first).
14
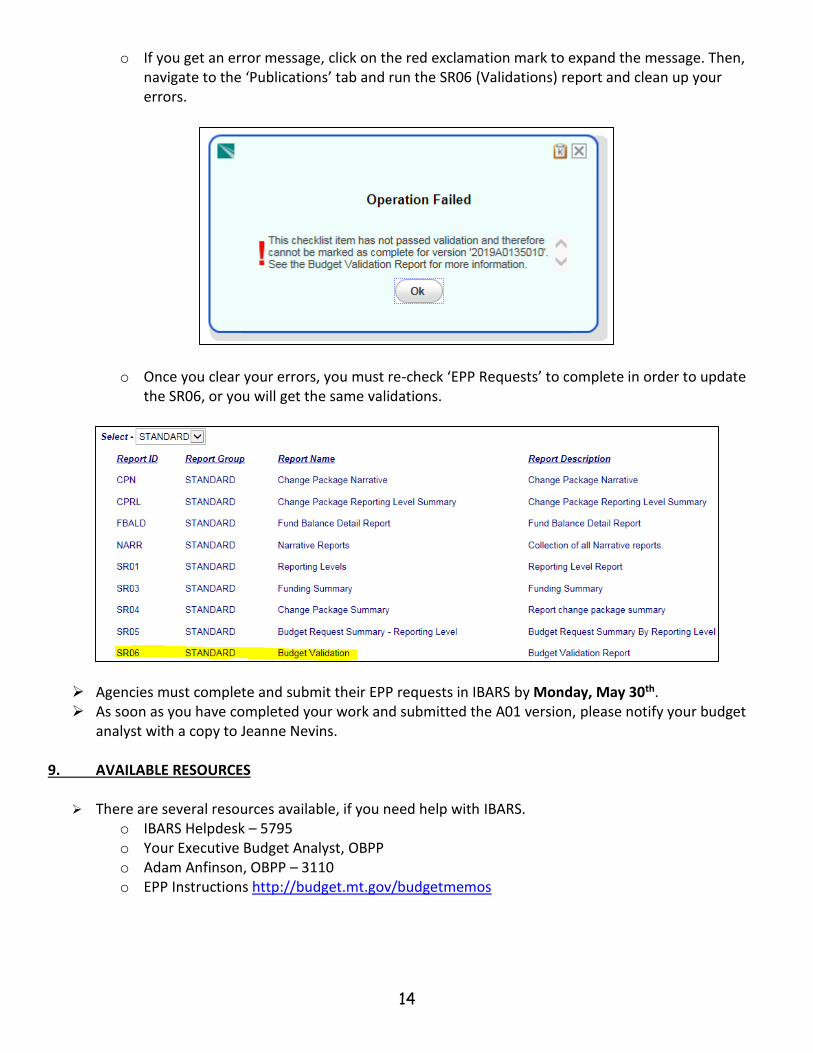
o If you get an error message, click on the red exclamation mark to expand the message. Then, navigate to the ‘Publications’ tab and run the SR06 (Validations) report and clean up your errors.
o Once you clear your errors, you must re-check ‘EPP Requests’ to complete in order to update the SR06, or you will get the same validations.
Agencies must complete and submit their EPP requests in IBARS by Monday, May 30th. As soon as you have completed your work and submitted the A01 version, please notify your budget
analyst with a copy to Jeanne Nevins.
9. AVAILABLE RESOURCES There are several resources available, if you need help with IBARS.
o IBARS Helpdesk – 5795 o Your Executive Budget Analyst, OBPP o Adam Anfinson, OBPP – 3110 o EPP Instructions http://budget.mt.gov/budgetmemos