2017 EBIKE OWNER’S MANUAL - · PDF file2017 EBIKE OWNER’S MANUAL MODELS MATE CITY...
44
2017 EBIKE OWNER’S MANUAL MODELS MATE CITY (25001): 250W, 36V 10.4Ah Li-Ion battery MATE CITY+ (25002): 250W, 36V 13Ah Li-Ion battery MATE CITY+ w/Booster upgrade (25003): 250W, 36V 17Ah Li-Ion battery MATE S (35001): 350W, 36V 13Ah Li-Ion battery MATE S w/Booster upgrade (35002): 350W, 36V 17Ah Li-Ion battery Please read before operating your new bike.
Transcript of 2017 EBIKE OWNER’S MANUAL - · PDF file2017 EBIKE OWNER’S MANUAL MODELS MATE CITY...

2017 EBIKE OWNER’S MANUAL
MODELS MATE CITY (25001): 250W, 36V 10.4Ah Li-Ion battery MATE CITY+ (25002): 250W, 36V 13Ah Li-Ion battery
MATE CITY+ w/Booster upgrade (25003): 250W, 36V 17Ah Li-Ion battery MATE S (35001): 350W, 36V 13Ah Li-Ion battery
MATE S w/Booster upgrade (35002): 350W, 36V 17Ah Li-Ion battery
Please read before operating your new bike.

Congratulations! You’ve just become one of the very first owners of a MATE bike in the world! We want to thank you for your support through your generous contribution and patience.
MATE wouldn’t have seen the light of day without the support from thousands of backers around the world who believed in our dream of bringing to the world a cool and affordable ebike - made for any rider, any journey, any situation.
We kindly request that you please read this manual from beginning to end. Our safety warnings are especially key before you hop on your MATE.
With love, Christian, Julie & the rest of the MATE team
FOREWORD
02
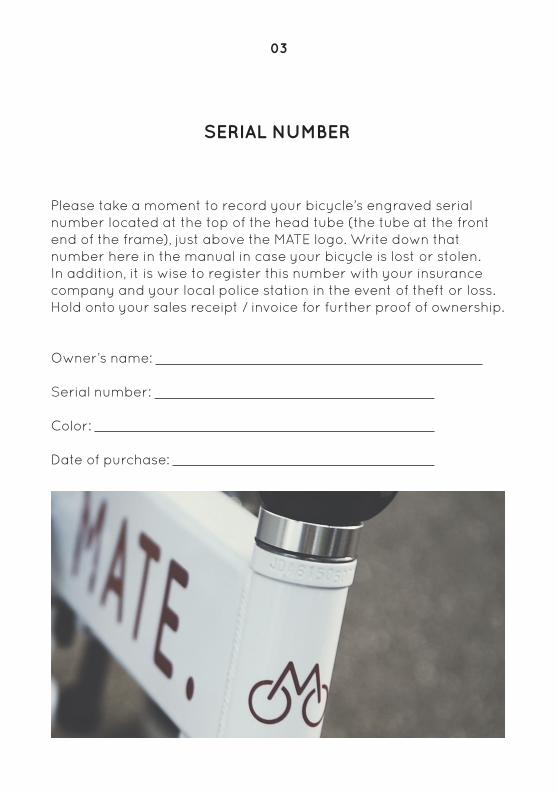
Please take a moment to record your bicycle’s engraved serial number located at the top of the head tube (the tube at the front end of the frame), just above the MATE logo. Write down that number here in the manual in case your bicycle is lost or stolen. In addition, it is wise to register this number with your insurance company and your local police station in the event of theft or loss. Hold onto your sales receipt / invoice for further proof of ownership.
Owner’s name:
Serial number:
Color:
Date of purchase:
SERIAL NUMBER
03
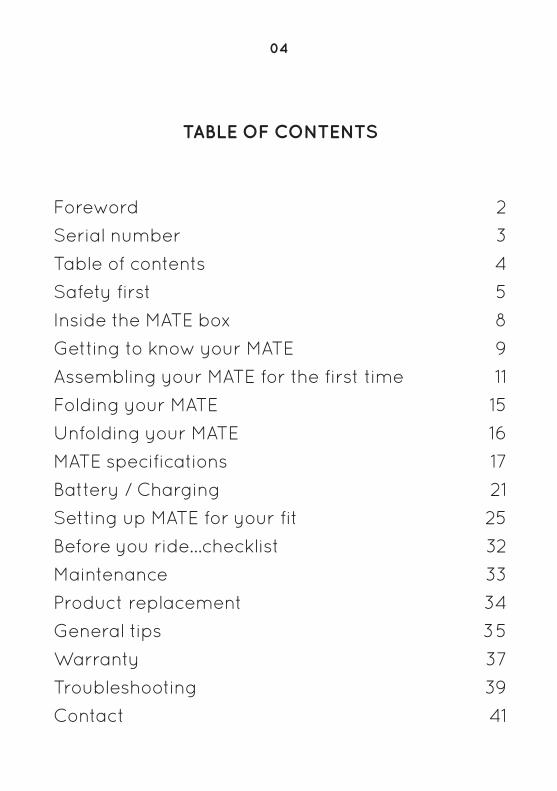
Foreword 2
Serial number 3
Table of contents 4
Safety first 5
Inside the MATE box 8
Getting to know your MATE 9
Assembling your MATE for the first time 11
Folding your MATE 15
Unfolding your MATE 16
MATE specifications 17
Battery / Charging 21
Setting up MATE for your fit 25
Before you ride...checklist 32
Maintenance 33
Product replacement 34
General tips 35
Warranty 37
Troubleshooting 39
Contact 41
tABLE OF cONtENtS
03 04

If you are unfamiliar with any aspect of this manual, it is recommended that you take your bike and this manual to a local bike shop for inspection, assembly and instructions.
• It is extremely important that you follow the safety guidelines contained in this manual in order to ensure maximum safety for you as well as maximum durability of your MATE.
• Before you ride your MATE for the first time, please be absolutely sure that it has been correctly assembled. You will find step by step instructions in this manual. But if for any reason you are not completely certain, please bring it to your nearest bicycle shop.
• Key assembly steps that must be completed with absolute certainty (to include secure fastening) are pedals, saddle height, handlebar (both rotation and height) and wheels.
• Please ensure all safety latches, including quick releases and rings, are locked in place and snug without any movement.
• Please ensure all bolts (including the front/rear wheels and saddle bolt) are properly tightened.
• If you are unfamiliar with cycling, we suggest that you take a cycling course that includes riding safely.
• Test your brakes prior to using the bike every time. In wet or icy conditions, use extra caution.
• Frequently check your tire pressures. They should be approximately between 4 and 6.5 bar (58 and 94 psi). Low tire pressures will result in damage to the tires and rims. It can shorten the lifespan of your bike as well as cut your ride short if you suffer from a flat tire.
•We recommend you to always wear a helmet when riding any bicycle.
SAFEty FIRSt
05
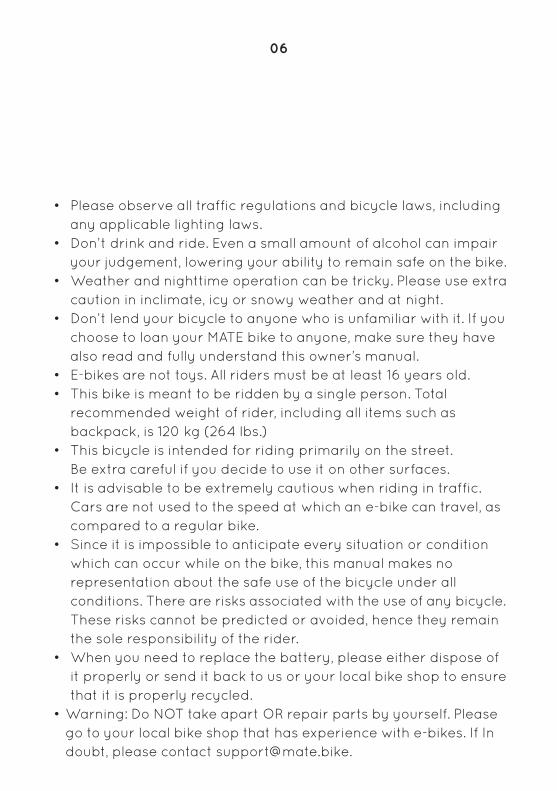
• Please observe all traffic regulations and bicycle laws, including any applicable lighting laws.
• Don’t drink and ride. Even a small amount of alcohol can impair your judgement, lowering your ability to remain safe on the bike.
• Weather and nighttime operation can be tricky. Please use extra caution in inclimate, icy or snowy weather and at night.
• Don’t lend your bicycle to anyone who is unfamiliar with it. If you choose to loan your MATE bike to anyone, make sure they have also read and fully understand this owner’s manual.
• E-bikes are not toys. All riders must be at least 16 years old.• This bike is meant to be ridden by a single person. Total
recommended weight of rider, including all items such as backpack, is 120 kg (264 lbs.)
• This bicycle is intended for riding primarily on the street. Be extra careful if you decide to use it on other surfaces.
• It is advisable to be extremely cautious when riding in traffic. Cars are not used to the speed at which an e-bike can travel, as compared to a regular bike.
• Since it is impossible to anticipate every situation or condition which can occur while on the bike, this manual makes no representation about the safe use of the bicycle under all conditions. There are risks associated with the use of any bicycle. These risks cannot be predicted or avoided, hence they remain the sole responsibility of the rider.
• When you need to replace the battery, please either dispose of it properly or send it back to us or your local bike shop to ensure that it is properly recycled.
•Warning: Do NOT take apart OR repair parts by yourself. Please go to your local bike shop that has experience with e-bikes. If In doubt, please contact [email protected].
05 06
US AND cANADA: FEDERAL LEgISLAtION OF E-BIKESDue to recent changes in federal legislation, an electric bike is no longer classified as a motor vehicle. However, e-bike laws vary from country to country, as well as state to state, so please familiarize yourself with the specific laws pertaining to your intended riding territory. These regulations may include, but are not limited to, being at least 16 years of age and/or having a valid driver’s license. For further clarification, please consult your local department of motor vehicles.
For all other countries, please contact the local motor vehicles authorities to familiarize yourself with the rules and regulations that apply to e-bikes in your intended riding area.
Please note that you are solely responsible for the operation of your MATE in compliance with all applicable laws and regulations.
If you have any further questions about the operation of this MATE e- bike, please consult your local e-bike dealer or contact MATE Bike directly by email at [email protected] - or check out the FAQs section on our website http://www.mate.bike.
07

INSIDE thE MAtE BOx
When you receive your MATE box, it will include the following items:
Suspension bike frame/forkRear wheelFront wheelStem/handlebarGears/chainBrakesSeat (saddle) / seatpostLeft/right pedalsBatteryBattery keysBattery chargerFront fenderRear fenderWheel reflectorsFront bike reflectorRear bike reflectorAssembly tools: 3 allen keys
Please contact us right away if something is missing or appears to be damaged.
08
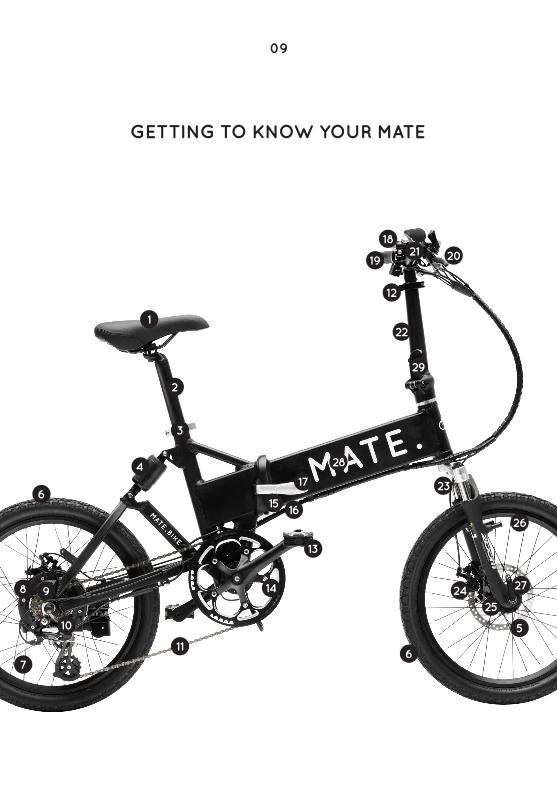
gEttINg tO KNOW yOUR MAtE
1
2
3
4
6
7
8 9
10
11
12
18
1921 20
22
13
14
16
17
15
28
23
24 27
5
6
26
25
09
29

1. Saddle2. Seatpost3. Seatpost quick release4. Rear suspension5. Disc brake 6. Tire7. Spoke8. Motor 9. Cassette10. Rear derailleur11. Chain12. Handlebar height quick release13. Pedal14. Crankset15. Charging hole (backside)16. Key / Battery lock17. Folding handle18. Display screen19. Handlebar20. Brake lever 21. Handlebar rotation quick release22. Handlebar stem23. Front suspension fork 24. Disc brake caliper 25. Hub26. Rim27. Wheel quick release 28. Hidden battery29. Handlebar stem vertical locking mechanism
09 10
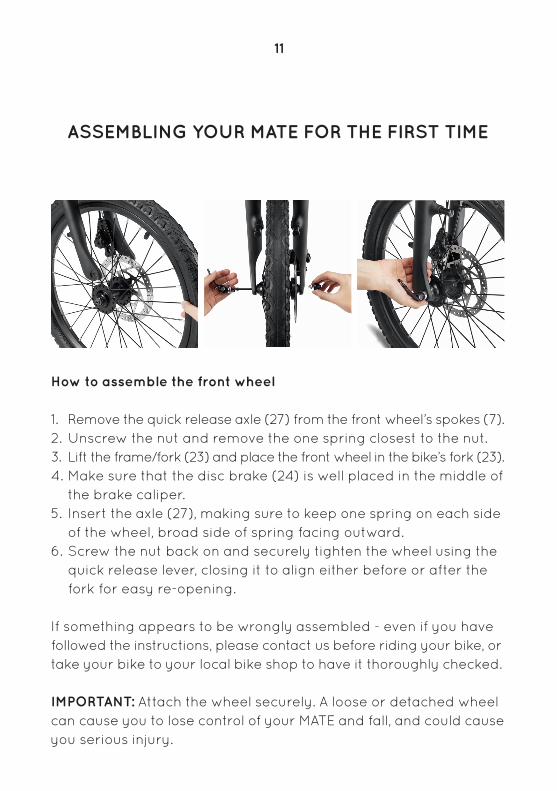
how to assemble the front wheel
1. Remove the quick release axle (27) from the front wheel’s spokes (7).2. Unscrew the nut and remove the one spring closest to the nut.3. Lift the frame/fork (23) and place the front wheel in the bike’s fork (23).4. Make sure that the disc brake (24) is well placed in the middle of
the brake caliper.5. Insert the axle (27), making sure to keep one spring on each side
of the wheel, broad side of spring facing outward.6. Screw the nut back on and securely tighten the wheel using the
quick release lever, closing it to align either before or after the fork for easy re-opening.
If something appears to be wrongly assembled - even if you have followed the instructions, please contact us before riding your bike, or take your bike to your local bike shop to have it thoroughly checked.
IMPORtANt: Attach the wheel securely. A loose or detached wheel can cause you to lose control of your MATE and fall, and could cause you serious injury.
ASSEMBLINg yOUR MAtE FOR thE FIRSt tIME
11
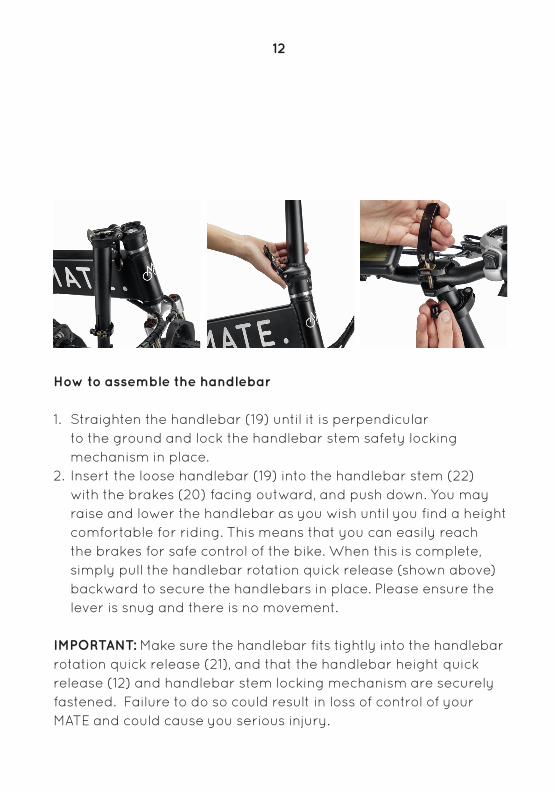
how to assemble the handlebar
1. Straighten the handlebar (19) until it is perpendicular to the ground and lock the handlebar stem safety locking mechanism in place.
2. Insert the loose handlebar (19) into the handlebar stem (22) with the brakes (20) facing outward, and push down. You may raise and lower the handlebar as you wish until you find a height comfortable for riding. This means that you can easily reach the brakes for safe control of the bike. When this is complete, simply pull the handlebar rotation quick release (shown above) backward to secure the handlebars in place. Please ensure the lever is snug and there is no movement.
IMPORtANt: Make sure the handlebar fits tightly into the handlebar rotation quick release (21), and that the handlebar height quick release (12) and handlebar stem locking mechanism are securely fastened. Failure to do so could result in loss of control of your MATE and could cause you serious injury.
12
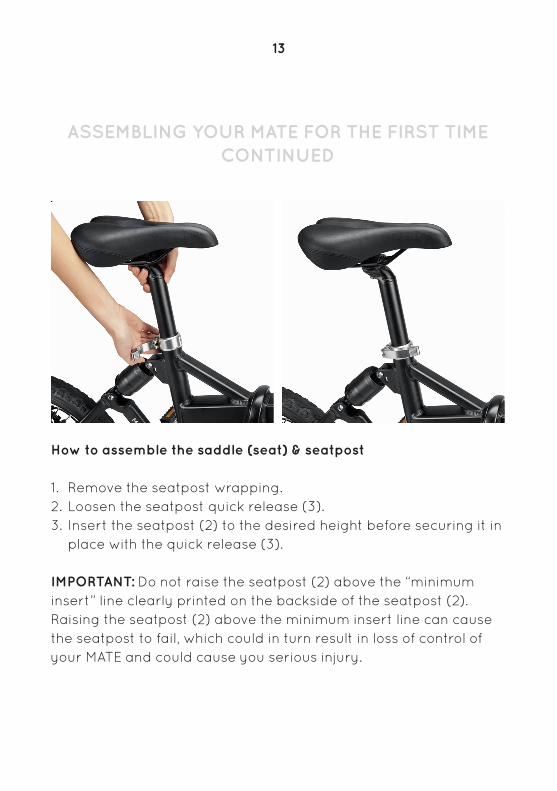
how to assemble the saddle (seat) & seatpost
1. Remove the seatpost wrapping. 2. Loosen the seatpost quick release (3).3. Insert the seatpost (2) to the desired height before securing it in
place with the quick release (3).
IMPORtANt: Do not raise the seatpost (2) above the “minimum insert” line clearly printed on the backside of the seatpost (2). Raising the seatpost (2) above the minimum insert line can cause the seatpost to fail, which could in turn result in loss of control of your MATE and could cause you serious injury.
ASSEMBLINg yOUR MAtE FOR thE FIRSt tIMEcONtINUED
13
13 14
Assembling the pedals
1. Each pedal has an “L” sticker or “R” sticker to indicate left or right side of the bike.
2. Screw “L” pedal into the left crank arm, turning counterclockwise.3. Use the largest of the allen keys provided to tighten the pedal in
place (see photo). Do this by sticking the allen key into the pedal via the backside of the crank arm and turning clockwise.
4. Repeat process for the “R” pedal, but with opposite turning directions. Screw the "R" pedal in clockwise, turn the allen key counterclockwise.
IMPORtANt: Make sure the pedals are tightly attached to each crank arm. Failure to tightly attach the pedals could result in the pedals becoming loose while riding. A loose or detached pedal can cause you to lose control of your MATE and fall, and could cause you serious injury.
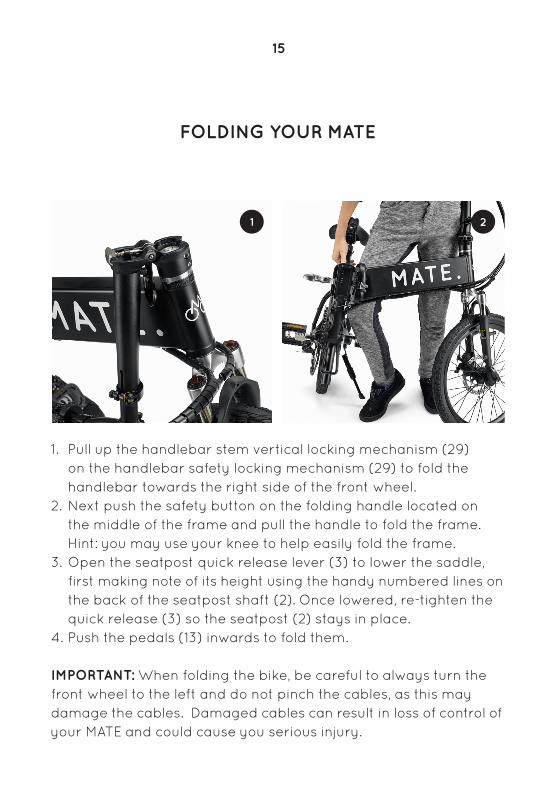
1. Pull up the handlebar stem vertical locking mechanism (29) on the handlebar safety locking mechanism (29) to fold the handlebar towards the right side of the front wheel.
2. Next push the safety button on the folding handle located on the middle of the frame and pull the handle to fold the frame. Hint: you may use your knee to help easily fold the frame.
3. Open the seatpost quick release lever (3) to lower the saddle, first making note of its height using the handy numbered lines on the back of the seatpost shaft (2). Once lowered, re-tighten the quick release (3) so the seatpost (2) stays in place.
4. Push the pedals (13) inwards to fold them.
IMPORtANt: When folding the bike, be careful to always turn the front wheel to the left and do not pinch the cables, as this may damage the cables. Damaged cables can result in loss of control of your MATE and could cause you serious injury.
FOLDINg yOUR MAtE
1 2
15
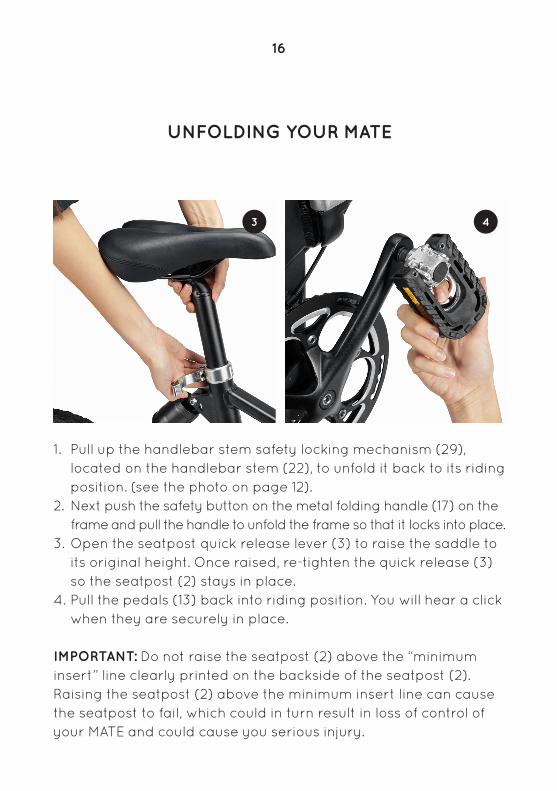
1. Pull up the handlebar stem safety locking mechanism (29), located on the handlebar stem (22), to unfold it back to its riding position. (see the photo on page 12).
2. Next push the safety button on the metal folding handle (17) on the frame and pull the handle to unfold the frame so that it locks into place.
3. Open the seatpost quick release lever (3) to raise the saddle to its original height. Once raised, re-tighten the quick release (3) so the seatpost (2) stays in place.
4. Pull the pedals (13) back into riding position. You will hear a click when they are securely in place.
IMPORtANt: Do not raise the seatpost (2) above the “minimum insert” line clearly printed on the backside of the seatpost (2). Raising the seatpost (2) above the minimum insert line can cause the seatpost to fail, which could in turn result in loss of control of your MATE and could cause you serious injury.
UNFOLDINg yOUR MAtE
3 4
16
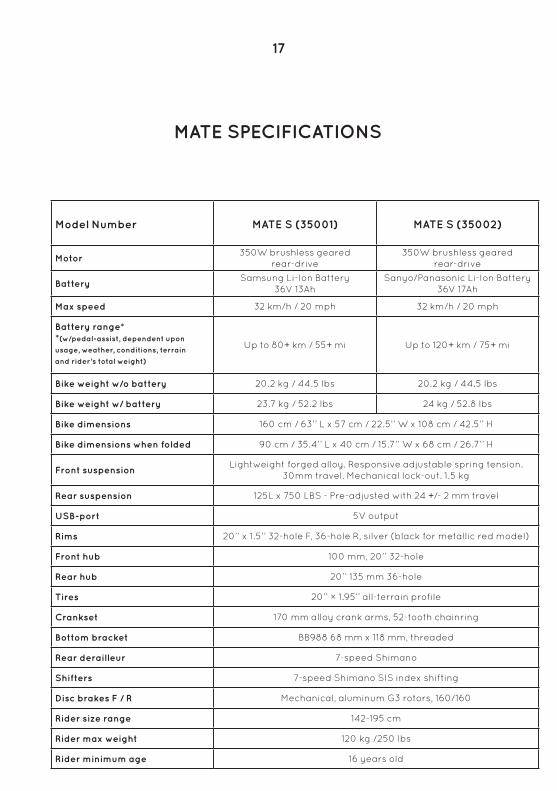
MAtE SPEcIFIcAtIONS
17
Model Number MAtE S (35001) MAtE S (35002)
Motor350W brushless geared
rear-drive350W brushless geared
rear-drive
BatterySamsung Li-Ion Battery
36V 13AhSanyo/Panasonic Li-Ion Battery
36V 17Ah
Max speed 32 km/h / 20 mph 32 km/h / 20 mph
Battery range**(w/pedal-assist, dependent upon
usage, weather, conditions, terrain
and rider’s total weight)
Up to 80+ km / 55+ mi Up to 120+ km / 75+ mi
Bike weight w/o battery 20.2 kg / 44.5 lbs 20.2 kg / 44.5 lbs
Bike weight w/ battery 23.7 kg / 52.2 lbs 24 kg / 52.8 lbs
Bike dimensions 160 cm / 63’’ L x 57 cm / 22.5’’ W x 108 cm / 42.5’’ H
Bike dimensions when folded 90 cm / 35.4’’ L x 40 cm / 15.7’’ W x 68 cm / 26.7’’ H
Front suspension Lightweight forged alloy. Responsive adjustable spring tension.
30mm travel. Mechanical lock-out. 1.5 kg
Rear suspension 125L x 750 LBS - Pre-adjusted with 24 +/- 2 mm travel
USB-port 5V output
Rims 20’’ x 1.5’’ 32-hole F, 36-hole R, silver (black for metallic red model)
Front hub 100 mm, 20’’ 32-hole
Rear hub 20’’ 135 mm 36-hole
tires 20’’ × 1.95’’ all-terrain profile
crankset 170 mm alloy crank arms, 52-tooth chainring
Bottom bracket BB988 68 mm x 118 mm, threaded
Rear derailleur 7-speed Shimano
Shifters 7-speed Shimano SIS index shifting
Disc brakes F / R Mechanical, aluminum G3 rotors, 160/160
Rider size range 142-195 cm
Rider max weight 120 kg /250 lbs
Rider minimum age 16 years old
17 18
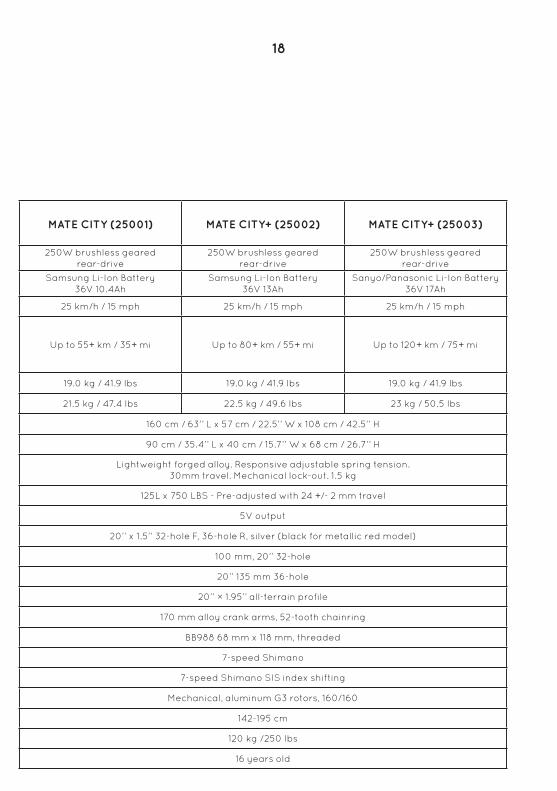
MAtE cIty (25001) MAtE cIty+ (25002) MAtE cIty+ (25003)
250W brushless gearedrear-drive
250W brushless gearedrear-drive
250W brushless gearedrear-drive
Samsung Li-Ion Battery36V 10.4Ah
Samsung Li-Ion Battery36V 13Ah
Sanyo/Panasonic Li-Ion Battery 36V 17Ah
25 km/h / 15 mph 25 km/h / 15 mph 25 km/h / 15 mph
Up to 55+ km / 35+ mi Up to 80+ km / 55+ mi Up to 120+ km / 75+ mi
19.0 kg / 41.9 lbs 19.0 kg / 41.9 lbs 19.0 kg / 41.9 lbs
21.5 kg / 47.4 lbs 22.5 kg / 49.6 lbs 23 kg / 50.5 lbs
160 cm / 63’’ L x 57 cm / 22.5’’ W x 108 cm / 42.5’’ H
90 cm / 35.4’’ L x 40 cm / 15.7’’ W x 68 cm / 26.7’’ H
Lightweight forged alloy. Responsive adjustable spring tension.30mm travel. Mechanical lock-out. 1.5 kg
125L x 750 LBS - Pre-adjusted with 24 +/- 2 mm travel
5V output
20’’ x 1.5’’ 32-hole F, 36-hole R, silver (black for metallic red model)
100 mm, 20’’ 32-hole
20’’ 135 mm 36-hole
20’’ × 1.95’’ all-terrain profile
170 mm alloy crank arms, 52-tooth chainring
BB988 68 mm x 118 mm, threaded
7-speed Shimano
7-speed Shimano SIS index shifting
Mechanical, aluminum G3 rotors, 160/160
142-195 cm
120 kg /250 lbs
16 years old

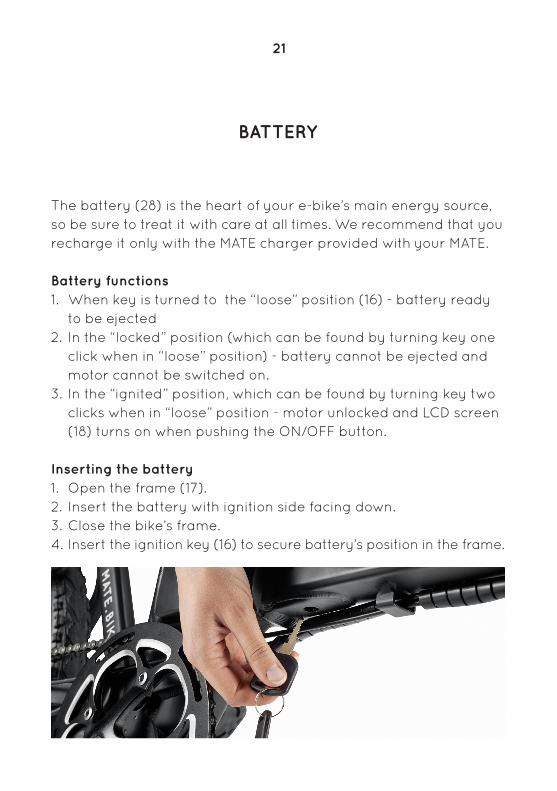
BAttERy
21
The battery (28) is the heart of your e-bike’s main energy source, so be sure to treat it with care at all times. We recommend that you recharge it only with the MATE charger provided with your MATE.
Battery functions1. When key is turned to the “loose” position (16) - battery ready
to be ejected2. In the “locked” position (which can be found by turning key one
click when in “loose” position) - battery cannot be ejected and motor cannot be switched on.
3. In the “ignited” position, which can be found by turning key two clicks when in “loose” position - motor unlocked and LCD screen (18) turns on when pushing the ON/OFF button.
Inserting the battery1. Open the frame (17).2. Insert the battery with ignition side facing down.3. Close the bike’s frame.4. Insert the ignition key (16) to secure battery’s position in the frame.

Removing the battery1. Turn off motor by turning key from “ignition” position to “loose”
position. To do this, push the key (16) in to turn it all the way to the unlocked “loose” position.
2. Remove the key from the battery/frame.3. Open the frame.4. Slide the battery out of the frame, using the small finger hook.5. Close the bike’s frame again (17).
When parking MATE, we recommend you lock your battery by setting it on “locked” position, then remove the key.
22

IMPORtANt: Do not charge the battery with any chargers other than the one supplied with your MATE bike. Failure to do so may result in battery damage and will void battery warranty. Follow all instructions provided with the charger supplied with your MATE bike. Failure to do so could result in damage to your battery or could create a fire hazard that could cause you serious injury.
Directly from the bike1. Make sure that the engine is
turned off (“loose” or “locked” battery position) when charging directly from the bike.
2. Plug the charger directly into the frame (15).
Removing the battery to chargeSimply remove the battery from the frame as explained above and plug the charger into the battery.For further charging instructions, please refer to enclosed spec sheet inside your charger’s box.
charging time of the batteryWith standard charger (2.0 A) : between 4 to 6 hours*With speed charger (4.0 A) : between 2 to 3 hours*
IMPORtANt: If your MATE will be kept for a long period in extreme temperatures (below 0ºC/32ºF or above 35ºC/95ºF), remove the battery and keep it in a place where the temperature is between 4ºC/40ºF and 32ºC/90ºF. Do not charge the battery when the air temperature is below 0ºC/32ºF or above 40ºC/104ºF. Serious damage to the battery could result.
chARgINg thE BAttERy
* Depends of current battery usage level, climate conditions, earlier charging cycles.
23
23
BAttERy USAgE
• To reach the furthest distance on one charge, it is recommended to pedal the bicycle while the Pedal Assist System is turned ON (18). It will help save the battery.
• When battery power is low while riding your e-bike, it is recommended to pedal as much as possible to minimize battery usage so you can get home on the charge that is left on the battery. Once home, charge it as soon as possible.
• To further get the best distance out of your e-bike, refrain from unnecessary braking; coast as much as possible.
• Turn off the power when parking. If you decide to push your bike for any reason, make use of the “walk-assist” option (18).
NOtE for MAtE S owners: • Once the bike is powered ON (18), when the rider presses down
on the thumb throttle, the bike will move forward. Do not power ON until you are ready to go.
• Squeezing the right / rear hand brake (20), or releasing the throttle, will automatically cut the power to the motor.
• When walking with the bike, be sure to turn it to “walk-assist” (18) by pressing the assist level arrow down for more than 3 seconds so you don’t automatically turn the throttle on and make the electric bicycle start suddenly and cause an accident.
MAtE battery: Important infoType: Lithium battery. Voltage: 36V. Capacity: varies between 120.4 Ah, 13 Ah and 17 Ah - Please check directly on the battery’s label. Battery lifecycle: between 400 and 600 charges
Warning: Do not take the battery apart. Do not burn, puncture, submerge in water or damage the battery in any way. Do not use the battery if it appears to be damaged. In case of any noise, irregular heat or leakage from the battery, seize all use immediately. Keep the battery stored in a ventilated place and out of direct sunlight. Keep the battery stored above 0° C to avoid excess loss of battery power.
24

Saddle heightTo adjust saddle height, open the seatpost quick release lever (3) located on the frame where the seatpost (2) enters. Once loose, adjust saddle to desired height, then straighten saddle so that it is centered (parallel to bike frame). When desired height is set, firmly tighten the quick release (3) so that saddle is securely in place. Try to manually move saddle from left to right to be sure it is firmly secured.
IMPORtANt: Do not raise the seatpost (2) above the “minimum insert” line clearly printed on the backside of the seatpost (2). Raising the seatpost (2) above the minimum insert line can cause the seatpost (2) to fail, which could in turn result in loss of control of your MATE and could cause you serious injury.
Saddle fore/aft/tilt positionTo move the saddle more forward/rearward or adjust the nose of the saddle to point slightly upward/downward, loosen the silver bolt located under the saddle, at the top of the seatpost (2). You can use one of the allen keys provided. Once loosened, move the saddle to its ideal position. When desired position is set, firmly tighten the bolt. Try to manually move the saddle up/down as well as forward/rearward to be sure it is firmly secured.
SEttINg UP MAtE FOR yOUR FIt
25
25
handlebar heightTo adjust height of handlebar (19) to match your comfort and riding style, first loosen the handlebar height quick release (12) located next to the front end of the frame. Adjust handlebar to desired height, making sure to center the handlebar so that it is perpendicular to the frame. Then securely tighten the quick release. Once tight, try to manually move the handlebar from side to side to make sure it is securely in place.
cAUtION: You must slide the handlebar stem connecting handlebar to frame in far enough that the series of parallel grooves that mark the minimum insertion level in the tubing are hidden (NOT exposed). Do NOT raise the handlebar higher than this height. If the handlebar stem is not inserted, at minimum, to this line, serious injury can occur to the rider.
handlebar rotationTo adjust rotating position of handlebar (19) to match your comfort and riding style, first loosen the handlebar rotation quick release (21) located on the handlebar itself. Rotate handlebar to desired position, making especially certain that the brake levers (20) are a comfortable reach for safe braking. Before tightening, double check that the handlebar is still centered. Then securely tighten the handlebar rotation quick release (21). Once tight, try to manually rotate the handlebar to make sure it is securely in place.
IMPORtANt: Make sure the handlebar is securely in place and that the brake levers are comfortably in reach. Failure to do so could result in loss of control of your MATE and could cause you serious injury.
26

Suspension adjustmentThe front (23) and rear suspension (4) are pre-adjusted for your convenience. To further adjust the front suspension fork’s spring tension to match your weight and riding style, simply turn the knob on the top of the fork.
BrakesDisc brakes (24) are pre-installed on both the front and rear wheels for braking control of the bike.
Brake adjustmentFirst step in mechanical disc brake adjustment is to position the caliper (24). By loosening the two bolts that hold the caliper in place, you can adjust it slightly side to side.
SEttINg UP MAtE FOR yOUR FIt cONtINUED
27
Barreladjuster
Pinchbolt
caliperbolt
caliperbolt
27
With the brake lever (20) (on the handlebar) NOT engaged, adjust the caliper so that the moving pad (outside) is as close to the caliper as possible without rubbing. Then tighten the caliper bolts to hold it in place, alternating until both are tight. Spin the wheel to be sure there is no rubbing anywhere on the rotor.
Next is to set the position of the stationary pad (inside). On the back side of the rotor, you will find an adjusting nut that moves the pad in or outward. Turned clockwise, it will move it toward the rotor, counter-clockwise will move it away. It is important that the stationary (inside) pad be about twice the distance farther away from the rotor than the moving (outside) pad.
Now squeeze the brake lever to test. The brake should fully engage before the lever reaches the handlebar. If you can pull the lever all the way to the handlebar, then move the stationary pad closer to the rotor.
If you cannot adjust the moving pad to be as close to the rotor as you would like by simply positioning the caliper, you can move that one in by turning the barrel adjuster counter-clockwise. This will put more tension on the brake cable. (If you need less tension on the brake cable, turn the adjuster clockwise). If you still need more tension, you can loosen the cable pinch bolt to pull more cable through. This will actually cause the brake arm to be slightly engaged in the rested position (however this isn’t usually recommended by brake manufacturers, so please take your bike to your local dealer if it comes to this step).
28
As you ride, your brake pads will become thinner. When you notice that braking power decreases, adjust the pads closer to the rotor. Always keep an eye on them so you can replace them the moment they are worn out. If you are unsure of anything relating to your brakes, please take your bike to your local dealer for their expert advice.
cAUtION:• Note which brake lever controls which wheel; left brake lever controls front wheel,
right brake lever controls rear wheel.• Be sure to avoid abrupt or strong braking as it can cause you to fall off the bike. • When braking, lean your body weight a bit rearward to counter balance the
braking inertia. • Keep an eye on the brake pads for wear as they wear out regularly. If they look
as though they are worn out or close to it, please replace them right away to maintain safe braking control.
• Before every ride, test the brakes to be sure they are working well.• Inspect and test the brakes before each ride. Worn, dirty, damaged, or
improperly-adjusted brakes can reduce your ability to control your MATE and could cause you serious injury.
gearsAll MATE bikes come equipped with 7 gears (9). To change gears, simply click the shifter. One click per gear change. The higher the gear, the higher the resistance. Change gears to match your pedaling comfort level. Be sure to pedal when shifting gears to ensure a smooth gear change. This will also prolong the life of your drivetrain components.
29
SEttINg UP MAtE FOR yOUR FIt cONtINUED

29
gear adjustmentTo adjust shifting, if necessary, start by shifting chain (11) to smallest sprocket (9). Then click once to move chain to next sprocket. Turn the pedals to test if it shifted successfully. If it did not move to the next sprocket, then turn barrel adjuster 1/4 turn counter-clockwise to tighten inner wire tension and pedal again to test the shift. If it still does not shift to the next sprocket, try another 1/4 turn and pedal until it shifts smoothly to the next sprocket.
Once on the second sprocket, test using the same method to make sure it goes up smoothly to each of the next larger sprockets, until you are up to the seventh (and largest) sprocket.
30
Rearbarrel
adjusterRear
Derailleur

When you’ve successfully reached the largest sprocket, it is now time to make your way down the sprockets back to the smallest one. You will use the same technique, but in reverse.
Click once to move chain from largest sprocket to next smaller one. Turn the pedals to test if it shifted successfully. If it did not move to the next sprocket, then turn barrel adjuster 1/4 turn clockwise to loosen inner wire tension and pedal again to test the shift. If it still does not shift to the next sprocket, try another 1/4 turn and pedal until it shifts smoothly to the next sprocket.
Once on the second largest sprocket, test using the same method to make sure it goes down smoothly to each of the next smaller sprockets, until you are back down to the smallest sprocket.
Please also refer to the Shimano Shifting Lever user’s manual.
Pedal-AssistThere are 6 pedal-assist level options (18). When switched to “0”, there is zero pedal assist - completely human-powered. 5 is the highest level of pedal-assistance.
31
NOTE: For Electric Assist - LCD Operating Instructions, please refer to the enclosed LCD spec sheet.
SEttINg UP MAtE FOR yOUR FIt cONtINUED
31 32
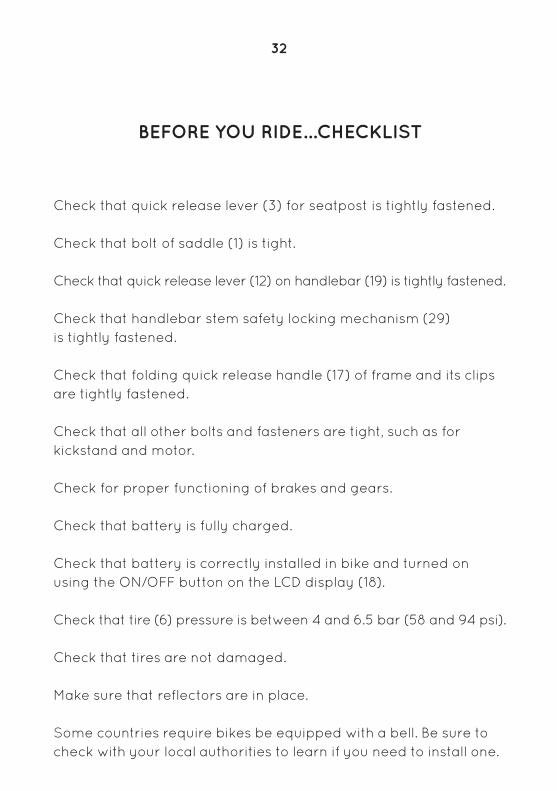
BEFORE yOU RIDE...chEcKLISt
Check that quick release lever (3) for seatpost is tightly fastened.
Check that bolt of saddle (1) is tight.
Check that quick release lever (12) on handlebar (19) is tightly fastened.
Check that handlebar stem safety locking mechanism (29) is tightly fastened.
Check that folding quick release handle (17) of frame and its clips are tightly fastened.
Check that all other bolts and fasteners are tight, such as for kickstand and motor.
Check for proper functioning of brakes and gears.
Check that battery is fully charged.
Check that battery is correctly installed in bike and turned on using the ON/OFF button on the LCD display (18).
Check that tire (6) pressure is between 4 and 6.5 bar (58 and 94 psi).
Check that tires are not damaged.
Make sure that reflectors are in place.
Some countries require bikes be equipped with a bell. Be sure to check with your local authorities to learn if you need to install one.
chain wearUsing a ruler, a new chain (11) should measure exactly 12 inches across 12 links, from middle of pin to middle of pin. If your chain measures past 12, by 1/16 inches (0.5 percent), it is time to replace the chain. If it is past 12, by 1/8 inches (one percent), you may also need to replace the cassette (9) as well. If you are not keen on measuring, you can purchase a chain-wear tool from your local bike shop. And if there remains any uncertainty, it is best to take your MATE to your local bike shop.
Be sure to keep your chain and all moving parts lubed so that they work effectively at all times. Lubrication is necessary to use when the moving parts are dry. As for the chain, lubricate the dried chain after every bike wash, as well as after every wet weather ride.
MAINtENANcE
33
33 34
It is always good to keep spare tires, inner tubes, lube, chain, brake pads on hand as these items are worn out most quickly. If a product is in need of replacement and you are not completely certain how to do this, it is recommended to take it to your local bike dealer. This includes cables/housing, bearing adjustments, brake adjustment and wheel adjustments. Be sure to replace parts with original bike components to ensure optimal level of performance.
Warning: As with all mechanical components, the bicycle is subjected to wear and high stresses. Different materials and components may react to wear or stress fatigue in different ways. If the design life of a component has been exceeded, it may suddenly fail possibly causing injury to the rider. Any form of crack, scratches, or change of coloring in highly stressed areas indicate that the life of the component has been reached and it should be replaced.
Failure to repair or replace worn components could reduce your ability to control your MATE and could cause you serious injury.
PRODUct REPLAcEMENt

35
• It is recommended to take your bicycle for a full tune-up and maintenance check by a bicycle mechanic on a regular basis.
• While our MATE bikes are rain and splash-proof, their electrical components should not be submerged in water.
• To prevent corrosion, dry the bicycle and its components after every wet ride. Store bike and battery in a dry location.
IMPORtANt! Do not attempt to open the casings of the battery, motor, or controller. This will void any warranties associated with those products, and could damage the products, reducing your ability to control your MATE and potentially causing you serious injury. If you experience a problem with the battery, motor, or controller, please contact our service department or your local bike shop.
gENERAL tIPS

35

1. MAtE Bike shall in its sole discretion determine whether any damage, failure, malfunction, or other loss is due to a cause that is covered by the MAtE product warranty. tERMS OF WARRANty
• This warranty only applies to the original owner of the MATE bike unless otherwise determined by applicable mandatory legislation.
• Proof of purchase is required for all warranty claims. The bicycle must be registered with MATE BIKE in order for a warranty claim to be processed.
2. LIMItED 14 DAyS FULL REPLAcEMENt WARRANtyIn the event of a major defect (that significantly affects the owner’s ability to operate the bike as intended) to your MATE bike that happens within the first 14 days after you have received your MATE bike, we will at our discretion repair or replace your MATE bike. As noted above, we shall in our sole discretion determine whether any claim of damage, failure, malfunction, or other loss is a “major defect.” Any such repair or replacement will be at MATE Bike’s expense.
3. LIMItED tWO yEARS cOMPONENtS WARRANtyIncludes: forks, stem, handlebar, seatpost, saddle, brakes, cables, bottom bracket, crankset, pedals, chain, rims, spokes, wheel hub, freewheel, cassette, derailleur, shifter, motor, throttle, controller, wiring harness, kickstand, reflectors, and hardware.
These items are warrantied to be free from manufacturer defects in materials and/or workmanship for a period of two years from the date you receive your MATE bike. This warranty does not cover normal wear and tear.
WARRANty
37
37
4. this Limited two years components Warranty covers replacement parts ONLy and does NOt cover the cost of shipping or installing the replacement parts.
• If you believe your bicycle needs service, or are experiencing problems with your bicycle, MATE Bike encourages you to bring your bike to your nearest electric bike dealer for warranty determination and assistance.
• This warranty does not cover any damages or defects resulting from failure to follow instructions in the owner’s manual, acts of God, accident, misuse, neglect, abuse, commercial use, modification, or improper assembly.
• This warranty does not cover normal wear and tear of the MATE bike or its components (for example: tires, inner tubes, brake pads, chains, etc.).
• This warranty does not cover parts damaged by an attempted repair unless performed by an authorized MATE Bike repair center with MATE Bike’s advance knowledge.
• This warranty does not cover any unauthorized modifications done to the bike and/or its components.
• MATE Bike reserves the right to refuse any warranty claim.
5. LIMItED tWO yEARS BAttERy WARRANtyLithium Ion batteries are warrantied to be free from manufacturer defects in materials and/or workmanship for a 2-year-period from the date of original purchase (cycle life or deep charge up to 70% full capacity).
38

tROUBLEShOOtINg
Top speed too slow 1. Fully recharge battery
Power on but motor not working
1. Reinstall battery / replace fuse
Riding shorter distance per recharge
1. Check tire pressures 2. Recharge completely or have
charger re-inspected 3. Replace battery
Power and indicator lights are all on, with throttle or pedal assist, but e-bike doesn’t work
1. Controller needs to be replaced, or
2. Motor needs to be replaced3. Please contact us.
Power and indicator lights are all on; bike works with throttle, but not with pedal assist
1. Controller needs to be replaced, or
2. Pedal assist module needs to be replaced, or
3. Motor needs to be replaced4. Please contact us.
Power and indicator lights are all on, bike works with pedal assist, but not with throttle
1. Controller needs to be replaced, or
2. Throttle needs to be replaced, or
3. Motor needs to be replaced4. Please contact us.
A.
B.
c.
D.
E.
F.
39

39
Power is on, and throttle is down, but bike doesn’t work
1. Check battery to see if it needs to be charged, or
2. Fuse needs to be replaced, or 3. Controller needs to be
replaced, or 4. Motor needs to be replaced5. Please contact us.
Switch is turned on, and bike takes off without using the throttle
1. Check if throttle is stuck in the ON position
2. Lubricate or replace throttle if it is faulty
After stopping, bike doesn’t start when throttle is twisted
1. Check whether the brake lever are fully released
2. Check D., E., and F. above
You connect the power to the charger, but indicator light does not come on
1. Check whether there is electricity to the charger
2. If you have a voltage meter, you can check to see if the charger produces the correct current
You plug in the charger to both bike and outlet, and the green light comes on instead of the red light - which means it isn’t charging
1. Check to see if the batteries aren’t already fully charged
2. Check whether the charger is plugged in properly to both battery and outlet
3. Check the voltage of the charger and battery
4. If “zero” voltage on the charger, then it needs to be replaced
5. If “zero” voltage from the battery, then check the fuse.
g.
h.
I.
J.
K.
40

If you have any further questions/comments, please feel free to contact us. We are here for you and your new MATE!
You can also become a part of our MATE family on social media:Facebook.com/matebikesTwitter: @mate_bikeInstagram: mate.bike#matebike
cONtAct
41
41
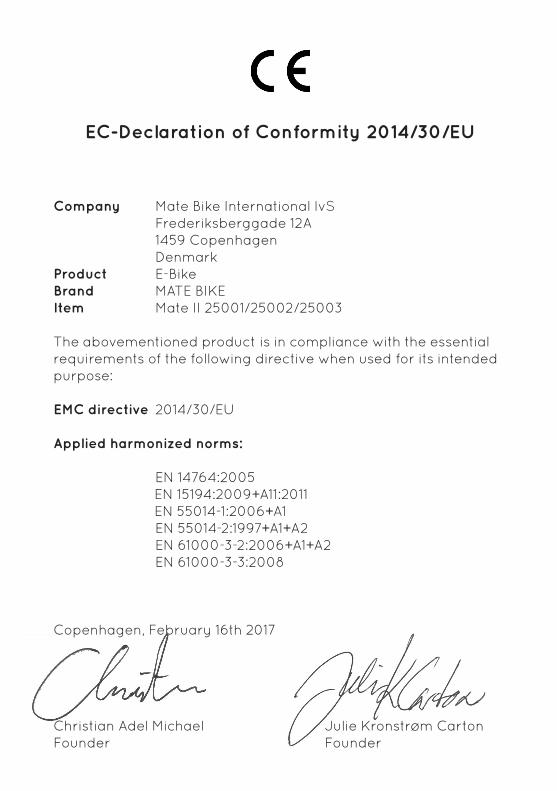
company Mate Bike International IvS Frederiksberggade 12A 1459 Copenhagen DenmarkProduct E-BikeBrand MATE BIKEItem Mate II 25001/25002/25003
The abovementioned product is in compliance with the essential requirements of the following directive when used for its intended purpose:
EMc directive 2014/30/EU
Applied harmonized norms:
EN 14764:2005 EN 15194:2009+A11:2011 EN 55014-1:2006+A1 EN 55014-2:1997+A1+A2 EN 61000-3-2:2006+A1+A2 EN 61000-3-3:2008
Copenhagen, February 16th 2017
Christian Adel MichaelFounder
Ec-Declaration of conformity 2014/30/EU
Julie Kronstrøm CartonFounder

MAtE BIKE INtERNAtIONAL IVSFrederiksberggade 12A
1459 CopenhagenDenmark
VAT : DK37934208Email: [email protected]
www.mate.bike