2016 Polaris Industries Inc.
35
1
Transcript of 2016 Polaris Industries Inc.

1

2
Copyright 2016 Polaris Industries Inc.
All information contained within this publication is based on the latest product information available at the time of publication. Product improvements or other changes may result in differences between this manual and the product. Depictions and/or procedures in this publication are intended for reference use only.
No liability can be accepted for omissions or inaccuracies. Polaris Industries Inc. reserves the right to make changes at any time, without notice and without incurring obligation to make the same or similar changes to products previously built. Any reprinting or reuse of the depictions and/or procedures contained within, whether whole or in part, is expressly prohibited.
The following are trademarks of POLARIS Industries Inc.:
POLARIS® RZR® RIDE COMMAND™
The Bluetooth® word mark and logos are registered trademarks owned by Bluetooth SIG, Inc. and any use of such marks by Polaris Industries Inc. is under license. Other trademarks and trade names are those of their respective owners.
Printed in U.S.A.
P/N 9926886

3
Table of Contents
Welcome ....................................................................... 4
Display Features .......................................................... 5
RIDE COMMAND™ 7” Display .................................... 6
General Information................................................ 7
Display Keys .......................................................... 8
Gauge Screens ...................................................... 9
Audio Screen .........................................................11
Map Screen ...........................................................12
Device Manager Screen ........................................17
Bluetooth Connection ............................................17
Settings .................................................................22
Connecting ..................................................................28
GoPro ....................................................................28
Engine Indicators ..................................................30
USB Connection ....................................................31
Update Software ...................................................32
Update Maps .........................................................33
Frequently Asked Questions .....................................34

4
Welcome
Thank you for purchasing a RIDE COMMAND™ Display, and welcome to the Polaris RIDE COMMAND™ App. Your Display is easy to use and will allow you to customize the information displayed through the use of alternate screen selections.
For a safe and enjoyable riding experience with your new Display, please read your vehicle’s owner’s manual and this Display owner’s manual. If you should need additional assistance with Display operation or software updates, please see your Polaris dealer or visit polaris.com/ridecommand.
WARNING! Do not enter information while operating your vehicle. Failure to pay attention to operating your vehicle could result in loss of control, injury, or death. You assume all risks associated with using this device. Read your User Guide.
Always ride with the latest maps and trails data from polaris.com/ridecommand. Your map and trail data was last updated on XX-XX-XXXX
Check polaris.com/ridecommand for updates.
Before Riding with Your New Display
1. Read this entire manual.
2. Familiarize yourself with the features and operations of the Display while the vehicle is stationary.
3. Register your vehicle if not already registered at polaris.com/ridecommand.
4. Download the Polaris RIDE COMMAND™ App from the Apple/Google Play store and create your personalized account
5. Check your display to ensure you have the appropriate maps and trails visible for your area. To change or update maps/trails, go page 33.
NOTE: Trails data expires 90 days from the file’s release date.

5
Display Features
The icon bar at the top of the screen displays cell phone-related information, a clock and the GPS heading. Some of these built-in features are only functional with the addition of Polaris Accessories (e.g GPS heading requires a GPS puck)
In most situations, the GPS and mapping features will function best while the vehicle is outdoors in an open space.

6
RIDE COMMAND™ 7” Display
The RIDE COMMAND™ Display features a 7-inch high resolution full color LCD display that provides access to the following information and functions.
Performance
View the speedometer, tachometer, dual trip meters, odometer, trip time, and engine hours.
Operating Conditions
View fuel level, coolant temperature, battery voltage, gear position, driveline status, diagnostics and maintenance warnings.
Bluetooth Functionality
Use Bluetooth-enabled communication with a compatible iOS and Android cell phone (with Bluetooth audio capability as well as notifications of incoming or missed calls and texts and the ability to view battery strength and signal strength).
GPS/Mapping
NOTE: The compass is controlled by the GPS system. Calibration is not required.
Use the compass and full-featured GPS when the GPS receiver is installed (includes the display of latitude, longitude and elevation). Mark and save waypoints and rides.
Screen Options
Select from available ride screens.
Software Updates
Software updates are recommended as they become available throughout the life of the vehicle. Log in to polaris.com/ridecommand to download the latest software updates. If you need assistance, please see your Polaris dealer.
Map Updates
Map updates are recommended every 90 days, and especially before long trips. Log in to polaris.com/ridecommand for the latest updates.

7
General Information
Device Operating Requirements
Phone functionality is dependent on the capabilities of your cell phone. Text messaging functionality may vary depending on your phone’s operating system.
NOTE: Some cell phones or operating systems will not work as shown in this manual.
Care and Maintenance
Use a soft cloth to clean the housing. Mild soap and water may be used. Do not use harsh or abrasive cleaners.
The touch screen can be disabled in order to clean the display (See page 26). For best results, use a microfiber towel to clean the screen. Window cleaner or alcohol may be used.
NOTICE: Immediately clean off any gasoline that splashes on the display.
Storage
When preparing the vehicle for storage, make sure the ignition switch is in the OFF position to prevent battery drain and a shortened battery life.
Speed Limitations
Various aspects of the display such as the front facing camera, GoPro preview, phone contacts and call logs may be unavailable while driving at various speeds.

8
Display Keys
1. 2. 3. 4. 5.
1. Gauge Screen Button
2. Audio Button
3. Map Button
4. Device Manager Button
5. Apps Screen Button

9
Button 1 -Gauge Screens
1. Press the Gauge button shown above to display the main gauge screen.
2. Use the Gauge button again to move between gauge and camera screens. These can also be selected with the touch screen buttons in the lower left corner.
3. The grey buttons on the gauge screen are touch selectable. Press on the “ODO” icon to toggle between trip 1, trip 2, time traveled, total hours, and total miles. To reset trip 1, 2 or time traveled, press and hold this icon on whichever output you wish to reset.
4. Pressing the MPH/RPM button will change whether miles per hour or RPM is shown on top.
5. Press on the coolant icon to cycle to battery

10
voltage, and turbo boost pressure (if applicable), then back to engine temperature.
6. Swipe down from the top of the screen or press the upper navigation bar to adjust brightness and Bluetooth connection.
Front and Rear Camera
Within the Gauge Menu is a front and rear view camera as shown below. To toggle between camera views, press the FRONT/REAR icon in the top left corner of the screen.

11
Button 2 - Audio Screen
1. Press the audio screen button shown above to display the audio screen.
2. Use the source button in the top left corner to change between FM, AM, Weather, Bluetooth, and USB Audio.
3. Press the tune up or down icons to change the radio station by small increments or press the scan up or down icon to search for the next quality signal station.
4. To set favorites, scroll to a radio station and hold an “Empty” favorite icon. Press the arrows on either side of the favorites to view all 18 favorite slots.

12
Button 3 - Map Screen
1. Press the Map Screen button shown above to display the map screen.
2. The map should center you based on the location of the GPS.
3. Use the plus and minus signs on the left side of the screen, or pinch the screen with your fingers to zoom in and out on the map.
4. The compass icon on the right side of the screen toggles north up and trail up. It will also re-center your vehicle if not already centered.
5. There are 2 ways to drop a waypoint.
a. option 1) press and hold (for 1 second) the location of the map that you would like to drop a way point.
b. option 2) press the Navigation Menu icon shown below to open the rides and waypoint management menu.
2. Select the add waypoint icon shown below to drop and name a waypoint where the crosshairs are pointing.

13
3. You can manage waypoints by selecting the Waypoint icon shown below.
4. When selected, the screen below will pop up with your previously saved waypoints.
5. You can also save a ride on your Display by clicking on the Record icon shown below to start recording your ride.
When you are finished recording your ride, press the Stop icon to stop recording.
6. You can manage rides on your Display by clicking on the Ride icon as shown below.

14
Managing Rides or Waypoints
1. To navigate to a waypoint go to the waypoint menu on your display, select the waypoint you would like to navigate to and press the Navigate to waypoint icon.
Or simply press the view waypoint icon to view it on your navigation screen.
2. To view a ride on your display go to the rides menu and press the View Ride icon to toggle whether the ride is shown on your display or not.
3. To edit a ride/waypoint select the ride/waypoint you wish to edit then press the edit icon. From here you can rename the ride or waypoint and change its color by pressing the color icon to the left of its name.
4. To export a single ride/waypoint to a USB, select the ride/waypoint you wish to export and press the export icon.

15
5. To delete a ride or waypoint select the ride/waypoint you would like to delete and press the delete icon.
Importing Rides and Waypoints
1. To import previously saved rides/waypoints from your USB drive, plug the USB drive in to the USB pigtail/port (to find this location refer to page 31) and press the USB import icon.
2. Press the down arrow icon to the left of the ride or waypoint that you would like to download. The ride/waypoint should then appear in your ride or waypoint list on the navigation screen.
NOTE: In order for .gpx files to be imported they must be saved in the root of a flash drive rather than in a folder.
Export Rides and Waypoints
1. To export rides/waypoints from your USB drive, plug the USB drive in to the USB pigtail/port and press the USB export icon.
2. Press the down arrow icon to the left of the ride or waypoint that you would like to download. The ride/way-point should then be saved on the USB.

16
Polaris RIDE COMMAND™ App
Rides and waypoints can also be created and edited with the Polaris RIDE COMMAND™ app. These rides and waypoints can then be transferred to and from the display via Bluetooth connection with your smartphone.
Group Ride
The Polaris RIDE COMMAND™ app also has the ability to track the location of friends you are riding with. Simply create or join a group with your friends from the Polaris RIDE COMMAND™ app on your smartphone, and en-sure your smartphone is connected to the display via Bluetooth. After this, other riders in your group should automatically appear on the map screen of the display with their location and profile name. Rider icons that are circular are moving and rider icons that are square are stationary. When rider icons are displayed in color it means they are active, when they are greyed out it means they or you have lost signal.
NOTE: You must be on the waypoint manager screen to import or export waypoints. You must be on the ride manager screen to import or export rides.

17
Button 4 - Device Manager Screen
1. Press the Device Manager button shown above to display the device manager screen.
2. This will open up the display below.
Connect your phone with the Display
The RIDE COMMAND™ Display is compatible with Android and iOS.
Check polaris.com/ridecommand for latest operating system compatibility.
Click on the Bluetooth icon below the cellphone image to open up the Bluetooth connection window.
The display will ask for you to turn on your Bluetooth if this is your first time connecting. If available, make your phone discoverable to other devices in your smartphone’s Bluetooth settings. Click Ok to poll Bluetooth devices.
iPhone
1. In your iPhone settings turn on Bluetooth. If available, make your phone discoverable to other devices in your iPhone’s Bluetooth settings. When your phone appears on the display press the “+” button next to it.
2. A prompt will appear on your iPhone requesting “Polaris RZR” to pair with your phone.
3. Ensure the conformation code on the screen and your

18
phone are the same then press “Pair” on your phone.
4. For optimal experience turn on show notifications from “Polaris RZR” within your smartphone’s Bluetooth settings.
Android
1. From your smartphone settings, open the Bluetooth options on your device and ensure that Bluetooth is turned on.
NOTE: On some phones you have to make the phone visible to other devices. If your phone has this feature, it should show up on the Bluetooth connection screen of your phone. If no option exists to make your phone visible to the display, it is already visible to the display.
2. Press the add device button on the bottom right corner of the Display and press “OK” on the display.
3. When your phone appears on the display press the “+” button next to it to pair with your phone.
4. Ensure the conformation code on the screen and your phone are the same then press “OK” on your phone.
5. For optimal experience press “Accept” on your phone when requested to access contacts and messages.
The display will now show a list of previously connected phones on the display. If it is unpaired, click on your phone from the list.

19
Once the display says connected/paired, your phone is now connected to the display via Bluetooth.
After a phone is connected, the Device Manager Screen will appear as shown below.

20
When a Smartphone is connected to the display via Bluetooth, users are able to make phone calls from the display through the keypad, recent calls, or their con-tacts by pressing the phone icon in the device manager screen or through the pull down menu.
Hardwire Mobile Phone
Users can also hardwire their smart phones to connect to the display and play music. To do this just plug a USB charge cable for your smartphone into the USB pig-tail/port (see page 31).
NOTE: USB music playback is not available on all devices.
Connecting your Bluetooth Headset with the Display
The Display can connect with Polaris approved Blue-tooth headsets to listen to music, take phone calls, and talk with other riders. Use the following steps to connect your Bluetooth headset to the Display.
NOTE: There is no built in microphone in the display. Phone call audio will play through the phone speakers or Polaris approved headset if connected. Some dial options may be unavailable at speeds greater than 3 MPH.
21
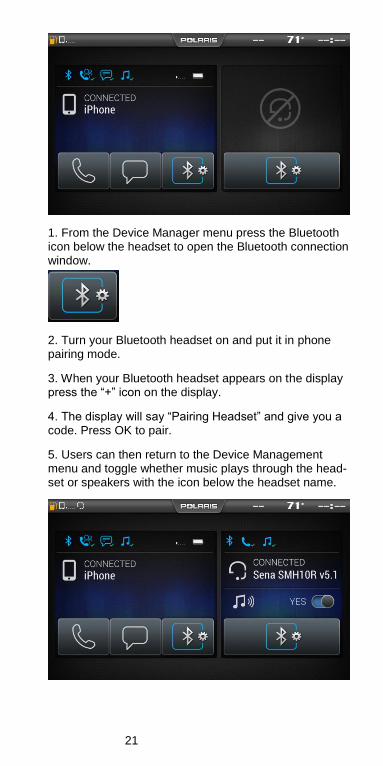
1. From the Device Manager menu press the Bluetooth icon below the headset to open the Bluetooth connection window.
2. Turn your Bluetooth headset on and put it in phone pairing mode.
3. When your Bluetooth headset appears on the display press the “+” icon on the display.
4. The display will say “Pairing Headset” and give you a code. Press OK to pair.
5. Users can then return to the Device Management menu and toggle whether music plays through the head-set or speakers with the icon below the headset name.

22
Button 5 - Apps Menu
1. Press the Apps Menu button shown above to display the Apps Menu.
From this menu Settings, Diagnostics, Lock Screen, GPS Satellite Status, Ride Stats, and GoPro features can all be accessed.
Settings
General
Pressing the Settings icon will take you to a general settings screen as shown below.
From here you can change:
Language
Speed units
Temperature units

23
Enable/Disable auto brightness
It also provides access to general system information and the ability to update the Display Software and Maps. To update software or maps refer to page 32 and 33.
Time
By pressing the time tab on the left side of the settings screen users are able to adjust:
Time zone
Daylight savings
Time format
Audio
The audio tab on the left side of the display allows access to automatic volume control as well as stereo adjustments. This menu is also available from the settings button on the audio screen.

24
Use the equalizer to adjust Bass, Mid, and Treble. To do this drag the dot above the desired adjustment up to increase band frequency and down to decrease band frequency.
Use the Fade/Balance screen to adjust sound output location. Drag the dot for Balance to the left to move sound output left or to the right to move sound out right. Similarly, drag the dot for Fade left to move sound output to the rear of the vehicle, or the right to move sound output to the front of the vehicle.

25
Vehicle
By pressing the vehicle tab on the left side users can see oil life.
Diagnostics
The Diagnostics menu is meant to show any faults that may have been detected by the vehicle. The Diagnostics menu will provide users with a brief description of the fault and an action for correcting the fault, if one exists. For a system diagnostics inspection and/or service, please see your authorized Polaris dealer.
NOTE: Faults display if they were active at least once during the current ignition cycle. If the Malfunction Indicator Light (MIL) is ON, one or more of the faults in this list is an active fault.

26
Lock Touchscreen
By pressing the Lock Touchscreen icon, you will see the display below. This screen is useful for clearing your screen of debris. To get out of this screen, press any of the hard buttons below the screen.
Satellite Status
In the Apps Menu, select GPs Satellite Status. The screen displays all available satellites in the area.

27
Ride Stats
The Ride Stats icon shows a summary of previous rides. The Ride Stats menu can be reset using the reset icon in the bottom right corner.

28
GoPro
The GoPro menu lets users sync their GoPro to the Display. From this, it allows control of camera record functions, switching camera options, and still previews of recorded videos and playback of previous images.
NOTE: Ride Command™ supports GoPro Hero 4 Black and Silver models. Other models may work with limitations. Polaris recommends the use of a MicroSD card comparable to a SanDisk Extreme Plus for optimal experience.
1. Turn on the GoPro camera by pressing the power but-ton. 2. Turn on the GoPro’s Wi-Fi by holding the side button until a blue light flashes (you should see a Wi-Fi signal on the GoPro display). 3. In order to connect a GoPro to the display navigate to Apps Screen. 4. Select the GoPro icon. 5. Select the "Camera" icon. 6. Select the "+(camera)" icon in the lower right corner of the display. 7. Select "Continue" if the on screen criteria has been met.

29
8. Select the "+" icon next to the name of your camera. 9. Select the type of GoPro device that you are trying to connect to the display. 10. Enter the password of the GoPro to connect it to the display. 11. After entering the password correctly you should see a message displaying "GoPro Successfully Connected". Select “OK”. 12. Press "Preview" on the display to pull an image pre-view and confirm that the camera is operating properly.
To record an image or video press the Capture button in the top right quarter of the screen.
To view previously taken images and still im-ages of videos press the Media icon.
To add and delete GoPros press the Camera icon.
The icons in the bottom right corner allow the camera mode to be changed between video, picture, burst, and time lapse.
NOTE: Preview image will be disabled when traveling at speeds over 15 MPH.

30
Engine Overheat Indicators
Temperature Scale
The engine temperature scale at the right side of the Display screen changes to RED and the check engine temperature indicator at the top left of the screen illuminates when the engine is overheating. Take action to cool the engine.
The indicator will flash when engine temperature reaches critical levels. Stop the engine immediately.
NOTE: Please see your vehicle owner’s manual for more information.
A flashing indicator indicates continued operation could result in serious engine damage. The engine management system will automatically reduce engine power and create a misfire condition. Stop the engine immediately. Allow the engine to cool down.
NOTE: If engine overheating seems to be caused by something other than poor cooling conditions, see your dealer for service.
CAUTION! The speedometer may display incorrect values at the existence of electromagnetic radiation >= 10 V/m. Front and/or rear video may become distorted at the existence of electromagnetic radiation >=10 V/M.
31
USB Hardware Recommendations
For software updates, Polaris recommends using a SanDisk® or similar USB flash drive with a minimum of 4G in available memory, formatted using the FAT32 file system. For assistance, search the web for “How to format FAT32”. For best results, remove all files from the flash drive before starting the update process.
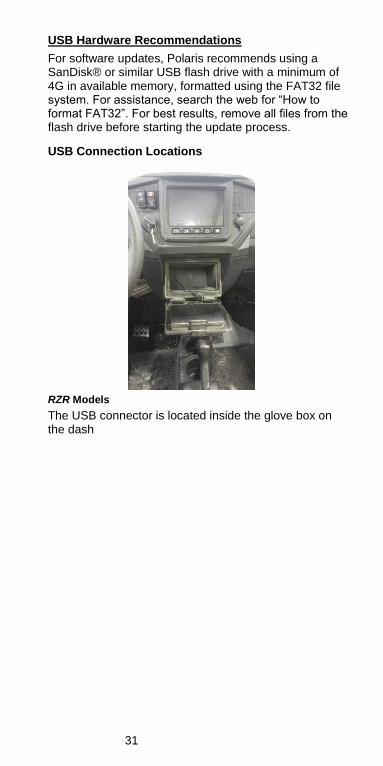
USB Connection Locations
RZR Models
The USB connector is located inside the glove box on the dash

32
Update Software
1. Before updating the Display, always export your exist-ing rides and waypoints to a USB drive to avoid losing them.
2. After downloading an update from your Polaris RIDE COMMAND™ App account and saving the extracted files to the USB flash drive, connect the flash drive to the USB connector on your vehicle. For vehicle USB con-nector locations, see page 31.
3. To update the display’s software, press the Apps Screen button and press the Update Software arrow in the general settings.
4. Select the down arrow icon to the left of the update you would like to install
5. The display will then ask you if you would like to up-date and restart the device. Press Yes to install.
6. If an error message occurs, perform one or all of the following actions to resolve the issue.
Remove and reconnect the USB flash drive se-curely.
Make sure the Display files are not inside a folder on the flash drive.
Make sure only Display files are on the flash drive. Remove any other files if necessary.
Try using a different USB flash drive.
7. The display will then initiate the update and restart with the new software. Do not remove the USB until the display has fully restarted.

33
Update Maps
1. To update maps on the display go to my.polaris.com and download the map update to a USB flash drive.
2. Insert the USB flash drive into the USB pigtail/port on your vehicle. For vehicle USB connector locations, see page 31.
3. Press the Update maps arrow in the general settings.
4. Select the file you want to install by pressing the cor-responding down arrow icon.
5. This will update the display’s maps which will auto-matically restart the display once the update is complete. Do not remove the USB until the display has fully re-started.

34
Frequently Asked Questions
Q: How do I update my map on my display?
A: Log in at my.polaris.com to download the latest MAPS/Software data. Then transfer the files to the Display using a USB flash drive. Refer to Update Software or MAPS/Software Data on page 33.
Q: How do I find the USB connection on my specific vehicle?
A: Refer to USB Connection Locations on page 31.
Q: Why does my display not acquire satellite signal or GPS?
A: The GPS can take a few minutes to lock from a cold start. After warm-up, if less than 4 satellites are shown in the GPS satellite screen move the vehicle to an area free of overhead obstructions. Refer to Satellite Status on page 26.
Q: I get a “Memory Full” warning while in the MAPS/RIDES screen, what should I do?
A: You are reaching the limit allowed for an individual ride. Save the current ride and start a new ride. Up to 20 rides can be saved.
Q: How do I connect my phone via Bluetooth to the Display?
A: Refer to Bluetooth on pages 17-20. Refer to the phone’s user manual for specific Bluetooth functionality.
Q: How do I change the screens brightness?
A: Option 1: While on any screen, pull down from the top of the display and adjust the brightness bar. Option 2: Apps Menu > Settings > General Settings > Turn Auto Brightness ON/OFF
Q: How do I find what version of software my display currently has?
A: Apps Menu > Settings > General Settings > Update Software
Q: How do I set the clock on my display?
A: Option 1: Make sure the time zone (GMT offset) and daylight savings mode is correct for your

35
location if in GPS mode. See page 23. GPS automatically sets the clock when there is a locked GPS signal. Option 2: Apps Menu > Time Settings