2013 - 2014 Education Curriculum Checklist - Amazon S3Safety+Plan/... · 2013 - 2014 Education...
29
2013 - 2014 Education Curriculum Checklist 2013 - 2014 Education Curriculum Month Lesson Plan Topic Date Mgr Completed Initial's Aug Wiping Cloth Bucket - Mixing & Use Germ Warfare - Sanitizer Sinks Germ Warfare - Sanitizer Spray Bottles Sept Thermometer Calibration Food Alergens Oct Cooling Food Properly - OR - Proper Food Handling (Pick one) Holding Hot and Cold Potentially Hazardous Foods Nov Chemical Mixing & MSDS Fire Extinguisher Use & Safety - PASS Dec Food Handler Glove Use Proper Handwashing Procedures Jan Date Marking Ready-to-Eat, Potentially Hazardous Food Watch Your Step - Prevent Slips & Falls Customer "TLC" - Safety TIPS in The Cafeteria Feb Dining Table Cleaning Machine Ware Washing (If applicable) - OR - Protect Your Back Mar Washing Fruits and Vegetables Don't Cut Yourself - Knife Safety April Slow Down - Avoiding "Contact" Injury Ice Machine Usage May Burn Prevention Food Contact Surface Cleaning & Sanitizing Additional Training Performed - 1 2 3 4 5 Page 1 7/12/2013
Transcript of 2013 - 2014 Education Curriculum Checklist - Amazon S3Safety+Plan/... · 2013 - 2014 Education...

2013 - 2014 Education Curriculum Checklist
2013 - 2014 Education CurriculumMonth Lesson Plan Topic Date Mgr
Completed Initial's
Aug Wiping Cloth Bucket - Mixing & Use
Germ Warfare - Sanitizer Sinks
Germ Warfare - Sanitizer Spray Bottles
Sept Thermometer CalibrationFood Alergens
Oct Cooling Food Properly - OR - Proper Food Handling (Pick one)
Holding Hot and Cold Potentially Hazardous Foods
Nov Chemical Mixing & MSDSFire Extinguisher Use & Safety - PASS
Dec Food Handler Glove Use
Proper Handwashing Procedures
Jan Date Marking Ready-to-Eat, Potentially Hazardous FoodWatch Your Step - Prevent Slips & Falls
Customer "TLC" - Safety TIPS in The Cafeteria
Feb Dining Table Cleaning
Machine Ware Washing (If applicable) - OR - Protect Your Back
Mar Washing Fruits and Vegetables
Don't Cut Yourself - Knife Safety
April Slow Down - Avoiding "Contact" Injury
Ice Machine Usage
May Burn Prevention
Food Contact Surface Cleaning & Sanitizing
Additional Training Performed - 12345
Page 1 7/12/2013

Education Module
This document is part of the Southwest Training Systems Inc. / SFSPac Food Service Sanitation and Safety Program and is proprietary material of Southwest Training Systems and PortionPac Chemical Corp. This document may not be copied, modified, distributed or otherwise disseminated, in whole or part to any third parties without express written permission from Southwest Training Systems Inc and PortionPac. All images and logos including SFSPac®, Kid Clean®, Wake Up Riight™, It’s So Cool ™ and the “Pac® Family” names and images are the
intellectual property of PortionPac® Chemical Corp. ©2010 PortionPac Chemical Corp. All rights reserved.
ATTENDANCE ROSTER
School District: _______________________________________________ State_________
Education Module: __________________________________________________________
Instructor __________________________________________________________________
Location: ______________________________________________ Date: ______________
Name (As it Appears on SNA Certification Card)
SNA Identification # Signature

This document is proprietary material of PortionPac Chemical Corp. and may not be copied, modified, distributed or otherwise disseminated, in whole or part to any third parties without express written permission from PortionPac. SFSPac®, Kid Clean®, Wake Up Right™, It’s So Cool ™ and the “Pac® Family” names and images are the intellectual property of PortionPac® Chemical Corp. ©2012 PortionPac Chemical Corp. All rights reserved.
Wiping Cloth Bucket
Viruses• Leading cause of foodborne illness• Can survive cooler and freezer temps• Can’t grown in food, grow once eaten• Found in food and water• Transfer - Person to person - People to food - People to food contact surfaces
Definition- The law, local codes and food safety best practices require wiping cloths to be kept in a sanitizing solution. Cloths should be rinsed in running water and wrung out before placing in bucket with sanitizing solution.
Information-A wet and dirty wiping cloth has all the ingredients present (moisture, soil, and temperature) to encourage bacteria growth. Wiping cloths kept in a bucket of sanitizer solution will keep bacteria from growing and contaminating your customer’s food when used to wipe up spills.
Process for Wiping Cloth Bucket Mixing and Testing-1. Fill bucket to the indicated line with warm water (65°-110°F)2. Pump in one stroke from SFSPac® Sanitizer Stock Solution Bottle3. Soak Clean wiping cloths between use4. To test, tear a 2” strip from Sanitizer Test Strip Dispenser5. Submerge into bucket for 10 seconds. Hold without moving.6. Remove and compare to color chart on dispenser-should be
200ppm. Refer to Sanitizer testing poster for more information.7. Record results on Sanitizer Test Log. If not 200ppm, empty and
rinse bucket, then prepare new solution.
You Should Know1. Why is it important to keep wiping towels in a wiping cloth
bucket?2. When should you change the sanitizer solution in bucket?3. What should be done before placing a cloth in the bucket?
Note: When mixed according to manufacturer’s instructions, SFSPac® Sanitizer complies with SFSPac® Sanitizer complies with 40 C.F.R. 180.940 at a concentration of 150-400 ppm as referenced in the 2005 Model Food Code. SFSPac Sanitizer also complies with previous versions of the Model Food Code that referenced 21 C.F.R. 178.1010.
June 2013Monday Tuesday Wednesday Thursday Friday Saturday Sunday
1 2
3 4 5 6 7 8 9
10 11 12 13 14 15 16
17 18 19 20 21 22 23
24 25 26 27 28 29 30

Education Module
Sanitizer Spray Bottles
Definition Health Departments have very specific sanitizer strength requirements in a spray bottle. Since diluted sanitizing solutions can lose strength when in storage, testing strips are used to check the ppm (parts per million) of all “ready to use” sanitizing solutions. Information Effective sanitizing procedures reduce the number of disease organisms which may be present after cleaning. All equipment and utensils used for cooking or preparing food must be washed, rinsed and sanitized after use throughout the day. This will insure that new food does not become contaminated and will reduce the build up of food particles. Spray bottles with sanitizing solution may be used to sanitize larger items that cannot be placed in a 3 compartment sink. Items must be washed with detergent, thoroughly rinsed and then spray sanitized. Sanitizer must be allowed to air dry. Process for Sanitizer Spray Bottle Mixing and Testing
1. Fill the properly marked sanitizer spray bottle to the designated label fill line with water.
2. Pump in one stroke from SFSPac® Sanitizer Stock Solution . 3. To test, tear a 2” strip from Sanitizer Test Strip Dispenser 4. Submerge into bottle for 10 seconds. Hold test strip STILL in the solution. (Tip – a
quick test can provide a good indicator by spraying gently a 2” strip of test paper) 5. Remove and compare to color chart on dispenser - should be a minimum 200ppm
and not more than 400 ppm. 6. Record results on Sanitizer Test Log Form.
7. If not 200 to 400 ppm, empty and rinse bottle, then prepare new solution. You Should Know
1. Why is it important to test solution in a sanitizer spray bottle? 2. When should you change the sanitizer solution in bottle? 3. How to test the solution for proper strength? 4. What is a use for Sanitizer in a spray bottle?
This document is part of the SFSPac Food Service Sanitation and Safety Program and is proprietary material of PortionPac Chemical Corp. This document may not be copied, modified. distributed or otherwise disseminated, in whole or part to any third parties without express written permission from PortionPac. SFSPac®, Kid Clean®. Wake Up Rightt'' , It's So Cool T»I and the "Pac® Family" names and images are the intellectual property of PortionPac® Chemical Corp. ©2004-2008 PortionPac Chemical Corp. All rights reserved.

Education Module
Sanitizer Sink
Definition Health Departments have very specific sanitizer strength requirements in a 3 compartment sink. Since sanitizing solutions can lose strength when in use, testing strips are used to check the ppm (parts per million) of all “ready to use” sanitizing solutions. Information Effective sanitizing procedures reduce the number of disease organisms which may be present after cleaning. All equipment and utensils used for cooking or preparing food must be washed, rinsed and sanitized after use throughout the day. This will insure that new food does not become contaminated and will reduce the build up of food particles. Process for Sanitizer Sink Mixing and Testing
1. Fill the sink to the designated “Sanitizer” label fill line with warm water (75°-110°F).
2. Open one pac of SFS Sanitizer solution using the SFS Pac Cutter. 3. Dump the entire contents of the SFSPac Sanitizer solution into the sink. 4. The sink is ready for use immediately. 5. To test, tear a 2” strip from Sanitizer Test Strip Dispenser 6. Submerge into sink for 10 seconds. Hold test strip STILL in the solution. 7. Remove and compare to color chart on dispenser-should be a minimum
200 ppm and not more than 400 ppm. 8. Record results on Sanitizer Test Log Form. 9. If not 200 ppm, empty and refill sink - Then prepare new solution.
TIP – Sanitizer sink solution will generally handle up to three (3) Pot & Pan sink changes. Use the time when refilling Pot & Pan sinks to test Sanitizer solution. If solution still tests over 200 ppm and is clean then it is still good to use. You Should Know
1. Why is it important to keep wiping towels in a wiping cloth bucket? 2. When should you change the sanitizer solution in bucket? 3. What should be done before placing a cloth in the bucket? 4. How to test the solution for proper strength?
This document is part of the SFSPac Food Service Sanitation and Safety Program and is proprietary material of PortionPac Chemical Corp. This document may not be copied, modified, distributed or otherwise disseminated, in whole or part to any third parties without express
written permission from PortionPac. SFSPac®, Kid Clean®, Wake Up Riight™, It’s So Cool ™ and the “Pac® Family” names and images are the intellectual property of PortionPac® Chemical Corp. ©2007 PortionPac Chemical Corp. All rights reserved.

This document is proprietary material of PortionPac Chemical Corp. and may not be copied, modified, distributed or otherwise disseminated, in whole or part to any third parties without express written permission from PortionPac. SFSPac®, Kid Clean®, Wake Up Right™, It’s So Cool ™ and the “Pac® Family” names and images are the intellectual property of PortionPac® Chemical Corp. ©2012 PortionPac Chemical Corp. All rights reserved.
Thermometers and Calibrations
Thermometers can lose their accuracy when bumped, dropped or go through
severe temperature changes.
Calibrate at least once weekly.
Definition- Thermometers are used to determine the temperature in coolers, freezers, ovens, warewashing machines, etc. But perhaps the most important use is to measure the temperature of food. Thermometers should be calibrated weekly, after being dropped or after being used to check very hot or cold foods.
Information-Thermometers are essential for keeping food out of the temperature danger zone (41°-135°). The most common type used in food service the bi-metallic stemmed thermometer, which measures temperature from 0°F to 220°F. These thermometers are accurate to with +/- 2° degrees. They can be calibrated by two methods: Ice Point and Boiling Point.
Process for Ice Point Method Calibration-1. Fill a large container with crushed ice. Add clean tap water until the
container is full. 2. Put the thermometer stem or probe into the ice water so the sensing
area is completely submerged. 3. Wait 30 seconds, or until the indicator stops moving. 4. Hold the calibration nut securely with a wrench or other tool and rotate
the head of the thermometer until it reads 32°F.
Process for Boiling Point Method Calibration-1. Bring clean tap water to a boil in a deep pan. 2. Put the thermometer stem or probe into the boiling water so the
sensing area is completely submerged. 3. Wait 30 seconds, or until the indicator stops moving. 4. Hold the calibration nut securely with a wrench or other tool and
rotate the head of the thermometer until it reads 212°F, or the appropriate boiling point for your elevation.
You Should Know1. What is the temperature danger zone?*Note: The Temperature Danger Zone in the current FDA Food Code is 41°F to 135°F. Some jurisdictions are on
older versions of the Food Code and use 41°F to 140°F. Use the temperature that is in the version of the Food Code followed by your jurisdiction.
February 2013Monday Tuesday Wednesday Thursday Friday Saturday Sunday
1 2 3
4 5 6 7 8 9 10
11 12 13 14 15 16 17
18 19 20 21 22 23 24
25 26 27 28

This document is proprietary material of PortionPac Chemical Corp. and may not be copied, modified, distributed or otherwise disseminated, in whole or part to any third parties without express written permission from PortionPac. SFSPac®, Kid Clean®, Wake Up Right™, It’s So Cool ™ and the “Pac® Family” names and images are the intellectual property of PortionPac® Chemical Corp. ©2012 PortionPac Chemical Corp. All rights reserved.
Safe Food Handling
USDA guidelines to keep food safe:1. Clean - hands and surfaces often2. Separate – don’t cross-contaminate3. Cook – to proper temperatures4. Chill – promptly
1 2 3 4
Definition- Time and temperature play critical roles in the process of maintaining a safe food supply. They affect food quality and safety from the moment food arrives at the back door to the time a prepared meal is presented to the customer.
Information-Handling food properly plays a critical role in ensuring that the food that you serve to your customers stays safe. There are several factors that should be taken into consideration when preparing food, holding and serving food.
Process for Safe Food Handling-1. Thawing food properly minimizes the growth of foodborne
microorganisms.2. Thawing should be done either in the refrigerator, under running
potable water at 70° F, in the microwave if it will be cooked immediately or as part of the cooking process.
3. Fruits and vegetables should not be washed in detergents or sanitizers. They should be prepared away from raw meat, poultry and eggs.
4. Pay attention to leafy vegetables that can trap dirt and microorganisms, remove outer leaves, pull leafy heads apart and rinse.
5. Prepare fruits and vegetables on clean and sanitized surfaces, using clean and sanitized utensils.
6. After cooking food to its minimal internal temperature it should be hot held at 135° F or above, until it is ready to be served.
7. Reheat all previously cooked foods to 165° F for 15 seconds, within 2 hours.
The following are minimum temperatures only. Always follow the product label.165° F = Whole and ground poultry, casseroles, and previously cooked items155° F = Ground meats; beef and pork (hotdogs and sausage)
You Should Know1. What are the 4 ways of thawing food properly?2. What should you remember when preparing fruits and vegetables?3. At what temperature should hot food be held at, prior to serving?
September 2012Monday Tuesday Wednesday Thursday Friday Saturday Sunday
1 2
3 4 5 6 7 8 9
10 11 12 13 14 15 16
17 18 19 20 21 22 23
24 25 26 27 28 29 30


This document is proprietary material of PortionPac Chemical Corp. and may not be copied, modified, distributed or otherwise disseminated, in whole or part to any third parties without express written permission from PortionPac. SFSPac®, Kid Clean®, Wake Up Right™, It’s So Cool ™ and the “Pac® Family” names and images are the intellectual property of PortionPac® Chemical Corp. ©2012 PortionPac Chemical Corp. All rights reserved.
Cooling Food
If food has not cooled enough during cooling process, reheat it
to 165° for 15 seconds andthen re-cool it.
Discard if you cannot re-cool within the 2 hour cooling time frame.
Definition- Cooked food that will not be served right away (or is left over and can be saved) must be cooled quickly to prevent microbial growth. Temperatures must be taken during the cooling process to ensure that time and temperature standards are met and to ensure the safety of food.
Information-There are two acceptable methods of cooling foods. 1. Use the one-stage method to reduce the food temperature from
135°F to 41°F or lower within four hours.2. Use the two-step method to reduce the food temperature from
135°F to 70°F within two hours and from 70°F to 41°F or lower within an additional four hours. Employees should utilize the following practices to cool food rapidly.
Process for Cooling Food Safely-1. Reduce the quantity of the food being cooled by dividing food into
smaller containers.2. Use ice water baths.3. Stir foods to cool them faster. Use ice paddles, if available.4. Use steam-jacketed kettle filled with cold water to cool food rapidly.5. Add ice or cold water as an ingredient.6. Use blast or tumble chillers, if available.
You Should Know1. The denser the food, the slower it will cool.2. Shallow pans allow heat from food to disperse faster than deep pans.3. If food has not cooled enough in allotted time it should be reheated to
165° for 15 seconds and then cooled. If food has been reheated and the second attempt to cool is not successful, the food must be discarded.
4. Document the cooling process on a Cooling HACCP log. Include times and temperatures.*Note: The Temperature Danger Zone in the current FDA Food Code is 41°F to 135°F. Some jurisdictions are on
older versions of the Food Code and use 41°F to 140°F. Use the temperature that is in the version of the Food Code followed by your jurisdiction.
October 2012Monday Tuesday Wednesday Thursday Friday Saturday Sunday
1 2 3 4 5 6 7
8 9 10 11 12 13 14
15 16 17 18 19 20 21
22 23 24 25 26 27 28
29 30 31
Fall Committee Days National Harbor, MD

This document is proprietary material of PortionPac Chemical Corp. and may not be copied, modified, distributed or otherwise disseminated, in whole or part to any third parties without express written permission from PortionPac. SFSPac®, Kid Clean®, Wake Up Right™, It’s So Cool ™ and the “Pac® Family” names and images are the intellectual property of PortionPac® Chemical Corp. ©2012 PortionPac Chemical Corp. All rights reserved.
Chemical Mixing and MSDS
SFSPac pre-measures product for you – ALWAYS use just one Pac per bottle, bucket or sink.
Definition- Correct chemical mixing is following the manufacturer’s mixing and use instructions. Proper mixing is critical for effective cleaning, good sanitation and safety. All chemicals are required to have a Material Safety Data Sheet (MSDS). The MSDS are part of an employees’ right to know about chemical and hazard information of the product they use.
Information-MSDS should be kept in one location and accessible to all employees while on the job.
Process for Chemical Mixing and MSDS-1. To avoid confusion and injury, always use properly labeled bottles.2. Protect yourself with the proper PPE (Personal Protective
Equipment) and receive proper training on mixing and use of all chemicals in your kitchen.
3. Never mix two or more chemicals together.4. Always wash your hands after mixing and using chemicals.5. Know the exact location of the MSDS for ALL the chemicals in
your kitchen.6. Retrieve the MSDS if and when an accident takes place, for the
medical staff.
You Should Know1. Why is it important to follow the manufacturer’s mixing
instructions?2. What should you never do when mixing chemicals?3. What does PPE stand for and when should it be used when
dealing with chemicals?
November 2012Monday Tuesday Wednesday Thursday Friday Saturday Sunday
1 2 3 4
5 6 7 8 9 10 11
12 13 14 15 16 17 18
19 20 21 22 23 24 25
26 27 28 29 30
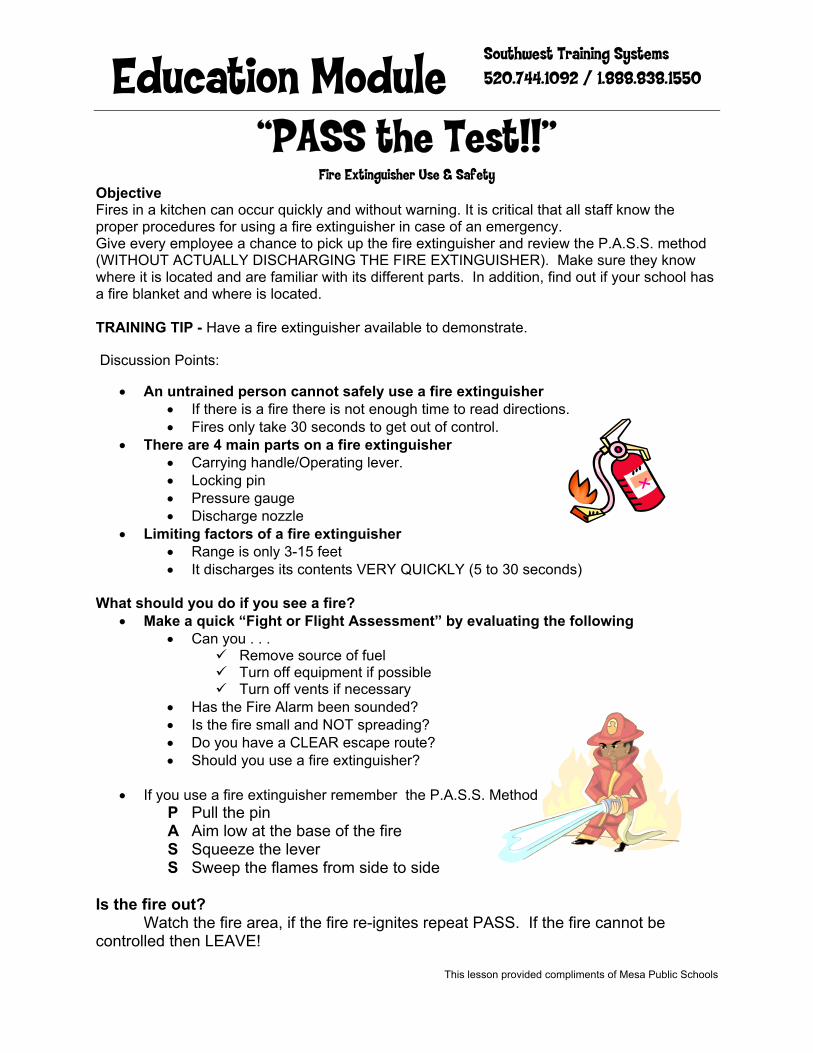
Education Module
“PASS the Test!!” Fire Extinguisher Use & Safety
Objective Fires in a kitchen can occur quickly and without warning. It is critical that all staff know the proper procedures for using a fire extinguisher in case of an emergency. Give every employee a chance to pick up the fire extinguisher and review the P.A.S.S. method (WITHOUT ACTUALLY DISCHARGING THE FIRE EXTINGUISHER). Make sure they know where it is located and are familiar with its different parts. In addition, find out if your school has a fire blanket and where is located. TRAINING TIP - Have a fire extinguisher available to demonstrate.
Discussion Points:
• An untrained person cannot safely use a fire extinguisher • If there is a fire there is not enough time to read directions. • Fires only take 30 seconds to get out of control.
• There are 4 main parts on a fire extinguisher • Carrying handle/Operating lever. • Locking pin • Pressure gauge • Discharge nozzle
• Limiting factors of a fire extinguisher • Range is only 3-15 feet • It discharges its contents VERY QUICKLY (5 to 30 seconds)
What should you do if you see a fire?
• Make a quick “Fight or Flight Assessment” by evaluating the following • Can you . . .
Remove source of fuel Turn off equipment if possible Turn off vents if necessary
• Has the Fire Alarm been sounded? • Is the fire small and NOT spreading? • Do you have a CLEAR escape route? • Should you use a fire extinguisher?
• If you use a fire extinguisher remember the P.A.S.S. Method
P Pull the pin A Aim low at the base of the fire S Squeeze the lever S Sweep the flames from side to side
Is the fire out? Watch the fire area, if the fire re-ignites repeat PASS. If the fire cannot be controlled then LEAVE!
This lesson provided compliments of Mesa Public Schools
Southwest Training Systems 520.744.1092 / 1.888.838.1550

January 2013Monday Tuesday Wednesday Thursday Friday Saturday Sunday
1 2 3 4 5 6
7 8 9 10 11 12 13
14 15 16 17 18 19 20
21 22 23 24 25 26 27
28 29 30 31
Child NutritionIndustry Conference
San Antonio, TX
Child Nutrition Industry Conference San Antonio, TX
Hand Washing
19 million food borne illnesses each year are the result of
improper handwashing.
Definition- The majority of foodborne illness is transmitted by people. While it may appear fundamental, many food handlers fail to wash their hands properly and as often as needed. Never take this simple action for granted. You can help eliminate cross contamination from poor hygiene through frequent and proper hand washing with an effective cleansing agent.
Information-Wash your hands every time you enter the kitchen facility, use the restroom, eat, drink, clean, take out the garbage, handle raw food, touch your hair, face or body, after sneezing or coughing, when changing food handler gloves and when touching anything that could contaminate hands.
Process for Proper Hand Washing-1. Wet your hands with hot running water (100°) at dedicated
hand wash sink. 2. Apply soap.3. Rub hands together for at least twenty seconds.4. Clean under fingernails and between fingers.5. Rinse hands thoroughly under running water.6. Dry hands with single use towel.7. Turn off water using a single use towel if available.8. Always open door with towel when exiting a restroom or
wash hands again before returning to work station.
You Should Know1. How often should you wash your hands?2. Is it OK to wash hands in dish sink?3. Is it OK to use cold water to wash your hands?
This document is proprietary material of PortionPac Chemical Corp. and may not be copied, modified, distributed or otherwise disseminated, in whole or part to any third parties without express written permission from PortionPac. SFSPac®, Kid Clean®, Wake Up Right™, It’s So Cool ™ and the “Pac® Family” names and images are the intellectual property of PortionPac® Chemical Corp. ©2012 PortionPac Chemical Corp. All rights reserved.

This document is proprietary material of PortionPac Chemical Corp. and may not be copied, modified, distributed or otherwise disseminated, in whole or part to any third parties without express written permission from PortionPac. SFSPac®, Kid Clean®, Wake Up Right™, It’s So Cool ™ and the “Pac® Family” names and images are the intellectual property of PortionPac® Chemical Corp. ©2012 PortionPac Chemical Corp. All rights reserved.
Food Handler Gloves
You should NEVER use gloves in place of handwashing.
ALWAYS wash hands before putting on gloves and
when changing to a new pair.
Definition- If used, SINGLE-USE gloves shall be used for only one task such as working with READY-TO-EAT FOOD or with RAW FOOD, used for no other purpose, and discarded when damaged or soiled, or when interruptions occur in the operation.
Information-Handling food properly plays a critical role in ensuring that the food that you serve to your customers stays safe. There are several factors that should be taken into consideration when serving ready to eat food or handling raw food.
Process for Safe Food Handling-1. Always wash hands before putting on a fresh pair of gloves.2. Never take off and re-apply a used pair of gloves.3. Never use the same pair of gloves with different foods
(raw and cooked or when performing different task).4. When gloves become soiled, torn or ripped, discard; properly
wash your hands and put on a fresh pair.5. Change gloves at least every 4 hours during continual use.6. Use gloves to protect a bandaged cut or abrasion.
You Should Know1. What should you do before putting on a fresh pair of gloves?2. What should you do if you have a cut or bandaged finger?3. When should you change gloves?
April 2013Monday Tuesday Wednesday Thursday Friday Saturday Sunday
1 2 3 4 5 6 7
8 9 10 11 12 13 14
15 16 17 18 19 20 21
22 23 24 25 26 27 28
29 30

Loss Prevention Module
“Watch Your Step”
Objective: Prevent Slips and Falls Background Information: Falls hurt your business. They can lead to absenteeism, decreased productivity, high insurance costs and, when a customer falls, heavy liability. Educate your staff on how they can help prevent falls, for their safety and for the safety of your customers.
Discussion Points: General Wear slip-resistant flat-soled shoes to work. Watch out for potential hazards inside and outside the cafeteria. When lights burn out, replace or report them. Do not be afraid to ask for assistance with heavy or bulky loads. Do not carry loads you can not see over. Watch where you are going at all times. Walk - don't run! No horseplay!
Indoors Make sure floor mats are clean and in place. Sweep and damp mop regularly to keep kitchen floor clean and dry. Place caution signs around the area you are mopping or when floors are still wet. Notify the manager of damaged flooring. Keep kitchen aisles clear. Do not set up stumbling hazards. Keep waste cans, bun trays and product cases
away from walking areas. Outside Keep loading dock and parking lot clear of litter, equipment and wet-slick spots. Notify manager of outdoor hazards. Shovel snow, scrape ice and use melting chemicals on icy walkways.
To accurately document training, progress and education credit, be sure to complete Attendance Roster and Training Record. Materials Needed: Attendance Roster Training Record
This document is part of the SFSPac Food Service Sanitation and Safety Program and is proprietary material of PortionPac Chemical Corp. This document may not be copied, modified, distributed or otherwise disseminated, in whole or part to any third parties without express
written permission from PortionPac. SFSPac®, Kid Clean®, Wake Up Riight™, It’s So Cool ™ and the “Pac® Family” names and images are the intellectual property of PortionPac® Chemical Corp. ©2004 PortionPac Chemical Corp. All rights reserved.

HACCP-Based Education Module Date Marking Ready-to-Eat (RTE), Potentially Hazardous Food(PHF) Definition: To ensure appropriate rotation of ready-to-eat food to prevent or reduce the risk of foodborne illness. Process for Date Marking RTE / PHF: 1. The best practice for a date marking system would be to include a label with the
product name, the date, the time it is prepared or opened and a “use by” date. Examples of how to indicate when the food is prepared or opened include: • Labeling food with a calendar date, such as “cut cantaloupe, 5/16/08, 8:00 a.m.
use by 5/23/08,” 2. Follow State or local health department requirements. 3. Label all ready-to-eat, potentially hazardous foods that are prepared on-site and are
held. 4. Label any processed, ready-to-eat, potentially hazardous foods when opened, if they
are to be held. 5. Refrigerate all ready-to-eat, potentially hazardous foods at 41 ºF or below. 6. Serve or discard refrigerated, ready-to-eat, potentially hazardous foods within 7 days. 7. Foods to be frozen - Indicate with a separate label the date prepared, the date frozen,
and the date thawed of any refrigerated, ready-to-eat, potentially hazardous foods. 8. Calculate the 7-day time period by counting only the days that the food is under
refrigeration. For example: • On Monday, 8/1/08, lasagna is cooked, properly cooled, and refrigerated with a
label that reads, “Lasagna, Cooked, 8/1/08.” • On Tuesday, 8/2/08, the lasagna is frozen with a second label that reads, “Frozen,
8/2/08.” Two labels now appear on the lasagna. Since the lasagna was held under refrigeration from Monday, 8/1/08 – Tuesday, 8/2/08, only 1 day is counted towards the 7-day time period.
• On Tuesday 8/16/05 the lasagna is pulled out of the freezer. A third label is placed on the lasagna that reads, “Thawed, 8/16/05.” All three labels now appear on the lasagna. The lasagna must be served or discarded within 6 days.
MONITORING: A designated employee will check refrigerators daily to verify that foods are date marked and that foods exceeding the 7-day time period are not being used or stored. CORRECTIVE ACTION: 1. Retrain any foodservice employee found not following these procedures. 2. Foods that are not date marked or that exceed the 7-day time period will be discarded.

Loss Prevention Module
“Customer TLC”
Objective: Eliminate Customer Accidents Background Information: A good reputation is the key to a successful business. That is why it is important to make your cafeteria a safe one. It only takes a second for dangerous situations to pop up. Therefore, guest safety is everyone’s responsibility. This lesson plan will review different ways you and your staff can make your location a safe place for everyone. Discussion Points: • Clean spills and pick up trash immediately. • Keep the parking lot clear of trash and spills. • Keep floors clear of obstacles such as food, trash, brooms, trays, etc. • Put out “Caution: Wet Floor” signs when mopping or when floors are wet. • Make sure floor mats are clean and in place. • Report damaged carpet or flooring that may cause falls immediately. • Watch for unsafe conditions inside and outside the cafeteria. Report them immediately or
correct them yourself. • Change or report burned-out light bulbs. • Watch where you are going! • Watch for unsafe conditions outside the location that may cause injuries, for example,
cracked sidewalk, potholes and slick areas caused by ice, snow or rain. • Know your school’s Emergency Evacuation Plan. To accurately document training, progress and education credit, be sure to complete Attendance Roster and Training Record. .
Materials Needed: Wet Floor Signs Building Emergency Evacuation Plan Attendance Roster
Training Record
This document is part of the SFSPac Food Service Sanitation and Safety Program and is proprietary material of PortionPac Chemical Corp. This document may not be copied, modified, distributed or otherwise disseminated, in whole or part to any third parties without express written permission from PortionPac. SFSPac®, Kid Clean®, Wake Up Riight™, It’s So Cool ™ and the “Pac® Family” names and images are the intellectual property of PortionPac® Chemical Corp. ©2004 PortionPac Chemical Corp. All rights reserved.

Loss Prevention Module
“Protect Your Back”
Objective: Proper Lifting Techniques
Background Information: Back strain is a common cause of injuries and the leading cause of absences from work. There are various reasons for strained backs, but the leading cause is improper lifting techniques. Stress to your employees the importance of proper lifting. Practicing correct lifting techniques will cut down on injuries and relieve the strain on our Health Care, Insurance, and Workers’ Compensation systems. Discussion Points: Stretch before you lift to prevent muscle strain. Plan your lift. Know where you are going. Make sure the path is clear to where you will be carrying your load. Store heavy items between knee and shoulder height – it is easiest to reach. Have delivery people unload and deliver merchandise as close as possible to where it will
be stored. Do not carry more than one item at a time. Do not be afraid to ask for help if the load is too heavy or bulky.
Managers: Demonstrate and practice proper lifting techniques with employees. Follow These Steps When Lifting
1. Plant you feet shoulder width apart. 2. Bend at your knees. Keep your back straight. 3. Use your leg muscles to lift. 4. Lift smoothly. Do not stand up quickly. 5. Hold load firmly and close to your body. 6. When changing directions, turn your feet with the load. You could injure yourself if you
twist your back. 7. Do not stretch to pick up or set down loads.
To accurately document training, progress and education credit, be sure to complete Attendance Roster and Training Record. .
Materials Needed: Safety Chart Attendance Roster
Training Record This document is part of the SFSPac Food Service Sanitation and Safety Program and is proprietary material of PortionPac Chemical Corp. This document may not be copied, modified, distributed or otherwise disseminated, in whole or part to any third parties without express
written permission from PortionPac. SFSPac®, Kid Clean®, Wake Up Riight™, It’s So Cool ™ and the “Pac® Family” names and images are the intellectual property of PortionPac® Chemical Corp. ©2004 PortionPac Chemical Corp. All rights reserved.

HACCP-Based SOPs Education Module
Machine Warewashing - High Temperature Definition: To prevent foodborne illness by ensuring that all food contact surfaces are properly cleaned and sanitized. Information: 1. Train foodservice employees on using the procedures in this SOP. 2. Follow State or local health department requirements. 3. Follow manufacturer’s instructions regarding the use and maintenance of equipment
and use of chemicals for cleaning and sanitizing food contact surfaces. Refer to Storing and Using Poisonous or Toxic Chemicals SOP.
All silverware, serving dishes, and utensils are washed, rinsed, and sanitized after each use. The machine for warewashing will be checked prior to each meal period to ensure that it is functioning properly. Employees who use the warewashing machine will be responsible for knowing how to use the machine, document its use, and properly maintain it after use. Steps include:
1. Fill dish machine tanks prior to use, utilizing the automatic filler 2. Run dish machine for 10 minutes after being filled, but prior to being used, to
heat water. 3. Check that soap and rinse additive dispensers have enough products for the
day’s use. 4. Scrape and rinse all items before placing them in the machine. 5. Load the dishwasher racks. Avoid overloading or improper loading. 6. Place rack in machine and close door. 7. Check temperatures for wash, rinse, and final rinse cycles and the water
pressure. Temperatures and pressure should be at least: Wash - 150°F and run for a minimum of 2 minutes. Rinse - 170°. Final rinse - 180°F. For stationary-rack, single-temperature machines, the
rinse must be at least 165°F. Minimum water pressure for final rinse should be at 20 psi.
8. Record the date, temperature, and psi and initial the entry on the provided Warewashing Log. This should be done one time per meal period.

HACCP-Based SOPs Education Module
Machine Warewashing - High Temperature, continued
9. If available place a thermal strip or a t-stick on a tray. Check the thermal strip (or t-stick) after it has run through the machine to make sure it has changed to black, indicating that the rinse temperature is adequately hot. The strip (or t-stick) should be taped on the Warewasing log with the temperature readings. If final rinse temperature does not meet the standard, do not run anything through the machine and report the problem to a supervisor immediately.
10. Run racks of trays and flatware through the dish machine. 11. Remove trays and flatware from machine and allow to air dry. MONITORING: Foodservice employees will: 1. During all hours of operation, visually and physically inspect food contact surfaces of
equipment and utensils to ensure that the surfaces are clean. 2. In a 3-compartment sink, on a daily basis:
Visually monitor that the water in each compartment is clean. Take the water temperature in the first compartment of the sink by using a
calibrated thermometer. If using chemicals to sanitize, test the sanitizer concentration by using the
appropriate test kit for the chemical. If using hot water to sanitize, use a calibrated thermometer to measure the water
temperature. Refer to Using and Calibrating Thermometers SOPs. CORRECTIVE ACTION: 1. Retrain any foodservice employee found not following the procedures in this SOP. 2. Wash, rinse, and sanitize dirty food contact surfaces. Sanitize food contact surfaces if
it is discovered that the surfaces were not properly sanitized. Discard food that comes in contact with food contact surfaces that have not been sanitized properly.
3. In a 3-compartment sink: Drain and refill compartments periodically and as needed to keep the water clean. Adjust the water temperature by adding hot water until the desired temperature is
reached. Add more sanitizer or water, as appropriate, until the proper concentration is
achieved.

HACCP-Based SOPs Education Module
Machine Warewashing - Chemical Sanitizing Definition: To prevent foodborne illness by ensuring that all food contact surfaces are properly cleaned and sanitized. Information: 1. Train foodservice employees on using the procedures in this SOP. 2. Follow state or local health department requirements. 3. Follow manufacturer’s instructions regarding the use and maintenance of equipment
and use of chemicals for cleaning and sanitizing food contact surfaces. Refer to Storing and Using Poisonous or Toxic Chemicals SOP.
All silverware, serving dishes, and utensils must be washed, rinsed, and sanitized after each use. The machine for warewashing should be checked prior to each meal period to ensure that it is functioning properly. Employees who use the warewashing machine will be responsible for knowing how to use the machine, document its use, and properly maintain it after use. Steps include:
1. Fill dish machine tanks prior to use, using the automatic filler. 2. Run dish machine for 10 minutes after being filled, but prior to being used, to
heat water. 3. Check that soap and rinse additive dispensers have enough products for the
day’s use. 4. Scrape and rinse all items before placing them in the machine. 5. Load the dishwasher racks. Avoid overloading or improper loading. 6. Place rack in machine and close door. Check that the wash cycle is
maintaining at least 120°F and runs for a minimum of 2 minutes. 7. Record the temperatures for the wash and rinse cycles and the water pressure.
Temperatures and pressure should be at least: Wash - 120°F and runs for a minimum of 2 minutes Rinse - 75-120°F Minimum water pressure for final rinse should be at 15-25 psi
8. Check sanitizer concentration using appropriate test strips. 9. Record the date, temperatures, water pressure, sanitizer concentration and initial the entry on the provided Warewashing Log.
10. Run racks of trays, dishes, and flatware through the dish machine. 11. Remove dishes from machine, and allow to air dry.

HACCP-Based SOPs Education Module
Machine Warewashing - Chemical Sanitizing, continued MONITORING: Foodservice employees will: 1. During all hours of operation, visually and physically inspect food contact surfaces of
equipment and utensils to ensure that the surfaces are clean. 2. In a 3-compartment sink, on a daily basis:
Visually monitor that the water in each compartment is clean. Take the water temperature in the first compartment of the sink by using a
calibrated thermometer. If using chemicals to sanitize, test the sanitizer concentration by using the
appropriate test kit for the chemical. If using hot water to sanitize, use a calibrated thermometer to measure the water
temperature. Refer to Using and Calibrating Thermometers SOPs. CORRECTIVE ACTION: 1. Retrain any foodservice employee found not following the procedures in this SOP. 2. Wash, rinse, and sanitize dirty food contact surfaces. Sanitize food contact surfaces if
it is discovered that the surfaces were not properly sanitized. Discard food that comes in contact with food contact surfaces that have not been sanitized properly.
3. In a 3-compartment sink: Drain and refill compartments periodically and as needed to keep the water clean. Adjust the water temperature by adding hot water until the desired temperature is
reached. Add more sanitizer or water, as appropriate, until the proper concentration is
achieved.

This document is proprietary material of PortionPac Chemical Corp. and may not be copied, modified, distributed or otherwise disseminated, in whole or part to any third parties without express written permission from PortionPac. SFSPac®, Kid Clean®, Wake Up Right™, It’s So Cool ™ and the “Pac® Family” names and images are the intellectual property of PortionPac® Chemical Corp. ©2012 PortionPac Chemical Corp. All rights reserved.
Table Cleaning
Several studies have found that school food service tables are
the most contaminated surfaces in a school. Evenmore than bathroom sink
faucets and paper towel handles.
(Source: Cleanlink.com)
Definition- Cafeteria Dining Tables require proper cleaning for the health of students and the general appearance of the dining facility. Effective cleaning will reduce the potential spread of harmful organisms to students while eating.
Information-1. DO NOT use spray Germicide during dining periods, or when
students are present. Only the Sanitizer buckets with wiping clothes should be used for wipe-up during breakfast and lunch periods.
2. Children should not use chemicals.
Process for Cleaning Dining Tables (no students present)-Wash 1. Spray table with Germicidal Detergent.2. Wipe food spills, debris and soil using a wet towel.3. When towel becomes soiled, rinse towel in bucket of clean water.4. Allow table to air dry before next meal service.
You Should Know1. When is it ok to use spray Germicidal Detergent on tables?2. What Table Cleaning Process should be used when students
are present?3. Why is it so important that tables are always properly cleaned?
August 2012Monday Tuesday Wednesday Thursday Friday Saturday Sunday
1 2 3 4 5
6 7 8 9 10 11 12
13 14 15 16 17 18 19
20 21 22 23 24 25 26
27 28 29 30 31

HACCP-Based SOPs Education Module Washing Fruits and Vegetables PURPOSE: To prevent or reduce risk of foodborne illness or injury by contaminated fruits and vegetables. INSTRUCTIONS: 1. Train foodservice employees on using the procedures in this SOP. 2. Follow State or local health department requirements. 3. Wash hands using the proper procedure. 4. Wash, rinse, sanitize, and air-dry all food-contact surfaces, equipment, and utensils
that will be in contact with produce, such as cutting boards, knives, and sinks. 5. Follow manufacturer’s instructions for proper use of chemicals. 6. Wash all raw fruits and vegetables thoroughly before combining with other
ingredients, including: • Unpeeled fresh fruit and vegetables that are served whole or cut into pieces. • Fruits and vegetables that are peeled and cut to use in cooking or served ready-to-
eat. 7. Wash fresh produce vigorously under cold running water or by using chemicals that
comply with the Local Regulation and Food Code. CHLORINE IS NOT ACCEPTABLE FOR THIS PROCESS. Packaged fruits and vegetables labeled as being previously washed and ready-to-eat are not required to be washed.
8. Scrub the surface of firm fruits or vegetables such as apples or potatoes using a clean and sanitized brush designated for this purpose.
9. Remove any damaged or bruised areas. 10. Label, date, and refrigerate fresh-cut items. 11. Serve cut melons within 7 days if held at 41 ºF or below. Refer to the Date Marking
Ready-to-Eat, Potentially Hazardous Food Education Module and SOP. 12. Do not serve raw seed sprouts to highly susceptible populations such as preschool-age
children. MONITORING: 1. The foodservice manager will visually monitor that fruits and vegetables are being
properly washed, labeled, and dated during all hours of operation. 2. Foodservice employees will check daily the quality of fruits and vegetables in cold
storage. CORRECTIVE ACTION: 1. Retrain any foodservice employee found not following the procedures in this SOP. 2. Remove unwashed fruits and vegetables service and washed immediately before
being served. 3. Label and date fresh cut fruits and vegetables. 4. Discard cut melons held after 7 days.

Loss Prevention Module
“Don’t Cut Yourself”
Objective: Prevent Cuts
Background Information: Cuts hurt and can affect an employee’s mood, well being and performance. We can eliminate cuts by heightening knife, slicer and sharp object safety awareness. This month review slicer operating and cleaning procedures; safe usage, cleaning and storage for all cutting tools; and inspect the kitchen for sharp edges and protrusions that could injure your staff. Discussion Points: • Always wear cut-resistant gloves when cleaning slicers. • Only use approved knives. • Make sure guards for slicing equipment are in place and operational. • Keep razor blades out of the facility. • Only use safe and approved box cutters. • Report all sharp edges on counters or other equipment for repair. • Always cut away from yourself so the blade will not hit you if it slips. • Place a towel under the cutting board so it will not slip. • When you are finished using a knife, store it in the proper safe place. • Never wipe a slicer with a cloth. • Do not try to catch a falling knife. • Do not touch blades. • Never compact trash in waste barrels with your hands. • Never put knives in the pot and pan sink. To accurately document training, progress and education credit, be sure to fill out Attendance Roster and Training Record. Materials Needed: Safety Chart Attendance Roster
Training Record
This document is part of the SFSPac Food Service Sanitation and Safety Program and is proprietary material of PortionPac Chemical Corp. This document may not be copied, modified, distributed or otherwise disseminated, in whole or part to any third parties without express written permission from PortionPac. SFSPac®, Kid Clean®, Wake Up Riight™, It’s So Cool ™ and the “Pac® Family” names and images are the intellectual property of PortionPac® Chemical Corp. ©2004 PortionPac Chemical Corp. All rights reserved.

Loss Prevention Module
“Slow Down”
Objective: Reduce Contact Injuries Background Information: One of the most common injuries in school food service is a contact injury. Someone runs into an object, drops something on the foot, slams his or her hand in a door, etc. These injuries almost always result from staff in a hurry. Talk about ways to reduce these types of accidents.
Discussion Points: Never lift objects that are heavier than you can handle. Always ask for help.
Keep aisle clear of equipment, carts and empty boxes.
Make sure doorways are clear before closing doors.
When operating machinery, make sure all parts are securely fastened.
Watch out for sharp corners or edges on tables.
Operate in teams when emptying trash containers.
Watch where you are going.
To accurately document training, progress and education credit, be sure to complete Attendance Roster and Training Record.
.
Materials Needed: Attendance Roster
Training Record
This document is part of the SFSPac Food Service Sanitation and Safety Program and is proprietary material of PortionPac Chemical Corp. This document may not be copied, modified, distributed or otherwise disseminated, in whole or part to any third parties without express
written permission from PortionPac. SFSPac®, Kid Clean®, Wake Up Riight™, It’s So Cool ™ and the “Pac® Family” names and images are the intellectual property of PortionPac® Chemical Corp. ©2004 PortionPac Chemical Corp. All rights reserved.

HACCP-Based SOPs Education Module
Ice Machine Usage Definition: To prevent foodborne illness by ensuring that ice is handled in a manner to ensure safety. Information:
1. Wash hands before handling scoop or portioning ice. 2. Use a scoop to transfer ice to a clean and sanitized container. The scoop should
be stored in a sanitary manner adjacent to the ice machine. It should never be stored in the ice storage bin. Scoop should be cleaned and sanitized daily.
3. Avoid using bare hands or inserting a glass directly into the ice storage bin. Cross contamination or introduction of a physical hazard (glass) could occur.
4. Store and transport ice in designated containers only. Do not use containers that formerly held chemicals or raw foods.
5. Discard ice used for display (salad bars) or ice baths. Do not use for consumption.
6. Clean and sanitize parts of ice machine considered “food contact surfaces” according to manufacturer’s guidelines.
The unit supervisor will:
1. Monitor employees to ensure that proper ice handling techniques are being followed.
2. Develop an ice machine cleaning schedule, following manufacturer’s guidelines. 3. Provide training and tools for employees to properly clean and sanitize. 4. Follow up as necessary. 5. File logs with HACCP records.
MONITORING: Foodservice employees will: 1. During all hours of operation, visually and physically inspect food contact surfaces of
equipment and utensils to ensure that the surfaces are clean and stored properly. CORRECTIVE ACTION: 1. Retrain any foodservice employee found not following the procedures in this SOP. 2. Wash, rinse, and sanitize dirty utensils that may come in contact with the ice at
anytime. Sanitize food contact surfaces if it is discovered that the surfaces were not properly sanitized.

Loss Prevention Module
“Hot! Hot! Hot!”
Objective: Prevent Burns
Background Information: Unfortunately, burn injuries are common in school food service. If we exercise caution, follow proper procedures, and utilize the proper thermal protective equipment, we can reduce or eliminate the number of injuries. This lesson plan will help you train your staff to protect themselves and others from burns.
Discussion Points: • Properly place lids on containers when transporting hot foods.
• Follow correct procedures for using all appliances and equipment.
• Wear personal protective equipment around “hot spots” such as fryers, broilers, heat lamps, steamers, ovens and hot water.
• Wear an apron, face shield and gloves when handling hot oil to protect yourself.
• Be careful when removing items from ovens or steamers.
• Make sure fry baskets are dry before you put them in oil. Wet fry baskets splatter oil and create steam.
• Do not overfill fry baskets. You could splash hot oil and burn yourself.
• Be careful not to drip oil on the floor. Wipe up spills immediately.
• Use management approved safety procedures for oil disposal, filtration and cleaning of deep fryers.
• Warn others when: carrying hot food, serving hot food, putting food into hot oil, and pouring hot liquids, etc.
• Let ovens cool down before cleaning.
To accurately document training, progress and education credit, be sure to complete Attendance Roster and Training Record. Materials Needed: Inventory of PPE Attendance Roster
Training Record
This document is part of the SFSPac Food Service Sanitation and Safety Program and is proprietary material of PortionPac Chemical Corp. This document may not be copied, modified, distributed or otherwise disseminated, in whole or part to any third parties without express written permission from PortionPac. SFSPac®, Kid Clean®, Wake Up Riight™, It’s So Cool ™ and the “Pac® Family” names and images are the intellectual property of PortionPac® Chemical Corp. ©2004 PortionPac Chemical Corp. All rights reserved.

This document is proprietary material of PortionPac Chemical Corp. and may not be copied, modified, distributed or otherwise disseminated, in whole or part to any third parties without express written permission from PortionPac. SFSPac®, Kid Clean®, Wake Up Right™, It’s So Cool ™ and the “Pac® Family” names and images are the intellectual property of PortionPac® Chemical Corp. ©2012 PortionPac Chemical Corp. All rights reserved.
Food Contact Surfaces
Definition- A food contact surface is any surface or utensil that touches food.
Information-Proper food service cleaning and strict food safety laws require a specific cleaning process for Food Contact Surfaces and Equipment. This process is critical in order to insure that all surfaces used for food preparation and service is clean and free from contamination. All Food contact surfaces must be washed, rinsed, and sanitized:• After each use• When you begin working with another type of food• Any time you are interrupted during a task and the tools or items
you have been working with may have been contaminated• At four-hour intervals if the items are in constant use.
Process for Proper Cleaning and Sanitizing-1. Scrape all loose particles from the surface2. Wash with a proper detergent solution3. Rinse with clean, potable water4. Sanitize with a properly mixed solution of Sanitizer5. Let surface/utensils air dry
You Should Know1. What is a food contact surface?2. What are the 5 steps for cleaning a food contact surface?
A wet and dirty wiping cloth is a stomping ground for
bacteria growth.
Storing cloths in a wiping cloth bucket of properly mixed sanitizer solution
will keep bacteria from growing and contaminating food contact
surfaces when it is used to wipe up spills.