2011 Kite User's Guide - Naish Kiteboarding€¦ · Kite User's 2011 Guide. ... It is important to...
13
Kite User's Guide 2011
Transcript of 2011 Kite User's Guide - Naish Kiteboarding€¦ · Kite User's 2011 Guide. ... It is important to...

Kite User's Guide2011

naishkites.com naishkites.com
7. Relaunching Your Kite 7. Relaunching Your KiteRelaunchShift System Use
How the Shift System helps to relaunch the kite:When you crash the kite and you have NOT let go of the bar, it is very simple to relaunch the kite with the Shift system.
Pics 1 & 2Wait until the kite is downwind. Make sure all lines are tensioned. Reach above the bar, grab the Shift line and pull it toward yourself. This should force the leading edge of the kite to come toward you. As the kite rolls over onto its canopy, keep your eyes on the kite. Never wrap the lines around your hand. When you let go of the slack line, pay special attention to stay clear of all lines.
Pics 3 & 4To get the kite to begin moving toward the edge of the window, you will need to put some pressure on the steering lines. Use extreme caution and keep clear of the Shift line. Apply tension on the appropriate steering line as the kite moves closer to the edge of the window for relaunch. When the kite lifts out of the water, check all lines and make sure there are no tangles. If the kite rolls over let it drift down wind and begin the process over again.
Tip: When your kite has relaunched, if you have to body drag to get to your board, adjust the trim strap to depower the kite. This will make it easier to work your way upwind. It might make steering looser, but the advantages of a shorter body drag are well worth it.
How the Universal Control System helps to relaunch the kite:If the kite is straight downwind of you, with the leading edge on the water, you can simply pull on one of the back leader lines to relaunch the kite. As you pull the leader line in, the kite will roll on its side and work its way to the edge of the window. From there it will relaunch easily. Make sure that you never wrap the line around your hand. Be careful not to become entangled in any slack line.
3 34
1 2
4
1 2
18 19
English

naishkites.com naishkites.com
InstallationLay out your Universal Control System in an open area. Untangle your lines like you are going to attach your kite. Pic 1- Lay out your 20 M LWR flyline and yellow leader. The end with the size demarcation will end up at the kite end of the assembled system.Pic 2- Carefully thread the blue control line through the guides on the LWR Flyline.Note: It is important to always thread the flyline through guide loop the same direction. Failure to do so willhinder the operation of the LWR System. Hint: Anchor the ends of both flylines to aid in assembly.Pic 3- Once the LWR flyline is assembled on the blue flyline, attach the yellow LWR leader. Use a loop-to-loopconnection.Pic 4- Slide the bar float up the leader.Hint: Slide the float all the way up onto the blue flyline.Pic 5 & 6- Using the exposed blue flyline, tie a loop through the loop at the end of the LWR leader. Use this to pull the leader through the float.Hint: The knot only needs to be snug as you will untie it immediately after this stepPic 7- Connect the LWR leader to the control system leader.Note: This must be below the main flyline connection to maintain proper left/right line lengths.Pic 8A & 8B- Completed assembly
7. Light Wind RelaunchLWR Installation/Tuning
TuningWhen you attach the LWR flying line to the LWR kite bridle there should be little slack in the system. You want the flyline to sit snuggly against the main flyline. At the same time, the LWR should not affect the normal flying of the kite. If it is too tight, your kite will pull (turn) to the right.
Too tight Tuning:Pic 1-Move the LWR leader above the knot where the main flying line is attached. Too loose tuning:Pic 2- Move the LWR leader down the adjustment leader at the bar end
Using your LWRThe LWR is for use when the kite is in a leading edge down position and the wind is so light that pulling a rear leader will not re-launch the kite.Pic 1- Using your right hand, grab the yellow LWR leader line. Do not wrap the leader around your hand, body or control bar.Pic 2- Pull the yellow LWR leader line towards you. You do not need to pull the line past your body. The kite wingtip will rise off the water and the kite will begin to move towards the edge of the window. Pic 3- Release tension on the LWR leader as the kite moves to the re-launch positionNote: The kite can rotate onto the trailing edge if you pull too hard on the LWR leader. This may cause the kite to launch deep in the wind window with an excessive amount of power.Pic 4- As the kite nears the edge of the window, release the LWR leader and steer the kite into the air using the control bar. Warning: Be careful to avoid any slack line when releas-ing the LWR leader line.
7 8a 8b
4 5 6
1 2 3
2
2
4
2
1
1
3
1
Installing the LWR line to the kiteYour LWR line is located in the neoprene pocket located on the right wing tip of your kite.Pic 1- Thread the looped end through the guide loop in the blue back line connector of your kite.Pic 2- Thread the looped end through the plastic ring at the end of the wing tip.Note: do not go through the webbing.Pic 3- Using a larks head connection, attach the LWR line to grey spectra line.
43
Connecting your LWR linePic 4- Using a larks head connection loop the LWR line over the red ball.
20 21
English
naishkites.com naishkites.com
8. Kite Maintenance & CareNotes on Caring for Your Kite
Folding the kite:After landing and securing your kite, detach your lines and wind them up. Leaving lines on the ground can be haz-ardous.
Note: The Octopus valves are not designed to hold air overnight or for long periods of time.
• Never store kite wet.• Let it dry and remove excess sand from the kite before rolling it up. Use a hand broom to help remove sand from your inflated kite.
Carefully folding the kite is very important to prolong the life of the kite and to prevent twisting the leading edge bladder. Before folding your kite, dry it out completely.
To fold the kite: 1. Deflate all of the struts.2. Open both valves on the leading edge – deflate valve and inflate valve – to fully deflate air from the main bladder.3. Lay the kite flat on the ground and flatten the leading edge.4. Start folding the kite at the wingtip towards the center making sure that the leading edge stays flat.5. Fold both sides together.6. Fold the kite into three sections.
Pulleys- Make sure that all the pulleys are in good working order before each session. Rinse them with fresh water after each session to keep them sand and debris free.
Sun- Ultraviolet radiation is the enemy of all fabrics. Your kite will last a long time in even the most extreme sun, but care should be given not to subject the kite to unnecessary exposure. For instance; If you have more than one kite rigged on the beach, put the one you are not using in the shade.
Wind- Leaving a kite that is not being used sitting in the wind can cause the canopy material to flutter. This flutter-ing can wear down the material. If a kite is not being used either pack it up or leave it in the shade out of the wind.
Heat- Bladder pressure increases when the air inside gets hot. Be careful of kites left on dark surfaces (black sand, asphalt) as the pressure in the bladders may cause damage to the kite. Don’t leave struts fully inflated inside a hot car.
Sand- Try to keep sand from sitting in the crease between the inflated frame and the canopy. Sand left here will act as a constant source of abrasion.
Rocks- Rocks, coral, sticks and other beach debris are potential puncture hazards for any kite.
Bladders- Keep sand and water out of the internal bladders. If deflating the kite on the water, close valve afterwards.
Storing- The combination of a kite stored while still wet, and or heat can cause colors to transfer. Only pack your kite away after it is completely dry. Never store your kite in hot temperatures (over 40C or 104F) for example in a hot car. Doing so will damage your bladders.
Pump- Apply even pressure on both sides of the pump handle to decrease the possibility of handle failure.
Self-launch- Use caution when self-launching in windy conditions as this puts a lot of strain on the leading edge.
Leading edge- Do not allow the leading edge to bend backwards. Use care when handling on the beach during launching or landing to keep the leading edge in its proper “C” shape. The kite is not designed to be bent backwards. Straightening or bending the leading edge backwards puts tremendous strain on the fabric.
Shore Break- Even a small shore break can be brutal on a kite. Not only does the shorebreak carry sand into every crevice on the kite, but moving water can rip the kite skin.
Miscellaneous- Impact zones, shore breaks, power lines and trees are even the most durable kite’s worst nightmare. Use only properly designed and manufactured parts from a reputable supplier (helmets, harnesses, etc).
Line checks- Check all of your lines, including bridle lines, before and after each use. Check lines for fraying, change in diameter and color loss. Compress line together and look closely at braid for evidence of wear. Replace any lines that have any signs of wear. Change out bridle lines every 3 to 6 months based upon use and condition.
9. Naish Warranty PolicyNaish warrants this product to be free from major defects in material or workmanship to the original purchaser for a period of ninety (90) days from the date of purchase. This warranty is subject to the following limitations:
The warranty is valid only when the product is registered in the warranty section of www.naishkites.com within seven (7) days from the date of purchase.
The warranty is valid only when this product is used for normal recreational activties, and does not cover products used in rental or teaching operations.
Naish will make the final warranty determination, which may require inspection and/or photos of the equipment, which clearly show the defect(s). If necessary, this information must be sent to the Naish distributor in your coun-try, postage prepaid. Product can be returned only if a return authorization number (RAN) is given in advance by the Naish distributor. The RAN number must be clearly labeled on the outside of the package, or it will be refused.
If a product is deemed to be defective by Naish, the warranty covers the repair or replacement of the defective product only. Naish will not be responsible for any costs, losses, or damages incurred as a result of loss of use of this product.
This warranty does not cover damage caused by misuse, abuse, neglect or normal wear and tear including, but not limited to, punctures, rigging with other than Naish components, damage due to excessive sun exposure, or damage due to over inflation of the bladders, damage caused by improper handling and storage, damage caused by use in waves or shore break, and damage caused by crashing the kite at high speed or damage caused by anything other than defects in material and workmanship.
This warranty is void if any unauthorized repair, change or modification has been made to any part of the equip-ment.
The warranty for any repaired or replacement equipment is good from the date of the original purchase only.
The original purchase receipt must accompany all warranty claims. The name of the retailer and date of purchase must be clear and legible.
There are no warranties, which extend beyond the warranty specified herein.
22 23
English

naishkites.com naishkites.com
Kite User’s GuideEnglish- pages 4-23Thank you for purchasing a Naish kite. You have chosen a kite of the highest quality and performance. Please read this manual to familiarize yourself with the technical features and benefits built into every Naish kite. Follow the guidelines and safety precautions found in this User’s Guide to help maximize your enjoyment and to prolong the life of your kite. This is not a “How To” manual. We strongly encourage you to get professional kiteboarding lessons from a reputable instructor before operating this kite.
Limited Warranty Registration- To receive full warranty and customer service benefits, you must register your product within 7 days of purchase at the warranty section of our website. Register product at: www.naishkites.com
Gebrauchsanweisung Für KitesDeutsch- seite 24-43Vielen Dank für die Wahl eines Naish Kites. Sie haben sich für ein Produkt höchster Qualität und Leistung entschie-den. Bitte nehmen Sie sich die Zeit die Gebrauchsanweisung zu lesen, um alle technischen Details und Feinheiten kennen zu lernen, die unsere 4-Leinen Kites besitzen. Folgen Sie den Richtlinien und Sicherheitshinweisen, die Sie in dieser Anleitung finden, um maximale Freude mit diesem Produkt zu haben. Dies ist keine – „Wie kitet man“-Anleitung. Wir empfehlen dringend vor der Nutzung dieses Kites entsprechenden Unterricht bei einem lizenzierten Kitelehrer zu nehmen.
Garantie Registrierung- Um den vollen Umfang der Garantie- und Se viceleistungen nutzen zu können, müssen Sie sich innerhalb von 7 Tagen nach Erwerb des Produktes im Garantiebereich auf unserer Website registrieren. Regis-trieren Sie Ihr Produkt unter: www.naishkites.com
Guia Del Usario CometaEspañol- paginas 44-63Gracias por haber adquirido el Shift System de Naish. Has escogido un producto de alta calidad y alto rendimiento. Por favor lee el manual para familiarizarte con las características técnicas y beneficios que te aportará el uso del Shift System. Sigue las instrucciones y consejos de seguridad que encontrarás en la Guía del Usuario para maxi-mizar el re dimiento de tu cometa y prolongar la vida de tu equipo. Esto no es un manual de manejo de la cometa. Te aconsejamos realmente de que tomes lecciones de un monitor profesional cualificado antes de utilizar este producto.
Límite de registro de garantía- Para poder obtener una garantía completa y beneficios de servicio, tienes que regis-trar tú producto en la sección de garantías de nuestra Web con un tiempo máximo de 7 días después de la compra. Registra tu producto en: www.naishkites.com
Aile Guide De L’utilisateurFrançais- pages 64-83Merci d’avoir acheté une aile Naish. Vous avez choisi une aile de haute qualité et aux performances exceptionnelles. Veuillez lire ce manuel pour vous familiariser avec les caractéristiques techniques et les avantages de nos ailes à quatre lignes. Respectez les directives et les précautions de sécurité répertoriées dans ce Guide de l’utilisateur pour tirer le meilleur parti de votre aile et prolonger sa durée de vie. Il ne s’agit pas d’un manuel d’apprentissage. Nous vous recommandons vivement de prendre des leçons de kiteboarding dispensées par des professionnels avant d’utiliser cette aile.
Enregistrement de Garantie Limitée- Pour obtenir une garantie complète et les avantages du service client, vous devez enregistrer votre produit dans les sept jours qui suivent la date d’achat, dans la section Warranty de notre site Web. Enregistrez votre produit à l’adresse suivante : www.naishkites.com
Guida All’utilizzo Del KiteItaliano- paginas 84-103Grazie per aver acquistato un prodotto Naish. Avete scelto il kite con la migliore qualita’ e con le migliori perfor-mance. Leggete prima questo manuale per prendere confidenza nel montaggio e conoscere le particolarita’ tecniche del kite a 4 linee. Seguite I consigli e le precauzioni sulla sicurezza riportati in questa utile guida per divertirvi ed aumentare il rendimento e la vita del vostro aquilone. Questo NON è un manuale per l’apprendimento del kitesurf, raccomandiamo vivamente di prendere delle lezioni da un instruttore qualificato e professionale prima di praticare questo sport.
Limite della Garanzia di Registrazione- Al fine di ricevere la piena garanzia e i servizi benefit alla clientela, devi registrare il tuo prodotto entro 7 giorni dall’acquisto alla sezione garanzia del nostro website. Registra il prodotto a: www.naishkites.com
1. Release & Agreements [4]
2. Warning & Safety Precautions [5]
3. Assembling the Bar and Lines [6-11]
4. Assembling the Kite [11]
5. Safety [12-15]
6. Tuning Your Kite [15-17]
7. Relaunching Your Kite [18-19]
8. Light Wind Relaunch [20-21]
9. Kite Maintenance & Care [22]
10. Naish Warranty Policy [23]
Table of Contents
2 3

naishkites.com naishkites.com
1. Releases & AgreementsRelease of Liability, Claim Waiver and Assumption of Risk Agreement
Release and Waiver of Claims Agreement:In consideration of your use of this product, you hereby agree to the following, to the fullest extent permittedby law:
To waive any and all claims that you have or may in the future have against Naish International, a division of Nalu Kai Incorporated, or any of its agents, resulting from use of this product and any of its components.
To release Naish International, a division of Nalu Kai Incorporated, or any of its agents from any and all liability for any loss, damage, injury or expense that you or any users of this product may suffer, or that your next of kin may suffer, as a result of the use of this product, due to any cause whatsoever, including negligence or breach of contract on the part of Naish International, a division of Nalu Kai Incorporated, or any of its agents, in the design or manufac-ture of this product.
Arbitration:In further consideration of the sale to you of this product and any of its components, you hereby agree to submit to binding arbitration any and all claims, which you believe you may have against Naish International, a division of Nalu Kai Incorporated, or any of its agents, arising from the use of any of the Naish International/Nalu Kai Incorpo-rated equipment. The arbitration shall be pursuant to the rules of the American Arbitration Association.
Arbitration shall be commenced within one (1) year from the date on which any alleged claim first arose. Further, the arbitration shall be held in Maui, Hawaii unless otherwise mutually agreed to by all parties. The submission to the American Arbitration Association shall be limited and the arbitration award may be enforced by any court of competent jurisdiction.
Binding Effect of Agreement:In the event of your death or incapacity, this Agreement shall be effective and binding upon your heirs, next of kin, executors, administrators, assigns and representatives.
Entire Agreement:In entering into this Agreement, you are not relying upon any oral or written representations other than what is set forth in this agreement and User’s Guide.
By inflating the leading edge and assembling this product, you are agreeing to:1) be bound to the terms set forth below; and 2) require anyone using this product to be bound by such terms. If you are unwilling to be bound by these terms, return this product (before use) for a full refund.
Assumption of Risk:Use of this product and any of its components involves certain inherent risks, dangers and hazards, which can result in serious personal injury and death. In using this product you freely agree to assume and accept any and all known and unknown risks of injury while using this equipment. The risks inherent in the sport can be greatly reduced by abiding by the Warnings and Guidelines listed in this User’s Guide and by using common sense.
2. Warning & Safety PrecautionsRead the following points before assembling your kite:
Warning:• Kite flying can be dangerous.• Always use extreme caution when using this product.• Misuse of this product can cause serious injury or death.• Only use this product if you are in good physical health.• Never act in a careless manner when using this product (such as jumping in the air, or tying yourself down).• You are responsible for your own safety, and the safety of others around you when using this product.• If you are under 18 you should have your parents or legal guardian read these warnings and instructions. You should not use this product unless you are under proper guidance and supervision.• The use of this product exposes the user to many unavoidable and unexpected risks, dangers and hazards.• Do not use this product if you are under the influence of alcohol, drugs or medications.
Important Safety Rules:• Before using this product take lessons from a certified school. Do not attempt to fly a kite without being trained by a certified kite instructor.• This product is not a personal flotation device. Always wear a Coast Guard approved personal flotation device when using this product near the water.• Always have a partner when launching and landing your kite.• Always learn to use a small two-line stunt kite before attempting to use this product.• Never allow anyone who is not familiar with traction kiting to use this product without experienced assistance.• Never use this product without a leash system. A loose kite is extremely dangerous to everyone down wind.• The leash system is not a permanent attachment to this product. Never permanently attach yourself to the kite or any of its components.• Always wear a helmet, gloves, shoes, and protective eyewear when using this product.• Always use a high quality, kite specific harness.• Get yourself used to the way your Quick release devices work by testing them often in a non emergency situation.• Rinse your Quick Release device in fresh water after every session. Quick Release devices have a limited life time and must be checked and changed often.• The Quick Release Trim Loop and your leash equipped with a quick release must be changed after 250 hours of kiting. Change them before if you see any sign of wear. The wearing of your Quick Release devices is not considered a warranty issue.
Choose Safe Weather Conditions:• Never learn to use this product in more than 10 knots of wind.• Never use this product in high winds.• Never use this product in thunderstorm and lightning conditions.• Only use this product when you can remain in a standing position.• Never use this product in wind conditions that are above your ability level.• Never use this product near or on the water in offshore wind conditions unless you are an expert swimmer.
Choose a Safe Location:• Always observe local rules and regulations when using this product.• Never use this product near power lines, telephone poles, trees, bushes, roads, automobiles, or airports.• Only use this product when you have 100 meters of clear space downwind, and on both sides of your launching position. The power of the kite can pull you downwind unexpectedly and with great force.• Do not fly your kite over other people or pets. Spectators should remain upwind of you when using this product.• Never use this product on crowded beaches or fields.• Never use this product near the water unless you know how to swim and are in good physical health.• Practice launching and landing procedures, and self rescue techniques before using this product near the water.
Use Caution with Flying Lines:• Never touch the flying lines when the kite is in use. Flying lines are extremely dangerous while under tension and can cause serious injury or death.• Never use this product with worn lines. A line that breaks while under tension can cause serious injury or death.• Always check your flying lines for knots before each use. Knots greatly reduce the strength of the lines.• Stay away from tangled flying lines unless the kite is secured to the ground. An unsecured kite can self launch unexpectedly, and can cause serious injury or death.• Never allow yourself, or anyone else, to get between the control bar and the kite when using this product.
4 5
English

naishkites.com naishkites.com
3. Assembling the Bar and LinesThe Shift System Drawing of Entire Shift System
3. Assembling the Bar and LinesThe Universal System Drawing of Entire Universal System
Your new Universal Control System is a plug and play device; it comes completely assembled and ready to use. Below is a diagram of the system and descriptions of each line and its function.
A) Control barB) Leader LinesC) Vario bar length adjuster tabD) Handle pass leashE) Smart LoopF) Chicken fingerG) Trim line (Universal System)H) Sliding stopperI) Fixed stopperJ) Flagging line (yellow)K) Universal line clusterL) Colored back linesM) Grey Front lines- attach to leading edge of kiteN) Bridle linesO) Bridle pulleyP) LWR line (optional)
Your new Shift System is a plug and play device. It come completely assembled and ready to use. These are diagrams of the Shift System and descriptions of each line and its function.
A) Control bar B) Leader LinesC) Vario bar length adjuster tabD) Handle pass leashE) Attachment loopF) Smart LoopG) Chicken fingerH) Trim line (Shift System)I) Sliding stopperJ) Shift Line yellow bungeeK) Grey Front lines- attach to leading edge of kiteL) Shift Line yellow- attached on kite (not shown)M) Y connector with pigtails for grey control lines to attach toN) Shift Line- yellow spectra lineO) Colored back lines
A
B B
C C
D
F
G
H
I
J
KK
O O
N
M
A
C C
D
E
F
G
HI
N
L
O
K
J
M
P
A
B B
C C
D
F
G
H
I
A
C C
D
E
F
G
H
I
E
E
B B
B B
M M
N
L
J
6 7
English

naishkites.com naishkites.com
3. Assembling the Bar and Lines 3. Assembling the Bar and LinesAssembling the Universal Control SystemAssembling the Shift System
Preparation:Pic 1- Position your kite on the beach facing directly into the wind. Place sand on the canopy. Layout the bar up-wind of the kite. Place the Red side of bar on the left side when you are looking down wind toward the kite. Make sure the lines are straight and not wrapped, knotted or tangled in any way.
Attaching the Shift System Bar and Lines:Lay the kite across the lines approximately 5 meters before the end of the lines.Pic 2- Attach the Grey control lines to the leading edge pigtails.Pic 3- Move the steering lines outside of the kite and attach the Red and Blue steering lines first using either the Figure 8 knot or the larks head dependent on your kite’s pig tails.Pics 4 & 5- Make sure all lines are hooked up correctly and take extra time to straighten your lines before each session as the lines will tend to be twisted. It is difficult to see twist in the Shift line at the Red Bungee and Y connection. Pay special attention to these points when checking your lines. Look for twists in the Shift line. Use the quick disconnect point to help untwist the lines. Also look for twists of the Shift line around the control lines just above the Y connection. You can use the larks head attachment points on the Y Connector to untwist the grey control lines.
The Shift Extension Line:Pic 6- On the end of the Shift Extension line you will find a knot. Attach the Shift Line to the Shift Extension line.
Preparation:Pic 1- Position your kite on the beach facing directly into the wind. Place sand on the canopy. Lay out the bar upwind of the kite. Place the red side of the bar on the left side when you are looking down wind toward the kite. Make sure the lines are straight and not wrapped, knotted or tangled in any way.
Attaching your lines to the bridle:Pic 2- Move the steering lines outside of the kite and attach the red and blue steering lines to the back line bridle attachments using the larks head. Attach the grey front lines to the front line bridle attachments using the larks head on the front lines. Make sure to keep the left and right front line on the correct side, without twists. Make sure that all bridle lines are clear and free of tangles. Make sure there are no knots in any of the flying or bridle lines. Make sure the pulleys on the bar and in the bridle system are turning freely.
2 3
4 6
1
2
Fool Proof Flying Lines:Naish kites are equipped with specialized flying line connectors which prevent inadvertently attaching the front lines to the trailing edge and the opposite. The pictures above show how to use this feature. The line connectors have a handy easy-open feature as well. Pull on the black tab to release your flying lines after your session.
1
5
8 9
English

naishkites.com naishkites.com
3. Assembling the Bar and LinesChicken Finger
How to lock the Chicken Finger into yourharness hook:The Control System is designed with a Chicken Finger to help you stay locked into your QRTL. Before you con-nect the finger to your harness hook make sure that your lines are set up properly without any tangles or twists.
Pic 1- Push the finger into the center of the harness hook.Pic 2- Make sure that it is below the trim loop and that the Chicken Finger gets all the way in and is straight.
If you want to disconnect from the trim loop, you can grab the finger and pull it out of the harness hook, and then unhook the loop. Or, you can release your QRTL as described on page 12.
Rotating Chicken Finger:Be aware that using this item can cause serious injury or death. When the chicken finger is installed, you will have to activate your Quick Release Trim Loop in order to release yourself from the kite. Only use the chicken finger if you are an expert kiteboarder. Install the chicken finger only when you are in the water and away from all obstacles. NEVER return to the shore with your chicken finger installed. To use it simply slip it under you harness bar hook and out the end so that the QRTL will not fall from the hook if there is no pressure on the QRTL.
Note: Pressure from the QRTL can cause the chicken finger to bend and let the QRTL come unhooked in some circumstances.
Adjusting the power of your kite with the Smart Loop:
Trim Line
Line Extensions:For kite sizes 9m – 12m your kite is delivered with 4m flying line extensions in the outer pocket of the bag.For kite sizes 13m – 16m your kite is delivered with 7m flying line extensions in the outer pocket of the bag. Putting these extensions of the end of your flying lines will increase the power of your kite and give you a longer power stroke.
Pic 1- To install the line extensions pass the end of the extension line through the loop in the end of the flying line.Pic 2- Then pass the end of the extension line (with the easy release tab) through the loop in the extension line and pull it tight.Pic 3-Completed Assembly.
1 2
3. Assembling the Bar and Lines
LineExtensions
FlyingLines
1
2 3
4. Assembling the Kite
Pics 1-3- Always use the pump leash to hold your kite while you inflate it.
On Your Octopus System Equipped Kite:• Close all strut valves.• Close the deflate valve on the LE.• Inflate the kite at the LE inflation valve.• Pump until the kite is very firm and rigid.• Close the inflate valve with the velcro and valve lock bungee.
How to Deflate Your Octopus Equipped Kite:• Open all strut valves.• Open the deflate valves on the LE. That’s it.
Inflation Pressure:Smaller kites require greater pressure in the bladder to hold their shape. Below are recommended maximum pressures.
• 3m through 7m kites require a maximum of 8.5 psi or .57 mPa• 8m through 11m kites require a maximum of 7.5 psi or .51 mPa• 12m through 15m kites require a maximum of 6.5 psi or .44 mPa• 16m kites require a maximum of 5.5 psi or .37 mPa• Always inflate kite very firmly.
Note: Do not over inflate the kite struts or you may dam-age the internal bladder.
Inflating Your Kite
Trim Line
To give your kite more power, pull down on the trim line to release it from the jam cleat. Feed out the desired amount of line and then lock the line back into the jam cleat.
To depower your kite pull down on the trim line, below the QRTL, the desired amount, then lock the line in the jam cleat.
1
2
3
Depower
Full Power
10 11
English

naishkites.com naishkites.com
5. SafetyQuick Release Features
To Release:
1 2
3 4
6b 76a
Sliding Stopper:The Sliding Stopper should be set at a height at the top of your depower range. Its function is to allow you to rest the control bar against it and spin the bar. You can push the Sliding Stopper up with the control bar during a gust or if you want more depower.
5. Safety
This chart is only to be used as a point of reference. It is based upon a rider who is 75kg (170 lbs) riding on a 132 cm twin tip board. Your kite size choice may vary based on your body weight, ability, board size, water conditions and riding preferences. Please use common sense and your personal experience when selecting your kite size. Check to see what size kite others are riding. Lighter riders should use smaller kites and heavier riders may need a bigger size.
Charger
Knots 8 12 16 20 24 28 32 36 40
not recommended for 75kg rider3.5
5
7
9
11
13
15
Bolt
Knots 8 12 16 20 24 28 32 36 40
not recommended for 75kg rider3
5
6
7
8
9
10.5
12
14
16
Knots 8 12 16 20 24 28 32 36 40
Park
6
8
10
12
14
Torch
Knots 8 12 16 20 24 28 32 36 405
6
7
8
9
10
11
12
14
Wind Range Chart
Operating the Quick Release Trim Loop:To activate the Quick Release Trim Loop: Grasp the handle of the quick release trim loop and force it up the QRTL line, away from your body.
Important: It is your responsibility to maintain the proper working order of the quick release mechanism. Always inspect this piece prior to launching your kite. Make sure the trigger mechanism is properly seated before you ride, and occasionally while on the water. There are two ways to do this:
1. Grasp the handle and pull it towards your body.2. Briefly unhook from the loop, and then hook back in.
Release Pics 1-4: To release, grasp the handle and force it away from your body to open the loop. Reload Pic 5: Released QRTL.Reload Pic 6A & B: Slide the arm through the stainless steel loop at the end of the QRTL.Reload Pic 7: Slide the handle down the line over the arm.
Note: You MUST test your Quick Releases before every session in order to get used to the way they work. This is the only way for you to be able to use them fast enough in case of emergency. Remember that the Quick Release devices have a limited lifetime and you must change them after 250 hours of kiting. Our Quick Releases are developed and designed to be used by a rider of 80kg or less.
5
SlidingStopper
FixedStopper
To Reload:
12 13
English
naishkites.com naishkites.com
5. SafetyShift Leash Quick Release Features
Releasing the Shift Leash Quick Release:
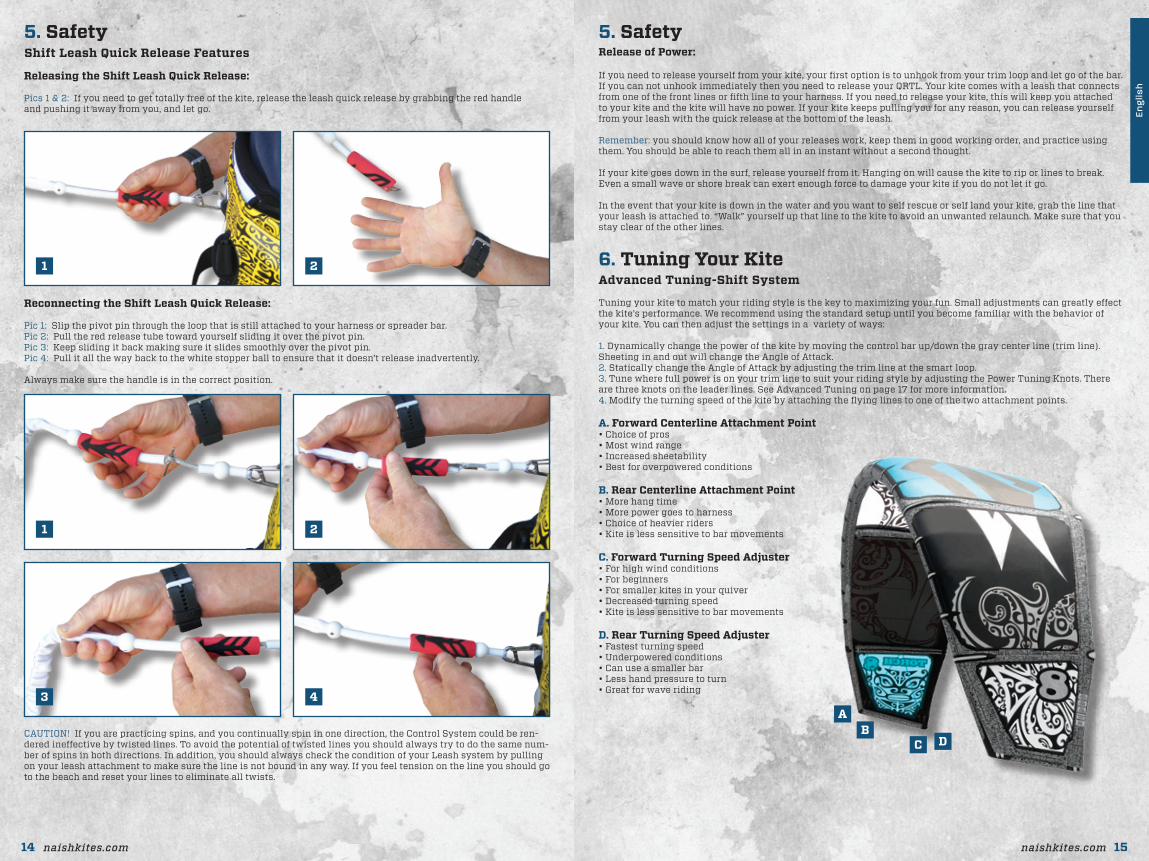
Pics 1 & 2: If you need to get totally free of the kite, release the leash quick release by grabbing the red handle and pushing it away from you, and let go.
CAUTION! If you are practicing spins, and you continually spin in one direction, the Control System could be ren-dered ineffective by twisted lines. To avoid the potential of twisted lines you should always try to do the same num-ber of spins in both directions. In addition, you should always check the condition of your Leash system by pulling on your leash attachment to make sure the line is not bound in any way. If you feel tension on the line you should go to the beach and reset your lines to eliminate all twists.
1 2
1 2
3 4
5. Safety
6. Tuning Your KiteAdvanced Tuning-Shift System
Tuning your kite to match your riding style is the key to maximizing your fun. Small adjustments can greatly effect the kite’s performance. We recommend using the standard setup until you become familiar with the behavior of your kite. You can then adjust the settings in a variety of ways:
1. Dynamically change the power of the kite by moving the control bar up/down the gray center line (trim line). Sheeting in and out will change the Angle of Attack.2. Statically change the Angle of Attack by adjusting the trim line at the smart loop.3. Tune where full power is on your trim line to suit your riding style by adjusting the Power Tuning Knots. There are three knots on the leader lines. See Advanced Tuning on page 17 for more information. 4. Modify the turning speed of the kite by attaching the flying lines to one of the two attachment points.
Release of Power:
If you need to release yourself from your kite, your first option is to unhook from your trim loop and let go of the bar. If you can not unhook immediately then you need to release your QRTL. Your kite comes with a leash that connects from one of the front lines or fifth line to your harness. If you need to release your kite, this will keep you attached to your kite and the kite will have no power. If your kite keeps pulling you for any reason, you can release yourself from your leash with the quick release at the bottom of the leash.
Remember: you should know how all of your releases work, keep them in good working order, and practice using them. You should be able to reach them all in an instant without a second thought.
If your kite goes down in the surf, release yourself from it. Hanging on will cause the kite to rip or lines to break. Even a small wave or shore break can exert enough force to damage your kite if you do not let it go.
In the event that your kite is down in the water and you want to self rescue or self land your kite, grab the line that your leash is attached to. “Walk” yourself up that line to the kite to avoid an unwanted relaunch. Make sure that you stay clear of the other lines.
Reconnecting the Shift Leash Quick Release:
Pic 1: Slip the pivot pin through the loop that is still attached to your harness or spreader bar.Pic 2: Pull the red release tube toward yourself sliding it over the pivot pin.Pic 3: Keep sliding it back making sure it slides smoothly over the pivot pin.Pic 4: Pull it all the way back to the white stopper ball to ensure that it doesn’t release inadvertently.
Always make sure the handle is in the correct position.
A. Forward Centerline Attachment Point• Choice of pros• Most wind range• Increased sheetability• Best for overpowered conditions
B. Rear Centerline Attachment Point • More hang time• More power goes to harness• Choice of heavier riders• Kite is less sensitive to bar movements
C. Forward Turning Speed Adjuster• For high wind conditions• For beginners• For smaller kites in your quiver• Decreased turning speed• Kite is less sensitive to bar movements
D. Rear Turning Speed Adjuster• Fastest turning speed• Underpowered conditions• Can use a smaller bar• Less hand pressure to turn• Great for wave riding
AB
C D
14 15
English

naishkites.com naishkites.com
6. Tuning Your KiteAdvanced Tuning
The following is a general guide for what your kite will do at certain knot positions. Do not hesitate to try several different combinations to find what suits your style best.
Attach the outside flying lines to one of the three knots on the control bar’s extension lines labeled A, B, or C.
Knot A: The kite will be somewhat depowered when your arms are outstretched. Push the bar away from your body for even less power. The kite will fly at optimum trim while the control bar is close to the quick release trim loop. You will be ready to unhook at any moment for power moves.
Knot B: The kite will be fully powered when the bar is a few inches from the quick release trim loop. This posi-tion will allow you to be fully powered when your arms are in a more extended and comfortable position. This setup retains a good amount of depower room above the bar, and puts you in a more ergonomic body posture.
Knot C: This position allows you to ride with the kite fully powered when your arms are outstretched. This setup is great for one-handed jumps. Pulling the bar down to the center loop will oversheet the kite.
Caution: This setting does not allow the rider much room to depower the kite, compromising the ability to sheet out completely. Only advanced kiteboarders should use this setup.
Correct trim
Oversheeted
Bar End Flip:Your bar has a plastic piece that can be removed and flipped 180 degrees to change the effective pull point of the steering lines. Pull down on the tab to pull the plastic piece out. Because the piece has the flying knot going through it, you will only get it to come part way out. When you have enough slack, turn the piece 180 degrees and reinsert into the slot. Carefully align the piece back into the slot to get it to fully reseat. Repeat on the other bar end so that the knots are either both to the inside or outside. The bar ends will flex under load and give you an effectively new bar length.
A
B
C
1 2
6. Tuning Your KiteAdvanced Tuning
Important Considerations for Maintaining Your Shift System:You may find that your tensioned lines stretch at a different rate than the Shift Line. This means you will have to monitor the slack in the Shift line above the Y connector. It is always a good idea to monitor your kites performance in relation to how your kite lines are stretching. If at full power the line is slack, you can shorten your connection point on the Shift Extension line to eliminate the slack and give the kite optimal per-formance. You can test the slack by pulling on the ball at the fixed point on the QRTL and watch the results at the kite. Have someone look at the shape of the leading edge to make sure it is not flat in any way. Always check for wear on all lines and loops where friction occurs.
Over sheeting diagram for Shift System kitesView of kite from riders perspective. Kite in the neutral position directly above the rider. Over sheeted wingtip (too much back line tension). Front lines too long.
Bridle Tuning:1- More grunt2-More depower
Bar Pressure:If you want to increase the bar pressure there is an ad-ditional rear line attachment point on the kite. (Toward the middle of the kite).
More
Less
Wingtip
Center of K
ite
1
2
16 17
English
Naishkites.com©2010 Naish International, A division of Nalu Kai Incorporated