
2010 Professional Installation Handbook - a.mannington.io · 2010 Professional Installation...
137
2010 Professional Installation Handbook Mannington Mills, Inc., P.O. Box 30, Salem, NJ 08079 Mannington.com 1-800-FLOOR-US (356-6787 © Floor designs copyrighted by Mannington Mills, Inc. ®©™ Mannington Mills, Inc. 2009 10/09. Due to computer monitor limitations, colors pictured cannot be guaranteedto match actual flooring material.
-
Upload
dangkhuong -
Category
Documents
-
view
224 -
download
0
Transcript of 2010 Professional Installation Handbook - a.mannington.io · 2010 Professional Installation...

2010 ProfessionalInstallation Handbook
Mannington Mills, Inc.,P.O. Box 30, Salem, NJ 08079Mannington.com1-800-FLOOR-US (356-6787
© Floor designs copyrighted by Mannington Mills, Inc. ®©™ Mannington Mills, Inc. 2009 10/09.Due to computer monitor limitations, colors pictured cannot be guaranteedto match actual flooring material.
Welcome | 2
Welcome to another new edition of the Mannington Professional Installation Handbook. This Guide has beencreated for installers and specifiers of Mannington floor covering products. It will prove especially helpful to thosewho require a basic knowledge of products and how to install those products properly.
Our commitment is to provide comprehensive information to assist you in performing the best installation possible.Only by helping you perform at your best can we obtain optimum results and the longest performance life for ourfloor covering products.
Mannington strongly recommends following all the directions and advice we have so carefully researched andprovided for you in this new handbook. We have based all of our instructions on industry-acceptedrecommendations. Also, regular field testing of our products and their installation systems produces importantreal-world experience. These kinds of helpful hints have been included for your help.
Talk To Us
We always enjoy hearing from our installers and specifiers. If you have ideas on how we can make this handbookbetter for you, contact us. Remember, we are trying to help you provide the best installation possible for yourcustomers. We know how important honest, hard work is in today’s business world. You can contact us by callingour Customer Care Department at 1-800-FLOOR-US (356-6787.)
Important Notice to Floor Covering Installers
If it becomes necessary to remove any resilient floor covering materials containing asbestos, it is important torecognize that governmental regulations apply. Please also be aware that governmental regulations involving theremoval of existing asbestos-containing materials vary from state to state.
Always exercise safeguards to protect yourself and others on the job site.
Mannington recommends that whenever possible, new wood panel underlayment be installed over existing resilientfloor covering. Mannington Embossing Leveler is an alternative. Removal of existing floor covering should only bedone as a last resort.
DANGER: Do not sand, dry sweep, dry scrape drill, saw, beadblast, or mechanically chip orpulverize existing resilient flooring, backing, lining felt or asphaltic “cutback” adhesives.
These products may contain either asbestos fibers or crystalline silica. Avoid creating dust.Inhalation of such dust containing respirable fibers or crystallline silica may cause cancer andrepiratory tract diseases. Smoking by individuals exposed to asbestos fibers greatly increases therisk of seroius bodily harm. Unless positively certain that the product is a nonasbestos-containingmaterial, you must presume it contains asbestos. Regulations may require that the material betested to determine asbestos content.
For specific instructions on how to remove existing resilient floor covering, consult this handbook, or refer tothe Resilient Floor Covering Institute’s brochure, Recommended Work Practices for Removal of ResilientFloor Coverings.
Welcome
�
Introduction | 3
Introduction . . . . . . . . . . . . . . . . . . . . . . . . . . . . . . . 4General Installation Guidelines . . . . . . . . . . . . . . . . . 6
Choosing the Correct Underlayment Panel . . . . . . . 10
Residential Resilient Installation Guide . . . . . . . . . . . 14Residential Triple Option Installation . . . . . . . . . . 16
Sobella Installation Guide . . . . . . . . . . . . . . . . . . . . 25Residential Perimiflex InstallationSystem for Aurora Flex . . . . . . . . . . . . . . . . . . . . 32
Adura Installation Guide . . . . . . . . . . . . . . . . . . . . . 43Residential Resilient Installation Accessories . . . . . . 52Hardwood Installation Guide . . . . . . . . . . . . . . . . . 59
LocNGo Wood Installation . . . . . . . . . . . . . . . . . 75
Laminate Installation Guide . . . . . . . . . . . . . . . . . . . 79Porcelain Installation Guide . . . . . . . . . . . . . . . . . . . 92Commercial . . . . . . . . . . . . . . . . . . . . . . . . . . . . . 102
Commercial Resilient Sheet andModular Installation Guide . . . . . . . . . . . . . . . . 103
Commercial Vinyl Composition Tile andPremium Tile Installation Guide . . . . . . . . . . . . . 114
Commercial Luxury Vinyl Tile FloorsInstallation Recommendations. . . . . . . . . . . . . . 118
iCore® II Installation Guidelines . . . . . . . . . . . . . 123
Installation Accessories . . . . . . . . . . . . . . . . . . . 127
Table of Contents
We have included many handy features in the Guide to help you find the information you need more quickly andeasily. To begin, you will notice a block of grey tabs along the side of each page indicating the name of the chapter.This will be very helpful when you wish to quickly thumb through the Guide to find a particular section.
Throughout the Guide you will also notice three icons. Each denotes the type of message that follows it.
NOTE: A helpful hint or words of wisdom from Mannington to achieve optimum results.
CAUTION: A cautionary direction that should be followed before proceeding with theapplication or job at hand.
DANGER: A warning of possible danger or bodily harm.
All the information contained in this handbook pertains to Mannington floor covering products. It is based onindustry-accepted recommendations established by various trade organizations and on thorough field testing ofvarious products and their installation systems. This information is also based on the most up-to-date technicalinformation available. We are constantly striving to improve, standardize, and simplify all aspects of flooringinstallation as new products and procedures are developed. As the professional installer or specifier, it is yourresponsibility to remain current regarding recommendation for suitability of intended use of our floor coveringproducts and their required installation systems. One last advisory note: Always use Mannington recommendedadhesives, seam sealers and floor patching products.
As you might understand, it is not possible to cover all situations or conditions relevant to the installation of flooring.Final decisions and responsibility for each specific installation rest with the floor covering contractor. If youencounter any unusual situations or conditions, stop the installation immediately and contact your local ManningtonDistributor, Mannington Regional Installation Specialist, or call Mannington Customer Care at 1-800-FLOOR-US.
How to use this Guide
�
!�
Introduction | 4
Introduction
No floor covering material is functional until it is installed into a location. The skill with which this material is fitinto the location and the overall condition of the location greatly influences the appearance and theperformance of the floor-covering material. Additionally, the type of floor-covering material selected must beappropriate for the intended use. Therefore, it is absolutely critical that sufficient consideration is given to thesefactors. This is the intent of this Professional Installation Handbook. Although this handbook cannot possiblycover every possible situation nor answer every specific floor covering question, it can provide generalguidelines and references to enable installers, sales representatives and product specifiers to make soliddecisions regarding the floor covering process.
Mannington Mills, Inc. is a manufacturing company that offers a full array of flooring products that providealternatives and solutions for both residential and commercial flooring customers. The utmost care andsophisticated process control systems are incorporated into our manufacturing activities. In fact, both thecommercial Inlaid and VCT plants in Salem, NJ are ISO 9001 certified, and our laminate plant in High point, NCis also ISO 9001 certified. This ISO certification carries a requirement that the manufacturing processes fromraw materials through finished inventories be routinely audited as a provision for maintaining this ISOcertification. In addition, both our commercial and residential operations in Salem, NJ and our Carpet plant inCalhoun, GA are ISO 14001 certified. These certifications ensure our Environmental Management Systems arepart of everyday business from design through manufacturing of our products. We are constantly exploringways to improve our products and manufacturing technologies to reduce our environmental footprint, increaseresource efficiency, cut waste, and improve the use of recycled materials.
This commitment to quality and the environment in manufacturing should be evident in the floor coveringproducts we supply.
We expect these flooring products to be installed with the same commitment to quality. The professionalinstaller should ultimately be the last inspector of the quality of any finished flooring products and should neverinstall a product with a visible defect.
Additionally, professional flooring installers should abide by the following guidelines:
� Conduct their business as professionals and secure all required licenses,permits, insurances and applicable tax identification numbers.
� Present themselves as professionals, in both appearance and deed,to all business associates.
� Follow all Mannington- and industry-established recommendationsregarding installation requirements and work practices.
� Install products and perform installation techniques with which they areknowledgeable, trained and truly competent.
Introduction | 5
Introduction (continued)
Basic Guidelines
Regardless of the type of hard-surface flooring product being installed, the following basic guidelines should beconsidered to insure a successful installation. In the event that there is a flooring complaint, more often than not,one or more of these six essential guidelines was ignored or not properly completed.
1. Proper storage, handling and transporting of materials� Interior storage location – protected from the weather� Do not overstack – protect from forklift traffic� Fully support product during transportation
2. Job site conditions� Interior locations only (Exception – thru body Porcelain)� Permanent HVAC, operational and regulated� Dry, secure; all windows and doors installed and operable
3. Subfloor selection and preparation� Clean, dry and structurally sound� Concrete subfloors tested for moisture (MVT)� Wood subfloors covered with appropriate underlayment
4. Product cutting and fitting� Material layout is aligned in correct position and balanced� Appropriate tools and equipment are available and maintained� Craftsmanship is exhibited and evident in fit and function
5. Securing the flooring� Correct adhesives are selected and applied in correct amounts� Fasteners are of sufficient length and specifically designed for this purpose� Proper moldings and transitions are used (even in “floating” installations)
6. Seam alignment and treatment� By definition – a seam is a line of junction� All flooring products have the probability of seams
Tile products – tight, square and trueWood and Laminate – tight, straight and properly positionedPorcelain – fully grouted and sealedResilient – Strategically placed and properly sealed
� Minimize complexity of design and layout
General Installation Guidelines | 6
These guidelines are relevant for all types of floor coverings. Although there may be some specific requirementsdetailed for specific product categories, the information provided in this section should be considered beforebeginning any flooring installation.
Storage
All floor covering products require care during storage and handling. It is important to store flooring products in adry, temperature-controlled interior area. The temperature range should be between 65º F and 100º F, and therelative humidity should be controlled and maintained between 30% to 70%. If it is not possible to provide thesestorage conditions, you must make provision to have the material conditioned for at least 48 hours beforebeginning the installation.
Roll sheet goods must be stored tightly rolled, face-out on a sturdy cardboard core. Resilient products 12' widemust be stored horizontally and fully supported across their entire width. Six-foot wide rolls may be stored standingon edge in a protected area. It is important to comply with these storage recommendations to preventcompression or distortion of the rolls.
Flooring materials that are shipped in cartons must also be stored properly. These cartons must be kept squarelypositioned on the pallet to prevent distortion of the contents and to be fully supported. Stored cartons are to beprotected from forklift and other traffic that can damage carton corners. Never double-stack pallets of flooringproducts. Check specific product instructions to determine maximum carton stacking on pallets.
Handling
Flooring products can be heavy and bulky. Always use proper material-handling equipment when moving theseproducts. Always use proper lifting techniques and never lift more than you can safely handle. Fully supportproducts during transportation. Distribute the load as evenly as possible in the truck.
Flooring products can be damaged by rough handling before installation. Exercise care when handling andtransporting these products.
Pre-Installation Checklist
Before starting the job, always check the flooring materials to ensure they are the correct pattern, style and color.Also make certain that the correct amount of product is available to complete the job.
Remember to thoroughly inspect all materials for visible defects. Mannington Mills, Inc will not pay labor chargeson claims filed for materials installed with obvious visible defects. If you discover visible defects, do not proceedwith the installation; contact your material provider for assistance.
Be certain to thoroughly understand the requirements of the installation with regard to seam placement, productlayout, plank direction, etc. before starting the job.
Be certain to have all necessary and correct adhesives, seam treatments, moldings and trims available on thebefore beginning the job.
Be certain to have a thorough understanding of the scope of the project and the expectations of time ofcompletion before starting the job.
General Installation Guidelines
GeneralInstallation
Guidelines
General Installation Guidelines | 7
General Installation Guidelines (continued)
Job Site Conditions
The environment and condition play a very important role in assuring a successful flooring product installation. If thejob site is not climate-controlled or structurally sound, the chances for a successful flooring installation aredramatically reduced. All Mannington products are designed to be installed in climate controlled interior locations.
Temperature and Humidity Requirements
Do not install floor covering products until the work area can be climate controlled. The recommendedtemperature range for starting the installation is no cooler than 65º F and no warmer than 100º F. This
acceptable climatic condition must be maintained for at least 48 hours before, during and after the installation. Thisrequirement can seldom be fulfilled with temporary space heaters or air conditioners. A permanent, operationalheating or cooling system should be operational before proceeding with the installation of the flooring products.
Once the floor covering is installed, the temperature of the location should not be allowed to fall below 55º F orexceed 100º F for the life of the floor covering. Failing to maintain a climate-controlled interior environment willadversely affect the performance of the flooring products and/or the adhesives.
Structural Requirements
The structural integrity of the job site is a critical component to the performance of the floor covering. The type andmethod of construction, the grade level, the subflooring system, and composition all impact the installation offlooring products. Many times local building codes establish only minimum requirements and these constructionpractices may not result in sufficient rigidity, flatness or smoothness.
Structural subflooring systems are constructed of either concrete (or cement-like materials) or wood. Thedescription of each of these subfloor constructions that are referred to in this handbook are provided to giveprofessional flooring installers enough information to make intelligent decisions regarding the suitability of thesubfloor systems they may encounter. For comprehensive information, contact The American Concrete Institute orThe American Plywood Association about their respective products.
Subfloor Recommendations and Preparation
Concrete Subfloors
New and existing concrete subfloors should meet the requirements prescribed in the latest edition of ASTM F 710,“Standard Practice for Preparing Concrete Floors to Receive Resilient Flooring.” Although this practice specificallyaddresses preparing the concrete substrate to receive resilient flooring, the requirements are appropriate for allMannington floors.
Concrete subfloors must be permanently dry, clean, smooth, flat and structurally sound. Concrete subfloors on orbelow grade must have an acceptable vapor retarding membrane to isolate the concrete from the soil. Newly pouredconcrete, regardless of grade level, must be given ample time to cure and fully dry. Drying times for concrete slabsvary greatly depending on mix, atmospheric conditions, construction practices and location of slab.
Concrete subfloors must have a minimum compressive strength of 3000 PSI and a dry density of at least 100pounds per cubic foot. The concrete surface must be free of surface defects or surface contaminants. Surfacedefects include cracks, holes, flaking or dusting of the concrete surface. Surface contaminants should be consideredas any substance that will interfere with the bond of the floor covering to the subfloor, such as curing or partingcompounds, paints, oils, solvents or existing adhesives.
Surface defects must be corrected before installing any finished flooring product. Low spots, cracks, holes and otherirregularities can be patched smooth using a latex Portland cement compound designed for this purpose.
GeneralInstallation
Guidelines
General Installation Guidelines | 8
General Installation Guidelines (continued)
Mannington MVP-2023 patching compound is ideal for this type of surface preparation. If the surface of the concreteis found to be flaking or dusting, these conditions must be mechanically removed and the concrete then re-surfacedwith an appropriate compound. All surface contaminants that may interfere with bond must also be mechanicallyremoved and then be re-surfaced before installing any flooring product which requires a direct glue-down procedure.Mannington does not recommend using any chemicals or solvents to remove concrete surface contaminants.
Many concrete slabs will have joints designed in to them. Expansion and isolation joints are designed to allow theconcrete slab to expand and contract. These expansion joints must never be filled with patching or levelingcompound nor covered with hard surface flooring products. Expansion joint covers are available and designed tobe used with specific types of floor covering products. Other types of concrete joints such as construction, controland/or saw cuts can be smoothed and leveled using an appropriate Portland cement patching compound likeMannington MVP-2023.
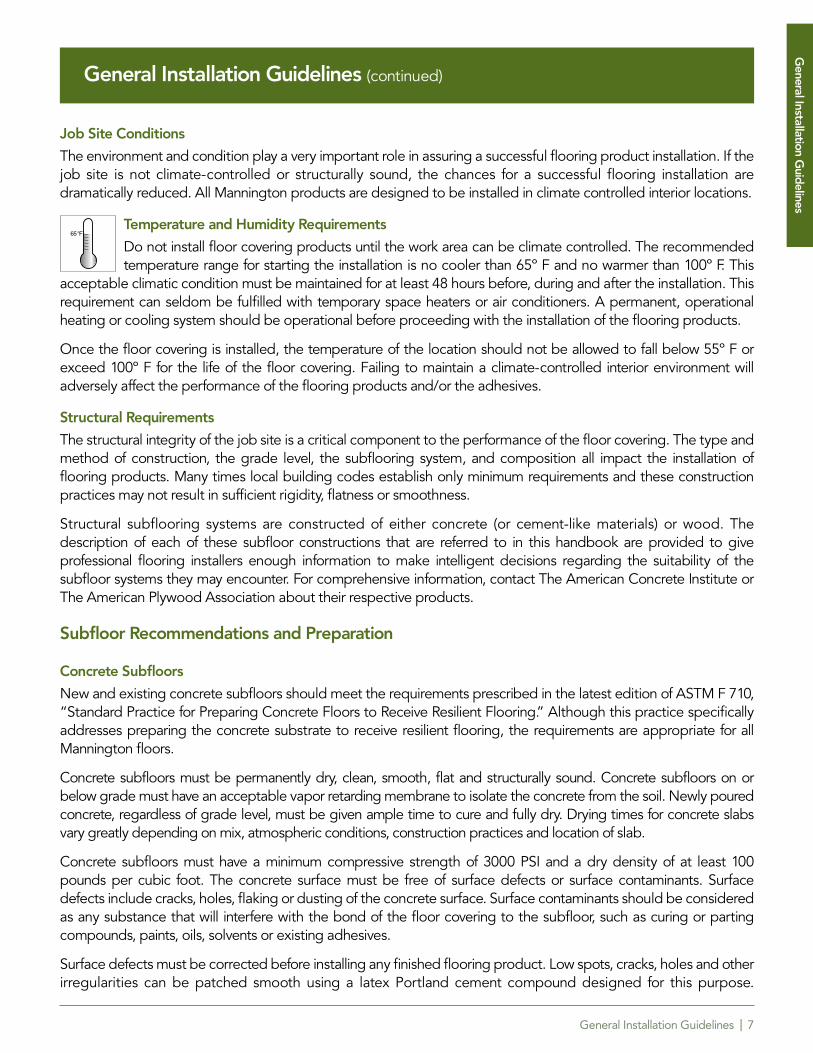
Moisture Testing
Regardless of the time in place or the grade level, all concrete subfloors must be tested for moisture andalkalinity before covering with flooring products. Although nearly each product type in each product
category has a different tolerance for permissible moisture vapor emissions, it is important to have a quantitativereading to be able to resolve any potential problems before, rather than after the fact. The most common quantativemoisture test is the Anhydrous Calcium Chloride test. This test must be performed inaccordance with ASTM F 1869-04, “Standard Test Method for Measuring MoistureVapor Emissions Rate of Concrete Subfloor Using Anhydrous Calcium Chloride.”According to the ASTM, the moisture emissions from the concrete floor shall notexceed 3 lbs/1000 sq. ft./24 hours. At least one test kit should be used in areas up to1000 sq. ft. Additional kits should be used in larger areas. Certain Mannington Flooringproducts can tolerate up to 8 lbs of moisture vapor emission. The acceptable moisturetolerance rates for Mannington flooring products are:
RH% / M-Guard MVER/M-GuardFlooring Product RH% MVER Adhesive Adhesive
Residential Cushioned Vinyl ≤75% 3 lbs. NA NA
Adura Luxury Vinyl Homestead ≤75% 5 lbs. NA NA
Laminate Floors w AquaBarrier II ≤75% 5 lbs. NA NA
Hardwood –fully adhered with UltraSpread –floated over AquaBarrier II ≤75% 5 lbs. NA NA
Fine Fields; Magna ≤75% 5 lbs. NA NA
CustomSpec; Insight ≤75% 3 lbs. NA NA
VCT & PT products.Essentials: Designer Essentials; Inspirations; ≤ 85 % ≤ 8 lbs.Brushworks; Solid Point; Color Point Safewalks ≤75% 5 lbs. M-Guard V-11 M-Guard V-11
BioSpec; Lifelines: Relay RE; Assurance II; ≤ 80 % ≤ 8 lbs.Assurance Squared; Natures Paths Realities; Primus ≤75% 3 lbs. M-Guard V-68 M-Guard V-68
Calcium Chloride Test Kit
GeneralInstallation
Guidelines
General Installation Guidelines | 9
General Installation Guidelines (continued)
Another quantitative moisture test method is the In Situ Relative Humidity test. This test measures the relativehumidity level within the concrete slab. This test must be performed in accordance with ASTM F 2170. Therelative humidity of the slab must not exceed 75%. If the relative humidity in the slab exceeds 75%, do not installany Mannington Floor Coverings. (Unless an approved moisture resistant adhesive is used.)
Moisture Meters
There are many manufacturers of quality moisture reading devises. However, there is no standard correlationbetween the meter reading and the calcium chloride or the relative humidity test methods. Each meter is calibratedto its own scale and must be interpreted as directed by the manufacturer.
Concrete Curing, Hardening, Sealing and Parting Compounds
Often, various compounds will be added in the concrete mix or applied to the surface of the freshly placedconcrete to assist in the curing process. These compounds may interfere with the bond of any fully-adheredflooring product. If any of these surface compounds is suspected to remain on the surface, they must be removedby grinding, scarifying or bead blasting.
Alkali Testing
A pH test should be conducted on all concrete floors, regardless of the age or the grade level. The testis performed using a wide range pH paper and distilled water. Puddle the water on the surface of the
concrete for a minimum of 60 seconds and then dip the pH paper into the water. The acceptable pH range isbetween 5 to 10 on the pH scale. If the pH is greater than 10, it must be reduced before proceeding with any fully-adhered flooring product installation.
Bond Testing
If the surface of the concrete shows any evidence of contamination, or if the history of the concrete isunknown, a bond test should be performed before beginning the flooring installation. To conduct a bond
test select approximately a 3' X 3' piece of the exact flooring product specified for the job and adhere it to thesubfloor with the exact adhesive that will be used during installation. On large installations, conduct several bondtests. After 72 hours attempt to remove the test sample. If sufficient force must be used to remove the sample, youmay consider the concrete suitable for installation.
Residual Adhesive
Completely remove all residual adhesives on a previously covered concrete underfloors or cover them with acementitious underlayment intended for this purpose. Never use solvent-based adhesive removers. Completeremoval of all residual solvent is very difficult. Any remaining on the surface of the concrete will prohibit satisfactorybond of the new adhesives. Complete removal of asphalt cutback or asphalt emulsion adhesive from a concreteunderfloor is nearly impossible. Wet-scrape these adhesives from the concrete. Then cover the concrete with aminimum of 1/8" of a trowelable or self-leveling cementitious underlayment intended for this purpose. ManningtonMVP 2023 may be used to cover residual adhesive stainants on concrete underfloors.
DANGER: Older asphalt adhesives may contain asbestos fibers. Do not use power devicesthat create asbestos dust in removing these adhesives. The inhalation of asbestos dust may
cause bodily harm. Smoking by individuals exposed to asbestos fibers greatly increases this risk.
pH
�
General Installation G
uidelines
UNDERLAYMENT CHARTType Manufacturer Thickness Dimensions Warranty General Comments Availability
Varies(usually
imported)
Min. 5.2 mm
CanadaUSA
Mexico
Most panels are animported lauan substitute.
Check with supplier
4’ x 8’Lauan-Type I Ext. (facegrades-OVL,
CC, BB)
Varies
Varies
1/4" 11/32"15/32"
19/32", 5/8"23/32" 3/4", 1" 11/8"
4’ x 8’
No warranty - panels manufactured to
industry underlayment standards PS1
Construction and industrial plywood.
Additional Info: (253) 620-7400
CanadaUSA
Mexico
CanadaUSA
Mexico
Construction and industrial plywood.
Additional Info: (253) 620-7400
No warranty - panels manufactured to
industry underlayment standards PS1
4’ x 8’APA-rated
Sturd-I-Floor with sanded face
APA underlayment, APA CCplugged, APA underlayment CCplugged, APA AC, BC, AD & BD,
APA underlayment AC or BC
CanadaUSA
Solid core 5-ply birch. Additional Info: (888) 322-5753
Limited lifetime warranty
4’ x 5’Accuply 6 mmCapitol U.S.A.
6 mm9 mm
CanadaUSA
Solid core arctic birch.Additional Info: (800) 576-1636
10-year limited warranty
4’ x 5’Halex
HU 845HalexCorp.
General Installation Guidelines | 10
General Installation Guidelines (continued)
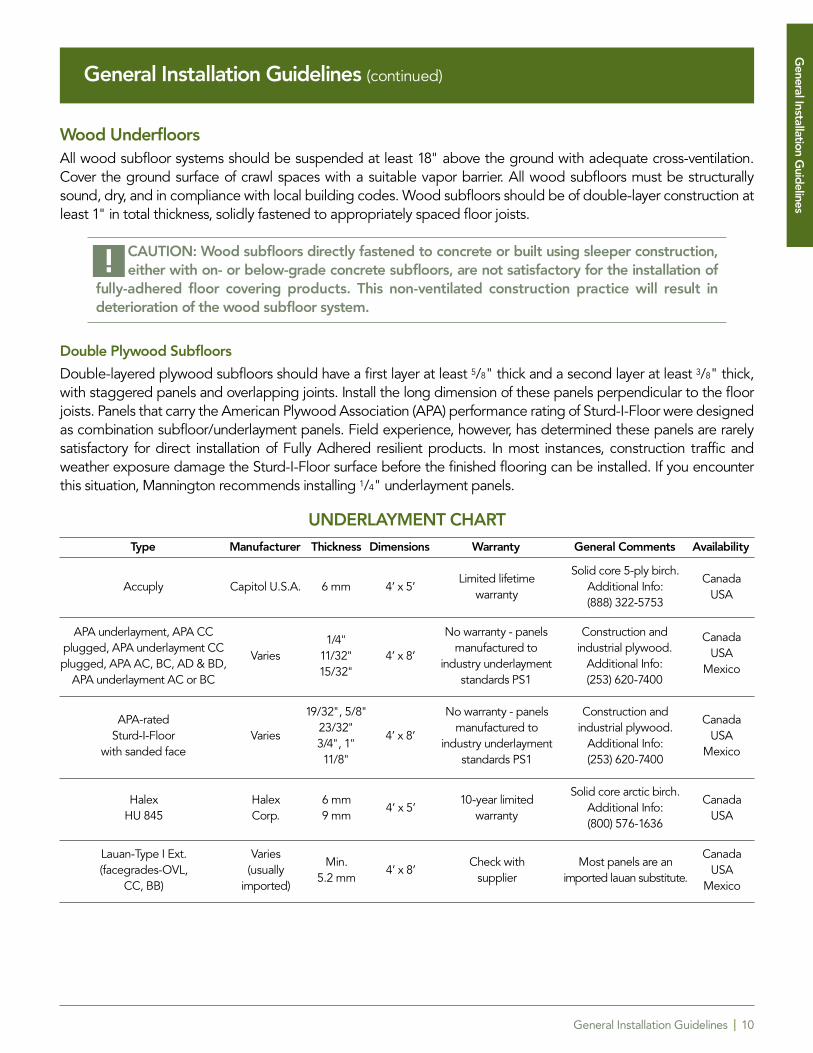
Wood UnderfloorsAll wood subfloor systems should be suspended at least 18" above the ground with adequate cross-ventilation.Cover the ground surface of crawl spaces with a suitable vapor barrier. All wood subfloors must be structurallysound, dry, and in compliance with local building codes. Wood subfloors should be of double-layer construction atleast 1" in total thickness, solidly fastened to appropriately spaced floor joists.
CAUTION: Wood subfloors directly fastened to concrete or built using sleeper construction, either with on- or below-grade concrete subfloors, are not satisfactory for the installation of
fully-adhered floor covering products. This non-ventilated construction practice will result indeterioration of the wood subfloor system.
Double Plywood Subfloors
Double-layered plywood subfloors should have a first layer at least 5/8" thick and a second layer at least 3/8" thick,with staggered panels and overlapping joints. Install the long dimension of these panels perpendicular to the floorjoists. Panels that carry the American Plywood Association (APA) performance rating of Sturd-I-Floor were designedas combination subfloor/underlayment panels. Field experience, however, has determined these panels are rarelysatisfactory for direct installation of Fully Adhered resilient products. In most instances, construction traffic andweather exposure damage the Sturd-I-Floor surface before the finished flooring can be installed. If you encounterthis situation, Mannington recommends installing 1/4" underlayment panels.
General Installation G
uidelines
!
General Installation Guidelines | 11
General Installation Guidelines (continued)
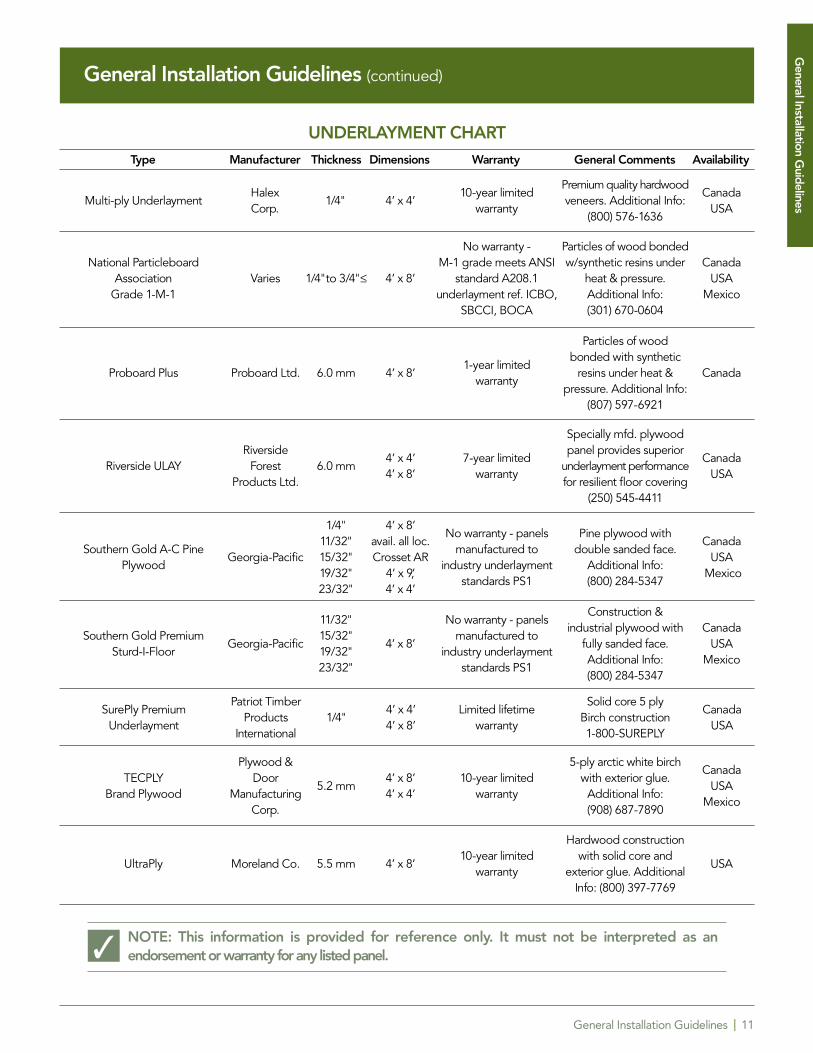
UNDERLAYMENT CHARTType Manufacturer Thickness Dimensions Warranty General Comments Availability
NOTE: This information is provided for reference only. It must not be interpreted as anendorsement or warranty for any listed panel.
HalexCorp.
1/4"Canada
USA
Premium quality hardwoodveneers. Additional Info:
(800) 576-1636
10-year limited warranty
4’ x 4’Multi-ply Underlayment
Canada USA
Mexico
Particles of wood bondedw/synthetic resins under
heat & pressure.Additional Info: (301) 670-0604
No warranty - M-1 grade meets ANSI
standard A208.1underlayment ref. ICBO,
SBCCI, BOCA
4’ x 8’National Particleboard
Association Grade 1-M-1
1/4"to 3/4"≤Varies
Proboard Ltd. 6.0 mm 4’ x 8’1-year limited
warranty
Particles of woodbonded with synthetic
resins under heat &pressure. Additional Info:
(807) 597-6921
CanadaProboard Plus
Riverside Forest
Products Ltd.6.0 mm
CanadaUSA
Specially mfd. plywoodpanel provides superior
underlayment performancefor resilient floor covering
(250) 545-4411
7-year limited warranty
4’ x 4’4’ x 8’
Riverside ULAY
General Installation G
uidelines
�
1/4"11/32"15/32"19/32"23/32"
CanadaUSA
Mexico
Pine plywood withdouble sanded face.
Additional Info: (800) 284-5347
No warranty - panels manufactured to
industry underlayment standards PS1
4’ x 8’avail. all loc.Crosset AR
4’ x 9,’ 4’ x 4’
Southern Gold A-C PinePlywood
Georgia-Pacific
Georgia-Pacific
11/32"15/32"19/32"23/32"
CanadaUSA
Mexico
Construction & industrial plywood with
fully sanded face.Additional Info: (800) 284-5347
No warranty - panels manufactured to
industry underlayment standards PS1
4’ x 8’Southern Gold Premium
Sturd-I-Floor
1/4"Canada
USA
Solid core 5 ply Birch construction1-800-SUREPLY
Limited lifetime warranty
4’ x 4’4’ x 8’
SurePly Premium Underlayment
Patriot TimberProducts
International
Plywood &Door
Manufac turingCorp.
5.2 mmCanada
USAMexico
5-ply arctic white birch with exterior glue.
Additional Info: (908) 687-7890
10-year limited warranty
4’ x 8’4’ x 4’
TECPLY Brand Plywood
Moreland Co. 5.5 mm USA
Hardwood constructionwith solid core and
exterior glue. AdditionalInfo: (800) 397-7769
10-year limited warranty
4’ x 8’UltraPly
General Installation Guidelines | 12
Existing Floor Coverings
In some cases, you may install Mannington products over a single layer of existing floor coverings. InstallingMannington Commercial Resilient products over existing resilient can compromise their performanceproperties. The performance of the new flooring, however, is directly dependent on the condition and continuedbond of the existing floor covering.
In any case, the existing resilient flooring should meet the following conditions:
� Be fully adhered (full-spread) and well bonded to a suitable substrate
� Consist of a single layer only
� Be free of all evidence of alkaline salts, hydrostatic pressure, or moisture from the substrate
� Not be a foam-backed or thickly cushioned product
� Not be a perimeter-fastened or loose-laid product
� Not be asphalt tile, self-stick tile, rubber tile, or surface containing residual asphalt-based adhesives
It is the floor covering retailers or installer’s responsibility to determine if the existing floor covering is suitable as anunderfloor for the installation of any Mannington flooring product. If there is any doubt about the suitability of theexisting floor, remove it or cover it with an appropriate underlayment.
Removal of Existing Floor Coverings
DANGER: Do not sand, dry-sweep, dry-scrape, drill, saw, beadblast, or mechanically chip or pulverize existing resilient flooring, backing, lining felt, or asphaltic “cutback” adhesives.
These products may contain either asbestos fibers or crystalline silica. Avoid creating dust.Inhalation of such dust containing respirable fibers or crystalline silica may cause cancer andrespiratory tract diseases. Smoking by individuals exposed to asbestos fibers greatly increasesthe risk of serious bodily harm. Unless positively certain that the product is a nonasbestos-containing material, you must assume it contains asbestos. Regulations may require that the materialbe tested to determine asbestos content.
Molds and Moisture
If there are visible indications of mold and mildew, the source of the problem must be located and corrected. Thisincludes making any structural repairs that may be necessary. The resilient flooring must not be installed until bothproblems have been addressed.
For additional information, we suggest you refer to the U.S. EPA website: www.epa.gov/iaq listed under indexsection titled Molds & Moisture, “A Brief Guide to Mold, Moisture, and Your Home.”
Other Subfloors
Metal Subfloors
You may encounter metal subfloors made of steel, stainless steel, lead, or aluminum. These types of subfloors aretypically found in specialized commercial applications. You must thoroughly clean them of all surface contaminantsbefore installing new floor covering. While these underfloors are usually compatible with Mannington flooring products,our recommendation is to always conduct a bond test with the appropriate adhesive and the specified floor covering.
General Installation Guidelines (continued)
General Installation G
uidelines
�
General Installation Guidelines | 13
Poured Floors
When working with a poured floor (polyurethane or epoxy-based) make sure it is fully cured and securely bondedto a concrete substrate. Be careful to remove all waxes and finishes and ensure that the surface is completelysmooth. Always conduct a bond test using the appropriate adhesive and the specified floor covering beforestarting the installation.
Terrazzo is a poured cementitious floor with a hard sealer on the surface. Be sure the floor is smooth and free ofwaxes and dressings. A terrazzo floor can be smoothed out with a terrazzo grinder.
There are several brands of poured polyurethane floor covering products. Mannington Flooring products may beinstalled directly over these surfaces as long as they are fully and firmly adhered to the substrate. Be sure that allwaxes and dressings are stripped off. Sand the surface smooth.
NOTE: The responsibility for warranties and/or performance of the concrete or poured subfloors as a suitable base for Mannington flooring products, regardless of their type and
grade level, rests with the concrete manufacturer or the poured floor manufacturer and not withMannington Floors, in the event of inherent deficiencies which would affect the bond andperformance of Mannington flooring and adhesive.
NOTE: Mannington Floors will not pay labor charges on claims filed on materials installed with obvious visible defects.
�
�
General Installation Guidelines (continued)
General Installation G
uidelines
General Installation | Resilient | 14
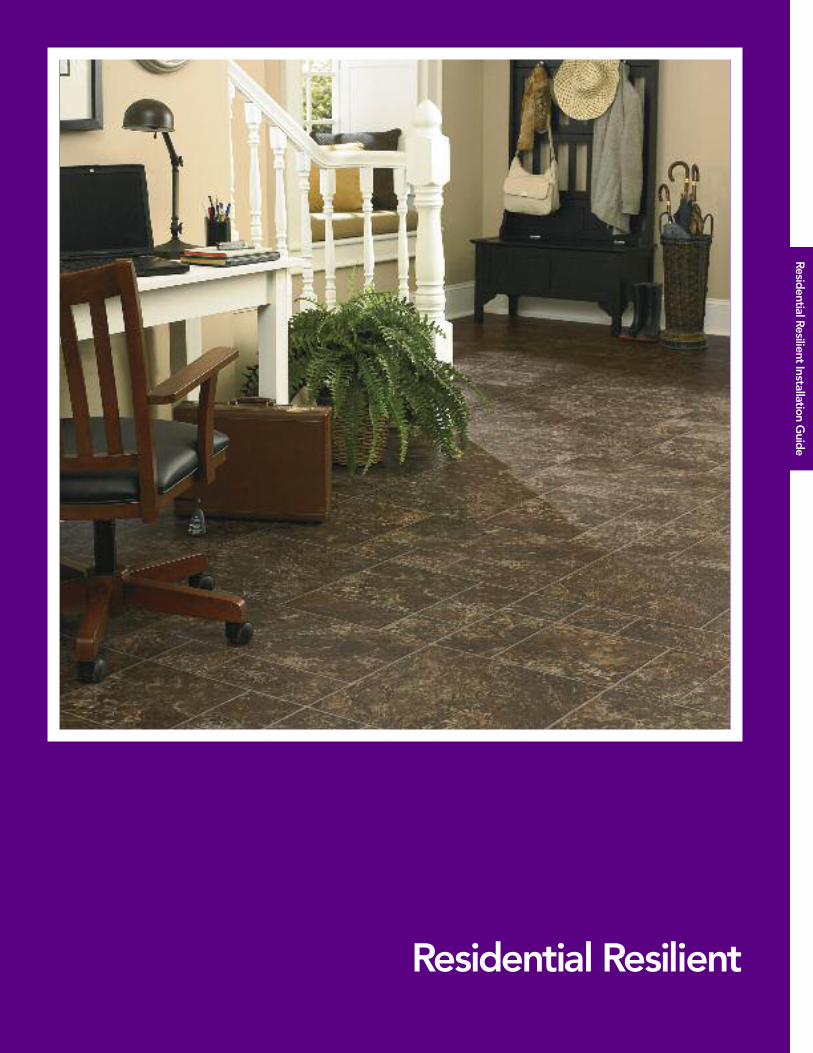
Residential Resilient Installation Guide
Residential Resilient
Residential Resilient | 15
Residential Resilient Products Residential Resilient Installation Guide
Storage and Handling
All resilient products must be stored in a protected interior location, ideally one that can be climate controlled.Optimum storage temperatures are between a low of 65ºF and high of 100ºF. Additionally, the humidity of thestorage area should be controlled and maintained between 30% and 70%.
Always store resilient sheet products tightly rolled, face-out on a sturdy cardboard core designed for that purpose.For 12' wide resilient flooring, store the roll horizontally and support it across the entire width. You may also store 6'wide resilient flooring vertically (on edge). You must follow these storage recommendations to prevent compressionand distortion of the resilient sheet materials.
Flooring products can be heavy and bulky. Be good to yourself and always use proper lifting techniques whenhandling these products. Whenever possible make use of material-handling equipment such as dollies or materialcarts. Never lift more than you can safely handle; get assistance. Flooring products can be damaged by roughhandling before installation. Exercise care when handling and transporting these products.
Before starting the job, always check the flooring materials to ensure they are the correct pattern, style, and color.Also make sure that the size and amount of the products are sufficient to complete the installation. Inspect thematerials closely before installation for any visible defects. Mannington Flooring products are manufactured to highquality standards and are carefully inspected before leaving our facility. Occasionally, however, defects are notdetected. If you notice a visible defect in the flooring product, stop the installation and contact your localMannington Distributor for assistance.
NOTE: Mannington Floors will not pay labor charges on claims filed for materials installed withobvious visible defects.
Job Site Conditions
The environment where flooring products are installed is critically important in regard to successful installation andcontinued performance of the flooring products. Mannington Flooring products are intended to be installed ininterior locations only. These interior locations must meet climatic and structural requirements as well.
Temperature Requirements
Do not install flooring products until the work area can be temperature controlled. We recommend that the workarea be maintained at a minimum temperature of 65°F and a maximum temperature of 100°F for 48 hours before,during, and after the installation. This requirement can seldom be fulfilled with temporary space heaters. Apermanent heating or cooling source should be operational before proceeding with the installation of any flooringproduct. For the entire life of the floor, the temperature should never fall below 55°F. If this minimum temperaturecannot be maintained, the performance of the flooring products and adhesives can be adversely affected. Ideallythe job site relative humidity will be maintained in the 40% to 50% range.
You may install all Mannington flooring products over hydroponic radiant-heated flooring systems, provided thesurface temperature of the system does not exceed 90°F. Before installing flooring products over newly-constructedradiant heating systems, operate the system at maximum capacity to force any residual moisture from thecementitious topping of the radiant heating system. Then set the thermostat to a comfortable room temperature forthe installation. For the smoothest job and best results, always condition flooring, adhesives, and installationaccessories to the job site temperature before beginning the installation. There are many in-floor warming systemsbeing introduced, while most of these systems are compatible with rigid products such as ceramic or hardwood,they are generally unsuitable with resilient flooring products. Always check with the flooring manufacturer beforecovering these in-floor warming systems
�
Residential Resilient Installation Guide
Residential Resilient | 16
Residential Resilient Products (continued)Residential Resilient Installation Guide (continued)
Structural Requirements
The structural integrity of the job site is critical for satisfactory flooring installation. The type and method ofconstruction, grade level, and flooring system components all impact the installation of flooring products. Manytimes local building codes establish only minimum requirements for flooring systems. These minimum requirementsmay not provide sufficient rigidity for successful installation and continued performance of flooring products.Structural flooring systems are constructed of either concrete (or cementlike materials) or wood. The description ofeach of these structural flooring constructions is presented in the General Installation information in Section I.
For more comprehensive information, contact the manufacturer of the particular flooring underlaymentsystem. The American Concrete Institute and APA The Engineered Wood Association, aka the AmericanPlywood Association can provide details for their respective products.
Residential Triple Option Installation
General Instructions
Before beginning any installation, carefully read the General Installation Guidelines described on pages 6-10 Wehave designed the Triple Option installation method for use with all Mannington running line felt-backed ResidentialResilient sheet products. (The product must be 12' wide. The Triple Option installation method cannot be usedwith 6' roll goods.)
Triple Option Installation Methods
Mannington’s Triple Option installation methods simplify the installation process of Mannington Residential Resilientfelt-backed flooring products. Triple Option lets installers match the installation technique to the job siteconditions. The three installation methods are:
� FULLY ADHERED: The Fully Adhered technique has a long history of proven success. It’s the best option in areassubjected to heavy foot or rolling traffic, or in more complex job sites with multiple alcove drops, center islands,or when intricate net-fit cutting is required.
� Acceptable substrates are clean, dry, smooth, and include both wood panel and concrete underfloors.� This technique becomes an installer’s only option if:
– the vinyl roll is distorted or not rolled face-out on a 4" core– the backing becomes kinked, cracked, or severely folded during installation
� LOOSE LAID: Loose Laid is the easiest of the Triple Option installation methods. Using this method, the vinyl isfit just slightly short of all vertical surfaces (approximately 1/16" away) so that it lies completely flat with no fullnessor “pinch” points. This installation method makes removal of the floor at the end of its life cycle remarkably easy.
� Loose-Laid floors can be installed over many substrates that are unacceptable for Fully Adhered products(particleboard, chipboard, flakeboard, lightweight concrete).
� This non-adhered installation method allows the material to be rolled back to correct any substrate problemsand is easily removed when required.
� Although the floor is referred to as Loose Laid, V-31 adhesive is necessary at all seams and around any floor vents.
� Restrictive and transition moldings are required.
Residential Resilient Installation Guide
Residential Resilient | 17
Residential Resilient Products Residential Resilient Installation Guide (continued)
� Loose Laid should not be used if the job site:– is larger than two full drops of material– is greater than 30' in length– is exceptionally “cut up” and complex
� Loose Laid is not an option if:– the roll is distorted– the roll is not rolled face-out– the felt becomes kinked, cracked, or severely folded during installation
� PERIMETER-FASTENED: In a Perimeter-Fastened installation, the sheet vinyl is fastened to an acceptablesubstrate around the perimeter of the work area and at any product seams. This installation method makesremoval of the floor at the end of its life cycle easy.
� Using this option, the vinyl can be installed over many types of substrates that may not be appropriate for aFully Adhered installation (particleboard, chipboard, flakeboard, lightweight concrete).
� Perimeter-Fastened installations require that the product be adhered with a 4" to 6" band of V-31 adhesiveapplied with a 1/16" x 1/16" x 1/16" notched trowel around the perimeter and at any seams.
� If the substrate is wood, the product can be fastened using staples.
The staples should:– have at least a 1/2" crown– be of sufficient length to fully seat into the underfloor panels– be spaced every 2" around the perimeter of the room– be applied after the adhesive when a combination of staples and adhesive is being used
� Restrictive moldings (cover base, quarter round, etc.) and transition moldings must be used in a Perimeter-Fastened installation.
� Perimeter-Fastened is not an option if:– The job site and material are not conditioned and climate controlled. This is particularly important in
new construction.– the roll is distorted– the roll is not rolled face-out– the felt becomes kinked, cracked, or severely folded during installation
Whichever option an installer chooses, it’s important to:
� Employ good resilient sheet flooring work practices regarding the careful handling and fitting of the products.
� Be vigilant in underfloor selection and preparation.� Install in indoor climate-controlled (temperature and humidity) environments.
Residential Resilient Installation Guide

Residential Resilient | 18
Residential Resilient Products (continued)Residential Resilient Installation Guide (continued)
Cutting and FittingYou may use pattern scribing, freehand knifing, or direct scribing techniques when installing Mannington felt-backed resilient products. The material is flexible and will handle easily when cutting and fitting. Always fold thematerial in a wide radius to avoid sharp kinks and creases that may cause breaks in the backing. You may flash coveall Mannington products that are fully adhered or perimeter-fastened (see pages 41-42) .Thoroughly sweep thesurface after you have completed the entire underfloor preparation. Be sure to carefully vacuum or sweep aroundthe perimeter of the room to remove loose dirt and debris.
One Piece InstallationPrecut the floor covering to fit the area, allowing 2" to 4" extra length and width for fitting. Position the resilientflooring in the room, allowing enough material to drop into offsets, closets, alcoves, etc.
Align pattern squarely in room, parallel to all walls. If the room is not square, align the pattern so the run-off islocated in the least conspicuous area.
HINT: When aligning resilient flooring with straight line patterns, avoid positioning a pattern line next to the wall. Ifthe line falls several inches from the wall, any pattern runoff caused by an out-of-square room will be lessnoticeable. After the sheet is positioned, weight it to prevent shifting. Make relief cuts around unusual objects suchas pipes, fixtures, floor registers, etc.
Make relief cuts on all inside and outside corners. Rough-cut the sheet to remove excess material. Trim and fit theperimeter so the floor covering lies flat before adhesive is spread.
Seamed InstallationFit and cut the first sheet as in a one-piece installation and weight this sheet to prevent it from shifting. (Use floor roller,tool box, adhesive container, etc.) Position the second sheet in the room and align it to the first sheet for accuratepattern match. Once you have achieved pattern alignment, weight the second sheet to prevent it from shifting.
Before positioning the resilient flooring material in the room, determine the best possible placement of the seamand the dry zone. Snap a white chalk line indicating where the seam will be positioned. Snap two white chalk lines18" on either side of the seam chalk line.
Residential Resilient Installation Guide
Residential Resilient | 19
Residential Resilient Products Residential Resilient Installation Guide (continued)
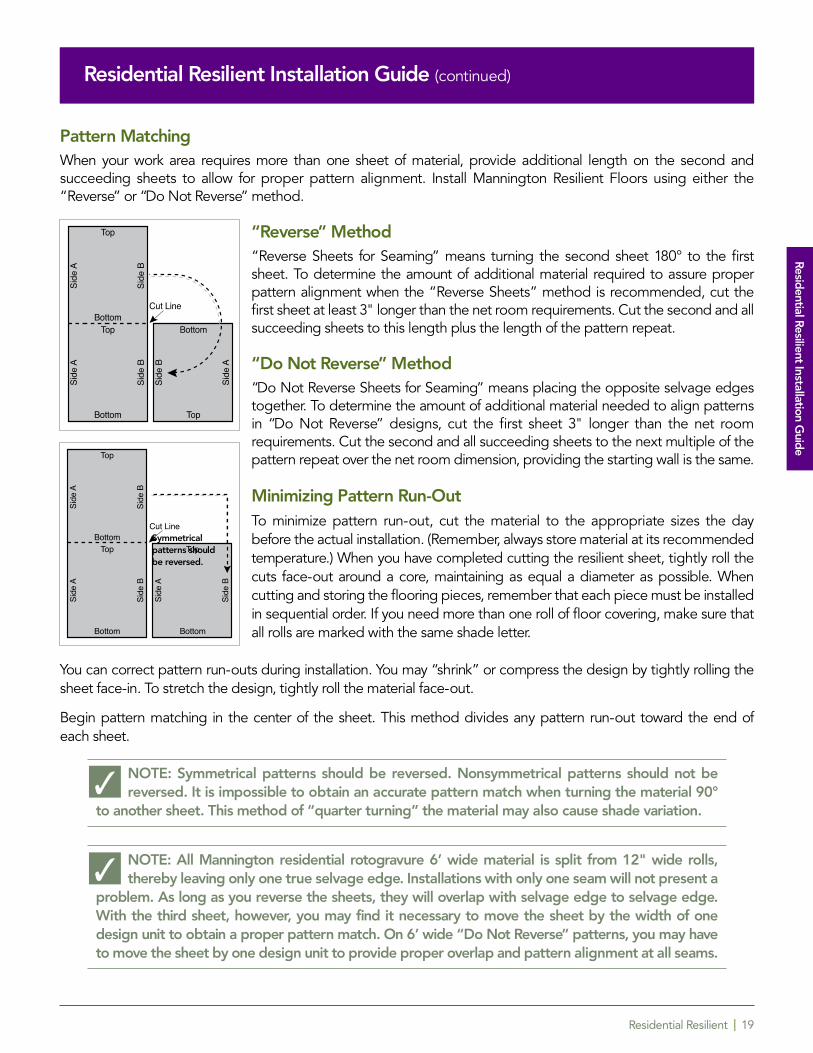
Pattern MatchingWhen your work area requires more than one sheet of material, provide additional length on the second andsucceeding sheets to allow for proper pattern alignment. Install Mannington Resilient Floors using either the“Reverse” or “Do Not Reverse” method.
“Reverse” Method“Reverse Sheets for Seaming” means turning the second sheet 180° to the firstsheet. To determine the amount of additional material required to assure properpattern alignment when the “Reverse Sheets” method is recommended, cut thefirst sheet at least 3" longer than the net room requirements. Cut the second and allsucceeding sheets to this length plus the length of the pattern repeat.
“Do Not Reverse” Method“Do Not Reverse Sheets for Seaming” means placing the opposite selvage edgestogether. To determine the amount of additional material needed to align patternsin “Do Not Reverse” designs, cut the first sheet 3" longer than the net roomrequirements. Cut the second and all succeeding sheets to the next multiple of thepattern repeat over the net room dimension, providing the starting wall is the same.
Minimizing Pattern Run-OutTo minimize pattern run-out, cut the material to the appropriate sizes the daybefore the actual installation. (Remember, always store material at its recommendedtemperature.) When you have completed cutting the resilient sheet, tightly roll thecuts face-out around a core, maintaining as equal a diameter as possible. Whencutting and storing the flooring pieces, remember that each piece must be installedin sequential order. If you need more than one roll of floor covering, make sure thatall rolls are marked with the same shade letter.
You can correct pattern run-outs during installation. You may “shrink” or compress the design by tightly rolling thesheet face-in. To stretch the design, tightly roll the material face-out.
Begin pattern matching in the center of the sheet. This method divides any pattern run-out toward the end of each sheet.
NOTE: Symmetrical patterns should be reversed. Nonsymmetrical patterns should not be reversed. It is impossible to obtain an accurate pattern match when turning the material 90°
to another sheet. This method of “quarter turning” the material may also cause shade variation.
NOTE: All Mannington residential rotogravure 6’ wide material is split from 12" wide rolls, thereby leaving only one true selvage edge. Installations with only one seam will not present a
problem. As long as you reverse the sheets, they will overlap with selvage edge to selvage edge.With the third sheet, however, you may find it necessary to move the sheet by the width of onedesign unit to obtain a proper pattern match. On 6’ wide “Do Not Reverse” patterns, you may haveto move the sheet by one design unit to provide proper overlap and pattern alignment at all seams.
Residential Resilient Installation Guide
Symmetrical patterns should be reversed.
�
�

Residential Resilient | 20
Residential Resilient Products (continued)
It is important to obtain accurate overlap of the selvage edges to ensure pattern match across the sheets, as well asalong the length of the seam. There are several techniques you may use to determine proper overlap. The firstmethod is to cut notches or “windows” along the selvage grout line. These notches will allow you to see theoverlapped grout line and will assist you in positioning the second sheet. The second method Manningtonrecommends to determine proper overlap is to measure the design elements across the first sheet with a tapemeasure to determine the pattern repeat and then transfer this measurement across both sheets to assist in thepositioning of the second sheet.
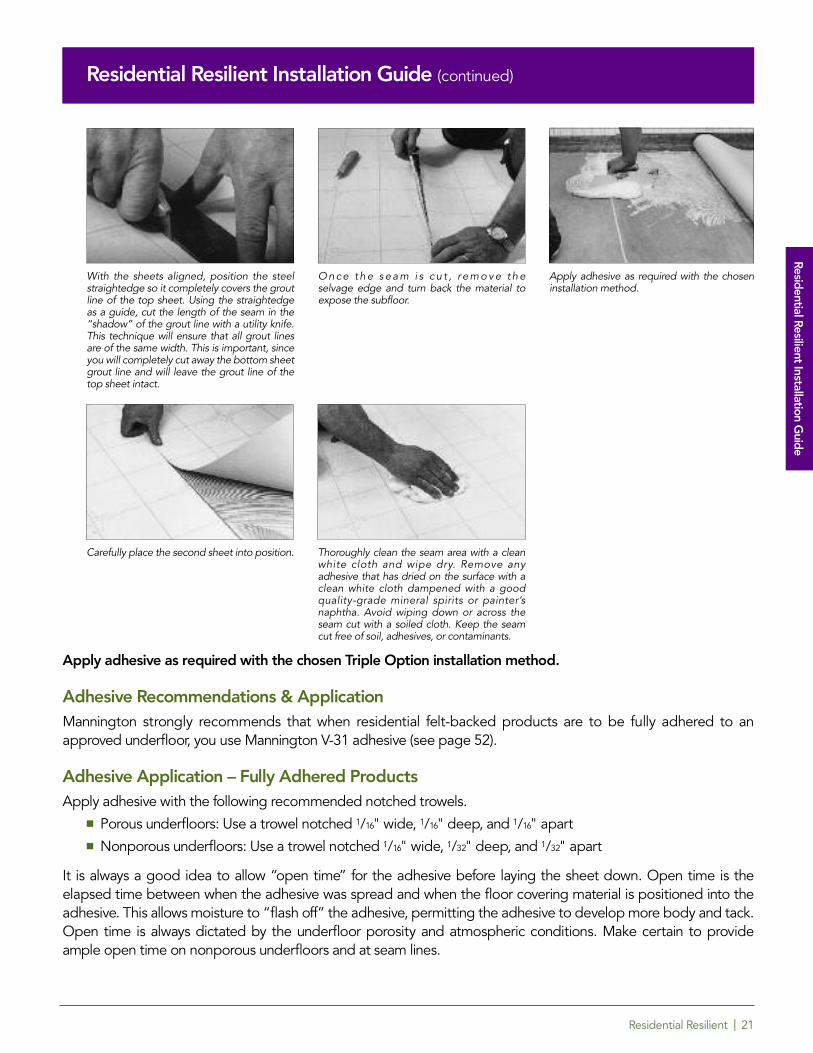
Seam CuttingSeaming is one of the most important aspects of resilient sheet installation. It is often the sole criteria for judging the entire installation. We cannot emphasize enough the importance of taking the time to ensure a properlyaligned, cut, and sealed seam. Always double-cut seams in Mannington Residential felt-back products with a new,sharp utility knife blade. Use a steel straightedge as a guide. A dull blade will not produce an acceptable seam. Ifthe seam is long, or if it is being cut on a concrete underfloor, we advise sharpening or changing blades as needed.It is also good practice to remove any oily, protective coating on the new blades with a clean cloth before startingto cut the seam.
Double-Cutting of Seams The most accurate method for cutting seams in felt-backed and fiberglass-reinforced vinyl back products is double-cutting. When double cutting, both sheets are cut at the same time. This ensures the edges of both sheets are cutexactly the same, with no gaps or fullness. Many of today’s resilient flooring patterns feature very narrow grout ordesign lines. It is very difficult to align and cut these narrow lines in the exact center. Because the grout or designlines are often the focal point of the pattern, it is extremely important to maintain the exact width of these grout linesthroughout the entire installation. The most accurate method of maintaining the line width is to make the seam cutalong the side of the grout line.
Cut the seam net, not full. Keep the knife blade parallel to the straightedge, at a 90° angle to the floor covering.Position the knife to allow as much of the cutting edge of the blade as possible to come in contact with the floorcovering. It is difficult to keep the utility knife steady if only the point of the knife is riding on the floor.
Residential Resilient Installation Guide (continued)
Residential Resilient Installation Guide
Residential Resilient | 21
Residential Resilient Products
Apply adhesive as required with the chosen Triple Option installation method.
Adhesive Recommendations & ApplicationMannington strongly recommends that when residential felt-backed products are to be fully adhered to anapproved underfloor, you use Mannington V-31 adhesive (see page 52).
Adhesive Application – Fully Adhered ProductsApply adhesive with the following recommended notched trowels.
� Porous underfloors: Use a trowel notched 1/16" wide, 1/16" deep, and 1/16" apart� Nonporous underfloors: Use a trowel notched 1/16" wide, 1/32" deep, and 1/32" apart
It is always a good idea to allow “open time” for the adhesive before laying the sheet down. Open time is theelapsed time between when the adhesive was spread and when the floor covering material is positioned into theadhesive. This allows moisture to “flash off” the adhesive, permitting the adhesive to develop more body and tack.Open time is always dictated by the underfloor porosity and atmospheric conditions. Make certain to provideample open time on nonporous underfloors and at seam lines.
Residential Resilient Installation Guide (continued)
With the sheets aligned, position the steelstraightedge so it completely covers the groutline of the top sheet. Using the straightedgeas a guide, cut the length of the seam in the“shadow” of the grout line with a utility knife.This technique will ensure that all grout linesare of the same width. This is important, sinceyou will completely cut away the bottom sheetgrout line and will leave the grout line of thetop sheet intact.
O n c e t h e s e a m i s c u t , re m o v e t h e selvage edge and turn back the material toexpose the subfloor.
Apply adhesive as required with the choseninstallation method.
Carefully place the second sheet into position. Thoroughly clean the seam area with a cleanwhite cloth and wipe dry. Remove anyadhesive that has dried on the surface with aclean white cloth dampened with a goodquality-grade mineral spirits or painter’snaphtha. Avoid wiping down or across theseam cut with a soiled cloth. Keep the seamcut free of soil, adhesives, or contaminants.
Residential Resilient Installation Guide
Residential Resilient | 22
Residential Resilient Products (continued)
After trimming the material to fit the room, tube or lap it back to expose approximately one-half of the underfloor.Strike a white chalk line near the fold of the material. This line provides a guide for adhesive application. Spread theadhesive, leaving no gaps, voids, puddles, or thin spots, over 100% of the exposed underfloor. Keep the trowelclean and properly notched to maintain this uniform coverage.
After the adhesive has begun to tack up, gently position the sheet into the adhesive. Roll the floor covering forwardinto the adhesive to eliminate trapping air. Do not drop or flop the material into the adhesive. Using a 75 lb. (orheavier) three-section floor roller, roll the material in both directions, starting in the middle of the sheet width androlling toward the edges. This process eliminates air and embeds the floor covering into the adhesive. Roll areas thatcannot be reached with a floor roller with a hand seam roller.
Failure to roll the floor covering can result in the following problems:� Lack of bond between material and underfloor� Telegraphing of adhesive ridges� Permanent indentations when heavy items are placed on the new flooring, resulting from adhesive
displacement
Once the first half of the material is adhered and rolled, fold back the second half and repeat the procedure. Whenfolding back the sheet use extreme caution to prevent tearing the felt backing at the glue line. Also, be careful toregulate the adhesive spread at the glue line. This will avoid an adhesive ridge left in the center of the sheet.
Adhesive Application – Perimeter-FastenedWhen installing resilient sheeting using the Options Felt Backing Perimeter installation system, the material is onlyfastened around the perimeter of the work area as well as at all seam lines. Fasten the material using eitherMannington V-31 Premium Latex Adhesive or staples.
Once the material has been fit, tube or lap back the flooring material and re-sweep the underfloor and back ofmaterial before fastening the product. Spread Mannington V-31 adhesive with a standard 1/16" x 1/16" x 1/16" notchedtrowel in a 4" to 6" wide band around the perimeter of the room. Thoroughly roll the material into the adhesiveusing a hand roller to ensure adhesion and to flatten out any adhesive ridges. Re-trim any fullness that may haveoccurred in the resilient sheet.
Adhesive Application – Loose LaidEven though adhesive is not required when using the loose-laid method, it is essential to apply an 8" band of V-31adhesive at all seams, and around any floor vents. Apply an 8" wide band of V-31 adhesive centered on the seam cut.Allow enough open time for adhesive to tack up, but do not allow adhesive to form a skin, or overdry. Reposition the cut seam edges and roll the material into the adhesive using a hand roller. Exercise care to help preventadhesive contamination in the seam cut.
NOTE: It is impossible to obtain an accurate pattern match when turning material 90° to another sheet. This method of “quarter turning” the material may also cause shade and
texture variation. For these reasons, Mannington does not recommend “quarter turning” of any ofour resilient floor covering products.
Residential Resilient Installation Guide (continued)
�
Residential Resilient Installation Guide
Residential Resilient | 23
Residential Resilient Products
Seam SealingBefore beginning the seam sealing process, thoroughly clean the work area of all scraps, soil, tools, etc. The long-term performance of any seam cut into a resilient sheet product depends on several significant requirements.The most important of these is the selection and application of the appropriate seam sealer for the type of resilientsheet being seamed. It is the flooring installer’s responsibility to use only recommended sealers and to be proficientin their application.
CAUTION: These adhesive solvents are flammable. Follow all precautions listed on the cans.
Avoiding adhesive contamination of the seam cut is another critical requirement. Mannington seam sealers consistof a solvent (THF) and a resin (PVC). The solvents cause the edges of the seam to “melt” and permit the resins to“attach” to each edge of the seam. This process results in a chemical weld. Adhesive forced up into the cut willadhere to the edges of the sheet, inhibit solvent action, and prevent a chemical weld from occurring. Additionally,adhesive forced into the cut creates a discolored line at the seam.
NOTE: We recommend waiting 24 hours to return the furniture or appliances to the room; circumstances, however, may otherwise require it. If so, replace appliances before starting
seam sealing. Always use wood or hardboard runways when moving furniture and/or appliances,even when using an appliance dolly.
Seal seams in Mannington Resilient floors immediately after installation with the recommended Mannington seamsealer. This seam sealing process provides a continuous, impervious surface that will be as strong as the resilientsurface and will remain intact for the life of the flooring.
Mannington offers four types of residential seam sealers:
� MHS 22 (#832222) High Gloss Sealer (two-part seam sealer) is designed for Mannington products with ahigh shine urethane-based wearlayer. The VST-96 Professional Applicator Bottle.
� MCT 20 (#832203) is a do-it-yourself consumer seam sealer kit. The 2-oz tube contains standard gloss seamsealer and is recommended for use with vinyl wearlayers.
� MLG 33 (#832233) Low Gloss Sealer (two-part seam sealer) is designed for Mannington products with a lowgloss vinyl or urethane-based wearlayer. The VST-96 Professional Applicator Bottle.
� MSS 20 (#832202) Standard Gloss Sealer, available in one-pint containers, is for all vinyl wearlayer products.Use the VST-96 Professional Applicator Kit (#832204). See next page for sealer instructions.
The Versatile Sealing Tip (VST) is used to chemically seal all Mannington resilient sheet products. The VST isincluded in the Professional Applicator Kit, the MHS 22 High Gloss Seam Sealer Kit, and the MLG 33 Low GlossSeam Sealer Kit. Be sure to order the Professional Applicator Kit separately when you order a seam sealer otherthan MHS 22 and MLG 33. The VST’s unique, ergonomic design offers many benefits. The all-composite plastic tipwill not leak. The plastic fin will not cut or mar the resilient sheet’s seam. The flat “landing face” on the tip providesjust the right angle and keeps the bottle steady during application. The flat, angled head has ridges (texture) andlets you apply a firm, downward pressure on the applicator tip without getting tired.
Residential Resilient Installation Guide (continued)
!
�
Residential Resilient Installation Guide
Residential Resilient | 24
Residential Resilient Products (continued)
Remember, it is crucial that the seam sealer be applied to the full thickness of the floor covering from top tobottom. To ensure a strong, tight seam, make certain there are no skips or voids along the cut.
Allow seam sealer to completely dry before walking on the seam or moving furniture over it. We recommendwaiting 24 hours.
NOTE: When using two-part seam sealer kits, it is necessary to combine the entire contents ofparts A & B (see pages 62 & 63). Once mixed, two-part seam sealers cannot be saved for reuse.
Residential Resilient Installation Guide (continued)
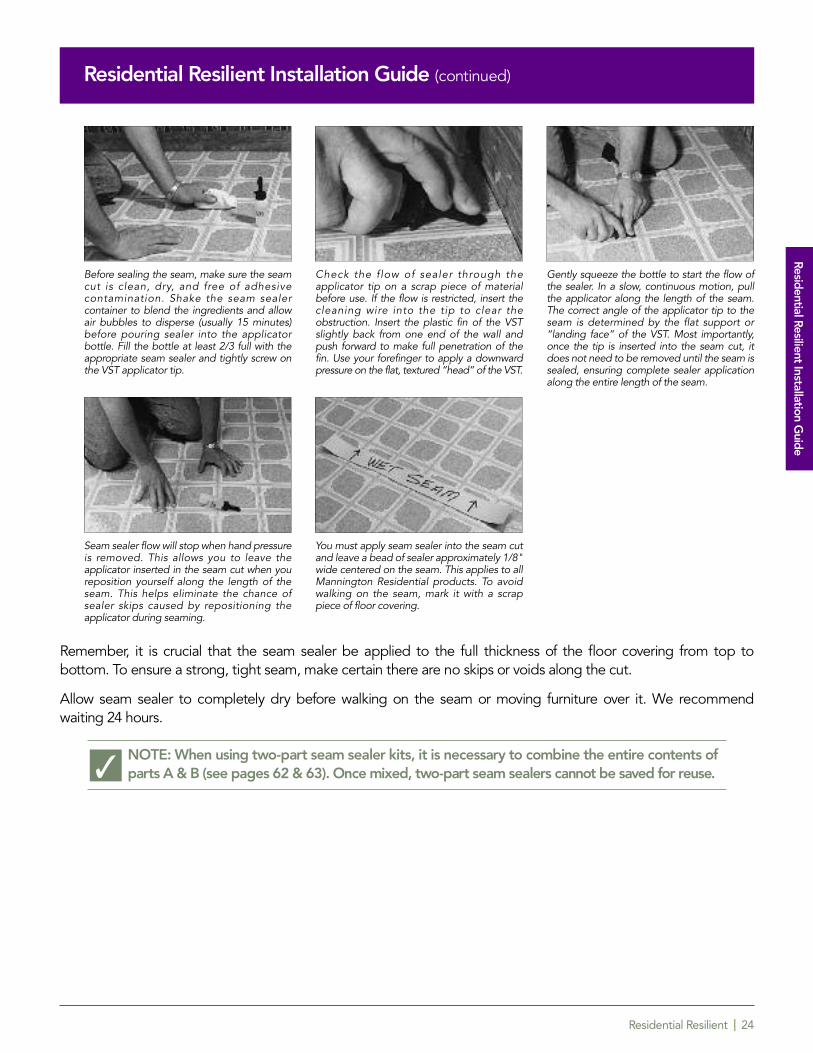
Before sealing the seam, make sure the seamcut is clean, dry, and free of adhesivecontamination. Shake the seam sealercontainer to blend the ingredients and allowair bubbles to disperse (usually 15 minutes)before pouring sealer into the applicatorbottle. Fill the bottle at least 2/3 full with theappropriate seam sealer and tightly screw onthe VST applicator tip.
Check the flow of sealer through theapplicator tip on a scrap piece of materialbefore use. If the flow is restricted, insert thecleaning wire into the tip to clear theobstruction. Insert the plastic fin of the VSTslightly back from one end of the wall andpush forward to make full penetration of thefin. Use your forefinger to apply a downwardpressure on the flat, textured “head” of the VST.
Gently squeeze the bottle to start the flow ofthe sealer. In a slow, continuous motion, pullthe applicator along the length of the seam.The correct angle of the applicator tip to theseam is determined by the flat support or“landing face” of the VST. Most importantly,once the tip is inserted into the seam cut, itdoes not need to be removed until the seam issealed, ensuring complete sealer applicationalong the entire length of the seam.
Seam sealer flow will stop when hand pressureis removed. This allows you to leave theapplicator inserted in the seam cut when youreposition yourself along the length of theseam. This helps eliminate the chance ofsealer skips caused by repositioning theapplicator during seaming.
You must apply seam sealer into the seam cutand leave a bead of sealer approximately 1/8"wide centered on the seam. This applies to allMannington Residential products. To avoidwalking on the seam, mark it with a scrappiece of floor covering.
�
Residential Resilient Installation Guide
General Installation | Adura® | 25
Sobella®
Sobella
™Installation G
uide
Sobella™ | 26
Sobella™ Installation Guide
Sobella™ Installation MethodsSobella’s™ installation methods simplify the installation process and let installers match the installation technique tothe job site conditions. Sobella™ can be installed by using the Fully Adhered technique or the Loose Laid technique.
� FULLY ADHERED: The Fully Adhered technique has a long history of proven success. It’s the best techniquein areas subjected to heavy foot or rolling traffic, or in more complex job sites with multiple alcove drops,center islands, or when intricate net-fit cutting is required.
� This technique requires that the flooring product be fully adhered to an acceptable substrate usingMannington MT-711 Adhesive. Acceptable substrates are clean, dry and smooth. They include bothwood panel and concrete underfloors.
� LOOSE LAID: Loose Laid is the easiest installation method. Using this method, Sobella™ is fit just slightlyshort of all vertical surfaces (1/8" to 1/4" away) so that it lies completely flat with no fullness or “pinch points.”This installation method makes removal of the floor at the end of its life cycle remarkably easy.
� Loose Laid floors can be installed over many substrates that are not suitable for Fully Adheredproducts (particleboard, chipboard, flakeboard, lightweight concrete).
� Only one major seam is permitted when installing with the Loose Laid systems.
� Never secure any permanent fixtures into the Sobella™. The product must be “free floating” withno “pinch points.”
� This non-adhered installation method allows the material to be rolled back to correct anysubstrate problems, and is easily removed when required.
No matter which installation system will be used it’s important to consider the following:
Storage and Handling
Sobella™ must be stored in a protected interior location, ideally one that can be climate controlled. Optimumstorage temperatures are between a low of 65ºF and high of 100ºF. Additionally, the humidity of the storage areashould be controlled and maintained between 30% and 70%.
Always store Sobella™ tightly rolled, face out on a sturdy cardboard core designed for that purpose. Store the rollhorizontally and support it across the entire width.
Flooring products can be heavy and bulky. Be good to yourself and always use proper lifting techniques whenhandling these products. Whenever possible, make use of material-handling equipment such as dollies or materialcarts. Never lift more than you can safely handle; get assistance. Flooring products can be damaged by roughhandling before installation. Exercise care when handling and transporting these products.
Before starting the job, always check the flooring materials to ensure they are the correct pattern, style, and color.Also make sure that the size and amount of the products are sufficient to complete the installation. Inspect the materials closely before installation for any visible defects. Mannington Flooring products are manufactured tohigh-quality standards and are carefully inspected before leaving our facility. Occasionally, however, defects are notdetected. If you notice a visible defect in the flooring product, stop the installation and contact your localMannington Distributor for assistance.
Sobella
™Installation G
uide
Sobella™ | 27
NOTE: Mannington Floors will not pay labor charges on claims filed for materials installedwith obvious visible defects.
Job Site Conditions
The environment where Sobella™ is to be installed is critically important in regard to successful installationand continued performance of the flooring products. Mannington is intended to be installed in interiorlocations only. These interior locations must meet climatic and structural requirements as well.
Temperature Requirements
Do not install Sobella™ until the work area can be temperature controlled. We recommend that the work area bemaintained at a minimum temperature of 65°F and a maximum temperature of 100°F for 48 hours before and afterthe installation and while installing. This requirement can seldom be fulfilled with temporary space heaters. Apermanent heating or cooling source should be operational before proceeding with the installation of any flooringproduct. For the entire life of the floor, the temperature should never fall below 55°F. If this minimum temperaturecannot be maintained, the performance of the flooring products and adhesives can be adversely affected. Ideally,the job site relative humidity will be maintained in the 30% to 70% range.
Radiant-Heated SubfloorsYou may install Sobella™ over hydroponic radiant-heated flooring systems, provided the surface temperature of thesystem does not exceed 90°F. Before installing flooring products over newly constructed radiant heating systems,operate the system at maximum capacity to force any residual moisture from the cementitious topping of theradiant heating system. Then set the thermostat to a comfortable room temperature for the installation. There aremany In-floor warming systems being introduced, while most of these systems are compatible with rigid productssuch as ceramic or hardwood, they are generally unsuitable with resilient flooring products. Always check with theflooring manufacturer before covering these in-floor warming systems.
For the smoothest job and best results, always condition flooring, adhesives, and installation accessories to the jobsite temperature before beginning the installation.
Structural Requirements
The structural integrity of the job site is critical for satisfactory flooring installation. The type and method ofconstruction, grade level, and flooring system components all impact the installation of flooring products. Manytimes, local building codes establish only minimum requirements for flooring systems. These minimumrequirements may not provide sufficient rigidity for successful installation and continued performance of flooringproducts. Structural flooring systems are either constructed of concrete (or cementlike materials) or wood.
Cutting & FittingYou may use pattern scribing, freehand knifing, or direct scribing techniques when installing Sobella.™ The materialis flexible and will handle easily for cutting and fitting. Always fold the material in a wide radius to avoid sharp kinks andcreases that may cause breaks in the backing. You may flash cove Sobella™ only when using the Fully Adhered technique.
One Piece InstallationThoroughly clean the subfloor, sweep or vacuum to remove all dust and debris.
Remove any quarter round, shoe base or wall base, and undercut any doorways.
Sobella™ Installation Guide (continued)
�
Sobella
™Installation G
uide
Sobella™ | 28
Precut the floor covering to fit the area, allowing 2" to 4" extra length and width for fitting. Position the resilientflooring in the room, allowing enough material to drop into offsets, closets, alcoves, etc.
Align pattern squarely in room, parallel to all walls. If the room is not square, align the pattern so the run-off islocated in the least conspicuous area. After the sheet is positioned, weight it to prevent shifting. Make relief cutsaround unusual objects such as pipes, fixtures, floor registers, etc. Make relief cuts on all inside and outside corners.Rough-cut the sheet to remove excess material. Trim and fit the perimeter so the floor covering lies flat.
FULLY ADHEREDWhen using the Fully Adhered technique, apply the adhesive with a 1/16" wide, 1/32" deep, and 1/32" apartnotched trowel.
After trimming the material to fit the room, tube or lap it back to expose approximately half of the underfloor. Strikea white chalk line near the fold of the material. This line provides a guide for adhesive application. Spread theadhesive, leaving no gaps, voids, puddles, or thin spots, over 100% of the exposed underfloor. Keep the trowelclean and properly notched to maintain this uniform coverage.
Immediately after adhesive application, gently position the sheet into the adhesive. Roll the floor coveringforward into the adhesive to avoid trapping air. Do not drop or flop the material into the adhesive. Using a 75-lb (orheavier) three-section floor roller, roll the material in both directions, starting in the middle of the sheet width androlling toward the edges. This process eliminates air and embeds the floor covering into the adhesive. Roll areas thatcannot be reached with a floor roller, with a hand seam roller.
Failure to roll the floor covering can result in the following problems:
� Lack of bond between material and underfloor
� Telegraphing of adhesive ridges
� Permanent indentations when heavy items are placed on the new flooring, resulting from adhesivedisplacement
When the first half of the material is adhered and rolled, fold back the second half and repeat the procedure. Whenfolding back the sheet, use extreme caution to prevent tearing the felt backing at the glue line. Also, be careful toregulate the adhesive spread at the glue line. This will avoid an adhesive ridge left in the center of the sheet.
LOOSE LAID The most critical requirement when loose laying a one-piece Sobella™ installation is to be certain that the materialis laying flat and positioned squarely in the room. In long drops, pull a string down a pattern line to assure that thematerial is positioned squarely in the work area.
Provide a gap of between 1/8" and a 1/4" around all edges of the Sobella™ flooring. Once the Sobella™ ispositioned in the room, allow 15 to 20 minutes for the material to relax and lay flat before the final trimming.Undercut all door casings so the material can be slid under these casings without “pinching” or locking material.When fitting around in-floor forced-air vents, it is necessary to apply a narrow band of adhesive around the vent toprevent air from being blown under the flooring.
Never secure cabinets or other permanent fixtures on top of loose laid Sobella™. Be certain that wall baseand transition strips are not fastened into the Sobella™.
Sobella™ Installation Guide (continued)
Sobella
™Installation G
uide
Sobella™ | 29
Seamed InstallationWhen the work area requires more than one Sobella™ drop, determine the best possible placement of the seam. If the work area requires more than one seam, the Fully Adhered method must be used. Fit and cut the firstsheet as in a one-piece installation. Weight this sheet to prevent it from shifting. Position the second sheet in theroom and align it to the first sheet for accurate pattern match. Once you have achieved pattern alignment, weightthe second sheet to prevent it from shifting.
Pattern MatchingWhen your work area requires more than one sheet of material, provide additional length on the second and succeedingsheets to allow for proper pattern alignment. Install Sobella™ using the “Reverse” or “Do Not Reverse” method.
Seam CuttingSeaming is one of the most important aspects of resilient sheet installation. Always double-cut seams inMannington Sobella™ with a new, sharp utility knife blade.
Double-Cutting of Seams The most accurate method for cutting seams in Sobella™ is double-cutting. In this technique, both sheets are cut atthe same time. This ensures the edges of both sheets are cut exactly the same, with no gaps or fullness. The construction of Sobella™ will not permit the product to be compressed or stretched into match. Overlapthe sheets of Sobella™ and bring the pattern into an exact match. The most accurate method of maintaining thepattern grout line width is to make the seam cut along the side of the grout line. With the sheets aligned, positionthe steel straightedge so it completely covers the grout line of the top sheet. Using the straightedge as a guide, cutthe length of the seam in the “shadow” of the grout line with a utility knife. This technique will ensure that all groutlines are of the same width.
Cut the seam net, not full. Do not add fullness to the cut by placing scrap under the seam. Keep the knife bladeparallel to the straightedge, at a 90° angle to the floor covering.
All seams are to be double cut “dry.”
When using the Fully Adhered technique, the sheets will be adhered up to a pre-determined dry zone; the seam iscut and then a uniform application of MT 711 is applied. After providing sufficient open time, carefully position thesheets into the adhesive and roll across the seam with a hand roller.
If the Loose Laid system is used, after cutting the seam, apply a 6" band of MT 711 at the seam line, providesufficient open time and then carefully position the sheet edges into the adhesive. Use caution to prevent the sheetedges from getting into the adhesive. Roll the seam area with a hand seam roller.
Seam SealingAll seams in Sobella™ flooring must be sealed with Mannington MLG 33 two-part seam sealer. Thoroughly mix allof part A and part B into the supplied VST applicator bottle. When using MLG 33 two-part seam sealer, it isnecessary to mix the entire contents of Parts A and B. Once mixed, MLG 33 cannot be saved for re-use. Check theflow of sealer through the applicator tip on a scrap piece of material, before use. If the flow is restricted, insert thecleaning wire into the tip to clear the obstruction. Before sealing the seam, make sure the seam cut is clean, dry, andfree of adhesive contamination.
Sobella™ Installation Guide (continued)
Sobella
™Installation G
uide
Sobella™ | 30
Insert the plastic fin of the VST slightly back from one end of the wall and push forward to make full penetration ofthe fin. Use your forefinger to apply a downward pressure on the flat, textured “head” of the VST. Gently squeezethe bottle to start the flow of the sealer. In a slow, continuous motion, pull the applicator along the length of the seam.
You must apply seam sealer into the seam cut and leave a bead of sealer approximately 1/8" wide centered on the seam.
Remember, it is crucial that the seam sealer be applied to the full thickness of the floor covering from top tobottom. To ensure a strong, tight seam, make certain there are no skips or voids along the cut.
Allow seam sealer to completely dry before walking on the seam or moving furniture over it. We recommendwaiting 24 hours.
Finishing and Maintenance
Molding and Base Installation
Protect all exposed edges of the flooring with trim or restrictive molding.
� Always use moldings and transition strips over product edges.
� Nail wood moldings into the wall and not into the floor covering.
� Use metal or vinyl transition or reducer strips where Sobella™ meets other types of flooring, and atdoorways.
� Apply a bead of silicone or latex caulk around bathtubs, shower stalls, toilets, and patio doors.
Job Site Cleanup
To enhance the appearance of the finished installation, it is always good practice to thoroughly clean the areabefore leaving.
� Sweep the floor.
� Remove all scraps and trash from the job site. (Leave any large pieces of flooring, rolled face out, with thecustomer for future repairs.)
� Remove any adhesive smears or residue from the surface of the flooring with a clean cloth dampened withmineral spirits or lighter fluid. (WARNING – flammable)
� If possible, wait 24 hours before moving furniture or appliances onto or across the floor. Always use wood orhardboard runways to move furniture and/or appliances, even when using a dolly. This is especiallyimportant when using the Loose Laid installation method.
� Leave Mannington maintenance and warranty literature with the customer. These are available from yourMannington Distributor.
Sobella™ Installation Guide (continued)
Sobella
™Installation G
uide
Sobella™ | 31
Repairs
Small Cuts
Small cuts will eventually gap open. To repair, clean any dirt from the cut and apply MLG 33 seam sealer.
Replacing Damaged Areas – Plugs
If you must replace a damaged area, follow these steps:
� Select a design element from the scrap material that matches the design to be removed from the existingresilient. Accurately overlay this piece over the damaged area.
� Double cut on the inside of the grout line, if possible, and remove the damaged piece. If the floor coveringyou are repairing is installed over existing resilient flooring, be careful not to cut too deep.
� If the Sobella™ was installed Fully Adhered apply a thin layer of MT 711 to the back of the repair piece andplace into position. Roll with a hand roller. Apply MLG 33 seam sealer. Protect from foot traffic until sealer isfully cured.
� If the Sobella™ was installed Loose Laid apply a thin layer of MT 711 on the back of the repair piece as wellas under the edges of the repair area. Position the repair piece into the cut-out area and lightly roll the areawith a hand seam roller. Apply MLG 33 seam sealer. Protect from foot traffic until sealer is fully cured.
Sobella™ Installation Guide (continued)
Sobella
™Installation G
uide
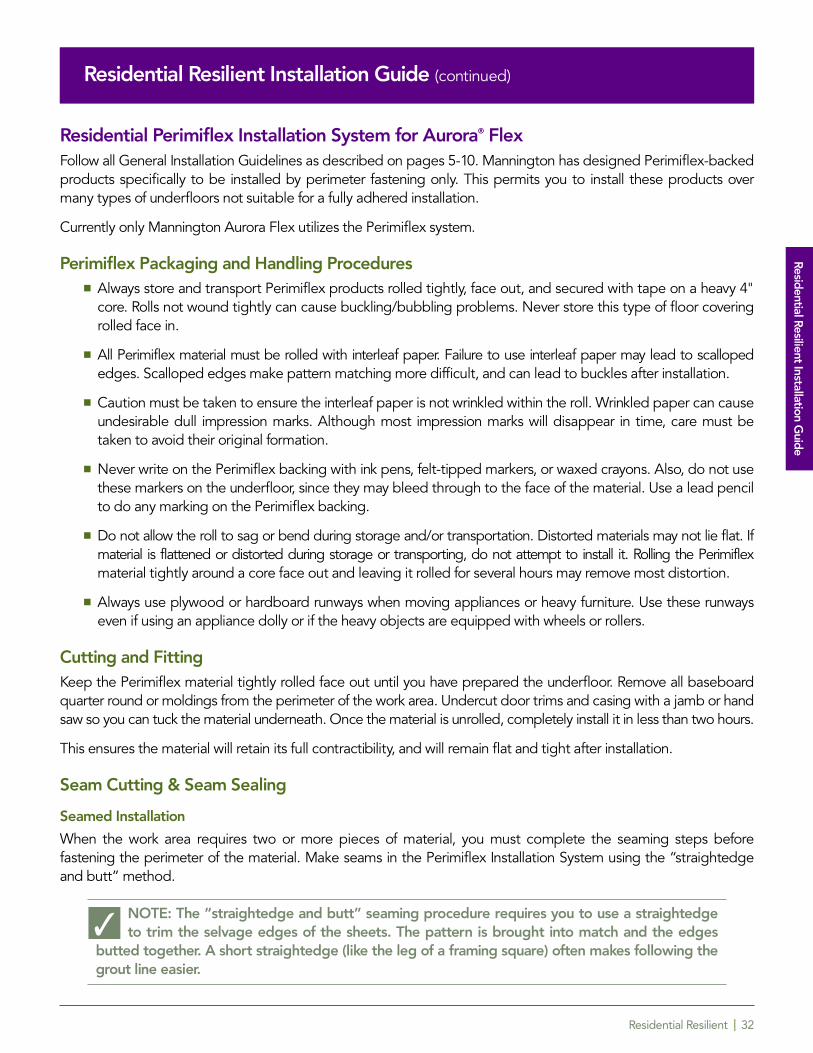
Residential Resilient | 32
Residential Resilient Products
Residential Perimiflex Installation System for Aurora® FlexFollow all General Installation Guidelines as described on pages 5-10. Mannington has designed Perimiflex-backedproducts specifically to be installed by perimeter fastening only. This permits you to install these products overmany types of underfloors not suitable for a fully adhered installation.
Currently only Mannington Aurora Flex utilizes the Perimiflex system.
Perimiflex Packaging and Handling Procedures� Always store and transport Perimiflex products rolled tightly, face out, and secured with tape on a heavy 4"
core. Rolls not wound tightly can cause buckling/bubbling problems. Never store this type of floor coveringrolled face in.
� All Perimiflex material must be rolled with interleaf paper. Failure to use interleaf paper may lead to scallopededges. Scalloped edges make pattern matching more difficult, and can lead to buckles after installation.
� Caution must be taken to ensure the interleaf paper is not wrinkled within the roll. Wrinkled paper can causeundesirable dull impression marks. Although most impression marks will disappear in time, care must betaken to avoid their original formation.
� Never write on the Perimiflex backing with ink pens, felt-tipped markers, or waxed crayons. Also, do not usethese markers on the underfloor, since they may bleed through to the face of the material. Use a lead pencilto do any marking on the Perimiflex backing.
� Do not allow the roll to sag or bend during storage and/or transportation. Distorted materials may not lie flat. Ifmaterial is flattened or distorted during storage or transporting, do not attempt to install it. Rolling the Perimiflexmaterial tightly around a core face out and leaving it rolled for several hours may remove most distortion.
� Always use plywood or hardboard runways when moving appliances or heavy furniture. Use these runwayseven if using an appliance dolly or if the heavy objects are equipped with wheels or rollers.
Cutting and FittingKeep the Perimiflex material tightly rolled face out until you have prepared the underfloor. Remove all baseboardquarter round or moldings from the perimeter of the work area. Undercut door trims and casing with a jamb or handsaw so you can tuck the material underneath. Once the material is unrolled, completely install it in less than two hours.
This ensures the material will retain its full contractibility, and will remain flat and tight after installation.
Seam Cutting & Seam Sealing
Seamed Installation
When the work area requires two or more pieces of material, you must complete the seaming steps beforefastening the perimeter of the material. Make seams in the Perimiflex Installation System using the “straightedgeand butt” method.
NOTE: The “straightedge and butt” seaming procedure requires you to use a straightedgeto to trim the selvage edges of the sheets. The pattern is brought into match and the edgesbutted together. A short straightedge (like the leg of a framing square) often makes following thegrout line easier.
Residential Resilient Installation Guide (continued)
�
Residential Resilient Installation Guide
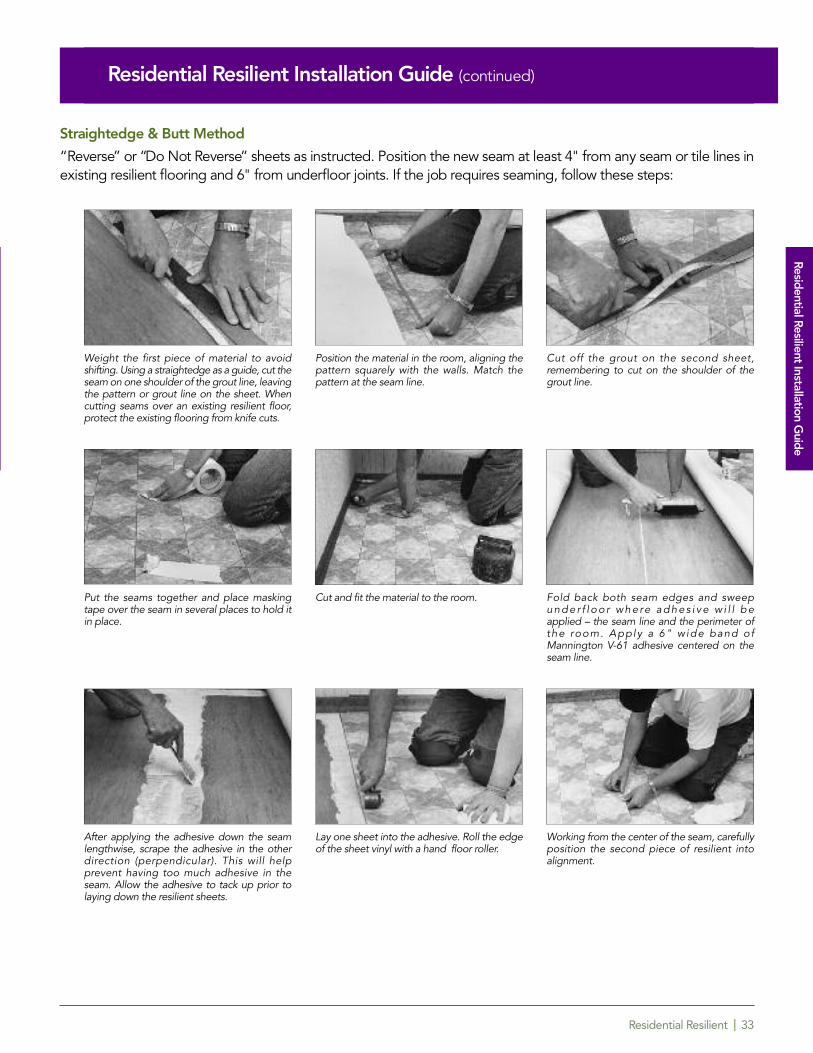
Residential Resilient | 33
Residential Resilient Products (continued)Residential Resilient Installation Guide (continued)
Straightedge & Butt Method
“Reverse” or “Do Not Reverse” sheets as instructed. Position the new seam at least 4" from any seam or tile lines inexisting resilient flooring and 6" from underfloor joints. If the job requires seaming, follow these steps:
Weight the first piece of material to avoidshifting. Using a straightedge as a guide, cut theseam on one shoulder of the grout line, leavingthe pattern or grout line on the sheet. Whencutting seams over an existing resilient floor,protect the existing flooring from knife cuts.
Position the material in the room, aligning thepattern squarely with the walls. Match thepattern at the seam line.
Cut off the grout on the second sheet,remembering to cut on the shoulder of thegrout line.
Put the seams together and place maskingtape over the seam in several places to hold itin place.
Cut and fit the material to the room. Fold back both seam edges and sweepu n d e r f l o o r w h e re a d h e s i v e w i l l b e applied – the seam line and the perimeter ofthe room. Apply a 6" w ide band o fMannington V-61 adhesive centered on theseam line.
After applying the adhesive down the seamlengthwise, scrape the adhesive in the otherdirection (perpendicular). This will helpprevent having too much adhesive in theseam. Allow the adhesive to tack up prior tolaying down the resilient sheets.
Lay one sheet into the adhesive. Roll the edgeof the sheet vinyl with a hand floor roller.
Working from the center of the seam, carefullyposition the second piece of resilient intoalignment.
Residential Resilient Installation Guide
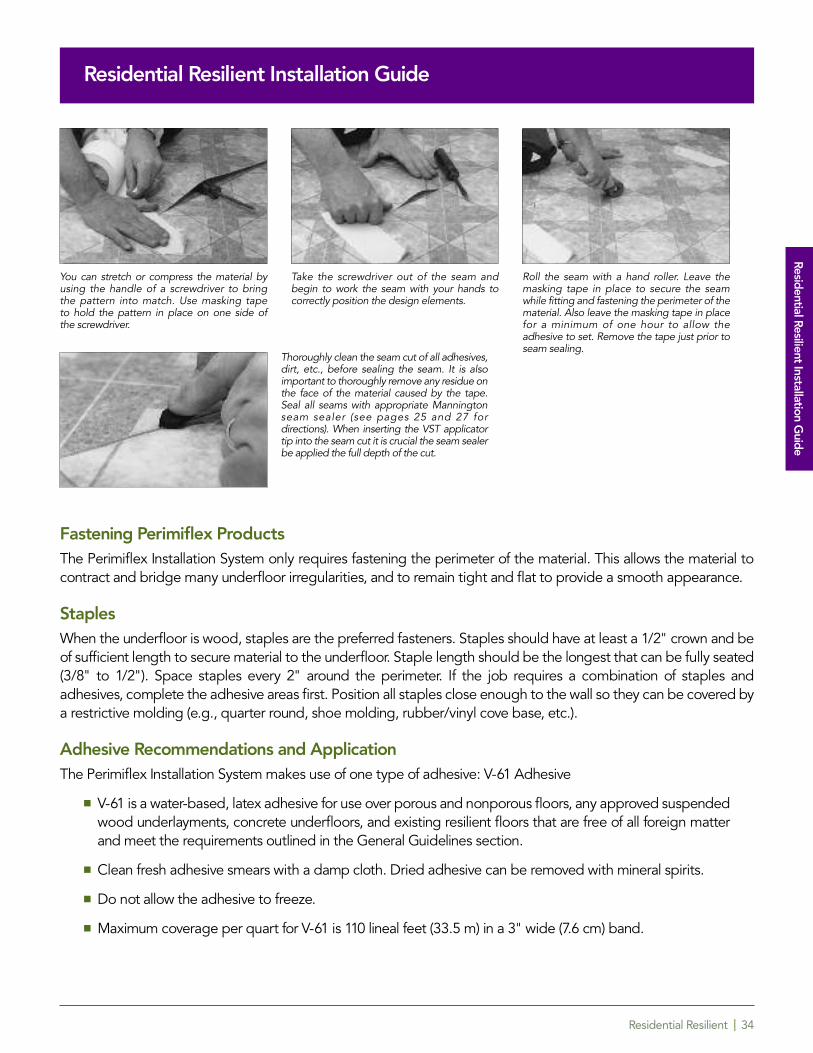
Residential Resilient | 34
Residential Resilient Installation Guide
Fastening Perimiflex ProductsThe Perimiflex Installation System only requires fastening the perimeter of the material. This allows the material tocontract and bridge many underfloor irregularities, and to remain tight and flat to provide a smooth appearance.
StaplesWhen the underfloor is wood, staples are the preferred fasteners. Staples should have at least a 1/2" crown and beof sufficient length to secure material to the underfloor. Staple length should be the longest that can be fully seated(3/8" to 1/2"). Space staples every 2" around the perimeter. If the job requires a combination of staples andadhesives, complete the adhesive areas first. Position all staples close enough to the wall so they can be covered bya restrictive molding (e.g., quarter round, shoe molding, rubber/vinyl cove base, etc.).
Adhesive Recommendations and ApplicationThe Perimiflex Installation System makes use of one type of adhesive: V-61 Adhesive
� V-61 is a water-based, latex adhesive for use over porous and nonporous floors, any approved suspendedwood underlayments, concrete underfloors, and existing resilient floors that are free of all foreign matterand meet the requirements outlined in the General Guidelines section.
� Clean fresh adhesive smears with a damp cloth. Dried adhesive can be removed with mineral spirits.
� Do not allow the adhesive to freeze.
� Maximum coverage per quart for V-61 is 110 lineal feet (33.5 m) in a 3" wide (7.6 cm) band.
You can stretch or compress the material byusing the handle of a screwdriver to bring the pattern into match. Use masking tape to hold the pattern in place on one side of the screwdriver.
Take the screwdriver out of the seam andbegin to work the seam with your hands tocorrectly position the design elements.
Roll the seam with a hand roller. Leave themasking tape in place to secure the seamwhile fitting and fastening the perimeter of thematerial. Also leave the masking tape in placefor a minimum of one hour to allow theadhesive to set. Remove the tape just prior toseam sealing.
Thoroughly clean the seam cut of all adhesives,dirt, etc., before sealing the seam. It is alsoimportant to thoroughly remove any residue onthe face of the material caused by the tape.Seal all seams with appropriate Manningtonseam sealer (see pages 25 and 27 fordirections). When inserting the VST applicatortip into the seam cut it is crucial the seam sealerbe applied the full depth of the cut.
Residential Resilient Installation Guide
Residential Resilient Installation Guide
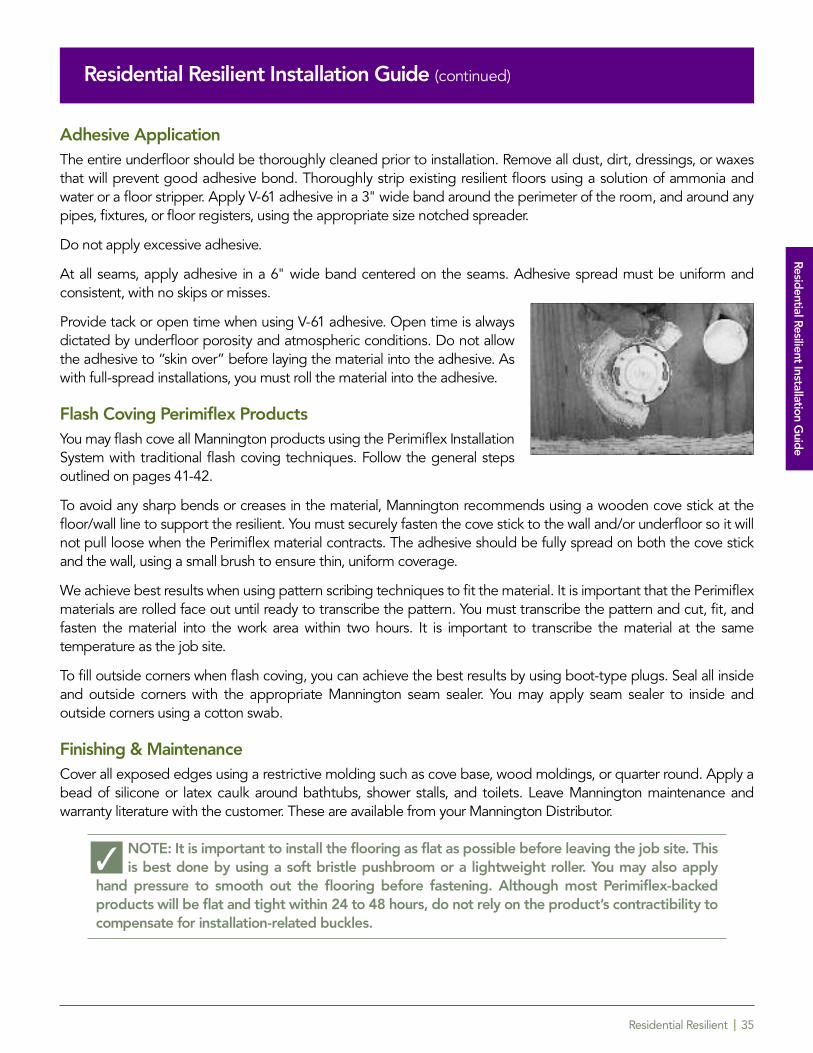
Residential Resilient | 35
Residential Resilient Installation Guide (continued)
Adhesive ApplicationThe entire underfloor should be thoroughly cleaned prior to installation. Remove all dust, dirt, dressings, or waxesthat will prevent good adhesive bond. Thoroughly strip existing resilient floors using a solution of ammonia andwater or a floor stripper. Apply V-61 adhesive in a 3" wide band around the perimeter of the room, and around anypipes, fixtures, or floor registers, using the appropriate size notched spreader.
Do not apply excessive adhesive.
At all seams, apply adhesive in a 6" wide band centered on the seams. Adhesive spread must be uniform andconsistent, with no skips or misses.
Provide tack or open time when using V-61 adhesive. Open time is alwaysdictated by underfloor porosity and atmospheric conditions. Do not allowthe adhesive to “skin over” before laying the material into the adhesive. Aswith full-spread installations, you must roll the material into the adhesive.
Flash Coving Perimiflex ProductsYou may flash cove all Mannington products using the Perimiflex InstallationSystem with traditional flash coving techniques. Follow the general stepsoutlined on pages 41-42.
To avoid any sharp bends or creases in the material, Mannington recommends using a wooden cove stick at thefloor/wall line to support the resilient. You must securely fasten the cove stick to the wall and/or underfloor so it willnot pull loose when the Perimiflex material contracts. The adhesive should be fully spread on both the cove stickand the wall, using a small brush to ensure thin, uniform coverage.
We achieve best results when using pattern scribing techniques to fit the material. It is important that the Perimiflexmaterials are rolled face out until ready to transcribe the pattern. You must transcribe the pattern and cut, fit, andfasten the material into the work area within two hours. It is important to transcribe the material at the sametemperature as the job site.
To fill outside corners when flash coving, you can achieve the best results by using boot-type plugs. Seal all insideand outside corners with the appropriate Mannington seam sealer. You may apply seam sealer to inside andoutside corners using a cotton swab.
Finishing & MaintenanceCover all exposed edges using a restrictive molding such as cove base, wood moldings, or quarter round. Apply abead of silicone or latex caulk around bathtubs, shower stalls, and toilets. Leave Mannington maintenance andwarranty literature with the customer. These are available from your Mannington Distributor.
NOTE: It is important to install the flooring as flat as possible before leaving the job site. This is best done by using a soft bristle pushbroom or a lightweight roller. You may also apply
hand pressure to smooth out the flooring before fastening. Although most Perimiflex-backedproducts will be flat and tight within 24 to 48 hours, do not rely on the product’s contractibility tocompensate for installation-related buckles.
�
Residential Resilient Installation Guide

Residential Resilient | 36
Residential Resilient Installation Guide (continued)
Repairs
Small Cuts
Small cuts will eventually gap open. To repair, clean and compress the material. When the cut is closed, place papermasking tape around the area. Clean dirt from the cut and apply seam sealer. Remove masking tape after 24 hours.
Replacing Damaged Areas – Plugs
If you must replace a damaged area, follow these steps:
� Select a design element from the scrap material that matches the design to be removed from theexisting resilient.
� Place wide masking tape around the damaged area to hold the floor from pulling back too much.
� Cut on the inside of the grout line, if possible, and remove the damaged piece. If the floor covering youare repairing is installed over existing resilient flooring, be careful not to cut too deep.
� Cut plug from scrap material.
� Lift edges of flooring and apply a band of adhesive carefully under the flooring and in patch area.
� Hold flooring up slightly with a knife or screwdriver to allow in sufficient air circulation to tack up theadhesive.
� Put the patch piece in place and tape two sides securely.
� Slightly warm the Perimiflex flooring and pull it into place until it fits to the patch. Tape securely and rollwith a hand roller.
� After 1⁄2 hour, remove the tape one side at a time. Clean any adhesive that may have squeezed into theseam by passing the back side of a hook knife through the area.
� Apply seam sealer. Cut scrap material in 1⁄2” widths and place on each side of the seam. Tape over top ofthese “bridges” to hold material in place while the sealer dries. Do the same procedure with “bridges”on each side of the patch and leave for 24 hours.
Residential Resilient Installation Guide
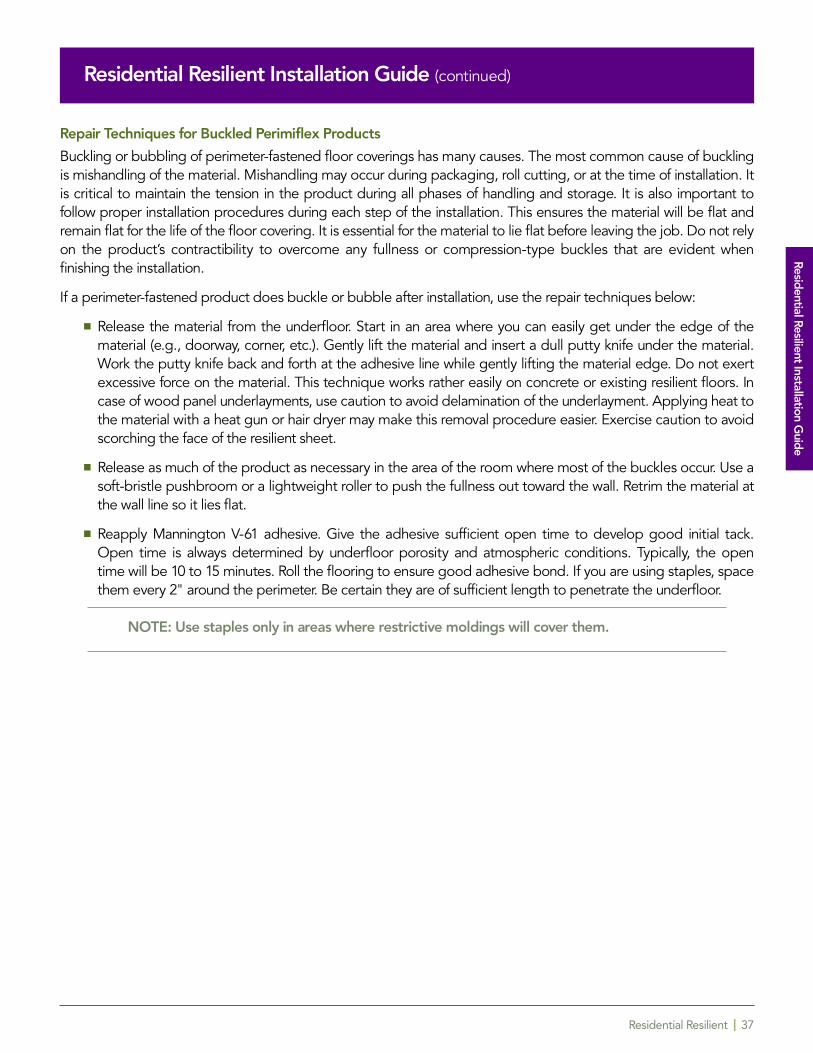
Residential Resilient | 37
Residential Resilient Installation Guide (continued)
Repair Techniques for Buckled Perimiflex Products
Buckling or bubbling of perimeter-fastened floor coverings has many causes. The most common cause of bucklingis mishandling of the material. Mis handling may occur during packaging, roll cutting, or at the time of installation. Itis critical to maintain the tension in the product during all phases of handling and storage. It is also important tofollow proper installation procedures during each step of the installation. This ensures the material will be flat andremain flat for the life of the floor covering. It is essential for the material to lie flat before leaving the job. Do not relyon the product’s contractibility to overcome any fullness or compression-type buckles that are evident whenfinishing the installation.
If a perimeter-fastened product does buckle or bubble after installation, use the repair techniques below:
� Release the material from the underfloor. Start in an area where you can easily get under the edge of thematerial (e.g., doorway, corner, etc.). Gently lift the material and insert a dull putty knife under the material.Work the putty knife back and forth at the adhesive line while gently lifting the material edge. Do not exertexcessive force on the material. This technique works rather easily on concrete or existing resilient floors. Incase of wood panel underlayments, use caution to avoid delamination of the underlayment. Applying heat tothe material with a heat gun or hair dryer may make this removal procedure easier. Exercise caution to avoidscorching the face of the resilient sheet.
� Release as much of the product as necessary in the area of the room where most of the buckles occur. Use asoft-bristle pushbroom or a lightweight roller to push the fullness out toward the wall. Retrim the material atthe wall line so it lies flat.
� Reapply Mannington V-61 adhesive. Give the adhesive sufficient open time to develop good initial tack.Open time is always determined by underfloor porosity and atmospheric conditions. Typically, the open time will be 10 to 15 minutes. Roll the flooring to ensure good adhesive bond. If you are using staples, spacethem every 2" around the perimeter. Be certain they are of sufficient length to penetrate the underfloor.
NOTE: Use staples only in areas where restrictive moldings will cover them.
Residential Resilient Installation Guide
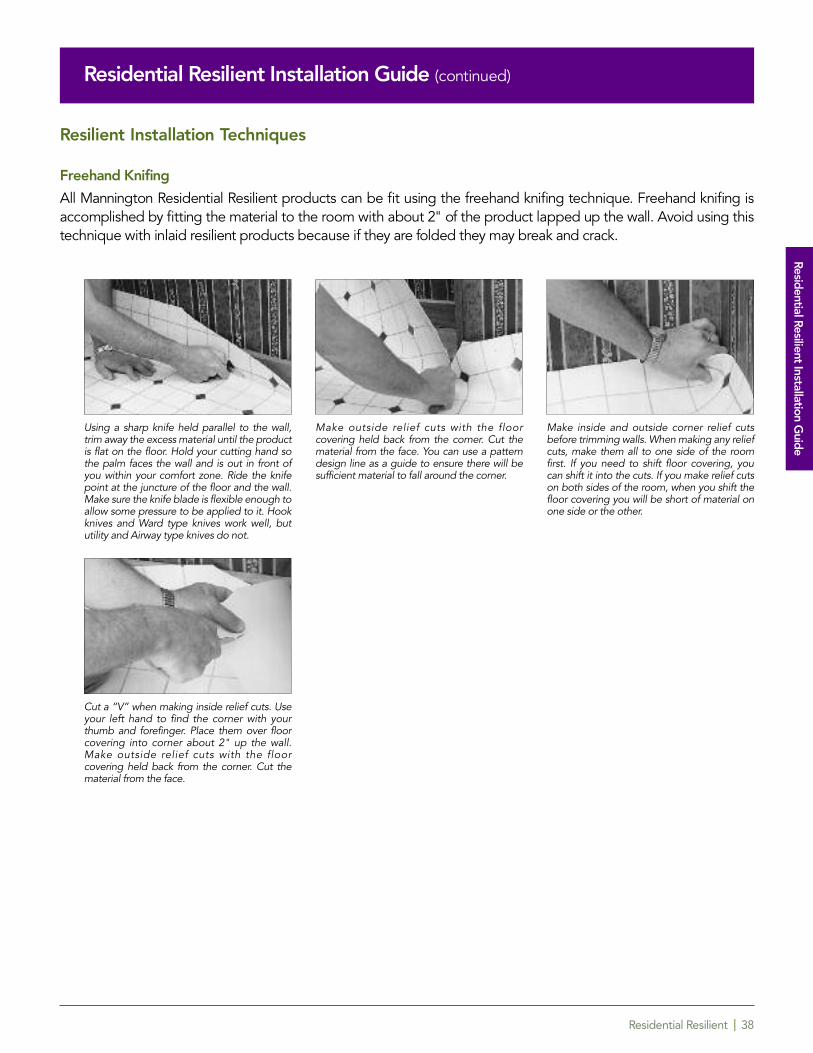
Residential Resilient | 38
Residential Resilient Installation Guide (continued)
Resilient Installation Techniques
Freehand Knifing
All Mannington Residential Resilient products can be fit using the freehand knifing technique. Freehand knifing isaccomplished by fitting the material to the room with about 2" of the product lapped up the wall. Avoid using thistechnique with inlaid resilient products because if they are folded they may break and crack.
Make outside relief cuts with the floorcovering held back from the corner. Cut thematerial from the face. You can use a patterndesign line as a guide to ensure there will besufficient material to fall around the corner.
Make inside and outside corner relief cutsbefore trimming walls. When making any reliefcuts, make them all to one side of the roomfirst. If you need to shift floor covering, youcan shift it into the cuts. If you make relief cutson both sides of the room, when you shift thefloor covering you will be short of material onone side or the other.
Cut a “V” when making inside relief cuts. Useyour left hand to find the corner with yourthumb and forefinger. Place them over floorcovering into corner about 2" up the wall.Make outside relief cuts with the floorcovering held back from the corner. Cut thematerial from the face.
Using a sharp knife held parallel to the wall,trim away the excess material until the productis flat on the floor. Hold your cutting hand sothe palm faces the wall and is out in front ofyou within your comfort zone. Ride the knifepoint at the juncture of the floor and the wall.Make sure the knife blade is flexible enough toallow some pressure to be applied to it. Hookknives and Ward type knives work well, bututility and Airway type knives do not.
Residential Resilient Installation Guide
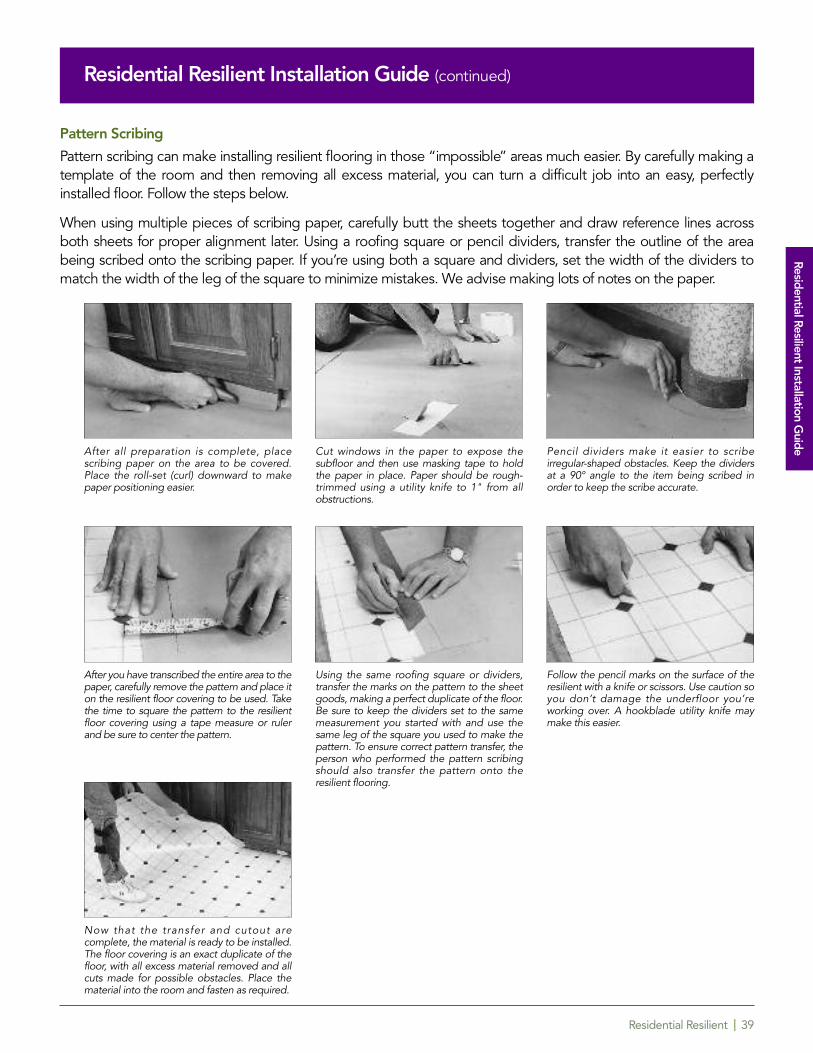
Residential Resilient | 39
Residential Resilient Installation Guide (continued)
Pattern Scribing
Pattern scribing can make installing resilient flooring in those “impossible” areas much easier. By carefully making atemplate of the room and then removing all excess material, you can turn a difficult job into an easy, perfectlyinstalled floor. Follow the steps below.
When using multiple pieces of scribing paper, carefully butt the sheets together and draw reference lines acrossboth sheets for proper alignment later. Using a roofing square or pencil dividers, transfer the outline of the areabeing scribed onto the scribing paper. If you’re using both a square and dividers, set the width of the dividers tomatch the width of the leg of the square to minimize mistakes. We advise making lots of notes on the paper.
After all preparation is complete, placescribing paper on the area to be covered.Place the roll-set (curl) downward to makepaper positioning easier.
Cut windows in the paper to expose thesubfloor and then use masking tape to holdthe paper in place. Paper should be rough-trimmed using a utility knife to 1" from allobstructions.
Pencil dividers make it easier to scribeirregular-shaped obstacles. Keep the dividersat a 90° angle to the item being scribed inorder to keep the scribe accurate.
After you have transcribed the entire area to thepaper, carefully remove the pattern and place iton the resilient floor covering to be used. Takethe time to square the pattern to the resilientfloor covering using a tape measure or rulerand be sure to center the pattern.
Using the same roofing square or dividers,transfer the marks on the pattern to the sheetgoods, making a perfect duplicate of the floor.Be sure to keep the dividers set to the samemeasurement you started with and use thesame leg of the square you used to make thepattern. To ensure correct pattern transfer, theperson who performed the pattern scribingshould also transfer the pattern onto theresilient flooring.
Follow the pencil marks on the surface of theresilient with a knife or scissors. Use caution soyou don’t damage the underfloor you’reworking over. A hookblade utility knife maymake this easier.
Now that the transfer and cutout arecomplete, the material is ready to be installed.The floor covering is an exact duplicate of thefloor, with all excess material removed and allcuts made for possible obstacles. Place thematerial into the room and fasten as required.
Residential Resilient Installation Guide
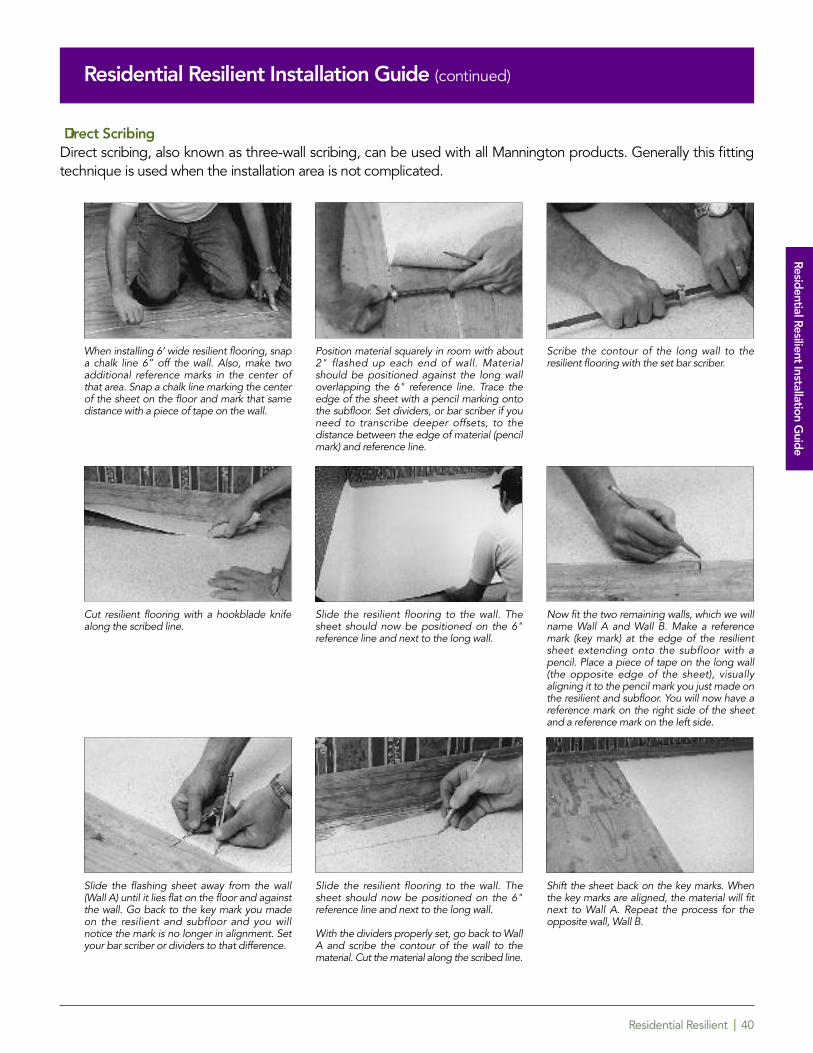
Residential Resilient | 40
Residential Resilient Installation Guide (continued)
Direct ScribingDirect scribing, also known as three-wall scribing, can be used with all Mannington products. Generally this fittingtechnique is used when the installation area is not complicated.
When installing 6’ wide resilient flooring, snapa chalk line 6” off the wall. Also, make twoadditional reference marks in the center ofthat area. Snap a chalk line marking the centerof the sheet on the floor and mark that samedistance with a piece of tape on the wall.
Scribe the contour of the long wall to theresilient flooring with the set bar scriber.
Cut resilient flooring with a hookblade knifealong the scribed line.
Now fit the two remaining walls, which we willname Wall A and Wall B. Make a referencemark (key mark) at the edge of the resilientsheet extending onto the subfloor with apencil. Place a piece of tape on the long wall(the opposite edge of the sheet), visuallyaligning it to the pencil mark you just made onthe resilient and subfloor. You will now have areference mark on the right side of the sheetand a reference mark on the left side.
Slide the flashing sheet away from the wall(Wall A) until it lies flat on the floor and againstthe wall. Go back to the key mark you madeon the resilient and subfloor and you willnotice the mark is no longer in alignment. Setyour bar scriber or dividers to that difference.
Slide the resilient flooring to the wall. Thesheet should now be positioned on the 6"reference line and next to the long wall.
With the dividers properly set, go back to WallA and scribe the contour of the wall to thematerial. Cut the material along the scribed line.
Shift the sheet back on the key marks. Whenthe key marks are aligned, the material will fitnext to Wall A. Repeat the process for theopposite wall, Wall B.
Slide the resilient flooring to the wall. Thesheet should now be positioned on the 6"reference line and next to the long wall.
Position material squarely in room with about2" flashed up each end of wall. Materialshould be positioned against the long walloverlapping the 6" reference line. Trace theedge of the sheet with a pencil marking ontothe subfloor. Set dividers, or bar scriber if youneed to transcribe deeper offsets, to thedistance between the edge of material (pencilmark) and reference line.
Residential Resilient Installation Guide
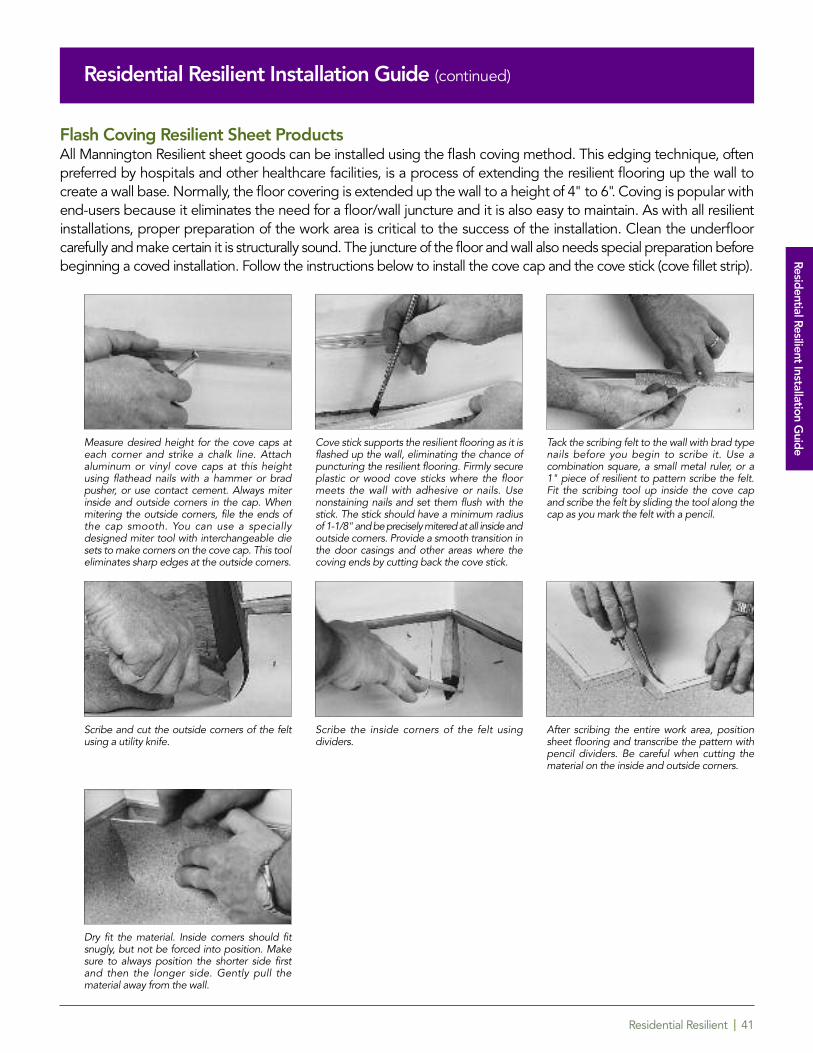
Residential Resilient | 41
Residential Resilient Installation Guide (continued)
Flash Coving Resilient Sheet ProductsAll Mannington Resilient sheet goods can be installed using the flash coving method. This edging technique, oftenpreferred by hospitals and other healthcare facilities, is a process of extending the resilient flooring up the wall tocreate a wall base. Normally, the floor covering is extended up the wall to a height of 4" to 6". Coving is popular withend-users because it eliminates the need for a floor/wall juncture and it is also easy to maintain. As with all resilientinstallations, proper preparation of the work area is critical to the success of the installation. Clean the underfloorcarefully and make certain it is structurally sound. The juncture of the floor and wall also needs special preparation beforebeginning a coved installation. Follow the instructions below to install the cove cap and the cove stick (cove fillet strip).
Tack the scribing felt to the wall with brad typenails before you begin to scribe it. Use acombination square, a small metal ruler, or a1" piece of resilient to pattern scribe the felt.Fit the scribing tool up inside the cove capand scribe the felt by sliding the tool along thecap as you mark the felt with a pencil.
Scribe and cut the outside corners of the feltusing a utility knife.
Scribe the inside corners of the felt usingdividers.
After scribing the entire work area, positionsheet flooring and transcribe the pattern withpencil dividers. Be careful when cutting thematerial on the inside and outside corners.
Dry fit the material. Inside corners should fitsnugly, but not be forced into position. Makesure to always position the shorter side firstand then the longer side. Gently pull thematerial away from the wall.
Measure desired height for the cove caps ateach corner and strike a chalk line. Attachaluminum or vinyl cove caps at this heightusing flathead nails with a hammer or bradpusher, or use contact cement. Always miterinside and outside corners in the cap. Whenmitering the outside corners, file the ends ofthe cap smooth. You can use a speciallydesigned miter tool with interchangeable diesets to make corners on the cove cap. This tooleliminates sharp edges at the outside corners.
Cove stick supports the resilient flooring as it isflashed up the wall, eliminating the chance ofpuncturing the resilient flooring. Firmly secureplastic or wood cove sticks where the floormeets the wall with adhesive or nails. Usenonstaining nails and set them flush with thestick. The stick should have a minimum radiusof 1-1/8" and be precisely mitered at all inside andoutside corners. Provide a smooth transition inthe door casings and other areas where thecoving ends by cutting back the cove stick.
Residential Resilient Installation Guide
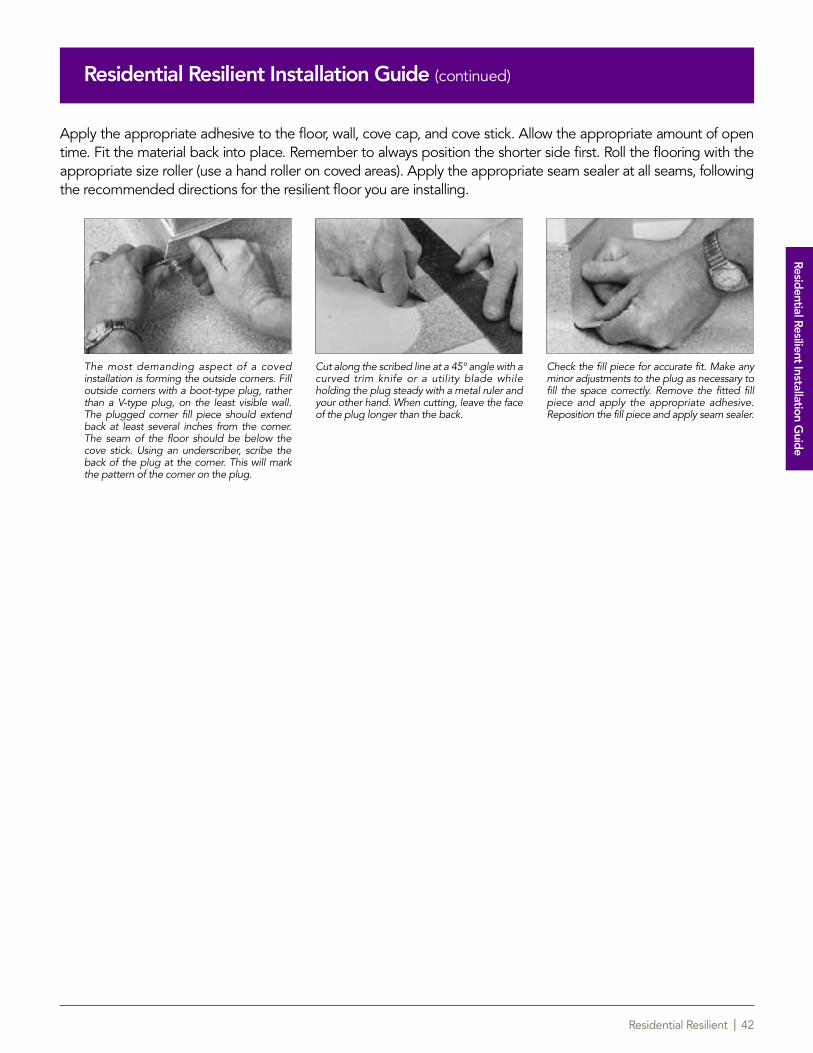
Residential Resilient | 42
Residential Resilient Installation Guide (continued)
Apply the appropriate adhesive to the floor, wall, cove cap, and cove stick. Allow the appropriate amount of opentime. Fit the material back into place. Remember to always position the shorter side first. Roll the flooring with theappropriate size roller (use a hand roller on coved areas). Apply the appropriate seam sealer at all seams, followingthe recommended directions for the resilient floor you are installing.
The most demanding aspect of a covedinstallation is forming the outside corners. Filloutside corners with a boot-type plug, ratherthan a V-type plug, on the least visible wall.The plugged corner fill piece should extendback at least several inches from the corner.The seam of the floor should be below thecove stick. Using an underscriber, scribe theback of the plug at the corner. This will markthe pattern of the corner on the plug.
Check the fill piece for accurate fit. Make anyminor adjustments to the plug as necessary tofill the space correctly. Remove the fitted fillpiece and apply the appropriate adhesive.Reposition the fill piece and apply seam sealer.
Cut along the scribed line at a 45° angle with acurved trim knife or a utility blade whileholding the plug steady with a metal ruler andyour other hand. When cutting, leave the faceof the plug longer than the back.
Residential Resilient Installation Guide
General Installation | Adura® | 43
Adura®
Ad
ura®
Luxury Floors Installation Guide
Adura® | 44
Adura® Luxury Floors Installation Guide
General InformationAll of the general installation instructions stated in General Installation Guidelines regarding storage and job siteconditions, including climatic and structural requirements, are applicable to Adura® Luxury Floors. Review andconsider these requirements before proceeding with the installation.
These installation specifications are for all Fully Adhered installations of Mannington Adura® Luxury Floors.Recommendations are based on the most recent available information. All instructions and recommendations mustbe followed for a satisfactory installation.
� Adura® Luxury Floors must be stored and installed in climate-controlled interior locations where thetemperature can be regulated to between 65º and 85º F.
� Install Adura® Floors only after the job site has been cleaned and cleared of other trade apparatus that maydamage a finished installation.
� Before installation always, check the cartons to ensure the pattern number is correct. Work from severalcartons to mix design elements. Do not “cluster” similar design elements.
� All subfloor/underlayment patching must be done with a non-shrinking water resistant Portland cementpatching compound such as Mannington MVP-2023.
� Never install Mannington resilient product over residual asphalt-type (cut back) adhesive. It can bleedthrough the new floor covering. Residual asphalt-type adhesive must be thoroughly removed or coveredwith underlayment plywood or Mannington latex underlayment.
� Adura® Luxury Floors are to be adhered with Mannington MT-711. MT-711 is a solvent-free, acrylic-based pressuresensitive adhesive that is appropriate with Mannington resilient and carpet modular flooring products.
� Use only Adura® Luxury Grout when grouting is desired.
All precautions and requirements regarding subfloor selection and preparation found in the General InstallationInformation section apply to Adura® Luxury Flooring.
Installation
Tile Layout
As with all tile formats, Adura® tiles should be “balanced” in the work area. Tiles may be laid squarely in the workarea or laid out diagonally in the work area. In either case, the room must be accurately measured to square off thearea and to determine the center point of the area. The work area should be divided into quadrants designated bystriking chalk lines. It is critical that the intersection of the chalk lines be square at 90°. All border tiles should be ofnearly equal dimensions and at least one-half of a tile wide. Careful and precise measurements must be takenduring tile layout. Lay all tiles in the same direction with all directional arrows pointing in the same direction.
Plank Layout
It is also important to balance the layout of the plank format. Proper planning and layout will prevent narrow plankwidths at wall junctures. Determine layout to prevent having less than half a plank width (2") or very short lengthpieces. As with all plank products, lay the long dimension of the plank parallel to the long dimension of the workarea. Accurately measure the room to determine the center line; adjust this established line to accommodate abalanced layout and then transpose this line to a comfortable width away from the starting wall (approximately 2'to 3' wide). Apply the adhesive in this area and begin installing planks.
Ad
ura®
Luxury Floors Installation Guide
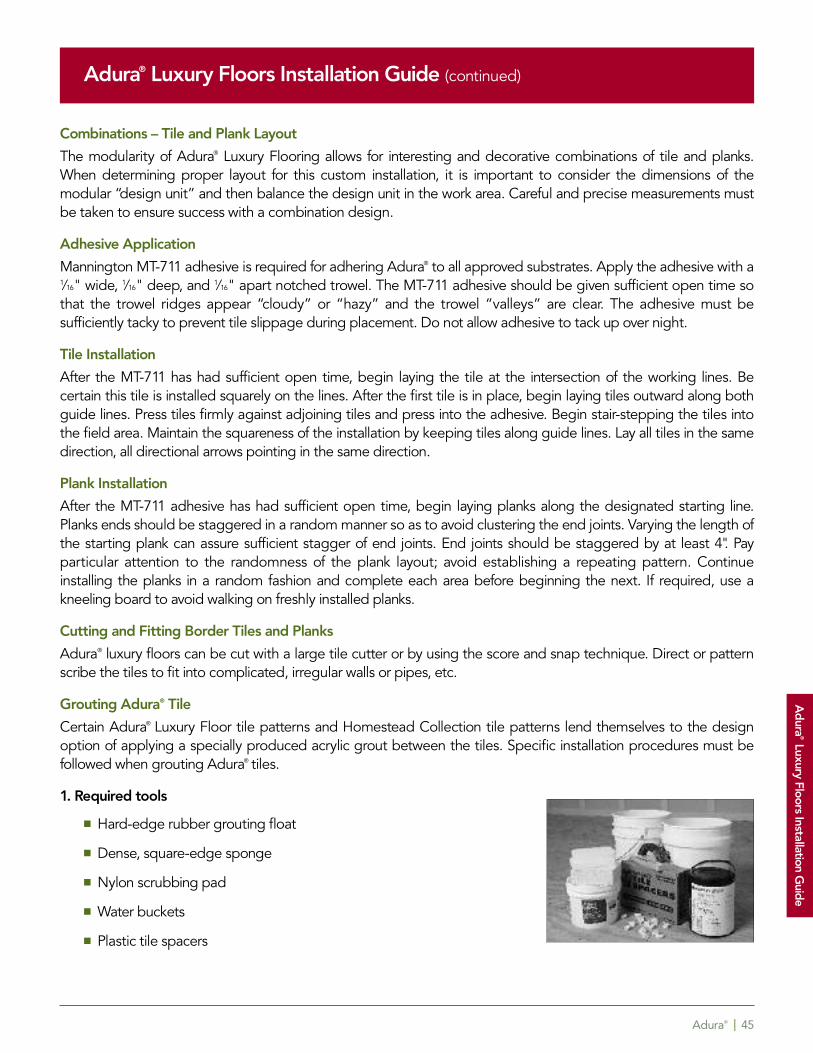
Adura® | 45
Adura® Luxury Floors Installation Guide (continued)
Combinations – Tile and Plank Layout
The modularity of Adura® Luxury Flooring allows for interesting and decorative combinations of tile and planks.When determining proper layout for this custom installation, it is important to consider the dimensions of themodular “design unit” and then balance the design unit in the work area. Careful and precise measurements mustbe taken to ensure success with a combination design.
Adhesive Application
Mannington MT-711 adhesive is required for adhering Adura® to all approved substrates. Apply the adhesive with a1/16" wide, 1/16" deep, and 1/16" apart notched trowel. The MT-711 adhesive should be given sufficient open time sothat the trowel ridges appear “cloudy” or “hazy” and the trowel “valleys” are clear. The adhesive must besufficiently tacky to prevent tile slippage during placement. Do not allow adhesive to tack up over night.
Tile Installation
After the MT-711 has had sufficient open time, begin laying the tile at the intersection of the working lines. Becertain this tile is installed squarely on the lines. After the first tile is in place, begin laying tiles outward along bothguide lines. Press tiles firmly against adjoining tiles and press into the adhesive. Begin stair-stepping the tiles intothe field area. Maintain the squareness of the installation by keeping tiles along guide lines. Lay all tiles in the samedirection, all directional arrows pointing in the same direction.
Plank Installation
After the MT-711 adhesive has had sufficient open time, begin laying planks along the designated starting line.Planks ends should be staggered in a random manner so as to avoid clustering the end joints. Varying the length ofthe starting plank can assure sufficient stagger of end joints. End joints should be staggered by at least 4". Payparticular attention to the randomness of the plank layout; avoid establishing a repeating pattern. Continueinstalling the planks in a random fashion and complete each area before beginning the next. If required, use akneeling board to avoid walking on freshly installed planks.
Cutting and Fitting Border Tiles and Planks
Adura® luxury floors can be cut with a large tile cutter or by using the score and snap technique. Direct or patternscribe the tiles to fit into complicated, irregular walls or pipes, etc.
Grouting Adura® Tile
Certain Adura® Luxury Floor tile patterns and Homestead Collection tile patterns lend themselves to the designoption of applying a specially produced acrylic grout between the tiles. Specific installation procedures must befollowed when grouting Adura® tiles.
1. Required tools
� Hard-edge rubber grouting float
� Dense, square-edge sponge
� Nylon scrubbing pad
� Water buckets
� Plastic tile spacers
Ad
ura®
Luxury Floors Installation Guide
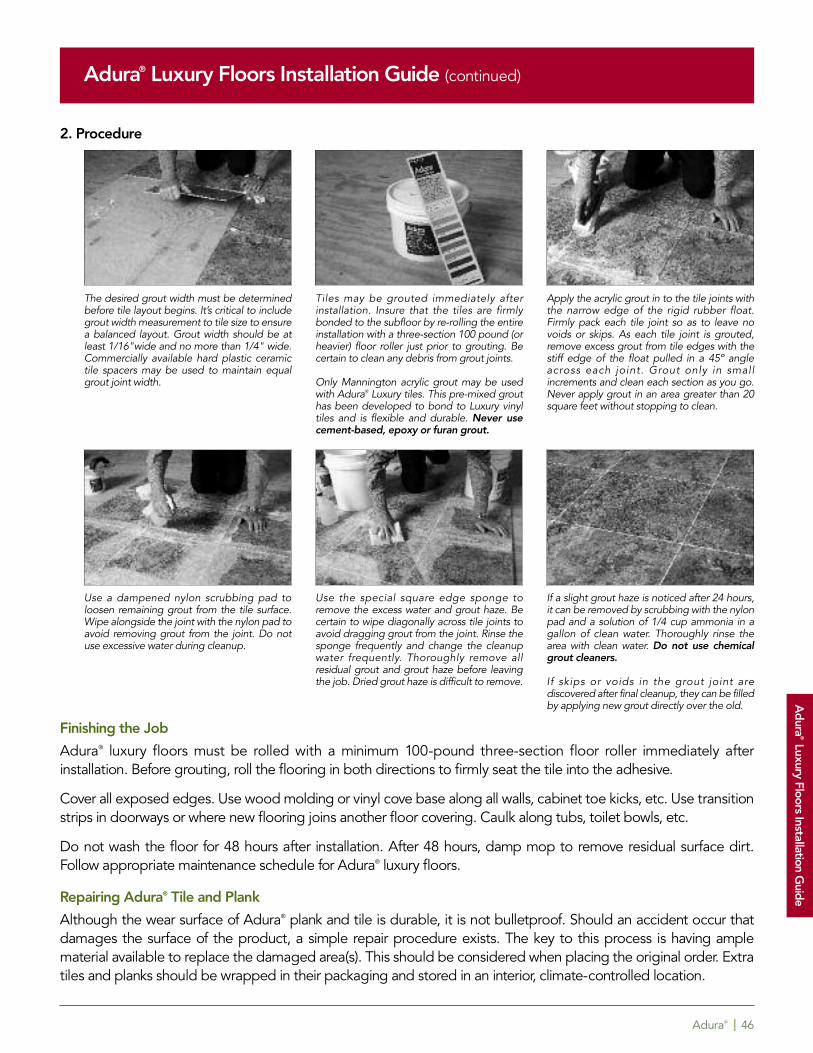
Adura® | 46
Adura® Luxury Floors Installation Guide (continued)
2. Procedure
Finishing the Job
Adura® luxury floors must be rolled with a minimum 100-pound three-section floor roller immediately afterinstallation. Before grouting, roll the flooring in both directions to firmly seat the tile into the adhesive.
Cover all exposed edges. Use wood molding or vinyl cove base along all walls, cabinet toe kicks, etc. Use transitionstrips in doorways or where new flooring joins another floor covering. Caulk along tubs, toilet bowls, etc.
Do not wash the floor for 48 hours after installation. After 48 hours, damp mop to remove residual surface dirt.Follow appropriate maintenance schedule for Adura® luxury floors.
Repairing Adura® Tile and Plank
Although the wear surface of Adura® plank and tile is durable, it is not bulletproof. Should an accident occur thatdamages the surface of the product, a simple repair procedure exists. The key to this process is having amplematerial available to replace the damaged area(s). This should be considered when placing the original order. Extratiles and planks should be wrapped in their packaging and stored in an interior, climate-controlled location.
The desired grout width must be determinedbefore tile layout begins. It’s critical to includegrout width measurement to tile size to ensurea balanced layout. Grout width should be atleast 1/16"wide and no more than 1/4" wide.Commercially available hard plastic ceramictile spacers may be used to maintain equalgrout joint width.
Apply the acrylic grout in to the tile joints withthe narrow edge of the rigid rubber float.Firmly pack each tile joint so as to leave novoids or skips. As each tile joint is grouted,remove excess grout from tile edges with thestiff edge of the float pulled in a 45º angleacross each joint. Grout only in smallincrements and clean each section as you go.Never apply grout in an area greater than 20square feet without stopping to clean.
Use a dampened nylon scrubbing pad toloosen remaining grout from the tile surface.Wipe alongside the joint with the nylon pad toavoid removing grout from the joint. Do notuse excessive water during cleanup.
If a slight grout haze is noticed after 24 hours,it can be removed by scrubbing with the nylonpad and a solution of 1/4 cup ammonia in agallon of clean water. Thoroughly rinse thearea with clean water. Do not use chemicalgrout cleaners.
If skips or voids in the grout joint arediscovered after final cleanup, they can be filledby applying new grout directly over the old.
Use the special square edge sponge toremove the excess water and grout haze. Becertain to wipe diagonally across tile joints toavoid dragging grout from the joint. Rinse thesponge frequently and change the cleanupwater frequently. Thoroughly remove allresidual grout and grout haze before leavingthe job. Dried grout haze is difficult to remove.
Tiles may be grouted immediately afterinstallation. Insure that the tiles are firmlybonded to the subfloor by re-rolling the entireinstallation with a three-section 100 pound (orheavier) floor roller just prior to grouting. Becertain to clean any debris from grout joints.
Only Mannington acrylic grout may be usedwith Adura® Luxury tiles. This pre-mixed grouthas been developed to bond to Luxury vinyltiles and is flexible and durable. Never usecement-based, epoxy or furan grout.
Ad
ura®
Luxury Floors Installation Guide
Adura® | 47
To remove a tile or plank, gently heat with a hot-air blower to allow the material to become more flexible. Insert athin 2" wide putty knife in the seam and gently lift up. Be careful not to damage the surrounding flooring. Removethe damaged tile or plank from the floor. When removing a tile, pay attention to the orientation of the embossedarrow on the back of the damaged piece so that the new tile can be installed in the same direction. Inspect thesubfloor for lumps of residual adhesive, remove and smooth out as necessary.
Using a 1/32" notched trowel, apply a thin coating of MT711 to the back of the replacement piece. Consider thethickness of the residual adhesive layer when determining the appropriate adhesive application to the replacementpiece; too much adhesive will cause the replacement flooring to be higher than the surrounding tile or plank.Provide sufficient open time (typically 15 minutes) and then position the tile or plank into the repair area. Roll evenlywith a hand roller and, if necessary, weight the tile or plank for several hours until the adhesive sets.
If the tile was grouted, the grout must be removed and replaced during tile replacement.
Cautions and Miscellaneous
� Furniture should be moved onto the newly-installed floor, using an appliance hand truck over hardboard runways.
� Do not place heavy items on newly-installed floor covering for at least 24 hours after completion of theinstallation. Heavy furniture should be equipped with suitable non-staining, wide-bearing casters.
� Floor covering subjected to excessive heat and light exposure is subject to thermal degradation. Useappropriate precautions to minimize potential effects on the floor covering.
� Oil- or petroleum-based products can result in surface staining. Do not track asphalt driveway sealer orautomobile oil drips onto the vinyl floor covering.
� Use non-staining walk-off mats. Rubber can discolor resilient floor coverings.
� To achieve maximum product performance, Mannington Adura® floors should not be installed over existingresilient floor coverings. In the rare cases where removal of the existing resilient floor covering is not anoption, the existing flooring must be covered with MANNINGTON MVP 2023 used as an Embossing Leveleror other appropriate porous underlayment.
Mannington MUL - The Prefect Solution for Problem Subfloors
Mannington MUL is a six-foot wide vinyl-coated sheet designed to be used as an underlayment with Adura andAdura Elements when the subfloor is not suitable for a fully adhered resilient product or when removal of theflooring system is being considered. These two options are possible because the Mannington MUL is not adhereddirectly to the subfloor but rather is permitted to “float” over the questionable subfloor. These subfloors are:
� Gypsum underlayments � Flakeboard
� Residual adhesives � Particleboard
� Painted subfloors � Existing ceramic tile ( properly prepared)
� Stripwood hard wood floors � Concrete (on all grade levels)
� Oriented Strand Board � Existing resilient vinyl floors
Mannington MUL is available in 85 square yard rolls 6’ wide by 127.5’ long. Also available in 170 square yardrolls 6' wide by 255'.
Adura® Luxury Floors Installation Guide (continued)
Ad
ura®
Luxury Floors Installation Guide
Adura® | 48
Adura® Luxury Floors Installation Guide (continued)
Directions for Use
Mannington MUL is intended to be used in climate controlled indoor residential locations only.
Subfloor Considerations
Although MUL may be used over many unconventional subfloor systems it is still critical that these subfloors areclean, dry, smooth, flat and structurally sound.
MUL will bridge minor cracks on the same plane on concrete subfloors. MUL is not intended for use overexpansion joints (structural design joints) or structural (out-of-plane) movement cracks.
MUL Installation
� Thoroughly sweep or vacuum the entire work area.
� Plan the MUL layout so that the seams of the MUL do not coincide with the seams in the finished product.When installing Adura plank position the MUL sheets perpendicular to plank layout.
� When installing MUL over residual adhesive the adhesive must be scrapped smooth and have no residual tack.
� Unroll the MUL vinyl side down just prior to beginning the flooring installation.
� Trim the MUL back approximately 1/8” to ¼” from all fixed vertical surfaces.
� Align the factory edges of the MUL and secure with 2” wide thin, clear tape.
� When installing Adura Luxury Flooring apply Mannington MT 711 with a 1/16” wide, 1/16” deep, 1/16” apartnotched trowel. Begin applying adhesive at the pre-determined chalk lines, and provide sufficient open time so thatthe trowel ridges appear “cloudy” or “hazy” and the trowel “Valleys” are clear. The adhesive must be sufficientlytacky to prevent tile slippage during placement. DO NOT ALLOW ADHESIVE TO DRY AND TURN CLEAR.
� Fit the Adura Luxury flooring to the edges of the MUL sheet, maintaining the 1/8” to ¼”expansion/contraction gap.
� Roll the Adura Luxury Flooring with a minimum 100 pound three-section floor roller immediately afterinstallation. Roll the flooring in both directions to firmly seat the tile into the adhesive.
� When installing wall base or transitions strips do not fasten through the finished flooring or the MUL.
ADURA Loc N’Go Luxury Flooring
General Information
These installation specifications are for Loc-N’-Go Luxury Plank flooring. All recommendations are based on the mostrecent available information. All instructions and recommendations must be followed for a satisfactory installation.
� The floor covering should be stored and installed in climate controlled indoor locations – Temperature 65°- 85°F.
� Install Loc-N’-Go Luxury Plank flooring only after the jobsite has been cleaned and cleared of other tradeapparatus that may damage a finished tile installation.
� To minimize shade variation, mix and install planks from several different cartons.
� All subfloor / underlayment patching must be done with a non-shrinking water resistant Portland cementpatching compound such as Mannington MVP-2023.
Ad
ura®
Luxury Floors Installation Guide
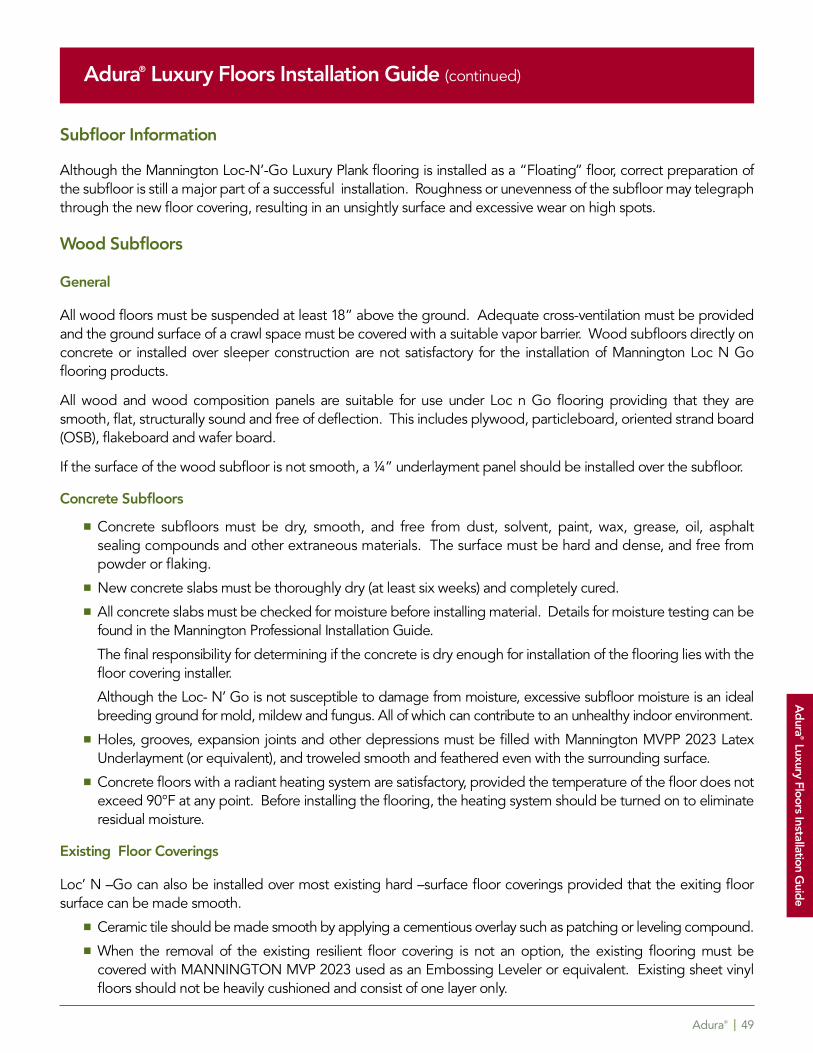
Adura® | 49
Adura® Luxury Floors Installation Guide (continued)
Subfloor Information
Although the Mannington Loc-N’-Go Luxury Plank flooring is installed as a “Floating” floor, correct preparation ofthe subfloor is still a major part of a successful installation. Roughness or unevenness of the subfloor may telegraphthrough the new floor covering, resulting in an unsightly surface and excessive wear on high spots.
Wood Subfloors
General
All wood floors must be suspended at least 18” above the ground. Adequate cross-ventilation must be providedand the ground surface of a crawl space must be covered with a suitable vapor barrier. Wood subfloors directly onconcrete or installed over sleeper construction are not satisfactory for the installation of Mannington Loc N Goflooring products.
All wood and wood composition panels are suitable for use under Loc n Go flooring providing that they aresmooth, flat, structurally sound and free of deflection. This includes plywood, particleboard, oriented strand board(OSB), flakeboard and wafer board.
If the surface of the wood subfloor is not smooth, a ¼” underlayment panel should be installed over the subfloor.
Concrete Subfloors
� Concrete subfloors must be dry, smooth, and free from dust, solvent, paint, wax, grease, oil, asphaltsealing compounds and other extraneous materials. The surface must be hard and dense, and free frompowder or flaking.
� New concrete slabs must be thoroughly dry (at least six weeks) and completely cured.
� All concrete slabs must be checked for moisture before installing material. Details for moisture testing can befound in the Mannington Professional Installation Guide.
The final responsibility for determining if the concrete is dry enough for installation of the flooring lies with thefloor covering installer.
Although the Loc- N’ Go is not susceptible to damage from moisture, excessive subfloor moisture is an idealbreeding ground for mold, mildew and fungus. All of which can contribute to an unhealthy indoor environment.
� Holes, grooves, expansion joints and other depressions must be filled with Mannington MVPP 2023 LatexUnderlayment (or equivalent), and troweled smooth and feathered even with the surrounding surface.
� Concrete floors with a radiant heating system are satisfactory, provided the temperature of the floor does notexceed 90°F at any point. Before installing the flooring, the heating system should be turned on to eliminateresidual moisture.
Existing Floor Coverings
Loc’ N –Go can also be installed over most existing hard –surface floor coverings provided that the exiting floorsurface can be made smooth.
� Ceramic tile should be made smooth by applying a cementious overlay such as patching or leveling compound.
� When the removal of the existing resilient floor covering is not an option, the existing flooring must becovered with MANNINGTON MVP 2023 used as an Embossing Leveler or equivalent. Existing sheet vinylfloors should not be heavily cushioned and consist of one layer only.
Ad
ura®
Luxury Floors Installation Guide
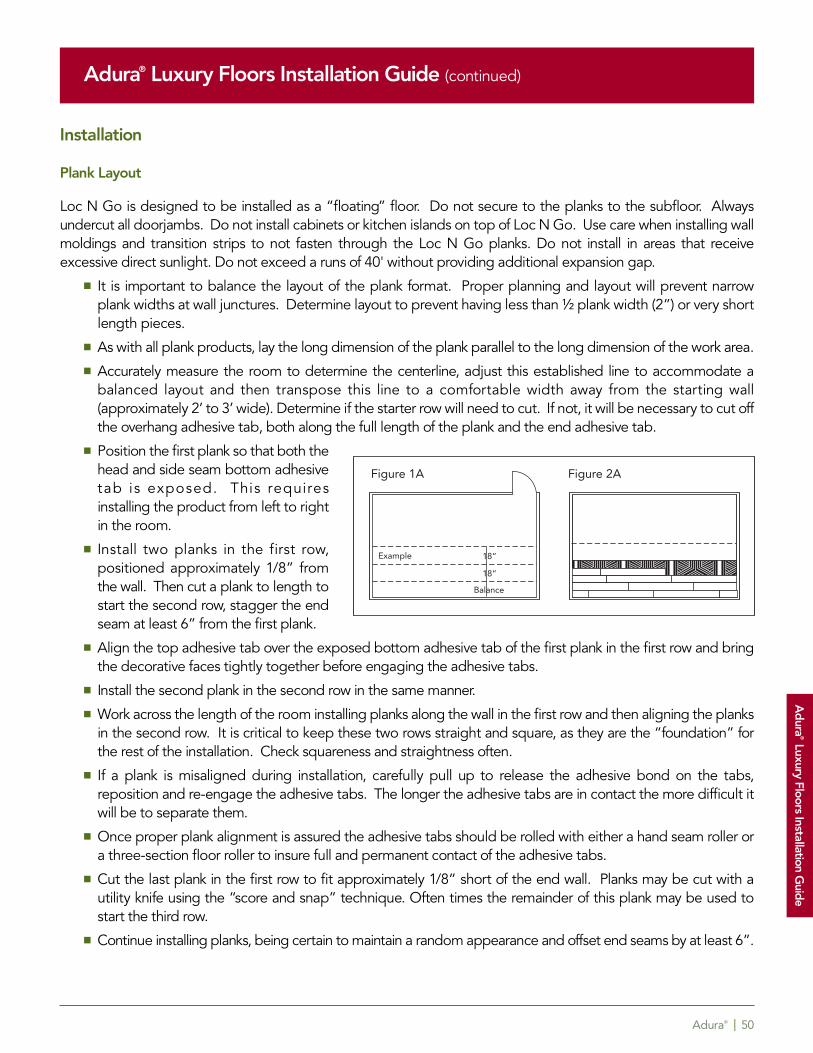
Adura® | 50
Adura® Luxury Floors Installation Guide (continued)
Installation
Plank Layout
Loc N Go is designed to be installed as a “floating” floor. Do not secure to the planks to the subfloor. Alwaysundercut all doorjambs. Do not install cabinets or kitchen islands on top of Loc N Go. Use care when installing wallmoldings and transition strips to not fasten through the Loc N Go planks. Do not install in areas that receiveexcessive direct sunlight. Do not exceed a runs of 40' without providing additional expansion gap.
� It is important to balance the layout of the plank format. Proper planning and layout will prevent narrowplank widths at wall junctures. Determine layout to prevent having less than ½ plank width (2”) or very shortlength pieces.
� As with all plank products, lay the long dimension of the plank parallel to the long dimension of the work area.
� Accurately measure the room to determine the centerline, adjust this established line to accommodate abalanced layout and then transpose this line to a comfortable width away from the starting wall(approximately 2’ to 3’ wide). Determine if the starter row will need to cut. If not, it will be necessary to cut offthe overhang adhesive tab, both along the full length of the plank and the end adhesive tab.
� Position the first plank so that both thehead and side seam bottom adhesivetab is exposed. This requiresinstalling the product from left to rightin the room.
� Install two planks in the first row,positioned approximately 1/8” fromthe wall. Then cut a plank to length tostart the second row, stagger the endseam at least 6” from the first plank.
� Align the top adhesive tab over the exposed bottom adhesive tab of the first plank in the first row and bringthe decorative faces tightly together before engaging the adhesive tabs.
� Install the second plank in the second row in the same manner.
� Work across the length of the room installing planks along the wall in the first row and then aligning the planksin the second row. It is critical to keep these two rows straight and square, as they are the “foundation” forthe rest of the installation. Check squareness and straightness often.
� If a plank is misaligned during installation, carefully pull up to release the adhesive bond on the tabs,reposition and re-engage the adhesive tabs. The longer the adhesive tabs are in contact the more difficult itwill be to separate them.
� Once proper plank alignment is assured the adhesive tabs should be rolled with either a hand seam roller ora three-section floor roller to insure full and permanent contact of the adhesive tabs.
� Cut the last plank in the first row to fit approximately 1/8” short of the end wall. Planks may be cut with autility knife using the “score and snap” technique. Often times the remainder of this plank may be used tostart the third row.
� Continue installing planks, being certain to maintain a random appearance and offset end seams by at least 6”.
Ad
ura®
Luxury Floors Installation Guide
Figure 1A Figure 2A
Example
Balance
18”
18”
Adura® | 51
Adura® Luxury Floors Installation Guide (continued)
� When fitting around obstacles or into irregular spaces Mannington Loc N Go can be cut easily and cleanlyusing a utility knife with a sharp blade. It is often beneficial to make a cardboard template of the area andtransfer this pattern to the plank.
� Roll the completed installation in both directions with a 100 lbs three-section floor roller.
� Protect all exposed edges of the Loc N Go by installing wall molding and/or transition strips. Use caution toprevent the fasteners from securing the planks to the subfloor.
Repairs
Plank Replacement
If a plank becomes damaged the following replacement procedure should be used:
� Using a straight edge and a sharp utility knife cut out and remove, about a 2” strip of the center of the plank.This will allow you to determine the location of the top and bottom adhesive strips of the damaged plank.
� Position a straight edge along the side seam on the bottom adhesive tab of the damaged plank and cutthrough the plank. This will leave the adhesive tab of the damaged plank in place, under the adjoining plank.
� Use a heat gun to help release the adhesive and slowly and carefully peel away top adhesive tab of thedamaged plank from the adjoining plank.
� Insert a 2” putty knife under the adjoining plank to remove the bottom adhesive tab of the damaged piece.Once a corner is loosened, the tab can be folded under and peeled away.
� Slip a sheet of waxed paper (lining paper) under the adjoining plank(s), slip the bottom adhesive tab of thereplacement plank under the waxed paper and position the top adhesive tab in place.
� Carefully remove the waxed paper to allow adhesive contact on the replacement plank and the adjoiningplank(s).
� Roll the adhesive tabs with a hand roller to assure good bond.
Ad
ura®
Luxury Floors Installation Guide
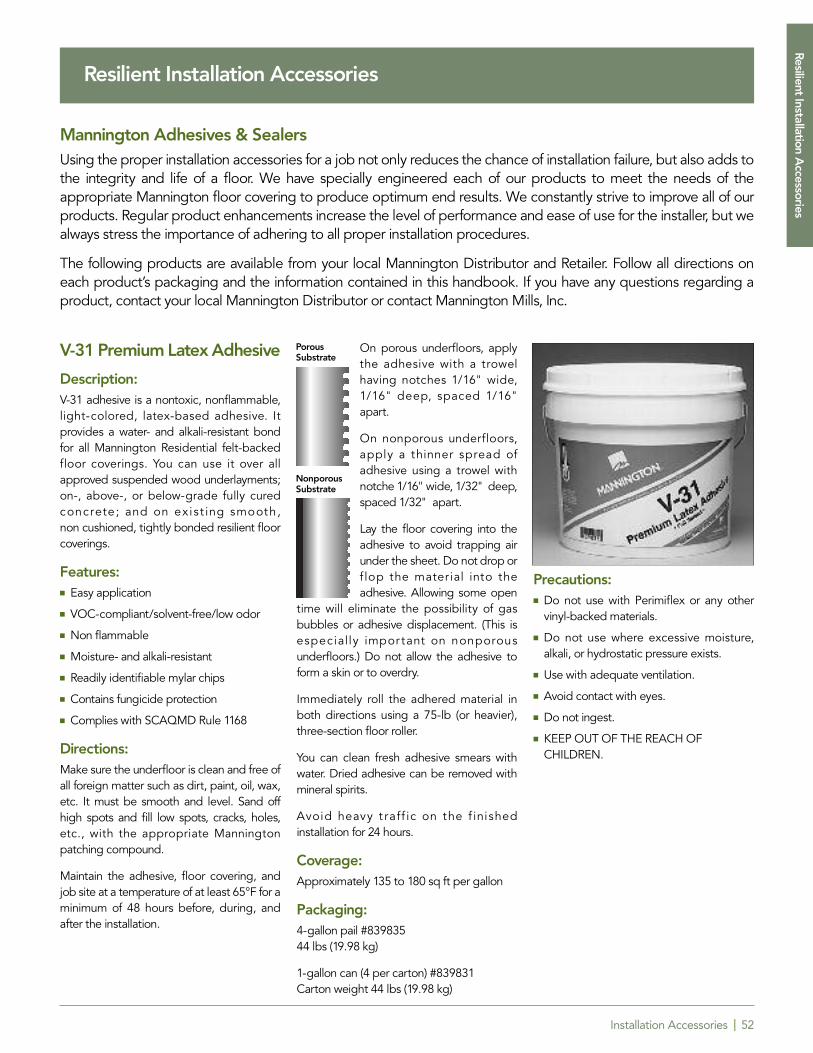
Installation Accessories | 52
Mannington Adhesives & Sealers Using the proper installation accessories for a job not only reduces the chance of installation failure, but also adds tothe integrity and life of a floor. We have specially engineered each of our products to meet the needs of theappropriate Mannington floor covering to produce optimum end results. We constantly strive to improve all of ourproducts. Regular product enhancements increase the level of performance and ease of use for the installer, but wealways stress the importance of adhering to all proper installation procedures.
The following products are available from your local Mannington Distributor and Retailer. Follow all directions oneach product’s packaging and the information contained in this handbook. If you have any questions regarding aproduct, contact your local Mannington Distributor or contact Mannington Mills, Inc.
Resilient Installation Accessories
V-31 Premium Latex Adhesive
Description:V-31 adhesive is a nontoxic, nonflammable,light-colored, latex-based adhesive. Itprovides a water- and alkali-resistant bondfor all Mannington Residential felt-backedfloor coverings. You can use it over allapproved suspended wood underlayments;on-, above-, or below-grade fully cured concrete; and on exist ing smooth, non cushioned, tightly bonded resilient floorcoverings.
Features:� Easy application
� VOC-compliant/solvent-free/low odor
� Non flammable
� Moisture- and alkali-resistant
� Readily identifiable mylar chips
� Contains fungicide protection
� Complies with SCAQMD Rule 1168
Directions:Make sure the underfloor is clean and free ofall foreign matter such as dirt, paint, oil, wax,etc. It must be smooth and level. Sand offhigh spots and fill low spots, cracks, holes,etc., with the appropriate Manningtonpatching compound.
Maintain the adhesive, floor covering, andjob site at a temperature of at least 65°F for aminimum of 48 hours before, during, andafter the installation.
On porous underfloors, applythe adhesive with a trowelhaving notches 1/16" wide,1/16" deep, spaced 1/16"apart.
On nonporous underfloors,apply a thinner spread ofadhesive using a trowel withnotche 1/16" wide, 1/32" deep,spaced 1/32" apart.
Lay the floor covering into theadhesive to avoid trapping airunder the sheet. Do not drop orf lop the material into theadhesive. Allowing some open
time will eliminate the possibility of gasbubbles or adhesive displacement. (This isespecially impor tant on nonporousunderfloors.) Do not allow the adhesive toform a skin or to overdry.
Immediately roll the adhered material inboth directions using a 75-lb (or heavier),three-section floor roller.
You can clean fresh adhesive smears withwater. Dried adhesive can be removed withmineral spirits.
Avoid heavy t raff ic on the f inishedinstallation for 24 hours.
Coverage:Approximately 135 to 180 sq ft per gallon
Packaging:4-gallon pail #83983544 lbs (19.98 kg)
1-gallon c an (4 per carton) #839831Carton weight 44 lbs (19.98 kg)
Precautions:� Do not use with Perimiflex or any other
vinyl-backed materials.
� Do not use where excessive moisture,alkali, or hydrostatic pressure exists.
� Use with adequate ventilation.
� Avoid contact with eyes.
� Do not ingest.
� KEEP OUT OF THE REACH OFCHILDREN.
PorousSubstrate
NonporousSubstrate
Resilient Installation Accessories
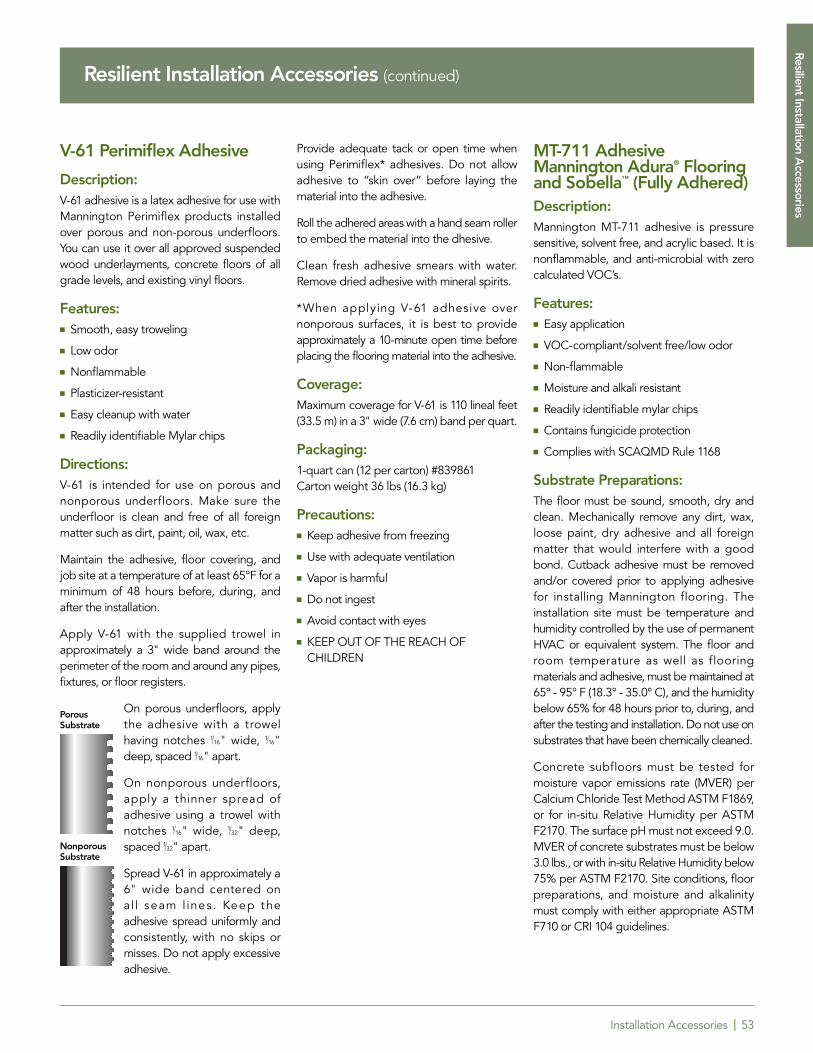
Installation Accessories | 53
V-61 Perimiflex Adhesive
Description:V-61 adhesive is a latex adhesive for use withMannington Perimiflex products installedover porous and non-porous underfloors.You can use it over all approved suspendedwood underlayments, concrete floors of allgrade levels, and existing vinyl floors.
Features:� Smooth, easy troweling
� Low odor
� Nonflammable
� Plasticizer-resistant
� Easy cleanup with water
� Readily identifiable Mylar chips
Directions:V-61 is intended for use on porous andnonporous underfloors. Make sure theunderfloor is clean and free of all foreignmatter such as dirt, paint, oil, wax, etc.
Maintain the adhesive, floor covering, andjob site at a temperature of at least 65°F for aminimum of 48 hours before, during, andafter the installation.
Apply V-61 with the supplied trowel inapproximately a 3" wide band around theperimeter of the room and around any pipes,fixtures, or floor registers.
On porous underfloors, applythe adhesive with a trowelhaving notches 1/16" wide, 1/16"deep, spaced 1/16" apart.
On nonporous underfloors,apply a thinner spread ofadhesive using a trowel withnotches 1/16" wide, 1/32" deep,spaced 1/32" apart.
Spread V-61 in approximately a6" wide band centered on al l seam l ines . Keep t headhesive spread uniformly andconsistently, with no skips ormisses. Do not apply excessiveadhesive.
Provide adequate tack or open time whenusing Perimiflex* adhesives. Do not allowadhesive to “skin over” before laying thematerial into the adhesive.
Roll the adhered areas with a hand seam rollerto embed the material into the dhesive.
Clean fresh adhesive smears with water.Remove dried adhesive with mineral spirits.
*When applying V-61 adhesive overnonporous surfaces, it is best to provideapproximately a 10-minute open time beforeplacing the flooring material into the adhesive.
Coverage:Maximum coverage for V-61 is 110 lineal feet(33.5 m) in a 3" wide (7.6 cm) band per quart.
Packaging:1-quart can (12 per carton) #839861Carton weight 36 lbs (16.3 kg)
Precautions:� Keep adhesive from freezing
� Use with adequate ventilation
� Vapor is harmful
� Do not ingest
� Avoid contact with eyes
� KEEP OUT OF THE REACH OFCHILDREN
MT-711 AdhesiveMannington Adura® Flooringand Sobella™ (Fully Adhered)Description:Mannington MT-711 adhesive is pressuresensitive, solvent free, and acrylic based. It isnonflammable, and anti-microbial with zerocalculated VOC’s.
Features:� Easy application
� VOC-compliant/solvent free/low odor
� Non-flammable
� Moisture and alkali resistant
� Readily identifiable mylar chips
� Contains fungicide protection
� Complies with SCAQMD Rule 1168
Substrate Preparations:The floor must be sound, smooth, dry andclean. Mechanically remove any dirt, wax,loose paint, dry adhesive and all foreignmatter that would interfere with a goodbond. Cutback adhesive must be removedand/or covered prior to applying adhesivefor installing Mannington flooring. Theinstallation site must be temperature andhumidity controlled by the use of permanentHVAC or equivalent system. The floor androom temperature as well as flooringmaterials and adhesive, must be maintained at65° - 95° F (18.3 ° - 35.0° C), and the humiditybelow 65% for 48 hours prior to, during, andafter the testing and installation. Do not use onsubstrates that have been chemically cleaned.
Concrete subfloors must be tested formoisture vapor emissions rate (MVER) perCalcium Chloride Test Method ASTM F1869,or for in-situ Relative Humidity per ASTMF2170. The surface pH must not exceed 9.0.MVER of concrete substrates must be below3.0 lbs., or with in-situ Relative Humidity below75% per ASTM F2170. Site conditions, floorpreparations, and moisture and alkalinitymust comply with either appropriate ASTMF710 or CRI 104 guidelines.
PorousSubstrate
NonporousSubstrate
Resilient Installation Accessories (continued)
Resilient Installation Accessories
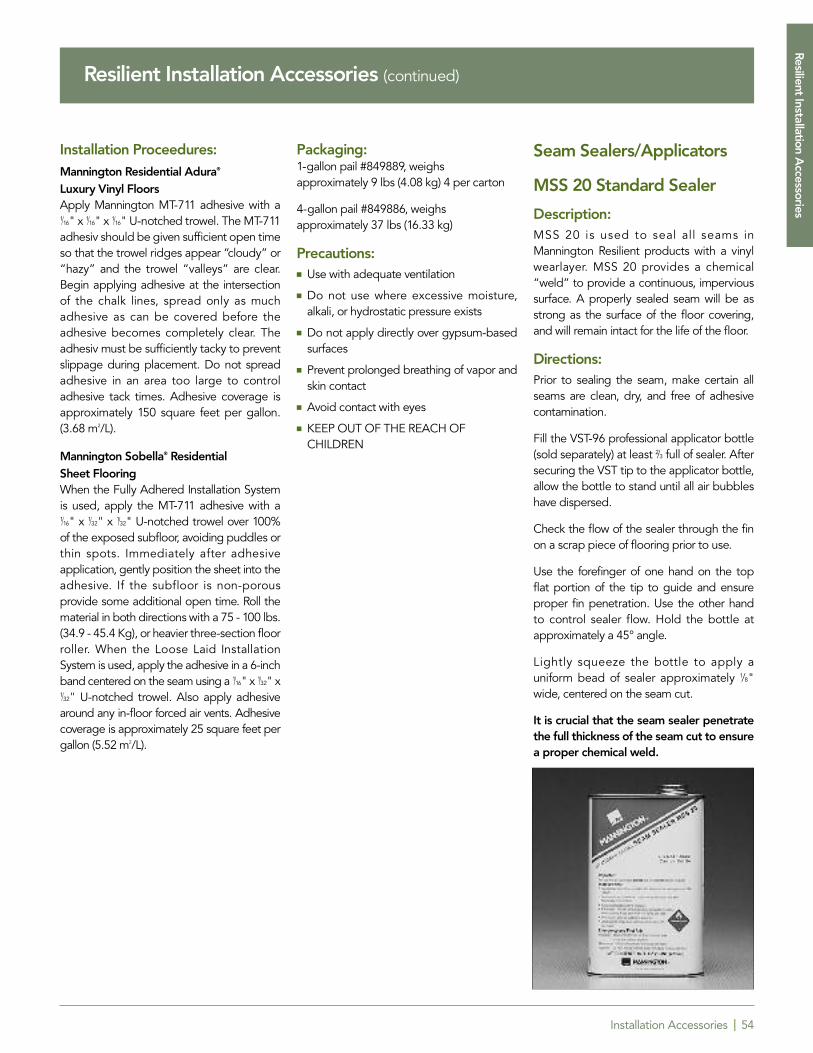
Installation Accessories | 54
Installation Proceedures:Mannington Residential Adura®
Luxury Vinyl FloorsApply Mannington MT-711 adhesive with a1/16" x 1/16" x 1/16" U-notched trowel. The MT-711adhesiv should be given sufficient open timeso that the trowel ridges appear “cloudy” or“hazy” and the trowel “valleys” are clear.Begin applying adhesive at the intersectionof the chalk lines, spread only as muchadhesive as can be covered before theadhesive becomes completely clear. Theadhesiv must be sufficiently tacky to preventslippage during placement. Do not spreadadhesive in an area too large to controladhesive tack times. Adhesive coverage isapproximately 150 square feet per gallon.(3.68 m2/L).
Mannington Sobella® Residential Sheet FlooringWhen the Fully Adhered Installation Systemis used, apply the MT-711 adhesive with a1/16" x 1/32" x 1/32" U-notched trowel over 100%of the exposed subfloor, avoiding puddles orthin spots. Immediately after adhesiveapplication, gently position the sheet into theadhesive. If the subfloor is non-porousprovide some additional open time. Roll thematerial in both directions with a 75 - 100 lbs.(34.9 - 45.4 Kg), or heavier three-section floorroller. When the Loose Laid InstallationSystem is used, apply the adhesive in a 6-inchband centered on the seam using a 1/16" x 1/32" x1/32" U-notched trowel. Also apply adhesivearound any in-floor forced air vents. Adhesivecoverage is approximately 25 square feet pergallon (5.52 m2/L).
Packaging:1-gallon pail #849889, weighsapproximately 9 lbs (4.08 kg) 4 per carton
4-gallon pail #849886, weighsapproximately 37 lbs (16.33 kg)
Precautions:� Use with adequate ventilation
� Do not use where excessive moisture,alkali, or hydrostatic pressure exists
� Do not apply directly over gypsum-basedsurfaces
� Prevent prolonged breathing of vapor andskin contact
� Avoid contact with eyes
� KEEP OUT OF THE REACH OFCHILDREN
Seam Sealers/Applicators
MSS 20 Standard Sealer
Description:MSS 20 is used to seal all seams inMannington Resilient products with a vinylwearlayer. MSS 20 provides a chemical“weld” to provide a continuous, impervioussurface. A properly sealed seam will be asstrong as the surface of the floor covering,and will remain intact for the life of the floor.
Directions:Prior to sealing the seam, make certain allseams are clean, dry, and free of adhesivecontamination.
Fill the VST-96 professional applicator bottle(sold separately) at least 2/3 full of sealer. Aftersecuring the VST tip to the applicator bottle,allow the bottle to stand until all air bubbleshave dispersed.
Check the flow of the sealer through the finon a scrap piece of flooring prior to use.
Use the forefinger of one hand on the topflat portion of the tip to guide and ensureproper fin penetration. Use the other handto control sealer flow. Hold the bottle atapproximately a 45° angle.
Lightly squeeze the bottle to apply auniform bead of sealer approximately 1/8"wide, centered on the seam cut.
It is crucial that the seam sealer penetratethe full thickness of the seam cut to ensurea proper chemical weld.
Resilient Installation Accessories (continued)
Resilient Installation Accessories
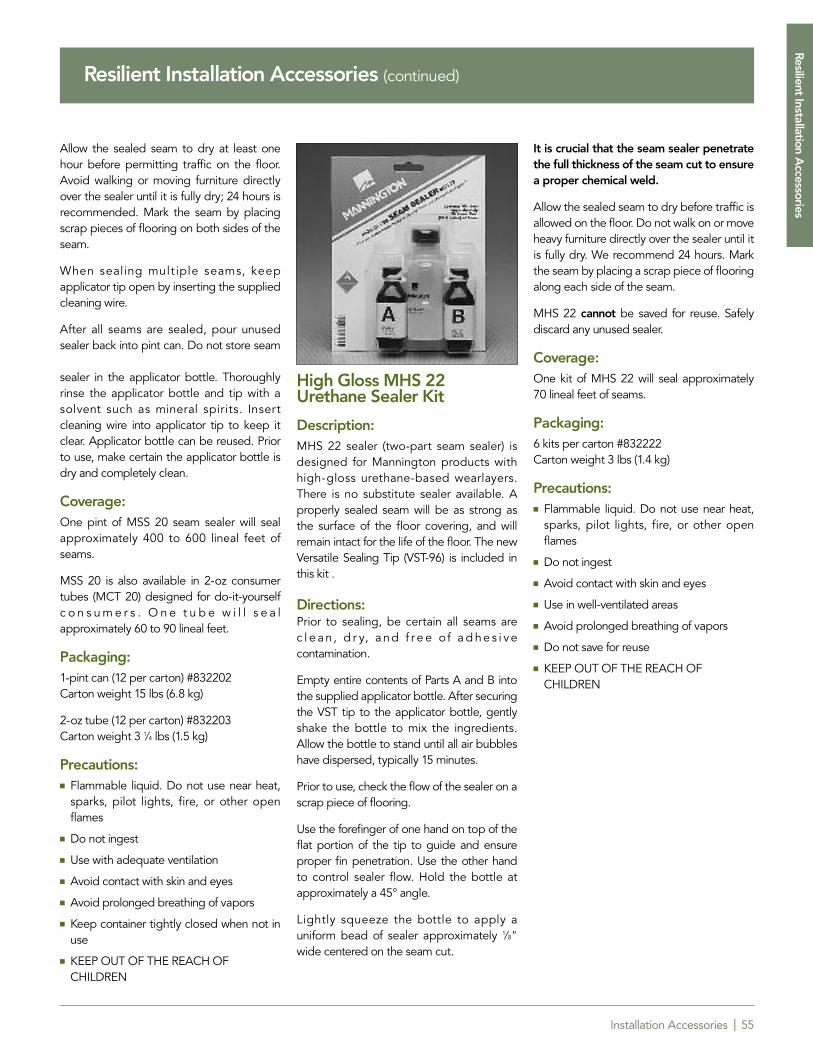
Installation Accessories | 55
Allow the sealed seam to dry at least onehour before permitting traffic on the floor.Avoid walking or moving furniture directlyover the sealer until it is fully dry; 24 hours isrecommended. Mark the seam by placingscrap pieces of flooring on both sides of theseam.
When sealing mult iple seams, keepapplicator tip open by inserting the suppliedcleaning wire.
After all seams are sealed, pour unusedsealer back into pint can. Do not store seam
sealer in the applicator bottle. Thoroughlyrinse the applicator bottle and tip with asolvent such as mineral spirits. Insertcleaning wire into applicator tip to keep itclear. Applicator bottle can be reused. Priorto use, make certain the applicator bottle isdry and completely clean.
Coverage:One pint of MSS 20 seam sealer will sealapproximately 400 to 600 lineal feet ofseams.
MSS 20 is also available in 2-oz consumertubes (MCT 20) designed for do-it-yourselfc o n s u m e r s . O n e t u b e w i l l s e a lapproximately 60 to 90 lineal feet.
Packaging:1-pint can (12 per carton) #832202Carton weight 15 lbs (6.8 kg)
2-oz tube (12 per carton) #832203Carton weight 3 1/4 lbs (1.5 kg)
Precautions:� Flammable liquid. Do not use near heat,
sparks, pilot lights, fire, or other openflames
� Do not ingest
� Use with adequate ventilation
� Avoid contact with skin and eyes
� Avoid prolonged breathing of vapors
� Keep container tightly closed when not inuse
� KEEP OUT OF THE REACH OFCHILDREN
High Gloss MHS 22Urethane Sealer Kit
Description:MHS 22 sealer (two-part seam sealer) isdesigned for Mannington products withhigh-gloss urethane-based wearlayers.There is no substitute sealer available. Aproperly sealed seam will be as strong asthe surface of the floor covering, and willremain intact for the life of the floor. The newVersatile Sealing Tip (VST-96) is included inthis kit .
Directions:Prior to sealing, be certain all seams arec l e a n, d r y, a n d f r e e of a d h e s i vecontamination.
Empty entire contents of Parts A and B intothe supplied applicator bottle. After securingthe VST tip to the applicator bottle, gentlyshake the bottle to mix the ingredients.Allow the bottle to stand until all air bubbleshave dispersed, typically 15 minutes.
Prior to use, check the flow of the sealer on ascrap piece of flooring.
Use the forefinger of one hand on top of theflat portion of the tip to guide and ensureproper fin penetration. Use the other handto control sealer flow. Hold the bottle atapproximately a 45° angle.
Lightly squeeze the bottle to apply auniform bead of sealer approximately 1/8"wide centered on the seam cut.
It is crucial that the seam sealer penetratethe full thickness of the seam cut to ensurea proper chemical weld.
Allow the sealed seam to dry before traffic isallowed on the floor. Do not walk on or moveheavy furniture directly over the sealer until itis fully dry. We recommend 24 hours. Markthe seam by placing a scrap piece of flooringalong each side of the seam.
MHS 22 cannot be saved for reuse. Safelydiscard any unused sealer.
Coverage:One kit of MHS 22 will seal approximately70 lineal feet of seams.
Packaging:6 kits per carton #832222Carton weight 3 lbs (1.4 kg)
Precautions:� Flammable liquid. Do not use near heat,
sparks, pilot lights, fire, or other openflames
� Do not ingest
� Avoid contact with skin and eyes
� Use in well-ventilated areas
� Avoid prolonged breathing of vapors
� Do not save for reuse
� KEEP OUT OF THE REACH OFCHILDREN
Resilient Installation Accessories (continued)
Resilient Installation Accessories
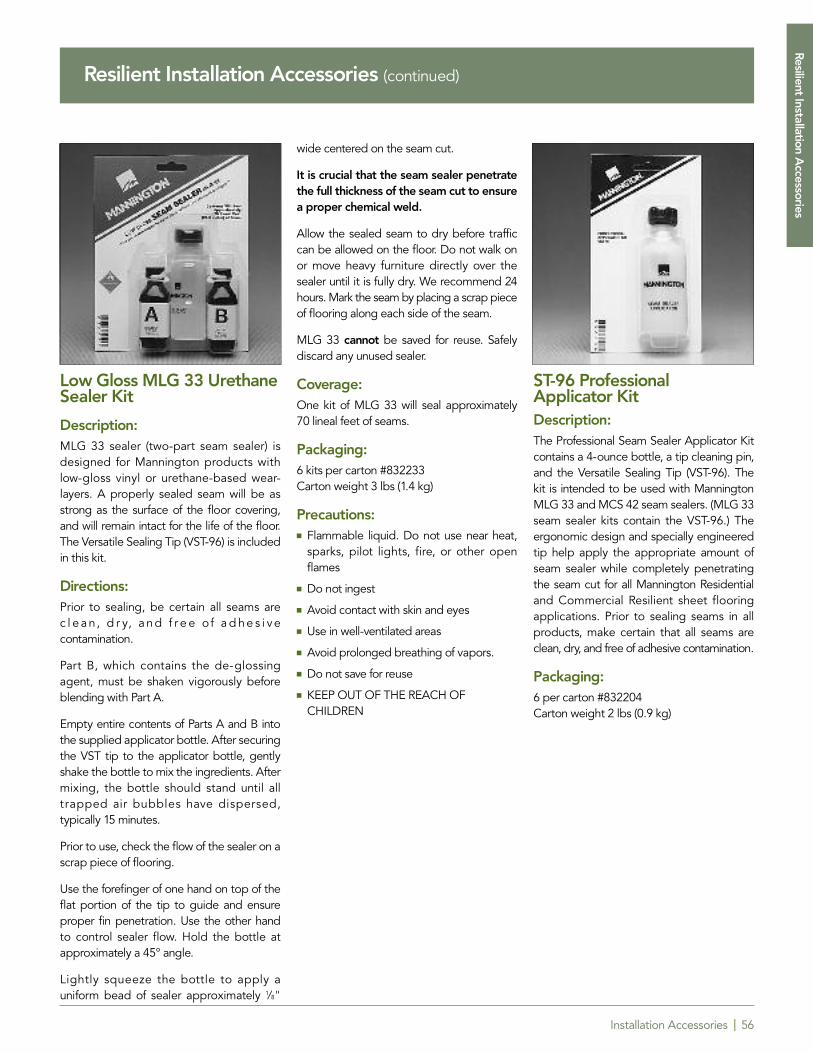
Installation Accessories | 56
Low Gloss MLG 33 UrethaneSealer Kit
Description:MLG 33 sealer (two-part seam sealer) isdesigned for Mannington products with low-gloss vinyl or urethane-based wear-layers. A properly sealed seam will be asstrong as the surface of the floor covering,and will remain intact for the life of the floor.The Versatile Sealing Tip (VST-96) is includedin this kit.
Directions:Prior to sealing, be certain all seams arec l e a n, d r y, a n d f r e e of a d h e s i vecontamination.
Part B, which contains the de-glossingagent, must be shaken vigorously beforeblending with Part A.
Empty entire contents of Parts A and B intothe supplied applicator bottle. After securingthe VST tip to the applicator bottle, gentlyshake the bottle to mix the ingredients. Aftermixing, the bottle should stand until alltrapped air bubbles have dispersed,typically 15 minutes.
Prior to use, check the flow of the sealer on ascrap piece of flooring.
Use the forefinger of one hand on top of theflat portion of the tip to guide and ensureproper fin penetration. Use the other handto control sealer flow. Hold the bottle atapproximately a 45° angle.
Lightly squeeze the bottle to apply auniform bead of sealer approximately 1/8"
wide centered on the seam cut.
It is crucial that the seam sealer penetratethe full thickness of the seam cut to ensurea proper chemical weld.
Allow the sealed seam to dry before trafficcan be allowed on the floor. Do not walk onor move heavy furniture directly over thesealer until it is fully dry. We recommend 24 hours. Mark the seam by placing a scrap pieceof flooring along each side of the seam.
MLG 33 cannot be saved for reuse. Safelydiscard any unused sealer.
Coverage:One kit of MLG 33 will seal approximately70 lineal feet of seams.
Packaging:6 kits per carton #832233Carton weight 3 lbs (1.4 kg)
Precautions:� Flammable liquid. Do not use near heat,
sparks, pilot lights, fire, or other openflames
� Do not ingest
� Avoid contact with skin and eyes
� Use in well-ventilated areas
� Avoid prolonged breathing of vapors.
� Do not save for reuse
� KEEP OUT OF THE REACH OFCHILDREN
ST-96 Professional Applicator Kit Description:The Professional Seam Sealer Applicator Kitcontains a 4-ounce bottle, a tip cleaning pin,and the Versatile Sealing Tip (VST-96). Thekit is intended to be used with ManningtonMLG 33 and MCS 42 seam sealers. (MLG 33seam sealer kits contain the VST-96.) Theergonomic design and specially engineeredtip help apply the appropriate amount ofseam sealer while completely penetratingthe seam cut for all Mannington Residentialand Commercial Resilient sheet flooringapplications. Prior to sealing seams in allproducts, make certain that all seams areclean, dry, and free of adhesive contamination.
Packaging:6 per carton #832204Carton weight 2 lbs (0.9 kg)
Resilient Installation Accessories (continued)
Resilient Installation Accessories
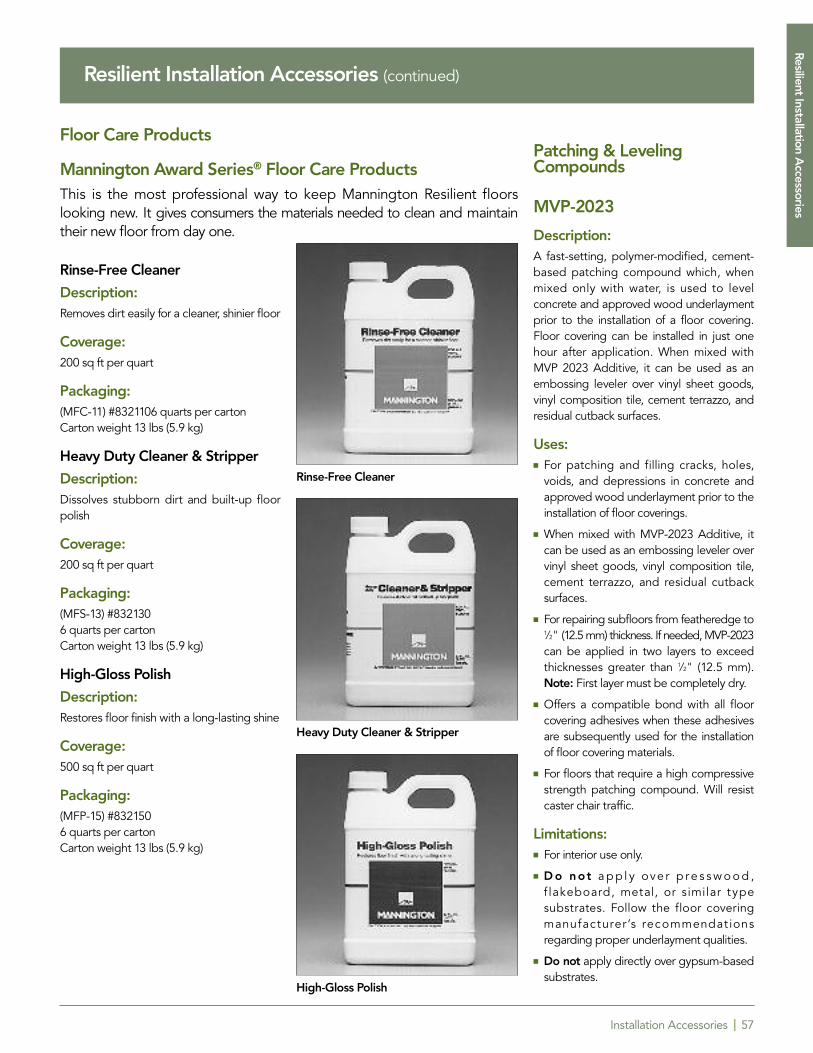
Installation Accessories | 57
Rinse-Free Cleaner
Description:Removes dirt easily for a cleaner, shinier floor
Coverage:200 sq ft per quart
Packaging:(MFC-11) #8321106 quarts per cartonCarton weight 13 lbs (5.9 kg)
Heavy Duty Cleaner & Stripper
Description:Dissolves stubborn dirt and built-up floorpolish
Coverage:200 sq ft per quart
Packaging:(MFS-13) #8321306 quarts per cartonCarton weight 13 lbs (5.9 kg)
High-Gloss Polish
Description:Restores floor finish with a long-lasting shine
Coverage:500 sq ft per quart
Packaging:(MFP-15) #8321506 quarts per cartonCarton weight 13 lbs (5.9 kg)
Patching & LevelingCompounds
MVP-2023
Description:A fast-setting, polymer-modified, cement-based patching compound which, whenmixed only with water, is used to level concrete and approved wood underlaymentprior to the installation of a floor covering.Floor covering can be installed in just onehour after application. When mixed withMVP 2023 Additive, it can be used as anembossing leveler over vinyl sheet goods,vinyl composition tile, cement terrazzo, andresidual cutback surfaces.
Uses:� For patching and filling cracks, holes,
voids, and depressions in concrete andapproved wood underlayment prior to theinstallation of floor coverings.
� When mixed with MVP-2023 Additive, itcan be used as an embossing leveler overvinyl sheet goods, vinyl composition tile,cement terrazzo, and residual cutbacksurfaces.
� For repairing subfloors from featheredge to1/2" (12.5 mm) thickness. If needed, MVP-2023can be applied in two layers to exceedthicknesses greater than 1/2" (12.5 mm).Note: First layer must be completely dry.
� Offers a compatible bond with all floorcovering adhesives when these adhesivesare subsequently used for the installationof floor covering materials.
� For floors that require a high compressivestrength patching compound. Will resistcaster chair traffic.
Limitations:� For interior use only.
� D o not a p p l y ove r p r e s s w o o d ,f lakeboard, metal, or similar typesubstrates. Follow the floor coveringmanufacturer ’s recommendat ionsregarding proper underlayment qualities.
� Do not apply directly over gypsum-basedsubstrates.
Rinse-Free Cleaner
Heavy Duty Cleaner & Stripper
High-Gloss Polish
Floor Care Products
Mannington Award Series® Floor Care ProductsThis is the most professional way to keep Mannington Resilient floorslooking new. It gives consumers the materials needed to clean and maintaintheir new floor from day one.
Resilient Installation Accessories (continued)
Resilient Installation Accessories
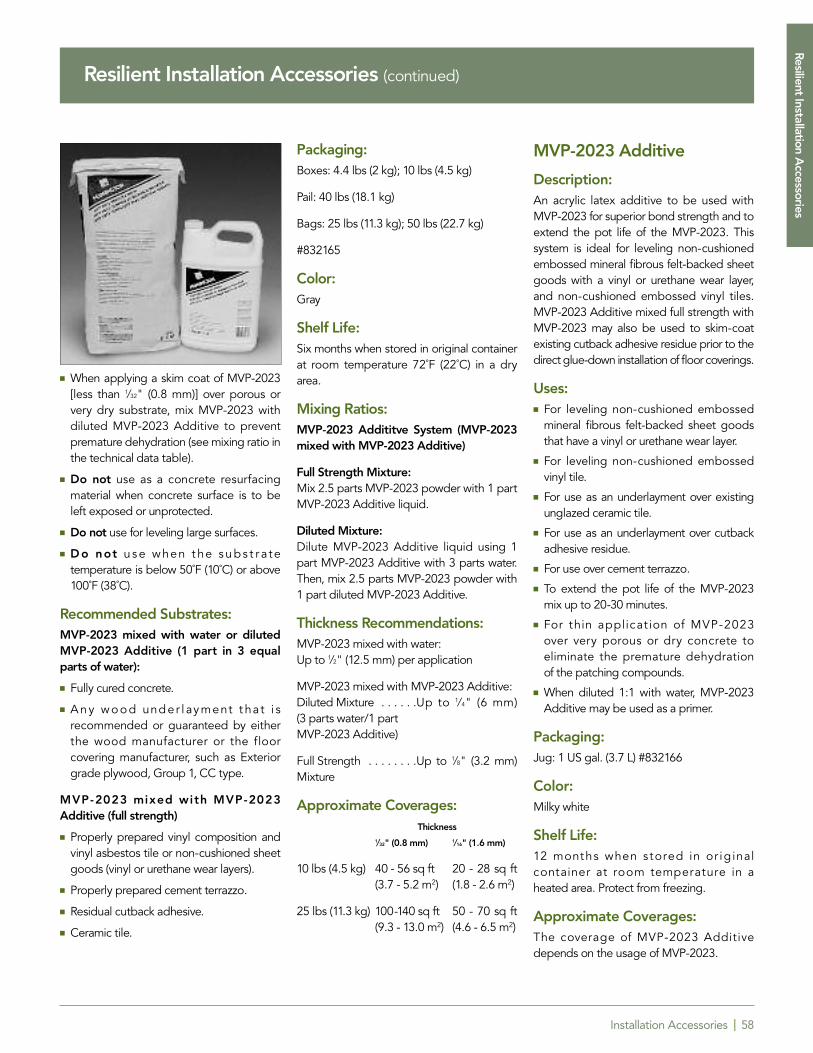
Installation Accessories | 58
� When applying a skim coat of MVP-2023[less than 1/32" (0.8 mm)] over porous orvery dry substrate, mix MVP-2023 withdiluted MVP-2023 Additive to preventpremature dehydration (see mixing ratio inthe technical data table).
� Do not use as a concrete resurfacingmaterial when concrete surface is to beleft exposed or unprotected.
� Do not use for leveling large surfaces.
� D o not u s e w hen t he s u b s t r a tetemperature is below 50˚F (10˚C) or above100˚F (38˚C).
Recommended Substrates:MVP-2023 mixed with water or dilutedMVP-2023 Additive (1 part in 3 equalparts of water):
� Fully cured concrete.
� A n y w o o d und er l ay ment t hat i srecommended or guaranteed by eitherthe wood manufacturer or the floorcovering manufacturer, such as Exteriorgrade plywood, Group 1, CC type.
MVP-2023 mixed with MVP-2023Additive (full strength)
� Properly prepared vinyl composition andvinyl asbestos tile or non-cushioned sheetgoods (vinyl or urethane wear layers).
� Properly prepared cement terrazzo.
� Residual cutback adhesive.
� Ceramic tile.
Packaging:Boxes: 4.4 lbs (2 kg); 10 lbs (4.5 kg)
Pail: 40 lbs (18.1 kg)
Bags: 25 lbs (11.3 kg); 50 lbs (22.7 kg)
#832165
Color:Gray
Shelf Life:Six months when stored in original containerat room temperature 72˚F (22˚C) in a dryarea.
Mixing Ratios:MVP-2023 Addititve System (MVP-2023mixed with MVP-2023 Additive)
Full Strength Mixture:Mix 2.5 parts MVP-2023 powder with 1 partMVP-2023 Additive liquid.
Diluted Mixture:Dilute MVP-2023 Additive liquid using 1part MVP-2023 Additive with 3 parts water.Then, mix 2.5 parts MVP-2023 powder with1 part diluted MVP-2023 Additive.
Thickness Recommendations:MVP-2023 mixed with water:Up to 1/2" (12.5 mm) per application
MVP-2023 mixed with MVP-2023 Additive:Diluted Mixture . . . . . .Up to 1/4" (6 mm)(3 parts water/1 part MVP-2023 Additive)
Full Strength . . . . . . . .Up to 1/8" (3.2 mm)Mixture
Approximate Coverages:Thickness
1/32" (0.8 mm) 1/16" (1.6 mm)
10 lbs (4.5 kg) 40 - 56 sq ft 20 - 28 sq ft (3.7 - 5.2 m2) (1.8 - 2.6 m2)
25 lbs (11.3 kg) 100-140 sq ft 50 - 70 sq ft(9.3 - 13.0 m2) (4.6 - 6.5 m2)
MVP-2023 Additive
Description:An acrylic latex additive to be used withMVP-2023 for superior bond strength and toextend the pot life of the MVP-2023. Thissystem is ideal for leveling non-cushionedembossed mineral fibrous felt-backed sheetgoods with a vinyl or urethane wear layer,and non-cushioned embossed vinyl tiles.MVP-2023 Additive mixed full strength withMVP-2023 may also be used to skim-coatexisting cutback adhesive residue prior to thedirect glue-down installation of floor coverings.
Uses:� For leveling non-cushioned embossed
mineral fibrous felt-backed sheet goodsthat have a vinyl or urethane wear layer.
� For leveling non-cushioned embossedvinyl tile.
� For use as an underlayment over existingunglazed ceramic tile.
� For use as an underlayment over cutbackadhesive residue.
� For use over cement terrazzo.
� To extend the pot life of the MVP-2023mix up to 20-30 minutes.
� For thin applicat ion of MVP-2023 over very porous or dry concrete toeliminate the premature dehydration of the patching compounds.
� When diluted 1:1 with water, MVP-2023Additive may be used as a primer.
Packaging:Jug: 1 US gal. (3.7 L) #832166
Color:Milky white
Shelf Life:12 months when stored in or ig inal container at room temperature in a heated area. Protect from freezing.
Approximate Coverages:The coverage of MVP-2023 Additivedepends on the usage of MVP-2023.
Resilient Installation Accessories (continued)
Resilient Installation Accessories
General Installation | Adura® | 59
Hardwood
Hard
wood
Flooring Installation G
uide

Hardwood | 60
Hardwood Flooring Installation Guide
General RecommendationsAll general installation instructions stated in General Installation Guidelines regarding storage and job siteconditions, including climatic and structural requirements, are applicable to Mannington Hardwood Floors. Reviewand consider these requirements before proceeding with the installation.
Product InspectionWood is a natural product, containing natural variations in color, tone, and grain. Before any Mannington engineeredwood flooring leaves our plant, each plank goes through numerous inspection stations. Color variation betweenplanks, however, is to be expected in a wood floor. Mannington cannot guarantee against natural variation in eachplank, nor minor differences between samples and the color of the floor. With Mannington, you’re protected by ourexclusive Pre-Installation Limited Warranty. Return any planks you are not satisfied with, uncut, BEFORE installationand we’ll replace them, no questions asked.
We urge you to inspect for color, finish, and graining BEFORE installation. Care should be taken during installationto remove or repair particular characteristics you do not desire. We suggest you use cut planks as starter strips tobegin each new row and to “rack" the flooring to ensure a random appearance.
Furthermore, we recommend that you examine cartons to determine those that contain random length planks and those that contain full length planks. Plan the layout accordingly so that a random appearance is maintainedthroughout the installation.
NOTE: Mannington Hardwood Floors accepts no responsibility for costs incurred when a floor with visible defects has been installed.
Job Site ConditionsIn addition to the general instructions, Mannington Hardwood has category specific requirements.
Mannington engineered wood flooring does not need to be acclimated to the job site unless the flooring will betransported from one extreme temperature or humidity to another. If there is a severe temperature or humidity difference,make sure to condition the cartons of wood flooring and UltraSpread Mastic™ adhesive, if being used, 24 hoursbefore the installation.
Temperature & Humidity RequirementsThe job site in a wood flooring installation must be climate controlled. If you are transporting wood flooring from oneextreme temperature or humidity to another, however, make sure to condition the cartons 24 hours before installation;48 hours for bamboo. Wood flooring performs best in climate-controlled interior environments. A permanent HVAC unit (or equavilent) must be operational in order to provide consistent room temperature between 60º and 80º F(16º to 27º C) and a humidity level of 35% to 55%. Temperature and humidity must be controlled for the life of the flooring.
UltraSpread Mastic™ has a minimum working temperature of 65°F. Never use UltraSpread Mastic™ below thistemperature. Open time for UltraSpread Mastic™ is affected by temperature and humidity. As a general rule, thehigher the temperature and humidity, the shorter the open time.
Moisture RequirementsWood subfloor moisture content must never exceed 14% moisture content when measured with a dependablemoisture meter. The difference between the wood subfloor system moisture content and that of the hardwoodflooring must not be greater than 4%.
The moisture content of the bamboo flooring and the wood subfloor must never be greater than 2% of each other.
Concrete subfloors must be visibly dry, with no history or evidence of excessive moisture vapor transmission. As aframe of reference, Calcium Chloride test results should be at 5 pounds or less moisture vapor transmission.
�
Hard
wood
Flooring Installation G
uide
Hardwood | 61
Hardwood Flooring Installation Guide (continued)
Subfloor InformationAll subfloors should be free of dirt, oil, grease, wax, paint, or any substance that would hinder adhesion. Allsubfloors should also be level to 1⁄4" per 10' span and should be visually dry and structurally sound.
Wood SubfloorsAll wood subfloors must be structurally sound, dry, at least 3/4" in thickness, solidly fastened to appropriatelyspaced floor joists, and in compliance with all local building codes. First, make sure subfloor is dry. Subfloor woodmoisture content cannot exceed 14% prior to installation. For bamboo it cannot exceed 10%. To determine woodmoisture content use a quality moisture meter. Next, determine if subfloor is structurally sound; both floor joistspacing and subfloor panel selection must be considered. Use the following requirements as a guide:
� Planks may be installed (stapled, nailed, glued, or floated) to a single layer of 3/4" thick, tongue-and-grooveplywood or 3/4" structural grade oriented strand board (OSB) substrate over appropriately spaced floor joists.
� If the subfloor is plywood or OSB less than 3/4" thick, add a second cross layer for strength and stability(minimum 5/16" thick to total 1" in thickness). To reduce the possibility of squeaking, install the underlaymentper the manufacturer’s guidelines.
� 19.2" and 24" on center joist spacing may be acceptable if the subfloor system is designed in accordancewith local building codes and is free of deflection.
NOTE: Do not staple or nail down Mannington engineered wood flooring over particleboard subfloors.
Concrete SubfloorsAll concrete subfloor systems must meet or exceed local building code specifications.
For concrete slabs that are on- or below-grade, it is recommended they be constructed so that ground water vaporcannot penetrate. Suspended, above-grade concrete subfloors often require extended drying time to lose initialmoisture. Curing and drying time will vary depending on the type of concrete mix and the environment in which it isplaced. New concrete slabs require a minimum of six weeks drying time before they can be covered with a woodfloor. You can install Mannington engineered hardwood floors over concrete subfloors when using ManningtonUltraSpread Mastic™ (glue-down method) or Mannington MegaGlueTM adhesive (floating method) if the subfloor isvisually dry and has no history of moisture problems.
Preparing Concrete Underfloors
Remove all curing agents, parting agents, or surface hardeners by grinding before installing wood flooring products.Also remove all paint, varnish, or other surface contaminants. You may remove these either chemically ormechanically, but do not use solvent-based strippers under any circumstances. Residual solvents can prohibitsatisfactory bond of flooring adhesives. Be careful to maintain any physical expansion joints in the concreteunderfloor. These joints were placed to permit expansion and movement of the slab. Use transition moldingsmanufactured specifically for this purpose to maintain the functionality of the expansion joint. Fill and level all othercold joints, cracks, or depressions with Mannington MVP 2023 or a quality cementitious patching compound.
NOTE: Mannington Hardwood Floors’ moisture release warranty is in effect only when........Mannington UltraSpread Mastic is used and the flooring is installed according to Mannington
installation instructions.
�
Hard
wood
Flooring Installation G
uide
�
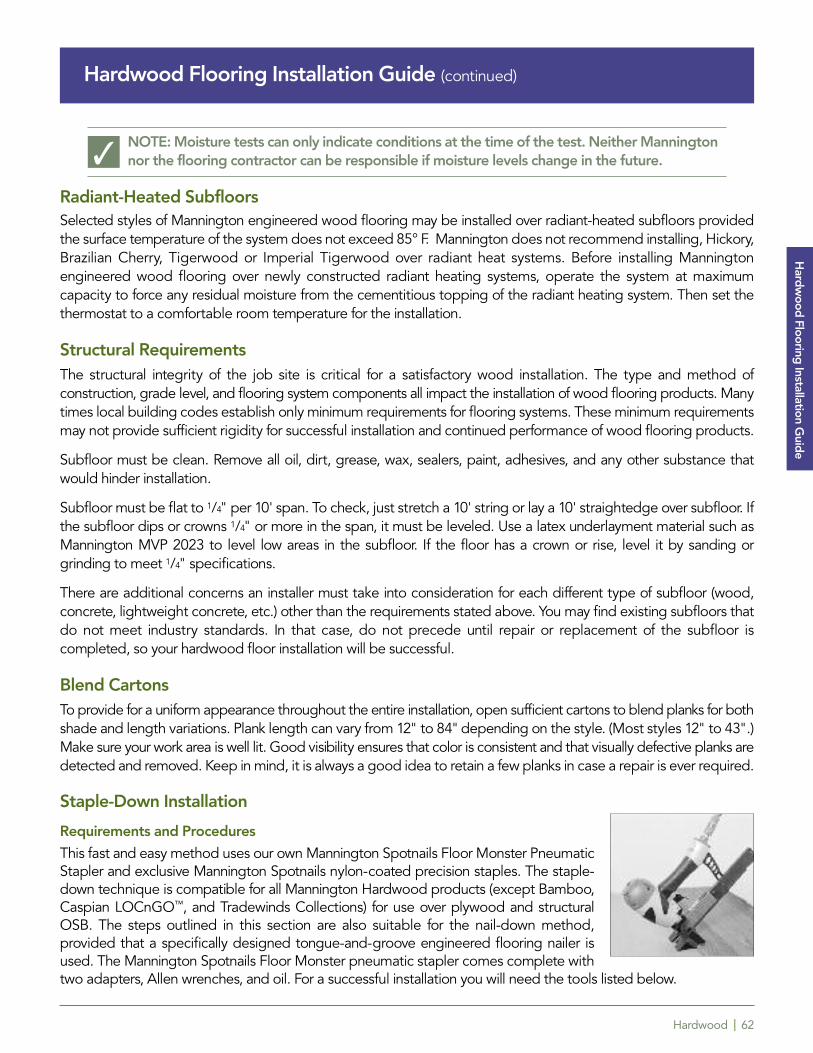
Hardwood | 62
Hardwood Flooring Installation Guide (continued)
NOTE: Moisture tests can only indicate conditions at the time of the test. Neither Manningtonnor the flooring contractor can be responsible if moisture levels change in the future.
Radiant-Heated SubfloorsSelected styles of Mannington engineered wood flooring may be installed over radiant-heated subfloors providedthe surface temperature of the system does not exceed 85° F. Mannington does not recommend installing, Hickory,Brazilian Cherry, Tigerwood or Imperial Tigerwood over radiant heat systems. Before installing Manningtonengineered wood flooring over newly constructed radiant heating systems, operate the system at maximumcapacity to force any residual moisture from the cementitious topping of the radiant heating system. Then set thethermostat to a comfortable room temperature for the installation.
Structural RequirementsThe structural integrity of the job site is critical for a satisfactory wood installation. The type and method ofconstruction, grade level, and flooring system components all impact the installation of wood flooring products. Manytimes local building codes establish only minimum requirements for flooring systems. These minimum requirementsmay not provide sufficient rigidity for successful installation and continued performance of wood flooring products.
Subfloor must be clean. Remove all oil, dirt, grease, wax, sealers, paint, adhesives, and any other substance thatwould hinder installation.
Subfloor must be flat to 1/4" per 10' span. To check, just stretch a 10' string or lay a 10' straightedge over subfloor. Ifthe subfloor dips or crowns 1/4" or more in the span, it must be leveled. Use a latex underlayment material such asMannington MVP 2023 to level low areas in the subfloor. If the floor has a crown or rise, level it by sanding orgrinding to meet 1/4" specifications.
There are additional concerns an installer must take into consideration for each different type of subfloor (wood,concrete, lightweight concrete, etc.) other than the requirements stated above. You may find existing subfloors thatdo not meet industry standards. In that case, do not precede until repair or replacement of the subfloor iscompleted, so your hardwood floor installation will be successful.
Blend CartonsTo provide for a uniform appearance throughout the entire installation, open sufficient cartons to blend planks for bothshade and length variations. Plank length can vary from 12" to 84" depending on the style. (Most styles 12" to 43".)Make sure your work area is well lit. Good visibility ensures that color is consistent and that visually defective planks aredetected and removed. Keep in mind, it is always a good idea to retain a few planks in case a repair is ever required.
Staple-Down Installation
Requirements and Procedures
This fast and easy method uses our own Mannington Spotnails Floor Monster PneumaticStapler and exclusive Mannington Spotnails nylon-coated precision staples. The staple-down technique is compatible for all Mannington Hardwood products (except Bamboo,Caspian LOCnGO™, and Tradewinds Collections) for use over plywood and structuralOSB. The steps outlined in this section are also suitable for the nail-down method,provided that a specifically designed tongue-and-groove engineered flooring nailer isused. The Mannington Spotnails Floor Monster pneumatic stapler comes complete withtwo adapters, Allen wrenches, and oil. For a successful installation you will need the tools listed below.
�
Hard
wood
Flooring Installation G
uide
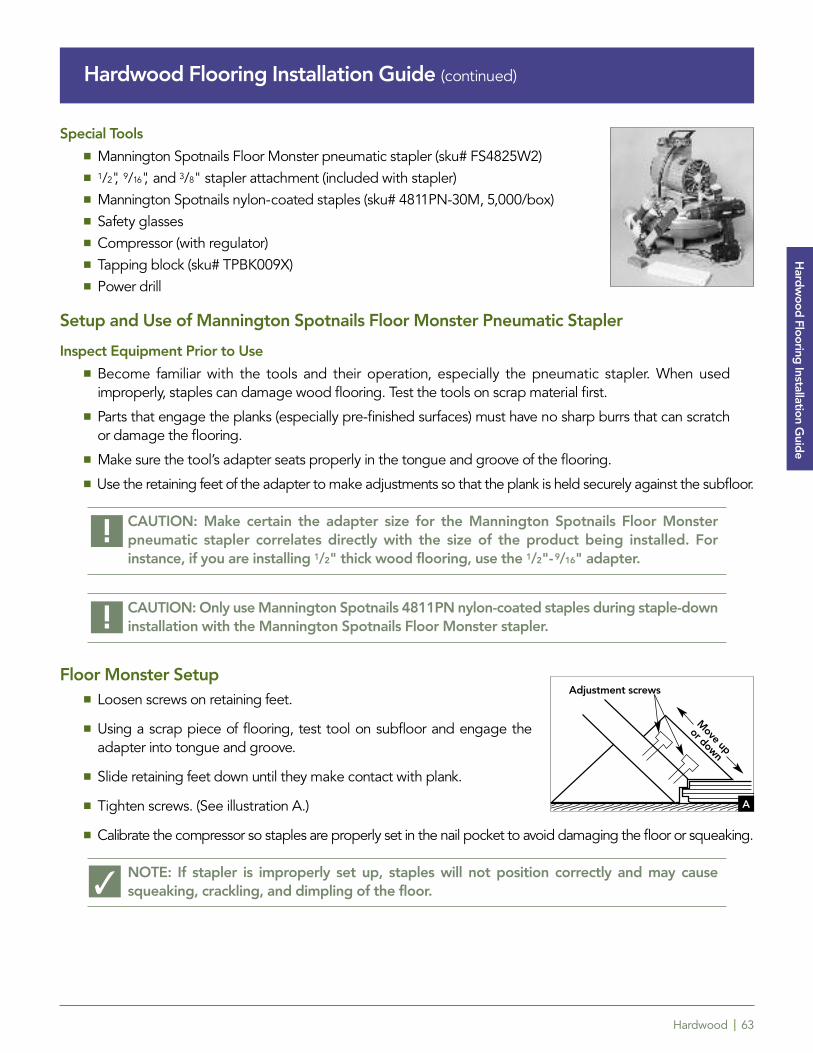
Hardwood | 63
Hardwood Flooring Installation Guide (continued)
Special Tools� Mannington Spotnails Floor Monster pneumatic stapler (sku# FS4825W2)� 1/2", 9/16", and 3/8" stapler attachment (included with stapler)� Mannington Spotnails nylon-coated staples (sku# 4811PN-30M, 5,000/box)� Safety glasses� Compressor (with regulator)� Tapping block (sku# TPBK009X)� Power drill
Setup and Use of Mannington Spotnails Floor Monster Pneumatic Stapler
Inspect Equipment Prior to Use� Become familiar with the tools and their operation, especially the pneumatic stapler. When used
improperly, staples can damage wood flooring. Test the tools on scrap material first.
� Parts that engage the planks (especially pre-finished surfaces) must have no sharp burrs that can scratchor damage the flooring.
� Make sure the tool’s adapter seats properly in the tongue and groove of the flooring.
� Use the retaining feet of the adapter to make adjustments so that the plank is held securely against the subfloor.
CAUTION: Make certain the adapter size for the Mannington Spotnails Floor Monster pneumatic stapler correlates directly with the size of the product being installed. For instance, if you are installing 1/2" thick wood flooring, use the 1/2"-9/16" adapter.
CAUTION: Only use Mannington Spotnails 4811PN nylon-coated staples during staple-down installation with the Mannington Spotnails Floor Monster stapler.
Floor Monster Setup� Loosen screws on retaining feet.
� Using a scrap piece of flooring, test tool on subfloor and engage theadapter into tongue and groove.
� Slide retaining feet down until they make contact with plank.
� Tighten screws. (See illustration A.)
� Calibrate the compressor so staples are properly set in the nail pocket to avoid damaging the floor or squeaking.
NOTE: If stapler is improperly set up, staples will not position correctly and may cause squeaking, crackling, and dimpling of the floor.
!
!
A
Adjustment screws
Move up
or down
Hard
wood
Flooring Installation G
uide
�
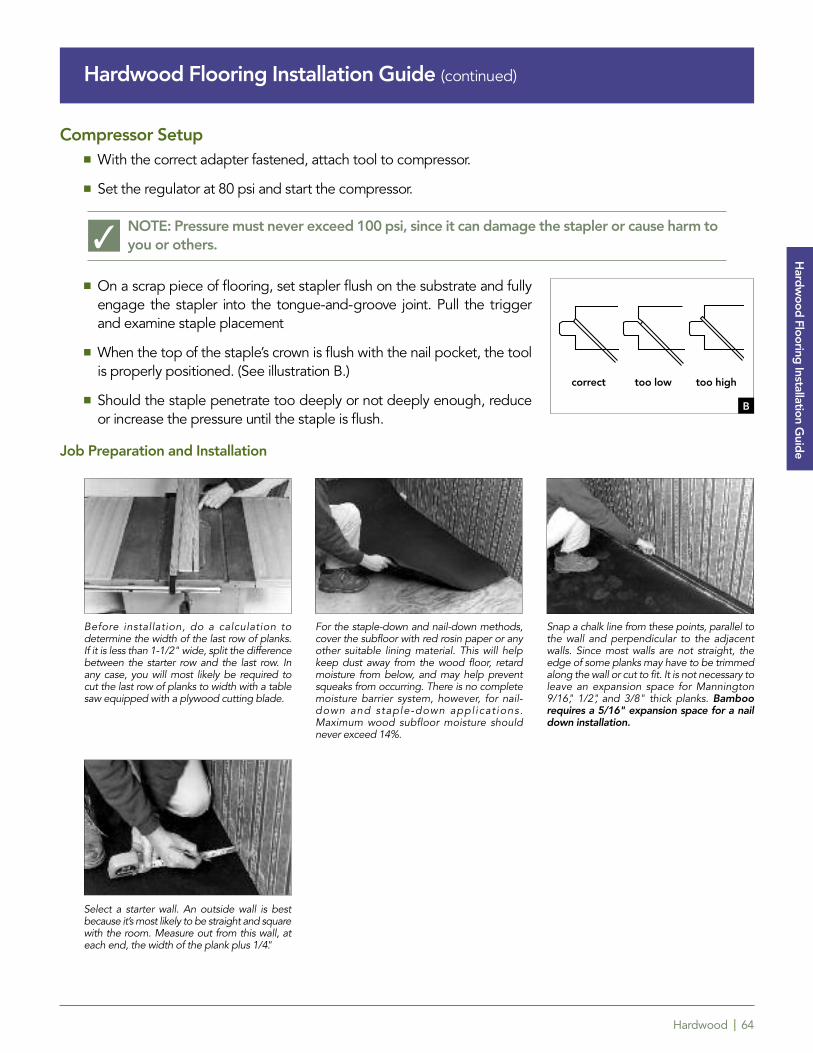
Hardwood | 64
Hardwood Flooring Installation Guide (continued)
Compressor Setup� With the correct adapter fastened, attach tool to compressor.
� Set the regulator at 80 psi and start the compressor.
NOTE: Pressure must never exceed 100 psi, since it can damage the stapler or cause harm to you or others.
� On a scrap piece of flooring, set stapler flush on the substrate and fullyengage the stapler into the tongue-and-groove joint. Pull the triggerand examine staple placement
� When the top of the staple’s crown is flush with the nail pocket, the toolis properly positioned. (See illustration B.)
� Should the staple penetrate too deeply or not deeply enough, reduceor increase the pressure until the staple is flush.
Job Preparation and Installation
�
Before installation, do a calculation todetermine the width of the last row of planks.If it is less than 1-1/2" wide, split the differencebetween the starter row and the last row. Inany case, you will most likely be required tocut the last row of planks to width with a tablesaw equipped with a plywood cutting blade.
For the staple-down and nail-down methods,cover the subfloor with red rosin paper or anyother suitable lining material. This will helpkeep dust away from the wood floor, retardmoisture from below, and may help preventsqueaks from occurring. There is no completemoisture barrier system, however, for nail-down and staple-down appl icat ions.Maximum wood subfloor moisture shouldnever exceed 14%.
Snap a chalk line from these points, parallel tothe wall and perpendicular to the adjacentwalls. Since most walls are not straight, theedge of some planks may have to be trimmedalong the wall or cut to fit. It is not necessary toleave an expansion space for Mannington9/16", 1/2", and 3/8" thick planks. Bamboorequires a 5/16" expansion space for a naildown installation.
Select a starter wall. An outside wall is bestbecause it’s most likely to be straight and squarewith the room. Measure out from this wall, ateach end, the width of the plank plus 1/4."
B
correct too low too high
Hard
wood
Flooring Installation G
uide
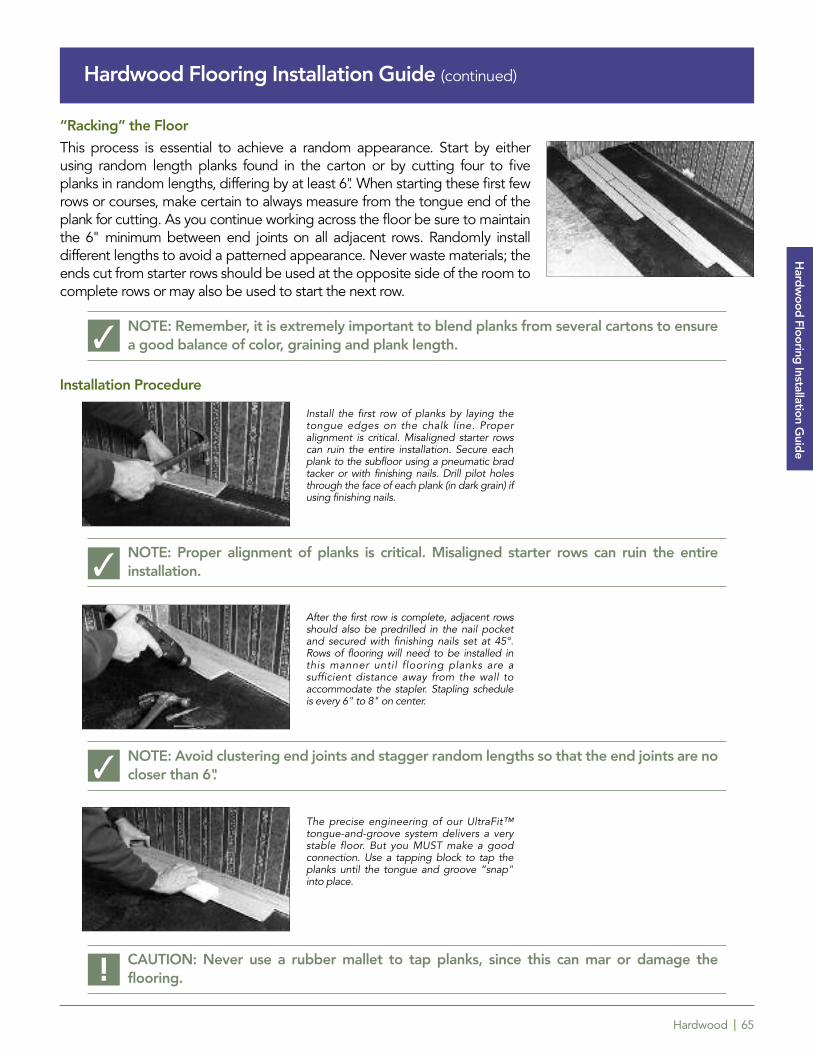
Hardwood | 65
Hardwood Flooring Installation Guide (continued)
“Racking” the Floor
This process is essential to achieve a random appearance. Start by eitherusing random length planks found in the carton or by cutting four to fiveplanks in random lengths, differing by at least 6". When starting these first fewrows or courses, make certain to always measure from the tongue end of theplank for cutting. As you continue working across the floor be sure to maintainthe 6" minimum between end joints on all adjacent rows. Randomly installdifferent lengths to avoid a patterned appearance. Never waste materials; theends cut from starter rows should be used at the opposite side of the room tocomplete rows or may also be used to start the next row.
NOTE: Remember, it is extremely important to blend planks from several cartons to ensurea good balance of color, graining and plank length.
Installation Procedure
NOTE: Proper alignment of planks is critical. Misaligned starter rows can ruin the entireinstallation.
NOTE: Avoid clustering end joints and stagger random lengths so that the end joints are no closer than 6".
CAUTION: Never use a rubber mallet to tap planks, since this can mar or damage theflooring.
Install the first row of planks by laying thetongue edges on the chalk line. Properalignment is critical. Misaligned starter rowscan ruin the entire installation. Secure eachplank to the subfloor using a pneumatic bradtacker or with finishing nails. Drill pilot holesthrough the face of each plank (in dark grain) ifusing finishing nails.
After the first row is complete, adjacent rowsshould also be predrilled in the nail pocketand secured with finishing nails set at 45°.Rows of flooring will need to be installed inthis manner until flooring planks are asufficient distance away from the wall toaccommodate the stapler. Stapling scheduleis every 6" to 8" on center.
The precise engineering of our UltraFit™tongue-and-groove system delivers a verystable floor. But you MUST make a goodconnection. Use a tapping block to tap theplanks until the tongue and groove “snap"into place.
�
�
�
!
Hard
wood
Flooring Installation G
uide
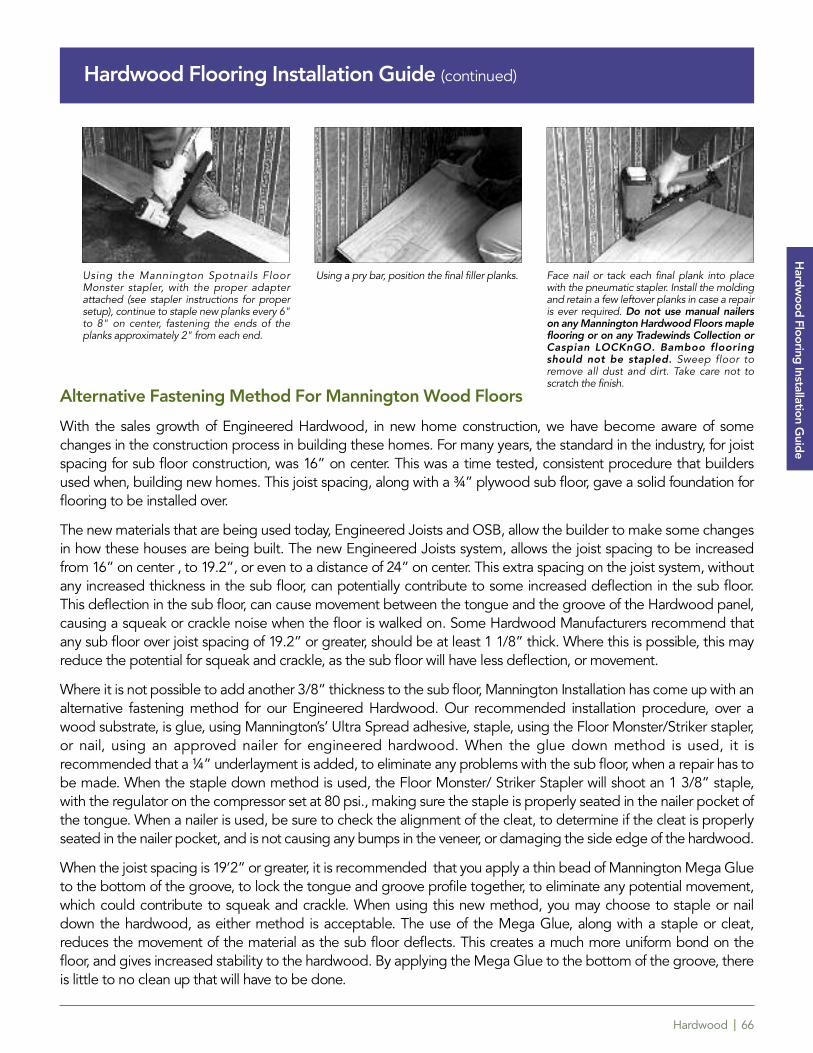
Hardwood | 66
Hardwood Flooring Installation Guide (continued)
Alternative Fastening Method For Mannington Wood Floors
With the sales growth of Engineered Hardwood, in new home construction, we have become aware of somechanges in the construction process in building these homes. For many years, the standard in the industry, for joistspacing for sub floor construction, was 16” on center. This was a time tested, consistent procedure that buildersused when, building new homes. This joist spacing, along with a ¾” plywood sub floor, gave a solid foundation forflooring to be installed over.
The new materials that are being used today, Engineered Joists and OSB, allow the builder to make some changesin how these houses are being built. The new Engineered Joists system, allows the joist spacing to be increasedfrom 16” on center , to 19.2”, or even to a distance of 24” on center. This extra spacing on the joist system, withoutany increased thickness in the sub floor, can potentially contribute to some increased deflection in the sub floor.This deflection in the sub floor, can cause movement between the tongue and the groove of the Hardwood panel,causing a squeak or crackle noise when the floor is walked on. Some Hardwood Manufacturers recommend thatany sub floor over joist spacing of 19.2” or greater, should be at least 1 1/8” thick. Where this is possible, this mayreduce the potential for squeak and crackle, as the sub floor will have less deflection, or movement.
Where it is not possible to add another 3/8” thickness to the sub floor, Mannington Installation has come up with analternative fastening method for our Engineered Hardwood. Our recommended installation procedure, over awood substrate, is glue, using Mannington’s’ Ultra Spread adhesive, staple, using the Floor Monster/Striker stapler,or nail, using an approved nailer for engineered hardwood. When the glue down method is used, it isrecommended that a ¼” underlayment is added, to eliminate any problems with the sub floor, when a repair has tobe made. When the staple down method is used, the Floor Monster/ Striker Stapler will shoot an 1 3/8” staple,with the regulator on the compressor set at 80 psi., making sure the staple is properly seated in the nailer pocket ofthe tongue. When a nailer is used, be sure to check the alignment of the cleat, to determine if the cleat is properlyseated in the nailer pocket, and is not causing any bumps in the veneer, or damaging the side edge of the hardwood.
When the joist spacing is 19’2” or greater, it is recommended that you apply a thin bead of Mannington Mega Glueto the bottom of the groove, to lock the tongue and groove profile together, to eliminate any potential movement,which could contribute to squeak and crackle. When using this new method, you may choose to staple or naildown the hardwood, as either method is acceptable. The use of the Mega Glue, along with a staple or cleat,reduces the movement of the material as the sub floor deflects. This creates a much more uniform bond on thefloor, and gives increased stability to the hardwood. By applying the Mega Glue to the bottom of the groove, thereis little to no clean up that will have to be done.
Using the Mannington Spotnails FloorMonster stapler, with the proper adapterattached (see stapler instructions for propersetup), continue to staple new planks every 6"to 8" on center, fastening the ends of theplanks approximately 2" from each end.
Using a pry bar, position the final filler planks. Face nail or tack each final plank into placewith the pneumatic stapler. Install the moldingand retain a few leftover planks in case a repairis ever required. Do not use manual nailerson any Mannington Hardwood Floors mapleflooring or on any Tradewinds Collection orCaspian LOCKnGO. Bamboo flooringshould not be stapled. Sweep floor toremove all dust and dirt. Take care not toscratch the finish.
Hard
wood
Flooring Installation G
uide
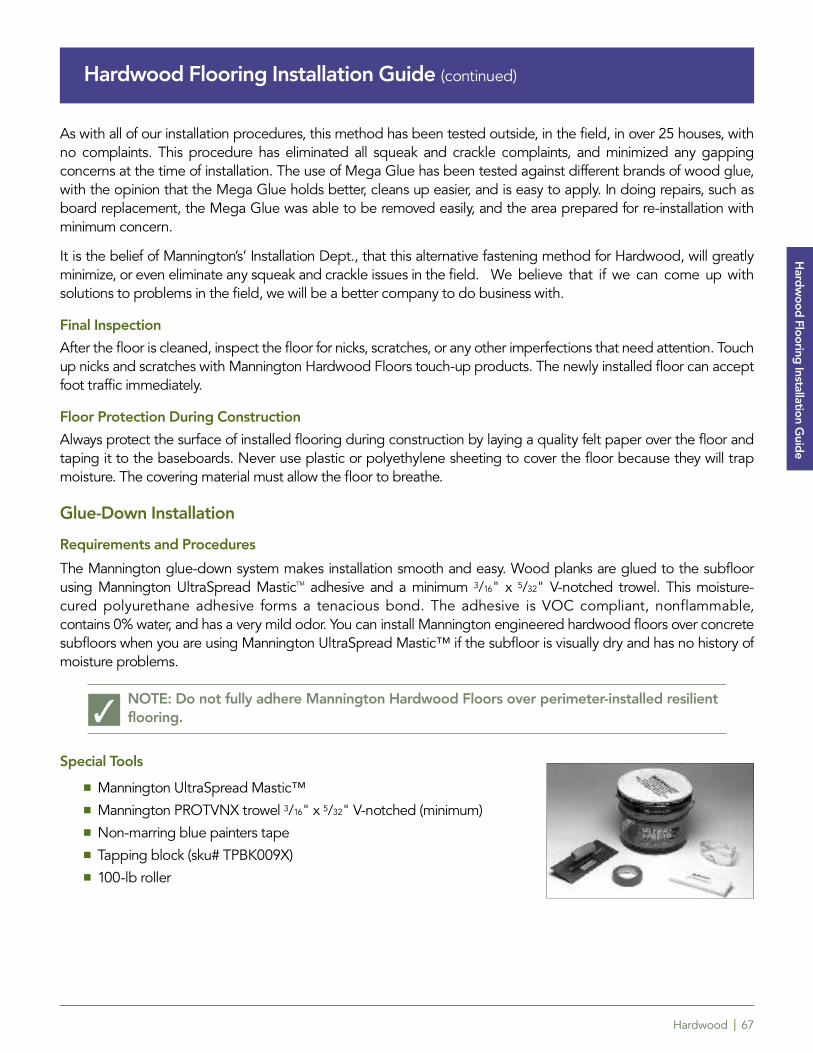
Hardwood | 67
Hardwood Flooring Installation Guide (continued)
As with all of our installation procedures, this method has been tested outside, in the field, in over 25 houses, withno complaints. This procedure has eliminated all squeak and crackle complaints, and minimized any gappingconcerns at the time of installation. The use of Mega Glue has been tested against different brands of wood glue,with the opinion that the Mega Glue holds better, cleans up easier, and is easy to apply. In doing repairs, such asboard replacement, the Mega Glue was able to be removed easily, and the area prepared for re-installation withminimum concern.
It is the belief of Mannington’s’ Installation Dept., that this alternative fastening method for Hardwood, will greatlyminimize, or even eliminate any squeak and crackle issues in the field. We believe that if we can come up withsolutions to problems in the field, we will be a better company to do business with.
Final Inspection
After the floor is cleaned, inspect the floor for nicks, scratches, or any other imperfections that need attention. Touchup nicks and scratches with Mannington Hardwood Floors touch-up products. The newly installed floor can acceptfoot traffic immediately.
Floor Protection During Construction
Always protect the surface of installed flooring during construction by laying a quality felt paper over the floor andtaping it to the baseboards. Never use plastic or polyethylene sheeting to cover the floor because they will trapmoisture. The covering material must allow the floor to breathe.
Glue-Down Installation
Requirements and Procedures
The Mannington glue-down system makes installation smooth and easy. Wood planks are glued to the subfloorusing Mannington UltraSpread MasticTM adhesive and a minimum 3/16" x 5/32" V-notched trowel. This moisture-cured polyurethane adhesive forms a tenacious bond. The adhesive is VOC compliant, nonflammable, contains 0% water, and has a very mild odor. You can install Mannington engineered hardwood floors over concretesubfloors when you are using Mannington UltraSpread Mastic™ if the subfloor is visually dry and has no history ofmoisture problems.
NOTE: Do not fully adhere Mannington Hardwood Floors over perimeter-installed resilientflooring.
Special Tools
� Mannington UltraSpread Mastic™� Mannington PROTVNX trowel 3/16" x 5/32" V-notched (minimum)� Non-marring blue painters tape� Tapping block (sku# TPBK009X)� 100-lb roller
�
Hard
wood
Flooring Installation G
uide
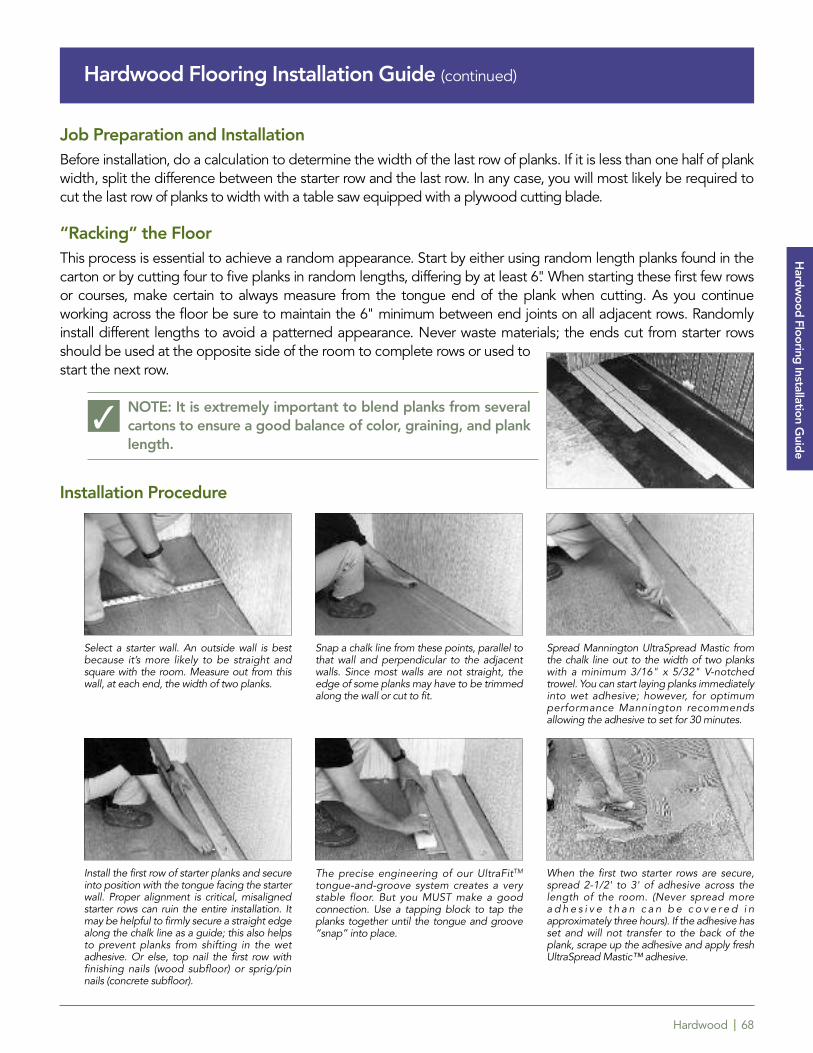
Hardwood | 68
Hardwood Flooring Installation Guide (continued)
Job Preparation and InstallationBefore installation, do a calculation to determine the width of the last row of planks. If it is less than one half of plankwidth, split the difference between the starter row and the last row. In any case, you will most likely be required tocut the last row of planks to width with a table saw equipped with a plywood cutting blade.
“Racking” the FloorThis process is essential to achieve a random appearance. Start by either using random length planks found in thecarton or by cutting four to five planks in random lengths, differing by at least 6". When starting these first few rowsor courses, make certain to always measure from the tongue end of the plank when cutting. As you continueworking across the floor be sure to maintain the 6" minimum between end joints on all adjacent rows. Randomlyinstall different lengths to avoid a patterned appearance. Never waste materials; the ends cut from starter rowsshould be used at the opposite side of the room to complete rows or used tostart the next row.
NOTE: It is extremely important to blend planks from severalcartons to ensure a good balance of color, graining, and planklength.
Installation Procedure
Select a starter wall. An outside wall is bestbecause it’s more likely to be straight andsquare with the room. Measure out from thiswall, at each end, the width of two planks.
Spread Mannington UltraSpread Mastic fromthe chalk line out to the width of two plankswith a minimum 3/16" x 5/32" V-notchedtrowel. You can start laying planks immediatelyinto wet adhesive; however, for optimumperformance Mannington recommendsallowing the adhesive to set for 30 minutes.
When the first two starter rows are secure,spread 2-1/2' to 3' of adhesive across thelength of the room. (Never spread morea d h e s i v e t h a n c a n b e c o v e r e d i napproximately three hours). If the adhesive hasset and will not transfer to the back of theplank, scrape up the adhesive and apply freshUltraSpread Mastic™ adhesive.
Snap a chalk line from these points, parallel tothat wall and perpendicular to the adjacentwalls. Since most walls are not straight, theedge of some planks may have to be trimmedalong the wall or cut to fit.
Install the first row of starter planks and secureinto position with the tongue facing the starterwall. Proper alignment is critical, misalignedstarter rows can ruin the entire installation. Itmay be helpful to firmly secure a straight edgealong the chalk line as a guide; this also helpsto prevent planks from shifting in the wetadhesive. Or else, top nail the first row withfinishing nails (wood subfloor) or sprig/pinnails (concrete subfloor).
The precise engineering of our UltraFitTM
tongue-and-groove system creates a verystable floor. But you MUST make a goodconnection. Use a tapping block to tap theplanks together until the tongue and groove“snap” into place.
�
Hard
wood
Flooring Installation G
uide
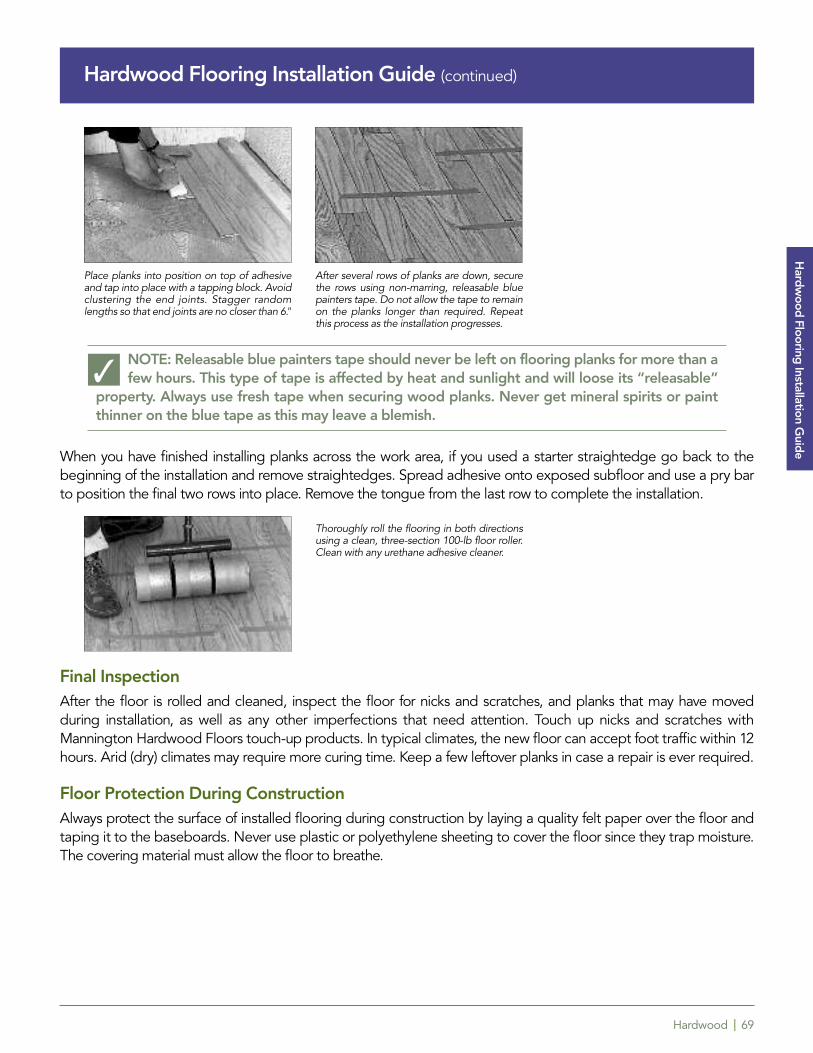
Hardwood | 69
Hardwood Flooring Installation Guide (continued)
NOTE: Releasable blue painters tape should never be left on flooring planks for more than a few hours. This type of tape is affected by heat and sunlight and will loose its “releasable”
property. Always use fresh tape when securing wood planks. Never get mineral spirits or paintthinner on the blue tape as this may leave a blemish.
When you have finished installing planks across the work area, if you used a starter straightedge go back to thebeginning of the installation and remove straightedges. Spread adhesive onto exposed subfloor and use a pry barto position the final two rows into place. Remove the tongue from the last row to complete the installation.
Final InspectionAfter the floor is rolled and cleaned, inspect the floor for nicks and scratches, and planks that may have movedduring installation, as well as any other imperfections that need attention. Touch up nicks and scratches withMannington Hardwood Floors touch-up products. In typical climates, the new floor can accept foot traffic within 12hours. Arid (dry) climates may require more curing time. Keep a few leftover planks in case a repair is ever required.
Floor Protection During ConstructionAlways protect the surface of installed flooring during construction by laying a quality felt paper over the floor andtaping it to the baseboards. Never use plastic or polyethylene sheeting to cover the floor since they trap moisture.The covering material must allow the floor to breathe.
Place planks into position on top of adhesiveand tap into place with a tapping block. Avoidclustering the end joints. Stagger randomlengths so that end joints are no closer than 6."
After several rows of planks are down, securethe rows using non-marring, releasable bluepainters tape. Do not allow the tape to remainon the planks longer than required. Repeatthis process as the installation progresses.
Thoroughly roll the flooring in both directionsusing a clean, three-section 100-lb floor roller.Clean with any urethane adhesive cleaner.
�
Hard
wood
Flooring Installation G
uide
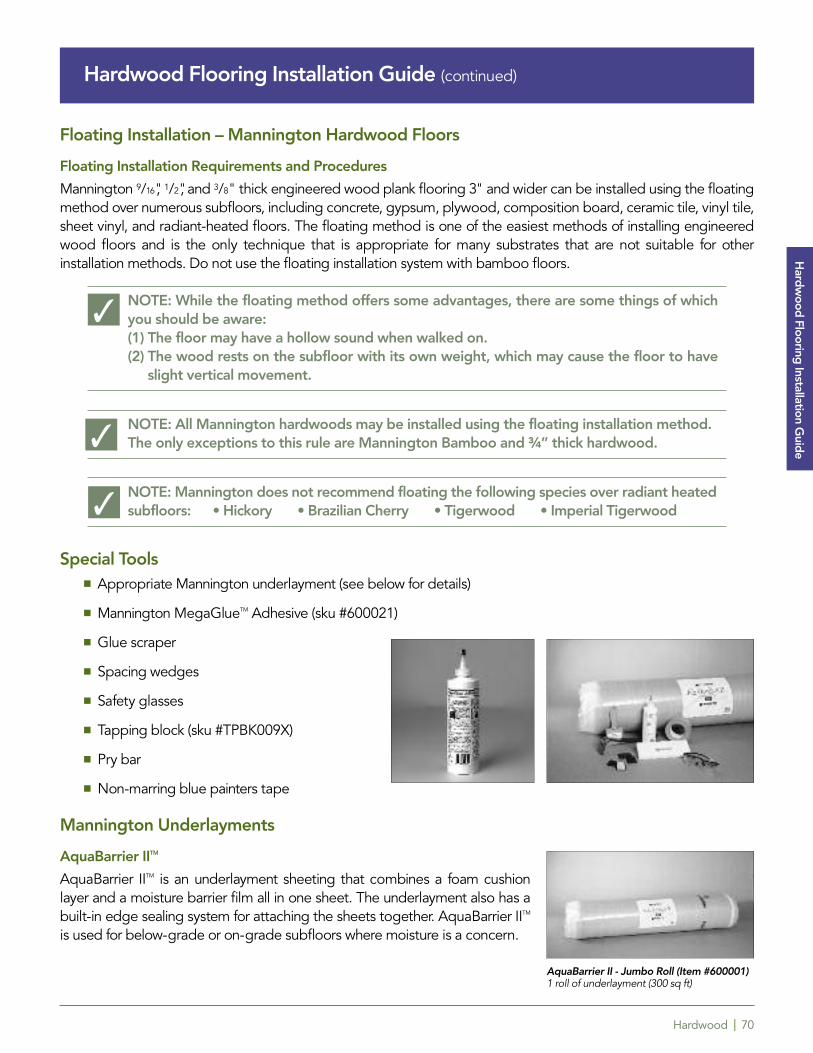
Hardwood | 70
Hardwood Flooring Installation Guide (continued)
Floating Installation – Mannington Hardwood Floors
Floating Installation Requirements and Procedures
Mannington 9/16", 1/2", and 3/8" thick engineered wood plank flooring 3" and wider can be installed using the floatingmethod over numerous subfloors, including concrete, gypsum, plywood, composition board, ceramic tile, vinyl tile,sheet vinyl, and radiant-heated floors. The floating method is one of the easiest methods of installing engineeredwood floors and is the only technique that is appropriate for many substrates that are not suitable for otherinstallation methods. Do not use the floating installation system with bamboo floors.
NOTE: While the floating method offers some advantages, there are some things of whichyou should be aware:(1) The floor may have a hollow sound when walked on.(2) The wood rests on the subfloor with its own weight, which may cause the floor to have
slight vertical movement.
NOTE: All Mannington hardwoods may be installed using the floating installation method.The only exceptions to this rule are Mannington Bamboo and ¾” thick hardwood.
NOTE: Mannington does not recommend floating the following species over radiant heatedsubfloors: • Hickory • Brazilian Cherry • Tigerwood • Imperial Tigerwood
Special Tools� Appropriate Mannington underlayment (see below for details)
� Mannington MegaGlueTM Adhesive (sku #600021)
� Glue scraper
� Spacing wedges
� Safety glasses
� Tapping block (sku #TPBK009X)
� Pry bar
� Non-marring blue painters tape
Mannington Underlayments
AquaBarrier IITM
AquaBarrier IITM is an underlayment sheeting that combines a foam cushionlayer and a moisture barrier film all in one sheet. The underlayment also has abuilt-in edge sealing system for attaching the sheets together. AquaBarrier IITM
is used for below-grade or on-grade subfloors where moisture is a concern.
AquaBarrier II - Jumbo Roll (Item #600001)1 roll of underlayment (300 sq ft)
�
�
�
Hard
wood
Flooring Installation G
uide
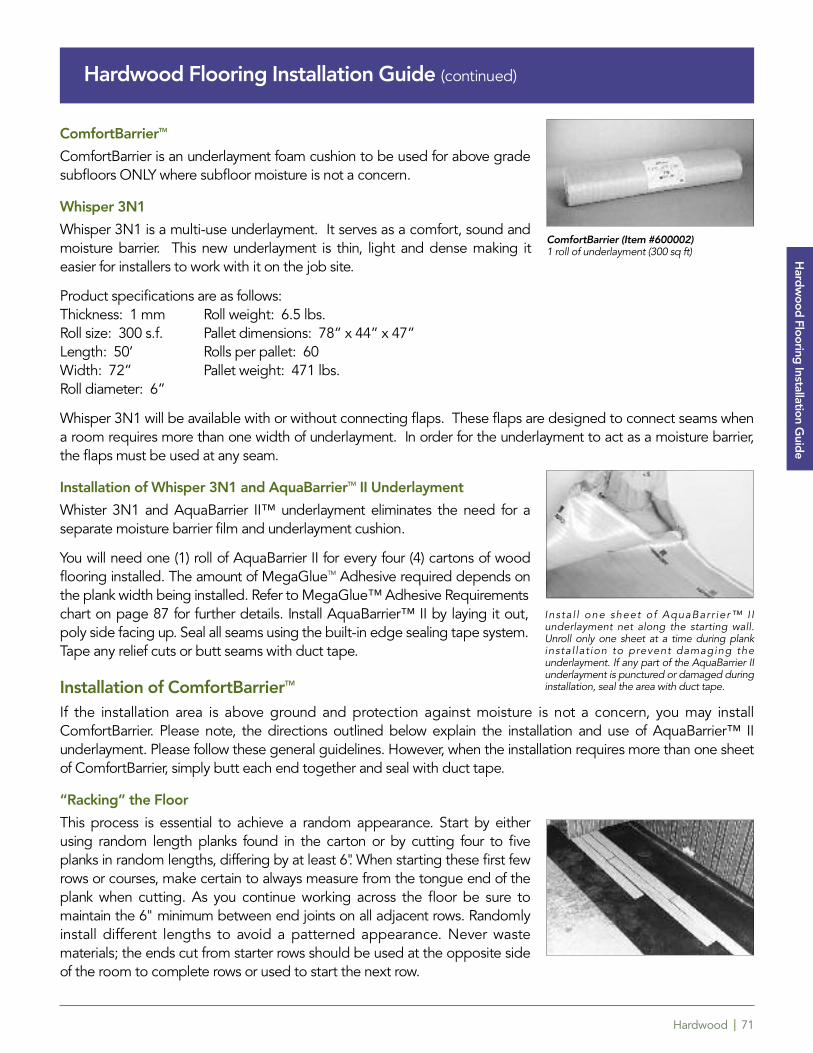
Hardwood | 71
Hardwood Flooring Installation Guide (continued)
ComfortBarrierTM
ComfortBarrier is an underlayment foam cushion to be used for above gradesubfloors ONLY where subfloor moisture is not a concern.
Whisper 3N1
Whisper 3N1 is a multi-use underlayment. It serves as a comfort, sound andmoisture barrier. This new underlayment is thin, light and dense making iteasier for installers to work with it on the job site.
Product specifications are as follows:Thickness: 1 mm Roll weight: 6.5 lbs.Roll size: 300 s.f. Pallet dimensions: 78” x 44” x 47”Length: 50’ Rolls per pallet: 60Width: 72” Pallet weight: 471 lbs.Roll diameter: 6”
Whisper 3N1 will be available with or without connecting flaps. These flaps are designed to connect seams whena room requires more than one width of underlayment. In order for the underlayment to act as a moisture barrier,the flaps must be used at any seam.
Installation of Whisper 3N1 and AquaBarrierTM II Underlayment
Whister 3N1 and AquaBarrier II™ underlayment eliminates the need for aseparate moisture barrier film and underlayment cushion.
You will need one (1) roll of AquaBarrier II for every four (4) cartons of woodflooring installed. The amount of MegaGlueTM Adhesive required depends onthe plank width being installed. Refer to MegaGlue™ Adhesive Requirementschart on page 87 for further details. Install AquaBarrier™ II by laying it out,poly side facing up. Seal all seams using the built-in edge sealing tape system.Tape any relief cuts or butt seams with duct tape.
Installation of ComfortBarrierTM
If the installation area is above ground and protection against moisture is not a concern, you may installComfortBarrier. Please note, the directions outlined below explain the installation and use of AquaBarrier™ IIunderlayment. Please follow these general guidelines. However, when the installation requires more than one sheetof ComfortBarrier, simply butt each end together and seal with duct tape.
“Racking” the Floor
This process is essential to achieve a random appearance. Start by eitherusing random length planks found in the carton or by cutting four to fiveplanks in random lengths, differing by at least 6". When starting these first fewrows or courses, make certain to always measure from the tongue end of theplank when cutting. As you continue working across the floor be sure tomaintain the 6" minimum between end joints on all adjacent rows. Randomlyinstall different lengths to avoid a patterned appearance. Never wastematerials; the ends cut from starter rows should be used at the opposite sideof the room to complete rows or used to start the next row.
ComfortBarrier (Item #600002)1 roll of underlayment (300 sq ft)
Insta l l one sheet of AquaBarr ier™ I Iunderlayment net along the starting wall.Unroll only one sheet at a time during plankinstal lat ion to prevent damaging theunderlayment. If any part of the AquaBarrier IIunderlayment is punctured or damaged duringinstallation, seal the area with duct tape.
Hard
wood
Flooring Installation G
uide
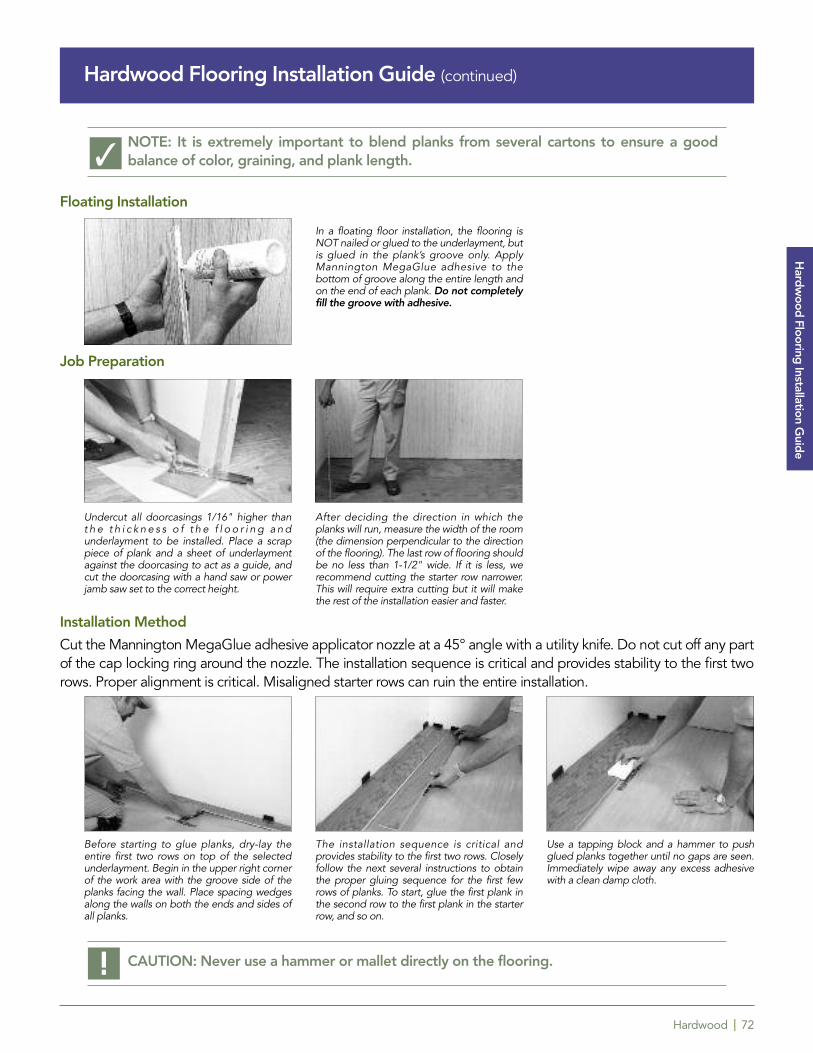
Hardwood | 72
Hardwood Flooring Installation Guide (continued)
NOTE: It is extremely important to blend planks from several cartons to ensure a goodbalance of color, graining, and plank length.
Floating Installation
Job Preparation
Installation Method
Cut the Mannington MegaGlue adhesive applicator nozzle at a 45° angle with a utility knife. Do not cut off any partof the cap locking ring around the nozzle. The installation sequence is critical and provides stability to the first tworows. Proper alignment is critical. Misaligned starter rows can ruin the entire installation.
CAUTION: Never use a hammer or mallet directly on the flooring.
Undercut all doorcasings 1/16" higher thant h e t h i c k n e s s o f t h e f l o o r i n g a n dunderlayment to be installed. Place a scrappiece of plank and a sheet of underlaymentagainst the doorcasing to act as a guide, andcut the doorcasing with a hand saw or powerjamb saw set to the correct height.
After deciding the direction in which theplanks will run, measure the width of the room(the dimension perpendicular to the directionof the flooring). The last row of flooring shouldbe no less than 1-1/2" wide. If it is less, werecommend cutting the starter row narrower.This will require extra cutting but it will makethe rest of the installation easier and faster.
Before starting to glue planks, dry-lay theentire first two rows on top of the selectedunderlayment. Begin in the upper right cornerof the work area with the groove side of theplanks facing the wall. Place spacing wedgesalong the walls on both the ends and sides ofall planks.
The installation sequence is critical andprovides stability to the first two rows. Closelyfollow the next several instructions to obtainthe proper gluing sequence for the first fewrows of planks. To start, glue the first plank inthe second row to the first plank in the starterrow, and so on.
Use a tapping block and a hammer to pushglued planks together until no gaps are seen.Immediately wipe away any excess adhesivewith a clean damp cloth.
!
In a floating floor installation, the flooring isNOT nailed or glued to the underlayment, butis glued in the plank’s groove only. ApplyMannington MegaGlue adhesive to thebottom of groove along the entire length andon the end of each plank. Do not completelyfill the groove with adhesive.
Hard
wood
Flooring Installation G
uide
�
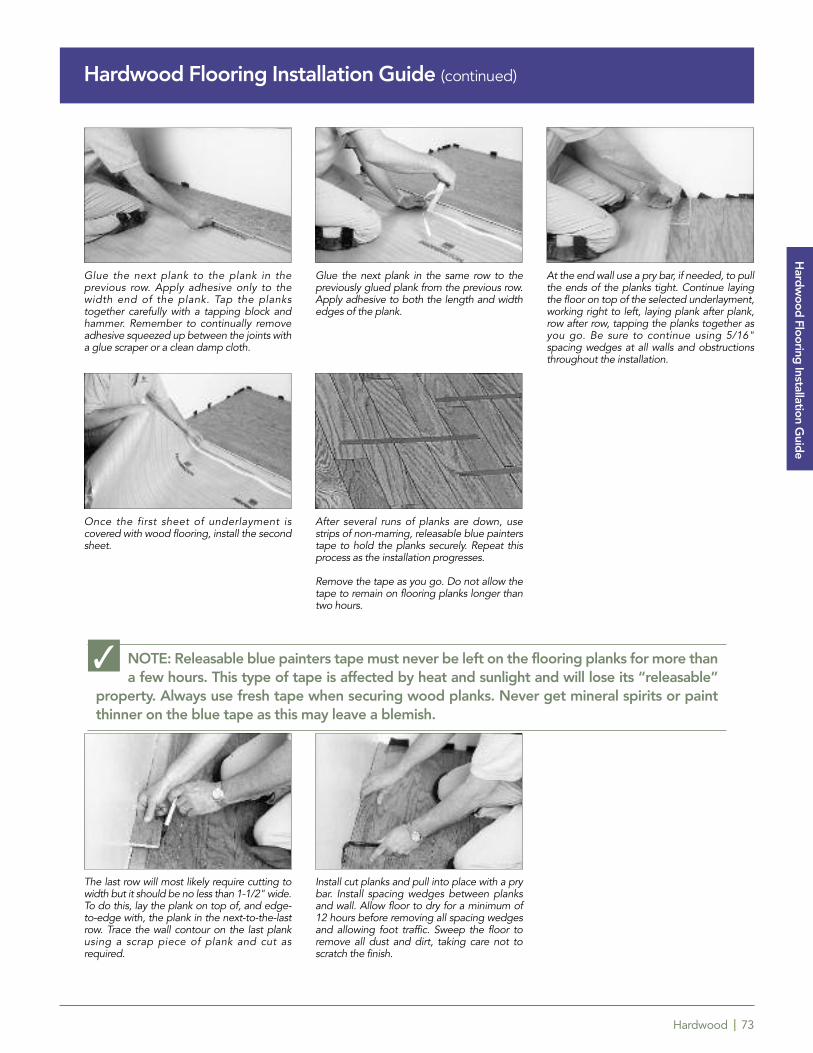
Hardwood | 73
Hardwood Flooring Installation Guide (continued)
NOTE: Releasable blue painters tape must never be left on the flooring planks for more than a few hours. This type of tape is affected by heat and sunlight and will lose its “releasable”
property. Always use fresh tape when securing wood planks. Never get mineral spirits or paintthinner on the blue tape as this may leave a blemish.
Glue the next plank to the plank in theprevious row. Apply adhesive only to thewidth end of the plank. Tap the plankstogether carefully with a tapping block andhammer. Remember to continually removeadhesive squeezed up between the joints witha glue scraper or a clean damp cloth.
Glue the next plank in the same row to thepreviously glued plank from the previous row.Apply adhesive to both the length and widthedges of the plank.
After several runs of planks are down, usestrips of non-marring, releasable blue painterstape to hold the planks securely. Repeat thisprocess as the installation progresses.
Remove the tape as you go. Do not allow thetape to remain on flooring planks longer thantwo hours.
At the end wall use a pry bar, if needed, to pullthe ends of the planks tight. Continue layingthe floor on top of the selected underlayment,working right to left, laying plank after plank,row after row, tapping the planks together asyou go. Be sure to continue using 5/16"spacing wedges at all walls and obstructionsthroughout the installation.
Once the first sheet of underlayment iscovered with wood flooring, install the secondsheet.
Install cut planks and pull into place with a prybar. Install spacing wedges between planksand wall. Allow floor to dry for a minimum of12 hours before removing all spacing wedgesand allowing foot traffic. Sweep the floor toremove all dust and dirt, taking care not toscratch the finish.
The last row will most likely require cutting towidth but it should be no less than 1-1/2" wide.To do this, lay the plank on top of, and edge-to-edge with, the plank in the next-to-the-lastrow. Trace the wall contour on the last plankusing a scrap piece of plank and cut asrequired.
�
Hard
wood
Flooring Installation G
uide
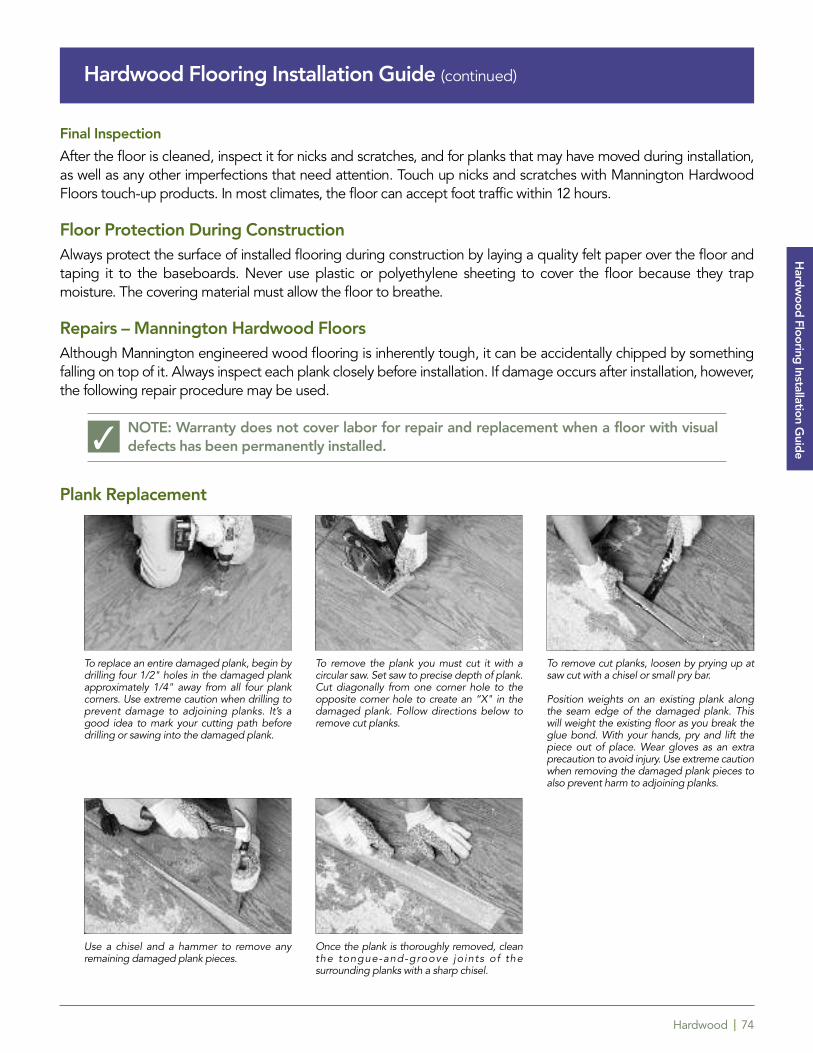
Hardwood | 74
Hardwood Flooring Installation Guide (continued)
Final Inspection
After the floor is cleaned, inspect it for nicks and scratches, and for planks that may have moved during installation,as well as any other imperfections that need attention. Touch up nicks and scratches with Mannington HardwoodFloors touch-up products. In most climates, the floor can accept foot traffic within 12 hours.
Floor Protection During ConstructionAlways protect the surface of installed flooring during construction by laying a quality felt paper over the floor andtaping it to the baseboards. Never use plastic or polyethylene sheeting to cover the floor because they trapmoisture. The covering material must allow the floor to breathe.
Repairs – Mannington Hardwood FloorsAlthough Mannington engineered wood flooring is inherently tough, it can be accidentally chipped by somethingfalling on top of it. Always inspect each plank closely before installation. If damage occurs after installation, however,the following repair procedure may be used.
NOTE: Warranty does not cover labor for repair and replacement when a floor with visualdefects has been permanently installed.
Plank Replacement
�
To replace an entire damaged plank, begin bydrilling four 1/2" holes in the damaged plankapproximately 1/4" away from all four plankcorners. Use extreme caution when drilling toprevent damage to adjoining planks. It’s agood idea to mark your cutting path beforedrilling or sawing into the damaged plank.
To remove the plank you must cut it with acircular saw. Set saw to precise depth of plank.Cut diagonally from one corner hole to theopposite corner hole to create an “X" in thedamaged plank. Follow directions below toremove cut planks.
To remove cut planks, loosen by prying up atsaw cut with a chisel or small pry bar.
Position weights on an existing plank alongthe seam edge of the damaged plank. Thiswill weight the existing floor as you break theglue bond. With your hands, pry and lift thepiece out of place. Wear gloves as an extraprecaution to avoid injury. Use extreme cautionwhen removing the damaged plank pieces toalso prevent harm to adjoining planks.
Use a chisel and a hammer to remove anyremaining damaged plank pieces.
Once the plank is thoroughly removed, cleanthe tongue-and-groove joints of thesurrounding planks with a sharp chisel.
Hard
wood
Flooring Installation G
uide

Hardwood | 75
Hardwood Flooring Installation Guide (continued)
LOCnGO™ Wood Installation Instructions
Interlocking Floating Installation Requirements & ProceduresMannington LOCnGO must be installed over an approved underlayment pad, such as Mannington Whisper 3-in-1or AquaBarrierTM II. Install only one sheet of underlayment at a time, cover with the wood flooring and then install thenext sheet of underlayment.
“Racking” the Floor
This process is essential to achieve a random appearance. Start by either using random length planks found in thecarton or by cutting four to five planks in random lengths, differing by at least 6." When starting these first few rowsor courses, be certain to measure from the tongue end of the plank when cutting. As you continue working acrossthe floor, be sure to maintain the 6" minimum between end joints on all adjacent rows. Randomly install differentlengths to avoid a patterned appearance. Never waste materials; the ends cut from starter rows should be used atthe opposite side of the room to complete rows or used to start the next row.
NOTE: As stated earlier, it is extremely important to blend planks from several cartons toensure a good balance of color, graining, and plank length.
As with all plank wood flooring, the long dimension of the plank should be installed in the long dimension of the work area. Measure the width of the work area to ensure a “balanced” layout of plank width on opposite longwalls of the work area. If the planks have been cut down in width and the locking mechanism has been damaged,apply a thin bead of MegaGlue™ in the end joints. This should only be necessary on the first and perhaps last rows of planks.
Once the starting wall has been determined, lay the first plank using 1/2" spacers to maintain the expansion gap.Align and lock the end joints of the second and consecutive planks in the first row. Cut a starter plank or use arandom plank of at least 9" to begin the second row. Maintain a random stagger of the end joints across the entireinstallation. Place the tongue of the plank into the groove of the plank in the first row. Align the second plank of the second row over the end joints of the adjoining plank; then insert the tongue into the groove of the plank in the first row and lock into place. Drop the end joints into place ensuring that the seam is tight. The “locking system”
Vacuum all sawdust and debris away fromrepair area before proceeding.
Prepare the replacement plank by cutting offthe plank’s bottom groove along both thelength and width using a power saw. Cuttingthis bottom flange away will help easeplacement of the repair plank into the repairarea. Also cut off 3" of the tongue from therepair plank. Check planks for fit.
Always use Mannington adhesive and sundryproducts. When employing the floatingmethod, apply adhesive to the bottom of thegroove on the repair plank. For the glue-downmethod, spread the appropriate amount ofUltraSpread MasticTM with the correct V-notched trowel.
Slide the repair plank into place using atapping block, first inserting the side with 3"cut off the tongue. Wipe away any excess gluewith a clean dampened cloth or with aMannington glue scraper. Weight the repairplank and avoid active foot traffic forapproximately 12 hours after the repair hasbeen completed.
�
Hard
wood
Flooring Installation G
uide
Hardwood | 76
will secure the end joints; these end joints will be held down by the following rows so no adhesive is necessary in the field end joints. Be certain to maintain the 1/2" expansion gap at all fixed, vertical objects throughout the entire installation. Continue installing planks, clicking the side seam and locking the end joints into place, untilreaching the last row.
More than likely, this last row will need to be cut to fit. Scribe the last row of planks to fit the opening, being certainto provide the 1/2" expansion gap, and cut along the scribed line with a scroll or jigsaw. Position the first plank in thelast row to click into the next to last row and, if the locking mechanism has been cut, place a bead of MegaGlue™adhesive in the end joint. Align and fasten the remainder of the planks, being certain to apply adhesive at the end joints.
If at any time during the installation you need to remove a “locked” plank, insert the supplied plastic tool into thegap at the side of the end joints. The tool should slide in easily. As you are inserting the tool, pull up on the boardto remove.
Remove all spacers and cover expansion joint with wall base or quarter round. Be certain to fasten into the wall andnot into the flooring product. Use the appropriate transition moldings at doorways, etc. Again, be certain not to nail or staple through the finished flooring product when fastening transition moldings.
Glue-Down Installation Requirements & ProceduresThe Mannington glue-down system makes installation smooth and easy. LOCnGO planks are glued to the subfloorusing urethane-based Mannington UltraSpread MasticTM adhesive and a minimum 3/16" x 5/32" V-notched trowel.This moisture-cured polyurethane adhesive forms a tenacious bond. The adhesive is VOC compliant,nonflammable, contains 0% water, and has a very mild odor.
Before installation, do a calculation to determine the width of the last row of planks. If it is less than one half of plankwidth, split the difference between the starter row and the last row. In any case, you will most likely be required tocut the last row of planks to width with a table saw equipped with a plywood cutting blade.
Select a starter wall. An outside wall is best because it’s more likely to be straight and square with the room.Measure out from this wall, at each end, the width of two or three planks.
Snap a chalk line from these points, parallel to that wall and perpendicular to the adjacent end walls. Since mostwalls are not straight, the edge of some planks may have to be trimmed along the wall or cut to fit.
It is not necessary to leave an expansion space for Mannington LOCnGO planks when fully adhered.
“Racking” the Floor
This process is essential to achieve a random appearance. Start by either using random length planks found in thecarton or by cutting planks in random lengths, differing by at least 6." When starting these first few rows or courses,make certain to always measure from the tongue end of the plank when cutting. As you continue working acrossthe floor be sure to maintain the 6" minimum between end joints on all adjacent rows. Randomly install differentlengths to avoid a patterned appearance. Never waste materials; the ends cut from starter rows should be used atthe opposite side of the room to complete rows or used to start the next row.
NOTE: As stated earlier, it is extremely important to blend planks from several cartons toensure a good balance of color, graining, and plank length.
Hardwood Flooring Installation Guide (continued)
�
Hard
wood
Flooring Installation G
uide
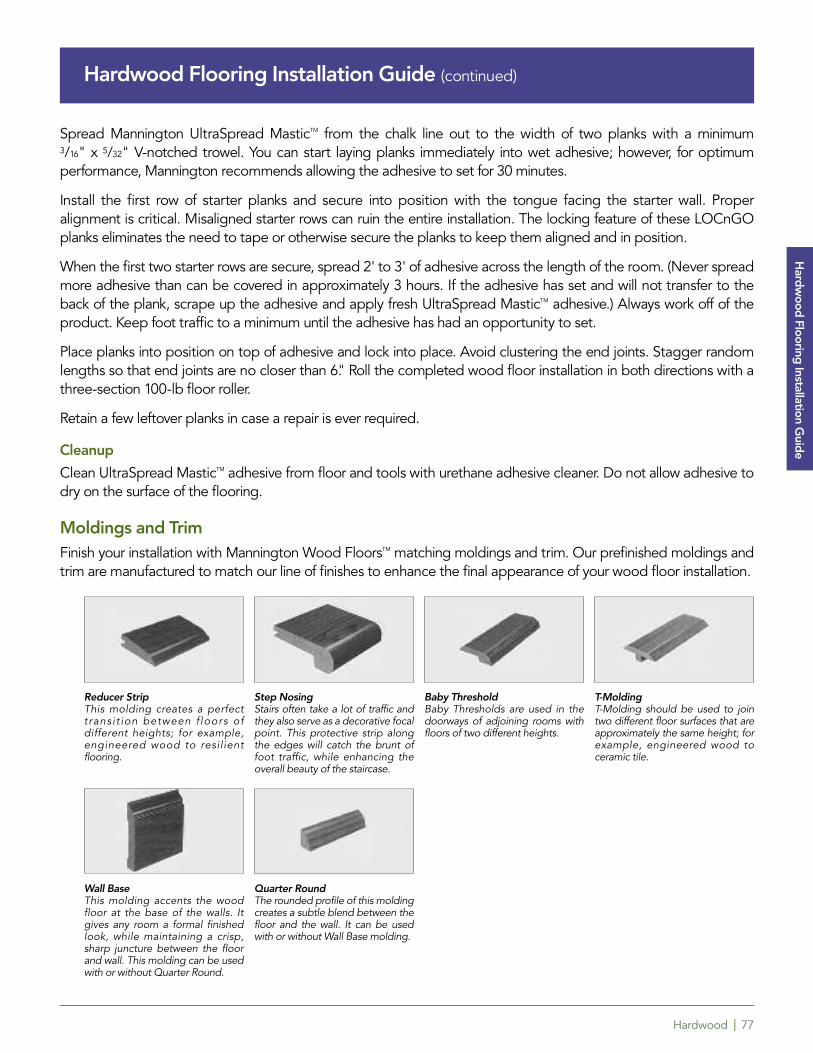
Hardwood | 77
Spread Mannington UltraSpread MasticTM from the chalk line out to the width of two planks with a minimum 3/16" x 5/32" V-notched trowel. You can start laying planks immediately into wet adhesive; however, for optimumperformance, Mannington recommends allowing the adhesive to set for 30 minutes.
Install the first row of starter planks and secure into position with the tongue facing the starter wall. Properalignment is critical. Misaligned starter rows can ruin the entire installation. The locking feature of these LOCnGOplanks eliminates the need to tape or otherwise secure the planks to keep them aligned and in position.
When the first two starter rows are secure, spread 2' to 3' of adhesive across the length of the room. (Never spreadmore adhesive than can be covered in approximately 3 hours. If the adhesive has set and will not transfer to theback of the plank, scrape up the adhesive and apply fresh UltraSpread MasticTM adhesive.) Always work off of theproduct. Keep foot traffic to a minimum until the adhesive has had an opportunity to set.
Place planks into position on top of adhesive and lock into place. Avoid clustering the end joints. Stagger randomlengths so that end joints are no closer than 6." Roll the completed wood floor installation in both directions with athree-section 100-lb floor roller.
Retain a few leftover planks in case a repair is ever required.
Cleanup
Clean UltraSpread MasticTM adhesive from floor and tools with urethane adhesive cleaner. Do not allow adhesive todry on the surface of the flooring.
Moldings and TrimFinish your installation with Mannington Wood FloorsTM matching moldings and trim. Our prefinished moldings andtrim are manufactured to match our line of finishes to enhance the final appearance of your wood floor installation.
Hardwood Flooring Installation Guide (continued)
Reducer StripThis molding creates a perfecttransit ion between f loors ofdifferent heights; for example,engineered wood to resilientflooring.
Step NosingStairs often take a lot of traffic andthey also serve as a decorative focalpoint. This protective strip alongthe edges will catch the brunt offoot traffic, while enhancing theoverall beauty of the staircase.
Wall BaseThis molding accents the woodfloor at the base of the walls. Itgives any room a formal finishedlook, while maintaining a crisp,sharp juncture between the floorand wall. This molding can be usedwith or without Quarter Round.
Quarter RoundThe rounded profile of this moldingcreates a subtle blend between thefloor and the wall. It can be usedwith or without Wall Base molding.
Baby ThresholdBaby Thresholds are used in thedoorways of adjoining rooms withfloors of two different heights.
T-MoldingT-Molding should be used to jointwo different floor surfaces that areapproximately the same height; forexample, engineered wood toceramic tile.
Hard
wood
Flooring Installation G
uide
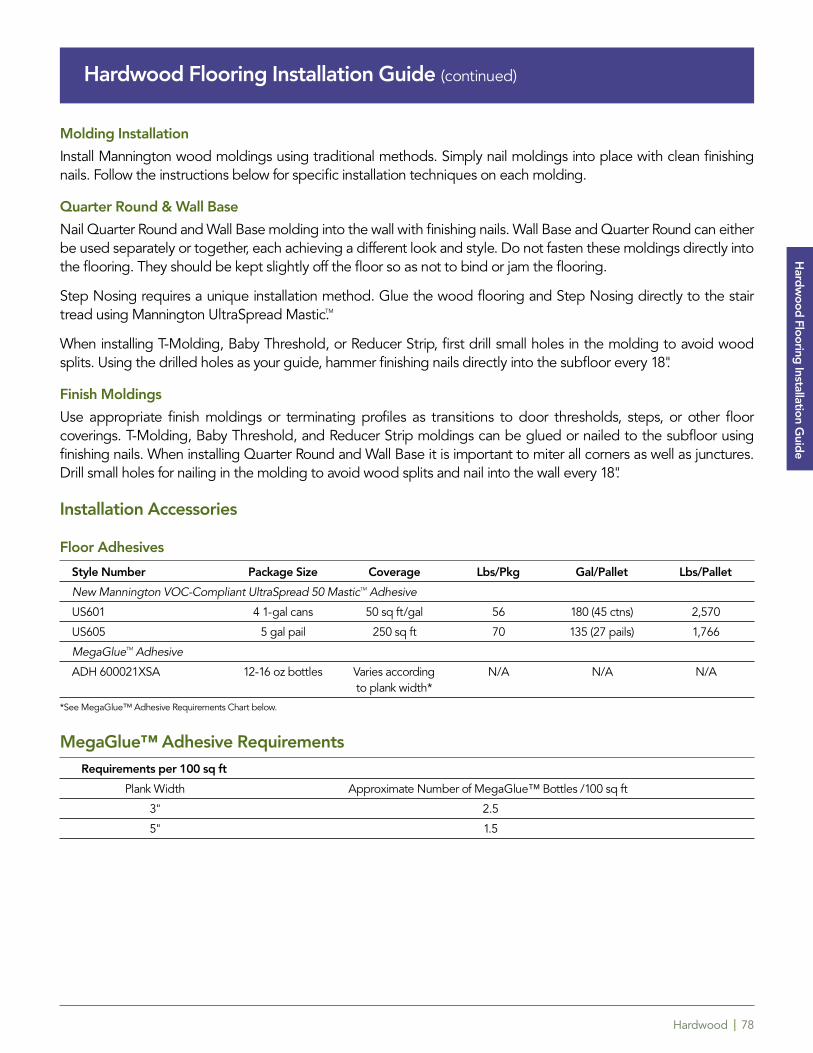
Hardwood | 78
Molding Installation
Install Mannington wood moldings using traditional methods. Simply nail moldings into place with clean finishingnails. Follow the instructions below for specific installation techniques on each molding.
Quarter Round & Wall Base
Nail Quarter Round and Wall Base molding into the wall with finishing nails. Wall Base and Quarter Round can eitherbe used separately or together, each achieving a different look and style. Do not fasten these moldings directly intothe flooring. They should be kept slightly off the floor so as not to bind or jam the flooring.
Step Nosing requires a unique installation method. Glue the wood flooring and Step Nosing directly to the stairtread using Mannington UltraSpread Mastic.TM
When installing T-Molding, Baby Threshold, or Reducer Strip, first drill small holes in the molding to avoid woodsplits. Using the drilled holes as your guide, hammer finishing nails directly into the subfloor every 18".
Finish Moldings
Use appropriate finish moldings or terminating profiles as transitions to door thresholds, steps, or other floorcoverings. T-Molding, Baby Threshold, and Reducer Strip moldings can be glued or nailed to the subfloor usingfinishing nails. When installing Quarter Round and Wall Base it is important to miter all corners as well as junctures.Drill small holes for nailing in the molding to avoid wood splits and nail into the wall every 18".
Installation Accessories
Floor Adhesives
Style Number Package Size Coverage Lbs/Pkg Gal/Pallet Lbs/Pallet
New Mannington VOC-Compliant UltraSpread 50 MasticTM Adhesive
US601 4 1-gal cans 50 sq ft/gal 56 180 (45 ctns) 2,570
US605 5 gal pail 250 sq ft 70 135 (27 pails) 1,766
MegaGlueTM Adhesive
ADH 600021XSA 12-16 oz bottles Varies according N/A N/A N/Ato plank width*
*See MegaGlue™ Adhesive Requirements Chart below.
MegaGlue™ Adhesive RequirementsRequirements per 100 sq ft
Plank Width Approximate Number of MegaGlue™ Bottles /100 sq ft
3" 2.5
5" 1.5
Hardwood Flooring Installation Guide (continued)
Hard
wood
Flooring Installation G
uide
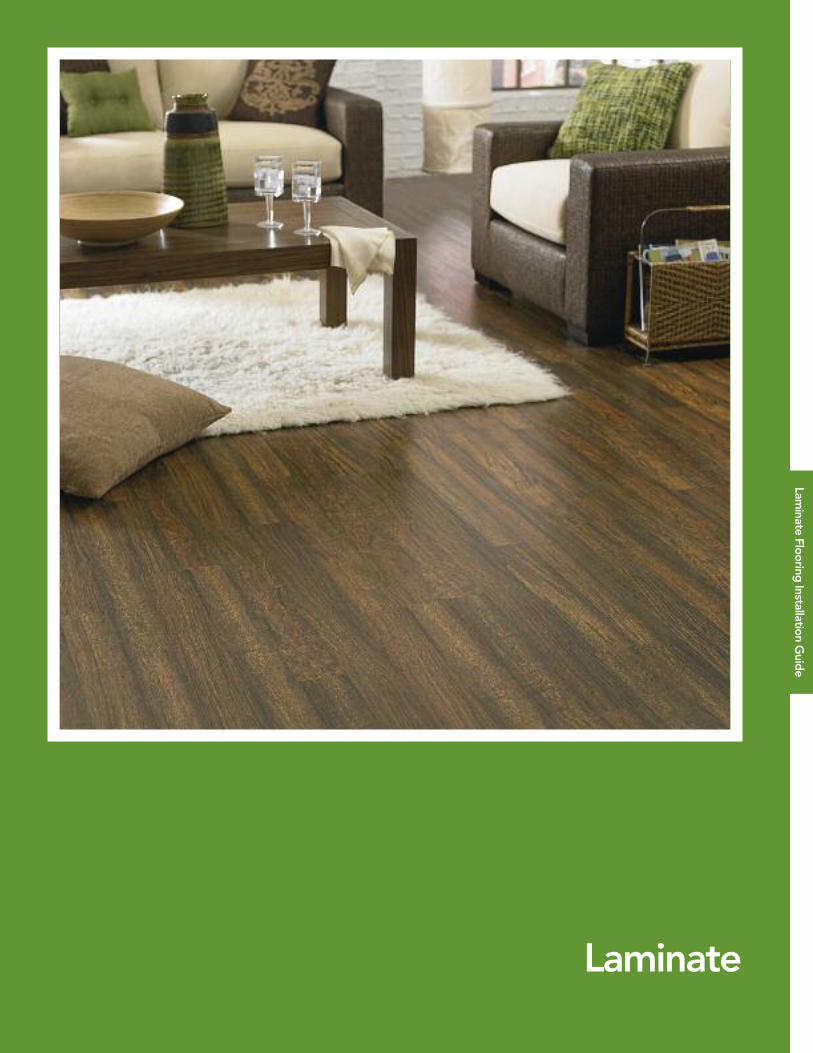
General Installation | Adura® | 79
Laminate
Laminate Flooring
Installation Guid
e
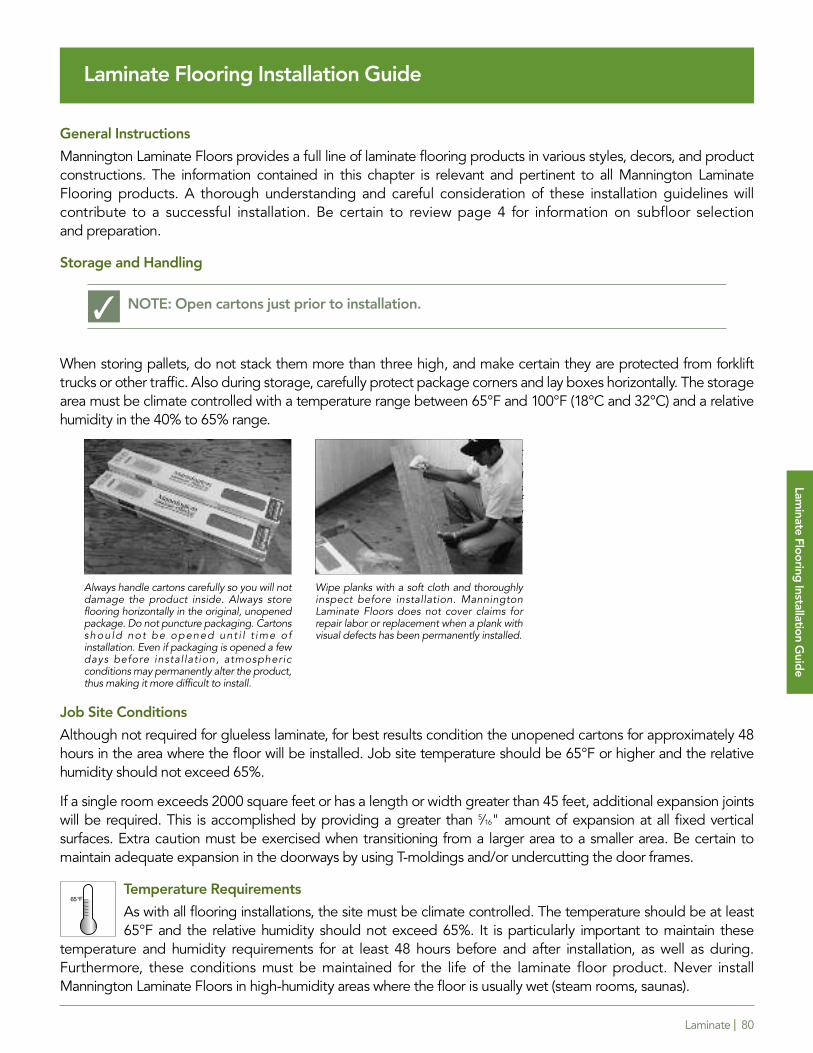
Laminate | 80
Laminate Flooring Installation Guide
General Instructions
Mannington Laminate Floors provides a full line of laminate flooring products in various styles, decors, and productconstructions. The information contained in this chapter is relevant and pertinent to all Mannington LaminateFlooring products. A thorough understanding and careful consideration of these installation guidelines willcontribute to a successful installation. Be certain to review page 4 for information on subfloor selection and preparation.
Storage and Handling
NOTE: Open cartons just prior to installation.
When storing pallets, do not stack them more than three high, and make certain they are protected from forklifttrucks or other traffic. Also during storage, carefully protect package corners and lay boxes horizontally. The storagearea must be climate controlled with a temperature range between 65°F and 100°F (18°C and 32°C) and a relativehumidity in the 40% to 65% range.
Job Site Conditions
Although not required for glueless laminate, for best results condition the unopened cartons for approximately 48hours in the area where the floor will be installed. Job site temperature should be 65°F or higher and the relativehumidity should not exceed 65%.
If a single room exceeds 2000 square feet or has a length or width greater than 45 feet, additional expansion jointswill be required. This is accomplished by providing a greater than 5/16" amount of expansion at all fixed verticalsurfaces. Extra caution must be exercised when transitioning from a larger area to a smaller area. Be certain tomaintain adequate expansion in the doorways by using T-moldings and/or undercutting the door frames.
Temperature Requirements
As with all flooring installations, the site must be climate controlled. The temperature should be at least65°F and the relative humidity should not exceed 65%. It is particularly important to maintain these
temperature and humidity requirements for at least 48 hours before and after installation, as well as during.Furthermore, these conditions must be maintained for the life of the laminate floor product. Never installMannington Laminate Floors in high-humidity areas where the floor is usually wet (steam rooms, saunas).
�
Always handle cartons carefully so you will notdamage the product inside. Always storeflooring horizontally in the original, unopenedpackage. Do not puncture packaging. Cartonsshould not be opened unt i l t ime ofinstallation. Even if packaging is opened a fewdays before installation, atmosphericconditions may permanently alter the product,thus making it more difficult to install.
Always handle cartons carefully so you will notdamage the product inside. Always storeflooring horizontally in the original, unopenedpackage. Do not puncture packaging. Cartonsshould not be opened unt i l t ime ofinstallation. Even if packaging is opened a fewdays before installation, atmosphericconditions may permanently alter the product,thus making it more difficult to install.
Wipe planks with a soft cloth and thoroughlyinspect before installation. ManningtonLaminate Floors does not cover claims forrepair labor or replacement when a plank withvisual defects has been permanently installed.
Laminate Flooring
Installation Guid
e
Laminate | 81
Laminate Flooring Installation Guide (continued)
Structural Requirements
The structural integrity of the job site is critical for a satisfactory flooring installation. The type and method ofconstruction, grade level, and flooring system components all impact the installation of flooring products. Manytimes, local building codes establish only minimum requirements for flooring systems. These minimumrequirements may not provide sufficient rigidity for successful installation and continued performance of flooringproducts. Hardwood, laminate, and porcelain flooring products require that the subfloor system is free of deflection.
Subfloor variations should not exceed 1/8" in 6' (3.18 mm in 1.8 m). Use a 6' level or straightedge to check forvariation. All high spots must be sanded or ground smooth. Fill in low spots, cracks, and depressions withMannington MVP 2023 or equivalent.
Radiant-Heated Subfloors
Mannington Laminate Flooring may be installed over hydroponic radiant-heated subfloors, provided the surfacetemperature of the system does not exceed 90°F. Before installing Mannington Laminate Flooring over newlyconstructed radiant-heating systems, operate the system at maximum capacity to force any residual moisture fromthe cementitious topping of the radiant heating system. Then set the thermostat to a comfortable room temperaturefor the installation.
Existing Flooring Coverings
Mannington Laminate Floors can be installed over existing resilient floor coverings, wood flooring, and ceramic tile(grout joints must be leveled). Do not install Mannington Laminate Floors over carpet. Remove all carpet beforeproceeding with a Mannington Laminate Floors installation and examine the subfloor underneath. Make any repairsto the subfloor, if necessary, prior to installation.
Whisper 3N1
Whisper 3N1 is a multi-use underlayment. It serves as a comfort, sound and moisture barrier. This newunderlayment is thin, light and dense making it easier for installers to work with it on the job site.
Product specifications are as follows:Thickness: 1 mm Roll weight: 6.5 lbs.Roll size: 300 s.f. Pallet dimensions: 78” x 44” x 47”Length: 50’ Rolls per pallet: 60Width: 72” Pallet weight: 471 lbs.Roll diameter: 6”
Whisper 3N1 is available with or without connecting flaps. These flaps are designed to connect seams when aroom requires more than one width of underlayment that is wider then 70”. In order for the underlayment to act asa moisture barrier, the flaps must be used at any seam.
Installation of Whisper 3N1 and AquaBarrier™
Whister 3N1 and AquaBarrier II™ underlayment eliminates the need for a separate moisture barrier film andunderlayment cushion. You will need one (1) roll of AquaBarrier II for every four (4) cartons of wood flooring installed.The amount of MegaGlueTM Adhesive required depends on the plank width being installed. Refer to MegaGlue™Adhesive Requirements chart on page 71 for further details. Install AquaBarrier™ II by laying it out, poly side facingup. Seal all seams using the built-in edge sealing tape system. Tape any relief cuts or butt seams with duct tape.
Laminate Flooring
Installation Guid
e
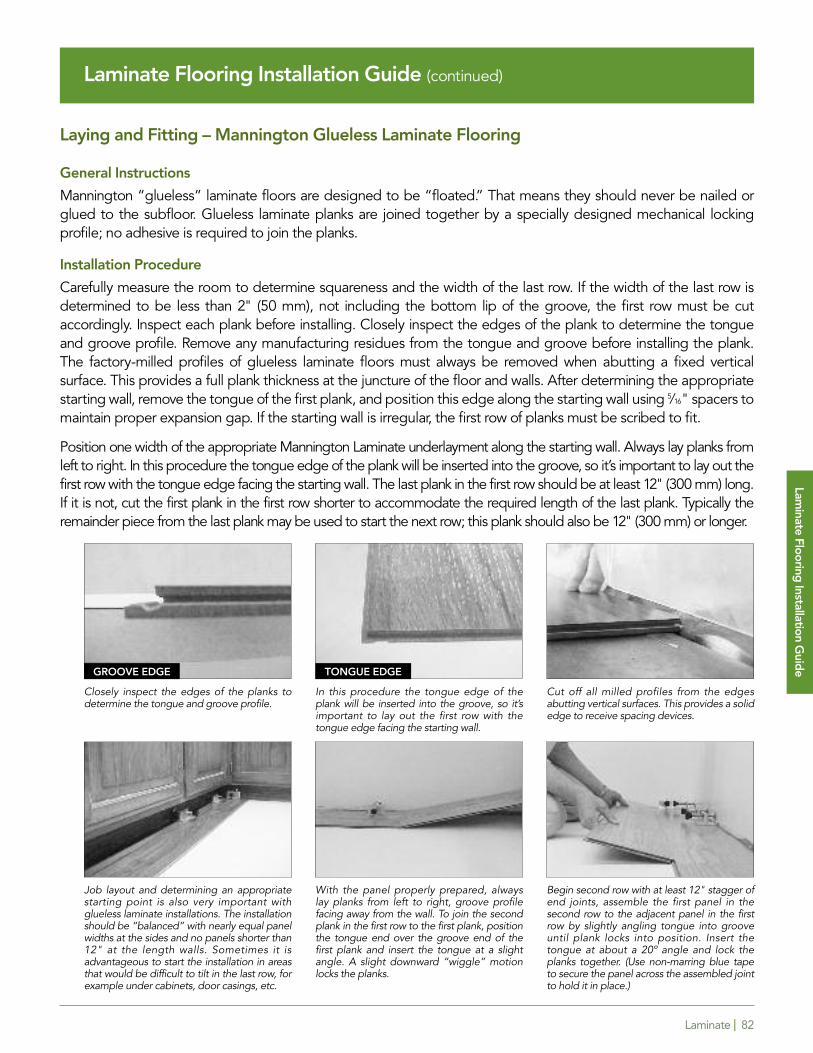
Laminate | 82
Laying and Fitting – Mannington Glueless Laminate Flooring
General Instructions
Mannington “glueless” laminate floors are designed to be “floated.” That means they should never be nailed orglued to the subfloor. Glueless laminate planks are joined together by a specially designed mechanical lockingprofile; no adhesive is required to join the planks.
Installation Procedure
Carefully measure the room to determine squareness and the width of the last row. If the width of the last row isdetermined to be less than 2" (50 mm), not including the bottom lip of the groove, the first row must be cutaccordingly. Inspect each plank before installing. Closely inspect the edges of the plank to determine the tongueand groove profile. Remove any manufacturing residues from the tongue and groove before installing the plank.The factory-milled profiles of glueless laminate floors must always be removed when abutting a fixed verticalsurface. This provides a full plank thickness at the juncture of the floor and walls. After determining the appropriatestarting wall, remove the tongue of the first plank, and position this edge along the starting wall using 5/16" spacers tomaintain proper expansion gap. If the starting wall is irregular, the first row of planks must be scribed to fit.
Position one width of the appropriate Mannington Laminate underlayment along the starting wall. Always lay planks fromleft to right. In this procedure the tongue edge of the plank will be inserted into the groove, so it’s important to lay out thefirst row with the tongue edge facing the starting wall. The last plank in the first row should be at least 12" (300 mm) long.If it is not, cut the first plank in the first row shorter to accommodate the required length of the last plank. Typically theremainder piece from the last plank may be used to start the next row; this plank should also be 12" (300 mm) or longer.
Closely inspect the edges of the planks todetermine the tongue and groove profile.
In this procedure the tongue edge of theplank will be inserted into the groove, so it’simportant to lay out the first row with thetongue edge facing the starting wall.
Cut off all milled profiles from the edgesabutting vertical surfaces. This provides a solidedge to receive spacing devices.
Job layout and determining an appropriatestarting point is also very important withglueless laminate installations. The installationshould be “balanced” with nearly equal panelwidths at the sides and no panels shorter than12" at the length walls. Sometimes it isadvantageous to start the installation in areasthat would be difficult to tilt in the last row, forexample under cabinets, door casings, etc.
With the panel properly prepared, always lay planks from left to right, groove profilefacing away from the wall. To join the secondplank in the first row to the first plank, positionthe tongue end over the groove end of thefirst plank and insert the tongue at a slightangle. A slight downward “wiggle” motionlocks the planks.
Begin second row with at least 12" stagger ofend joints, assemble the first panel in thesecond row to the adjacent panel in the firstrow by slightly angling tongue into grooveuntil plank locks into position. Insert thetongue at about a 20º angle and lock theplanks together. (Use non-marring blue tapeto secure the panel across the assembled jointto hold it in place.)
TONGUE EDGEGROOVE EDGE
Laminate Flooring Installation Guide (continued)
Laminate Flooring
Installation Guid
e

The last row of panels will more than likelyneed to be cut to fit. If not, it is still necessaryto cut off the groove profile to provide a fullplank thickness at the wall. If nothing preventsangling this last row of planks into position,proceed as normal to complete theinstallation.
If there are obstacles (door casings, toe kicks,radiators) that prevent the last row panels frombeing angled into position, it is necessary tolightly plane or sand off a bit of the lockingprofile of the groove and tongue.
PLANING OF GROOVE PLANING OF TONGUE
Position the panel onto the already installedrow; slide the panel under the obstruction. It’sa good practice to pre-fit the panel to makecertain it will slide back into place beforeapplying adhesive.
Separate the panels to completely expose thegroove. Apply a light coat of ManningtonMegaGlueTM onto the groove; slide the last rowpanel back into position. If necessary, use alast board puller to position the panel andlightly tap panel to close any gap. Wipe offany excess glue.
Laminate | 83
Laminate Flooring Installation Guide (continued)
Position the end tongue of the second plankover the first plank in the second row,approximately 1/8" to 1/4" away from theside groove. Lock the end seam together.Always lock the end (“head”) seams togetherbefore connecting sides seams.
Slightly angle the side tongue profile of thispanel into the side groove of the panels in thefirst row, and with a slight wiggling action, presstongue into groove and lower into position.(The tape will secure the previously assembledpanels together.) If necessary, tap with theheel of your hand to close any minor gaps.
Continue to lay the flooring from left to right,row after row.
Laminate Flooring
Installation Guid
e
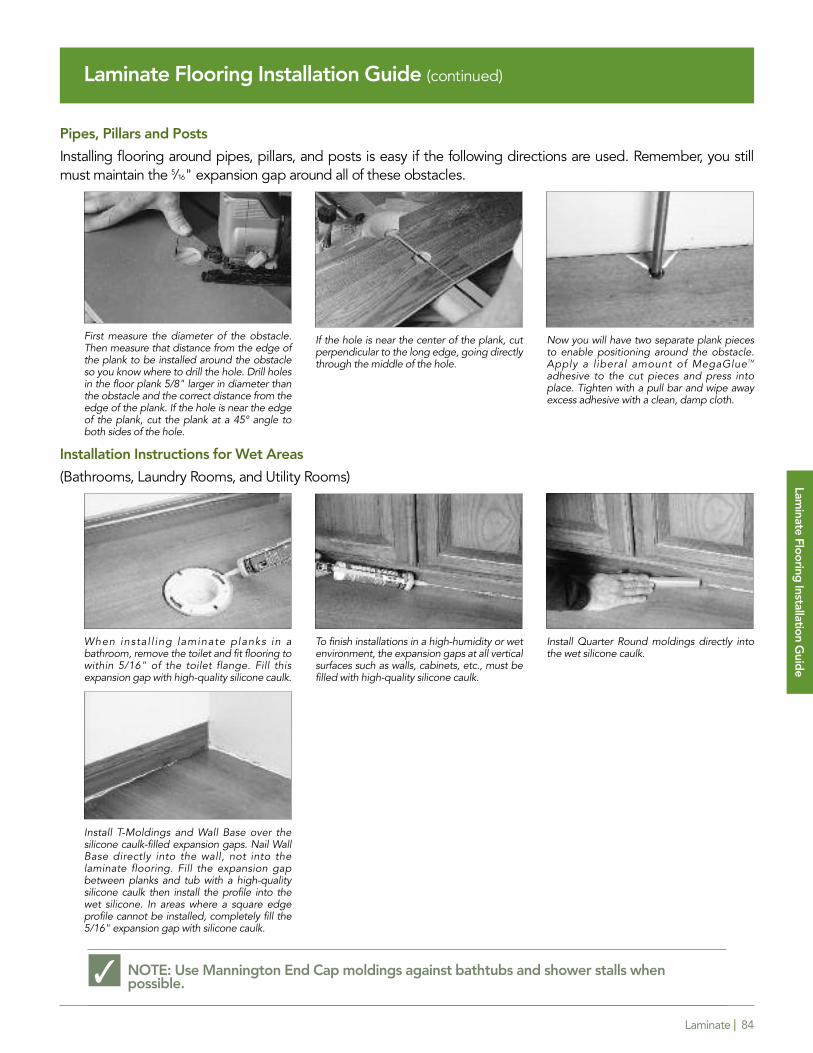
Laminate | 84
Laminate Flooring Installation Guide (continued)
Pipes, Pillars and Posts
Installing flooring around pipes, pillars, and posts is easy if the following directions are used. Remember, you stillmust maintain the 5/16" expansion gap around all of these obstacles.
Installation Instructions for Wet Areas
(Bathrooms, Laundry Rooms, and Utility Rooms)
NOTE: Use Mannington End Cap moldings against bathtubs and shower stalls whenpossible.
First measure the diameter of the obstacle.Then measure that distance from the edge ofthe plank to be installed around the obstacleso you know where to drill the hole. Drill holesin the floor plank 5/8" larger in diameter thanthe obstacle and the correct distance from theedge of the plank. If the hole is near the edgeof the plank, cut the plank at a 45° angle toboth sides of the hole.
If the hole is near the center of the plank, cutperpendicular to the long edge, going directlythrough the middle of the hole.
Now you will have two separate plank piecesto enable positioning around the obstacle.Apply a liberal amount of MegaGlueTM
adhesive to the cut pieces and press intoplace. Tighten with a pull bar and wipe awayexcess adhesive with a clean, damp cloth.
Laminate Flooring
Installation Guid
e
When instal l ing laminate planks in abathroom, remove the toilet and fit flooring towithin 5/16" of the toilet flange. Fill thisexpansion gap with high-quality silicone caulk.
Install T-Moldings and Wall Base over thesilicone caulk-filled expansion gaps. Nail WallBase directly into the wall, not into thelaminate flooring. Fill the expansion gapbetween planks and tub with a high-qualitysilicone caulk then install the profile into thewet silicone. In areas where a square edgeprofile cannot be installed, completely fill the5/16" expansion gap with silicone caulk.
To finish installations in a high-humidity or wetenvironment, the expansion gaps at all verticalsurfaces such as walls, cabinets, etc., must befilled with high-quality silicone caulk.
Install Quarter Round moldings directly intothe wet silicone caulk.
�
Laminate | 85
Laminate Flooring Installation Guide (continued)
Repairs – Mannington Laminate FloorsAlthough Mannington Laminate Floors are inherently tough, they can be accidentally chipped by falling objects.Always inspect each plank closely before installation; however, if damage occurs after installation, use the followingrepair procedures.
Mannington Laminate Repair Sealant
Mannington Laminate Repair sealant is a color-matched compound that is used to repair small nicks and chips. The sealant is applied to the damaged area to fill the void and the excess is removed with a dry cloth.
Plank Replacement for Glueless Laminate
Although the traditional method of plank replacement can be used with Mannington glueless laminate products,it is often easier and quicker to simply disassemble the planks back to the damaged area. Determine the closestwall to the repair area and remove the molding. Lift up to disengage tongue and groove of the planks andunlock the planks. Install a conditioned plank to replace the damaged one and reassemble the flooring. Replacetrim molding.
Floor Care Maintenance Instructions
Mannington Laminate Floors are the closest thing to “maintenance-free” floors. The melamine-impregnated surfacewith aluminum oxide makes it resistant to dirt and scratches.
� Ordinary vacuuming with a non-beaterbar vacuum or sweeping is usually sufficient to keep the floorclean. If needed, an occasional cleaning with a cloth or mop (microfiber or terry cloth hooded) slightlymoistened with Mannington UltraClean® is recommended.
� Never flood the floor with water.
� Do not use soap-based detergents because these can leave a dull finish on your floor.
� Do not use abrasive cleaners, steel wool, or scouring powder because these can scratch your floor.
IMPORTANT: Never wax, polish, sand, or lacquer Mannington Laminate Floors.
� Use doormats outside each entrance to your home to prevent dirt, sand, grit, and other substances such asoil, asphalt, and driveway sealer from being tracked onto your floor.
� For increased indentation resistance, use wide-bearing, non-staining floor protectors – such as clear hardplastic or non-staining felt protectors – for heavy furnishings.
Laminate Flooring
Installation Guid
e!
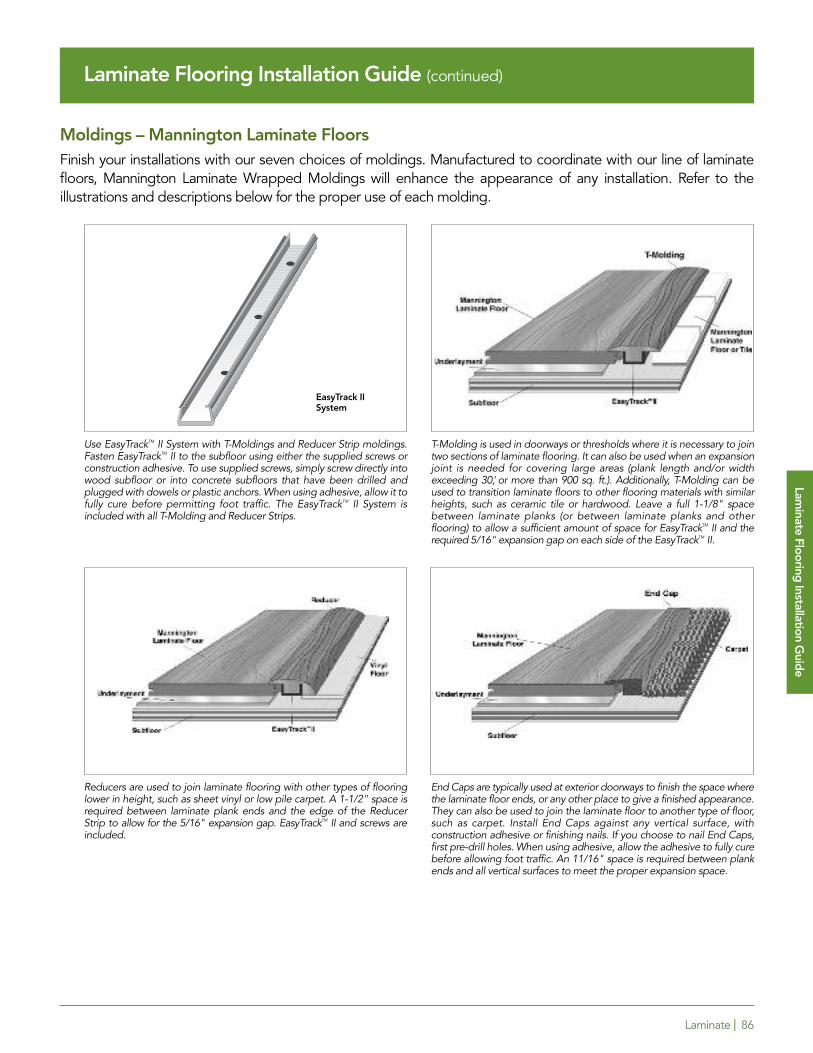
Laminate | 86
Moldings – Mannington Laminate FloorsFinish your installations with our seven choices of moldings. Manufactured to coordinate with our line of laminatefloors, Mannington Laminate Wrapped Moldings will enhance the appearance of any installation. Refer to theillustrations and descriptions below for the proper use of each molding.
Laminate Flooring Installation Guide (continued)
Use EasyTrackTM II System with T-Moldings and Reducer Strip moldings.Fasten EasyTrackTM II to the subfloor using either the supplied screws orconstruction adhesive. To use supplied screws, simply screw directly intowood subfloor or into concrete subfloors that have been drilled andplugged with dowels or plastic anchors. When using adhesive, allow it tofully cure before permitting foot traffic. The EasyTrackTM II System isincluded with all T-Molding and Reducer Strips.
T-Molding is used in doorways or thresholds where it is necessary to jointwo sections of laminate flooring. It can also be used when an expansionjoint is needed for covering large areas (plank length and/or widthexceeding 30,' or more than 900 sq. ft.). Additionally, T-Molding can beused to transition laminate floors to other flooring materials with similarheights, such as ceramic tile or hardwood. Leave a full 1-1/8" spacebetween laminate planks (or between laminate planks and otherflooring) to allow a sufficient amount of space for EasyTrackTM II and therequired 5/16" expansion gap on each side of the EasyTrackTM II.
EasyTrack IISystem
Laminate Flooring
Installation Guid
e
Reducers are used to join laminate flooring with other types of flooringlower in height, such as sheet vinyl or low pile carpet. A 1-1/2" space isrequired between laminate plank ends and the edge of the ReducerStrip to allow for the 5/16" expansion gap. EasyTrackTM II and screws areincluded.
End Caps are typically used at exterior doorways to finish the space wherethe laminate floor ends, or any other place to give a finished appearance.They can also be used to join the laminate floor to another type of floor,such as carpet. Install End Caps against any vertical surface, withconstruction adhesive or finishing nails. If you choose to nail End Caps,first pre-drill holes. When using adhesive, allow the adhesive to fully curebefore allowing foot traffic. An 11/16" space is required between plankends and all vertical surfaces to meet the proper expansion space.
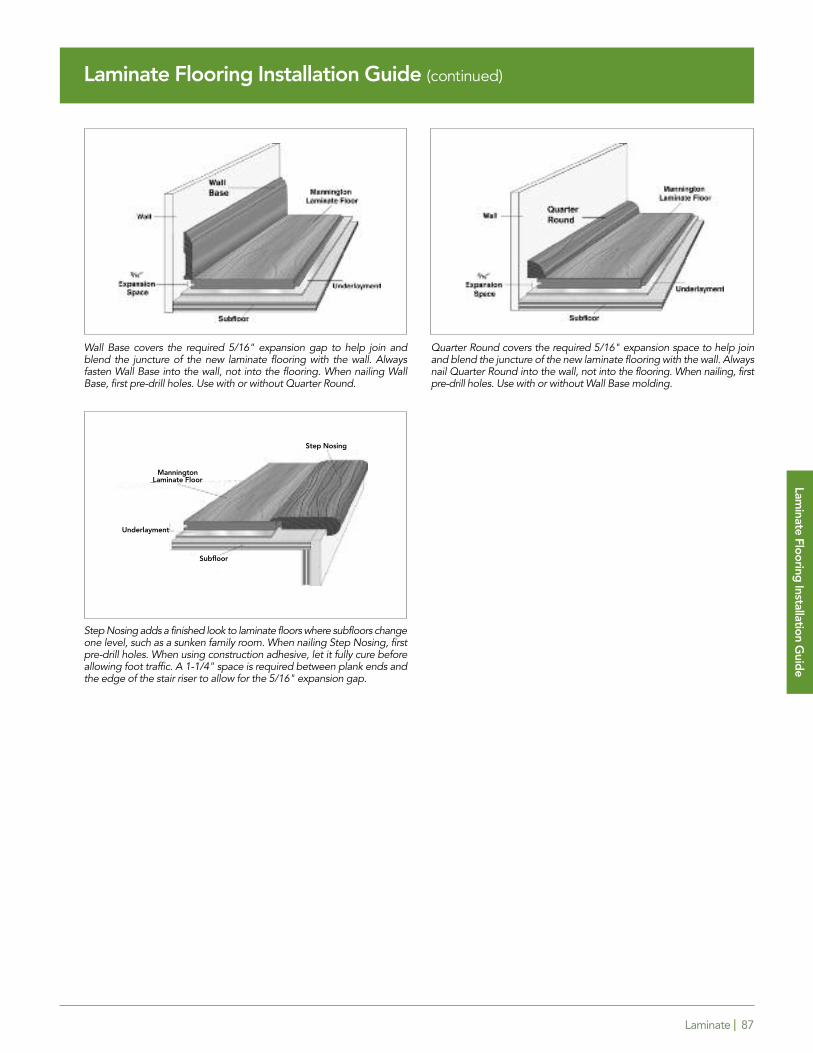
Laminate | 87
Laminate Flooring Installation Guide (continued)
Wall Base covers the required 5/16" expansion gap to help join andblend the juncture of the new laminate flooring with the wall. Alwaysfasten Wall Base into the wall, not into the flooring. When nailing WallBase, first pre-drill holes. Use with or without Quarter Round.
Step Nosing adds a finished look to laminate floors where subfloors changeone level, such as a sunken family room. When nailing Step Nosing, firstpre-drill holes. When using construction adhesive, let it fully cure beforeallowing foot traffic. A 1-1/4" space is required between plank ends andthe edge of the stair riser to allow for the 5/16" expansion gap.
Quarter Round covers the required 5/16" expansion space to help joinand blend the juncture of the new laminate flooring with the wall. Alwaysnail Quarter Round into the wall, not into the flooring. When nailing, firstpre-drill holes. Use with or without Wall Base molding.
Mannington Laminate Floor
Step Nosing
Underlayment
Subfloor
Laminate Flooring
Installation Guid
e
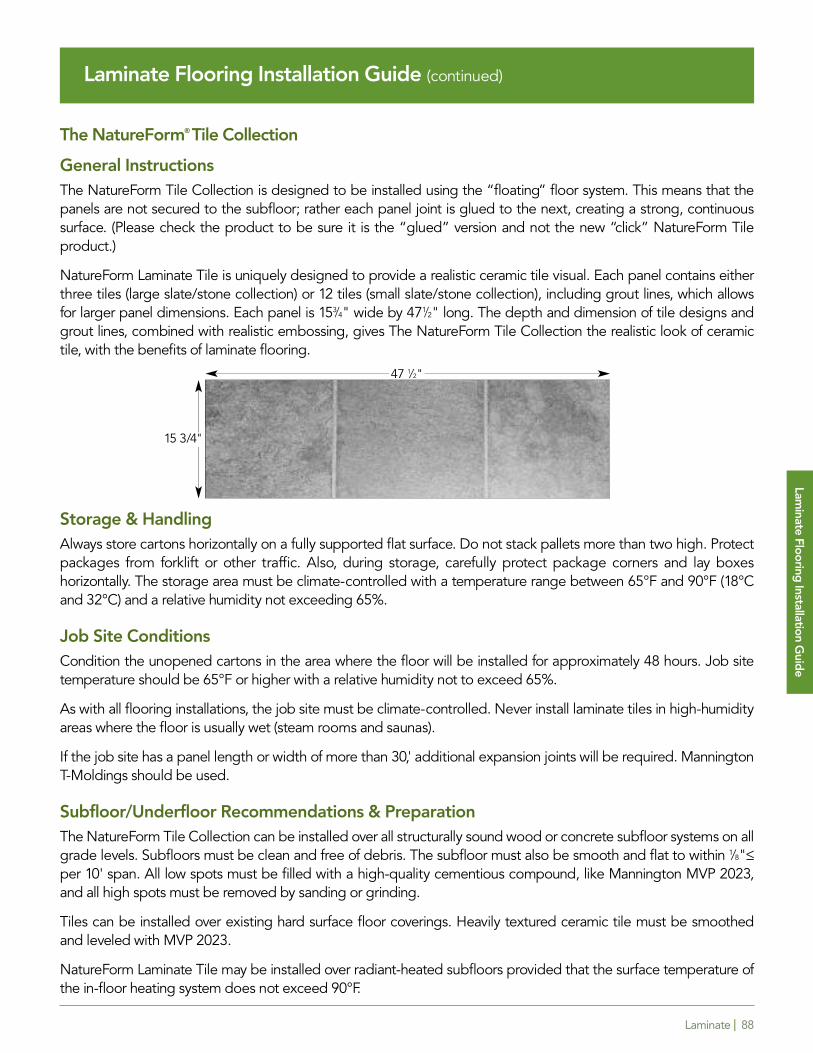
Laminate | 88
Laminate Flooring Installation Guide (continued)
The NatureForm® Tile Collection
General InstructionsThe NatureForm Tile Collection is designed to be installed using the “floating” floor system. This means that thepanels are not secured to the subfloor; rather each panel joint is glued to the next, creating a strong, continuoussurface. (Please check the product to be sure it is the “glued” version and not the new “click” NatureForm Tileproduct.)
NatureForm Laminate Tile is uniquely designed to provide a realistic ceramic tile visual. Each panel contains eitherthree tiles (large slate/stone collection) or 12 tiles (small slate/stone collection), including grout lines, which allowsfor larger panel dimensions. Each panel is 153/4" wide by 471/2" long. The depth and dimension of tile designs andgrout lines, combined with realistic embossing, gives The NatureForm Tile Collection the realistic look of ceramictile, with the benefits of laminate flooring.
Storage & HandlingAlways store cartons horizontally on a fully supported flat surface. Do not stack pallets more than two high. Protectpackages from forklift or other traffic. Also, during storage, carefully protect package corners and lay boxeshorizontally. The storage area must be climate-controlled with a temperature range between 65°F and 90°F (18°Cand 32°C) and a relative humidity not exceeding 65%.
Job Site ConditionsCondition the unopened cartons in the area where the floor will be installed for approximately 48 hours. Job sitetemperature should be 65°F or higher with a relative humidity not to exceed 65%.
As with all flooring installations, the job site must be climate-controlled. Never install laminate tiles in high-humidityareas where the floor is usually wet (steam rooms and saunas).
If the job site has a panel length or width of more than 30,' additional expansion joints will be required. ManningtonT-Moldings should be used.
Subfloor/Underfloor Recommendations & PreparationThe NatureForm Tile Collection can be installed over all structurally sound wood or concrete subfloor systems on allgrade levels. Subfloors must be clean and free of debris. The subfloor must also be smooth and flat to within 1/8"≤per 10' span. All low spots must be filled with a high-quality cementious compound, like Mannington MVP 2023,and all high spots must be removed by sanding or grinding.
Tiles can be installed over existing hard surface floor coverings. Heavily textured ceramic tile must be smoothedand leveled with MVP 2023.
NatureForm Laminate Tile may be installed over radiant-heated subfloors provided that the surface temperature ofthe in-floor heating system does not exceed 90°F.
15 3/4"
47 1/2"
Laminate Flooring
Installation Guid
e
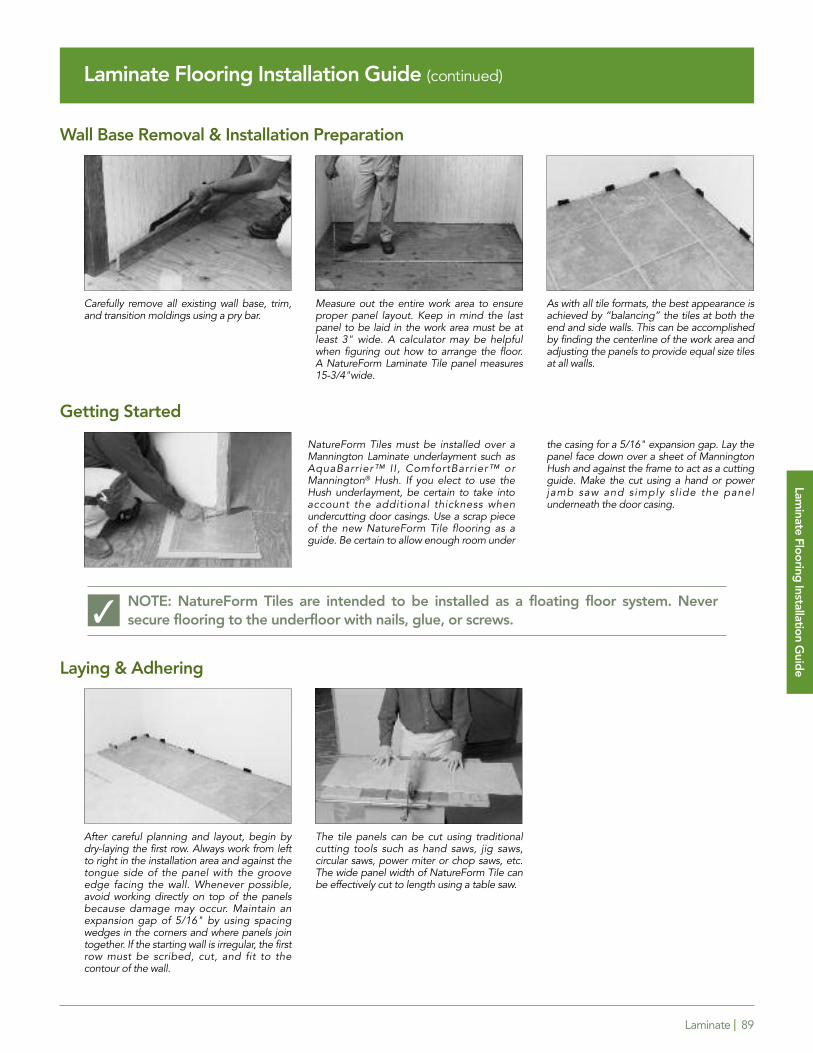
Laminate | 89
Laminate Flooring Installation Guide (continued)
Wall Base Removal & Installation Preparation
Getting Started
NOTE: NatureForm Tiles are intended to be installed as a floating floor system. Neversecure flooring to the underfloor with nails, glue, or screws.
Laying & Adhering
Carefully remove all existing wall base, trim,and transition moldings using a pry bar.
Measure out the entire work area to ensureproper panel layout. Keep in mind the lastpanel to be laid in the work area must be atleast 3" wide. A calculator may be helpfulwhen figuring out how to arrange the floor. A NatureForm Laminate Tile panel measures15-3/4"wide.
As with all tile formats, the best appearance isachieved by “balancing” the tiles at both theend and side walls. This can be accomplishedby finding the centerline of the work area andadjusting the panels to provide equal size tilesat all walls.
After careful planning and layout, begin bydry-laying the first row. Always work from leftto right in the installation area and against thetongue side of the panel with the grooveedge facing the wall. Whenever possible,avoid working directly on top of the panelsbecause damage may occur. Maintain anexpansion gap of 5/16" by using spacingwedges in the corners and where panels jointogether. If the starting wall is irregular, the firstrow must be scribed, cut, and fit to thecontour of the wall.
The tile panels can be cut using traditionalcutting tools such as hand saws, jig saws,circular saws, power miter or chop saws, etc.The wide panel width of NatureForm Tile canbe effectively cut to length using a table saw.
NatureForm Tiles must be installed over aMannington Laminate underlayment such asAquaBarrier™ II, ComfortBarrier™ orMannington® Hush. If you elect to use theHush underlayment, be certain to take intoaccount the additional thickness whenundercutting door casings. Use a scrap pieceof the new NatureForm Tile flooring as aguide. Be certain to allow enough room under
the casing for a 5/16" expansion gap. Lay thepanel face down over a sheet of ManningtonHush and against the frame to act as a cuttingguide. Make the cut using a hand or powerjamb saw and simply sl ide the panelunderneath the door casing.
�
Laminate Flooring
Installation Guid
e
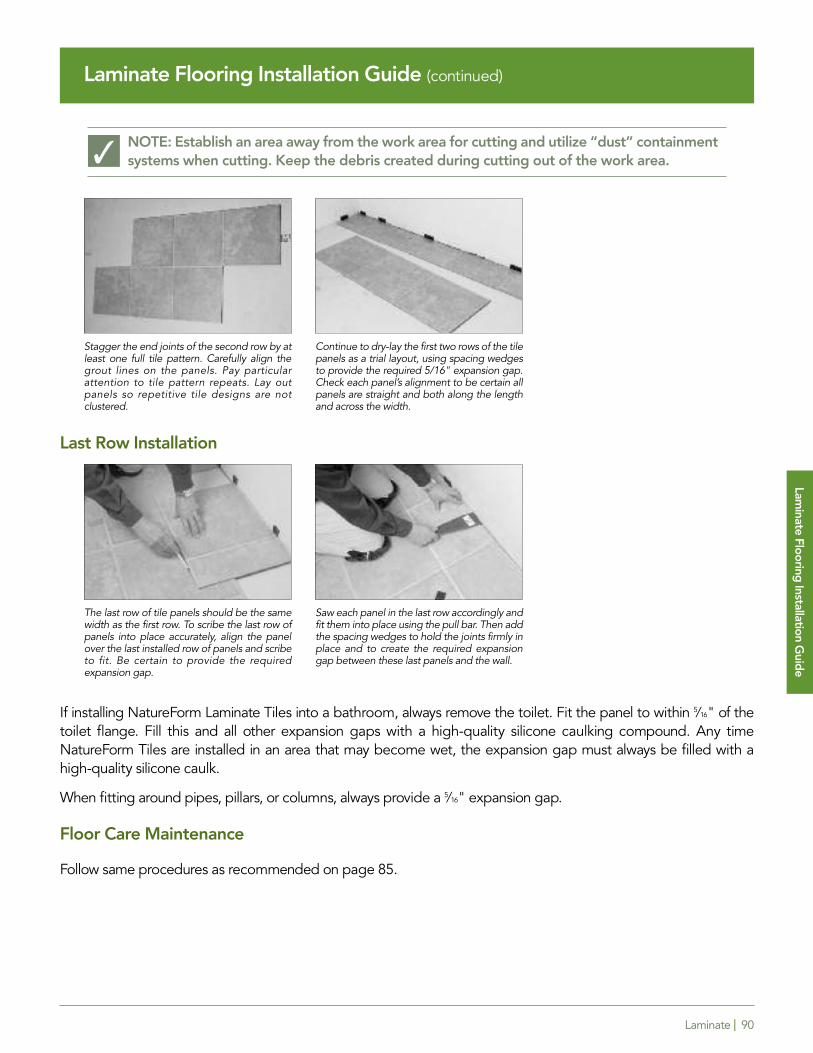
Laminate | 90
Laminate Flooring Installation Guide (continued)
NOTE: Establish an area away from the work area for cutting and utilize “dust” containmentsystems when cutting. Keep the debris created during cutting out of the work area.
Last Row Installation
If installing NatureForm Laminate Tiles into a bathroom, always remove the toilet. Fit the panel to within 5/16" of thetoilet flange. Fill this and all other expansion gaps with a high-quality silicone caulking compound. Any timeNatureForm Tiles are installed in an area that may become wet, the expansion gap must always be filled with ahigh-quality silicone caulk.
When fitting around pipes, pillars, or columns, always provide a 5/16" expansion gap.
Floor Care Maintenance
Follow same procedures as recommended on page 85.
�
Stagger the end joints of the second row by atleast one full tile pattern. Carefully align thegrout lines on the panels. Pay particularattention to tile pattern repeats. Lay outpanels so repetitive tile designs are notclustered.
Continue to dry-lay the first two rows of the tilepanels as a trial layout, using spacing wedgesto provide the required 5/16" expansion gap.Check each panel’s alignment to be certain allpanels are straight and both along the lengthand across the width.
The last row of tile panels should be the samewidth as the first row. To scribe the last row ofpanels into place accurately, align the panelover the last installed row of panels and scribeto fit. Be certain to provide the requiredexpansion gap.
Saw each panel in the last row accordingly andfit them into place using the pull bar. Then addthe spacing wedges to hold the joints firmly inplace and to create the required expansiongap between these last panels and the wall.
Laminate Flooring
Installation Guid
e
Molding Tips
� Before installing the first plank, select a dozen or more planks that closely blend with the molding.
� All Laminate Wrapped Molding Strips and Easy Track II come in 94" long pieces.
� Quarter Round, Wall Base, Step Nosing and End Caps are not available with Easy Track II System.
� Reducer Strips and T-Moldings include aluminum track screws and may be installed with or without theEasy Track II system.
Laminate | 91
Laminate Flooring Installation Guide (continued)
Technical & Packaging Information
Packaging – RevolutionsTM Plank
Board Thickness Width Length Weight Sq Ft Cartons
Plank 1 5⁄16" 55⁄16" 501⁄2" 2.97 lbs 1.85 —Carton 12 4" 55⁄16" 513⁄8" 35.7 lbs 22.24 1Pallet 588 275⁄9" 54" 42" 1,749 lbs 1,090.0 49
Packaging – RevolutionsTM Tile
AdirondackBoard Thickness Width Length Weight Sq Ft Cartons
Plank 1 5⁄16" 153⁄4" 503⁄4" 8.04 lbs 5.52 —Carton 4 11⁄2" 161⁄4" 515⁄8" 32.15 lbs 22.11 1Pallet 224 392⁄3" 321⁄2" 515⁄8" 1,800.53 lbs 1,237 56
Packaging – All Other RevolutionsTM Tile
Board Thickness Width Length Weight Sq Ft Cartons
Plank 1 5⁄16" 123⁄4" 503⁄4" 7.07 lbs 4.46 —Carton 5 13⁄4" 133⁄8" 515⁄8" 35.35 lbs 22.32 1Pallet 270 311⁄4" 40" 515⁄8" 1,909.05 lbs 1,205.34 54
Packaging – NatureForm® Tile Collection* and Valu Tile
Board Thickness Width Length Weight Sq Ft Cartons
Plank 1 5⁄16" 153⁄4" 471⁄8" 7.5 lbs 5.15 —Carton 4 11⁄2" 165⁄16" 481⁄8" 30 lbs 20.61 1Pallet 224 392⁄3" 325⁄8" 481⁄8" 1,680 lbs 1,154 56
Packaging – CoordinationsTM
Coordinations and Value Lock
Board Thickness Width Length Weight Sq Ft Cartons
Plank 1 5⁄16" 79⁄16" 501⁄2" 4.20 lbs 2.65 —Carton 8 25⁄8" 81⁄8" 513⁄8" 33.60 lbs 21.21 1Pallet 400 263⁄4" 401⁄2" 513⁄8" 1,680 lbs 1,061 50
Laminate Flooring
Installation Guid
e
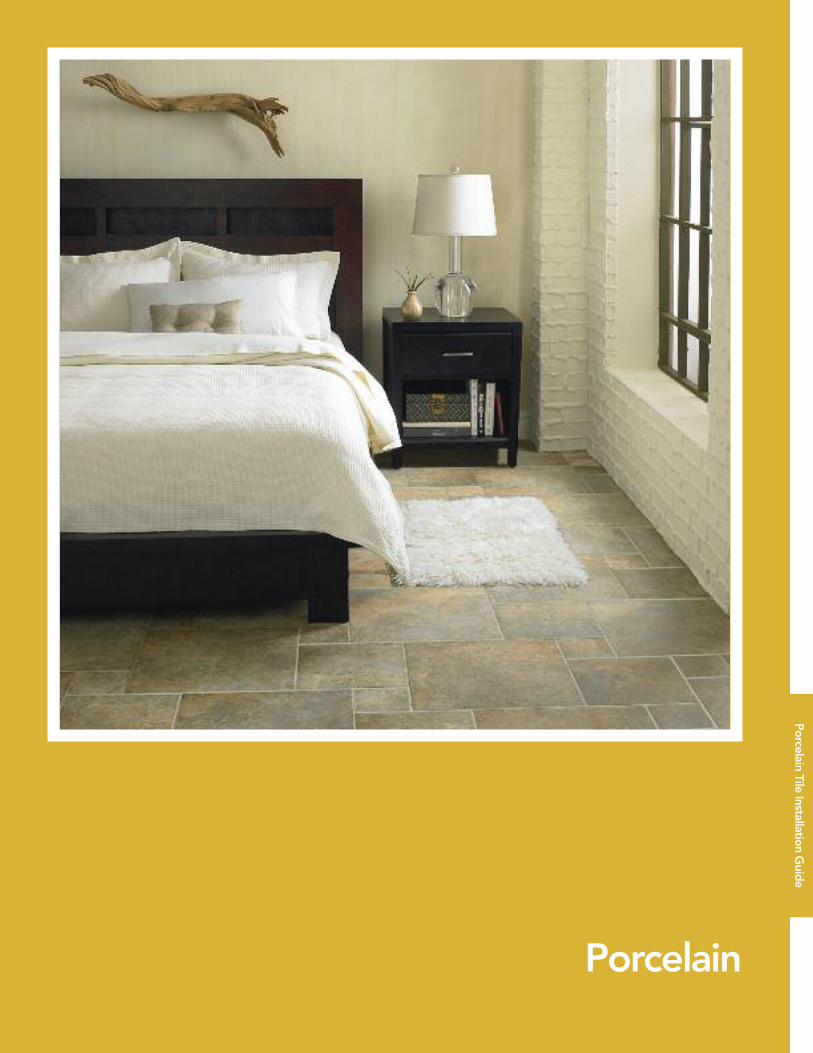
General Installation | Adura® | 92General Installation | Adura® | 92
Porcelain
Porcelain Tile Installation Guid
e
Porcelain | 93
Porcelain Tile Installation Guide
ESSENTIALS FOR PRODUCT SELECTION, JOB SITE CONDITIONS, SUBSTRATE PREPERATION,INSTALLATION AND MAINTENANCE.
The Mannington program is comprised exclusively of Porcelain tile. Our tile has been independently certified asporcelain tile by the Porcelain Tile Certification Agency which guarantees its performance characteristics. Madewith special clays and minerals that are kiln-fired at temperatures exceeding 2400° Fahrenheit, porcelain ceramictile is harder, denser and more durable than other ceramic tile products. It is frost proof and highly stain, scratch andwater resistant. Extremely low water absorption precludes normal stains and makes cleaning quicker and easier.Porcelain tiles can be installed in both interior or exterior application and performs well in heavy traffic areas. Inaddition to performance, porcelain tiles are aesthetically pleasing and have become one of the most widelyspecified and selected products for flooring and wall surfaces. They offer a wide selection of sizes and colors tosatisfy the needs for most residential and commercial installations. Porcelain tiles are beautiful in any color, are waterresistant and when properly installed will last a lifetime. Porcelain tile, made from all natural products, isenvironmentally friendly.
There are essentially three types of porcelain tile. First, there is glazed porcelain tile in which the body of the tileis fully covered by glaze. Usually the body of the tile is a different color than the surface and you can tell that bylooking at the face of the tile and then turning it over. If the body is a different color there is a high likelihood that itis a glazed porcelain tile. Another type of porcelain tile is Color-Core™ tile. This is where the body is an integralpart of the overall color of the tile. If you see the body color on the face of the tile you are most likely looking atColor-Core porcelain. Thirdly, there is Tru-Color™ porcelain tile which is the same color all the way through thebody of the tile. While some manufacturing techniques can become very complicated and proprietary, most if notall porcelain tile falls into one of these three categories.
Product selection is one of the most important and critical requirements for a high performance and aestheticallypleasing tile installation. The process for selecting your tile can seem daunting and confusing but Manningtonoffers a tile selection process that can alleviate some of the confusion. The process is as follows:
1. Choose Your Color and Texture2. Choose Your Size and Layout3. Choose Your Mosaics, Trim and Decorative Accents4. Choose Your Grout
If you follow this strategy while selecting your porcelain tile it may overcome some of your concerns. Regardless ofyour requirements you will find a variety of sizes and colors, some with border and accents, allowing virtuallyunlimited decoration options. Additionally, Mannington offers a myriad of pattern options on our website atwww.mannington.com. The pattern that you select can significantly enhance the aesthetic and visual appearanceof you tile. Just by changing the pattern you can change the look of the tile.
All ceramic or porcelain tiles are not suitable for all areas. Color-Core and Tru-Color porcelain features colorationthroughout the tile, is less likely to show scratches and minor wear and is usually more slip resistant than glazed tile.Most porcelain tiles are wear-rated and most manufacturers worldwide meet international standards. Since all tilesare not rated for floor traffic it’s important that you consult your Mannington Distributor or Retail Dealerrepresentative to determine that your selection is appropriate for your particular job requirements. While selectingyour tile please pay attention to several key porcelain tile characteristics. Pay attention to the shade rating which isclassified by a “V” rating, V1, V2, V3, or V4.
Porcelain Tile Installation Guid
e
Porcelain | 94
Porcelain Tile Installation Guide (continued)
V1 – Uniform Appearance Differences among pieces of tile from the same production run are minimal
V2 – Slight Variation Clearly distinguishable texture and/or pattern differences within the same pattern
V3 – Moderate Variation While the colors present on a single piece of tile will beindicative of the colors tobe expected on the other tiles, the amount of colors on each piece may varysignificantly.
V4 – Substantial Variation Random color differences from tile to tile so that one tile may have totally differentcolors than on other tiles. Thus, the final installation will be unique.
The shade rating is available for all Mannington porcelain tiles. It is extremely important to know what range of coloryour final installation will have after installation and it may require that you view several pieces of tile in order toascertain the range. If slip resistance is a concern, check the Coefficient of Friction (COF). A tile with a COF ≥ 0.60both wet and dry is considered slip resistant. There is a trade off between slip resistance and cleanability in someinstances. Choose the tile that meets your aesthetic and performance requirements.
Storage and Handling
Porcelain tile does not require special consideration regarding temperature or humidity and in certain climates itcan be stored outdoors. Prior to beginning installation, check the materials to ensure that you have the correctpattern, style and color. Check your quantities to make sure you have the required amounts to complete your job.Inspect the tiles before installation for any visible defects. Mannington products are manufactured to high-qualitystandards and are carefully inspected prior to shipment. Occasionally, however, defects are not detected. If visibledefects in the product are detected, stop the installation and contact your local Mannington Distributorimmediately. Consideration should always be given to security and protection from incidental damage from otherconstruction trades.
Job Site Conditions
The environment where tile is installed is critically important to successful installation and continued performance. Thearea should be free of all construction debris, dirt and surface contaminants. Unobstructed access to the job siteshould be provided and provisions must be made for handling the product from storage to the installation area. Priorto installation, permanent lighting or temporary lighting representative of permanent lighting, must be provided.Always consider the potential adverse effects of extreme temperatures and humidity on mortar and grout with exteriorinstallations of Porcelain tile. Adequate ventilation, heating and/or air conditioning should be available to sustain anenvironment required for the installation of bonding and grouting materials. The type and methods of construction,grade level and flooring system components all impact the final installation. Some minimal code requirements forflatness, levelness and deflection may not provide a suitable system for the installation of Porcelain tile.
Substrates:
Concrete and Masonry – When tile is directly bonded to an existing concrete or masonry substrate, the tileinstallation is greatly affected by the suitability and condition of the concrete or masonry supporting theinstallation and providing the bonding surface. Flatness of the substrate must be checked to meet industrymethods and specifications. The Tile Council of North America (TCNA) Handbook for Ceramic Tile Installationrequires that tile substrates have no more than ¼” variation in 10 feet and no more than 1/16” variation in 1 footfrom the required plane.
Porcelain Tile Installation Guid
e
Porcelain | 95
Porcelain Tile Installation Guide (continued)
If substrates do not meet the flatness requirements and remedial corrections are not made, the installation will likelyhave lippage or flatness issues, a leading cause of complaints. When correcting concrete or masonry substrates useonly products specifically designated for this purpose. Bonding materials like cement mortars (thin-sets) are notdesigned for patching or other thick applications. If the tile is 15”x15” or larger, it is strongly suggested that amedium bed thinset mortar be selected, allowing for the spreading of more mortar underneath the tile. Followclosely all manufacturers recommendations and directions.
In some instances grinding down high spots on floors will be necessary. Concrete and substrates must be clean andfree from dust, paint, or drywall compounds that can act as bond breakers. It is important to check for cracks inconcrete substrates. Bonding over cracks can lead to loss of bond or the crack telegraphing through the tile. Crackisolation, self leveling underlayments and uncoupling membranes are available to address problems of this type.Since there are many different methods of installation over concrete and masonry substrates the TCNA Handbookand the American National Standard (ANSI) Specifications for Ceramic Tile should be followed.
Wood Substrates – Unlike a concrete substrate, a wood subfloor only provides the support for tile installation, notthe bonding surface. When wood is the substrate, it’s important to be aware that wood expands and contractswhen its moisture content changes. Wood substrates deflect, or bend, under loads more than concrete substrates.Tile installations require a rigid substrate that will not deflect, or bend when loads are applied. The greatestdeflection will occur in the wood panels fastened to joists at the midway point between the joists particularly underpoint or concentrated loads. Too much deflection causes cracked and/or powdered grout joints, cracked anddebonded tiles. Subfloor panel thickness and joist spacing determine subfloor panel deflection. Smaller joistspacing and thicker subfloor panes allow less deflection. Most floor installation methods in the TCNA Handbooklimit joist spacing to 16” on center. However, there are methods in the Handbook that allows for a wider joistspacing, (19.2” on center and 24” on center) if certain requirements to prepare the substrate are met. All methodsrequire the subfloor to be at least 19/32” (5/8”). Many methods require the subfloor to be 23/32” (3/4”).
Some methods require a second layer of plywood for greater rigidity to reduce deflection. Since there are manydifferent methods of installation over wood substrates the TCNA Handbook and the ANSI Specifications forCeramic Tile should be followed. Further subfloor placement and fastening requirements can be obtained from theAmerican Plywood Association (APA). Follow all applicable industry methods and specifications and individualmanufacturers recommendations and directions. Backerboards and some types of plywood panels are suitableunderlayments to install over a wood subfloor to receive ceramic tile. There are several types, each having differentapplication suitability and some unique installation requirements for different applications. Because of theirsignificant differences the TCNA Handbook contains separate installation methods and standards for the variousboard types. To ascertain proper use and installation methods review the TCNA Handbook and the specific boardmanufacturer’s instructions.
Membranes – Membranes are flexile sheets that are bonded to concrete, wood and poured underlayments. Theyhave a broad range of uses and come in many forms. Some are pre- manufactured sheet goods that are simplybonded to the substrate. Others are applied as a wet material that becomes the bonded membrane once it hasdried in place. Some mortars used as the tile adhesive now possess the flexibility and meet the performancerequirements of a crack isolation membrane. Crack isolation membranes, full and partial coverage, and uncouplingmembranes are unique products. The proper methods and specifications for their use can be found in the TCAHandbook and the ANSI Specifications for Ceramic tile. Manufacturer recommendations and directions must becarefully followed.
Porcelain Tile Installation Guid
e
Porcelain | 96
Porcelain Tile Installation Guide (continued)
Layout – Layout is critical to an aesthetically pleasing tile installation. Tile layouts should be centered and balanced asmuch as possible with respect to the tiled area and any specific focal points. Usually, a space offers more than oneacceptable layout, making the final selection a matter of personal preference. The ANSI Specification for CeramicTile says: “an excessive amount of cuts shall not be made. Usually, no cuts smaller than half size should be made.Make all cuts on the outer edges of the field.” When multi-room layouts necessitate cuts smaller than ½ tile the bestpossible layout will place smaller cuts in the least obvious places. Movement joint requirements must be consideredalso. See the TCNA Handbook for Ceramic Tile Installation section EJ-171 for complete recommendations.
Bonding Materials – Innovative technology has produced a plethora of bonding materials for the installation of tileproducts. Careful consideration must be given to the type of substrate and type of tile selected in choosing theproper bonding material. Common tilesetter terms such as “thin-set” and “mastic” are not specifically definedmeanings. The term “thin-set” is used interchangeably to describe a cement-based mortar and a method thatencompasses all bonding materials that facilitates thin-bed installations. Therefore mastics (organic adhesives) andepoxies could be called “thin-set” Industry standardized terms for cement mortars are “dry-set mortar” or“latex/polymer modified mortar” instead of “thin-set”. Dry-set Portland cement mortar does not contain polymersand is often referred to as “unmodified mortar”. Cement based mortars that contain polymers additives are called“latex/polymer modified portland cement mortar” or “modified mortar”. Both perform dramatically better thanorganic adhesive (mastic) and are generally preferred for most jobs. Modified and unmodified mortars aresometimes interchangeable, however, many applications require the specific use of one or the other.
All bonding materials have minimum and maximum thicknesses that should not be ignored. Too little reduces bondstrength and too much provides inadequate compressive strength and may shrink causing lippage and cracked tiles.Minimum bond coat thickness after proper bedding is 3/32” for cement mortars and 1/32” for organic adhesives.While cement mortars thickness varies by product generally about ¼” is standard. For thicker applications, use amedium-bed mortar which will maintain compressive strength and minimize the potential for shrinkage.
Organic adhesives (mastic) are ready to use products sometimes referred to as mastic or glue. They arecategorized as Type I or Type II based on suitability for use in wet areas. Organic adhesives and cement-basedmortars differ in composition and application suitability. Organic adhesives have considerably more limitations andshould not be used interchangeably with cement mortars. Organic adhesive is not the best choice for bonding floortile, even in dry areas its low compressive strength, as compared to cement mortar, will not withstand impact orloading. Epoxy bonding materials are available and should be used with the express manufacturersrecommendations and directions.
Tools – Your Mannington Distributor can recommend a wide variety of tools for proper tile installation. The singlemost important tool is the notched trowel. They come in a variety of sizes and notch configuration and the properselection is vital to the performance of the finished installation. There are square notches and rounded notches in avariety of widths and depths. The tile industry is one of a few industries that use notched trowels. They aredesigned specifically to apply a gauged amount of bonding material to the substrate. The National Tile ContractorsAssociation, Inc. (NTCA) recommends the following Trowel Guidelines:
Porcelain Tile Installation Guid
e
Porcelain | 97
Porcelain Tile Installation Guide (continued)
Adhesives – 4-1/4 wall tile and ceramic mosaics on dry wall – V-notch 3/16” X 5/32”.6” X 6” to 9” X 9” on dry wall – Square notch ¼” X ¼” X ¼”
Dry-Set Mortars – 4-1/4 wall tile and ceramic mosaics on masonry and concrete :U-notch ¼” X ¼” X 5/16”6” X 6” to 9” X 9” on masonry walls and concrete:U-notch ¼” X ¼” X 3/8”
Medium Bed Mortars - 12” X 12” and larger size tiles on masonry or concrete & tiles with thickness variation: 3/8” X ¾” X 9/16” - 25/64” X ¾” X 19/32”
Always check trowel for excessive wear before use. Use the flat side of the trowel to key mortar or adhesive intosubstrate to achieve the best possible mechanical bond. Comb in one direction with the notched side of thetrowel, holding at a 45 degree angle. Specifications require no less than 3/32 inch (2mm) mortar and 1/32 inch(1mm) adhesive between tile and substrate after proper bedding. Set tile with a sliding motion perpendicular to themortar ridges. The 80 – 95 % coverage shall be sufficiently distributed to give full support to the tile with particularattention to support under all corners and edges of the tile. Periodically remove sheets or individual tiles to assureproper bond coverage consistent with industry specifications.
Grouting – A bad grout job can ruin a perfect installation. In addition to the aesthetic value of a quality grout job, itcan affect the longevity and maintenance requirement of the tiled area. Properly mixed and applied polymer-modified cementitious grouts withstand the heavy service and maintenance conditions of commercial areas.Poorly-installed grout can show signs of wear under lighter conditions of a residential bathroom. Grout joint widthand type of tile determine the grout product selection. A Grout Guide is provided in the TNCA Handbook coveringsuggested joint widths and tile type and use for the following grouts: Jobsite Mix (Sanded), Standard UnsandedCement Grout, Standard Sanded Cement Grout, Polymer Modified Unsanded Tile Grout, Polymer Sanded TileGrout, Modified Epoxy Emulsion, 100% Solid Epoxy, Furan, Silicone Urethane and Mastic Grout. Groutmanufacturers provide printed instructions for proper mixing, cleaning and curing of each type of grout. Theseinstructions must be carefully followed. A variety of sealers are available to enhance and protect certain types ofgrouts. Careful attention must be given to selection, application and clean-up of all sealers. Follow manufacturers’instructions explicitly. Top finishes and waxes affect the appearance of the tile and therefore are not recommended.
Clean Up – A final rinse of the grouted area should leave the surface clean and free of grout haze. Most grout hazecan be removed from Porcelain tile with warm water and a mild detergent using a nylon pad or soft bristle brush.Acid cleaning is rarely recommended and should be done only by qualified personnel. When necessary, a solutionof Sulfamic Acid is recommended with strict adherence to the manufacturers’ instructions. All acid or acid basedcleaners can adversely affect most grouts. Thorough rinsing to neutralize the acid is mandatory. Restrict traffic anduse of freshly – grouted areas for at least 12 to 24 hours in residential applications and up to 72 hours in commercialinstallations. Exposure to water and freezing temperatures must be avoided. Temperature and humidity affect thecuring time of all cementitious materials. Allow for extended cure times for temperatures below 60 degrees Fand/or when relative humidity is above 70%. Check individual data sheets and closely follow manufacturersrecommendations and directions.
Porcelain Tile Installation Guid
e
Porcelain | 98
Porcelain Tile Installation Guide (continued)
Maintenance – Porcelain tiles require a minimum of maintenance. Sweep thoroughly and mop with a clean dampmop. If necessary a mild household detergent can be used. Do not use abrasive cleaners or brushes with hardbristles. Clean up spills immediately, use detergent in strengths recommended by their manufacturer, allow thedetergent to remain on the surface of the tile as recommended and rinse thoroughly with clean water to removethe detergent and the emulsified residue. Choose a product compatible for cleaning the tile and grout at the sametime. It is strongly recommended that a small test area be used prior to usage of installation, tile, cleaning andmaintenance products to determine if the product selected will serve its intended purpose.
Suggested Cleaners for Porcelain Tile – Most household cleaners are sufficient to clean common stains so longas the problem is addressed immediately. Where stain removal becomes a problem, contact a cleaning andmaintenance product supplier or your local Mannington distributor for professional suggestions.
Technical & Packaging Information – Mannington Porcelain Tile
Warranties
Mannington (Mannington Mills Inc.) warrants that its first choice production porcelain tile (tile) is manufactured inaccordance with ANSI A137.1-1988 standards. In the event that it is established that the tile has a manufacturingdefect resulting from it not being manufactured in accordance with the said standards, Mannington will furnish, freeof charge, material for replacement of the defective tile of compatible color and shade as determined byMannington. Mannington shall not be responsible for labor charges incurred for installing replacement material andsuch charges are excluded from this warranty.
Mannington makes no warranty as to the suitability of its tile for installation for any particular purpose or locationand it does not warrant that its tile will not scratch, chip or show signs of wear.
Mannington specifically excludes liability for consequential or incidental damages resulting from breach of itswarranty except where exclusion of consequential damages is not permitted by applicable State law.
This warranty is a limited warranty and shall constitute the full extent of Mannington’s liability on itswarranty. This warranty is in place of all other warranties, expressed or implied, including the impliedwarranty of merchantability and the implied warranty of fitness for a particular purpose.
To make claim under this warranty, Mannington must receive notification of the claim as soon as reasonablypossible but in no event later than one year after the tile has been installed. Claims must be made by calling-1-800-FLOOR-US or in writing and sent by certified mail to Mannington addressed to: Mannington Mills, Inc., CustomerCare Department, 75 Mannington Mills Road, Salem, New Jersey 08079.
Claims concerning shade, appearance, caliber, finish or obvious defects in the tile must be communicated beforethe tile is installed. No such claims will be accepted for tile that has been installed before Manningtonreceives a written claim sent by certified mail to Mannington addressed to: Mannington Mills, Inc.,Customer Care Department, 75 Mannington Mills Road, Salem, New Jersey 08079.
Porcelain Tile Installation Guid
e
�
�
Porcelain | 99
Porcelain Tile Installation Guide (continued)
Carton Labeling
Shade: Two-digit code; maximum of 5 shades; target shade is 50.
48 – 49 50 51 – 52Lighter Target Darker
Production Run Identification: Alpha character (A – Z) represents this.
Sequence: XX A X Example: 50A5Shade Run Size
Size: One digit code; maximum of 5 calibrations per size; target caliber is 5.
3 – 4 5 6 – 7Lighter Target Darker
How To Read Full Carton Label:
ETOT13 WALNUT 50A6 1
Order Code, Color Color Shade, Production FirstCode, & Tile Size Name Run & Caliber Quality
NOTE: Rectified tiles are all one size due to manufacturing process and will not have a caliber listing.
NOTE: Some lot listing methods on cartons will vary. Please contact customer service in Salem, NJ with any questions.
Shade SizeRun
Porcelain Tile Installation Guid
e
Need to add contact information
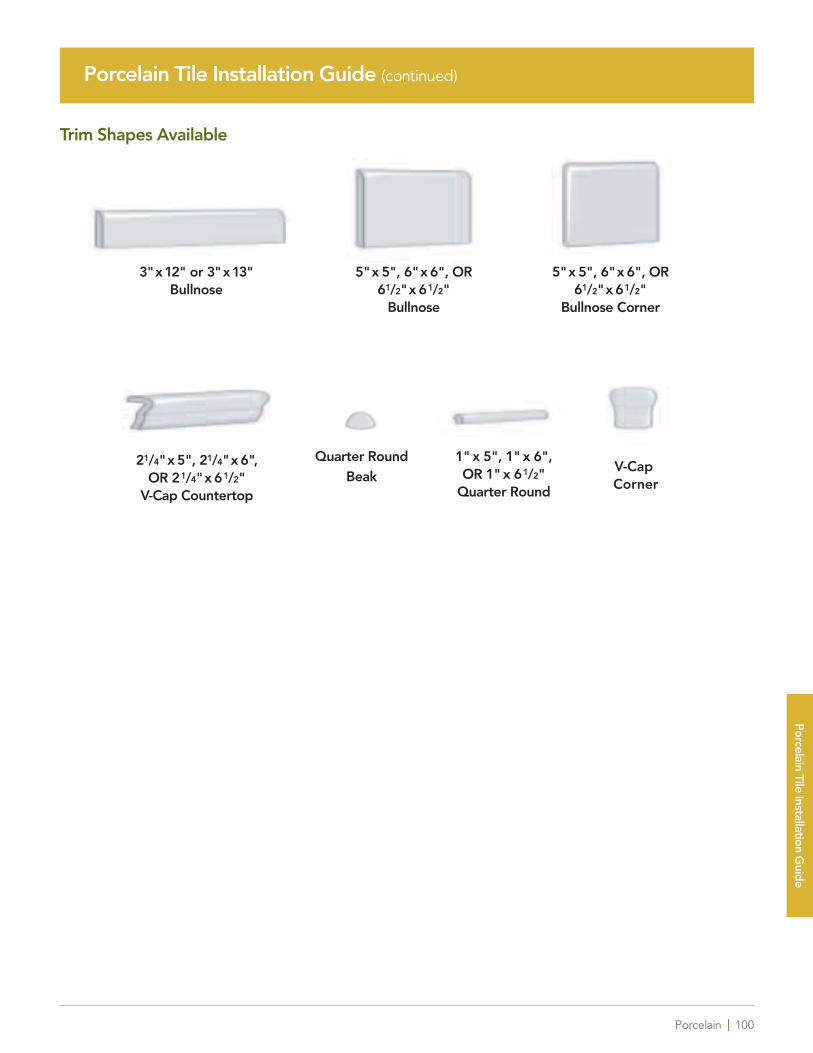
Porcelain | 100
Porcelain Tile Installation Guide (continued)
Trim Shapes Available
5" x 5", 6" x 6", OR61/2" x 61/2"
Bullnose
21/4" x 5", 21/4" x 6",OR 21/4" x 61/2"
V-Cap Countertop
5" x 5", 6" x 6", OR61/2" x 61/2"
Bullnose Corner
Quarter RoundBeak
1" x 5", 1" x 6",OR 1" x 61/2"
Quarter Round
V-Cap Corner
3" x 12" or 3" x 13"Bullnose
Porcelain Tile Installation Guid
e
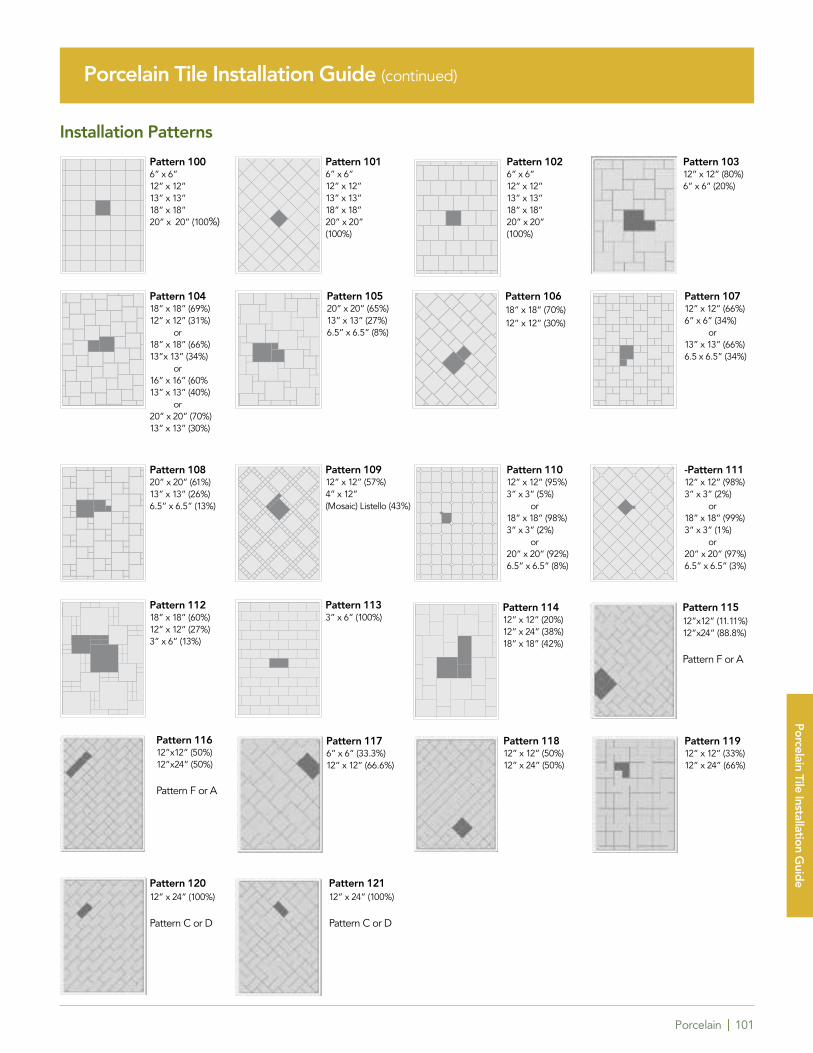
Porcelain | 101
Porcelain Tile Installation Guide (continued)
Porcelain Tile Installation Guid
e
Pattern 1006” x 6”12” x 12”13” x 13”18” x 18”20” x 20” (100%)
Pattern 1016” x 6”12” x 12”13” x 13”18” x 18”20” x 20”(100%)
Pattern 1026” x 6”12” x 12”13” x 13”18” x 18”20” x 20”(100%)
Pattern 10312” x 12” (80%)6” x 6” (20%)
Pattern 10418” x 18” (69%)12” x 12” (31%)
or18” x 18” (66%)13”x 13” (34%)
or16” x 16” (60%13” x 13” (40%)
or20” x 20” (70%)13” x 13” (30%)
Pattern 10520” x 20” (65%)13” x 13” (27%)6.5” x 6.5” (8%)
Pattern 10618” x 18” (70%)12” x 12” (30%)
Pattern 10712” x 12” (66%)6” x 6” (34%)
or13” x 13” (66%)6.5 x 6.5” (34%)
Pattern 10820” x 20” (61%)13” x 13” (26%)6.5” x 6.5” (13%)
Pattern 10912” x 12” (57%)4” x 12”(Mosaic) Listello (43%)
Pattern 11012” x 12” (95%)3” x 3” (5%)
or18” x 18” (98%)3” x 3” (2%)
or20” x 20” (92%)6.5” x 6.5” (8%)
-Pattern 11112” x 12” (98%)3” x 3” (2%)
or18” x 18” (99%)3” x 3” (1%)
or20” x 20” (97%)6.5” x 6.5” (3%)
Pattern 11218” x 18” (60%)12” x 12” (27%)3” x 6” (13%)
Pattern 1133” x 6” (100%)
Pattern 11512”x12” (11.11%)12”x24” (88.8%)
Pattern F or A
Pattern 11612”x12” (50%)12”x24” (50%)
Pattern F or A
Installation Patterns
Pattern 1176” x 6” (33.3%)12” x 12” (66.6%)
Pattern 11812” x 12” (50%)12” x 24” (50%)
Pattern 11912” x 12” (33%)12” x 24” (66%)
Pattern 12112” x 24” (100%)
Pattern C or D
Pattern 12012” x 24” (100%)
Pattern C or D
Pattern 11412” x 12” (20%)12” x 24” (38%)18” x 18” (42%)
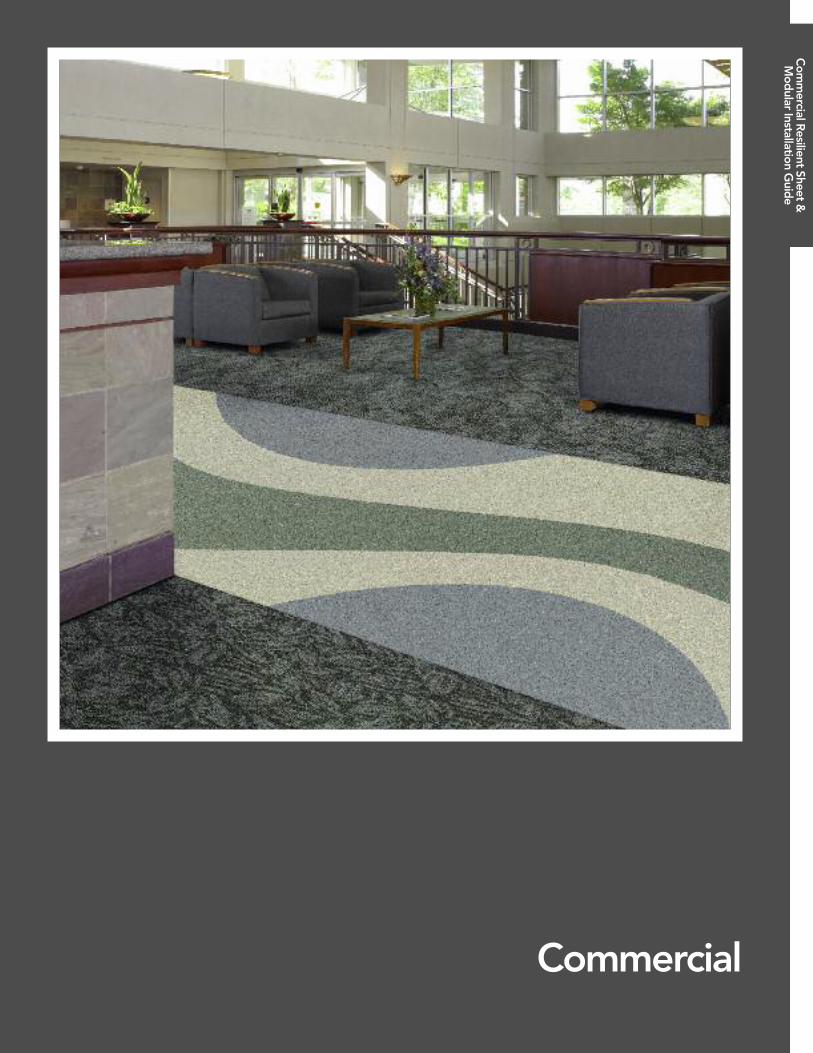
General Installation | Adura® | 102
Commercial
Com
mercial R
esilient Sheet &
Mod
ular Installation Guid
e
Commercial | 103
Commercial Resilient Sheet & Modular Flooring Installation Guide
General Commercial Installation
Subfloor Information
Careful and correct preparation of the subfloor is a major part of a satisfactory resilient floor covering installation.Roughness or unevenness of the subfloor will telegraph through the new floor covering, resulting in an unsightlysurface and excessive wear on high spots. Proper subfloor preparation and suitable underlayment installation areessential for a trouble-free job.
Wood Subfloors
General
All wood floors must be suspended at least 18” above the ground. Adequate cross-ventilation must be providedand the ground surface of a crawl space must be covered with a suitable vapor barrier. Wood subfloors directly onconcrete or installed over sleeper construction are not satisfactory for the installation of Mannington Resilientflooring products. Wood subfloors must be covered with a minimum ¼” or heavier underlayment rated panel toassure a successful finished flooring installation.
Underlayment
Many times wood panel subfloors are damaged during the construction process or are not of underlayment grade.These panels must be covered with an approved underlayment. Underlayment panels are intended to be used toprovide a smooth surface on which to adhere the finished floor covering. It must be understood that underlaymentpanels cannot correct structural deficiencies.
Particleboard, chipboard, construction grade plywood, any hardboard and flakeboard are not recommended asunderlayment. All have inadequate uniformity, poor dimensional stability, and variable surface porosity. ManningtonResilient Floors will not accept responsibility for adhered installation over these subfloors. In all cases, theunderlayment manufacturer or underlayment installer is responsible for all underlayment warranties.
Concrete Subfloors
1. Concrete subfloors must be dry, smooth, and free from dust, solvent, paint, wax, grease, oil, asphalt sealingcompounds and other extraneous materials. The surface must be hard and dense, and free from powder or flaking.
2. New concrete slabs must be thoroughly dry (at least six weeks) and completely cured. Curing agents, surfacehardeners and other additives may cause adhesive bonding failure. These should be removed by sanding or grinding.
3. All concrete slabs must be checked for moisture before installing material. Details for moisture testing can befound in the Mannington Professional Installation Handbook. Anhydrous Calcium Chloride tests conductedaccording to ASTM F 1869 and In Situ Relative humidity tests as conducted according to ASTM F 2170are the mostcommonly accepted test procedures. Mannington Commercial LVT must never be installed where moistureemissions may exist. Moisture emission from subfloor cannot exceed 3 lbs. per 1,000 sq. ft. per 24 hours asmeasured with the calcium chloride test or 75% relative humidity. Use Mannington Commercial M-Guard V-68where high moisture resistant adhesive is required up to 8lbs or 80%RH. Mannington will not assume responsibilityfor floor covering failure due to hydrostatic pressure or moisture vapor emission. The final responsibility fordetermining if the concrete is dry enough for installation of the flooring lies with the floor covering installer
4. Holes, grooves, expansion joints and other depressions must be filled with Mannington MVP 2023 LatexUnderlayment (or equivalent) , and trowelled smooth and feathered even with the surrounding surface.
Com
mercial R
esilient Sheet &
Mod
ular Installation Guid
e
Commercial | 104
Commercial Resilient Sheet & Modular Flooring Installation Guide (cont.)
5. Concrete floors with a hydroponics radiant heating system are satisfactory, provided the temperature of the floordoes not exceed 90°F at any point. Before installing the flooring, the heating system should be turned on toeliminate residual moisture.
Existing Resilient Floor Coverings
To achieve maximum product performance, Mannington Commercial Flooring products should not be installedover existing resilient floor coverings. In the rare cases where removal of the existing resilient floor covering is not anoption, the existing flooring must be covered with MANNINGTON MVP 2023 used as an Embossing Leveler orother appropriate porous underlayment.
Refer to pages 6-7 for general requirements for site conditions and preparation.
Resilient Sheet Installation SystemSince Mannington Commercial Resilient Sheet Flooring products are intended for use in high-traffic areas,underfloor selection and preparation are especially important. In most cases, remove all existing floor coveringsbefore installing these commercial products. (You must strictly follow all federal, state, and local regulationsregarding the removal of existing flooring.) Furthermore, all concrete underfloors must be tested for moisturebefore starting the installation. Mannington requires that the anhydrous calcium chloride test be performed in accordance with standard test method ASTM-F1869. Alternate test is ASTM-F2170 with a relative humidity levelof 75% maximum.
NOTE: Please be aware that installing these products over existing flooring may reducetheir excellent indentation resistance.
Roll Width Product Construction
Fine Fields,® Inlaid Magna® Micaflec and Magna® Multiflec BioSpec,® LifeLines II,TM Relay RE and Mannington AssuranceTM II are available in 6' wide rolls only.
CustomSpec II® and Insight® Heterogeneous Light Commercial come in 12' wide rolls only.
Realities and Primus heterogeneous commercial comes in 6,' 9' and 12' wide rolls.
Temperature Requirements
It is imperative to maintain the material, adhesive, and job site at a minimum temperature of 65°F and a maximumtemperature of 90°F for 48 hours before and after the installation and while installing. If the material has been storedat colder temperatures, it will need to be unrolled and allowed to relax overnight before proceeding with theinstallation. When using V-95 adhesive (NOTE: V-95 has replaced V-85), make sure to maintain the adhesive, floorcovering, and job site at a minimum temperature of 65°F for a minimum of 48 hours before and after the installationand while installing. NOTE: If the flooring contractor elects to install new floor covering over an existing floorcovering, the flooring contractor assumes all responsibility as to the suitability and continued performance of theexisting floor covering.
Removing Existing Flooring
If removal of existing resilient floor covering is required, follow all recommended Resilient Floor Covering Institute(RFCI) work practices at www.rcfi.com.
Com
mercial R
esilient Sheet &
Mod
ular Installation Guid
e
�
Commercial | 105
Commercial Resilient Sheet & Modular Flooring Installation Guide (cont.)
Do not sand, dry sweep, dry scrape, drill, saw, beadblast, or mechanically chip or pulverizeexisting resilient flooring, backing, lining felt, paint, asphaltic “cutback” adhesives, or otheradhesives. These products may contain asbestos fibers or crystalline silica. Avoid creating dust.Inhalation of such dust is a cancer and respiratory tract hazard. Smoking by individuals exposedto asbestos fibers greatly increases the risk of serious bodily harm. Unless positively certain thatthe product is a non-asbestos containing material, you must presume it contains asbestos.Regulations may require that the material be tested to determine asbestos content. TheResilient Floor Covering Institute (RFCI) document “Recommended Work Practices for Removalof Resilient Floor Coverings” should be consulted for a defined set of instructions addressed tothe task of removing all resilient floor covering structures.
Patching & Leveling Compounds
We recommend the use of latex/Portland cement trowelable underlayments or self-leveling cementitious productsfor repairing or leveling concrete subfloors. Sand and fill approved underlayment panel joints using a latex/Portlandcement compound. The properties and handling characteristics of Mannington MVP 2023 Fast Patch make it anideal compound for use under Mannington Commercial Resilient Sheet Flooring products. Do not use gypsum ormineral-based patching compounds in commercial applications under any circumstances.
Cutting and Fitting
Mannington Commercial inlaid products are flexible and will handle easily when cutting and fitting. This productcharacteristic lets the installer fit the material using freehand knifing techniques.
� If the job site is complex and requires a precise fit, use pattern-scribing techniques.
� The material may also be fit using direct scribing techniques. See page 40.
� Once the material has been fit, it is necessary to tube or lap back half of the sheet to expose theunderfloor for adhesive application.
� Take care when folding the material back. Always fold the material in a wide radius to avoid sharp kinksand creases, which may cause breaks in the product.
� Fully adhere Mannington Commercial Resilient Sheet Flooring to an approved underfloor.
� After you have trimmed the material to fit the room, tube or lap it back to expose the underfloor. Applyadhesive with the recommended notched trowel.
� Spread adhesive over 100% of the exposed subfloor, leaving no gaps or puddles.
� Maintain uniform coverage by keeping the trowel clean and properly notched.
� In most cases it is advisable to give the adhesive sufficient open time. Open time allows the moisture toflash off the adhesive, permitting the adhesive to develop more body and immediate tack. Open time isalways determined by subfloor porosity and atmospheric conditions. Be certain to provide ample opentime on non-porous subfloors and at seam lines.
Com
mercial R
esilient Sheet &
Mod
ular Installation Guid
e
Commercial | 106
Commercial Resilient Sheet & Modular Flooring Installation Guide (cont.)
Type of Underfloor and Adhesive Trowel Notch
Porous substrates with V-81 1/16" wide, 1/16" deep, and 1/16" apart
Non-porous substrates with V-81 1/16" wide, 1/32" deep, and 1/32" apart
Porous substrates with V-82 1/16" wide, 1/32" deep, and 1/32" apart
Porous substrates with M-Guard V-68 1/16" wide, 1/16" deep, 1/16"apart and 3/8" short nap roller
Non-porous substrates with M-Guard V-68 1/16" wide, 1/32" deep, 1/32" apart and 3/8" short nap roller
Porous substrates with V-95 1/16" wide, 1/32" deep, and 1/32" apart
Non-porous substrates with V-95 1/16" wide, 1/32" deep, and 1/32" apart
� After the adhesive has begun to tack up, roll the sheet forward into the adhesive to avoid trapping air. Do not drop or flop the material into the adhesive. Roll the floor covering with a three-section, 100 lb (or heavier) floor roller in both directions.
� After the first half of the sheet has been adhered and rolled, fold back the second half and repeat the procedure.
CAUTIONS: When providing open time, do not permit the adhesive to “skin over” or dry.Too much open time will result in insufficient bonding.
BioSpec, LifeLines II and Relay RE should be installed using V-82 or M-Guard V-68 adhesive overporous substrates. Use V-95 adhesive over non-porous substrates or where high performance isneeded.
Mannington V-95 adhesive has low initial tack. It may be necessary to apply weights to the floorcovering, especially in the seam area, until the adhesive sets. When using V-95 adhesive, roll theadhered flooring with a 100 lb (or heavier) roller within one hour after the flooring is installed.
Wait one to two hours and re-roll the flooring again to ensure full contact has been achieved. Re-rolling the material will also help remove any trapped air bubbles.
Seam Cutting
Double-cutting methodCustomSpec II® and InsightTM
� If required to seam CustomSpec® II or Insight,TM provide additional length on the second and succeedingsheets to allow for proper pattern alignment.
� Position CustomSpec® II and InsightTM floors using the “Reverse” or “Do Not Reverse” method (see page 19).
� To minimize pattern run-out, the floor covering should always be laid out minimizing the length of the seams.
� Cut material to the appropriate sizes the day before the actual installation.
� Store the material at recommended temperatures.
� Roll these cuts tightly, face-out around a core, maintaining as equal a diameter as possible.
� Cut and install the pieces in sequential order. If the job requires more than one roll of floor covering, makesure all rolls are marked with the same shade letter and that the roll serial numbers are in consecutive order.
Com
mercial R
esilient Sheet &
Mod
ular Installation Guid
e
!
Commercial | 107
Commercial Resilient Sheet & Modular Flooring Installation Guide (cont.)
� After aligning the pattern and providing adequate overlap, adhere the sheets of material up to thepredestinated dry zone.
� Cut the seam using a utility knife with a new, sharp blade. Using a steel straightedge, cut through bothsheets of flooring at a 90º angle to the floor covering.
� Once you have cut the seam, remove the selvage and fold back the sheets to expose the dry zone.
� Apply adhesive with a properly notched trowel across the dry zone.
� Allow the adhesive to develop tack and lay the sheet that was on the bottom during the cutting processinto the adhesive first.
� Then place the top sheet into the adhesive; avoid scraping adhesive into the cut. Roll the area with thethree-section floor roller.
� Bring seam edges level with the use of a hand seam roller.
� Thoroughly clean the seam area and wipe dry.
Sealing Seams
CustomSpec II® and InsightTM
Seal all CustomSpec II® and InsightTM seams using Mannington Commercial MCS 42 Seam Sealer.
� Apply the sealer using the VST-96 Professional Applicator Kit. (Note: MCS 42 replaces MCS 32).
� Fill the applicator bottle at least two-thirds full with the seam-sealing liquid and allow all entrapped airbubbles to disperse prior to sealing the seam.
� Apply the sealer in a continuous bead the entire length of the seam. Do not wipe the sealer from thesurface of CustomSpec II® and Insight.TM
� Allow the seam sealer to thoroughly dry (minimum two hours) before traffic is allowed on the floor.
� Do not allow dirt or dust to contaminate the wet sealer. Avoid walking on the seam or moving heavyfurniture over it for another 24 hours.
� It is crucial to apply the seam sealer between the full thickness of the floor covering from top to bottom.
� To ensure a strong, tight seam, make sure there are no skips or skids along the cut. A properly sealedseam will provide a continuous, impervious surface and will remain intact for the life of the flooring.
Recess scribing method
Magna,® Fine Fields,® BioSpec,® LifeLines II,TM Relay RE and Mannington AssuranceTM II
When seaming is required with Magna,® LifeLines II,TM Relay RE, Fine Fields,® BioSpec,® and ManningtonAssuranceTM II, position the materials as “Reverse Sheets.” This requires positioning the similar edges of thesheet together for seaming.
� Cut the selvage edge of one sheet using a straightedge and a utility knife or edge trimmer. Trim off about3/8" from the edge. Trimming is necessary since 6’ rolls are typically stored on end, causing compressionon one edge.
Com
mercial R
esilient Sheet &
Mod
ular Installation Guid
e
Commercial | 108
Commercial Resilient Sheet & Modular Flooring Installation Guide (cont.)
� Position the sheets in such a manner that the top sheet will overlap the previously straightened sheet byapproximately 1/2".
� Fold back the sheets to expose the underfloor and apply the appropriate adhesive. Place the trimmedsheet into the adhesive while providing sufficient overlap of the second sheet; then lay in the second sheet.
� Roll the adhered areas to within 6" of the seam line with a 100-pound three-section floor roller.
� Adjust the recess scriber, before actually cutting the seam, by cutting a slit in a scrap piece of resilientflooring material. Insert the button on one edge of the slit. The needle should just touch the oppositeside of the slit. Make sure to set the scriber to produce a net fit, neither gapped nor too full.
� Using a recess-scribing tool, insert the scriber against the straightedge piece of resilient. Use the bottomend of the tool, the guide, to follow the bottom sheet and lightly score the top sheet with the needle ofthe scribing tool. Keep the scribing tool perpendicular to the seam when scribing.
� Cut the seam net with a utility knife (straight or hook blade). Cut the seam by following the scribed mark.A burr may be created on the seam if the needle of the scriber is set too deep or if too much pressure isapplied. Remove any burrs by placing the seam with the back of a hook knife.
CAUTION: If the scriber is pulled too tightly against the bottom sheet, the seam will be toofull and will have the potential to peak.
� After scribing and cutting the seam, roll the seam area with a hand seam roller to bring the seam edges level.Re-roll the entire adhered area with the 100-pound floor roller. Thoroughly clean the seam area and wipe dry.
Recommended Seaming Methods – Chemical or Heat-Welded Seams
PRODUCT CHEMICALLY WELDED
Mannington Assurance IITM
� To utilize a chemical seam sealing method for Mannington Assurance II,TM the flooring must be installed fullspread using appropriate adhesive. Use V-95, centered at the seam location, in a 4"-6" wide band.
� After installing the flooring, apply a narrow bead of MLG-33 seam sealer using the applicator with the fin up.
� Do not insert the fin into the seam.
� Be sure that the sealer is in contact with both sides of the flooring.
� Leave this bead of sealer on top of the flooring.
� Do not wipe the seam.
� Allow 24 hours for the sealer to set before allowing foot traffic or moving furniture or appliances across seamed area.
Magna, Fine Fields,® BioSpec® LifeLines IITM and Relay RE� Thoroughly clean the seam of all adhesives, dirt, etc, before sealing it.
� If the seams are to be chemically welded, use Mannington Commercial MCS 42 Seam Sealer. (NOTE: MCS 42 replaces MCS 32).
Com
mercial R
esilient Sheet &
Mod
ular Installation Guid
e
!
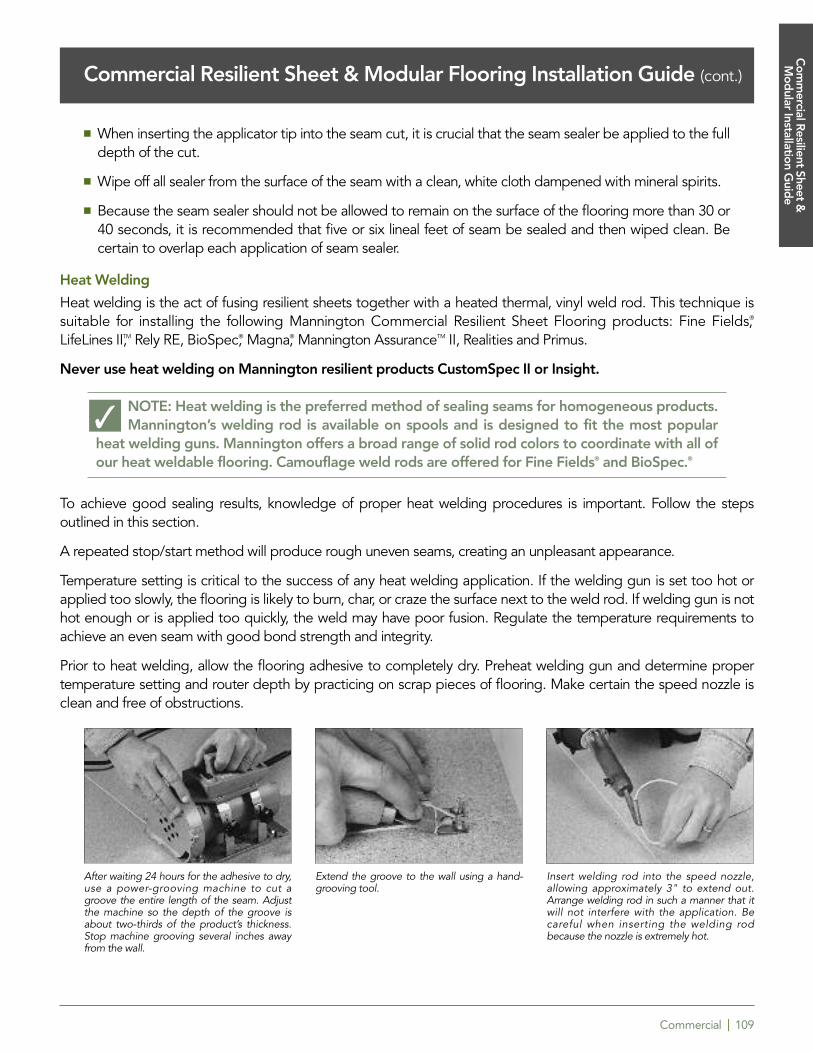
Commercial | 109
Commercial Resilient Sheet & Modular Flooring Installation Guide (cont.)
� When inserting the applicator tip into the seam cut, it is crucial that the seam sealer be applied to the fulldepth of the cut.
� Wipe off all sealer from the surface of the seam with a clean, white cloth dampened with mineral spirits.
� Because the seam sealer should not be allowed to remain on the surface of the flooring more than 30 or40 seconds, it is recommended that five or six lineal feet of seam be sealed and then wiped clean. Becertain to overlap each application of seam sealer.
Heat Welding
Heat welding is the act of fusing resilient sheets together with a heated thermal, vinyl weld rod. This technique issuitable for installing the following Mannington Commercial Resilient Sheet Flooring products: Fine Fields,®
LifeLines II,TM Rely RE, BioSpec,® Magna,® Mannington AssuranceTM II, Realities and Primus.
Never use heat welding on Mannington resilient products CustomSpec II or Insight.
NOTE: Heat welding is the preferred method of sealing seams for homogeneous products. Mannington’s welding rod is available on spools and is designed to fit the most popular
heat welding guns. Mannington offers a broad range of solid rod colors to coordinate with all ofour heat weldable flooring. Camouflage weld rods are offered for Fine Fields® and BioSpec.®
To achieve good sealing results, knowledge of proper heat welding procedures is important. Follow the stepsoutlined in this section.
A repeated stop/start method will produce rough uneven seams, creating an unpleasant appearance.
Temperature setting is critical to the success of any heat welding application. If the welding gun is set too hot orapplied too slowly, the flooring is likely to burn, char, or craze the surface next to the weld rod. If welding gun is nothot enough or is applied too quickly, the weld may have poor fusion. Regulate the temperature requirements toachieve an even seam with good bond strength and integrity.
Prior to heat welding, allow the flooring adhesive to completely dry. Preheat welding gun and determine propertemperature setting and router depth by practicing on scrap pieces of flooring. Make certain the speed nozzle isclean and free of obstructions.
Com
mercial R
esilient Sheet &
Mod
ular Installation Guid
e
�
After waiting 24 hours for the adhesive to dry,use a power-grooving machine to cut agroove the entire length of the seam. Adjustthe machine so the depth of the groove isabout two-thirds of the product’s thickness.Stop machine grooving several inches awayfrom the wall.
Extend the groove to the wall using a hand-grooving tool.
Insert welding rod into the speed nozzle,allowing approximately 3" to extend out.Arrange welding rod in such a manner that itwill not interfere with the application. Becareful when inserting the welding rodbecause the nozzle is extremely hot.
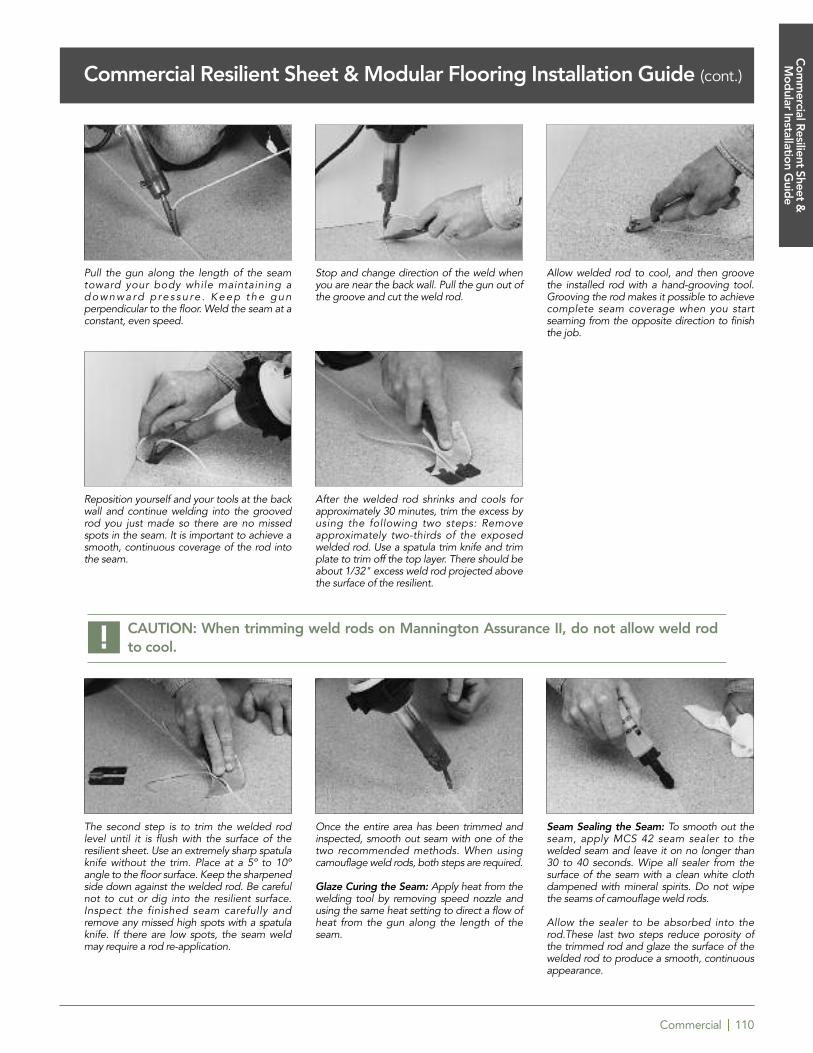
Commercial | 110
CAUTION: When trimming weld rods on Mannington Assurance II, do not allow weld rod to cool.
Commercial Resilient Sheet & Modular Flooring Installation Guide (cont.)
!
Pull the gun along the length of the seamtoward your body while maintaining ad o w n w a rd p re s s u re . K e e p t h e g u nperpendicular to the floor. Weld the seam at aconstant, even speed.
Stop and change direction of the weld whenyou are near the back wall. Pull the gun out ofthe groove and cut the weld rod.
Allow welded rod to cool, and then groovethe installed rod with a hand-grooving tool.Grooving the rod makes it possible to achievecomplete seam coverage when you startseaming from the opposite direction to finishthe job.
Reposition yourself and your tools at the backwall and continue welding into the groovedrod you just made so there are no missedspots in the seam. It is important to achieve asmooth, continuous coverage of the rod intothe seam.
After the welded rod shrinks and cools forapproximately 30 minutes, trim the excess byusing the following two steps: Removeapproximately two-thirds of the exposedwelded rod. Use a spatula trim knife and trimplate to trim off the top layer. There should beabout 1/32" excess weld rod projected abovethe surface of the resilient.
!
The second step is to trim the welded rodlevel until it is flush with the surface of theresilient sheet. Use an extremely sharp spatulaknife without the trim. Place at a 5º to 10ºangle to the floor surface. Keep the sharpenedside down against the welded rod. Be carefulnot to cut or dig into the resilient surface.Inspect the finished seam carefully andremove any missed high spots with a spatulaknife. If there are low spots, the seam weldmay require a rod re-application.
Once the entire area has been trimmed andinspected, smooth out seam with one of thetwo recommended methods. When usingcamouflage weld rods, both steps are required.
Glaze Curing the Seam: Apply heat from thewelding tool by removing speed nozzle andusing the same heat setting to direct a flow ofheat from the gun along the length of theseam.
Seam Sealing the Seam: To smooth out theseam, apply MCS 42 seam sealer to thewelded seam and leave it on no longer than30 to 40 seconds. Wipe all sealer from thesurface of the seam with a clean white clothdampened with mineral spirits. Do not wipethe seams of camouflage weld rods.
Allow the sealer to be absorbed into therod.These last two steps reduce porosity ofthe trimmed rod and glaze the surface of thewelded rod to produce a smooth, continuousappearance.
Com
mercial R
esilient Sheet &
Mod
ular Installation Guid
e
Commercial | 111
Commercial Resilient Sheet & Modular Flooring Installation Guide (cont.)
Seam Cutting Mannington Commercial Realties Heterogeneous
Mannington Commercial Realties heterogeneous sheet vinyl is available in 6’, 9’ and 12’ widths. Choose productwidth to eliminate unnecessary seams and minimize waste.
When seaming is required with Mannington Commercial Realties heterogeneous sheet vinyl, the materials shouldbe positioned Reverse Sheets for seaming.
The construction of heterogeneous vinyl requires that the seam be cut using the trace cutting technique. Theselvage edge of the one sheet should be straight-edged approximately 3/8” from the edge. Position the sheets insuch a manner that the straight-edged top sheet will overlap the untrimmed bottom sheet and maintain the patternmatch. Carefully trace along the edge of the top sheet with a utility knife, with a sharp blade, or a cutting tooldesigned for this purpose. Remove the trimmed selvage edge of the bottom of the sheet.
Once the seams are cut, weight the sheets and tube or lap back the sheets to expose the underfloor. Apply theappropriate Mannington Adhesive, using the correctly notched trowel, over 100% of the exposed underfloor. Afterproviding sufficient open time for the adhesive, lay the straight-edged sheet into the adhesive first, and then lay inthe second sheet. Roll the adhered areas to within about 6” of the seam line, with a 100lb. three-section floor roller.
Roll the seam area with a hand seam roller to bring the seam edges level. Reroll the entire adhered area with the100-pound floor roller. Thoroughly clean the seam area and wipe dry.
Heat Welding Realities Heterogeneous Vinyl
Seams may be heat welded using coordinating solid color weld rod. Wait at least 24 hours after initial installation toallow the adhesive to cure before grooving the sheet vinyl to receive the heat weld rod.
Proper temperature of the heat welding tool is critical to the success of this process. Heat welding is alwaysdependant on speed of the application and temperature. Practice on a scrap piece of material to determineoptimum speed and temperature.
After the weld rod has cooled, trim the applied weld rod in two steps. Always use a trim plate with a sharp spatulatrim knife for the first pass. Trim weld rod flush with the spatula knife, being careful not to gouge the vinyl surface.
Mannington Commercial Heat Weld Rod is color coordinated for use with Mannington Commercial heterogeneoussheet vinyl. Contrasting colors may be used if so desired.
Chemical Seam Sealing Realities Heterogeneous Vinyl
Seams in Mannington Commercial Realities Heterogeneous Vinyl may be sealed using the chemical seam sealingmethod. The seam will be sealed with MLG 33 and the supplied applicator tip. Before sealing the seams, makecertain all seams are clean, dry and free of adhesive contamination.
Insert the fin into the seam cut and lightly squeeze the bottle to apply a uniform bead of sealer approximately 1/8”wide, centered on the seam cut. It is crucial that the seam sealer penetrate the full thickness of the seam cut toinsure a proper chemical bond. Do not wipe the sealer from the surface of the heterogeneous vinyl.
Com
mercial R
esilient Sheet &
Mod
ular Installation Guid
e
Commercial | 112
Commercial Resilient Sheet & Modular Flooring Installation Guide (cont.)
Flash Coving
All Mannington resilient sheet goods can be installed using the flash coving method. This edging technique, oftenpreferred by hospitals and other healthcare facilities, is a process of extending the resilient flooring up the wall tocreate a wall base. Normally, the floor covering is extended up the wall to a height of 4" to 6". Coving is popular withend users because it eliminates the need for a floor/wall juncture and it is also easy to maintain.
As with all resilient installations, proper preparation of the work area is critical to the success of the installation.Clean the underfloor carefully and make certain it is structurally sound. The juncture of the floor and wall also needsspecial preparation before beginning a coved installation. Follow the instructions below to install the cove cap andthe cove stick (cove fillet strip).
� Measure desired height for the cove caps at each corner and strike a chalk line.
� Attach aluminum or vinyl cove caps at this height using flathead nails with a hammer or brad pusher, oruse contact cement.
� Always miter inside and outside corners in the cap. When mitering the outside corners, file the ends ofthe cap smooth. Use a specially designed miter tool with interchangeable die sets to make corners onthe cove cap. This tool eliminates sharp edges at the outside corners.
� Cove sticks support the resilient flooring as it is flashed up the wall, eliminating the chance of puncturingthe resilient flooring. Firmly secure plastic or wood cove sticks where the floor meets the wall, withadhesive or nails.
� Use nonstaining nails and set the flush with the stick. The stick should have a minimum radius of 11/8" andbe precisely mitered at all inside and outside corners.
� Provide a smooth transition in the door casings and other areas where the coving ends, by cutting backto the cove stick.
� Tack the scribing felt to the wall with brad type nails, before beginning to scribe it. Use a combinationsquare, a small metal ruler, or a 1" piece of resilient to pattern scribe the felt.
� Fit the scribing tool up inside the cove cap, and scribe the felt by sliding the tool along the cap as youmark the felt with a pencil.
� Scribe and cut the outside corners of the felt, using a utility knife, and the inside corners of the felt, usingdividers.
� After scribing the entire work area, position the pattern squarely on the resilient sheet flooring and transcribethe pattern with pencil dividers. Be careful when cutting the material on the inside and outside corners.
� Dry fit the material. Inside corners should fit snug, but not be forced into position. Make sure to alwaysposition the shorter side first and then the longer side.
� Gently pull material away from the wall. Apply the appropriate adhesive to the floor, wall, cove cap, andcove stick.
� Allow the appropriate amount of open time. Fit the material back into place. Remember to alwaysposition the shorter side first.
� Roll the flooring with the appropriate size roller (use a hand roller on coved areas). Apply the appropriateseam sealer at all seams, following the recommended directions for the resilient floor being installed.
Com
mercial R
esilient Sheet &
Mod
ular Installation Guid
e
Commercial | 113
Commercial Resilient Sheet & Modular Flooring Installation Guide (cont.)
� The most demanding aspect of a coved installation is forming the outside corners. Fill outside cornerswith a “boot” type plug, rather than a V-type plug, on the least visible wall. The plugged corner fill pieceshould extend back at least several inches from the corner. The seam of the floor should be below thecove stick. Using an underscriber, scribe the back of the plug at the corner. This will mark the pattern ofthe corner on the plug.
� Cut along the scribed line at a 45° angle, with a curved trim knife or a utility blade, while holding the plugsteady with a metal ruler and your other hand. When cutting, leave the face of the plug longer than the back.
� Check the fill piece for accurate fit. Make any minor adjustments to the plug, as necessary, to fill thespace correctly. Remove the fitted fill piece and apply the appropriate adhesive. Reposition the fill pieceand apply seam sealer.
NOTE: If planning to heat weld the seams, be aware that only Mannington Commercial Fine Fields,® BioSpec,® Mannington AssuranceTM II, Magna,® LifeLines IITM and Relay RE products can
be used. Remove the urethane coating before heat welding each inside corner by grooving orsanding. Preformed metal corner caps may also be used.
�
Com
mercial R
esilient Sheet &
Mod
ular Installation Guid
e

Commercial | 114
Commercial Vinyl Composition Tile and Premium Visual TileInstallation System
For EssentialsTM • Designer Essentials® • InspirationsTM • Brushwork® • ColorPoint • SolidPoint • Safe Walks
General InstructionsFollow all General Installation Guidelines as described on pages 3 to 8. Always store Mannington Commercial VinylComposition Tile (VCT) and Premium Tile (PT) in a protected, dry interior area. Do not double-stack pallets. Keepthe job site, adhesives, and tile at a minimum temperature of 65°F and maximum of 100°F for at least 48 hoursbefore installation. Maintain this minimum temperature during the installation and for 48 hours after the installation,to assure proper bond of the adhesives.
Store VCT and PT on a dry, level surface. Do not stack VCT or PT cartons more than five cartons high. Be careful tostack cartoons in straight tiers. Never double-stack pallets of VCT or PT cartons. Store pallets so they are protectedfrom accidental damage from forklift trucks or other traffic. Protection of the carton corners is highlyrecommended.
If you intend to cover a concrete slab with resilient floor covering, always test the concrete slab for the presence ofmoisture.
The required quantitative tests are the calcium chloride test or the in situ relative humidity test. The maximumacceptable moisture vapor emission specification is not to exceed 8 lbs per 1,000 sq ft per 24 hours or not exceed85% RH for all Vinyl Composition Tile and Premium Tile products when installed with Mannington M-Guard V-11Vinyl Composition Tile adhesive. This only applies to Mannington Commercial VCT and PT installations usingM-Guard V-11 adhesive. If any other adhesive is specified or selected, follow the adhesive manufacturer’s warrantyand recommendations regarding acceptable maximum moisture emission levels. The 5 lbs. moisture vaporemission rating is only applicable to Mannington Commercial VCT, PT, and Commercial felt-backed Resilient sheetproducts, and not any other Mannington Resilient sheet product. The maximum acceptable moisture vaporemission level for all Mannington Residential, homogeneous and heterogenous Resilient sheet products is 3 lbs per1,000 sq ft per 24 hours except when using M-Guard V-68 high moisture resistant adhesive for Commercial VinylBack products.
NOTE: Moisture testing can only indicate conditions at the time of the test and cannot predict any future changes in moisture levels. Neither Mannington nor the flooringcontractor can be responsible if moisture levels change in the future.
Install Mannington VCT and PT only after the job site has been cleaned and cleared of other trade apparatus thatmay damage the finished tile installation. The lighting on the job site must be sufficient to permit inspection andpreparation of the underfloor, layout, installation, cleanup, and final inspection of the tile. Always check the cartonsto assure the pattern number is correct and that there is a sufficient quantity of tile for the installation. Make certainthe lot numbers are the same on all cartons. To minimize any minor shade variation on large installations, mix andinstall tiles from several different cartons. If the shade variation is extreme, do not install the tile.
NOTE: Please be aware that installing Vinyl Composition Tile (VCT) and Premium Tile (PT)over existing flooring may reduce its excellent indentation resistance.
�
�
Com
mercial V
inyl Com
position Tile and
Premium
Tile Installation Guid
e
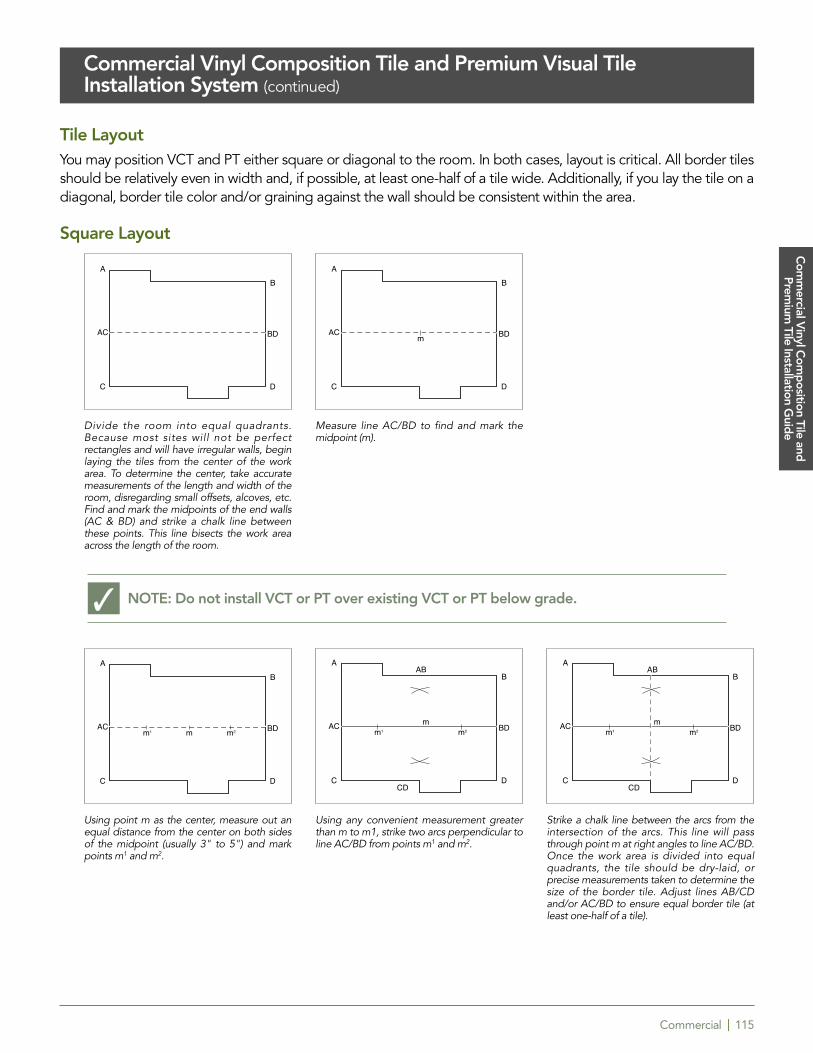
Commercial | 115
Commercial Vinyl Composition Tile and Premium Visual TileInstallation System (continued)
Tile LayoutYou may position VCT and PT either square or diagonal to the room. In both cases, layout is critical. All border tilesshould be relatively even in width and, if possible, at least one-half of a tile wide. Additionally, if you lay the tile on adiagonal, border tile color and/or graining against the wall should be consistent within the area.
Square Layout
NOTE: Do not install VCT or PT over existing VCT or PT below grade.
Divide the room into equal quadrants.Because most sites will not be perfectrectangles and will have irregular walls, beginlaying the tiles from the center of the workarea. To determine the center, take accuratemeasurements of the length and width of theroom, disregarding small offsets, alcoves, etc.Find and mark the midpoints of the end walls(AC & BD) and strike a chalk line betweenthese points. This line bisects the work areaacross the length of the room.
Measure line AC/BD to find and mark themidpoint (m).
Using point m as the center, measure out anequal distance from the center on both sidesof the midpoint (usually 3" to 5") and markpoints m1 and m2.
Using any convenient measurement greaterthan m to m1, strike two arcs perpendicular toline AC/BD from points m1 and m2.
Strike a chalk line between the arcs from theintersection of the arcs. This line will passthrough point m at right angles to line AC/BD.Once the work area is divided into equalquadrants, the tile should be dry-laid, orprecise measurements taken to determine thesize of the border tile. Adjust lines AB/CDand/or AC/BD to ensure equal border tile (atleast one-half of a tile).
�
Com
mercial V
inyl Com
position Tile and
Premium
Tile Installation Guid
e
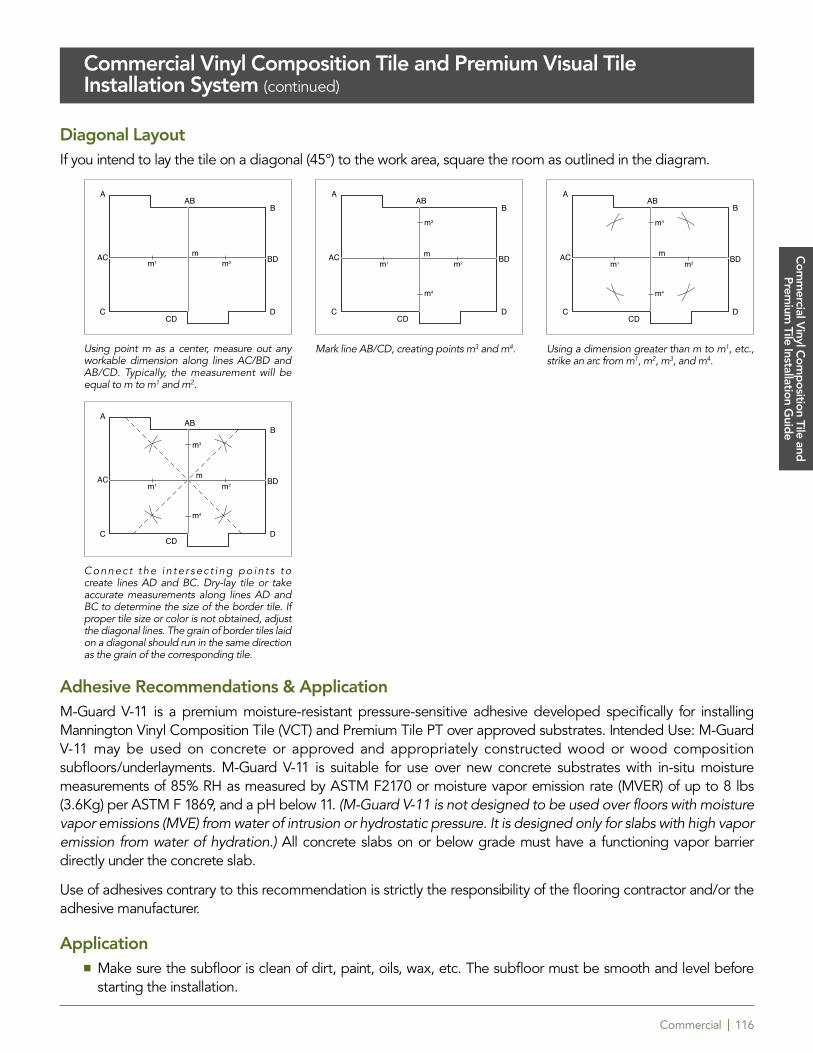
Commercial | 116
Diagonal LayoutIf you intend to lay the tile on a diagonal (45°) to the work area, square the room as outlined in the diagram.
Adhesive Recommendations & ApplicationM-Guard V-11 is a premium moisture-resistant pressure-sensitive adhesive developed specifically for installingMannington Vinyl Composition Tile (VCT) and Premium Tile PT over approved substrates. Intended Use: M-GuardV-11 may be used on concrete or approved and appropriately constructed wood or wood compositionsubfloors/underlayments. M-Guard V-11 is suitable for use over new concrete substrates with in-situ moisturemeasurements of 85% RH as measured by ASTM F2170 or moisture vapor emission rate (MVER) of up to 8 lbs(3.6Kg) per ASTM F 1869, and a pH below 11. (M-Guard V-11 is not designed to be used over floors with moisturevapor emissions (MVE) from water of intrusion or hydrostatic pressure. It is designed only for slabs with high vaporemission from water of hydration.) All concrete slabs on or below grade must have a functioning vapor barrierdirectly under the concrete slab.
Use of adhesives contrary to this recommendation is strictly the responsibility of the flooring contractor and/or theadhesive manufacturer.
Application� Make sure the subfloor is clean of dirt, paint, oils, wax, etc. The subfloor must be smooth and level before
starting the installation.
Using point m as a center, measure out anyworkable dimension along lines AC/BD andAB/CD. Typically, the measurement will beequal to m to m1 and m2.
Connec t the in te r sec t ing po in t s to create lines AD and BC. Dry-lay tile or takeaccurate measurements along lines AD andBC to determine the size of the border tile. Ifproper tile size or color is not obtained, adjustthe diagonal lines. The grain of border tiles laidon a diagonal should run in the same directionas the grain of the corresponding tile.
Mark line AB/CD, creating points m3 and m4. Using a dimension greater than m to m1, etc.,strike an arc from m1, m2, m3, and m4.
Commercial Vinyl Composition Tile and Premium Visual TileInstallation System (continued)
Com
mercial V
inyl Com
position Tile and
Premium
Tile Installation Guid
e
Commercial | 117
� Maintain the adhesive, tile, and job site at a minimum temperature of 65°F and a maximum temperature of100°F during the installation, and for 48 hours after the installation.
� After you complete the tile layout, apply adhesive to one-half of the work area. Exercise caution to maintainthe working lines. If necessary, re-strike the working lines over the adhesive after it dries clear.
� Apply M-Guard V-11 with a trowel notched 1/16" wide, 1/32" deep, and 1/32" apart. M-Guard V-11 can also beapplied using a roller or a brush.
� Apply adhesive evenly, with no bare spots or heavy puddles. Avoid overlapping edges of adhesive.
� Before installing tile, allow M-Guard V-11 adhesive to develop tack and dry. This normally takes 45 to 50minutes. Humidity and/or subfloor porosity, however, always dictate the proper open time.
� Set tiles firmly against adjoining tiles and press into adhesive. Do not slide tiles into place.
� You can remove fresh adhesive smears with a cloth dampened with water. Dried adhesive may be cleanedusing mineral spirits and a clean cloth.
Tile InstallationAfter the M-Guard V-11 adhesive dries, begin laying tile at the intersection of the working lines. Place the first tilesquarely against the working lines. Since the positioning of this tile determines the accuracy of the entire installation,it is critical to lay the starter tile exactly on the lines.
Once you have set the first tile firmly in place, begin laying tiles outward along both guide lines. Place tiles firmlyagainst adjoining tiles and press into adhesive. Do not slide into place. Keep tiles on the guide line.
After you have positioned several tiles along the working lines, begin stair-stepping tiles into the field area. This willkeep tiles square to each other throughout the installation. Lay tiles up to where border tiles must be cut to fit.Apply adhesive to the second half of the work area, let it dry clear, then continue laying tile.
Cutting & Fitting Border TilesYou may cut border tile to fit, using several techniques. The most common technique for square layouts is to placea full tile directly over the last full field tile. Using another full tile placed firmly against the wall and over the bordertile, score the border tile. Be certain the graining of the border tile is properly aligned. Cut the border tile along thescored line and position factory edges of tiles together with the cut edge against the wall.
Use a template cut from stiff cardboard or hardboard to cut border tile in diagonal layouts. For Mannington Commercial12" VCT and PT, cut the template to the diagonal dimension of the tile, approximately 17" square. Use accuratemeasurements to measure and cut the template. Use the template in place of the tile and proceed as outlined above.
You may direct scribe or pattern scribe the border tile for irregular walls, pipes, etc. For intricate cuts, werecommend you heat the tile from the back and cut with a sharp utility knife along the scribed marks.
Finishing & MaintenanceDo not wash or scrub the floor for at least 4 or 5 days after installation, to allow the floor tiles to bond to theunderlayment/subfloor. Keep heavy furniture and equipment off the floor for at least 48 hours to allow the adhesiveto set. Sweep or vacuum thoroughly, and remove any residual adhesive with a clean, white cloth dampened withmineral spirits. Apply a minimum of two coats of a high-quality cross-linked acrylic floor polish to temporarily protectthe floor until regular maintenance procedures can begin. Leave Mannington maintenance and warranty literaturewith the end-user. These are available from your Mannington Distributor.
Commercial Vinyl Composition Tile and Premium Visual TileInstallation System (continued)
Com
mercial V
inyl Com
position Tile and
Premium
Tile Installation Guid
e
Commercial | 118
Mannington Commercial Luxury Vinyl Tile Installation Recommendations
General Information
These installation specifications are for all fully adhered installations of Mannington Commercial LVT, Nature’s Paths,Nature’s Path Select, Walkways, Assurance Squared and Create luxury vinyl flooring. All recommendations arebased on the most recent available information. All instructions and recommendations must be followed for asatisfactory installation.
1. The floor covering, adhesive, and room temperature must be kept at a minimum temperature of 65°F or warmerfor at least 48 hours before, during, and 48 hours after installation. Maximum temperature must not exceed 100º F.
2. Install Mannington Commercial LVT only after the jobsite has been cleaned and cleared of other trade apparatusthat may damage a finished tile installation.
3. Always check the cartons to assure the pattern number is correct. To minimize shade variation, mix and installtiles/planks from several different cartons.
4. All subfloor / underlayment patching must be done with a non-shrinking water resistant Portland cementpatching compound such as Mannington MVP-2023.
5. Never install Mannington Commercial LVT over residual asphalt-type (cut back) adhesive. It can bleed throughthe new floor covering
6. Mannington Commercial LVT is to be adhered with Mannington Commercial adhesives, Nature’s Paths andNature’s Paths Select and Walkways will be adhered with Mannington Commercial V-82 or V-95 Adhesive. Createwill be adhered using Mannington MT-711 or V-95 adhesive.
Subfloor Information
Careful and correct preparation of the subfloor is a major part of a satisfactory resilient floor covering installation.Roughness or unevenness of the subfloor will telegraph through the new floor covering, resulting in an unsightlysurface and excessive wear on high spots. Proper subfloor preparation and suitable underlayment installation areessential for a trouble-free job.
Wood Subfloors
General
All wood floors must be suspended at least 18” above the ground. Adequate cross-ventilation must be providedand the ground surface of a crawl space must be covered with a suitable vapor barrier. Wood subfloors directly onconcrete or installed over sleeper construction are not satisfactory for the installation of Mannington Resilientflooring products.
Wood subfloors must be covered with a minimum ¼” or heavier underlayment rated panel to assure a successfulfinished flooring installation.
Com
mercial Luxury V
inyl Tile FloorsInstallation R
ecomm
endations
Commercial Luxury Vinyl Tile Floors Installation Recommendations

Commercial | 119
Underlayment
Many times wood panel subfloors are damaged during the construction process or are not of underlayment grade.These panels must be covered with an approved underlayment. Underlayment panels are intended to be used toprovide a smooth surface on which to adhere the finished floor covering. It must be understood that underlaymentpanels cannot correct structural deficiencies.
Particleboard, chipboard, construction grade plywood, any hardboard and flakeboard are not recommended asunderlayment. All have inadequate uniformity, poor dimensional stability, and variable surface porosity. ManningtonResilient Floors will not accept responsibility for adhered installation over these subfloors.
In all cases, the underlayment manufacturer or underlayment installer is responsible for all underlaymentwarranties.
Concrete Subfloors
1. Concrete subfloors must be dry, smooth, and free from dust, solvent, paint, wax, grease, oil, asphalt sealingcompounds and other extraneous materials. The surface must be hard and dense, and free from powder or flaking.
2. New concrete slabs must be thoroughly dry (at least six weeks) and completely cured. Curing agents, surfacehardeners and other additives may cause adhesive bonding failure. These should be removed by sanding or grinding.
3. All concrete slabs must be checked for moisture before installing material. Details for moisture testing can befound in the Mannington Professional Installation Handbook. Anhydrous Calcium Chloride tests conductedaccording to ASTM F 1869 and In Situ Relative humidity tests as conducted according to ASTM F 2170 are the mostcommonly accepted test procedures.
Mannington Commercial LVT must never be installed where moisture emissions may exist. Moisture emission fromsubfloor cannot exceed 3 lbs. per 1,000 sq. ft. per 24 hours as measured with the calcium chloride test or 75%relative humidity. Use Mannington Commercial M-Guard V-68 where high moisture resistant adhesive is requiredup to 8lbs or 80% RH. Mannington will not assume responsibility for floor covering failure due to hydrostaticpressure or moisture vapor emission. The final responsibility for determining if the concrete is dry enough forinstallation of the flooring lies with the floor covering installer
4. Holes, grooves, expansion joints and other depressions must be filled with Mannington MVP 2023 LatexUnderlayment (or equivalent) , and trowelled smooth and feathered even with the surrounding surface.
5. Concrete floors with a hydroponics radiant heating system are satisfactory, provided the temperature of the floordoes not exceed 90°F at any point. Before installing the flooring, the heating system should be turned on toeliminate residual moisture.
C. Existing Resilient Floor Coverings
To achieve maximum product performance, Mannington Commercial LVT should not be installed over existingresilient floor coverings. In the rare cases where removal of the existing resilient floor covering is not an option, theexisting flooring must be covered with MANNINGTON MVP 2023 used as an Embossing Leveler or otherappropriate porous underlayment.
Note: Consult Mannington’s Professional Installation Handbook or the RecommendedWork Practices brochure from the Resilient Floor Covering Institute for specific instructionson removal of old resilient floor covering.
�
Com
mercial Luxury V
inyl Tile FloorsInstallation R
ecomm
endations
Commercial Luxury Vinyl Tile Floors Installation Recommendations(continued)
Commercial | 120
WARNING: Do not sand, dry scrape, bead blast or mechanically pulverize existing resilient flooring, backing or lining felt. These products may contain asbestos fibers that are not
readily identifiable. Using the above non-recommended procedures on asbestos-containingmaterial can create asbestos dust. The inhalation of asbestos dust may cause asbestos or otherserious bodily harm. Smoking greatly increases the risk of serious bodily harm.
Installation
Nature’s Path Tile Layout
As with all tile formats, tiles should be “balanced” in the work area. Tiles may be laid squarely in the work area orlaid out diagonally in the work area. In either case, the room must be accurately measured to square off the areaand to determine the center point of the area. The work area should be divided into quadrants designated bystriking chalk lines. It is critical that the intersection of the chalk lines be square at 90º. All border tiles should be ofnearly equal dimensions and at least one-half of a tile wide. Careful and precise measurements must be takenduring tile layout. Adjust this established line to accommodate a balanced layout and then transpose this line to acomfortable width away from the starting wall (approximately 2’ to 3’ wide). Apply the adhesive in this area andbegin installing the tiles. Lay all tiles in the same direction, all directional arrows pointing in the samedirection.
Nature’s Path Plank Layout
It is also important to balance the layout of the plank format. Proper planning and layout will prevent narrow plankwidths at wall junctures. Determine layout to prevent having less than ½ plank width or very short length pieces. Aswith all plank products, lay the long dimension of the plank parallel to the long dimension of the work area.Accurately measure the room to determine the center line, adjust this established line to accommodate a balancedlayout and then transpose this line to a comfortable width away from the starting wall (approximately 2’ to 3’ wide).Apply the adhesive in this area and begin installing planks.
Combinations – Tile & Plank Layout
The modularity of Mannington Commercial LVT allows for interesting and decorative combinations of tile andplanks. When determining proper layout for this custom installation it is important to consider the dimensions of themodular “design unit” and then balance the design unit in the work area. Careful and precise measurements mustbe taken to insure success with a combination design.
Create Layout
The unique sizes and shapes of the Mannington Commercial Create allow for many interesting layouts. Create isavailable in 9” X 9” squares, 18” X 18” squares, 9” x 18” rectangles as well as Circles and Diamonds. The modularsize of the square and rectangles can be combined or used separately. The area of each 9”X 9” tile is 0.56 squarefoot; 18” X 18” is 2.25 square feet and the 9” X 18” area is 1.13 square feet.
Circles and Diamonds must always be used together. The area of each circle is 0.75 sq ft and the area of eachdiamond is 0.25 sq. ft. When designing an area the ratio of circles to Diamonds is one-to-one, this means oneCircle and one Diamond must be ordered for every Square Foot of the project. Example: Work area is 327 squarefeet in size, 327 pieces of Circle will be needed, 10 cartons (327 ÷36=9.08 cartons) 327 pieces of diamonds will beneeded, 9 cartons (327÷ 39 = 8.38 cartons). In addition to these product requirements an overage/wastefactor of approximately 15% should be added.
Regardless of which size or shape Create product is to be installed it is important to balance the installation. Square
�
Com
mercial Luxury V
inyl Tile FloorsInstallation R
ecomm
endations
Commercial Luxury Vinyl Tile Floors Installation Recommendations(continued)
Commercial | 121
Commercial Luxury Vinyl Tile Floors Installation Recommendations(continued)
off the work area as with any modular product and establish starting lines.
Adhesive Application
Mannington Commercial V-82, MT-711 or V-95 adhesive is required for adhering Mannington Commercial LVT to allapproved substrates.
For Nature’s Paths and Nature’s Paths Select, Assurance Squared and Walkways apply the V-82 adhesive with a 1/16”wide, 1/32” deep, 1/32” apart notched trowel. Begin applying adhesive at the pre-determined chalk lines working intwo to three foot increments working towards an exit of the room. The V-82 adhesive has a 30 minute working time.Do not apply more adhesive than can be covered in this time. Set Nature’s Path into the wet adhesive and neverwork directly on top of the freshly installed product. Roll each installed section of flooring with a three –section 100pound floor roller.
MT-711, used with Mannington Commercial Create will be applied with a1/16” wide, 1/16” deep, 1/16” apartnotched trowel along the pre-determined starting line. Allow MT-711 to develop tack before installing the Createproduct into the work area, the adhesive should have sufficient tack to hold the tile in place but not allowed to gocompletely clear. The non-typical sizes and shapes of the Create product benefit from being installed on a “tacky”adhesive, however, avoid working directly on freshly installed products to prevent shifting and gapping fromoccurring. Use knee boards if required.
Mannington Commercial V-95 two-part epoxy adhesive is used with Mannington Commercial LVT over non-poroussubstrates or where high performance adhesive is required. Apply the adhesive with a 1/16” wide, 1/32” deep,1/32” apart notched trowel and then roll the adhesive ridges smooth with a pre-soaked 3/8” nap roller.
Wait 10-20 minutes then install flooring material. Be careful to insure proper transfer as material is laid into theadhesive. Proper adhesive transfer to the backing should be confirmed periodically by lifting the material. (Notethat floor temperature directly affects setting time: The warmer it gets, the faster it sets.)
Begin applying adhesive at the pre-determined chalk lines working in two to three foot increments working towardsan exit of the room. The V-95 adhesive should be provided a 30 to 40 minute open time. Set ManningtonCommercial LVT into the wet adhesive and never work directly on top of the freshly installed product. Immediatelyroll each installed section of flooring with a three –section 100 pound floor roller. Wait approximately 1 hour andthen re-roll the installed sections. Do not permit V-95 to dry on the surface of the flooring.
Tile & Plank Installation
Nature’s Path, Natures Paths Select and Assurance Squared tiles will be installed using the “wet set” method. Thismeans that the tiles will be set before the adhesive begins to skin over or set. This requires that the tiles be installedfrom a wall working backwards towards an exit. Move the established lines to within 2’ or 3’ of the starting wall andapply the appropriate Mannington adhesive. Set the tile into the wet adhesive; do not slide tiles/planks into place.Thoroughly roll each section of installed product with a 100 pound three section floor roller. Do not walk or work onnewly installed tile except to roll. Continue this process by striking parallel chalk lines, applying adhesive and settingproduct along the line. Continue this process working towards the exit.
Nature’s Path tiles have arrows imprinted on the back of the tiles. Lay all tiles in the same direction, all directionalarrows pointing in the same direction.
After the appropriate adhesive has been applied, begin laying Nature’s Paths planks along the designated startingline, working back to the starting wall. Planks ends should be staggered in a random manner so as to avoidclustering the end joints. Varying the length of the starting plank can assure sufficient stagger of end joints. End
Com
mercial Luxury V
inyl Tile FloorsInstallation R
ecomm
endations
Commercial | 122
joints should be staggered by at least 4”. Pay particular attention to the randomness of the plank layout, avoidestablishing a repeating pattern. Continue installing the planks in a random fashion and complete each area beforebeginning the next. If required use a kneeling board to avoid walking on freshly installed planks.
Create Installation
The Create products will be installed into “Tacky Wet” MT-711 adhesive. The adhesive will appear clear in the“Valleys” and cloudy in the “Ridges.” Set size and shape as designed and place products firmly against each other.Do not slide the products into position to avoid dragging adhesive into the joints. Even though the Create productsare installed into a “tacky wet” adhesive it is still recommended to transpose starting lines along a wall and worktowards an exit, staying off of the newly installed product. Roll each completed section with a three-section 100pound floor roller.
Cutting and Fitting Border Tiles
Mannington Commercial LVT can be cut with a large tile cutter or by using the score and snap technique. Direct orpattern scribe the flooring to fit into complicated, irregular walls or pipes, etc.
Finishing the Job
Mannington Commercial LVT must be rolled with a minimum 100 pound three-section floor roller immediately afterinstallation. Roll the flooring in both directions to firmly seat the tile into the adhesive.
Cover all exposed edges. Use wood molding or vinyl cove base along all walls, cabinet toekicks, etc. Use transitionstrips in doorways or where new flooring joins another floor covering. Caulk along tubs, toilet bowls, etc.
Do not wash the floor for 48 hours after installation.
After 48 hours, damp mop to remove residual surface dirt.
Follow appropriate maintenance schedule for Nature’s Path.
Cautions and Miscellaneous
� Furniture should be moved onto the newly installed floor using an appliance hand truck over hardboardrunways.
� Do not place heavy items on newly installed floor covering for at least 24 hours after completion of theinstallation. Heavy furniture should be equipped with suitable non-staining, wide-bearing caster.
� Floor covering subjected to excessive heat and light exposure is subject to thermal degradation. Useappropriate precautions to minimize potential affects on the floor covering.
� Oil or petroleum based products can result in surface staining. Do not track asphalt driveway sealer orautomobile oil drips onto the vinyl floor covering.
� Use a non-staining walk off mats. Rubber can discolor resilient floor coverings.
Commercial Luxury Vinyl Tile Floors Installation Recommendations(continued)
Com
mercial Luxury V
inyl Tile FloorsInstallation R
ecomm
endations
Commercial | 123
iCORE® II Advanced Composite Flooring
ICORE II®Advanced Composite Flooring Installation Guidelines
Getting Started Assemble all tools listed below before beginning the installation process.
Tools & Materials
� CoreWeld™
� Mannington® Whisper 3N1 underlayment
� Spacing wedges – 5/16" (1 cm)
� Pull bar
� Utility knife
� Tapping block and Hammer
� Pencil
� Tape measure
� Carpenter’s square
� Transition moldings
� Hand or power jamb saw
� Circular saw, table saw, jig saw or preferably Bullet® Cutter
� Drill
� Chalk line
� Blue masking tape
� Safety glasses*
* Always wear safety glasses when using hammer or power equipment. Follow safety instructions and MSDSData Sheets.
* For future repairs, wrap remaining panels in original box and store in a normal, dry interior storage area atnormal room temperature.
Job Site Conditions
� Can be installed over structurally sound wood and concrete sub floors on all grade levels.
� Sub floor must be clean and free of debris.
� Sub floor must be level to within ¼ inch per 10-foot span.
� Low spots can be filled using Mannington’s MVP 2023 floor patching compound.
� Sanding or grinding must be used to remove high spots.
� Can be installed over most existing hard surface flooring. Remove hardwood floors that are glued downover concrete.
� Can be installed over most properly prepared ceramic tile floors.
iCore II Installation G
uidelines

Commercial | 124
iCORE® II Advanced Composite Flooring (continued)
� Can be installed over radiant heated flooring. (Maximum Temperature 90°)
� ICore II should not be installed over carpet.
� Jobsite installation temperature should be between 60° and 95°.
� ICore II is intended for indoor use in buildings that are climate controlled.
� ICore II should never be installed in areas subjected to direct and prolonged sunlight
� ICore II should not be installed over concrete sub floors where moisture problems exist.*
* Although moisture will not affect iCORE II plank, it is recommended not to install iCORE II over concreteslab with a history of excessive moisture.
If required, carefully remove existing wall base, trim, and transition moldings. Measure out the entire work area toensure proper panel layout. Make sure the last panel to be laid in the work area will be no less than 2" wide. If not,the first panel to be laid in the work area must be cut to compensate for the difference in the last panel.
Undercut all bottom door casings so the new flooring will fit underneath. Use a scrap piece of the ICore II plank andWhisper 3N1 underlayment as a guide. Make the cut using a hand or power jamb saw. Be certain to allow enoughroom under the casing for an expansion gap.
Install Mannington Whisper 3N1 underlayment, only one sheet at a time during panel installation to preventdamaging the underlayment. Once the first sheet of Mannington Whisper 3N1 underlayment is covered withiCORE II flooring, install the second sheet. Do not overlap sheets. Butt the two edges of the sheet together andseal with duct tape.
NOTE: Mannington Whisper 3N1 is a closed cell construction & does not require a moisturebarrier if installed on or below grade.
A 5/16” expansion space must be provided at all fixed, vertical structures. Use spacing wedges positioned at thehead seams to prevent movement of the rows and position spacers between the side of the first row and the wall.Spacers must be positioned around pillars, posts, pipes, thresholds, etc., to maintain the required expansion gap.
Laying ICore II
Fill the CoreWeld applicator and screw on the applicator tip. Snip off the very top of the applicator tip to the secondring. Apply an even application of weld to all head seams as you go. The majority of the CoreWeld will penetrateinto the joint and will also evaporate quickly from the surface of the flooring, however, wipe the area with a cleancloth to ensure that all of the CoreWeld has been removed from the surface.
Once the starting wall has been determined, begin laying the iCORE II planks along the wall using spacers oradjustable wedges to maintain the expansion gap. It is imperative that this row be installed straight and tight at allend joints. Cut the last plank to fit.
NOTE: iCORE II planks can be cut using traditional cutting tools such as hand saws, jig saws, circular saws, power miter or chop saws, etc. However, the preferred cutting tool, which will
minimize dust & noise, is a guillotine, or Bullet® type cutter. Establish an area away from thework area for cutting and utilize "dust" containment systems when cutting. Keep the “dust” outof the work area since it can easily interfere with the fit of the planks.
�
�
iCore II Installation G
uidelines
Commercial | 125
iCORE® II Advanced Composite Flooring (continued)
ICore II planks incorporate a durable side click profile design which simplifies the installation process. Planks can beassembled tongue-to-groove, or groove-to-tongue according to the installer’s preference.
The plank head seams have a horizontal click tongue & groove profile machined into the ends of each plank.This design enables the installer to first connect the side seams and then join the head seams horizontally eitherby hand, or with a tapping block. It is important that when using a tapping block, or similar device that you onlytap on the tongue-side of the plank head seam. Following this instruction will assure that the decorative layeris not damaged.
Typically the cut-off plank from the first row can be used to start the second row providing that it is 12" or longer.Stagger the end joints of the second row by at least 12" from the end joints in the first row.
If using a tapping block, be careful not to use too much force, or to contact the decorative surface of the plank.
Randomly stagger the end joints to achieve a random and aesthetically pleasing appearance.
Closely inspect these first three rows to assure that everything is straight and true. Be certain that all end joints are tight and aligned. If necessary, adjust these three rows of iCORE II planks using adjustable wedges beforeproceeding with the installation. It is sometimes helpful to secure the alignment of these three rows with blue, non-marring masking tape.
Apply CoreWeld to the head seams only. CoreWeld should be applied to the head seams just before assembly.Place a generous amount of CoreWeld on the seams, and then push the plank end into the mating plank. Be careful,because the CoreWeld may “split” slightly. (Remember to wear safety glasses!) This method ensures thatCoreWeld fully penetrates the seam and securely bonds the ends of the planks.
NOTE: Continue installing the planks across the work area. Periodically throughout the installation, check to be certain that the panels are staying straight and true. Maintain the
5/16" expansion gap. Apply Core Weld to the head seams as you go.
It is likely that the last row of planks will need to be rip cut to fit. Remember this last row must be at least 2" wide.Scribe the last row of panels as required maintaining the 5/16" expansion gap. Install the cut planks and pull intoplace with a pull bar.
NOTE: After welding is complete, pour unused CoreWeld back into the can. Do not store CoreWeld in the applicator bottle.
Use the appropriate finish molding or terminating profile as a transition to door thresholds, steps, or other floorcoverings. When installing base, caution must be taken to not nail into iCORE II planks; iCORE II is a “floating floor”and the planks must have the ability to move / expand as building / subfloor shifts. iCORE II has matching moldingsfor all running line decor color. The moldings include quarter-round, wall base, step-nosing, and end-molding. T-molding and reducers have a rigid aluminum core and color match decor sheet for added durability.
Repairs
Always inspect each panel closely before installation; however, if damage occurs after installation, the followingrepair procedures may be used.
If a panel is slightly damaged or chipped, fill it using Mannington Color-Matched Patchal Pencils. Follow alldirections described on the container.
�
�
iCore II Installation G
uidelines
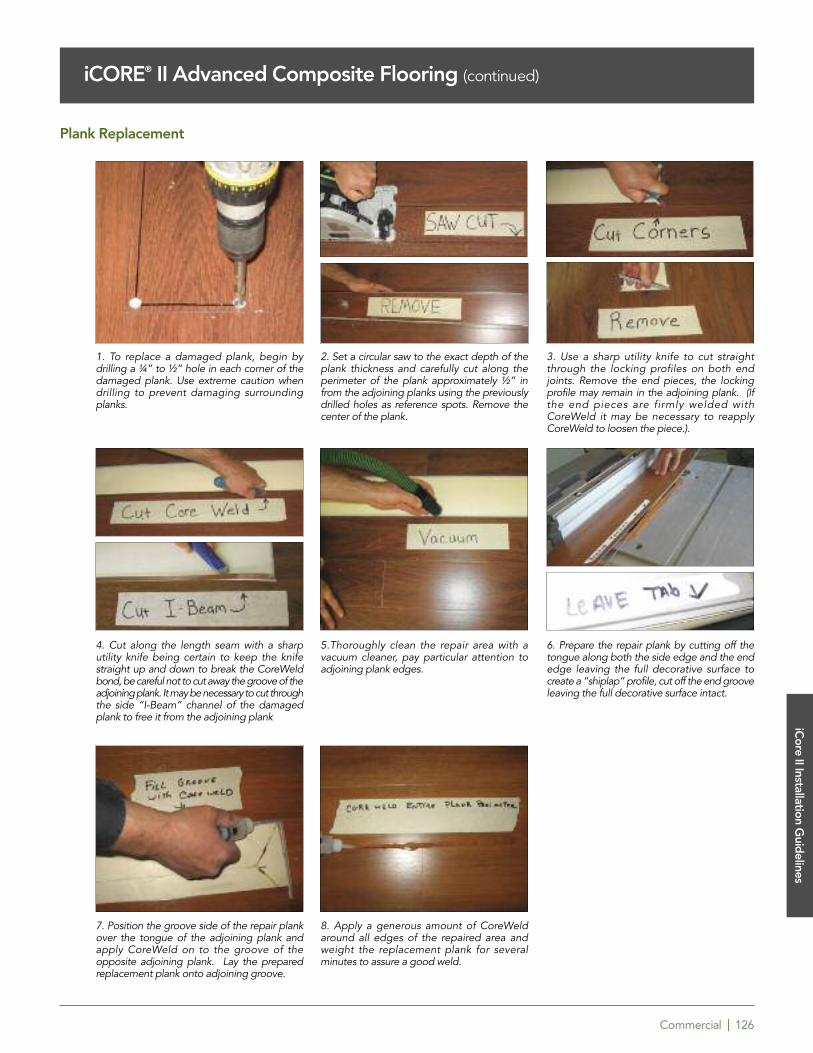
Plank Replacement
2. Set a circular saw to the exact depth of theplank thickness and carefully cut along theperimeter of the plank approximately ½” infrom the adjoining planks using the previouslydrilled holes as reference spots. Remove thecenter of the plank.
Commercial | 126
iCORE® II Advanced Composite Flooring (continued)
iCore II Installation G
uidelines
3. Use a sharp utility knife to cut straightthrough the locking profiles on both endjoints. Remove the end pieces, the lockingprofile may remain in the adjoining plank. (Ifthe end pieces are firmly welded withCoreWeld it may be necessary to reapplyCoreWeld to loosen the piece.).
1. To replace a damaged plank, begin bydrilling a ¼” to ½” hole in each corner of thedamaged plank. Use extreme caution whendrilling to prevent damaging surroundingplanks.
5.Thoroughly clean the repair area with avacuum cleaner, pay particular attention toadjoining plank edges.
6. Prepare the repair plank by cutting off thetongue along both the side edge and the endedge leaving the full decorative surface tocreate a “shiplap” profile, cut off the end grooveleaving the full decorative surface intact.
4. Cut along the length seam with a sharputility knife being certain to keep the knifestraight up and down to break the CoreWeldbond, be careful not to cut away the groove of theadjoining plank. It may be necessary to cut throughthe side “I-Beam” channel of the damagedplank to free it from the adjoining plank
8. Apply a generous amount of CoreWeldaround all edges of the repaired area andweight the replacement plank for severalminutes to assure a good weld.
7. Position the groove side of the repair plankover the tongue of the adjoining plank andapply CoreWeld on to the groove of theopposite adjoining plank. Lay the preparedreplacement plank onto adjoining groove.
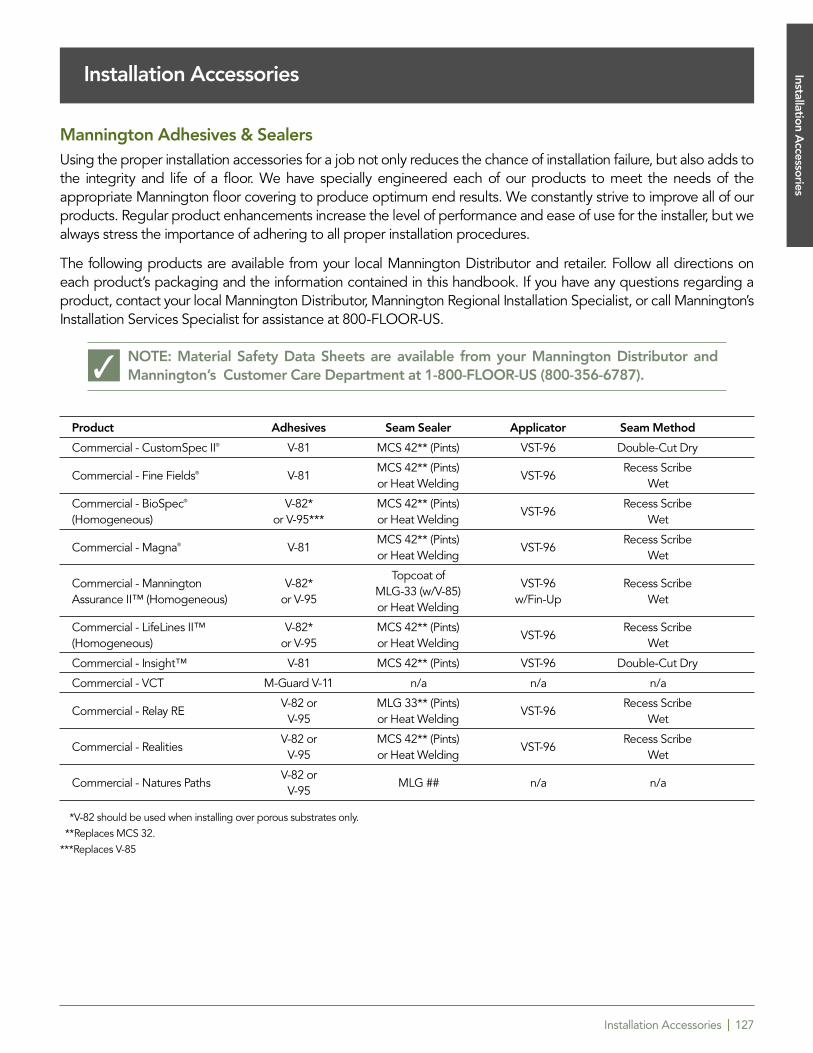
Installation Accessories | 127
Mannington Adhesives & Sealers Using the proper installation accessories for a job not only reduces the chance of installation failure, but also adds tothe integrity and life of a floor. We have specially engineered each of our products to meet the needs of theappropriate Mannington floor covering to produce optimum end results. We constantly strive to improve all of ourproducts. Regular product enhancements increase the level of performance and ease of use for the installer, but wealways stress the importance of adhering to all proper installation procedures.
The following products are available from your local Mannington Distributor and retailer. Follow all directions oneach product’s packaging and the information contained in this handbook. If you have any questions regarding aproduct, contact your local Mannington Distributor, Mannington Regional Installation Specialist, or call Mannington’sInstallation Services Specialist for assistance at 800-FLOOR-US.
NOTE: Material Safety Data Sheets are available from your Mannington Distributor and Mannington’s Customer Care Department at 1-800-FLOOR-US (800-356-6787).
Product Adhesives Seam Sealer Applicator Seam Method
Commercial - CustomSpec II® V-81 MCS 42** (Pints) VST-96 Double-Cut Dry
Commercial - Fine Fields® V-81MCS 42** (Pints)
VST-96Recess Scribe
or Heat Welding Wet
Commercial - BioSpec® V-82* MCS 42** (Pints)VST-96
Recess Scribe(Homogeneous) or V-95*** or Heat Welding Wet
Commercial - Magna® V-81MCS 42** (Pints)
VST-96Recess Scribe
or Heat Welding Wet
Topcoat ofCommercial - Mannington V-82*
MLG-33 (w/V-85)VST-96 Recess Scribe
Assurance II™ (Homogeneous) or V-95or Heat Welding
w/Fin-Up Wet
Commercial - LifeLines II™ V-82* MCS 42** (Pints)VST-96
Recess Scribe(Homogeneous) or V-95 or Heat Welding Wet
Commercial - Insight™ V-81 MCS 42** (Pints) VST-96 Double-Cut Dry
Commercial - VCT M-Guard V-11 n/a n/a n/a
Commercial - Relay REV-82 or MLG 33** (Pints)
VST-96Recess Scribe
V-95 or Heat Welding Wet
Commercial - RealitiesV-82 or MCS 42** (Pints)
VST-96Recess Scribe
V-95 or Heat Welding Wet
Commercial - Natures PathsV-82 or
MLG ## n/a n/aV-95
Installation Accessories Installation Accessories
�
* *V-82 should be used when installing over porous substrates only.**Replaces MCS 32.
***Replaces V-85
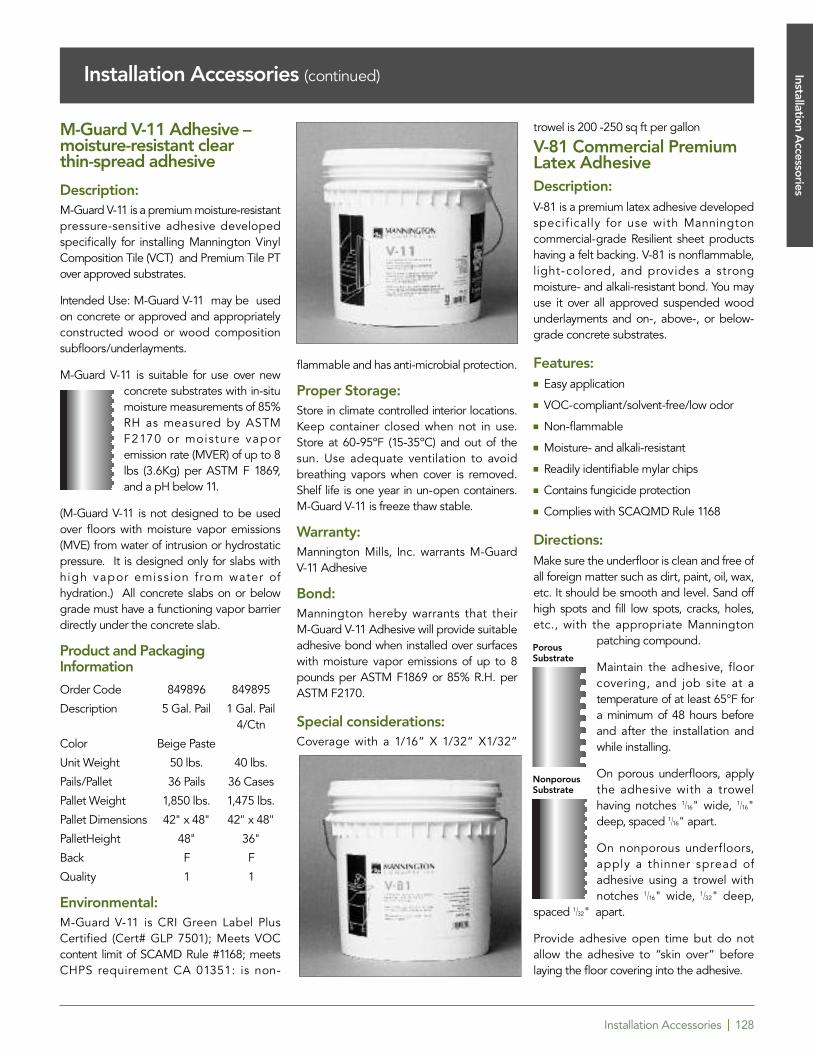
Installation Accessories | 128
M-Guard V-11 Adhesive –moisture-resistant clear thin-spread adhesive
Description:M-Guard V-11 is a premium moisture-resistantpressure-sensitive adhesive developedspecifically for installing Mannington VinylComposition Tile (VCT) and Premium Tile PTover approved substrates.
Intended Use: M-Guard V-11 may be usedon concrete or approved and appropriatelyconstructed wood or wood compositionsubfloors/underlayments.
M-Guard V-11 is suitable for use over newconcrete substrates with in-situmoisture measurements of 85%RH as measured by ASTMF2170 or moisture vaporemission rate (MVER) of up to 8lbs (3.6Kg) per ASTM F 1869,and a pH below 11.
(M-Guard V-11 is not designed to be usedover floors with moisture vapor emissions(MVE) from water of intrusion or hydrostaticpressure. It is designed only for slabs withhigh vapor emission f rom water ofhydration.) All concrete slabs on or belowgrade must have a functioning vapor barrierdirectly under the concrete slab.
Product and PackagingInformation
Order Code 849896 849895
Description 5 Gal. Pail 1 Gal. Pail 4/Ctn
Color Beige Paste
Unit Weight 50 lbs. 40 lbs.
Pails/Pallet 36 Pails 36 Cases
Pallet Weight 1,850 lbs. 1,475 lbs.
Pallet Dimensions 42" x 48" 42" x 48"
PalletHeight 48" 36"
Back F F
Quality 1 1
Environmental: M-Guard V-11 is CRI Green Label PlusCertified (Cert# GLP 7501); Meets VOCcontent limit of SCAMD Rule #1168; meetsCHPS requirement CA 01351: is non-
flammable and has anti-microbial protection.
Proper Storage: Store in climate controlled interior locations.Keep container closed when not in use.Store at 60-95ºF (15-35ºC) and out of thesun. Use adequate ventilation to avoidbreathing vapors when cover is removed.Shelf life is one year in un-open containers.M-Guard V-11 is freeze thaw stable.
Warranty: Mannington Mills, Inc. warrants M-Guard V-11 Adhesive
Bond:Mannington hereby warrants that their M-Guard V-11 Adhesive will provide suitableadhesive bond when installed over surfaceswith moisture vapor emissions of up to 8pounds per ASTM F1869 or 85% R.H. perASTM F2170.
Special considerations: Coverage with a 1/16” X 1/32” X1/32”
trowel is 200 -250 sq ft per gallon
V-81 Commercial PremiumLatex AdhesiveDescription:V-81 is a premium latex adhesive developedspecif ically for use with Manningtoncommercial-grade Resilient sheet productshaving a felt backing. V-81 is nonflammable,light-colored, and provides a strongmoisture- and alkali-resistant bond. You mayuse it over all approved suspended woodunderlayments and on-, above-, or below-grade concrete substrates.
Features:� Easy application
� VOC-compliant/solvent-free/low odor
� Non-flammable
� Moisture- and alkali-resistant
� Readily identifiable mylar chips
� Contains fungicide protection
� Complies with SCAQMD Rule 1168
Directions:Make sure the underfloor is clean and free ofall foreign matter such as dirt, paint, oil, wax,etc. It should be smooth and level. Sand offhigh spots and fill low spots, cracks, holes,etc., with the appropriate Mannington
patching compound.
Maintain the adhesive, floorcovering, and job site at atemperature of at least 65°F fora minimum of 48 hours beforeand after the installation andwhile installing.
On porous underfloors, applythe adhesive with a trowelhaving notches 1/16" wide, 1/16"deep, spaced 1/16" apart.
On nonporous underfloors,apply a thinner spread ofadhesive using a trowel withnotches 1/16" wide, 1/32" deep,
spaced 1/32" apart.
Provide adhesive open time but do notallow the adhesive to “skin over” beforelaying the floor covering into the adhesive.
PorousSubstrate
NonporousSubstrate
Installation Accessories (continued) Installation Accessories
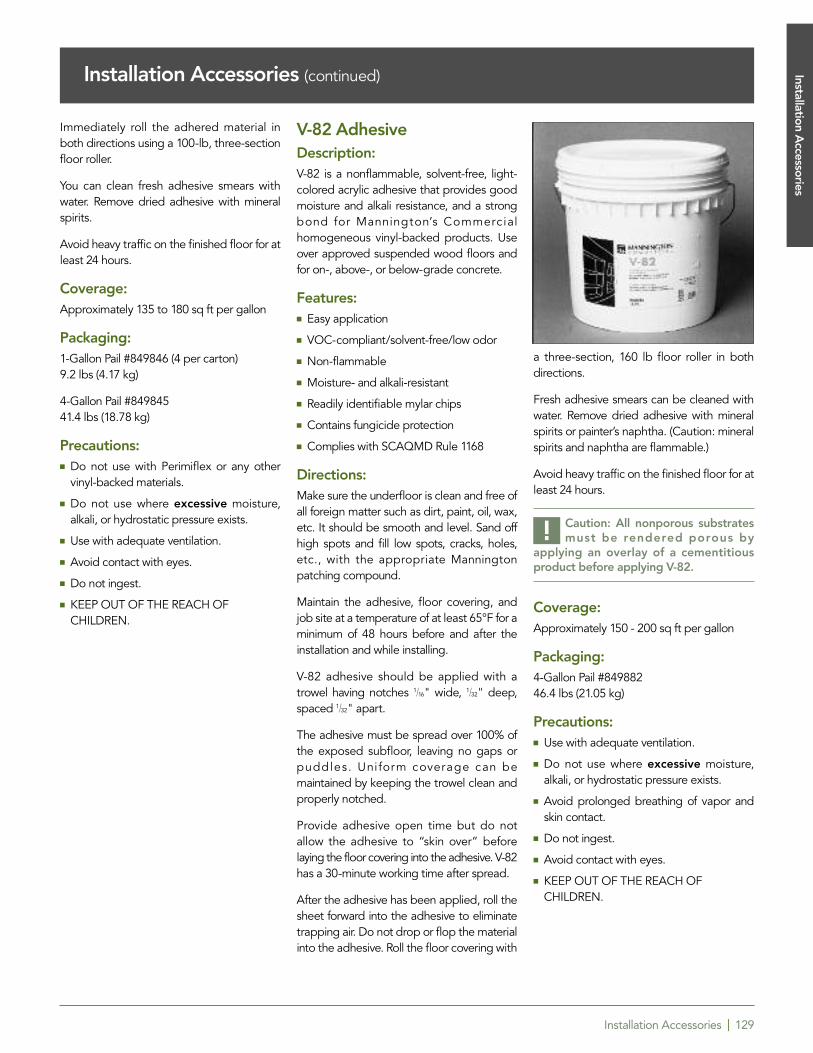
Installation Accessories | 129
Immediately roll the adhered material inboth directions using a 100-lb, three-sectionfloor roller.
You can clean fresh adhesive smears withwater. Remove dried adhesive with mineralspirits.
Avoid heavy traffic on the finished floor for atleast 24 hours.
Coverage:Approximately 135 to 180 sq ft per gallon
Packaging:1-Gallon Pail #849846 (4 per carton)9.2 lbs (4.17 kg)
4-Gallon Pail #84984541.4 lbs (18.78 kg)
Precautions:� Do not use with Perimiflex or any other
vinyl-backed materials.
� Do not use where excessive moisture,alkali, or hydrostatic pressure exists.
� Use with adequate ventilation.
� Avoid contact with eyes.
� Do not ingest.
� KEEP OUT OF THE REACH OFCHILDREN.
V-82 AdhesiveDescription:V-82 is a nonflammable, solvent-free, light-colored acrylic adhesive that provides goodmoisture and alkali resistance, and a strongbond for Mannington’s Commercialhomogeneous vinyl-backed products. Useover approved suspended wood floors andfor on-, above-, or below-grade concrete.
Features:� Easy application
� VOC-compliant/solvent-free/low odor
� Non-flammable
� Moisture- and alkali-resistant
� Readily identifiable mylar chips
� Contains fungicide protection
� Complies with SCAQMD Rule 1168
Directions:Make sure the underfloor is clean and free ofall foreign matter such as dirt, paint, oil, wax,etc. It should be smooth and level. Sand offhigh spots and fill low spots, cracks, holes,etc., with the appropriate Manningtonpatching compound.
Maintain the adhesive, floor covering, andjob site at a temperature of at least 65°F for aminimum of 48 hours before and after theinstallation and while installing.
V-82 adhesive should be applied with atrowel having notches 1/16" wide, 1/32" deep,spaced 1/32" apart.
The adhesive must be spread over 100% ofthe exposed subfloor, leaving no gaps orpuddles. Uniform coverage can bemaintained by keeping the trowel clean andproperly notched.
Provide adhesive open time but do notallow the adhesive to “skin over” beforelaying the floor covering into the adhesive. V-82has a 30-minute working time after spread.
After the adhesive has been applied, roll thesheet forward into the adhesive to eliminatetrapping air. Do not drop or flop the materialinto the adhesive. Roll the floor covering with
a three-section, 160 lb floor roller in bothdirections.
Fresh adhesive smears can be cleaned withwater. Remove dried adhesive with mineralspirits or painter’s naphtha. (Caution: mineralspirits and naphtha are flammable.)
Avoid heavy traffic on the finished floor for atleast 24 hours.
Caution: All nonporous substrates must be rendered porous by
applying an overlay of a cementitiousproduct before applying V-82.
Coverage:Approximately 150 - 200 sq ft per gallon
Packaging:4-Gallon Pail #84988246.4 lbs (21.05 kg)
Precautions:� Use with adequate ventilation.
� Do not use where excessive moisture,alkali, or hydrostatic pressure exists.
� Avoid prolonged breathing of vapor andskin contact.
� Do not ingest.
� Avoid contact with eyes.
� KEEP OUT OF THE REACH OFCHILDREN.
!
Installation Accessories (continued) Installation Accessories
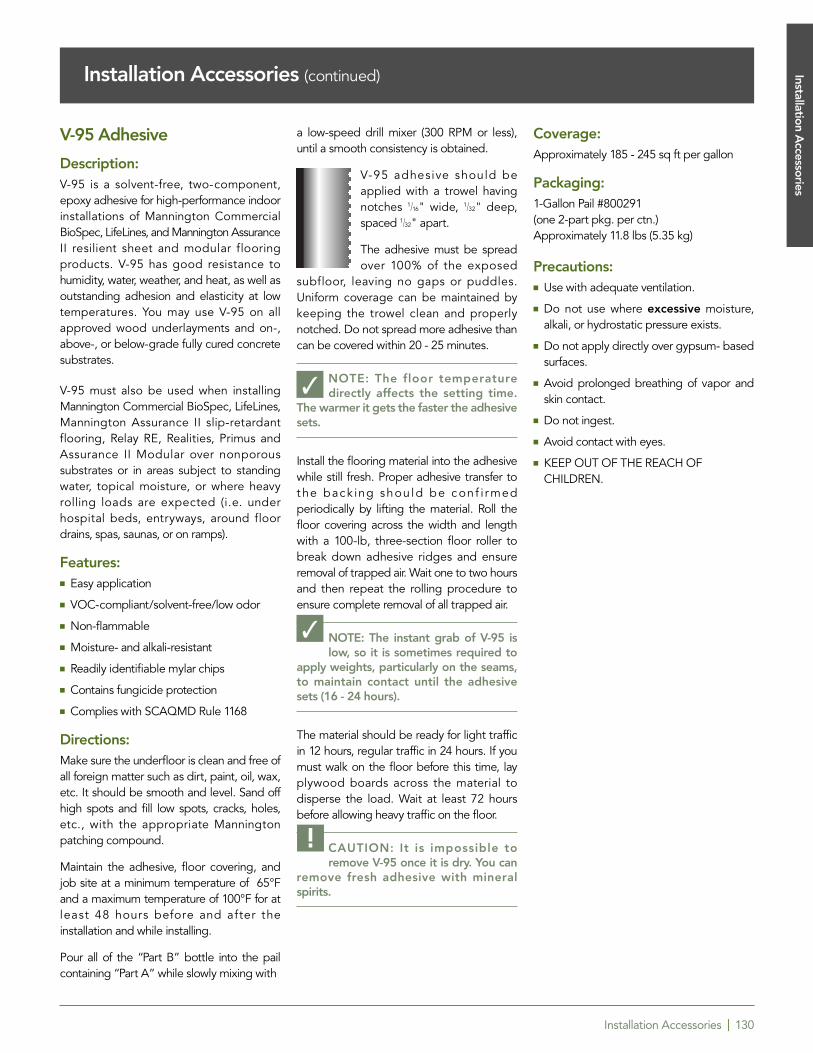
Installation Accessories | 130
V-95 Adhesive
Description:V-95 is a solvent-free, two-component,epoxy adhesive for high-performance indoorinstallations of Mannington CommercialBioSpec, LifeLines, and Mannington AssuranceII resilient sheet and modular flooringproducts. V-95 has good resistance tohumidity, water, weather, and heat, as well asoutstanding adhesion and elasticity at lowtemperatures. You may use V-95 on allapproved wood underlayments and on-,above-, or below-grade fully cured concretesubstrates.
V-95 must also be used when installingMannington Commercial BioSpec, LifeLines,Mannington Assurance II slip-retardantflooring, Relay RE, Realities, Primus andAssurance II Modular over nonporoussubstrates or in areas subject to standingwater, topical moisture, or where heavyrolling loads are expected (i.e. underhospital beds, entryways, around floordrains, spas, saunas, or on ramps).
Features:� Easy application
� VOC-compliant/solvent-free/low odor
� Non-flammable
� Moisture- and alkali-resistant
� Readily identifiable mylar chips
� Contains fungicide protection
� Complies with SCAQMD Rule 1168
Directions:Make sure the underfloor is clean and free ofall foreign matter such as dirt, paint, oil, wax,etc. It should be smooth and level. Sand offhigh spots and fill low spots, cracks, holes,etc., with the appropriate Manningtonpatching compound.
Maintain the adhesive, floor covering, andjob site at a minimum temperature of 65°Fand a maximum temperature of 100°F for atleast 48 hours before and after theinstallation and while installing.
Pour all of the “Part B” bottle into the pailcontaining “Part A” while slowly mixing with
a low-speed drill mixer (300 RPM or less),until a smooth consistency is obtained.
V-95 adhesive should beapplied with a trowel havingnotches 1/16" wide, 1/32" deep,spaced 1/32" apart.
The adhesive must be spreadover 100% of the exposed
subfloor, leaving no gaps or puddles.Uniform coverage can be maintained bykeeping the trowel clean and properlynotched. Do not spread more adhesive thancan be covered within 20 - 25 minutes.
NOTE: The floor temperature directly affects the setting time.
The warmer it gets the faster the adhesivesets.
Install the flooring material into the adhesivewhile still fresh. Proper adhesive transfer tot he back ing shou ld be c on f i r medperiodically by lifting the material. Roll thefloor covering across the width and lengthwith a 100-lb, three-section floor roller tobreak down adhesive ridges and ensureremoval of trapped air. Wait one to two hoursand then repeat the rolling procedure toensure complete removal of all trapped air.
NOTE: The instant grab of V-95 is low, so it is sometimes required to
apply weights, particularly on the seams,to maintain contact until the adhesivesets (16 - 24 hours).
The material should be ready for light trafficin 12 hours, regular traffic in 24 hours. If youmust walk on the floor before this time, layplywood boards across the material todisperse the load. Wait at least 72 hoursbefore allowing heavy traffic on the floor.
CAUTION: It is impossible to remove V-95 once it is dry. You can
remove fresh adhesive with mineralspirits.
Coverage:Approximately 185 - 245 sq ft per gallon
Packaging:1-Gallon Pail #800291 (one 2-part pkg. per ctn.)Approximately 11.8 lbs (5.35 kg)
Precautions:� Use with adequate ventilation.
� Do not use where excessive moisture,alkali, or hydrostatic pressure exists.
� Do not apply directly over gypsum- basedsurfaces.
� Avoid prolonged breathing of vapor andskin contact.
� Do not ingest.
� Avoid contact with eyes.
� KEEP OUT OF THE REACH OFCHILDREN.
�
�
!
Installation Accessories (continued) Installation Accessories
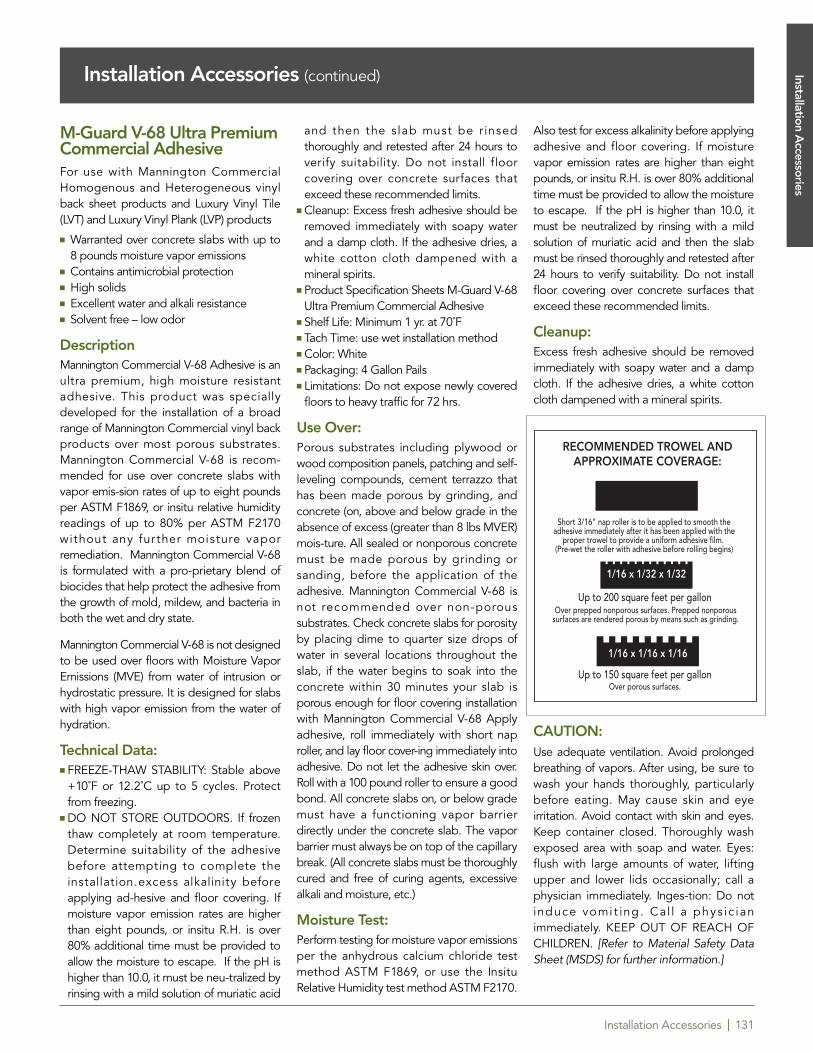
Installation Accessories | 131
Installation Accessories (continued)
M-Guard V-68 Ultra PremiumCommercial AdhesiveFor use with Mannington CommercialHomogenous and Heterogeneous vinylback sheet products and Luxury Vinyl Tile(LVT) and Luxury Vinyl Plank (LVP) products
� Warranted over concrete slabs with up to8 pounds moisture vapor emissions
� Contains antimicrobial protection� High solids� Excellent water and alkali resistance� Solvent free – low odor
DescriptionMannington Commercial V-68 Adhesive is anultra premium, high moisture resistantadhesive. This product was speciallydeveloped for the installation of a broadrange of Mannington Commercial vinyl backproducts over most porous substrates.Mannington Commercial V-68 is recom-mended for use over concrete slabs withvapor emis-sion rates of up to eight poundsper ASTM F1869, or insitu relative humidityreadings of up to 80% per ASTM F2170without any fur ther moisture vaporremediation. Mannington Commercial V-68is formulated with a pro-prietary blend ofbiocides that help protect the adhesive fromthe growth of mold, mildew, and bacteria inboth the wet and dry state.
Mannington Commercial V-68 is not designedto be used over floors with Moisture VaporEmissions (MVE) from water of intrusion orhydrostatic pressure. It is designed for slabswith high vapor emission from the water ofhydration.
Technical Data:� FREEZE-THAW STABILITY: Stable above
+10˚F or 12.2˚C up to 5 cycles. Protectfrom freezing.
� DO NOT STORE OUTDOORS. If frozenthaw completely at room temperature.Determine suitability of the adhesivebefore attempting to complete theinstallation.excess alkalinity beforeapplying ad-hesive and floor covering. Ifmoisture vapor emission rates are higherthan eight pounds, or insitu R.H. is over80% additional time must be provided toallow the moisture to escape. If the pH ishigher than 10.0, it must be neu-tralized byrinsing with a mild solution of muriatic acid
and then the s lab must be r insedthoroughly and retested after 24 hours toverify suitability. Do not install floorcovering over concrete surfaces thatexceed these recommended limits.
� Cleanup: Excess fresh adhesive should beremoved immediately with soapy waterand a damp cloth. If the adhesive dries, awhite cotton cloth dampened with amineral spirits.
� Product Specification Sheets M-Guard V-68Ultra Premium Commercial Adhesive
� Shelf Life: Minimum 1 yr. at 70˚F� Tach Time: use wet installation method� Color: White� Packaging: 4 Gallon Pails� Limitations: Do not expose newly covered
floors to heavy traffic for 72 hrs.
Use Over:Porous substrates including plywood orwood composition panels, patching and self-leveling compounds, cement terrazzo thathas been made porous by grinding, andconcrete (on, above and below grade in theabsence of excess (greater than 8 lbs MVER)mois-ture. All sealed or nonporous concretemust be made porous by grinding orsanding, before the application of theadhesive. Mannington Commercial V-68 isnot recommended over non-poroussubstrates. Check concrete slabs for porosityby placing dime to quarter size drops ofwater in several locations throughout theslab, if the water begins to soak into theconcrete within 30 minutes your slab isporous enough for floor covering installationwith Mannington Commercial V-68 Applyadhesive, roll immediately with short naproller, and lay floor cover-ing immediately intoadhesive. Do not let the adhesive skin over.Roll with a 100 pound roller to ensure a goodbond. All concrete slabs on, or below grademust have a functioning vapor barrierdirectly under the concrete slab. The vaporbarrier must always be on top of the capillarybreak. (All concrete slabs must be thoroughlycured and free of curing agents, excessivealkali and moisture, etc.)
Moisture Test: Perform testing for moisture vapor emissionsper the anhydrous calcium chloride testmethod ASTM F1869, or use the InsituRelative Humidity test method ASTM F2170.
Also test for excess alkalinity before applyingadhesive and floor covering. If moisturevapor emission rates are higher than eightpounds, or insitu R.H. is over 80% additionaltime must be provided to allow the moistureto escape. If the pH is higher than 10.0, itmust be neutralized by rinsing with a mildsolution of muriatic acid and then the slabmust be rinsed thoroughly and retested after24 hours to verify suitability. Do not installfloor covering over concrete surfaces thatexceed these recommended limits.
Cleanup: Excess fresh adhesive should be removedimmediately with soapy water and a dampcloth. If the adhesive dries, a white cottoncloth dampened with a mineral spirits.
CAUTION:Use adequate ventilation. Avoid prolongedbreathing of vapors. After using, be sure towash your hands thoroughly, particularlybefore eating. May cause skin and eyeirritation. Avoid contact with skin and eyes.Keep container closed. Thoroughly washexposed area with soap and water. Eyes:flush with large amounts of water, liftingupper and lower lids occasionally; call aphysician immediately. Inges-tion: Do notinduce vomi t ing . Cal l a phys ic i animmediately. KEEP OUT OF REACH OFCHILDREN. [Refer to Material Safety DataSheet (MSDS) for further information.]
1/16 x 1/16 x 1/16
1/16 x 1/32 x 1/32
Up to 200 square feet per gallon
Up to 150 square feet per gallonOver porous surfaces.
Over prepped nonporous surfaces. Prepped nonporoussurfaces are rendered porous by means such as grinding.
Short 3/16” nap roller is to be applied to smooth theadhesive immediately after it has been applied with the
proper trowel to provide a uniform adhesive film. (Pre-wet the roller with adhesive before rolling begins)
RECOMMENDED TROWEL ANDAPPROXIMATE COVERAGE:
Installation Accessories
Installation Accessories | 132
Installation Accessories (continued)
DirectionsPreparation: For proper results wheninstalling floor coverings with ManningtonCommercial V-68 always climatize theadhesive, floor covering, and installation area.At a minimum, store the adhesive, and thefloor covering at the job site for at least 48hours with the job site environment at aminimum of 65˚F and maximum 100º F, and arelative humidity of between 45% and 65%.
Area to be covered must be clean, sound,dry and free of any foreign matter that wouldinterfere with a solid bond. Level any highspots, and fill all cracks, holes and minordepressions with a suitable underlayment orfloor patch, otherwise irregularities can“telegraph” through the new surface.
Application:Mannington Commercial V-68 has beenspecially formulated to act as both an ultrapremium resilient flooring adhesive, and alsoto function as a moisture vapor emissionsretarder. This adhesive can be used overconcrete slabs with up to 8 pounds of MVEper ASTM F1869 or up to 80% R.H. perASTM test method F2170 without anyfurther moisture vapor remediation.Mannington Commercial V-68 is a firmsetting, wet-install, acrylic based adhesivethat is an excellent choice for all types of vinylback resilient floor covering products.
Install flooring products into the ManningtonCommercial V-68 while it is still wet, do notallow adhesive to skin over. All substratesmust exhibit some amount of porosity, withthe ability to absorb water topically, other-wise the adhesive will not set-up and cure.Mannington Commercial V-68 acts as anadhesive as well as a MVE reducer, thereforeall applications require the adhesive to betroweled on the substrate, and thenimmediately rolled with a short (3/16”) nappaint roller, (pre-wet the roller with adhesivebefore rolling begins). The trowel acts as ameter to ensure the proper amount ofadhesive is used, and the roller spreads theadhesive to make a consistent film over thesurface of the substrate.
Once the adhesive is nap rolled, lay floorcovering into the wet adhesive immediately,this will ensure good transfer. Do not let theadhesive skin over. Then roll the entire floorwith a 100 pound three-section floor roller.Roll the floor while the adhesive is still softand wet underneath the flooring this willensure good bonding. Seal seams whereappropriate, and restrict to light traffic for 24hours. Restrict from heavy traffic for 72hours. If seam contamination occurs, extendopen time or reduce trowel size.
WARNING! Do not sand, scrape, abrade, chip, pulverize, ordemolish existing resilient tile, sheet flooring,backing, lining felt, adhesive, or adhesiveresidue. These products may contain asbestosfibers that are not readily identifiable. Avoidcreating dust. Inhalation of asbestos dust maycause asbestosis or other serious bodilyharm. If old floors must be removed, consultand follow the recommended work practicesof the resilient flooring manufacturers.
Warranty: Mannington warrants the adhesive againstmanufacturing defects as fol-lows:
BOND – Mannington herby warrants thatMannington Commercial V-68 adhesive willprovide suitable adhesive bond wheninstalled over surfaces with moisture vaporemissions of up to 8 pounds per ASTM- 1869or 80% RH per ASTM F-2170.
CONDITIONS – This warranty shall not beeffective, unless the following conditions aresatisfied. The bond cre-ated by ManningtonCommercial V-68 adhesive is warranted to befree of defect in material and workmanshipfor 5 years on recommended ManningtonCommercial sheet and 10 years on Manningtonrecommended Luxury Vinyl Tile from theinitial installation date, provided:
1. The substrate is suitably preparedaccording to Mannington’s Installa-tionHandbook.
2. Mannington Commercial V-68 ad-hesiveis properly applied accord-ing to label andMannington’s In-stallation Handbook.
3. Moisture testing must be done uti-lizingeither ASTM F1869 (Calcium chloride) orASTM F 2170 (%RH) prior to the floorcovering being in-stalled.
4. Mannington Commercial V-68 must not beused on concrete slabs that do not have avapor retardant membrane properly placedabove the sand layer and next to the concrete.
5. Mannington Commercial V-68 must not beused on concrete slabs that have hydrostaticpressure or sources of moisture intrusion.
6. Alkalinity tests must also be performed.PH must not be greater than 10.0.
7. All tests have appropriate documentationavailable on request.
Please note that calcium chloride andalkalinity tests state only the condition of thefloor at the time of the test. Test results arenot indicative, nor do they predict, howenvironmental conditions may impactmoisture or alkalinity in the future.
Installation Accessories
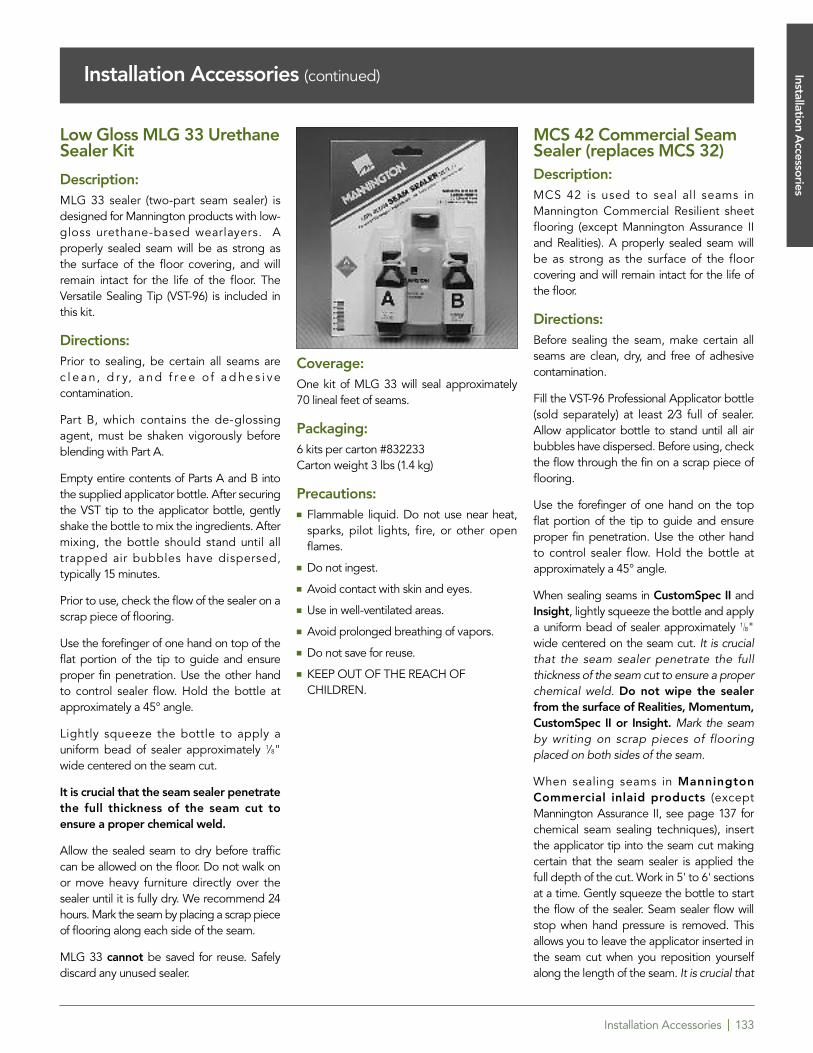
Installation Accessories | 133
Installation Accessories (continued)
Low Gloss MLG 33 UrethaneSealer Kit
Description:MLG 33 sealer (two-part seam sealer) isdesigned for Mannington products with low-gloss urethane-based wearlayers. Aproperly sealed seam will be as strong asthe surface of the floor covering, and willremain intact for the life of the floor. TheVersatile Sealing Tip (VST-96) is included inthis kit.
Directions:Prior to sealing, be certain all seams arec l e a n, d r y, a n d f r e e of a d h e s i vecontamination.
Part B, which contains the de-glossingagent, must be shaken vigorously beforeblending with Part A.
Empty entire contents of Parts A and B intothe supplied applicator bottle. After securingthe VST tip to the applicator bottle, gentlyshake the bottle to mix the ingredients. Aftermixing, the bottle should stand until alltrapped air bubbles have dispersed,typically 15 minutes.
Prior to use, check the flow of the sealer on ascrap piece of flooring.
Use the forefinger of one hand on top of theflat portion of the tip to guide and ensureproper fin penetration. Use the other handto control sealer flow. Hold the bottle atapproximately a 45° angle.
Lightly squeeze the bottle to apply auniform bead of sealer approximately 1/8"wide centered on the seam cut.
It is crucial that the seam sealer penetratethe full thickness of the seam cut toensure a proper chemical weld.
Allow the sealed seam to dry before trafficcan be allowed on the floor. Do not walk onor move heavy furniture directly over thesealer until it is fully dry. We recommend 24 hours. Mark the seam by placing a scrap pieceof flooring along each side of the seam.
MLG 33 cannot be saved for reuse. Safelydiscard any unused sealer.
Coverage:One kit of MLG 33 will seal approximately70 lineal feet of seams.
Packaging:6 kits per carton #832233Carton weight 3 lbs (1.4 kg)
Precautions:� Flammable liquid. Do not use near heat,
sparks, pilot lights, fire, or other openflames.
� Do not ingest.
� Avoid contact with skin and eyes.
� Use in well-ventilated areas.
� Avoid prolonged breathing of vapors.
� Do not save for reuse.
� KEEP OUT OF THE REACH OFCHILDREN.
MCS 42 Commercial SeamSealer (replaces MCS 32)Description:MCS 42 is used to seal all seams inMannington Commercial Resilient sheetflooring (except Mannington Assurance IIand Realities). A properly sealed seam willbe as strong as the surface of the floorcovering and will remain intact for the life ofthe floor.
Directions:Before sealing the seam, make certain allseams are clean, dry, and free of adhesivecontamination.
Fill the VST-96 Professional Applicator bottle(sold separately) at least 2⁄3 full of sealer.Allow applicator bottle to stand until all airbubbles have dispersed. Before using, checkthe flow through the fin on a scrap piece offlooring.
Use the forefinger of one hand on the topflat portion of the tip to guide and ensureproper fin penetration. Use the other handto control sealer flow. Hold the bottle atapproximately a 45° angle.
When sealing seams in CustomSpec II andInsight, lightly squeeze the bottle and applya uniform bead of sealer approximately 1/8"wide centered on the seam cut. It is crucialthat the seam sealer penetrate the fullthickness of the seam cut to ensure a properchemical weld. Do not wipe the sealerfrom the surface of Realities, Momentum,CustomSpec II or Insight. Mark the seamby writing on scrap pieces of flooringplaced on both sides of the seam.
When sealing seams in ManningtonCommercial inlaid products (exceptMannington Assurance II, see page 137 forchemical seam sealing techniques), insertthe applicator tip into the seam cut makingcertain that the seam sealer is applied thefull depth of the cut. Work in 5' to 6' sectionsat a time. Gently squeeze the bottle to startthe flow of the sealer. Seam sealer flow willstop when hand pressure is removed. Thisallows you to leave the applicator inserted inthe seam cut when you reposition yourselfalong the length of the seam. It is crucial that
Installation Accessories
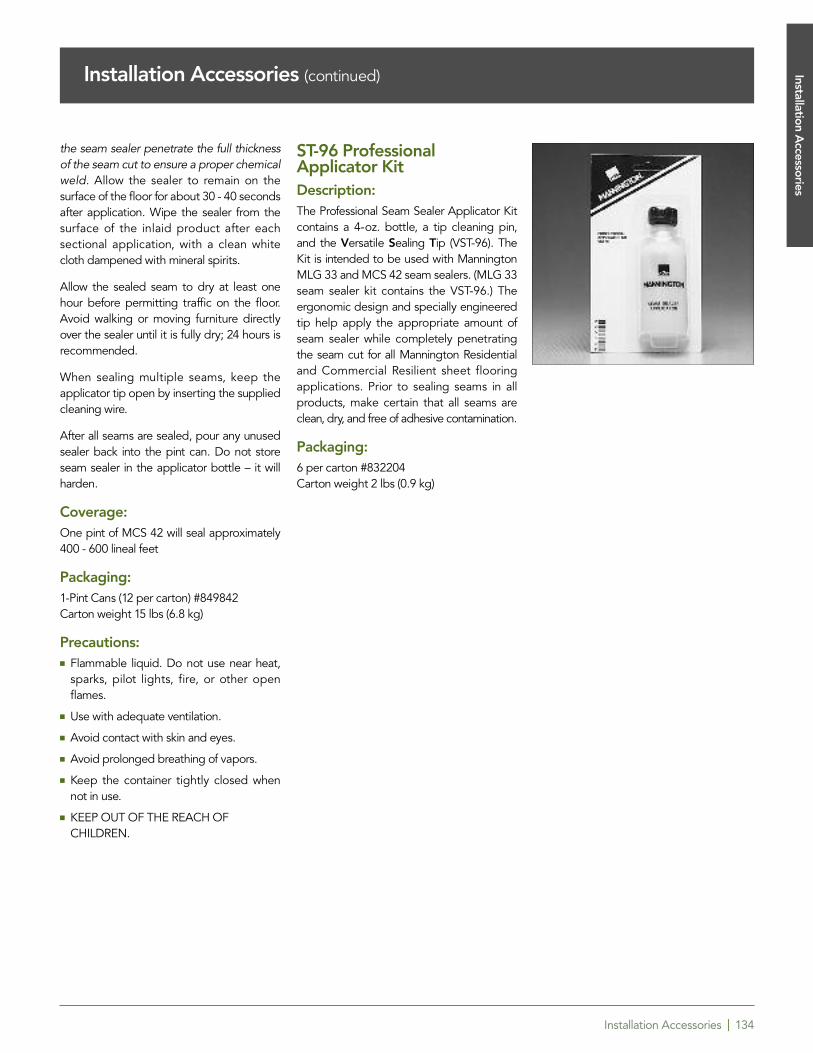
Installation Accessories | 134
the seam sealer penetrate the full thicknessof the seam cut to ensure a proper chemicalweld. Allow the sealer to remain on thesurface of the floor for about 30 - 40 secondsafter application. Wipe the sealer from thesurface of the inlaid product after eachsectional application, with a clean whitecloth dampened with mineral spirits.
Allow the sealed seam to dry at least onehour before permitting traffic on the floor.Avoid walking or moving furniture directlyover the sealer until it is fully dry; 24 hours isrecommended.
When sealing multiple seams, keep theapplicator tip open by inserting the suppliedcleaning wire.
After all seams are sealed, pour any unusedsealer back into the pint can. Do not storeseam sealer in the applicator bottle – it willharden.
Coverage:One pint of MCS 42 will seal approximately400 - 600 lineal feet
Packaging:1-Pint Cans (12 per carton) #849842Carton weight 15 lbs (6.8 kg)
Precautions:� Flammable liquid. Do not use near heat,
sparks, pilot lights, fire, or other openflames.
� Use with adequate ventilation.
� Avoid contact with skin and eyes.
� Avoid prolonged breathing of vapors.
� Keep the container tightly closed whennot in use.
� KEEP OUT OF THE REACH OFCHILDREN.
ST-96 Professional Applicator Kit Description:The Professional Seam Sealer Applicator Kitcontains a 4-oz. bottle, a tip cleaning pin,and the Versatile Sealing Tip (VST-96). TheKit is intended to be used with ManningtonMLG 33 and MCS 42 seam sealers. (MLG 33seam sealer kit contains the VST-96.) Theergonomic design and specially engineeredtip help apply the appropriate amount ofseam sealer while completely penetratingthe seam cut for all Mannington Residentialand Commercial Resilient sheet flooringapplications. Prior to sealing seams in allproducts, make certain that all seams areclean, dry, and free of adhesive contamination.
Packaging:6 per carton #832204Carton weight 2 lbs (0.9 kg)
Installation Accessories (continued) Installation Accessories
Installation Accessories | 135
Installation Accessories (continued)
Patching & LevelingCompounds
MVP-2023
Description:A fast-setting, polymer-modified, cement-based patching compound which, whenmixed only with water, is used to levelconcrete and approved wood underlaymentprior to the installation of a floor covering.Floor covering can be installed in just onehour after application.
Uses:� For patching and filling cracks, holes,
voids, and depressions in concrete andapproved wood underlayment prior to theinstallation of floor coverings.
� When mixed with MVP-2023 Additive, itcan be used as an embossing leveler overvinyl sheet goods, vinyl composition tile,cement terrazzo, and residual cutbacksurfaces.
� For repairing subfloors from featheredgeto 1/2" (12.5 mm) thickness. If needed,MVP-2023 can be applied in two layers toexceed thicknesses greater than 1/2" (12.5 mm). Note: First layer must becompletely dry.
� Offers a compatible bond with all floorcovering adhesives when these adhesivesare subsequently used for the installationof floor covering materials.
� For floors that require a high compressivestrength patching compound. Will resistcaster chair traffic.
Limitations:� For interior use only.
� D o n o t a p p l y ove r p r e s s w o o d ,f lakeboard, metal, or similar typesubstrates. Follow the floor coveringmanufacturer ’s recommendat ionsregarding proper underlayment qualities.
� Do not apply directly over gypsum-basedsubstrates.
� When applying a skim coat of MVP-2023[less than 1/32" (0.8 mm)] over porous orvery dry substrate, mix MVP-2023 withdiluted MVP-2023 Additive to preventpremature dehydration (see mixing ratio inthe technical data table).
� Do not use as a concrete resurfacingmaterial when concrete surface is to beleft exposed or unprotected.
� Do no t u s e w hen t he s u b s t r atetemperature is below 50°F (10°C) or above100°F (38°C).
Recommended Substrates:MVP-2023 mixed with water or dilutedMVP-2023 Additive (1 part in 3 equalparts of water):
� Fully cured concrete.
� A n y w o o d und er l ay ment t hat i srecommended or guaranteed by eitherthe wood manufacturer or the floorcovering manufacturer, such as Exteriorgrade plywood, Group 1, CC type.
MVP-2023 mixed with MVP-2023Additive (full strength)
� Properly prepared vinyl composition andvinyl asbestos tile or non-cushioned sheetgoods (vinyl or urethane wear layers).
� Properly prepared cement terrazzo.
� Residual cutback adhesive.
� Ceramic tile.
Packaging:Boxes: 4.4 lbs (2 kg); 10 lbs (4.5 kg);Pail: 40 lbs (18.1 kg)Bags: 25 lbs (11.3 kg); 50 lbs (22.7 kg)
Color:Gray
Shelf Life:Six months when stored in original containerat room temperature 72°F (22°C) in a dryarea.
Mixing Ratios:MVP-2023 Addititve System (MVP-2023mixed with MVP-2023 Additive)
Full Strength Mixture:Mix 2.5 parts MVP-2023 powder with onepart MVP-2023 Additive liquid
Diluted Mixture:Dilute MVP-2023 Additive liquid using onepart MVP-2023 Additive with 3 parts water.Then, mix 2.5 parts MVP-2023 powder withone part diluted MVP-2023 Additive.
Thickness Recommendations:MVP-2023 mixed with water:Up to 1/2" (12.5 mm) per application
MVP-2023 mixed with MVP-2023 Additive:Diluted Mixture . . . . . . . Up to 1/4" (6 mm)(3 parts water/1 part MVP-2023 Additive)
Full Strength Mixture . . . Up to 1/8" (3.2 mm)
Approximate Coverage:Thickness1/32" (0.8 mm) 1/16" (1.6 mm)
10 lbs 40 - 56 sq ft 20 - 28 sq ft (4.5 kg) (3.7 - 5.2 m2) (1.8 - 2.6 m2)
25 lbs 100 - 140 sq ft 50 - 70 sq ft(11.3 kg) (9.3 - 13.0 m2) (4.6 - 6.5 m2)
Installation Accessories
Installation Accessories | 136
Installation Accessories (continued)
MVP-2023 AdditiveDescription:An acrylic latex additive to be used withMVP-2023 for superior bond strength and toextend the pot life of the MVP-2023. Thissystem is ideal for leveling non-cushionedembossed mineral fibrous felt-backed sheetgoods with a vinyl or urethane wear layer,and non-cushioned embossed vinyl tiles.MVP-2023 Additive mixed full strength withMVP-2023 may also be used to skim-coatexisting cutback adhesive residue prior tothe direct glue-down installation of floorcoverings.
Uses:� For leveling non-cushioned embossed
mineral fibrous felt-backed sheet goodsthat have a vinyl or urethane wear layer.
� For leveling non-cushioned embossedvinyl tile.
� For use as an underlayment over existingunglazed ceramic tile.
� For use as an underlayment over cutbackadhesive residue.
� For use over cement terrazzo.
� To extend the pot life of the MVP-2023mix up to 20-30 minutes.
� For thin application of MVP-2023 over veryporous or dry concrete to eliminate thepremature dehydration of the patchingcompounds.
Packaging:Jug: 1 US gal. (3.7 L)
Color:Milky white
Shelf Life:12 months when stored in original containerat room temperature in a heated area.Protect from freezing.
Approximate Coverage:The coverage of MVP-2023 Additivedepends on the usage of MVP-2023.
Installation Accessories

Notes | 137
Notes