2010-2011 Suffolk University Academic Catalog Content Provider
38
2010-2011 Suffolk University Academic Catalog Content Provider’s Guide A Publication of ITS Web Services Author: Steven M. Becker Version 1.3.2 11/05/09
Transcript of 2010-2011 Suffolk University Academic Catalog Content Provider

2010-2011 Suffolk University Academic Catalog
Content Provider’s Guide A Publication of ITS Web Services Author: Steven M. Becker Version 1.3.2 11/05/09

Table of Contents Part One: Getting Started ......................................................................................................... 1
Before You Begin ................................................................................................................... 1 The Fine Print ......................................................................................................................... 2 Resources ................................................................................................................................ 3 Logging into the CMS System ................................................................................................ 4 Navigating the Site .................................................................................................................. 4 The RedDot Home Page ......................................................................................................... 6
Part Two: The Author/Editor Role: Adding and Editing Text Content ...................................... 7 Preparing to Enter or Edit Body Content on a Text Page ....................................................... 7 The Text Editor ....................................................................................................................... 8 The RedDot Text Editor Tool Bar .......................................................................................... 9 For Mac Users: The FCKeditor Tool Bar ............................................................................. 10 Entering and Editing Copy on Your Web Page .................................................................... 11 How to Enter or Edit Copy Directly ..................................................................................... 11 How to Enter Copy from a Word or Other Text Document ................................................. 12 How to Enter Copy from a Web Page .................................................................................. 13
Part Three: Formatting Text ..................................................................................................... 15 The Importance of Proper Formatting .................................................................................. 15 Formatting Your Text ........................................................................................................... 16 Body Text.............................................................................................................................. 16 Headers and Subheads .......................................................................................................... 17 The H3 Header ...................................................................................................................... 17 Bold Text .............................................................................................................................. 17 Using Capital Letters ............................................................................................................ 17 Underlining ........................................................................................................................... 17 Italics ..................................................................................................................................... 17
Part Four: Submitting and Reviewing Pages in Workflow ....................................................... 18 Standard Criteria for Reviewing an Online Catalog Page .................................................... 18 Workflow Roles .................................................................................................................... 19 Author ................................................................................................................................... 19 Department Editor ................................................................................................................. 19 Office of the Dean Editor ...................................................................................................... 19 Office of the Registrar .......................................................................................................... 19 ITS Web Services ................................................................................................................. 19 The Publication Time Line ................................................................................................... 20 The Author’s Role: Submitting and Correcting Pages ......................................................... 20 The Editor’s Role: Reviewing Pages for Content and Formatting ....................................... 23 The Office of the Registrar and ITS Web Services: Tracking, Reviewing, and Releasing for Publication ............................................................................................................................ 27
Part Five: Additional Features of Red Dot CMS ...................................................................... 28 Properties .............................................................................................................................. 28 Actions .................................................................................................................................. 29 Page Preview ......................................................................................................................... 30 Page Information ................................................................................................................... 30

2
Part Six: Troubleshooting ........................................................................................................ 33 Bugs and Issues ..................................................................................................................... 33 Pop-up Windows Don’t Open ............................................................................................... 33 Changing IE Pop-Up Preferences ......................................................................................... 33 Changing Google Pop-up Preferences .................................................................................. 34 The System Is Slow or Nothing Happens ............................................................................. 34 I’ve Been Logged Off ........................................................................................................... 34

1
Part One: Getting Started Before You Begin
This manual applies to all content areas of the Suffolk University Academic Catalogs at http://www.suffolk.edu that are edited using the Red Dot Content Management System (CMS).
This includes all content with the exception of course descriptions, which are edited in Datatel Colleague, and not in the CMS. Edits for course descriptions are handled separately.
The online catalogs and their pages constitute legal documents and are the basis of all print and print-ready (PDF) catalogs. As such, certain conventions apply to all edits, updates, and modifications of the catalogs or their pages.
Many of these conventions are maintained or supported through the technologies that allow members of the University community to post and edit content. Others, including the assignment of certain text formats, the creation of bulleted lists, and tables, are addressed in Part Three of this manual.
All Web pages and the formatting of content on those pages follow consistent, predetermined formats, as described in this manual. Only those authorized by the appropriate Web Administrators may edit any area of the Suffolk University Academic Catalogs. Such authorization is generally limited to a department or area for which the contributor is responsible. Authorization requires that contributors receive instruction in the tasks for which they are authorized, and that they conform to the methods and practices outlined in the following pages.
If you require editorial access to an area of the catalog, have questions about your authorization, or if you have questions or suggestions regarding any information in this manual, please contact ITS Web Services at [email protected] or your Web Administrator.

Getting Started
2
The Fine Print
Do not edit or amend this manual at any time. If you would like to request any change to the manual, contact [email protected].
Only Suffolk University ITS Web Services is authorized to modify this document.
This manual contains proprietary information. It is the express property of Suffolk University, and is intended exclusively for use by Suffolk University employees who are authorized to enter content on the Suffolk University Web Site and its subsidiary web sites.
This document is not for distribution in any form outside the University.
Periodically, addenda to this manual will be distributed to all authorized contributors. Note any changes, and keep them with this manual. This manual will be updated from time to time, which will be indicated by the version number.
Note that some screen images depicted in this manual may be somewhat different from what you see, based on changes to the system or to your access level.
© 2006, 2007, 2008, 2009 by Suffolk University All Rights Reserved
Suffolk University 8 Ashburton Place Boston, MA 02108-2770

Getting Started
3
Resources
In writing for the Suffolk University Academic Catalogs, and in reviewing pages prior to publication, you should be familiar with the content of this Suffolk University Academic Catalog Content Provider’s Guide. You should also have and use the following reference materials.
This will help assure uniformity of usage and a professional level of presentation throughout the Suffolk University Web Site.
The Chicago Manual of Style Available at most booksellers, or online at http://www.chicagomanualofstyle.org/
Merriam Webster College Dictionary Available at most booksellers, or online at http://www.m-w.com/

Getting Started
4
Logging into the CMS System The tool you will use to enter and edit content on the Suffolk University Web site is the Red Dot® Content Management System (CMS). You can use the Red Dot CMS on a PC using either Windows XP®, Windows 2000®, or on an Apple® (Macintosh) computer.
Note: If you are working on a PC, you will need to access the CMS through Microsoft’s Internet Explorer®. If you work on a Mac, you will need to use Mozilla Firefox®. Any other browser will not function properly. You can only access Red Dot from a computer that is inside the University firewall. When using Firefox, you may find that formatting does not appear correct until you review a document in its Preview Mode, explained later.
1. Open Internet Explorer (or, if you’re using a Mac, Firefox).
2. In the address bar, enter this address: http://srv-ganymede/cms (You may want to bookmark this address for easier access.)
Enter your user name and the password you use to log in to your computer.
Warning: Never give your password to anyone. If someone else uses your password to access the system, anything they do will be attributed to you. If you don’t know your password, or need to reset it, contact the Web Administrator responsible for your area, posted in the Addendum.
3. Click the Start button.
Note: When you’re finished working in RedDot, always remember to log out using the gray Log Off button before closing the RedDot window. After a set amount of time, you will be automatically logged off, but by staying on longer, you may be slowing the system for other users.
Navigating the Site
If you use RedDot to edit your web site, the system will continue to open to the pages you are authorized to edit on your web site. From there, you can navigate to the appropriate Academic Catalog pages. To go to your catalog pages, begin at the top level navigation—the yellow band in the header at the top of the web page. Select Academics. Then, in the left-hand navigation, select Academic Catalogs. Open the appropriate catalog and navigate to the pages you are authorized to edit.

Getting Started
5
If you are only editing catalog pages, the system will open on the catalog pages you are authorized to edit. RedDot will open on the Start Page if you have not been assigned to a workflow.
If the Start Page opens:
1. In the RedDot menu to the left, be sure that SmartEdit is highlighted (a darker gray). Select Suffolk University main site.
2. This will take you to the University home page. From here, you’ll select Academics, then the appropriate catalog, and so on.
3. All the menu links and text links work, so you’ll be navigating just as you would when visiting the site.
Note: Try to remember not to use the navigating tools in Internet Explorer, such as the “Back” button, whenever you are working in Red Dot. This could cause your work to be lost, or your files to become corrupted.
Note: There are numerous choices on this page, but you should only open Suffolk University main site. Using other entries could cause your work to be lost, or it could damage the work of others.
Getting Started
6
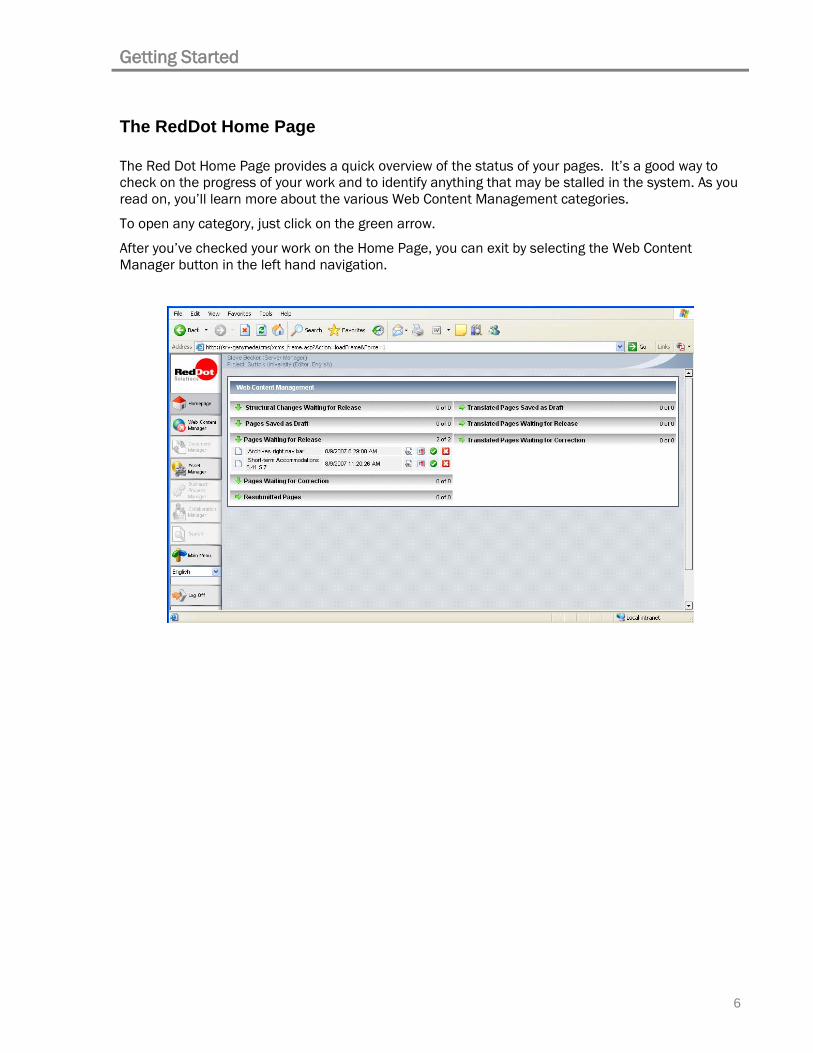
The RedDot Home Page The Red Dot Home Page provides a quick overview of the status of your pages. It’s a good way to check on the progress of your work and to identify anything that may be stalled in the system. As you read on, you’ll learn more about the various Web Content Management categories.
To open any category, just click on the green arrow.
After you’ve checked your work on the Home Page, you can exit by selecting the Web Content Manager button in the left hand navigation.

7
Part Two: The Author/Editor Role: Adding and Editing Text Content If you are an author or an editor—someone who enters Academic Catalog content into the RedDot Content Management System, you’ll need to follow the procedures described here.
Preparing to Enter or Edit Body Content on a Text Page
1. In the CMS system, navigate to the page you want to edit.
Hint: In RedDot, all the navigational tools should be fully functional.
Links in the page header Left-hand navigation Breadcrumbs Right-hand navigation, such as See Also links Hypertext links in the body copy
2. You will see a number of red dots on the page. Each provides editorial access for a particular aspect of the page. When editing a catalog page, only use the [Open and edit this content] red dot. Opening or modifying any other part of the page may result in damage to the catalog and its contents.

Adding and Editing Text Content
8
3. Click on this red dot: [Open and edit this content]. The page will refresh, and the body text area will open.
4. Select the red dot above the text. Remember; do not select any other red dot. The Text Editor will open.
The Text Editor
The only way to edit or add content is to use the Text Editor. The functions available in the Text Editor are very specific, so you should be sure you understand the following sections about entering (adding) and editing text, and, equally important, Part Three of this manual, where text formatting is explained.
There are two different Text Editors: The RedDot Text Editor for PC users, and the FCKeditor for Mac users. While the basics are generally the same, each has a different tool bar. In this manual, we will use the RedDot Text Editor to demonstrate text editing.
Alert: Do not select any red dot other than [Open and edit this content].
While it may not be immediately apparent, performing any action using any other red dot may invalidate your page, or an entire section of the Academic Catalog.

Adding and Editing Text Content
9
The RedDot Text Editor Tool Bar The tools on the RedDot Text Editor are similar to those you’ll find in Word, but there are important differences. The most important thing to remember when editing for the catalog is that most of these tools are used for editing the web site, but not the catalog, as you’ll see by the glossary following this illustration.
Note: Depending on your specific authorization and the specific type of content you’re editing, you may not see or be able to use all the tools you see here.
1 2 3 4 5 6 7 8 9 10 11 12 13 14 15
16 17 18 19
1 Open File Options (Do not use.) 2 Print 3 Cut and Copy 4 Paste Formatted (Never use this tool.) 5 Paste Unformatted Text (Use this tool when pasting.) 6 Undo and Redo 7 Spell Check 8 Insert Symbols (Use only when absolutely necessary.) 9 Switch Text Direction (Do not use.) 10 Unformat Text (Removes bold, italic, or underline.) 11 Bold, Italic, and Underline (Do not use.) 12 Superscript and Subscript (Use only when absolutely necessary.) 13 Font Resize (Never use this tool.) 14 BLOCKQUOTE (Do not use.) 15 Bullets and Numbering (Do not use.) 16 Table Tools (Do not use.) 17 Text Head and Subhead Tools (Use only the H3 header as explained later.) 18 Do Not Wrap Text (Do not use.) 19 Remove/Add Hyperlinks (Do not use.)

Adding and Editing Text Content
10
For Mac Users: The FCKeditor Tool Bar The tools on the FCK Text Editor are similar to those you’ll find in Word, but there are important differences. The most important thing to remember when editing for the catalog is that most of these tools are used for editing the web site, but not the catalog, as you’ll see by the glossary following this illustration.
Note: Depending on your specific authorization and the specific type of content you’re editing, you may not see or be able to use all the tools you see here. DO NOT FORMAT TEXT USING TEXT COLOR OR SIZE COMMANDS, AS THESE WILL NOT MAINTAIN THE INTENDED DESIGN OF THE SITE.
1 2 3 4 5 6 7 8 9 10 11 12 13 14 15 16 17 18
19 20 21 22 23 24 25 26 27 28 29
1. View Source Code (The text editor creates its own HTML coding. Modifying this manually could potentially interfere with formatting when the page is printed or viewed in another browser configuration.)
2. Save (Closes Text Editor and transfers edited contents to Web Content Page.)
3. New Page (Do not Use.)
4. Preview
5. Cut
6. Copy
7. Paste, Paste as (unformatted) Text, Paste from Word (Always use Paste Text.)
8. Print (Since text in the editor won’t show final formatting, this is not very useful.)
9. Undo - Redo
10. Find
11. Find and Replace
12. Select All
13. Unformat Text
14. Format Text: Bold, Italic, Underline, Strikethrough, Subscript, Superscript (Do not use.)
15. Numbered and Bulleted Lists (Do not use.)
16. Reverse Indent and Indent (Do not use.)
17. Align Paragraph: Left, Center, Right, and Justified (Always use Left alignment.)
18. Create and Remove Text Link (Do not use.)
19. Insert Picture (Do not use)
20. Insert Table
21. Insert Horizontal Line (Do not use.)
22. Insert Symbol
23. Foreign Language Keyboard (Do not use.)
24. Text Formatting: Body Text, Headers, etc. (Use only as described in this guide.)
25. Font (Using this will interfere with proper formatting of text in this system.)
26. Font Size (Using this will interfere with proper formatting of text in this system.)
27. Text Color (Do not use.)
28. Background Color (Do not use.)
29. Help

Adding and Editing Text Content
11
Entering and Editing Copy on Your Web Page
There are three ways to enter copy:
Type directly onto the page
Copy text from a Microsoft Word or other text document
Copy text from an existing web page
You can use any of these methods to edit your copy as well. For example, you can edit copy directly by typing on the page. You can also add or replace copy by cutting and pasting, as described below.
Note: Be certain that you understand the instructions for each procedure before you proceed. Failure to follow these directions could cause your page or your entire section of the Academic catalog to fail.
How to Enter or Edit Copy Directly 1. Type your copy on the blank page before you. At this stage, do not format your
copy in any way, other than to separate headers, subheads, and paragraphs by a return, using the Enter key. (You can also use a soft return, which starts a new line but doesn’t separate your lines as in a paragraph.) Your copy will look like this:

Adding and Editing Text Content
12
2. After you format your text, it will look like this while you’re in the Text Editor.
Formatting is explained in Section Three of this manual. Here again, while you see the text formatting, it’s not the same as what you’ll see on the final page.
3. To spell-check your text, select this icon on the Text Editor Tool Bar . After you’ve run the spell-checker, you should proofread your text.
4. Skip to Part Three to learn about formatting your text in the RedDot CMS system.
How to Enter Copy from a Word or Other Text Document 1. With your RedDot Text Editor window open, open the Word or other text document
that contains your content.
In the text document, highlight the text that you want to copy to the web page, and select Edit>Copy. Minimize the Word document on your screen so you can see your Red Dot page.
Hint: You might not want to close the Word document window completely. You’ll probably find it useful as a reference when you format your page in the RedDot Text Editor.
2. On the top menu, click on the button for pasting unformatted text, circled below in red.

Adding and Editing Text Content
13
Warning:
Never use this button (Paste Formatted Text) to paste anything into the Text Editor.
Never use any shortcuts, such as Control+V to paste text into the Text Editor. These will import non-HTML formatting that may interfere with the underlying HTML
code required by your web page. o Your page may not function properly. o The corrupt page may also cause other web pages in the Academic Catalog to
fail, and take down your section of the catalog. o Bullets, numbering, and other formatting copied from Word will not work as
intended. Even if you can’t see the problem, there will be users with other browsers who may see your page as a mess, and the page will not print properly.
3. The copy will appear on the page. If there were any hypertext links on your page, they will not be lost—you’ll see them reappear in the Text Editor. Be sure you check those links before you release your page to workflow.
4. If there were bullets or numbered lists in your original page, they will appear in the Text Editor as characters, not formatting. You should always correct this: failure to do so will cause your page to display improperly.
5. To learn how to recreate and format bullets and numbered lists—and how to format the rest of your text--go to Part Three: Formatting Text with the Text Editor.
6. To Spell-Check your text, select this icon on the Text Editor Tool Bar . After you’ve run the spell checker, you should proofread your text.
How to Enter Copy from a Web Page 1. With your RedDot Text Editor window open, open another web browser window.
Hint: You can open more than one instance of Internet Explorer at a time, and view a different web site in each. In Firefox you can use the Tab feature to open additional windows.
2. On the web page, highlight the text you want to copy to your new page. If a picture is included in the highlighted area, that’s ok.
3. Select Edit>Copy. Minimize the Internet Explorer page you are using as your source (or, in Firefox, select the tab for the Red Dot Window) so you can see your RedDot page.

Adding and Editing Text Content
14
Hint: You might not want to close the source window completely. You’ll probably find it useful as a reference when you format your page in the Red Dot Text Editor.
,
4. On the top menu, click on the button for pasting unformatted text . The copy will appear on the page.
a. Pictures or images you may have copied will not appear on your new page.
b. In places where there were paragraph breaks on the web page, extra space will appear between paragraphs in the Text Editor. RedDot has read each paragraph break as two. Delete the extras using your backspace or delete keys.
c. Bullets, numbered lists, and some other formatting will be lost, and you will have to recreate them in the Text Editor.
d. Note that some links will not copy from the original web page, so you’ll need to rebuild them in the Text Editor.
Warning:
Never use this button (Paste Formatted Text) to put anything in the Text Editor.
Never use any shortcuts, such as Control+V to paste text into the Text Editor. This will import formatting that may corrupt the underlying HTML code of your web page. o Your page may not function properly. o The corrupt page may also cause other web pages in your Web site to fail, and
take down your site. In addition, bullets, numbering, and other formatting copied from Word will not work as intended. Even if you can’t see the problem, there will be users with other browsers who will see your page as a mess.
5. To spell-Check your text, select this icon on the Text Editor Tool Bar: . After you’ve run the spell checker, you should proofread your text.
To format the rest of your text, go to Part Three: Formatting Text.

Formatting Text
15
Part Three: Formatting Text The Importance of Proper Formatting Each page of the Suffolk University Web Site is based on a carefully crafted design that has been reviewed and approved by a committee of administrators from across the University. These page designs serve a number of important functions including:
• Presenting a visually attractive interface
• Being easy to navigate
• Meeting basic standards of usability
• Being accessible to visitors who may face significant challenges in using the Web
• Ensuring that your page appears properly in different web browsers, and on different computers
These designs help present Suffolk to the world outside, and to our colleagues within.
They also ensure that future changes to our site can be implemented efficiently and effectively.
Our online Academic Catalogs require an additional consideration. Because the catalog is a legal document, it must be formatted in a manner that allows the web and print-friendly versions to match.
All of the text in a catalog page is controlled by Cascading Style Sheets (CSS), a programming language that applies styles, or formatting, to the content on our site.
Some of the formatting that is applied to your content is automatic. Fonts, font sizes, and text placement, among other things, will be controlled by the CSS. You will still have a limited number of options as to how you set up your page. This formatting is based on your selection of “styles”, such as page headers (the page name), subheads (H3 in the Text Editor), or body text.
If you modify your text other than by using the prescribed styles or formats as identified and defined in this manual,
• You defeat the efforts of your colleagues across the University in creating a well-ordered, user-friendly catalog.
• You make it costly and difficult to publish the print-ready versions
• You risk that your pages will malfunction for some of our visitors. Different web browsers and computer platforms see web pages differently, and, although you may not see a problem, your page could break down for someone else or, at a minimum, not be viewed the same way you see it.
The following formatting information represents conventions that have been reviewed and accepted by Web Services (for the University), the College, and the Sawyer Business School. Please do not deviate from these practices.

Formatting Text
16
You should become familiar with these conventions to help you better understand your role as a Content Author, Editor, or Publisher, in formatting text. The only formatting you should apply to your content is explained in this section of your Guide.
Attention: All approved formatting is explained in this manual. So a good rule of thumb is that, if you don’t see it in this manual, don’t do it. If you have a question about formatting, contact your Web Administrator, listed in the Addendum.
Formatting Your Text
Note: You should always spell-check and proofread your text before you format it. This will avoid having to make changes that may disrupt the formatting after you’ve spent the time to make your page look good.
After you’ve formatted your text, you should spell-check and proofread again. Errors can creep in at any stage of the process, but if they sneak through to the final page when it’s posted on the web site, they can be embarrassing to you and your department.
Body Text
Any text that is not a header or subhead is body text. Its font, size, color, and alignment are determined by the CSS. Fonts are controlled by the CSS. You should never change the font, font size, alignment, or color of any text.
All text is left-aligned. It is never centered or justified. There are no hanging indents; the first line of a paragraph is aligned with the following lines. And the indent of bullets is automatically determined.
If some of your body text is accidentally converted to a header or subhead, look at the top tool bar, and click on the header button that is highlighted. This will toggle it off, and your text will return to normal.

Formatting Text
17
Headers and Subheads When you are working on the Academic Catalogs, the only modification from body text that you will use is the H3 subhead.
Note: Each button is a toggle. So let’s say you highlight a line of text and make it an H3 subhead by clicking on the H3 button. Later, you realize that you don’t want it to be a subhead after all. Just highlight the text again, click H3, and the H3 formatting is removed. If you’re not sure what header level you’ve assigned to some copy, you can just click on the copy, and the appropriate button will be highlighted. Another way to unformat your text is to use the Unformat Text button (A in the circle above).
The H3 Header The H3 header is the subhead used for all subject or topic breaks within a page in the Academic Catalogs.
To make an H3 subhead, make sure that the text is on its own line, highlight the text, and click H3. When you create a subhead, the font, size, and color of the text is determined by the CSS, and should never be changed.
Bold Text Bold text is not used in the body text of the Academic Catalog, or as a header or subhead. For headers or subheads, use the H3 tag described above.
Using Capital Letters Use capital letters appropriately. Never write a word, a header or subhead, or a full sentence in all caps.
Underlining Never use underlining on an academic catalog page. The convention of the Web is that underlining is reserved for links.
Italics Italics should only be used for the titles of publications, following the conventions stated in the Chicago Manual of Style. It is available online at http://www.chicagomanualofstyle.org/home.html.

Workflow
18
Part Four: Submitting and Reviewing Pages in Workflow
Before the Suffolk University Academic Catalogs are made available to the public, they must be reviewed to make sure there are no errors. Each page may be checked several times by different people.
Standard Criteria for Reviewing an Online Catalog Page
Everyone in a department or school who looks at the page—the Author who created it, as well as the Editor and Publisher— should review the content on each page before it is published. Of course, common sense will tell you a lot about whether a page is ready to be published, but, at a minimum, always keep these criteria in mind.
• Does it represent the University in an appropriate manner?
• Accuracy of information
• Spelling
• Grammar and punctuation
• Text formatting—All headers and text conform to Section Three of this Guide. Note that irregularly formatted text should be returned to the author for correction.
• Respect for copyright—never use copyrighted material without explicit written permission. Remember, everything you find on the Web, including pictures, is protected by copyright.
• Does everything align as it should on the web page?
• Are sentences short and easy to read? Are paragraphs broken into easily scanned chunks? A paragraph that’s more than five lines long on the page is getting difficult to read.
• Are headers used in a manner that will be consistent with the printer-friendly version? Is the copy concise, presented exactly as it should appear in a print or PDF version of the catalog?
• Are any links working as they should?
If all of these criteria have been met, and you feel that the page is ready to be posted to the web site, you can move it along to the next step in the workflow.
Whenever a new page is created or when an existing page is modified, it must meet all of these criteria before it can be published. The approval process takes place within a workflow that extends from
• Your department
• Through the Office of the Dean
• To the Registrar

Workflow
19
• To ITS Web Services.
Within that workflow, various individuals are assigned roles to assure the success of this process.
Workflow Roles
Each individual who has access to RedDot is assigned a specific role. Each role has specific responsibilities.
Author Each academic department has an Author who enters content into the RedDot system. In many cases, the Author isn’t the person who wrote the content. The Author may simply be cutting and pasting content (or creating new pages) at the request of someone else in the department.
Department Editor In many academic departments, one or more Editors review the page after it is authored. If the page needs corrections, an Editor can return the page to the Author to have those corrections made. Generally, the Editor does not actually make the corrections on the page. If the Editor does make corrections on the page, he or she becomes the Author of record and cannot send the page back to the original Author for revision.
If the Editor finds that the page is correct, he sends the page on to an intermediary editor or to the Office of the Dean.
Office of the Dean Editor All pages that have been approved by the Department or an intermediary editor are reviewed by the Office of the Dean. Pages that are accepted move forward in the workflow. Pages that have errors are returned to the Author, with comments. The corrected page then moves forward through the department editor, and back to the Office of the Dean for approval. If the Office of the Dean makes corrections on the page, they become the Author of record and cannot send the page back to the original Author for revision.
Office of the Registrar Pages released by the Office of the Dean pass through two levels of tracking and review in the Office of the Registrar. Note that the Registrar does not review for accuracy of content, spelling, or grammar. Following approval, each page is sent forward to ITS Web Services.
ITS Web Services Web Services reviews each page for technical functionality. If a page is properly functional, it is released for publication. If changes need to be made, Web Services may either:

Workflow
20
• Return the page to the Author, and it will pass through the editorial and review cycle again
• Correct technical problems that cannot be addressed at the Author level.
If the page is ready to go live, the Web Services releases the page for publication
The Publication Time Line
There are many steps to publishing the catalog. More than a hundred individuals contribute to the process, some working independently, and some working together. Unlike other CMS processes, where completed pages are generally available for viewing within days of submission, catalog pages, even after they are released, are not immediately available for viewing.
This schedule indicates how the process works, leading up to the date the catalog is released.
Workflow Calendar, 2010-2011 Catalog
DATE STEP November 13 to December 11, 2009
Content development in department or program
December 11, 2009 Content is due to Office of Dean February 8, 2010 Content is due to Registrar February 10, 2010 Content is due to ITS Web Services February 10 to February 24, 2010
Review period in OpenText (RedDot
February 24, 2010 All final corrections are due February 24, 2010 Final Course Descriptions uploaded March 3 to March 9, 2010
Final Review Period on WebStage
March 10, 2010 Publication of Catalog
The Author’s Role: Submitting and Correcting Pages When a page is created, it is only available (visible) in the account of the person who is working on that document. By submitting your files into the workflow, you make them visible to all RedDot users. Until a page is submitted, it cannot be reviewed or published to the live web site.
As an Author, you can submit pages you have created or edited. You can also correct and resubmit any pages that have been returned to you by the Editor or Publisher for your department or area.
If you want to submit a page, go to the Select Tasks window. Pages saved as draft are pages that you have authored, or that you have edited, in which case you will now be listed as the Author.

Workflow
21
1. When you have one or more pages to submit to workflow, or you want to review pages as an Editor or Publisher, click on the Task button of the RedDot left-hand menu.
This will take you to the Select Tasks window. Click on Edit Pages to open the Pages Saved as a Draft. Depending on your role, you may see different options in the Select Tasks window.

Workflow
22
1. Click on the text circled above to open the list of pages waiting to be submitted. A list of all pages that have been saved as draft will open. You can change the display and sort options for this screen by clicking on the links at the top of the menu.
Note: When you create or modify a page, it will appear in your Select Tasks menu as a draft page. This means that the page is still in your workspace, until you decide that you are finished making changes, and you are ready to submit it.
2. If a page is new, you can preview the page (click on the binocular icon ), and if it’s
revised, you can also look at the changes in redlining mode.
3. To go back and change the page, click on the page name, and it will open.
4. To submit your page(s) to workflow, either click on the checkbox to the right of each page you want to upload (left circle) or, if you want to submit all the pages on your list, click the “Select all entries of this results page” checkbox below. You can also submit individual pages using the green checkmark icon to the left of the page name, or, if you have made a change that you don’t want to submit, you can cancel the change using the red “x” icon (Undo Changes).
Note: Remember that, even if you’ve only added one new Web page to your site, you may have several “pages” to submit. For example, you may have pages named “Pagename,” “Pagename Sub Nav,” “Pagename Content,” and “See Also for Pagename” (a

Workflow
23
right hand navigation element). Together, all of them make up the actual web page, and all of them should be submitted to workflow.
5. Then select Submit Selected Pages to Workflow.
If a page has been returned for revisions, you can open it from the “Select Tasks” window. A Rejection window will open, explaining why the page has been sent back for corrections.
To correct the page, click on the page name to open it. After you have made all the requested corrections, you can submit this page to workflow again.
The Editor’s Role: Reviewing Pages for Content and Formatting
The Editor in the department reviews pages submitted to workflow by an Author in his or her department or area. The Office of the Dean reviews pages submitted to workflow by the Department.
Note: It is recommended that Editors do not circumvent the editorial process by making corrections to pages, as this will change the Editor to an Author within the RedDot system. The original Author will no longer be able to see the corrections, or be able to make further corrections until after the page is published.
An editor should review each page based on the Standard Criteria for Reviewing an Online Catalog Page, above. To begin reviewing pages, select Tasks in the left hand menu of the RedDot screen. The Select Tasks window will open. If there are pages waiting for release, they will be indicated in this window as well as any pages you have submitted for review, and pages you may need to correct.
Workflow
24
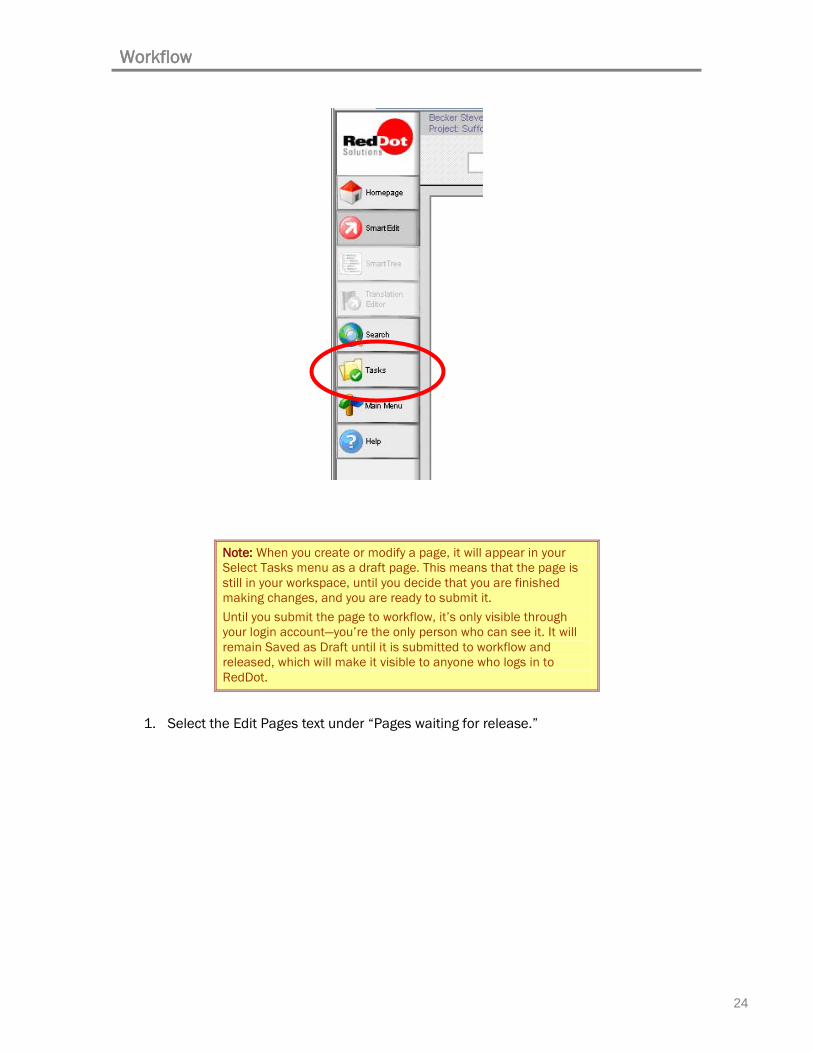
Note: When you create or modify a page, it will appear in your Select Tasks menu as a draft page. This means that the page is still in your workspace, until you decide that you are finished making changes, and you are ready to submit it. Until you submit the page to workflow, it’s only visible through your login account—you’re the only person who can see it. It will remain Saved as Draft until it is submitted to workflow and released, which will make it visible to anyone who logs in to RedDot.
1. Select the Edit Pages text under “Pages waiting for release.”
Workflow
25
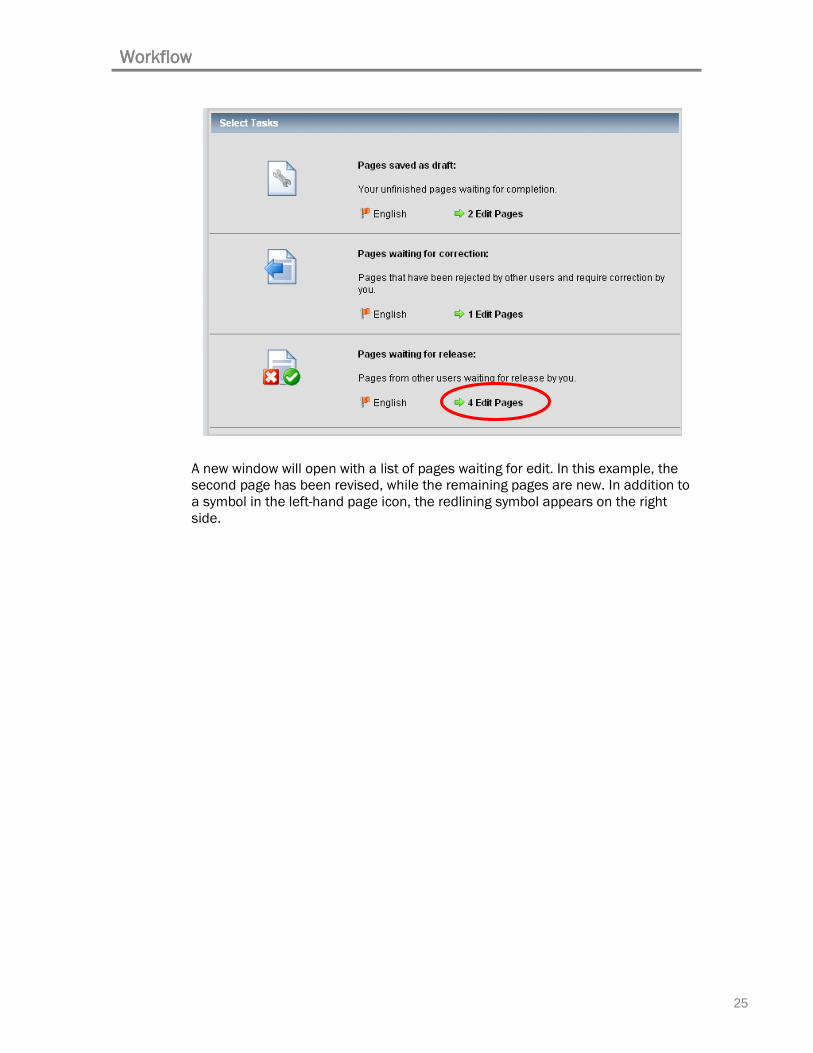
A new window will open with a list of pages waiting for edit. In this example, the second page has been revised, while the remaining pages are new. In addition to a symbol in the left-hand page icon, the redlining symbol appears on the right side.

Workflow
26
To review a revised page, you can click on the binoculars to see the finished result, or the “r” icon to see the changes in redlining mode.
In some instances, you may need to look at the page in redlining mode, to determine just what’s wrong with certain formatting errors. You can open the page by clicking on the name of the page, and then open the Text Editor. But be careful to click Cancel, not Save or OK to close the Text Editor, or you will become the Author of the page, and you won’t be able to send it back for correction.
2. If a page needs changes, click on the red x icon for that page. A text window will open for your comments. Type in whatever instructions are necessary to help the Author make the required changes. If more than one person might have reviewed a page, it’s a good idea to identify yourself by name in closing.
3. When all of your changes are documented, click the OK at the bottom of the window, and the page will be sent back to the Author, who can then make the changes and resubmit the page.

Workflow
27
4. If, after you’ve examined a page, it meets all the criteria for a good web page, you can release the page to the Publisher, who will do a final check and then release the page for publication.
The Office of the Registrar and ITS Web Services: Tracking, Reviewing, and Releasing for Publication The Office of the Registrar and Web Services operate on the assumption that content, spelling and grammar, and text formatting are correct. They review the page for tracking purposes, and for technical functionality, prior to releasing any page for publication. To properly track and release a catalog page, this final process may involve three or more reviewers. Until all of them have completed their work, a page will not appear in published mode.

Additional Features
28
Part Five: Additional Features of Red Dot CMS
In addition to the many capabilities described throughout this manual, the Red Dot Content Management System offers additional functionality via the top menu. While you’ve already used a number of features supported by this menu, this chapter will help you access that additional functionality.
When you open any part of a page, such as the foundation page or the content, a menu appears at the top of your RedDot Screen. At the top, it tells you which page you’re editing, identifying your page by its name and page ID.
The tools you may have occasion to use are listed under Properties, Actions, and Page Information. The other functions, Linking, Keywords, and Notes, are used for specific purposes that are covered in other areas of this manual, and should not be used except in the context of those purposes.
Properties The Properties function is very simple. It allows you to change the name of a page. If you click on the Properties button, a drop-down menu will open.
To change the name of the page, simply type in a new headline and click OK. Note that, when you change the name of a Foundation Page, it will change the page header and any left-hand menus where the page appears.

Additional Features
29
Warning: Never enter anything in the File Name text box. RedDot uses a very specific file naming system, and changes could have unintended impacts. There may be rare instances where it is acceptable to change a file name. If you believe a file name should be changed, contact your Web Administrator.
Actions Click on Actions to open the page actions menu. This offers a number of capabilities, although, depending on your level of authorization, not all of them may be available to you.
Additional Features
30
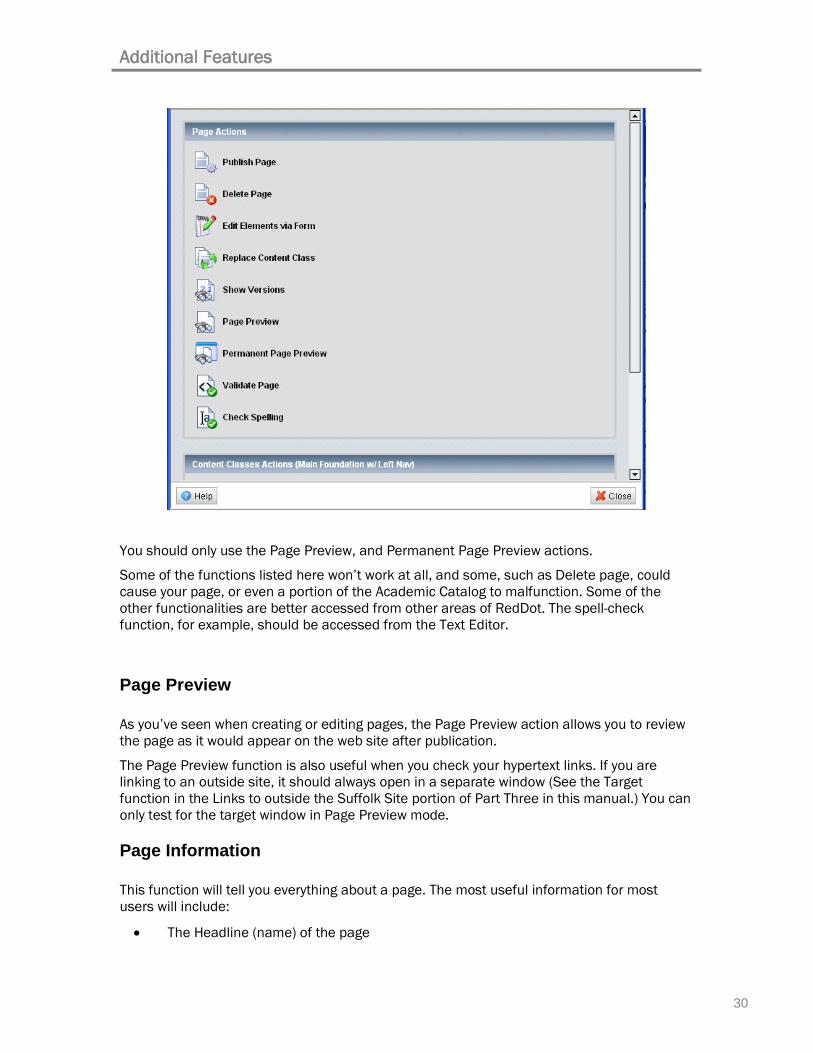
You should only use the Page Preview, and Permanent Page Preview actions.
Some of the functions listed here won’t work at all, and some, such as Delete page, could cause your page, or even a portion of the Academic Catalog to malfunction. Some of the other functionalities are better accessed from other areas of RedDot. The spell-check function, for example, should be accessed from the Text Editor.
Page Preview As you’ve seen when creating or editing pages, the Page Preview action allows you to review the page as it would appear on the web site after publication.
The Page Preview function is also useful when you check your hypertext links. If you are linking to an outside site, it should always open in a separate window (See the Target function in the Links to outside the Suffolk Site portion of Part Three in this manual.) You can only test for the target window in Page Preview mode.
Page Information This function will tell you everything about a page. The most useful information for most users will include:
• The Headline (name) of the page
Additional Features
31
• The page ID number
• The content class
• The status of the page
In the example below, the page was last released by MSCHNEIDER on 8/23/2006, was being edited by SBECKER on 3/27/2007, and is locked because that final edit is still in edit mode and has not been released. It also tells when the page was created, and by whom.

Additional Features
32
Troubleshooting
33
Part Six: Troubleshooting Bugs and Issues
Occasionally, you may find what appears to be a bug—a functional issue—where something doesn’t work the way you expect. It may just be a bug, or it may be that you just don’t know how to perform a specific task—that happens to all of us from time to time.
Review the instructions below to see if you can correct the problem. If the issue isn’t listed here, or if you need to do something that isn’t covered in this manual, contact the appropriate Web Administrator, as listed in the Addendum.
Pop-up Windows Don’t Open If you’re working on a PC, you may find that one or more of the Red Dot pop-up windows won’t open. Most often, this will happen when you are using the Asset Manager. If it happens, to you, check your Internet Explorer pop-up blocker preferences. The preferences must allow pop-up blockers in IE, and in Google or Yahoo if either of these toolbars is showing.
Changing IE Pop-Up Preferences 1. Open Internet Explorer. 2. On the tools menu select Pop-Up Blocker.
If Pop-up Blocker Settings is grayed out, then the IE pop-up blocker isn’t causing your problem. If Pop-up Blocker Settings is available, select it to open the dialog box.
3. Under Address of Web site to allow, type: http://srv-ganymede/cms/ and select Add. 4. Under Notifications and Filter Level, check both boxes. 5. Under the Filter Level pull-down menu, select Low: Allow pop-ups from secure sites. Your dialog
box should look like is:

Troubleshooting
34
6. Close the Dialog box.
Changing Google Pop-up Preferences The Google toolbar is configured to prevent pop-up windows. When a pop-up is blocked, you’ll see this icon in the toolbar:
1. Click on the “blocked” button and it will change to “Pop-ups okay.”
The System Is Slow or Nothing Happens Sometimes, activities such as system maintenance, page publishing, or an unusual number of users on the system may slow things down. And depending on how many users are on the system, it might take a few moments for the system to respond. If you become impatient and click on the link again, it will start again from the beginning, and may take longer.
I’ve Been Logged Off

Troubleshooting
35
Sometimes, technical issues may require that system administrators log everyone off the system. If this happens, you can log in again at a later time (sometimes, you can log back in right away).