2008 Rattlers Playbook Draft Power Point 1-23-08
155
RATTLERS OFFENSE Offensive Terminology
-
Upload
skip-foster -
Category
Documents
-
view
150 -
download
12
Transcript of 2008 Rattlers Playbook Draft Power Point 1-23-08

RATTLERSOFFENSE
Offensive Terminology

YZ
T C G
X
QBFB
Putting The Ball Into Play
BALL
5 yards
10yards
BallOffensive Huddle
BENCH
Rattlers Offensive Football
Huddle:
1. The Offensive Center will set the huddle 6 yards from the Line of Scrimmage and directly behind the ball. He will face away from the ball and make a “HUDDLE” call. All other players will form a “U” huddle around the QB.
2. Hustle at all times into and out of the Huddle. We have 25 precious seconds.
3. The QB will be the last man into the huddle after receiving the play from the coach.
4. When the QB steps into the huddle he must have command of the entire offensive team. All offensive personnel should stop talking and focus on the QB.
5. Our Huddle will reflect our offensive team. If we are sharp, up-tempo, poised, and aggressive that is how are opponents will perceive us. HUSTLE, HUSTLE!!!!!!!!!!!

C. EXAMPLES
F. The "CADENCE" will be referred to as a non-rhythmic snap count. The QB Should Change the Rhythm of the snap count and use his voice to hold the defensive linemen. It is the offensive team's job to get off on the QB's cadence.
1. We will rarely go on ONE.2. We will usually go on TWO or THREE.3. To start any plyer in motion, the QB will use a heel kick to start the motion. 4. "EASY, EASY" Call made by the QB if he wants to restart his cadence.
G. HARD COUNT- The hard count is referring to the QB adding Voice Influction to the Cadence. This is vital in Arena Football to hold the Defense from timing up the snap count. The hard count is the QB's ability to use our non-rhythmic count and voice alterations to try and get the defense to jump.
1. Quarterback will give the 1 Minute Offense Signal. 2. He will then call a right or left call to set the formation. 3. Right or Left will also declare either 52 protection=Right or 53 protection= Left. 4. He will then give the Recievers a hand signal for the following. a. HANDS DOWN is ALL STOPS. b. 1 FINGER STINGER is Sting Switch. c. FIST IN HAND is Smash. d. BENCH PRESS action is Benches. e. CROSSING FINGERS is Crossers. f. INDEX FINGER CIRCLING IN TORNADO is Storm. 5. The QB can tag any route with a HITCH by pointing(tagging) the reciever and pointing to his heel.
H. 1 Minute Offense. We will use this formation at the end of the half or end of the game when we are in a HURRY UP situation. Every player on the offense must respond with a sense of urgency as well as maintaining composure.
D. When the QB says "READY BREAK" in the huddle, all eight players should then say all together "READY BREAK". Remember we must establish an attitude from the huddle on how wwe plan to attack the opponents defense. Our attitude in and out of the huddle will be reflective of our offensive success.
A. When the QB steps into the huddle all eyes and focus is on his instructions. All other players stop talking immediately. B. QB will then Call " FORMATION, BACKFIELD SETS, MOTION, PLAY, SNAP COUNT NUMBER, SNAP COUNT NUMBER.
Play Calling In the Huddle
RIGHT Z LOOP 52 Double Post ON ONE, ON ONE, READY BREAK !!
E. QB cadence at the line of Scrimmage. Go.........Hut.......Hut.......Hut

YZ
T C GX
QB
FB
Y
ZT C G X
QB
FB
Formation = Right
2 Reciever Side Routes or Package = Smash (Package Route For Y & X.
Tagged Route- (Term Used to change Y's Route to a Delay Slant)
PASS PLAY
RUN PLAY
Formation = Right
Motion = Z Loop
Play Calling System For Run and Pass
Right Y Zoom 92 Smash Hitch
Protection = 92
1 Receiver Side Route = 5 Yard Hitch Route
Right Z Loop 26 Quick Pitch
Run Play = 26 Quick Pitch
Motion = Y Zoom

Offensive Series System
Ten Series
Thirty Series
Fourty Series
Fifty Series
Sixty Series
Seventy Series
Eighty Series
Ninety Series
Twenty Series
We will use a series system to call our offensive plays. The first number indicates the series of play and the second number will indicate play direction.
Passing Game= Sprint Out or Dash Passing Game
Passing Game= Play Pass Passing Game.
Run Game= Draws.
Passing Game= 3 Step Drop Passing Game.
Run Game= Base Dive.
Run Game= Misdirection Counters
Passing Game= 5 Step Drop Passing Game.
Passing Game= Quick 3 Step with Cutblocks or Hard Set rules for OL.
Run Game= Quick Pitch, Sweep or Iso

TE C RG X
z QB Y
FB
21 43 65
AABC B C
NE
BC FCS
JDefensive Positions
Offensive Positions
0
Offensive Hole Numbering
Defensive Gap Responsiblities
Offensive and Defensive Position Symbols
7
PE

TT
T T
Near
Far
BACKFIELD SETS
Gun
HOME

TY
ZX
F
T
Y
ZX
F
T Y
Z X
F
T
Y
ZX
F
TY
Z X
F
T
Y
ZX
F
T
Y
Z
X
F
T
Y
ZX
F
TY
ZX
F
T
Y
ZX
F
T
Y
ZX
F
T Y
Z X
F
T
Y
ZX
F
T
Y
ZX
F
RIGHT SLOT LEFT SLOT
RIGHT
RIGHT OVER LEFT OVER
Offensive Formations- We will call the formation by a word association. We will call a right or left call and then tag the formation to what we want.
LEFT
Z RIGHT
X RIGHT
Z LEFT
X LEFT
RIGHT UP LEFT UP
X RIGHT UP- X and Y Switch positions and Y is now at #1 position off the line and X is at #2 position and on the LOS.
X RIGHT UP- X and Y Switch positions and Y is now at #1 position off the line and X is at #2 position and on the LOS.
RIGHT TIGHT
X will still be considered by origninal alignment the #1 receiver but he will now split the difference between the guard and dasherboards.
X will still be considered by origninal alignment the #1 receiver but he will now split the difference between the guard and dasherboards.
LEFT TIGHT
Wing- moves the Z to a WING position to the TE side.

T
Y
ZX
F
T
Y
ZX
F
T
Y
ZX
F
T
Y
ZX
F
T
Y
ZX
F
T
Y
ZX
F
T
Y
Z
X
F
T
Y
ZX
F
T
Y
ZX
F
T
Y
ZX
F
T
Y
ZX
T
Y
Z
X
F
T
Y
ZX
F
T
Y
ZX
F
F
RIGHT TRIPS LEFT TRIPS
RIGHT BUNCH LEFT BUNCH
RIGHT TREY LEFT TREY
RIGHT CLUMP LEFT CLUMP
Offensive Formations Continued
5 yd5 yd
RIGHT RAGE LEFT RAGE
RIGHT BUNCH WIDE
5 yd
RIGHT SOLID
5 yd
LEFT SOLID
X RIGHT TRIPS= X goes to #2 and Y goes to #1Z RIGHT TRIPS= Z goes to #2 and Y goes to #3
X LEFT TRIPS= X goes to #2 and Y goes to #1Z LEFT TRIPS= Z goes to #2 and Y goes to #3
LEFT BUNCH TIGHT
5 yd

T X
FB Y
Z
X
FB
YZ
X
FB
YZ
X
FB
YZ
BIG
TAILBACK
Offensive Formations Continued HEAVY PERSONNEL GROUPINGS
RIGHT JUMBO (REGULAR PERSONNEL)
HEAVY
HAMMER
HOGS
5 Yd.
Linemen
We will use the following personnel groupings in situational opportunities within a game. When we call regular personnel groupings this is referring to the players we have in the game. This is not a formation call.
"H" Personnel groupings refers to Linemen replacing recievers.Heavy- 1 Linemen in to replace Z. Regular Fullback Hammer- 2 Linemen in to replace Y and Z. Hogs- 3 Linemen in to replace X,Y and Z.
Jumbo-Regular personnel. FB lines up at wing to call side. Z lines up in Backfield
Linemen Linemen
LinemenLinemen
Linemen

X
QB
FB
YZ
X
FB
YZ
X
FB
YZ
TX
FB
YZ
HEAVY PERSONNEL GROUPINGS
Fullback
FAT
FullbackLinemen
Fullback
FLABBY
Linemen
Linemen
Offensive Formations Continued
PISTOL- The QB moves to the Z Reciever and the Z becomes the QB.
FUZZY
We will use the following personnel groupings in situational opportunities within a game. When we call regular personnel groupings this is referring to the players we have in the game. This is not a formation call.
"F" Personnel groupings refers to Fullbacks and Linemen replacing recievers.FUZZY - 1 Fullback replaces Z receiver. FLAY 1 Fullback replaces the Y receiver.FAT- 1 Fullback replaces the Y and 1 Linemen replaces the Z. FLABBY- 1 Fullback replaces the Y and 2 Linemen replace the X and Z.
Fullback
FLAY

T
Y
ZX
F
T
Y
ZX
F
T
Y
ZX
F
T
Y
ZX
F
T
Y
ZX
F
T
Y
ZX
F
T
Y
ZX
F
TY
ZX
F
TY
ZX
F
T
Y
ZX
F
Y
ZX
T
Y
ZX
F
T
Y
ZX
F
T
Y
ZX
F
T
F
RIGHT Z CRAZY
LEFT Z FLY
LEFT Y CRAZY
LEFT TIGHT Z INSIDE
RIGHT Y ZOOM LEFT Z ZOOM
LEFT UP X INSIDE
RIGHT TREY Y FLY
RIGHT CLUMP Y PLUNGE
RIGHT Y QUICK LEFT Z QUICK
RIGHT BUNCH WIDE Y INSIDE
RIGHT BUNCH Z OUTSIDE LEFT TIGHT Y OUTSIDE
Wide Reciever Motions- Zoom, Quick, Crazy, Inside, Outside, Divide, Plunge, Fly

T
F
T
Y
ZX
F
T
Y
ZX
F
T
Y
ZX
F
Y
ZX
T
Y
ZX
F
T
Y
ZX
F
TY
ZX
F
T
Y
ZX
F
T
Y
ZX
F
T
Y
ZX
F
T
Y
ZX
F
T
Y
ZX
F
T
Y
ZX
F
T
Y
ZX
F
LEFT Z FLY
LEFT TIGHT Z INSIDE
RIGHT Y ZOOM LEFT Z ZOOM
LEFT UP X INSIDE
RIGHT TREY Y FLY
RIGHT CLUMP Y PLUNGE
RIGHT Y QUICK LEFT Z QUICK
RIGHT BUNCH WIDE Y INSIDE
RIGHT BUNCH Z OUTSIDE LEFT TIGHT Y OUTSIDE
Wide Reciever Motions- Zoom, Quick, Crazy, Inside, Outside, Divide, Plunge, Fly
RIGHT TREY Y DIVIDE LEFT TREY TIGHT Z DIVIDE

Offensive Terminology• Bunch- Offensive formation where all 3 receivers line up in a tight triangle
formation. • Counter- Misdirection run play either by using multiple RB’s and fakes or
misdirection by the offense to create flow one way by the defense and run the ball in the opposite direction.
• Coming Out- Area of the field from the Goaline to the 10 yard line. • FIB- Abbreviation for Formation Into Boundary• Formation- The alignment of the offense. • Footwork- Movement of the feet for any position in football to obtain the
most desirable body position used in a play. • Gadgets- Special plays grouped together to be deceptive to the defensive
unit. • Gap Responsibility- A defensive term used to define the
spacing/relationships from one defender to the next within a formation. • Goal Line- Area of the field from the +5 to the Goal Line.• Hand Carriage- Positioning of the Hands in the pass protection position
by any offensive pass blocker. • Hard Count- Voice inflection used by the Quarterback to entice the
defensive team to jump off sides.• Hole Numbering- A number designed to the gaps in the offensive LOS
from one side of the field to another. • Huddle- Term used to define the offensive teams alignment to receive the
play from the QB. • LOS- Abbreviation for Line of Scrimmage.• Motion- Any type of movement by the eligible receiver off the LOS prior to
the snap. • Over- Formation term used to tell a specific receiver to line up on the
opposite side of the ball. This term for us will be to declare to the X that he will begin the offensive formation in an over alignment.
• Passing Game- Offensive reference which groups all plays designed to forward pass the football.
• Posture- Reference for pass protection to the body in positioning for pass protection.
• Protection- The reference to protecting the Quarterback by the team in a scheme of a pass play.
• Quick Pitch- Run play on offense between the Quarterback and Running back.
• Red Zone- Area of the field from the +15 yard to the +6 going in.

Offensive Terminology Continued• Running Game- Offensive reference which groups all plays designed to
run the football. • Series System- A numbered system to call offensive run and pass plays
by grouping them into similar plays. • Screens- Pass play thrown behind the LOS to utilize downfield blocking
by other offensive team members.• Shift- Movement by any number of offensive players prior to the snap. All
offensive members must be set for 1 second prior to any motion or the ball being snapped.
• Slot- A tight alignment next to the Guard by a receiver. (Same as a Wing to the Guard side)
• Stance- The position of the body in the most efficient way for his position prior to starting the play at the LOS.
• Tagged Route- Reference to changing a specific route in a pass play. • Tempo-The pace of the game which you attempt to set in a game. This
can be Up or Slow down.• Trade- Term used to change places by two receivers. In Trade formation
the X and Z flip flop from one side of the field to the other. • Wing- A tight alignment next to the Tight End by a Receiver. (Same as a
Slot to the Tight End Side)• MOTION DEFINITIONS• Crazy Motion – Typically short motion to the top of the ball and back to
the original side of field.• Deadset- Offensive formation with no motion.• Divide – Motion where a receiver motions between two other receivers on
the same side of ball.• Fly- Fast horizontal motion by any eligible receiver. • Inside- Any motion where the receiver is motioning inside another
receiver or receivers. • Loop- High motion from one side of the ball to the other side of the ball. • Outside- Any motion where the receiver is motioning outside another
receiver or receivers.• Plunge- High motion into the line of scrimmage. • Quick Zoom – Short 2 step motion by any receiver to surprise the
defenders.• Zoom – High motion on the same side of the ball.

OFFENSIVE PENALTIES• Offsides 5 Yards• Illegal Kick 5 Yards• Illegal Forward Pass 5 Yards• False Start 5 Yards• QB Head bob 5 Yards• Illegal Snap 5 Yards• Delay of Game 5 Yards• Spiking 5 Yards• Quick play before ref is set 5 Yards (after warning)• Excess Time Out 5 Yards• Illegal Address of Official by non captain 5 Yards• 5th Time out for injury 5 Yards• Illegal Eligibility 5 Yards• Failure to Report an Eligible Receiver 5 Yards• Return of player with illegal equipment 5 Yards (Must sit out 2
downs)• Illegal Motion 5 Yards• Illegal Formation 5 Yards• More than 8 players 5 Yards• Ineligible beyond LOS before Pass Thrown 5 Yards• Assisting Runner 5 Yards• Illegal Shift 5 Yards• Illegal Bat 5 Yards (Loss/down • Illegal Return of Injured player 10 Yards• Substitute Enters While Ball in Play 10 Yards• Crowd Noise- or fans throwing objects on field 10 Yards• Illegal Cut 10 Yards• Offensive Pass Interference 10 Yards• Pass touched/ caught by ineligible beyond LOS 10 Yards• Contact by Ineligible beyond LOS 10 Yards• Striking/ Kicking Opponent (or missing) 10 Yards• Unnecessary Roughness 10 Yards• Clipping 10 Yards• Illegal Crack back 10 Yards• Chop Block 10 Yards• Unsportsmanlike Conduct 10 Yards• Hands on Official (disqualification) 10 Yards• Non-player foul 10 Yards• Palpably Unfair Act 10 Yards• Illegal Entry to Field 10 Yards• Holding 10 Yards• Substitution Violation 10 Yards• Sideline Control (3rd, 4th violation) 10 Yards• Helmet Removal 10 Yards• Illegal block from behind above waist 10 Yards• Hands to the Face 10 Yards• Illegal Pass Loss Of Down• Intentional Grounding Loss Of Down• Illegal Bat Loss Of Down• Illegal Kick Loss Of Down• Second Pass Loss Of Down• QB crosses LOS and returns Loss Of Down• Pass touched/ caught by ineligible Loss Of Down• Backwards pass deliberately out of bounds Loss Of Down Loss Of Down

RATTLERSOFFENSE
Offensive Pass Protections

Rattlers Football “Protecting the QB”
We must be able to protect the QB to be successful in Arena Football. The defense is limited in what they can do to put the pressure on the QB. We must NEVER ALLOW the QB to be pressured or sacked. Pressure from a pass rush can result in loss of yardage, turnovers and disruption of timing between the QB and receivers.
Sound protection is based on effective blocking techniques and effort. Blown assignments resulting in unblocked pass rushers should never happen in our game. The defense can only rush 4 players; we know which 4 can come and all are limited in the stunts they can use.
We must anticipate the snap count, set quick, hands up looking thru the window and always be prepared to step and strike. We need to outwork our opponents for 5 seconds and then hustle downfield to help your teammates or recover a loose ball. Remember, you are the most important man in every play.
In Arena Football, the pass rush can get on the QB much quicker than the 11 man game. The offensive blockers must have the ability to flatten out the move of the pass rusher redirecting him away from the QB.

E
QB Set point on 5 step drop.
Optimal path for pass rusher.
With both players forces beingequal this would be the path ofthe pass rusher. QB throws the
ball, offense wins
Pass Protection Technique
Flatten the pass rush movetowards the boards.
QB
X
Understanding Pass Protection is the angles between the Defensive linemens start path and the launch point of the ball from the QB.
You will hear these coaching points constantly while we execute our passing game.Work on them diligently each day and you will improve in pass protection. Flatten the move – refers to the action of pass protecting and redirecting the pass rusher move towards the boards. The diagram below illustrates this:
Kick Slide – will refer to your steps as you work to the outside to flatten out the outside rusher. You willquickly and firmly kick back and square with your “kick” or outside leg and foot and then quickly slide the same distance with your inside foot. Your base should remain the same throughout the progression.
Pound the Post – will refer to your steps as you shut off and stuff the inside pass rusher. You will pound your “Post” or inside leg and foot for the rusher to cross your inside leg. You must always double up on your pound the post step.
P-step – is the same as pound the post but is a shorter step. It refers to picking up the inside foot and pounding it in almost the exact same position. You will use this step when the rusher is only a threat to go inside.
Slide Block – will be executed by the designated lineman in our slide protection while stepping down to block the Nose and the Mac. Your initial footwork is pound the post to close off any daylight between you and the center. You must help the center by stopping the charge of the Nose at the LOS. Your eyes must be aware of the Mac.
Gap Block – will be executed by the FB in our gap protection while blocking the Nose. Initial footwork must get you on the near hip of the Center with only a slight stagger, while closing off any daylight between you and the Center.
Cut Block – This is the technique we will use early in a game when blocking the DE in our quick passing game (30’s). The objective is to get the DE’s hands down and open up passing lanes. Take a quick position step and attack the DE inside out with your head up. Your aiming point is 6 inches above the knee of the DE’s inside leg. Always be aggressive and don’t leave your feet until you can step on the defenders toes. Never miss to the outside allowing the DE to interfere with the passing lane. This is a very effective weapon that we must perfect. It will slow down good pass rushers and cause them to lose effectiveness throughout the course of a game.
Stab Set – Refers to using aggressive footwork and getting your hands on defenders immediately. This is an effective change up to a cut block provided we keep the defenders out of a passing lane. It is important that you establish a good base and posture after you punch the defender.
Drive Set – Another aggressive change up to a cut block. You will execute drive block technique. Take a short drive set with outside foot to outside instep of DL. Lock hands onto inside numbers of DL. Move off of LOS with short choppy steps and wide base. Chest on thighs swing your tail to keep DL between your legs. If DL lines up tight to head up you must step with inside foot first.

5 Most Important Factors in Pass Protections
• 1. Stance- 2 point or 3 point stance. Heel toe stagger with feet about shoulder width and not too wide, feet should point straight ahead with shoulders square to LOS. Bend in the knees with flat
• back. You should be able to execute all blocks from this stance.
• 2. Footwork- Kick Slide/Pound the Post footwork will be executed. You must move your feet quickly on the snap count and position yourself to a head up to inside attitude on the defender. Maintain a consistant base and never cross over or get too narrow. Your base will widen when you have engaged the defender.
• 3. Posture- You should maintain the proper posture throughout the progression. Legs should be bent with proper "Z" in the inside knee. Back should be locked and flat with chest out and
• shoulders back. Weight should be distribute evenly on both feet.
• 4. Hand Placement- From the moment you take your set your hands should be up and inside protecting your numbers. Thumbs should be up, elbows in and ready to take a short 8 inch punch. You should never drop you hands. You should always be able to look through your hands at the defender..
• 5.Punch- Patience and timing should be the most important aspect of our punch. Wait until the defender is close enough to smell his breath and deliver a violent punch the defenders numbers and lock on if you can. Never reach for the defender. You must maintain good posture while punching and never lose the "Z" in your inside knee.

E N E
MJ
ENE
M J
X R L RL
FB FB
Assignment
Center
FB
Position
CUT CUTCUT CUT
__________________________________________________________
X
Punch Nose with playside hand and take a small p-step to TE side, you are responsible for the Nose or the Mac in the TE side "A" gap. If Nose comes to you control his rush at the LOS with both eyes being aware of the Mac. If the Mac follows the Nose, feel the FB and be ready to come off on the Mac. If Nose goes away squeeze him back and take away the inside rush of the Mac and flatten out any outside moves. If Mac follows Nose, stay square and squeeze back on Nose with both eyes on the Mac until he or the Nose works back.
3-STEP GAP CUT PROTECTION 32/33
32 33
Pass Pro Man- Cut Technique
Pass Pro Man- Cut Technique
Attack the "A" gap to the Mac side and work to get on the same level as the Center. Take away any daylight between you and the Center. Expect to punch the Nose with a heavy inside hand and control his rush at the LOS. Both eyes must be aware of the Mac. If Mac follows the Nose, feel the Center and be ready to come off on the Mac. If Nose goes away, take away the inside rush of the Mac and flatten out any outside moves. If Mac follows the Nose, continue to squeeze back with heavy hand on the Nose and both eyes on the Mac until he or the Nose works back.
Playside
Backside
Establish the cut block on the DE. We will always be aggressive when blocking the DE in 30's. It is crucial that we establish the cut block early in a game. This will allow us to mix in other aggressive short and drive sets. You must always get the DE's hands down.
Establish the cut block on the DE. We will always be aggressive when blocking the DE in 30's. It is crucial that we establish the cut block early in a game. This will allow us to mix in other aggressive short and drive sets. You must always get the DE's hands down.

ENE
MJ
E N E
MJ
__________________________________________________________
XX
FB FB
Assignment
Center
FB
Position
CUT CUTCUT CUT
Backside
Playside
Use Pound the Post footwork to take away daylight between you and the Center. Expect to punch the Nose with a heavy inside hand and control his rush at the LOS. Both eyes must be aware of the Mac. If Mac follows the Nose, feel the Center and be ready to come off on the Mac. If Nose goes away, take away the inside rush of the Mac and flatten out any outside moves. If Mac follows the Nose, continue to squeeze back with heavy hand on the Nose and both eyes on the Mac until he or the Nose works back.
BS PS PS BS
Establish the cut block on the DE. You must always get the DE's hands down.
Punch Nose with playside hand and take a small p-step to backside, you are responsible for the Nose or the Mac in the backside "A" gap. If Nose comes to you control his rush at the LOS with both eyes being aware of the Mac. If the Mac follows the Nose, feel the PS and be ready to come off on the Mac. If Nose goes away squeeze him back and take away the inside rush of the Mac and flatten out any outside moves. If Mac follows Nose, stay square and squeeze back on Nose with both eyes on the Mac until he or the Nose works back.
3-STEP SLIDE CUT PROTECTION 34/35
34 35
Pass Pro Man- Cut Technique
Pass Pro Man- Cut TechniqueEstablish the cut block on the DE. We will always be aggressive when blocking the DE in 30's. It is crucial that we establish the cut block early in a game. This will allow us to mix in other aggressive short and drive sets. You must always get the DE's hands down.

E N E
MJ
ENE
M J
X R L RL
FB FB
Assignment
Center
FB
Position
92 93
__________________________________________________________3-STEP GAP PROTECTION 92/93
X
Punch Nose with playside hand and take a small p-step to TE side, you are responsible for the Nose or the Mac in the TE side "A" gap. If Nose comes to you control his rush at the LOS with both eyes being aware of the Mac. If the Mac follows the Nose, feel the FB and be ready to come off on the Mac. If Nose goes away squeeze him back and take away the inside rush of the Mac and flatten out any outside moves. If Mac follows Nose, stay square and squeeze back on Nose with both eyes on the Mac until he or the Nose works back.
Aggressive short set block on the DE. We will always be aggressive when blocking the DE in 90's. This protection will be used in BIG 3 STEP drops by the QB therefore we will not cut. This will allow us to mix in other aggressive short and drive sets. You must always get the DE's hands down.
Aggressive short set block on the DE. We will always be aggressive when blocking the DE in 90's. This protection will be used in BIG 3 STEP drops by the QB therefore we will not cut. This will allow us to mix in other aggressive short and drive sets. You must always get the DE's hands down.
Pass Pro Man- Hard Set Technique.
Pass Pro Man- Hard Set Technique.
Attack the "A" gap to the Mac side and work to get to the Centers near hip. Take away any daylight between you and the Center. Expect to punch the Nose with a heavy inside hand and control his rush at the LOS. Both eyes must be aware of the Mac. If Mac follows the Nose, feel the Center and be ready to come off on the Mac. If Nose goes away, take away the inside rush of the Mac and flatten out any outside moves. If Mac follows the Nose, continue to squeeze back with heavy hand on the Nose and both eyes on the Mac until he or the Nose works back.
Playside
Backside

ENE
M J
E N E
MJ
__________________________________________________________
XX R L RL
FB FB
Assignment
Center
FB
Position
52 53
Attack the "A" gap to the Mac side and work to get on the same level as the Center. Take away any daylight between you and the Center. Expect to punch the Nose with a heavy inside hand and control his rush at the LOS. Both eyes must be aware of the Mac. If Mac follows the Nose, feel the Center and be ready to come off on the Mac. If Nose goes away, take away the inside rush of the Mac and flatten out any outside moves. If Mac follows the Nose, continue to squeeze back with heavy hand on the Nose and both eyes on the Mac until he or the Nose works back.
Will man block the DE using Kick Slide/Pound the Post Footwork.
Will man block the DE using Kick Slide/Pound the Post Footwork.
5-STEP GAP PROTECTION 52/53
Punch Nose with playside hand and take a small p-step to TE side, you are responsible for the Nose or the Mac in the TE side "A" gap. If Nose comes to you control his rush at the LOS with both eyes being aware of the Mac. If the Mac follows the Nose, feel the FB and be ready to come off on the Mac. If Nose goes away squeeze him back and take away the inside rush of the Mac and flatten out any outside moves. If Mac follows Nose, stay square and squeeze back on Nose with both eyes on the Mac until he or the Nose works back.
Playside
Backside

E N E
MJ
ENE
MJ
__________________________________________________________
XX
FB FB
Assignment
FB
Position
5-STEP SLIDE PROTECTION 54/55
54 55
Will man block the DE using Kick Slide/Pound the Post Footwork.
Will man block the DE using Kick Slide/Pound the Post Footwork.
Backside
Playside
Center
BS PS PS BS
Use Pound the Post footwork to take away daylight between you and the Center. Expect to punch the Nose with a heavy inside hand and control his rush at the LOS. Both eyes must be aware of the Mac. If Mac follows the Nose, feel the Center and be ready to come off on the Mac. If Nose goes away, take away the inside rush of the Mac and flatten out any outside moves. If Mac follows the Nose, continue to squeeze back with heavy hand on the Nose and both eyes on the Mac until he or the Nose works back.
Punch Nose with playside hand and take a small p-step to backside, you are responsible for the Nose or the Mac in the backside "A" gap. If Nose comes to you control his rush at the LOS with both eyes being aware of the Mac. If the Mac follows the Nose, feel the PS and be ready to come off on the Mac. If Nose goes away squeeze him back and take away the inside rush of the Mac and flatten out any outside moves. If Mac follows Nose, stay square and squeeze back on Nose with both eyes on the Mac until he or the Nose works back.

ENE
M J
E N E
MJ
XX
FB FB
Assignment
FB
Position
Will man block the DE using Kick Slide/Pound the Post Footwork.Backside
Playside
Center
BS PS PS BS
SHORT ROLL OR SPRINT OUT PROTECTION 66/67
66 67
CUT CUT
Shuffle Shuffle then cut block the outside leg of DE. You must always get the DE's hands down and pin him in.
Punch Nose with backside hand and take a small p-step to backside, you are responsible for the Nose or the Mac in the backside "A" gap. If Nose comes to you control his rush and make him go backside. If Nose goes away squeeze him back and force the Mac to go backside.
Use Pound the Post footwork and get ready to pin the Mac or the Nose to the inside. If Mac follows the Nose, be sure to squeeze the Nose back to the center and attempt to stay outside the Mac. Make the Nose or Mac go backside.
_______________________________________________________

RATTLERSOFFENSE
Offensive Run Game

B
EE
B
E N
E E
High Block
BallBall
Ball
Ball Ball Ball
Ball
Veer Block
Drive Block Reach Block Draw Block
Short drive step with outside foot to outside instep of DL. Look hands onto inside number of DL. Move off of LOS with short choppy steps and wide base. Chest on thighs swing your tail to keep DL between your legs. If DL lines up tight to head up you must step w/inside foot first.
Playside block on Draw (Jack)
Playside block on Veer Playside block on Veer
E
E
Pull Down Block
E NB
Ball
Take pass set and allow DE to run upfield. Punch DE's hip and ride him upfield. If DE rushes inside you must wash him down inside.
Quick step with outside foot and flash with outside hand. Stay square and rip up to out side number of B. Pin him and drive him inside. Be alert for run through.
Step hard and evasively with inside foot. Keep pad level low and rip up to outside number of B. Pin him and drive him inside. Be alert for run through.
Pull step with inside foot. Run to playside number of N. Do not allow N penetration you must close daylight now.Punch N and swing tail and drive with wide base. If N runs with Center block any color hanging off. Be alert for possibility to climb to nearest B.
Step hard and wide with outside foot and gain hat postition on DE. Rip through outside number of DE with inside arm and foot apply pressure and work upfield.
Playside block on Base/Iso/Follow/Bounce
Playside block on Sweep + Qk Pitch
Backside block on Bounce + Sweep Centers block on BouncePost High Drive Block
Step hard through playside number of N with eyes on playside B. Climb to B. Drive him out with wide base. If N mirrors down the line lock on and move him upfield.
B
Step hard and evasively with inside foot. Keep pad level low and rip up to playside number of B. Your angle must take you through feet of next DL. Pin B and drive away from ball. If B flys over the top hunt him down and block him to the boards.
Center + Backside block on Qk Pitch. Center's block only on Sweep.
B
C
BS
C
C
BSBS
N
PS
PS
PSPS
PS
Rattlers Run Game Individual Blocks
Flash Veer Block

B
G C
M
E N
M
G C
M
E NG C
Ball Ball Ball
If N steps hard backside Centercan climb to drive scraping M.Guard must drive and swing on N.
Mac AwarenessBackside of Follow/Dive/Veer/Lead
E N
C
E N
B
E N
B
Ball Ball
Center takes small positionstep upfield with playside footand drives through playside number of N. Guard steps hard with inside foot and drives throughbackside number of N. Must get movement on N to cut off M pursuit.
Scoop
E
B
EB
Ball Ball
wr wr
On some plays and situations such as Iso in the field. Guard must have "Mac Awareness" to prevent M from running through and making a play on deep hand-off. Center will drive and swing on N.
Double Team
Db
Db
wr
PS
OL takes a pull step and runs tightaround crack blocks. Eye's must pick up Db to B and block first guythat shows. Stationary wr mustgage E's charge and pin his hip.Motion wr must block Db intoB's Path.
If DE and B take Jet charge OL must continue to work to outside Number of DE and force him to give ground. Bump WR up to B. WR can keep applying pressure to outside shoulder of DE until OL bumps him up.
OL takes aggressive reach step with outside foot to outside number of DE. Drive upfield and swing. WR steps with inside foot to outside foot of DE. Look hands onto outside shoulder and work to climb and drive on B. If B gets over the top stay with him and block him to the boards.
wr
EB
ChipPlayside of Chip Quick Pitch or Sweep.
PSPS
Playside of Quick Pitch Crack.
Rattlers Run Game Combination Blocks
G Scheme
Center takes 45 degree step withplayside foot. If N steps playside drive and swing on him. Backside OL takes 45 degree step see's N go away and climbs to drive and swing on B. If N plays firm and B flys over top OL can bang Center over to block B.
C
If N goes backside Center will climb to drive scraping B. Backside OL drive and swing on N.
Ball
C
N E
Frontside Scoop
Techinique used on the frontside between the Center and PSG. PSG will initiate a reach step, if DE goes with him he will stay locked on. Center will reach for Near Side Number of the DE. If DE stays at home or pinches overtake the block. If DE goes wide climb to LB.

Draw (Jack)
Veer Flash
E N E
B B
E N E
B B
E N E E N E
E N E E N E
E N E E N E
B B B B
B B B B
B B B B
S
F
wr
E N E
E N E
B B
B B B B
E N E
B BMac Awareness
E N E
DoubleTeam
DriveBlock
DriveBlock
PullDown
DoubleTeam
DoubleTeam
VeerBlock
VeerFlash
Reach or ChipHighBlock
PullDown
DrawBlock
Scoop
DoubleTeam
DriveBlock
Lead
DoubleTeam
DoubleTeam Double
Team
DriveBlock
DriveBlock
DriveBlock
Lead
LeadClimb
LeadClimb
1st Show
Center Check Backer Run Through
Base Iso
Bounce
PostHighDrive
Veer
SweepQuick Pitch
Wedge
Reachor Crack
Follow
Rattlers Run Game Blocking Schemes

S N EJ M
FSC C
E N SM J
FSC C
PS.
BS.
CTR.
FB
QB
X
Y
Z
FORMATIONS: COACHING POINTS:
FORMATION/PLAY: FORMATION/PLAY
TT
13 BASE 12 BASE
* PS - GUARD/TE WIDE SPLITS* MUST GET VERTICAL PUSH* NO OPTION* IF FB IS IN NEAR/FAR SET QB NOW STEPS DOWN LOS* RUN AT THE JACK
ARIZONA RATTLERS OFFENSE
PLAY: 12-13 BASE
SCOOP W CENTER; OVERTAKE
SCOOP W BS TO LBer.
OPEN AT 5 O'CLOCK; REACH & RIDE FB.
AIM POINT IS INSIDE CHEEK OF GUARD;HARD 45 DOWNHILL
STALK BLOCK MAN ON; RELEASE ACROSS FACE OF DEFENDER IN A PURSUIT PATH BACKSIDE
STALK BLOCK MAN ON; RELEASE ACROSS FACE OF DEFENDER IN A PURSUIT PATH BACKSIDE
STALK BLOCK MAN ON; RELEASE ACROSS FACE OF DEFENDER IN A PURSUIT PATH BACKSIDE
BASE DRIVE BLOCK PS END.

S N EJ M
FSC C
E N SM J
FSC C
PS.
BS.
CTR.
FB
QB
X
Y
Z
FORMATIONS: COACHING POINTS:
FORMATION/PLAY:
TT
* PS - GUARD/TE WIDE SPLITS* MUST GET VERTICAL PUSH* FB MUST SELL BALL FAKE* CAN RUN EITHER SIDE
13 FOLLOW 12 CRACK FOLLOW
FORMATION/PLAY:
12/13 CRACK FOLLOW: FB AND CRACK RECEIVER CHANGE RESPONSIBILITIES ON WHO THEY BLOCK.
ARIZONA RATTLERS OFFENSE
PLAY: 12-13 FOLLOW (CRACK FOLLOW)
BASE DRIVE BLOCK PS END.
SCOOP W CENTER; OVERTAKE
SCOOP W BS TO LBer.
AIM POINT IS INSIDE CHEEK OF GUARD;HARD 45 DOWNHILL
STALK BLOCK MAN ON; RELEASE ACROSS FACE OF DEFENDER IN A PURSUIT PATH BACKSIDE
STALK BLOCK MAN ON; RELEASE ACROSS FACE OF DEFENDER IN A PURSUIT PATH BACKSIDE
STALK BLOCK MAN ON; RELEASE ACROSS FACE OF DEFENDER IN A PURSUIT PATH BACKSIDE
BASE DRIVE BLOCK PS END.
SCOOP W CENTER; OVERTAKE
SCOOP W BS TO LBer.
OPEN AT 5 O'CLOCK; REACH & RIDE; SEAT BALL - RUN TO FIRST DAYLIGHT INSIDE OR OUTSIDE OF THE DE.

S N E
J M
FSC C
E N S
M J
FSC C
PS.
BS.
CTR.
FB
QB
X
Y
Z
FORMATIONS: COACHING POINTS:
FORMATION/PLAY: FORMATION/PLAY
TT
* PS - GUARD/TE WIDE SPLITS* MUST GET VERTICAL PUSH* NO OPTION* IF FB IS IN NEAR/FAR SET QB NOW STEPS DOWN LOS* RUN AT THE JACK
13 COUNTER BASE 12 COUNTER BASE
LOOP MOTION AND FAKE DIVE ACTION
ARIZONA RATTLERS OFFENSE
PLAY: 12-13 COUNTER BASE
BASE DRIVE BLOCK PS END.
SCOOP W CENTER; OVERTAKE
SCOOP W BS TO LBer.
AIM POINT IS INSIDE CHEEK OF GUARD;HARD 45 DOWNHILL
STALK BLOCK MAN ON; RELEASE ACROSS FACE OF DEFENDER IN A PURSUIT PATH BACKSIDE
STALK BLOCK MAN ON; RELEASE ACROSS FACE OF DEFENDER IN A PURSUIT PATH BACKSIDE
OPEN AT 5 O'CLOCK; REACH & RIDE FB. AFTER THE GIVE TO FB COUNTER FAKE TO PLUNGE MOTION.

S N EJ M
FSC C
E N SM J
FSC C
PS.
BS.
CTR.
FB
QB
X
Y
Z
FORMATIONS: COACHING POINTS:
FORMATION/PLAY: FORMATION/PLAY
TT
12 VEER 13 VEER
ARIZONA RATTLERS OFFENSE
PLAY: 12-13 VEER
SCOOP W CENTER; OVERTAKE
SCOOP W BS TO LBer.
HARD 45 DOWNHILL; AIMING POINT IS THE INSIDE LEG OF OL; RUN TRACK UPFIELD LOOKING FOR OUTSIDE HIP OF OL.
OPEN AT 5 O'CLOCK; REACH & RIDE FB.
VEER OR FLASH VEER TO PS LBer. BE AWARE OF LBer RUN THROUGH.
STALK BLOCK MAN ON; RELEASE ACROSS FACE OF DEFENDER IN A PURSUIT PATH BACKSIDE
STALK BLOCK MAN ON; RELEASE ACROSS FACE OF DEFENDER IN A PURSUIT PATH BACKSIDE
STALK BLOCK MAN ON; RELEASE ACROSS FACE OF DEFENDER IN A PURSUIT PATH BACKSIDE
* PS - GUARD/TE WIDE SPLITS* MUST GET VERTICAL PUSH* CAN RUN EITHER SIDE

S N EJ M
FS
C
C
E N SM J
FSC C
PS.
BS.
CTR.
FB
QB
X
Y
Z
FORMATIONS: COACHING POINTS:
TT
SCOOP W CENTER; OVERTAKE
SCOOP W BS TO LBer.
ARIZONA RATTLERS OFFENSE
PLAY: 12-13 OPTION
12 OPTION 13 OPTION
12 VEER PATH. QB IS READING THIS PLAY. BE READY TO TAKE THE BALL OR BLOCK LBer IF QB PULLS THE BALL.
READ SECONDARY. IF DB GOES WITH MOTION RUN 12 OPTION. PRESNAP READ PS DE.
LOOP TO BACKSIDE. BLOCK 1ST THREAT OVER THE WING.
BUBBLE RELEASE AND BE READY FOR QUICK SHOVEL PASS.
* PS - GUARD/TE WIDE SPLITS* MUST LOOP MOTION SO QB MAY READ THE COVERAGE. * QB WILL RUN 12/13 OPTION OR BUBBLE SCREEN TO Z IF COVERAGE DOES NOT ROLL.
SLIP FRONTSIDE CB TO BOZ ROUTE. IF CORNER FIRES BE READY FOR QB TO UNDERHAND PITCH TO YOU IN CORNER.
VEER OR TO PS LBer. BE AWARE OF LBer RUN THROUGH.

S N E
J M
FS
C
C
E N SM J
FSC C
PS.
BS.
CTR.
FB
QB
X
Y
Z
FORMATIONS: COACHING POINTS:
TT
SCOOP W CENTER; OVERTAKE
SCOOP W BS TO LBer.
LOOP TO BACKSIDE. BLOCK 1ST THREAT OVER THE WING.
* PS - GUARD/TE WIDE SPLITS* MUST LOOP MOTION SO QB MAY READ THE COVERAGE. * QB WILL RUN 12/13 OPTION OR BUBBLE SCREEN TO Z IF COVERAGE DOES NOT ROLL.
VEER OR TO PS LBer. BE AWARE OF LBer RUN THROUGH.
ARIZONA RATTLERS OFFENSE
PLAY: 12-13 FLASH VEER.
DELAY 1 COUNT TO VEER PATH OF PLAY CALLED.
FLASH BUBBLE SCREEN PASS TO VEER HANDOFF.
12 FLASH VEER13 FLASH VEER
BUBBLE RELEASE AND FAKE BUBBLE SCREEN.
STALK BLOCK MAN ON; RELEASE ACROSS FACE OF DEFENDER IN A PURSUIT PATH BACKSIDE

S N E
J M
FSC C
E N S
M J
FSC C
PS.
BS.
CTR.
FB
QB
X
Y
Z
FORMATIONS: COACHING POINTS:
FORMATION/PLAY: FORMATION/PLAY
TT
* PS - GUARD/TE WIDE SPLITS* MUST GET VERTICAL PUSH* NO OPTION* IF FB IS IN NEAR/FAR SET QB NOW STEPS DOWN LOS* RUN AT THE JACK
STALK BLOCK MAN ON; RELEASE ACROSS FACE OF DEFENDER IN A PURSUIT PATH BACKSIDE
STALK BLOCK MAN ON; RELEASE ACROSS FACE OF DEFENDER IN A PURSUIT PATH BACKSIDE
STALK BLOCK MAN ON; RELEASE ACROSS FACE OF DEFENDER IN A PURSUIT PATH BACKSIDE
ARIZONA RATTLERS OFFENSE
PLAY: 14-15 BASE
FRONTSIDE SCOOP WITH CENTER.
SCOOP W CENTER; OVERTAKE
AIM POINT IS OUTSIDE CHEEK OF GUARD; SLIGHTLY WIDER THAN 12/13 BASE.
OPEN AT 3 O'CLOCK; REACH & RIDE FB.
15 BASE 14 BASE
SCOOP W PS GUARD. BE AWARE OF MACK RUN THROUGH.

S N EJ M
FSC C
E N SM J
FSC C
BS.
CTR.
FB
QB
X
Y
Z
FORMATIONS: COACHING POINTS:
FORMATION/PLAY: FORMATION/PLAY
TT
OPEN STEP; CROSSOVER; ROLLOVER INTO HOLE; AIM POINT IS INSIDE HIP OF PS LINEMAN
REVERSE OUT; GET BALL AS DEEP AS POSSIBLE TO FB; BOOT FAKE.
PS.
22 BOUNCE 23 BOUNCE
ARIZONA RATTLERS OFFENSE
PLAY: 22-23 BOUNCE
SCOOP W CENTER; OVERTAKE
FRONTSIDE SCOOP W PS GUARD; BE AWARE OF PS LBer RUN THROUGH.
* IF PS END IS HEADS UP OR INSIDE SHADE, PS LINEMAN WILL MAKE A "ICE CREAM" CALL FOR FRONTSIDE SCOOP * LINEMAN KEEPS SHOULDERS SQUARE; THINK VERTICAL PUSH.* QB BOOT FAKES
STALK BLOCK MAN ON; RELEASE ACROSS FACE OF DEFENDER IN A PURSUIT PATH BACKSIDE
STALK BLOCK MAN ON; RELEASE ACROSS FACE OF DEFENDER IN A PURSUIT PATH BACKSIDE
STALK BLOCK MAN ON; RELEASE ACROSS FACE OF DEFENDER IN A PURSUIT PATH BACKSIDE
FRONTSIDE SCOOP BLOCK WITH CENTER.
RUN WITH FLY MOTION TO PROMOTE FAST FLOW FROM DEFENSE.

S N E
J M
FSC C
E N SM J
FSC C
PS.
BS.
CTR.
FB
QB
X
Y
Z
FORMATIONS: COACHING POINTS:
FORMATION/PLAY: FORMATION/PLAY
TT
26 SPEED SWEEP 27 SPEED SWEEP
SAME AS 22/23; AFTER WR CLEARS SEALS EDGE TO LB.
REVERSE OUT; HANDOFF TO WR & CARRY OUT ZONE FAKE TO FB.
ARIZONA RATTLERS OFFENSE
PLAY: 26-27 SPEED SWEEP
SCOOP W CENTER; OVERTAKE
FRONTSIDE SCOOP W PS GUARD; BE AWARE OF PS LBer RUN THROUGH.
FRONTSIDE SCOOP BLOCK WITH CENTER.
STALK BLOCK MAN ON; RELEASE ACROSS FACE OF DEFENDER IN A PURSUIT PATH BACKSIDE
STALK BLOCK MAN ON; RELEASE ACROSS FACE OF DEFENDER IN A PURSUIT PATH BACKSIDE
* FB KEEPS TIGHT BOUNCE PATH; AFTER WR CLEARS, SEAL EDGE TO PS LB.
FLY MOTION ACROSS THE FORMATION. ANTICIPATE THE QB PULLING THE SNAP 1 YD. OUTSIDE OF DE. TAKE BALL IN BACKSIDE ARM AND RUN TO HEELS OF WIDEST WR'S BLOCK.

S N EJ M
FSC C
E N SM J
FSC C
PS.
BS.
CTR.
FB
QB
X
Y
Z
FORMATIONS: COACHING POINTS:
FORMATION/PLAY: FORMATION/PLAY
TT
HARD 45; GET DOWNHILL & BLOW UP PS LB'r.
REVERSE OUT; HANDOFF TO THE Z; CARRY OUT BOOT FAKE TO HOLD BS END.
SHORT LOOPING MOTION. TRY NOT TO MOTION ANY DEEPER THAN 6 YARDS FROM LOS.
* PS - END OR TE WIDE SPLITS* QB BOOTS TO HOLD BS END* FB LINES UP IN HOME POSITION* FB READ BLOCK OF PS. IF DE SLANTS HE WILL CARRY HIS PATH OUTSIDE. *BALLCARRIER- SAME READ AS FB.
23 ISO 22 ISO
ARIZONA RATTLERS OFFENSE
PLAY: 22-23 ISO
BASE DRIVE BLOCK PS END.
DOUBLE TEAM WITH CENTER TO BS LBer.
DOUBLE TEAM WITH CENTER TO BS LBer.
*SET THIS PLAY UP TO RUN WITH YOUR BEST RB FROM ANY OF THE RECEIVER POSITIONS. * NORMALLY BEST TO HAVE A TIGHT SLOT/WING CUTOFF BS DE.
STALK BLOCK MAN ON; RELEASE ACROSS FACE OF DEFENDER IN A PURSUIT PATH BACKSIDE
STALK BLOCK MAN ON; RELEASE ACROSS FACE OF DEFENDER IN A PURSUIT PATH BACKSIDE

S N EJ M
FSC C
E N SM J
FSC C
PS.
BS.
CTR.
FB
QB
X
Y
Z
FORMATIONS: COACHING POINTS:
FORMATION/PLAY:
TT
AIM POINT IS SLIHTLY WIDER THAN END MAN; CHIP END TO PS LB'r TO BS CORNER.
REVERSE OUT; SOFT TOSS BALL; QB BOOTS OUT & CHECKS BS END TO RECEIVER.
FORMATION: Left Slot
24 SWEEP 25 CHIP SWEEP
ARIZONA RATTLERS OFFENSE
PLAY: 24-25 SWEEP (CHIP SWEEP)
SCOOP W CENTER; OVERTAKE
FRONTSIDE SCOOP W PS GUARD; BE AWARE OF PS LBer RUN THROUGH.
STALK BLOCK MAN ON; RELEASE ACROSS FACE OF DEFENDER IN A PURSUIT PATH BACKSIDE
STALK BLOCK MAN ON; RELEASE ACROSS FACE OF DEFENDER IN A PURSUIT PATH BACKSIDE
SHORT MOTION TO 6 YARDS DEPTH. ANTICIPATE THE QB PULLING THE SNAP WHEN YOU ARE BEHIND THE BS OL. RECIEVE THE TOSS FROM QB AND ATTACK DOWNHILL READING THE PS GUARDS BLOCK.
* WR PATH IS 2-3 YDS OUTSIDE THE END MAN.* DOWNHILL SWEEP* FB CHIPS END; SQUEEZE CORNER* RUN O
UT OF NEAR POSITION
FRONTSIDE SCOOP BLOCK WITH CENTER.

S N E
J M
FSC C
E N S
M J
FSC C
BS.
CTR.
FB
QB
X
Y
Z
FORMATIONS: COACHING POINTS:
FORMATION/PLAY: FORMATION/PLAY
TT
FAKE DIVE AWAY FROM CALL AND BLOCK SEAL BLOCK BACKSIDE COLOR
FAKE DIVE TO FB AND REVERSE OUT TO BALLCARRIER. AFTER HANDOFF BOOT AWAY FROM PLAY
PS.
24 COUTNER SWEEP 25 COUTNER SWEEP
BASE DRIVE PS DE.
DOUBLE TEAM AND OVERTAKE THE NOSE.
DOUBLE TEAM WITH BS GUARD AND SLIP TO FRONTSIDE LBer.
* Run with Plunge Motion. * QB gives Quick Fake to FB.* Center be patient on slip to LBer.* Fullback must get seal on End.
ARIZONA RATTLERS OFFENSE
PLAY: 24-25 COUNTER DIVE
STALK BLOCK MAN ON; RELEASE ACROSS FACE OF DEFENDER IN A PURSUIT PATH BACKSIDE
STALK BLOCK MAN ON; RELEASE ACROSS FACE OF DEFENDER IN A PURSUIT PATH BACKSIDE
SHORT MOTION AND RUN DOWN HILL. QB WILL HAND OFF BALL. LOOK TO BOUNCE IF DE PINCHES.

S N EJ M
FSC C
E N SM J
FSC C
PS.
BS.
CTR.
FB
QB
X
Y
Z
FORMATIONS: COACHING POINTS:
FORMATION/PLAY: FORMATION/PLAY
TT
OPEN, LEAD & SPRINT TO THE SIDELINE; LOOK FOR THE ALLEY; SECURE PATH; KEEP SHOULDERS TO LOS.
OPEN UP; SOFT TOSS THE BALL 1 YD WIDER THAN THE FB; QB BOOTS OUT.
26 QUICK PITCH 27 CRACK QUICK PITCH
ARIZONA RATTLERS OFFENSE
PLAY: 26-27 QUICK PITCH (CRACK Q.P.)
SCOOP W CENTER; OVERTAKE
FRONTSIDE SCOOP W PS GUARD; BE AWARE OF PS LBer RUN THROUGH.
FRONTSIDE SCOOP BLOCK WITH CENTER.
STALK BLOCK MAN ON; RELEASE ACROSS FACE OF DEFENDER IN A PURSUIT PATH BACKSIDE
STALK BLOCK MAN ON; RELEASE ACROSS FACE OF DEFENDER IN A PURSUIT PATH BACKSIDE
STALK BLOCK MAN ON; RELEASE ACROSS FACE OF DEFENDER IN A PURSUIT PATH BACKSIDE

S N E
J MFSC C
E N S
M J
FS
CC
PS.
BS.
CTR.
FB
QB
X
Y
Z
FORMATIONS: COACHING POINTS:
FORMATION/PLAY: FORMATION/PLAY
TT
OPEN, LEAD & SPRINT TO THE SIDELINE; LOOK FOR THE ALLEY; SECURE PATH; KEEP SHOULDERS TO LOS.
OPEN UP; SOFT TOSS THE BALL 1 YD WIDER THAN THE FB; QB BOOTS OUT.
SCOOP W CENTER; OVERTAKE
ARIZONA RATTLERS OFFENSE
PLAY: 26-27 G PITCH
G BLOCK TO THE 2ND FORCE DEFENDER. REPLACE THE SLOT.
SCOOP W BS GUARD; BE AWARE OF PS LBer RUN THROUGH.
G BLOCK WITH GUARD. ALIGN SPLIT TO BE ABLE TO BLOCK PS HIP OF DE. STAY ON HIP.
26 G PITCH 27 G PITCH
STALK BLOCK MAN ON; RELEASE ACROSS FACE OF DEFENDER IN A PURSUIT PATH BACKSIDE
STALK BLOCK MAN ON; RELEASE ACROSS FACE OF DEFENDER IN A PURSUIT PATH BACKSIDE
* On any G scheme we need to loopmotion reciever vs. any press alignment on slot or wing.* On any G scheme QB may need the option to audible this to base scheme vs. press DB on G.

S N EJ M
FSC C
E N SM J
FSC C
PS.
BS.
CTR.
FB
QB
X
Y
Z
FORMATIONS: COACHING POINTS:
FORMATION/PLAY: FORMATION/PLAY
TT
READS T.E. BLOCK AND RUNS INSIDE OR OUTSIDE OF T.E. BLOCK
THREE STEP DROP
CRACK THE JACK LINEBACKER
*SELL THE PLAYSIDE BLOCKS AS THREE STEP PASS *FULLBACK MUST READ T.E. BLOCK
ARIZONA RATTLERS OFFENSE
PLAY: 82-83 DRAW CRACK
PASS SET ON PS DE. ALLOW DE TO RUN UPFIELD. IF DE RUSHES INSIDE WASH BLOCK.
DOUBLE TEAM WITH CENTER.
DOUBLE TEAM WITH BS TO SLIP TO LBer.
83 DRAW CRACK 82 DRAW CRACK
STALK BLOCK MAN ON; RELEASE ACROSS FACE OF DEFENDER IN A PURSUIT PATH BACKSIDESTALK BLOCK MAN ON; RELEASE ACROSS FACE OF DEFENDER IN A PURSUIT PATH BACKSIDE
STALK BLOCK MAN ON; RELEASE ACROSS FACE OF DEFENDER IN A PURSUIT PATH BACKSIDE

FB
SN
TE
EJ
X
M
Y
FS
CC
Z
BS.
CTR.
FB
QB
X
Y
Z
FORMATIONS:
FORMATION/PLAY:
T
PS.
PRE SNAP READ=3 DB'S TO JUMBO SIDE, CHECK QUICK PITCH WEAK. IF 1 DB STAYS BACKSIDE RUN THE PLAY.
OPEN STEP, RUN FLAT TO DASHER BOARDS. RUN TO THE HEELS OF THE Y RECEIVER.
This play is better if you shift to the jumbo package out of base offense.
WR BLOCKING; Alignment must be tight enough so no defender can beat you to the inside. Step with inside foot and stay square on block at all times. Never turn your shoulders.
COACHING POINTS:
BIG
RB
ARIZONA RATTLERS OFFENSE
PLAY: JUMBO LEFT CHECK 26 or 27 HAND SWEEP
DOUBLE TEAM WITH FB.
SCOOP WITH BACKSIDE. BE AWARE OF MACK RUN THROUGH.
SCOOP BLOCK WITH CENTER.
DOUBLE TEAM WITH PS GUARD TO CHIP.
MUST BLOCK 1st DEFENDER HEAD UP ON THE FB TO OUTSIDE. BE AWARE OF DB KNIFING INSIDE.
MUST BLOCK 1st DEFENDER HEAD UP TO INSIDE. BE AWARE OF KNIFING DEFENDER INSIDE.

FB
S N
TE
EJ
X
M
Y
FS
C C
Z
BS.
CTR.
FB
QB
X
Y
Z
FORMATIONS:
FORMATION/PLAY:
T
PS.
COACHING POINTS:
DOUBLE AND CHIP DE TO PLAYSIDE LB.
OPEN AT 5 O'CLOCK AND GIVE BALL TO Y.
BIG BIG
RB
ARIZONA RATTLERS OFFENSE
PLAY: 14/15 Kickout (HEAVY PERSONNEL)
SCOOP BLOCK WITH CENTER
SCOOP BLOCK WITH CENTER.
DOUBLE AND CHIP TO MACK BE AWARE OF PS LBer RUN THROUGH.
FLY MOTION TO CENTER SHUFFLE, SHUFFLE AND KICKOUT BLOCK THE DEFENDER ON THE Y.
DOUBLE AND CHIP BLOCK WITH GUARD TO PS LBer.
BLOCK #1 DEFENDER

FB
S N
TE
EJ
X
M
Y
FSC C
Z
BS.
CTR.
FB
QB
X
Y
Z
FORMATIONS:
FORMATION/PLAY:
T
PS.
COACHING POINTS:
DOUBLE AND CHIP TO MACK
PULL FLAT AND CLIMB TO KICKOUT
ZONE DRIVE THE NOSE.
DOUBLE AND CHIP DE TO PLAYSIDE LB.
OPEN AT 5 O'CLOCK AND GIVE BALL TO Y.
BLOCK #1DEFENDER
LINE UP 5 YARDS DEPTH. TAKE 1 SHORT SLIDE STEP AND ATTACK 1 YARD OUTSIDE PSG.
ZONE CUTOFF BACKSIDE DE. DO NOT ALLOW PENETRATION.
BIG BIG
RB
ARIZONA RATTLERS OFFENSE
PLAY: 24 Bill (HEAVY PERSONNEL)

FB
S N
TE
EJ
X
M
Y
FSC C
Z
BS.
CTR.
FB
QB
X
Y
Z
FORMATIONS:
FORMATION/PLAY:
T
COACHING POINTS:
PS TE
ZONE DRIVE THE NOSE
TRAP PS DE. TAKE INSIDE OUT PATH AND KICK OUT.
DROP STEP OPPOSITE AND HAND TO RB
BLOCK #1 DEFENDER
LINE UP 5 YARDS DEPTH. STEP OPPOSITE THE CALL. HUG THE TRAP BLOCK OF THE FB.
RB
BIGBIG
VEER RELEASE OR VEER FLASH TO BS LBer.
FLASH THE DE AND SLIP OVER THE TOP TO PS LBer.
ARIZONA RATTLERS OFFENSE
PLAY: 23 TRAP (Heavy Personnel)
SEAL BS A GAP. BE AWARE OF MACK RUN THROUGH.

FB
S N
TE
E
J
X
M
Y
FSC
C
Z
BS.
CTR.
FB
QB
X
Y
Z
FORMATIONS:
FORMATION/PLAY:
COACHING POINTS:
RB
BIGBIG
ARIZONA RATTLERS OFFENSE
PLAY: BASE CHECK (Heavy Personnel)
PS G BLOCK 12,13,14 OR 15 BASE.
BLOCK 12,13,14 OR 15 BASE.
BLOCK 12,13,14 OR 15 BASE.
RUN 12,13,14 OR 15 BASE.
MAKE PRE SNAP READ. CHECK 2,3,4 OR 5 AT THE LOS.
BLOCK 12,13,14 OR 15 BASE.
BLOCK 12,13,14 OR 15 BASE.
BLOCK 12,13,14 OR 15 BASE.
CHECK RULES:1. CHECK TO WIDEST END. 2. CHECK TO SOFTEST LB. 3. CHECK TO BEST MATCHUP WITH OUR BLOCKERS VS. THEIR DEFENDERS.

FB
S N
TE
EJ
X
M
Y
FS
C C
Z
BS.
CTR.
FB
QB
X
Y
Z
FORMATIONS:
FORMATION/PLAY:
T
PS.
COACHING POINTS:
DOUBLE AND CHIP DE TO PLAYSIDE LB.
OPEN AT 5 O'CLOCK AND GIVE BALL TO Y.
BIG BIG
RB
ARIZONA RATTLERS OFFENSE
PLAY: 14/15 Kickout (HEAVY PERSONNEL)
SCOOP BLOCK WITH CENTER
SCOOP BLOCK WITH CENTER.
DOUBLE AND CHIP TO MACK BE AWARE OF PS LBer RUN THROUGH.
FLY MOTION TO CENTER SHUFFLE, SHUFFLE AND KICKOUT BLOCK THE DEFENDER ON THE Y.
DOUBLE AND CHIP BLOCK WITH GUARD TO PS LBer.
BLOCK #1 DEFENDER

RATTLERSOFFENSE
Offensive Run Game Heavy Packages

FB
S N
TE
EJ
X
M
Y
FS
C C
Z
FB
S N
TE
EJ
X
M
Y
FS
C C
Z
FB
S N
TE
EJ
X
M
Y
FSC C
Z
FB
S NTE
E
J
X
M
Y
FSC C
Z
FORMATION/PLAY:
BIG BIG
RB
FORMATION/PLAY:
BIG BIG
RB
FORMATION/PLAY:
BIG BIG
RB
FORMATION/PLAY:
BIG BIG
RB
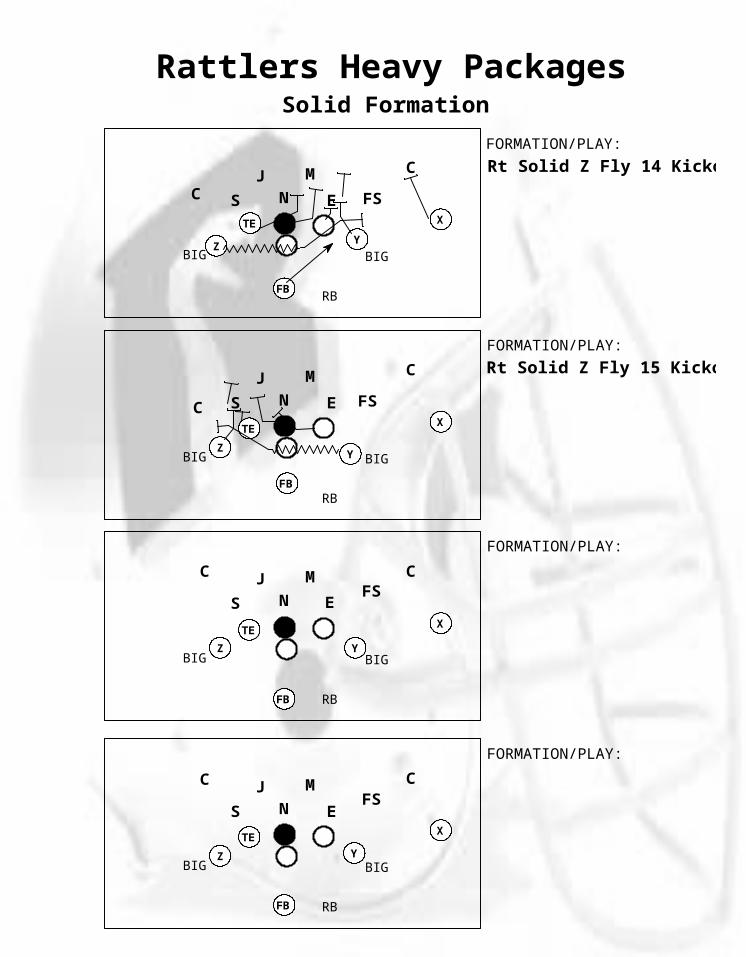
Solid Formation
Rt Solid Base Check
Check 313 Base
Check 515 Base
Rt Solid Z Fly 26 Chip Quick Pitch
Rt Solid Z Fly 26 Quick Pitch
Rt Solid Base Check
Rattlers Heavy Packages
FB
S N
TE
EJ
X
M
Y
FSC C
Z
FB
S N
TE
EJ
X
M
Y
FSC C
Z
FB
S N
TE
EJ
X
M
Y
FSC
C
Z
FB
S NTE
EJ
X
M
Y
FSCC
Z
FORMATION/PLAY:
BIG BIG
RB
FORMATION/PLAY:
BIG BIG
RB
FORMATION/PLAY:
BIG BIG
RB
FORMATION/PLAY:
BIG BIG
RB
Solid Formation
Rt Solid Z Fly 14 Kickout
Rt Solid Z Fly 15 Kickout
Rattlers Heavy Packages

FB
S N
TE
EJ
X
M
Y
FSC C
Z
FB
S N
TE
EJ
X
M
Y
FS
C C
Z
FB
S N
TE
EJ
X
M
Y
FSC C
Z
FB
S NTE
EJ
X
M
Y
FSC
C
Z
FORMATION/PLAY:
BIG
FORMATION/PLAY:
BIG
FORMATION/PLAY:
BIG
FORMATION/PLAY:
BIG
Clump Formation
Right Clump Z Fly 27 Quick Pitch
Right Clump Ck 26 QP or 13 Follow
Right Clump Ck 26 QP or 13 Follow
Check 6 26 Quick Pitch
Check 313 Follow
Rattlers Heavy Packages

FB
S N
TE
EJ
X
M
Y
FSC C
Z
FB
S N
TE
EJ
X
M
Y
FSC C
Z
FB
S N
TE
EJ
X
M
Y
FSC C
Z
FB
S NTE
EJ
X
M
Y
FSC C
Z
FORMATION/PLAY:
BIG BIG
RB
FORMATION/PLAY:
BIG BIG
RB
FORMATION/PLAY:
BIG BIG
RB
FORMATION/PLAY:
BIG BIG
RB
Pass and Deceptives
Rt Clump Z Fly Back 92 Slant Z Arrow
Rt Solid Y Fly 92 Goaline Special
Rt Solid Z Fly 92 Y Slip Z Arrow
Rattlers Heavy Packages

RATTLERSOFFENSE
Offensive Screens and Gadgets

E
T
N E
Z
J
X
M
Y
QB
BC
FB
FCFS
RECNO.
POS. Alignment/Coaching Points
Protection Keys Reads/Coaching PointsDrop Formations
QB
Y
X
Z
F
QUICK 1
Route:
Low Hold Route
Zoom Motion and Block the CB.
2 Hard Steps off the Line and Come back behind the LOS and Square up to the QB.
Once you catch the ball get inside 1st block and then work out to the boards.
PSG Quick Step and Release Inside to #2 DB.
Block Away from Play.
If we motion to this and the Defense doesnot roll coverage to it, throw the Quick Scr.
Arizona Rattlers Right Y Zoom X Quick Screen Rt
Right Y Zoom X Quick Screen Rt
Vs. #2 or #3 Press Block most dangerous threat.
Block most dangerous man vs. Press the motion.
Quick 1 Step and Give it to the X.

E
T
NE
Z
J
X
M
Y
QB
BC
FB
FC FS
RECNO. POS. Alignment/Coaching Points
Protection Keys Reads/Coaching PointsDrop Formations
QB
Y
X
Z
F
T
QUICK 1
Low Hold Route
Zoom Motion and Block the CB.
2 Hard Steps off the Line and Come back behind the LOS and Square up to the QB.
Once you catch the ball get inside 1st block and then work out to the boards.
Quick Step and Release Inside to #2 DB.
Block Away from Play.
Quick 1 Step and Give it to the Y. If we motion to this and the Defense doesnot roll coverage to it, throw the Quick Scr.
Arizona Rattlers
Vs. #2 or #3 Press Block most dangerous threat.
Left Y Zoom X Quick Screen Lt
Left Y Zoom X Quick Screen Lt

ET
N E
Z
J
X
M
Y
QB
BC
FB
FCFS
RECNO.
POS. Alignment/Coaching Points
Protection Keys Reads/Coaching PointsDrop Formations
QB
Y
X
Z
F
Route:
Low Hold Route
PSG
2 Step and Pump Fake, 3 More and Throw offof FS and Field CB.
2 Hard Steps off the Line and Come back, Look at QB and Release on Hard Post Route.
Zoom Motion and Show Screen Block On CB.Stutter and release in front of to Go Route.
Block Protection Called.
Block Protection Called.
Arizona Rattlers Right Y Zoom 55 PUMP
Right Y Zoom 55 PUMP

E
T
NE
Z
J
X
M
Y
QB
BC
FB
FC
FS
RECNO.
POS. Alignment/Coaching Points
Protection Keys Reads/Coaching PointsDrop Formations
QB
Y
X
Z
F
QUICK 1
Low Hold Route
PSG
2 Step and Pump Fake, 3 More and Throw offof FS and Field CB.
2 Hard Steps off the Line and Come back, Look at QB and Release on Hard Post Route.
Zoom Motion and Show Screen Block On CB.Stutter and release in front of to Go Route.
Block Protection Called.
Block Protection Called.
Route:
Arizona Rattlers
Left Y Zoom 54 Pump
Left Y Zoom 54 Pump

E
T
N E
Z
J
X
M
YQB
BC
FB
FCFS
RECNO. POS. Alignment/Coaching Points
Protection Keys Reads/Coaching PointsDrop Formations
QB
Y
X
Z
F
QUICK 1
Block Away from Play.
Quick 1 Step and Give it to the Y.
Stalk Block the Playside CB.
2 Hard Steps off the Line and Come back behind the LOS and Square up to the QB.
PSG Quick Step and Release Inside to #3 DB.
Zoom Motion and Block #2 DB from outside or most dangerous threat.
Arizona Rattlers Right Trips Z Zoom Y Quick Screen Rt
Route:Rt Trips Z Zoom Y Quick Screen Rt

E
T
NE
Z
J
X
M
Y
QB
BC
FB
FC FS
RECNO. POS. Alignment/Coaching Points
Protection Keys Reads/Coaching PointsDrop Formations
QB
Y
X
Z
F
T
QUICK 1
Block Away from Play.
Stalk Block the Playside CB.
2 Hard Steps off the Line and Come back behind the LOS and Square up to the QB. Loop Motion and Block Most Dangerous Threat between the BCB and FS.
Quick Step and Release Inside to #3 DB.
Quick 1 Step and Give it to the X.
Arizona Rattlers Left Z Loop Y Quick Screen Left
Left Z Loop Y Quick Screen Left

E
T
N E
Z
J
X
M
Y
QB
BC
FB
FCFS
RECNO. POS. Alignment/Coaching Points
Protection Keys Reads/Coaching PointsDrop Formations
QB
Y
X
Z
F
QUICK 1
Block Away from Play.
Stalk Block the Playside CB.
PSG Quick Step and Release Inside to #3 DB.
Arizona Rattlers Right Z Loop Z Bubble Screen Rt
Stalk Block the Playside FS or 2nd Threat.
Route:Rt Z Loop Z Bubble Screen Rt.
Secure Ball and Run to Heels of #1 WR.
Quick 1 Step Drop and throw bubble to the Z. Pull the Snap early to allow BubbleRoute to stay behind his blockers.
Loop Motion/Bubble Route.Stay behind Blockers.

E
T
NE
Z
J
X
M
YQB
BC
FB
FC FS
RECNO. POS. Alignment/Coaching Points
Protection Keys Reads/Coaching PointsDrop Formations
QB
Y
X
Z
F
QUICK 1
Block Away from Play.
Stalk Block the Playside CB.
PSG Quick Step and Release Inside to #3 DB.
Arizona Rattlers
Quick 3 Step Drop and throw bubble to the Z.
Stalk Block the Playside FS or 2nd Threat.
Left Z Loop Z Bubble Screen Lt
Route:
Left Z Loop Z Bubble Screen Lt
Secure Ball and Run to Heels of #1 WR.Loop Motion/Bubble Route.Stay behind Blockers.

E
T
N E
Z
J
X
M
Y
QB
BC
FB
FC
FS
RECNO. POS. Alignment/Coaching Points
Protection Keys Reads/Coaching PointsDrop Formations
QB
Y
X
Z
F
QUICK 1
Block Away from Play.
PSG Quick Step and Release Inside to #3 DB.
Zoom Motion and Block #2 DB from outside or most dangerous threat.
Short Bubble route and look for ball quickly.Read coverage as to know who the X will be blocking FS or BC.
Quick 1 Step and Give it to the X
Stalk Block the Playside CB
Arizona Rattlers Right Trips Y Zoom Z Bubble Screen Rt
Right Trips Y Zm. Z Bubble Screen Rt.

E
T
NE
Z
J
X
M
Y QB
BC
FB
FCFS
RECNO. POS. Alignment/Coaching Points
Protection Keys Reads/Coaching PointsDrop Formations
QB
Y
X
Z
F
QUICK 1
Block Away from Play.
PSG Quick Step and Release Inside to #3 DB.
Zoom Motion and Block #2 DB from outside or most dangerous threat.
Short Bubble route and look for ball quickly.
Quick 1 Step and Give it to the Z
Arizona Rattlers Left Trey Y Divide Z Bubble Screen Lt
Left Trey Y Divide Z Bubble Screen Lt
Stalk Block the Playside #1 DB from outside.
Read coverage as to know who the Y will be blocking FS or BC.

ET
N E
Z
J
X
M
YQB
BC
FB
FC
FS
POS. Alignment/Coaching Points
Protection Keys Reads/Coaching PointsDrop Formations
QB
Y
X
Z
F
QUICK 1
Route:
PSG
If we motion to this and the Defense doesnot roll coverage to it, throw the Quick Scr.
Depending Upon How we motion you will have most dangerous threat of #1 or #2.
RECNO.
Depending Upon How we motion you will have most dangerous threat of #1 or #2.
Must know Coverage to Bunch by Defense.
Quick 1 Step and Give it to the Z
Bubble Route
Block Away from Play
Quick Step and Release Inside to #3 DB
Arizona Rattlers Right Bunch Y Divide Z Bubble Screen Rt
Right Bunch Y Divide Z Bubble Screen Rt
Divide Motion and Block #2 DB from Outside.
Block #1 DB from Outside.

E
T
NE
Z
J
X
M
Y QB
BC
FB
FC
FS
POS. Alignment/Coaching Points
Protection Keys Reads/Coaching PointsDrop Formations
QB
Y
X
Z
F
QUICK 1
Route:
PSG
Block Away from Play.
If we motion to this and the Defense doesnot roll coverage to it, throw the Quick Scr.
Depending Upon How we motion you will have most dangerous threat of #1 or #2.
RECNO.
Depending Upon How we motion you will have most dangerous threat of #1 or #2.
Bubble Route. Must know Coverage to Bunch by Defense.
Quick Step and Release Inside to #3 DB.
Quick 1 Step and Give it to the Z
Arizona Rattlers
Left Bunch Z Bubble Screen Lt
Left Bunch Z Bubble Screen Lt
Block #1 DB from Outside.
Block #2 DB from Outside.

ET
N E
Z
J
X
M
YQB
BC
FB
FC
FS
POS. Alignment/Coaching Points
Protection Keys Reads/Coaching PointsDrop Formations
QB
Y
X
Z
F
QUICK 1
Route:
PSG
RECNO.
Bubble Route.
Block Protection Called
Block Protection Called
Ball Pump Fake to Z (Bubble) and throw to Y on Slip Screen.
Show Block and slip to Post.
Show Block on CB.
Slip Vertically into the End Zone. Stay away from the Mack or the Jack.
Arizona Rattlers Right Bunch 95 Z Bubble X Slip
Right Bunch 95 Z Bubble X Slip

ET
NE
Z
J
X
M
Y QB
BC
FB
FC
FS
POS. Alignment/Coaching Points
Protection Keys Reads/Coaching PointsDrop Formations
QB
Y
X
Z
F
QUICK 1
Route:
PSG
RECNO.
Bubble Route.
Block Protection Called
Block Protection Called
Show Block on CB.
Show Block and slip to Post.
Ball Pump Fake to Z (Bubble) and throw to Y on Slip Screen.
Slip Vertically into the End Zone. Stay away from the Mack or the Jack.
Arizona Rattlers Left Bunch 94 Z Bubble X Slip
Left Bunch 94 Z Bubble X Slip

E
T
N E
Z
J
X
M
YQB
BC
FB
FC
FS
RECNO. POS. Alignment/Coaching Points
Protection Keys Reads/Coaching PointsDrop Formations
QB
Y
X
Z
F
QUICK 1
PSG
Short Bubble route and look for ball quickly.
Arizona Rattlers
FS If FS stays on Frontside go to Z on Bubble now.
Can also be run with X running GL Special.
Loop Motion Outside and Block the #1 DB to that side.
Run a BOZ route or Go route.
Right Wing Y Outside 94 Z Bubble X BOZ
Right Wing Y Outside 94 Z Bubble X BOZ
Read FS and either go to X on Go or Z on Bubble.

E
T
N E
Z
J
X
M
Y
QB
BC
FB
FC
FS
Protection Keys Reads/Coaching PointsDrop Formations
QB
Y
X
Z
F
T
Alignment/Coaching Points
2 Hard Steps Off the Line and Come Back Behind the LOS to Catch the Ball.
RECNO.
Quick Jab Step and Release to Block CB.
Fake 36 Quick Pitch
Arizona Rattlers
POS.
Run X Quick Screen
Block X Quick Screen
Stay Flat. Anticipate CB coming up hard.
Rt Y Zoom Fake 26 Z Backside Screen Lt
Rt Y Zm Fake 26 Z Backside Screen Lt
Fake 26 Quick Pitch and Reverse Out and give the Z the Ball.
If the CB is pressing the Z, avoid the fullback and throw X Quick Screen.

E
T
NE
Z
J
X
M
Y
QB
BC
FB
FC FS
POS.
Protection Keys Reads/Coaching PointsDrop Formations
QB
Y
X
Z
F
T
Alignment/Coaching Points
2 Hard Steps Off the Line and Come Back Behind the LOS to Catch the Ball.
RECNO.
Quick Jab Step and Release to Block CB.
Fake 37 Quick Pitch
Arizona Rattlers Lt Y Zoom Fake 27 Z Backside Screen Rt
Lt Y Zm Fake 27 Z Backside Screen Rt
Run X Quick Screen
Block X Quick Screen
Fake 27 Quick Pitch and Reverse Out and give the Z the Ball.
If the CB is pressing the Z, avoid the fullback and throw X Quick Screen.

E
T
N E
Z
J
X
M
Y
QB
BC
FB
FCFS
RECNO. POS. Route: Alignment/Coaching Points
Protection Keys Reads/Coaching PointsDrop Formations
QB
Y
X
Z
F
T
Arizona Rattlers
Start motion between 15-18 Yards depth. Anticipate the QB pulling the snap early. Catch ball and run to the feet of the X Reciever.
Block #1 DB from the Outside.
Slide Away Frontside OL must aggressive cut DE.
Run Z Quick Screen and be ready for hot call.
Rt Y Zoom 35 Y Fire Rt
Rt Y Zoom 35 Y Fire Rt
Pull snap between 9 and 7 yards deep. Pitch ball to Y Reciever.

E
T
N E
Z
J
X
M
YQB
BC
FB
FCFS
RECNO. POS. Route: Alignment/Coaching Points
Protection Keys Reads/Coaching PointsDrop Formations
QB
Y
X
Z
F
T
Arizona Rattlers
Block #1 DB from the Outside.
Slide Away Frontside OL must aggressive cut DE.
Run off of Pro Hash if jack Buzzes Motion.
Start motion between 15-18 Yards depth.
Run Bubble Screen and be ready for hot call.
Lt Z Zoom 35 Z Fire Rt
Lt Z Zoom 35 Z Fire Rt
Pull snap between 9 and 7 yards deep.Pitch ball to Z Reciever.
Anticipate the QB pulling the snap early. Catch ball and run to Boards.

E
T
N E
Z
J
X
M
Y
QB
BC
FB
FCFS
RECNO. POS. Route: Alignment/Coaching Points
Protection Keys Reads/Coaching PointsDrop Formations
QB
Y
X
Z
F
T
Big 5 Step, Be Patient and wait for TE to Cross.
Push Hard at the Field CB and Pull up to Block.
Over the Mack and Under the Jack. If MackDoes not Blitz Occupy Him.
High Motion tight to TE. Make Jack Notice You.
Block 95 Protection.
Slide to Nose and Slip Over the top to Drag Route.
Any Kind of Zone Coverage to the Field throw Away.
Right Z Zoom 55 TE Drag
Right Z Zoom 55 TE DragArizona Rattlers

E
T
NE
Z
J
X
M
Y
QB
BC
FB
FCFS
RECNO. POS. Route: Alignment/Coaching Points
Protection Keys Reads/Coaching PointsDrop Formations
QB
Y
X
Z
F
T
Big 5 Step, Be Patient and wait for TE to Cross.
Push Hard at the Field CB and Pull up to Block.
Over the Mack and Under the Jack. If MackDoes not Blitz Occupy Him.
High Motion tight to TE. Make Jack Notice You.
Block 95 Protection.
Slide to Nose and Slip Over the top to Drag Route.
Any Kind of Zone Coverage to the Field throw Away.
Left Z Zoom 54 TE Drag
Left Z Zoom 54 TE Drag
Punch Backside A Gap Rusher
Arizona Rattlers

E
T
N E
Z
J
X
M
Y
QB
BC
FB
FC
FS
POS.Route:
Alignment/Coaching Points
Protection Keys Reads/Coaching PointsDrop Formations
QB
Y
X
Z
F
T
Run a Go Route. Must Get CB turned outsidetoward the Walls.
Run a Post Route. Must Get FS turned inside.
Go Route.
2 Verticle Kicks and Block DE. Slip to Screen.
RECNO.
If Mack Comes then Go to FB. If Mack Stays then Go to TE.
Run a flat route. If Mack is blitzing look for the ball quickly.
Arizona Rattlers Rt Y Zoom 54 F Flat TE Read Screen
Rt Y Zoom 54 F Flat TE Read Screen

E
T
NE
Z
J
X
M
Y
QB
BC
FB
FC
FS
POS. Route: Alignment/Coaching Points
Protection Keys Reads/Coaching PointsDrop Formations
QB
Y
X
Z
F
T
Run a Go Route. Must Get CB turned outsidetoward the Walls.
Run a Post Route. Must Get FS turned inside.
Go Route.
2 Verticle Kicks and Block DE. Slip to Screen.
RECNO.
If Mack Comes then Go to FB. If Mack Stays then Go to TE.
Run a flat route. If Mack is blitzing look for the ball quickly.
May use 52/53 or 54/55 Protection. Use Gap vs. Strong Mack. Use Slide vs. Slow Mack.
Arizona Rattlers Lt Y Zoom 53 F Flat TE Read Screen
Lt Y Zoom 53 F Flat TE Read Screen

ET
N E
Z
J
X
M
Y
QB
BC
FB
FC
FS
POS. Route: Alignment/Coaching Points
Protection Keys Reads/Coaching PointsDrop Formations
QB
Y
X
Z
F
T
Run a Go Route. Must Get CB turned outsidetoward the Walls.
Run a Post Route. Must Get FS turned inside.
Go Route.
RECNO.
Run a flat route. If Mack is blitzing look for the ball quickly.
Arizona Rattlers Rt Y Zoom 52 F Flat Z Backside
Rt Y Zoom 52 F Flat Z Backside
Inside Release and Block Boundary CB.
If Mack Comes then Go to FB. If Mack Stays then Go to Z.
Be alert for Jack Buzzing the Z. Do Not Pass Up a defender to block another.
Be aware that backside DE is unblocked to the QB. Get depth with feet.

ET
NE
Z
J
X
M
Y
QB
BC
FB
FC
FS
POS. Route: Alignment/Coaching Points
Protection Keys Reads/Coaching PointsDrop Formations
QB
Y
X
Z
F
T
Run a Go Route. Must Get CB turned outsidetoward the Walls.
Run a Post Route. Must Get FS turned inside.
Go Route.
RECNO.
Run a flat route. If Mack is blitzing look for the ball quickly.
Arizona Rattlers
If Mack Comes then Go to FB. If Mack Stays then Go to Z.
Inside release and block boundary CB. Be alert for Jack Buzzing the Z. Do Not Pass Up a defender to block another.
Be aware that backside DE is unblocked to the QB. Get depth with feet.
Lt Y Zoom 53 F Flat Z Backside
Rt Y Zoom 53 F Flat Z Backside

E
T
N E
Z
J
X
M
Y
QB
BC
FB
FCFS
RECNO. POS. Route: Alignment/Coaching Points
Protection Keys Reads/Coaching PointsDrop Formations
QB
Y
X
Z
F
T
Rt Y Zoom 55 Sting FB BS Screen LtSTING ROUTE ON FRONTSIDE
Z Reciever - Read Zone or Man. If Man run Shoot Route under Jack. If Zone Take BC out on a go route.
MAN
ZONE
5 Step Drop. Look frontside
Run Sting Route.
Run Sting Route.
Read Man or Zone.
Slide to call slide Bang the DE and slip to screen.
Rt Y Zoom 55 Sting FB BS Screen Lt
Arizona Rattlers
Inside the 15 yard line always run shoot.

E
T
NE
Z
J
X
M
Y
QB
BC
FB
FC FS
RECNO. POS. Route: Alignment/Coaching Points
Protection Keys Reads/Coaching PointsDrop Formations
QB
Y
X
Z
F
T
STING ROUTE ON FRONTSIDE
Z Reciever - Read Zone or Man. If Man run Shoot Route under Jack. If Zone Take BC out on a go route.
MAN
ZONE
5 Step Drop. Look frontside
Run Sting Route.
Run Sting Route.
Read Man or Zone.
Slide to call slide Bang the DE and slip to screen.
Lt Y Zoom 54 Sting FB BS Screen Lt
Lt Y Zoom 54 Sting FB BS Screen Lt
Arizona Rattlers
Inside the 15 yard line always run shoot route.

E
T
N E
Z
J
X
M
YQB
BC
FB
FC
FS
POS. Route: Alignment/Coaching Points
Protection Keys Reads/Coaching PointsDrop Formations
QB
Y
X
Z
F
Fake Iso and Naked Boot. Read Shoot (TE) toBoz.
BOZ Route
Delay Drag. Fit into the Frontside but do notget into the Shoot Route.
Kick Out on DE away.
TE Run a Shoot Route. No Delay.
Arizona Rattlers Rt Solid Y Plunge 23 Naked T Drag
RECNO.
Fake 23 Iso
Rt Solid Y Plunge 23 Naked T Drag

E
T
NE
Z
J
X
M
Y QB
BC
FB
FC
FS
RECNO. POS.
Route:Alignment/Coaching Points
Protection Keys Reads/Coaching PointsDrop Formations
QB
Y
Z
F Kick Out on DE away.
TE Run a Shoot Route. No Delay.
Fake Iso and Naked Boot. Read Delay Arrowto Boz.
Arizona Rattlers Lt Y Trips Y Plunge 22 Naked Z Delay
Lt Trips Y Plunge 22 Naked Z Delay
X BOZ Route
Plunge Motion and Fake Iso.
Block down on End and Run a Delay Arrow. QB must be outside of you before you release to your arrow route.

E
T
N E
Z
J
X
M
Y
QB
BC
FB
FCFS
RECNO. POS. Alignment/Coaching Points
Protection Keys Reads/Coaching PointsDrop Formations
QB
Y
X
Z
F
T
Run a Go Route
Quick Drop and Read Jack. Throwing from TE to Fullback.
Quick 3-5 Jack Rt/Lt Z Loop or Trips
Inside Release of the DE and Work inside the Jack on a Go Route.
Hi Loop Motion and Block X Screen Rt.
Run X Quick Screen Rt QB can chose to give you the ball.
Block X Quick Screen Rt
Run Hot Route Avoid DE. Look Immediately
Arizona Rattlers
94 or 95 Base Center must block man to man on the Nose Guard
Rt Trips Z Zoom 95 TAB
Route:Rt Trips Z Zoom 95 TAB

RATTLERSOFFENSE
Offensive Passing Game

C
Drag (0)Stop (4)
Post (8)Go (9) Post Corner (7)
Slant (2)
Hitch (1)
Storm(3)
Bench (5)In (6)
Route Tree - Numbered Routes
Notes:

Notes:
C WR
QB
WR
Bench and Go Bench Post
Shoot
Delay
Slide Whip
Curl Comeback
Sail Post
Bubble
Smoke Sluggo
Sluggo Post
Dig
Route Tree - Tags and Specials
Smash (Poco)
Pole(Poco)
Poco Route is an option route. The reciever will run a Pole route at 9 yards or a Smash route at 9 yards.
BOZ- (Back of the End Zone)
Stay

From Position Frontside _____ Middle ____ Backside ____ All _____
Motion: Zoom or Loop Motions
YES YES
HIGH MOTION STATIONARY
RIGHT SIDE
Motion: Zoom or Loop Motions
Conversions: Vs. Press Coverage stay with the route. Work DB upfield at least 2 steps and work club rip or club swim across the defenders body to get inside. Turn numbers to QB and make the defender play through your body.
Coaching Points: Vs. Inside reciever position work a slant route release and go high angle backside. We will never throw the football through the Mack/Jack Box.
YES YES
RIGHT SIDE
HIGH MOTION STATIONARY
YES YES
Route Description: Reciever should push off the ball 2 steps with outside foot and stick route at 5 yards depth.
Coaching Points: Reciever must hit landmark and split so there is a throwing lane between him and the QB. Find the QB's eyes.
Conversions: Vs. Press: Convert to Go Route if there is no deep route over the top from any reciever. Vs Press out of high motion reciever should take easiest possible release. Term is "Just Win"
From Position Frontside _____ Middle ____ Backside ____ All _____
From Position Frontside _____ Middle ____ Backside ____ All _____
Motion: Zoom or Loop Motions
Route Description: Reciever should push off the ball 2 steps with outside foot and plant and drive at 45 degree angle inside.
Route Description:
Coaching Points:
Route: Bubble RIGHT SIDE-Only run from Stationary Position
Bubble From #2 Positon
Receiver Routes: 3 Step/90 Routes
Route: Hitch
Route: Slant
STATIONARY vs. press
DB
Conversions:From #2 or #3 Position. Open step and create width immediately. Be ready for to catch the ball at any time. Must be able to get shoulders around when ball is thrown.
Outside or #1 Position. This becomes a stay route.
Route: StayStay
Stay Route- Receiver will hold his route at the LOS and get his numbers to the QB.
Route: Delay Receiver will delay at the LOS for a 2 count and then drive on a slant roue.

From Position Frontside _____ Middle ____ Backside ____ All _____
Conversions:
Coaching Points:
From Position Frontside _____ Middle ____ Backside ____ All _____
Motion: Zoom or Loop Motions
Conversions:
From Position Frontside _____ Middle ____ Backside ____ All _____
Motion: Zoom or Loop Motions
HIGH MOTIONSTATIONARY
HIGH MOTIONSTATIONARY
RIGHT SIDE
Route: Slide
Route: Whip
Motion: Zoom or Loop Motions
RIGHT SIDE-Slide is Inside
RIGHT SIDE-Whip is Outside
Route Description: Quick 2 steps with the outside foot. Drive and sell the slant at a 45 degree angle. At appr. 5 yards depth stick your inside foot and slide out of route creating deception and seperation from the defender.
Coaching Points: Reciever must sell slant. If using it to hold down a defender the reciever must be active and ready for the ball at all times.
Route Description: Quick 2 steps up and angle outside. Drive and sell an outside breaking route at a similar 45 degree angle to the slide route except outside. At appr. 5 yards depth stick your outside foot and slide inside flat creating deception and seperation from the defender.
Conversions:
Coaching Points:
Route: Shoulder Route
Route Description: Run through the inside shoulder of the defender. Eyes must go through the defender.
FS
Receiver Routes: 3 Step/90 Routes

From Position Frontside _____ Middle ____ Backside ____ All _____
Motion: Zoom or Loop Motions
Conversions:
Coaching Points:
From Position Frontside _____ Middle ____ Backside ____ All _____
Motion: Zoom or Loop Motions
Conversions:
HIGH MOTION STATIONARY
From Position Frontside _____ Middle ____ Backside ____ All _____
Motion: Zoom or Loop Motions
Coaching Points:
RIGHT SIDE
HIGH MOTION STATIONARY
RIGHT SIDE
RIGHT SIDE
Route: Arrow
Route: Go Route
Route: Short Storm
Coaching Points: Hit your depth of route at 5 yards. As you roll over your outside leg, snap your eyes around to the QB and be ready for the football.
Route Description: Slight up field movement as you drive on a flat route outside towards the dasher boards.Outside breaking route creating horizontal stretch on the defense. Little to no verticle push in this route except to position the recievers shoulders and body in a position to catch the football on the run.
Conversions: No Conversions.
Route Description: Speed out at 5 yards depth from stationary or high motion. Reciever must roll out on his outside foot creating quick seperation from the defender.
Route Description: Deep takeoff route. Stretch the field by getting fast release. Try to stack the defender in your back pocket.
Receiver Routes: 3 Step/90 Routes

From Position Frontside _____ Middle ____ Backside ____ All _____
Motion: Zoom or Loop Motions
HIGH MOTION STATIONARY
From Position Frontside _____ Middle ____ Backside ____ All _____
RIGHT SIDE
HIGH MOTION
STATIONARY
RIGHT SIDE
RIGHT SIDE
Route: Sluggo
Sluggo Post Sluggo
From Position Frontside _____ Middle ____ Backside ____ All _____Motion: No Motion
Coaching Points: Timing route which requires alot of work. The key for the WR is to make this route look similar to the slant concept. Must also stick the route very hard with your inside foot to get out to the fade.
Route Description: Two step And sell the slant, stick the route with your inside foot and go to fade.
Motion: No Motion
From Position Frontside _____ Middle ____ Backside ____ All _____
Route: Slide and GoMotion: Zoom or Loop Motions
Coaching Points: Route can be run from stationary at any position. It is also an excellent route to run from High Motion, particularly in our caswell package. Receiver must be very athletic and deceptive in his stop and go routes.
Coaching Points: Sell the Slide route first. Stick the slide and work to a flat route for 1-2 steps. Stick the outside foot and go to the post.
Conversions:
Route: Bench and Go
Route Description: The receiver is going to push off the line of scrimmage and sell the bench route. Shorten up the out cut from 15 yards on a bench to 10 yards on Bench and Go. Sell the out cut with a speed out. Make sure you get your eyes back to the QB to get the DB to break on the route.
Conversions: vs. Press run a go route.
Coaching Points: Must set this route up by beating the DB with the Bench route. Best used when the DB is undercutting the Bench route and trying to anticipate the throw by the QB. Not good vs. a DB who plays hard on the upfield shoulder.
Route Description: Two step and sell the slant and go concept. After defender bites on the sluggo then cross his face inside on the post.
Receiver Routes: Big 3 Step Routes
Route: Sluggo Post

From Position Frontside _____ Middle ____ Backside ____ All _____
RIGHT SIDE
HIGH MOTION
RIGHT SIDE
From Position Frontside _____ Middle ____ Backside ____ All _____
Break route at 45 degree Angle away from DB.
Route Description: Single Break Route Broken off opposite foot to 45 degree angle.
Coaching Points: Drive to midline of defender covering high motion and break opposite of his leverage.
Motion: Generally run with Motion and Loop motion to #2 or #3 position.
BALL
BALL
Route: Smash Route
Motion: Zoom or Loop Motions. Can be run from stationary position.
Coaching Points:
Conversions: Vs. Smack Coverage convert and beat deep (just win) coverage. Vs. Sky coverage wiggle inside the Middle Safety.
Coaching Points: Drive in High Motion to midline of defenders body and break off inside foot at 45 degree angle.
Red Zone Adjustment: If we run Poco inside the 15 yard line, set up the route the same way except we will drive up on the toes of the defender and break when we break within 1 yard of his cushion and take it high angle to the corner of the end zone.
Red Zone Adjustment: If we run Poco inside the 15 yard line, set up the route the same way except we will drive up on the toes of the defender and break when we break within 1 yard of his cushion and take it high angle to the corner of the end zone.
From Position Frontside _____ Middle ____ Backside ____ All _____
Motion: Zoom or Loop Motions
Route Description:
Conversions:
Coaching Points:
HIGH MOTION
STATIONARY
RIGHT SIDE
Route Description: Push verticle to 10 yards and then break route to post. Do not double break this route. Break off of outside foot. Make sure you get your depth on this route.
Route: Poco
Receiver Routes: Big 3 Step Routes
Route: Pole

From Position Frontside _____ Middle ____ Backside ____ All _____
Conversions:
Coaching Points:
From Position Frontside _____ Middle ____ Backside ____ All _____
Motion: Zoom or Loop Motions
Coaching Points:
HIGH MOTION STATIONARY
From Position Frontside _____ Middle ____ Backside ____ All _____
Motion: Zoom or Loop Motions
Conversions:
RIGHT SIDE
HIGH MOTIONSTATIONARY
HIGH MOTION STATIONARY
RIGHT SIDE
RIGHT SIDE
Route: Stop
Route: Storm
Route: Bench
Route Description: Speed out at 10 yards depth from stationary or high motion. Reciever must roll out on his outside foot creating quick seperation from the defender.
Coaching Points: Hit your depth of route at 5 yards. As you roll over your outside leg, snap your eyes around to the QB and be ready for the football.
Conversions: Convert to Go vs. Press unless you have a route over the top of you.
Motion: Zoom or Stationary
Route Description: Stem defender inside and push to 15 yards depth. Snap off the top of the route and be ready for the ball right now.
Receiver Routes: 5 Step/50 Routes
Route Description: Drive hard off the ball and sell the Go route. At 10 -12 yards stick outside foot if ball is not there work back to QB.

From Position Frontside _____ Middle ____ Backside ____ All _____
Conversions:
Coaching Points:
From Position Frontside _____ Middle ____ Backside ____ All _____
Motion: Zoom or Loop Motions
Conversions:
HIGH MOTION STATIONARY
From Position Frontside _____ Middle ____ Backside ____ All _____
Motion: Zoom or Loop Motions
Conversions:
HIGH MOTIONSTATIONARY
HIGH MOTIONSTATIONARY
Route: In
Route: Dig
Route: Shoot Motion: Never run Shoot routes with any type of Motion.
RIGHT SIDE
RIGHT SIDE-ALWAYS FRONTSIDE ROUTE
Route Description: Drive off the ball hard. Get defender to driving deep, come under control and run a square in at 15 yards.
Coaching Points: We want to throw this ball on the frontside of the field. We cannot throw this route in the middle of the field.
Coaching Points: This route will be run from the backside or the Inside receiver on the frontside. We will never run this from the Y reciever spot or #1 reciever on the frontside of the formation. We would call the IN route.
Route Description:Drive to set up the post route. At 12 yards post break the route and flatten off at 15 yards. At the top of this route, try and run this route downhill by 1 Yard.
Route Description:Drive flat down the line of scrimmage two steps and then climb in a crossing route. Must take this route under the Mack or Jack linebacker.
Receiver Routes: 5 Step/50 Routes
RIGHT SIDE-THIS WILL ALWAYS BE A BACKSIDE OR MIDDLE RECEIVER ROUTE

From Position Frontside _____ Middle ____ Backside ____ All _____
Conversions:
From Position Frontside _____ Middle ____ Backside ____ All _____
Motion: Zoom or Loop Motions
HIGH MOTION STATIONARY
From Position Frontside _____ Middle ____ Backside ____ All _____
RIGHT SIDE
HIGH MOTIONSTATIONARY
HIGH MOTIONSTATIONARY
RIGHT SIDE
RIGHT SIDE
Route: Post
Route: Corner
Route: Post Corner
Route Description: Deep Post Route driven to 15 yards and break deep at high angle route.
Conversions: If the defender stays high on top of Post break reciever may flatten route off to prevent undercutting.
Coaching Points: Must press off the Line of Scrimmage to get high angle throw in. Good against DB's who are playing too tight or trying to play man to man coverage.
Route Description: Deep Corner route driven to 15 yards and break deep at high angle to corner of field.
Coaching Points: Think high angle early and flatten off route if DB stays high and you cannot break his cushion.
Conversions:
Route Description: Post Corner Route may be run from any alignment. The key to this route is driving to 12 yards and breaking hard on the post before taking it back to the corner.
Coaching Points: When selling the post look back at the QB to get DB to bite. Receiver must be patient with this route. Do not hurry up the route.
Motion: Zoom Loop or Stationary Position.
Motion: Zoom Loop or Stationary Position.
Receiver Routes: 5 Step/50 Routes

E
T
N E
Z
J
X
P
Y
QB
BC
FB
FCFS
RECNO. POS. Route: Alignment/Coaching Points
Protection Keys Reads/Coaching PointsDrop Formations
QB Quick 3 Step Drop
Y
5 Yard Hitch, 2nd Outside Step
5 Yard Hitch, 2nd Outside Step
5 Yard Hitch, 2nd Outside Step
X
Z
TE/FB Protection Called
If pressed, convert to go route
If pressed, convert to go route
Read Softest Defender and Nearest Rec. Pre - Snap.
Must work for throwing lane between the DE and Frontside LBer.
Any reciever in high motion must take easiest possible release and beat the defender. "Just Win"
Arizona RattlersRight Y Zoom 32 Hitch
Right Y Zoom 32 Hitch
3 Step Game

E
T
N E
Z
J
X
P
Y
QB
BC
FB
FCFS
RECNO. POS. Route: Alignment/Coaching Points
Protection Keys Reads/Coaching PointsDrop Formations
QB Quick 3 Step Drop
Y
5 Yard Hitch, 2nd Outside Step
X
Z
TE/FB Protection Called
If pressed, convert to go route
Read Softest Defender and Nearest Rec. Pre - Snap.
5 Yard Hitch, Hard 45 Angle Step and Replacethe Hitch Alignment of the #1 Reciever.
If pressed, release inside of the middle of the field and beat the DB on a go route.
5 Yard Hitch, Hard \45 Angle Step over the topof the inside reciever to the Hitch Position.
If pressed convert to wheel route up the boards.
Arizona RattlersRight Up Y Zoom 32 Hitch Switch
Right Up Y Zoom 32 Hitch Switch
3 Step Game

E
T
N E
Z
J
X
P
Y
QB
BC
FB
FCFS
RECNO. POS. Route: Alignment/Coaching Points
Protection Keys Reads/Coaching PointsDrop Formations
QB Quick 3 Step Drop
Y
X
Z
TE/FB Protection Called
Slant Route off your 2nd Outside Step If pressed stay with your slant release.
5 Yard Hitch Route. Work to Dasher Boards
Read Softest Defender and Nearest Rec. Look Y To Z.
Attack inside Shoulder of FS and release inside regardless of his coverage.
Work 5 yard Hitch Route and work to dasher boards.
Shoulder Route
Arizona Rattlers3 Step GameRight X Zoom 34 Slant Y Shoulder
Right X Zoom 34 Slant Y Shoulder

E
T
N E
Z
J
X
P
YQB
BC
FB
FC
FS
RECNO. POS. Route: Alignment/Coaching Points
Protection Keys Reads/Coaching PointsDrop Formations
QB Quick 3 Step Drop
Y
X
Z
TE/FB Protection Called
5 Yard Hitch Route. Work to Dasher Boards
Arizona Rattlers3 Step GameRight Z Zoom 35 Y Bubble Z Hitch
Always call slide protection away from bubble.
Read defender covering Z. If he squats go frontside to bubble.
Block frontside CB. If FS comes down block him as most dangerous.
Bubble route.
Right Z Zoom 35 Y Bubble Z Hitch

E
T
N E
Z
J
X
P
Y
QB
BC
FB
FCFS
RECNO. POS. Route: Alignment/Coaching Points
Protection Keys Reads/Coaching PointsDrop Formations
QB Quick 3 Step Drop
Y
X
Z
Protection Called
Read Softest and Nearest Defender. Pre - Snap.Look Y to Z
Sell the Slant and Pivot Out Flat to a Slide.
OL/FB
Shoulder Route Must release inside vs. press.
Slide Route
Slide RouteSell the Slant and Pivot Out Flat to a Slide. If Pressed Hold Down Defender on the boards.
Arizona Rattlers
STAY
3 Step GameRight Y Zoom 94 X Slide Y Shoulder
Right Y Zoom 94 X Slide Y Shoulder

E
T
N E
Z
J
X
P
YQB
BC
FB
FCFS
RECNO. POS. Route: Alignment/Coaching Points
Protection Keys Reads/Coaching PointsDrop Formations
QB Quick 3 Step Drop
Y
X
Z
TE/FB Protection Called
Slant Route off your 2nd Outside Step
Slant Route off your 2nd Outside Step
If pressed stay with your slant release.
If pressed stay with your slant release.
Run Bubble Route Open step with outside foot and snap your eyes around and be ready for ball.
Right 92 Bubble, Slide
Pre-Snap read for soft coverage. Think Two Man side to Slide Route.
Arizona RattlersRight Z Zoom 92 Sling 3 Step Game

E
T
N E
Z
J
X
P
Y
QB
BC
FB
FC
FS
RECNO. POS. Route: Alignment/Coaching Points
Protection Keys Reads/Coaching PointsDrop Formations
QB
Y
X
Z
TE/FB Protection Called We can slide protect with all stops.
Read the Drop of the 2 rec. side CB.
5 Yard Hitch Route off of 2nd outside step
Smash Route
Arizona Rattlers
VS. Sky Coverage or any force bythe FS the Y must take inside release and work to the middle of the field.Be Aware of either CB undercutting your route.
Right Y Zoom 92 Smash, X Stay
Right Y Zoom 92 Smash, X Stay (X Delay)
Stay Route X Delay Tag- WR read inside defender. If he stays I stay if he goes deep I go.
3 Step Game
Big 3 Step Drop. Pull the snap 2-3 Yds. early.

E
T
N E
Z
J
X
P
Y
QB
BC
FB
FC
FS
RECNO. POS. Route: Alignment/Coaching Points
Protection Keys Reads/Coaching PointsDrop Formations
QB
Y
X
Z
TE/FB Protection Called
Shoot route
Z Loop Motion and Run a Smash Route
If pressed run a shoot route across the formation.
Arizona RattlersRight Trips Z Zoom 92 Z Smash, X Stay
Right Trips Z Zoom 92 Z Smash, X Stay
Hitch Route
Stay
3 Step Game
Big 3 Step Drop. Pull the snap 2-3 Yds. early.

E
T
N E
Z
J
X
P
Y
QB
BC
FB
FCFS
RECNO. POS. Route: Alignment/Coaching Points
Protection Keys Reads/Coaching PointsDrop Formations
QB
Y
X
Z
TE/FB Protection Called
5 Yard Hitch Route off of 2nd outside step
Pre-Snap read for soft coverage.
If pressed you must stay with route called.
Arizona RattlersRight Y Zoom 92 Pole X Delay
Right Y Zoom 92 Pole X Delay
Pole Route
Delay Slant. If pressed you must stay with route called.
3 Step Game
Big 3 Step Drop. Pull the snap 2-3 Yds. early.

E
T
NE
Z
J
X
P
Y
QB
BC
FB
FCFS
RECNO. POS. Route: Alignment/Coaching Points
Protection Keys Reads/Coaching PointsDrop Formations
QB
Y
X
Z
TE/FB Protection Called
Hitch Route
Poco Route
Arizona Rattlers
Big 3 Step Drop. Pull the snap 2-3 Yds. early.
Right Y Zoom 92 Poco X Delay
Right Y Zoom 92 Poco X Delay
Delay Slant
3 Step Game

E
T
N E
Z
J
X
P
Y
QB
BC
FB
FCFS
RECNO. POS. Route: Alignment/Coaching Points
Protection Keys Reads/Coaching PointsDrop Formations
QB
Y
X
Z
TE/FB Protection Called
5 Yard Hitch Route off of 2nd outside step
5 Yard Hitch Route off of 2nd outside step
Big 3 Step Drop Pre-Snap read for soft coverage.
If pressed you must stay with route called.
If Pressed you will work under the X's route.
Right Trips Z Zoom 92 POCO
If pressed run a shoot route across the formation.
Arizona Rattlers
POCO Route - Push Route to 10 Yards and then run Pole or Smash Based on Coverage.
Right Trips Z Zoom 92 Poco 3 Step Game

E
T
N E
Z
J
X
P
Y
QB
BC
FB
FCFS
RECNO. POS. Route: Alignment/Coaching Points
Protection Keys Reads/Coaching PointsDrop Formations
QB
Y
X
Z
TE/FB Protection Called
If any defenders play too far off, hook up and hold hand up for ball.
Quick 5 Step Drop Pre Snap Read For Soft coverage.
We can slide protect with all stops.
Arizona Rattlers
Post Corner
5 Step GameSmoke Route Concepts
Hitch Switch
Hitch Switch
Smoke Route = Hitch and Go
Right Z Zoom 54 Hitch Switch Z Smoke
Right Z Zoom 54 Hitch Switch Z Smoke

E
T
N E
Z
J
X
P
Y
QB
BC
FB
FCFS
RECNO. POS. Route: Alignment/Coaching Points
Protection Keys Reads/Coaching PointsDrop Formations
QB
Y
X
Z
TE/FB Protection Called
If any defenders play too far off, hook up and hold hand up for ball.
Quick 5 Step Drop Pre Snap Read For Soft coverage.
We can slide protect with all stops.
Stops with Tags
Run Tagged Route Called
Arizona Rattlers
Right Z Zoom 54 Hitch Switch Z Post
Hitch Switch
Hitch Switch
Right Z Zoom 54 Hitch Switch Z Post (Z Post Corner, Z Bench) 5 Step Game

E
T
N E
Z
J
X
P
Y
QB
BC
FB
FCFS
RECNO. POS.
Route:Alignment/Coaching Points
Protection Keys Reads/Coaching PointsDrop Formations
QB
Y
X
Z
TE/FB Protection Called
Quick 5 Step Drop
By Tagging the Y reciever, the post route and corner route go well with this combination.
15 Yard Post or Post Corner Cut
Arizona Rattlers
Hitch Route
Hitch Route
X Post X Post Corner
May Tag X receiver routes with any of these options.
X Bench
Right Up X Zoom 53 Hitch X Post
Right Up X Zoom 53 Hitch X Post (X Post Corner, X Bench) 5 Step Game

ET
N E
Z
J
X
P
YQB
BC
FB
FCFS
RECNO. POS. Route: Alignment/Coaching Points
Protection Keys Reads/Coaching PointsDrop Formations
QB
Y
X
Z
TE/FB Protection Called
If any defenders play too far off, hook up and hold hand up for ball.
Pre Snap Read For Soft coverage.
Push Hard off the ball and sit down at 10 yards. Snap head and eyes back to QB.
Push Hard off the ball and sit down at 10 yards. Snap head and eyes back to QB.
Push Hard off the ball and sit down at 10 yards. Snap head and eyes back to QB.
We can slide protect with all stops.
10 yard Stop Route
10 yard Stop Route
10 yard Stop Route
Quick 5 Step Drop
Arizona RattlersRight 54 Stops 5 Step Game
Right 54 Stops

E
T
NE
Z
J
X
P
Y
QB
BC
FB
FC FS
RECNO. POS. Route: Alignment/Coaching Points
Protection Keys Reads/Coaching PointsDrop Formations
QB
Z
TE/FB Protection Called
RECNO. POS. Alignment/Coaching Points
Protection Keys Reads/Coaching PointsDrop Formations
QB
Y
X
Z
TE/FB Protection Called
Low Hold route unless tagged.
Left Wing X Loop 53 Scissors
Left Wing X Loop 53 Scissors
Quick 5 Step Drop
Post Route
Corner Route
Arizona Rattlers5 Step Game
Stack the stem of your route over the top of the alignment of the Z receiver.

E
T
NE
Z
J
X
P
YQB
BC
FB
FCFS
RECNO. POS. Route: Alignment/Coaching Points
Protection Keys Reads/Coaching PointsDrop Formations
QB
Z
TE/FB Protection Called
RECNO. POS. Alignment/Coaching Points
Protection Keys Reads/Coaching PointsDrop Formations
QB
Y
Z
TE/FB Protection Called
Low Hold route unless tagged.
Quick 5 Step Drop
Post Route
Left Wing X Loop 53 Scissors Switch
Corner Route,
Arizona Rattlers5 Step Game
Stack the stem of your route over the top of the alignment of the Z receiver.
X
Left Wing Y Loop 53 Scissors, Switch

E
T
N E
Z
J
X
P
YQB
BC
FB
FCFS
RECNO. POS. Route: Alignment/Coaching Points
Protection Keys Reads/Coaching PointsDrop Formations
QB
Y
X
Z
TE/FB Protection Called
Quick 5 Step Drop
Go Route
By Tagging the Y reciever, the post route and corner route go well with this combination.
6 Yard Speed Out Cut Down 10 Yard Storm Route to 6 yards.
15 Yard Dig
Must Press the Go route hard off the ball.
Right Z Zoom 52 Short Storm, Z Dig
Right Z Zoom 52 Short Storm, Z Dig
Arizona Rattlers5 Step Game

E
T
N E
Z
J
X
P
Y
QB
BC
FB
FCFS
RECNO. POS. Route: Alignment/Coaching Points
Protection Keys Reads/Coaching PointsDrop Formations
QB
Y
X
Z
TE/FB Protection Called
Quick 5 Step Drop
Post Curl Show the Post Route and Curl up at 15 yards depth. Stay outside with this route.
Hitch Route
Arizona Rattlers5 Step GameRight Up X Zoom 52 Curl Combo
Right Up X Zoom 52 Curl Combo
Run Arrow to Hitch Route

E
T
N E
Z
J
X
P
YQB
BC
FB
FCFS
Protection Keys Reads/Coaching PointsDrop Formations
Reciever and QB can sight adjust this route. If the FS is high and over the topflatten this route off as needed.
RECNO. POS. Route: Alignment/Coaching Points
QB
Y
X
Z
TE/FB Protection Called
Quick 5 Step Drop
Go Route
Post Route
Shoot Route
Right 52 Go, Z Shoot (Z Read)
By Tagging Z READ onto the route the Z reciever will run either a Hitch route on the backside vs. soft or off coverage and a shoot route if the CB is tight or in press alignment.
Right 52 Go, Z Shoot (Z Read)
Arizona Rattlers5 Step Game

E
T
N E
Z
J
X
P
YQB
BC
FB
FCFS
RECNO. POS. Route: Alignment/Coaching Points
Protection Keys Reads/Coaching PointsDrop Formations
QB
Y
X
Z
TE/FB Protection Called
Go Route
Shoot Route
Quick 5 Step Drop
Post Route
Arizona Rattlers
Take a slightly wider alignment, first two steps should be flat down the LOS and then drag under the LBers.
X Zoom inside tight along side the Y.
5 Step GameRight Up X Inside 52 Go, Z Shoot
Reciever and QB can sight adjust this route. If the FS is high and over the topflatten this route off as needed.
Right Up X Inside 52 Go, Z Shoot

E
T
N E
Z
J
X
P
Y
QB
BC
FB
FCFS
RECNO. POS. Route: Alignment/Coaching Points
Protection Keys Reads/Coaching PointsDrop Formations
QB
Y
X
Z
TE/FB Protection Called
Quick 5 Step Drop
Go Route
Go Route
Work inside release, stem your route and then post break before you run your dig.
Work A Skinny Post using the X to Clear.
Work an Outside Go Release working through the FC's inside Shoulder.
Read Go Side for Y to X. Vs. Combo on the 2 Rec. Side come backto Dig.
Must Run X High Motion to Get this Clear Route to Work.
Right 52 Sting Switch
Right 52 Sting Switch
Stop Route
Arizona Rattlers5 Step Game

E
T
N E
Z
J
X
P
Y
QB
BC
FB
FCFS
RECNO.
POS. Route: Alignment/Coaching Points
Protection Keys Reads/Coaching PointsDrop Formations
QB
Y
X
Z
TE/FB Protection Called
Quick 5 Step Drop
Work inside release, stem your route and then post break before you run your dig.
Work an Outside Go Release working through the FC's inside Shoulder.
Stop Route
Arizona Rattlers5 Step GameRight Y Zoom 54 Y Comeback
Right Y Zoom 54 Y Comeback
Drive Inside of Y and go vertical.
15 Yard Comeback
Right Tight Y Zoom 50 Y Comeback is also a good route.

E
T
N E
Z
J
X
P
Y
QB
BC
FB
FC
FS
RECNO. POS. Route: Alignment/Coaching Points
Protection Keys Reads/Coaching PointsDrop Formations
QB
Y
X
Z
TE/FB Protection Called
Quick 5 Step Drop
Go Route
Go Route
10-12 Yard In Route
Right X Zoom 52 All Go Y In
Arizona RattlersRight Y Zoom 52 All Go Y In
Press step the and attack the Middle safety. Make him think you are going post and then run go route.
5 Step Game

E
T
N E
Z
J
X
P
YQB
BC
FB
FC
FS
RECNO. POS. Route: Alignment/Coaching Points
Protection Keys Reads/Coaching PointsDrop Formations
QB
Y
X
Z
TE/FB Protection Called
Quick 5 Step Drop
15 Yard Bench Route
15 Yard Bench Route
10 Yard Stop Route
Arizona RattlersRight Up X Zoom 52 Bench, Y Curl
Right Up X Zoom 52 Bench, Y Curl
10-12 Yard Curl Route into the Middle Open Zone of the Defense.
Vs. Press of any kind to middle reciever convert to skinny post route.
5 Step Game

E
T
N E
Z
J
X
P
Y
QB
BC
FB
FC
FS
RECNO. POS. Route: Alignment/Coaching Points
Protection Keys Reads/Coaching PointsDrop Formations
QB
Y
X
Z
TE/FB Protection Called
Quick 5 Step Drop
10 Yard Stop Route
We are thinking Double post route on the backside.
12 Yard Drag
Right Trips X Zoom 52 Double Post
Arizona Rattlers5 Step Game
15 Yard Post Route
We may also tag X on X IN.
Right Trips Y Zoom 52 Double Post
In all of our Double Post concept, High motion alwasy has high post and stationary has low.

E
T
N E
Z
J
X
P
Y
QB
BC
FB
FC
FS
RECNO. POS. Route: Alignment/Coaching Points
Protection Keys Reads/Coaching PointsDrop Formations
QB
Y
X
Z
TE/FB Protection Called
Quick 5 Step Drop We are thinking Double post route on the backside.
Arizona Rattlers5 Step Game
15 Yard Post Route
Right Trips Y Zoom 52 Go Z Slide or Z Read.
Right Trips Y Zoom 52 Go Z Slide
Go Route
6-8 Yard Slide Route

E
T
N E
Z
J
X
P
YQB
BC
FB
FC
FS
RECNO. POS. Route: Alignment/Coaching Points
Protection Keys Reads/Coaching PointsDrop Formations
QB
Y
X
Z
TE/FB Protection Called
Quick 5 Step Drop
Arizona Rattlers5 Step Game
Go Route
Loop to #3 and read low defender to run slide route at 6-8 or slip to backside.
Wheel route. Sit down at 5 yards.
Right Rage Y Short 52 Wheel Y Read
Right Rage Y Short 52 Wheel Y Read

E
T
N E
Z
J
X
P
YQB
BC
FB
FC
FS
RECNO. POS. Route: Alignment/Coaching Points
Protection Keys Reads/Coaching PointsDrop Formations
QB
Y
X
Z
TE/FB Protection Called
Quick 5 Step Drop
Arizona Rattlers5 Step Game
Right Rage Y loop 52 Wheel Y Read
Wheel route. Sit down at 5 yards.
Y Corner
Y Drag
Right Rage Y Short 52 Sling Y Drag
Slant Route
Loop to #3 and run drag route. We can tag corner route on this.

E
T
N E
Z
J
X
P
Y QB
BC
FB
FC
FS
RECNO. POS. Route: Alignment/Coaching Points
Protection Keys Reads/Coaching PointsDrop Formations
QB
Y
X
Z
TE/FB Protection Called
Quick 5 Step Drop
Arizona Rattlers5 Step Game
Wheel route. Sit down at 5 yards.
Slant Route
Bench
Post Corner Y Post
Right Rage Y Crazy 52 Sling Y Post
Right Rage Y Crazy 52 Sling Y Post
Crazy Motion to Post route.Create deception in your motion to gain leverage on the defender.
May tag Post, Post Corner or

E
T
NE
Z
J
X
P
YQB
BC
FB
FC
FS
RECNO. POS. Route: Alignment/Coaching Points
Protection Keys Reads/Coaching PointsDrop Formations
QB
Y
X
Z
TE/FB Protection Called
Quick 5 Step Drop
If the FS moves to the middle of the field with motion we are probably getting Zone Coverage
Run a wheel route but sit down at 10 Yards.
Post CornerPost
Run a wheel route from #2 position and sit down at 5 yards.
Arizona Rattlers
Left Trips Y Loop 53 Wheel, Y Post or Y Post Corner
Read Man or Zone. Often times the FS is the indicator.
Y Loop to frontside and run route called.
On wheel concept if you get any route breaking to your side you sit down at 12-15 yards. If the Y goes away take your wheel up the wall.
Left Trips Y Loop 53 Wheel, Y Postor Y Post Corner 5 Step Game

E
T
N E
Z
J
X
P
Y
QB
BC
FB
FC
FS
RECNO. POS. Route: Alignment/Coaching Points
Protection Keys Reads/Coaching PointsDrop Formations
QB
Y
X
Z
TE/FB Protection Called
Post Corner Combo Post Combo
Curl Combo
Run Arrow to Hitch Route
Run Drag to Backside Hitch Route
Run Post Curl
We can tag High Route with Curl Combo, Post Combo or Post Corner .
Arizona Rattlers5 Step GameRt Bunch Over Y Loop 53 Curl Combo
Rt Bunch Over Y Loop 53 Curl Combo
Quick 5 Step Drop

E
T
N E
Z
J
X
P
YQB
BC
FB
FC
FS
RECNO. POS. Route: Alignment/Coaching Points
Protection Keys Reads/Coaching PointsDrop Formations
QB
X
Z
TE/FB Protection Called
Run a Go Route
Zoom In to #2 and Run a 15 Yard Post Route
Run a Drag to 10 to 12 Yards.
Read Go Route to Double Post Concept
Arizona Rattlers Rt Bunch Y Divide 52 Double Post,
Rt Bunch Y Divide 52 Double Post,
Y
5 Step Game

E
T
N E
Z
J
X
P
YQB
BC
FB
FC
FS
RECNO. POS. Route: Alignment/Coaching Points
Protection Keys Reads/Coaching PointsDrop Formations
QB
X
Z
TE/FB Protection Called
Run a Go Route
Zoom In to #2 and Run a 15 Yard Post Route
Run a Drag to 10 to 12 Yards.
Read Go Route to Double Post Concept
Arizona Rattlers
Y
5 Step Game
Rt Bunch Wide Y Inside 52 Double Post,
Rt Bunch Wide Y Inside 52 Double Post,

RATTLERSOFFENSE
Offensive Red Zone Passing Game

E
T
N E
Z
J
X
M
YQB
BC
FB
FC
FS
RECNO. POS. Route: Alignment/Coaching Points
Protection Keys Reads/Coaching PointsDrop Formations
QB Quick 3 Step Drop
Y
X
Z
Protection Called
Read Softest and Nearest Defender. Pre - Snap.Look Y to Z
Slant Route off your 2nd Outside Step If pressed stay with your slant release. Work release upfield first if possible.
Sell the Slant and Pivot Out Flat to a Slide. If Pressed Hold Down Defender on the boards.
Run Slide Route or Hold Route
OL/FB
Shoulder Route thru FS. Drive at inside shoulder of FS. If FS vacates look for ball right now.
End Zone
Right 34 Slant, Y Shoulder
Right 34 Slant, Y Shoulder
Arizona Rattlers

E
T
N E
Z
J
X
M
Y
QB
BC
FB
FCFS
RECNO. POS. Route: Alignment/Coaching Points
Protection Keys Reads/Coaching PointsDrop Formations
QB Quick 3 Step Drop
Y
X
Z
Protection Called
Read Softest and Nearest Defender. Pre - Snap.Look Y to Z
Slant Route off your 2nd Outside Step
If pressed stay with your slant release. Must release inside vs. press.
Work to the boards and hold down your defender.
Sell the Slant and Pivot Out Flat to a Slide.
OL/FB
End Zone
Slide Route
Slant Route off your 1st Outside Step
Arizona RattlersRight Y Zoom 34 X Slide Y Shoulder
Y= vs. Press slip to BS Corner.
Right Y Zoom 34 X Slide Y Shoulder

E
T
N E
Z
J
X
M
YQB
BC
FB
FCFS
RECNO. POS. Route: Alignment/Coaching Points
Protection Keys Reads/Coaching PointsDrop Formations
QB Quick 3 Step Drop
Y
X
Z
Protection Called
Read Softest and Nearest Defender. Pre - Snap.Look Y to Z
Vs. Press
Right 95 Sluggo
Run Slide Route or Hold Route
OL/FB
Shoulder Route thru FS. Drive at inside shoulder of FS. If FS vacates look for ball right now.
Two Quick steps with outside foot, drive to slant. Stick with inside leg and drive to fade route.
Sell the Slant and Pivot Out Flat to a Slide. If Pressed Hold Down Defender on the boards.
End Zone
Sluggo Route= Slant and Go Route.
Arizona RattlersRight Y Zoom 94 Sluggo

E
T
N E
Z
J
X
M
Y
QB
BC
FB
FC
FS
RECNO. POS. Route: Alignment/Coaching Points
Protection Keys Reads/Coaching PointsDrop Formations
QB
Y
X
Z
Protection Called
Pre-Snap Read for Tough Man or Zone.
Run a Slide Route.
OL/FB
Smash Route
Big 3 Step Drop
Run a Slide or Hitch Route.
Aim to the Corner of the End Zone.
End Zone
Inside the 15 yard line, We will break off the corner route 1-2 yds. in front of FS.
Arizona RattlersRight Y Zoom 94 Smash X Stay
Right Y Zoom 94 Smash X Stay
Stay Route

E
T
N E
Z
J
X
M
Y
QB
BC
FB
FC
FS
RECNO. POS. Route: Alignment/Coaching Points
Protection Keys Reads/Coaching PointsDrop Formations
QB
Y
X
Z
Protection Called
Pre-Snap Read for Tough Man or Zone.
Run a Slide Route.
OL/FB
Smash Route
Delayed Slant Route
Big 3 Step Drop
Run a Slide or Hitch Route.
If pressed, Hold route on the LOS.
Delay at the LOS. Key QB's eyes, give him a look at the Smash. If he does not take it, run a delay slant route.
Aim to the Corner of the End Zone. End Zone
Inside the 15 yard line, We will break off the corner route 1-2 yds. in front of FS.
Arizona RattlersRight Y Zoom 94 Smash X Delay
Right Y Zoom 94 Smash X Delay

E
T
N E
Z
J
X
M
Y
QB
BC
FB
FC
FS
RECNO. POS. Route: Alignment/Coaching Points
Protection Keys Reads/Coaching PointsDrop Formations
QB Quick 3 Step Drop
Y
X
Z
Protection Called
Pre-Snap read for soft coverage.
Run Bubble Route from #1 Rec. Position Work for as much width as possible.
VS. Tough Coverage Run a BOZ Route.
Run a Slide Route.
OL/FB
End Zone
If pressed, convert to BOZ but whip out of it at the back of the Dasher Boards.
Sail Post Route Good against catch man technique by DB. Sell the Sail route and Whip it to the postafter clearing the FS hip.
Arizona RattlersRight Y Zoom 94 Sail Post
Right Y Zoom 94 Sail Post

E
T
N E
Z
J
Y
M
Y
QB
BC
FB
FCFS
X
RECNO. POS. Route: Alignment/Coaching Points
Protection Keys Reads/Coaching PointsDrop Formations
QB
Y
X
Z
End Zone
Protection Called
Read Coverage. Vs. Tough Press Look for the ball of the pick of Z quickly.
Quick 5 Step Drop
Run A BOZ route to the Back of the End Zoneand look for Ball.
OL/FB
High Motion and Run Slide or Slide and Go.
Run Arrow Route.
Read Coverage. Vs. Combo look to sit in the hole. Vs. Man Run Slide & Go.
Y May start his alignment in a wide technique.
Y Must vary his split from the Z based upon the Coverage. Vs. Smack Y Should pick for the Z. Vs. Combo split the difference between the Z and the Y.
We may incorporate BOZ with a whip or a Stutter BOZ and go technique.
Right Trips Y Zoom 54 Caswell
Right Trips Y Zoom 54 Caswell
Arizona Rattlers

E
T
N E
Z
J
X
M
YQB
BC
FB
FCFS
RECNO. POS. Route: Alignment/Coaching Points
Protection Keys Reads/Coaching PointsDrop Formations
QB
Y
X
Z
Protection Called
Line up in a slot formation. Run an Arrowroute after the clear route gets over you.
Loop motion and run a slide route at 3-5 yards.
End ZoneIf we want the dragjust tag the play with ZDrag
Read Coverage. Vs. Tough Press Look for the ball of the pick of Z quickly.
Read Coverage. Vs. Combo look to sit in the hole. Work route off of inside reciever.
Quick 5 Step Drop
Run A BOZ route to the Back of the End Zoneand look for Ball.
OL/FB
Arizona RattlersRight Slot Z Loop 54 Caswell
Right Slot Z Loop 54 Caswell

E
T
N E
Z
J
Y
M
Y
QB
BC
FB
FCFS
X
RECNO. POS. Route: Alignment/Coaching Points
Protection Keys Reads/Coaching PointsDrop Formations
QB
Y
X
Z
End Zone
Protection Called
Read Coverage. Vs. Tough Press Look for the ball of the pick of Z quickly.
Quick 5 Step Drop
Run A BOZ route to the Back of the End Zoneand look for Ball.
OL/FB
High Motion and Run Slide or Slide and Go.
Run Arrow Route.
Read Coverage. Vs. Combo look to sit in the hole. Vs. Man Run Slide & Go.
Y May start his alignment in a wide technique.
We may incorporate BOZ with a whip or a Stutter BOZ and go technique.
Right Bunch or Trey Y Zoom 54 Caswell
Right Bunch or Trey Y Zoom 54 Caswell
Arizona Rattlers

E
T
N E
Z
J
X
M
YQB
BC
FB
FCFS
RECNO. POS. Route: Alignment/Coaching Points
Protection Keys Reads/Coaching PointsDrop Formations
QB
Y
X
Z
Protection Called
End Zone
OL/FB
Arizona RattlersRight Slot Z Loop 66 Short Storm X Boz
Rt. Slot Z Loop 66 Short Storm X Boz
Sprint Out
Run A BOZ route to the Back of the End Zoneand look for Ball.
Loop to #2 and run a Short Storm.
Push it up field and work hard to high angleback corner of end zone.
If we go to the left we may go 50's.

E
T
N E
Z
JX
M
YQB
BC
FB
FCFS
RECNO. POS. Route: Alignment/Coaching Points
Protection Keys Reads/Coaching PointsDrop Formations
QB
Y
X
Z
Protection Called
Block most dangerous Threat.
Run Slant or Stop Fade
Loop and Block first threat defender
End Zone
OL/FB
The QB will hand signal 1 of 3 routes for the the X reciever to run. Slant, fade or stop fade based on the alignment of the FC.
QB should look for Slant 1st, Stop Fade 2nd or Regular Fade 3rd.
Hand Signal the route pre snap. Quick 3 Step Drop
Run Backside Quick Screen.
QB- if the FS stays frontside, throw the backside screen to Z.
Rt Y Loop 94 Goaline Special
Rt Y Loop 94 Goaline Special
Arizona Rattlers

E
T
NE
Z
J
X
M
YQB
BC
FB
FC
FS
RECNO. POS. Alignment/Coaching Points
Protection Keys Reads/Coaching PointsDrop Formations
QB
Y
X
Z
Protection Called
Block most dangerous Threat.
The Y reciever will run a slant,or stop fade based on the alignment of the FC.
Quick 3 Step Drop
Run Slant or Stop Fade
Loop and Block first threat defender
Run Bubble Route
Quick 3 Step drop and throw regular or slant or throw stop fade just like hitch.
Pre Snap read the alignment of Field Corner. If the Safety does not go with X then work the Bubble Screen to the Z.
End Zone
OL/FB
Lt Y Loop 95 Goaline Special
Route: Lt Y Loop 95 Goaline Special
Arizona Rattlers

E
T
N E
Z
J
X
M
YQB
BC
FB
FC
FS
RECNO. POS. Route: Alignment/Coaching Points
Protection Keys Reads/Coaching PointsDrop Formations
QB
Y
X
Z
Protection Called
Run Slant or Stop Fade
Loop and Block first threat defender
End Zone
OL/FB
The QB will hand signal 1 of 3 routes for the the X reciever to run. Slant, fade or stop fade based on the alignment of the FC.
Hand Signal the route pre snap. Quick 3 Step Drop
Run Backside Quick Screen.
QB- if the FS stays frontside, throw the backside screen to Z.
Arizona RattlersRt Wing Y Outside 94 Goaline Special
Y Blocks 1st Threat
Rt Wing Y Outside 94 Goaline Special
IF they keep FS frontside throw Z bubble to Z receiver.
If CB is soft be alertfor Jack to BUZZ.

E
T
N E
Z
J
X
M
YQB
BC
FB
FC
FS
RECNO. POS. Route: Alignment/Coaching Points
Protection Keys Reads/Coaching PointsDrop Formations
QB
Y
X
Z
End Zone
Quick 3 Step Drop
Loop and Sell ISO Fake
Block and Seal Defensive End
BOZ Route
TE Show Down Block and Release to Drag. Must release under the Jack.
Rt Solid Y Loop 23 Naked T Drag
Rt Solid Y Loop 23 Naked T Drag
Arizona Rattlers

E
T
NE
Z
J
X
M
Y QB
BC
FB
FC
FS
RECNO. POS. Route: Alignment/Coaching Points
Protection Keys Reads/Coaching PointsDrop Formations
QB
Y
X
Z
End Zone
Quick 3 Step Drop
Loop and Sell ISO Fake
Block and Seal Defensive End
BOZ Route
TE Show Down Block and Release to Drag. Must release under the Jack.
Lt Solid Y Plunge 22 Naked T Drag
Lt Solid Y Plunge 22 Naked T Drag
Arizona Rattlers

E
T
N E
Z
J
X
M
Y
QB
BC
FB
FC
FS
RECNO. POS. Route: Alignment/Coaching Points
Protection Keys Reads/Coaching PointsDrop Formations
QB
Y
X
Z
End Zone
Quick 3 Step Drop
Loop and Sell ISO Fake
OL/FB Block the Play. Do Not Work Downfield.
Delay
BOZ Route
Show Down Block with Hands and Releaseto Flat Route.
Arizona Rattlers X Rt Trips X Plunge 23 Naked Z Delay
X Rt Trips X Plunge 23 Naked Z Delay

E
T
N E
Z
JX
M
YQB
BC
FB
FC
FS
RECNO. POS. Route: Alignment/Coaching Points
Protection Keys Reads/Coaching PointsDrop Formations
QB
Y
X
Z
Protection Called
End Zone
OL/FB
Quick 3 Step Drop
Fade Route
Run Backside High Angle Drag
Run Slide Route
Work fade route from #2 position. Declare a landmark on the Back of the Zone.
Cut FrontsideTE Sluggit
Pre-Snap read for Y Fade. If Fade route is not there Pre Snap then work Slide to Drag after the snap.
Arizona RattlersRt Bunch Y Divide 95 X Fade Z Slide
Rt Bunch Y Divide 95 X Fade Z Slide

E
T
N E
Z
J
X
M
YQB
BC
FB
FC
FS
RECNO. POS. Route: Alignment/Coaching Points
Protection Keys Reads/Coaching PointsDrop Formations
QB
Y
X
Z
End Zone
OL/FB Protection Called- Hard set.
Big 3 step drop
Boz route. Work through outside shoulder of #2 defender.
High Motion and Run Slide or Slide and Go.
Run Arrow Route
Read Coverage. Vs. Combo look to sit in the hole. Vs. Man Run Slide & Go.
Read Coverage. Vs. Tough Press Look for the ball off the pick of Z quickly.
Arizona RattlersRt Bunch Y Inside 52 Caswell
Rt Bunch Y Inside 52 Caswell

E
T
N E
Z
J
X
M
YQB
BC
FB
FC
FS
POS.Route:
Alignment/Coaching Points
Protection Keys Reads/Coaching PointsDrop Formations
QB
Y
X
Z
Protection Called
End Zone
OL/FB
Short Corner Route
Slide Route
RECNO.
Short Storm Route
Big 3 Step Drop
Be patient in route. Work to inside shoulder of #2 defender and sell the backside route before breaking to Corner.Be patient in route. Work route upfield and then snap route off quickly on the out route.
Be patient in route. Work off of the #1 Defenders outside shoulder.
Arizona RattlersRt Bunch Y Inside 52 Short Storm Y Corner
Rt Bunch Y Inside 52 Short Storm Y Corner

E
T
N E
Z
J
X
M
YQB
BC
FB
FC
FS
RECNO. POS. Route: Alignment/Coaching Points
Protection Keys Reads/Coaching PointsDrop Formations
QB
Y
X
Z
Protection Called
End Zone
OL/FB
Quick 1 Step and Give it to the Z.
Block #3 Defender.
Zoom Inside and Block #2 Defender
Quick Bubble Screen and look for the ball quick.
Arizona RattlersRt Bunch Y Inside Z Bubble Screen Rt
May also use Quick motion and block #3.
Rt Bunch Y Inside Z Bubble Screen Rt

E
T
N E
Z
J
X
M
YQB
BC
FB
FC
FS
RECNO. POS. Route: Alignment/Coaching Points
Protection Keys Reads/Coaching PointsDrop Formations
QB
Y
X
Z
Protection Called
End Zone
OL/FB
Block Man on or #2 Defender.
Block Man on or #3 Defender
Right Bunch 95 Y Slant Pick
Right Bunch 95 Y Slant Pick
Quick 1 Step and Give it to the Y
Stab outside and then slant under the X.
Arizona Rattlers

E
T
N E
Z
J
X
M
Y
QB
BC
FB
FC
FS
RECNO. POS. Route: Alignment/Coaching Points
Protection Keys Reads/Coaching PointsDrop Formations
QB
Y
X
Z
Protection CalledOL/FB
Big 3 Step Drop
Delay at the LOS. Key QB's eyes, give him a look at the Smash. If he does not take it, run a delay slant route.
End Zone
Inside the 15 yard line, We will break off the corner route 1-2 yds. in front of FS.
Arizona RattlersRight Y Zoom 92 Y Pylon
Run Z Boz or Z Shoot
Run Run X Boz with a whip to the corner of the End Zone.
Right Y Zoom 92 Y Pylon
Buy time with your feet and wait for pylon route to come open. Work Boz or frontside Boz whip.
BOZ Whip to the Front corner of the End Zone.
Drive 1 behind the umpire and drive down to the Pylon.
Run a Boz route.