2007 Mitsubishi Galant - The National Locksmithftp.thenationallocksmith.com/pdf/NLAA_Sample.pdf ·...
16
™ Issue No.126 www.TheNationalLocksmith.com Chat, Forums, Editorial, Online Store, Tech Support Here's a great website for Automotive Locksmiths: The Official Publication of the NATIONAL LOCKSMITH AUTOMOBILE ASSOCIATION™ 08.11 2007 Mitsubishi Galant 1. 2007 Mitsubishi Galant 2. Code Series: F1-F1571 / Key Blank: Ilco MIT13-PT-(N), Service Key: Ilco MIT6. 3. HPC Key Machine Information: DSD: 167, 1200CMB Card No. CF306 / Cutter: CW-1011 / Jaw Type: A / Gauge: Red Tip Stop.
Transcript of 2007 Mitsubishi Galant - The National Locksmithftp.thenationallocksmith.com/pdf/NLAA_Sample.pdf ·...

™
Issue No.126
www.TheNationalLocksmith.com Chat, Forums, Editorial,
Online Store, Tech Support
Here's a great website for Automotive Locksmiths:
The Official Publication of the
NATIONAL LOCKSMITHAUTOMOBILE ASSOCIATION™
08.11
2007 Mitsubishi Galant
1. 2007 Mitsubishi Galant
2. Code Series: F1-F1571 / Key Blank: Ilco MIT13-PT-(N), Service Key: Ilco MIT6.
3. HPC Key Machine Information: DSD:
167, 1200CMB Card No. CF306 / Cutter:
CW-1011 / Jaw Type: A / Gauge: Red Tip Stop.

Manufacturers: Interested inoffering rebates or discounts to NLAA members? Contact Marc
Goldberg at the Home Office
2•AutomotiveEdge National Locksmith Automobile Association
6. HPC Car Opening Authority® Technique TC-2:
National Locksmith Automobile Association™
PublisherMarc Goldberg
DirectorGreg Mango
Printed in the U.S.A. NLAA, a division of the
National Publishing Company Publishers of
THE NATIONAL LOCKSMITH
1533 Burgundy Parkway Streamwood, Illinois 60107
Phone 630-837-2044 Fax 630-837-1210
E-mail address: [email protected]
Unsolicited manuscripts are accepted, but must include SASE.
©2011 National Publishing Co. All rights reserved.
Issue No. 126
4. Space/Inch: 1=841, 2=758, 3=675, 4=592, 5=509, 6=426, 7=343, 8=260
5.TransponderInformation:PhilipsEncryptedSystem.
Depth & Space Dimensions
7. Recommended Tool/Kit: HPC No.AKK-GF Gold Finger Automotive Killer Kit / Includes HPC No.CO-90 Gold Finger™, HPC No.AW-99 Air Wedge®, HPC No.AS-1 AutoSleeve ™.s
Vehicle Opening

National Locksmith Automobile Association IssueNo.126•3
8. Carefully wedge a gap at the window and frame using the HPC No.AW-99 Air Wedge®. Use the HPC No.AS-1 AutoSleeve™ to prevent damage to the weather stripping andautomobilefinish.Note:Extracare should be taken when prying the door away from the door frame.
10. Lock Picking Style: HPC Car Opening Authority Technique PX: Ignition Lock: Acc./On/Start = CW, Off/Lock = CCW. Driver Side Door Lock: Lock = CCW, Unlock = CW. Passenger Side Door Lock: Lock = None. Trunk Lock: None. GloveBoxLock:Lock=CW,Unlock=CCW.
9. Insert the HPC No.CO-90 Gold Finger™ through the gap. Position the tip of the tool
on the electric lock switch or by pulling out on the rocker button. Remove tool and
deflate Air Wedge® before opening door.
11. Vehicle Air Bag Locations: Driver Side Steering Wheel, Seatback, Side Curtain,
Passenger Side Front Dash.

4•AutomotiveEdge National Locksmith Automobile Association
12. Tumblers: 8 / Tumbler Positions: 1-8. Vehicle Code on Cylinder: None.
13. Remove 2 (P-2) screws on bottom portion of column shroud.
14. Remove 2 (P-2) screws, one on each side of steering wheel.
Ignition Lock Removal: Coumn Mount

National Locksmith Automobile Association IssueNo.126•5
15. Remove both top and bottom portions of column shroud.
16. With lock in “Accessory” position, depress on cylinder depression pin located at nine o’clock position of ignition lock housing.
17. Pull outward on ignition lock to remove.
18. Picture of ignition lock.

6•AutomotiveEdge National Locksmith Automobile Association
19. To service ignition lock, carefully push back depression pin to allow core to slide out.
20. Pull out on core (and disc
gate) to remove from housing.
21. Picture of ignition lock core.

National Locksmith Automobile Association IssueNo.126•7
22. Picture of ignition lock parts.
24. HPC Specialty Tools Needed: HPC AST6 Door clip removal tool.
25. Inside drivers door panel of vehicle.
Door Panel Removal
23. Tumblers: 8 / Tumbler Positions: 1-8. Vehicle Code on Cylinder: None.
Door Lock Removal

8•AutomotiveEdge National Locksmith Automobile Association
26. Remove 1 (P-2) screw at door lock/release. Slide trim towards door hinge to remove.
27. Remove 1 (P-2) screw at bottom corner of door panel behind screw cap.
28. Remove reflector lens at door panel edge and remove 1 (P-2) screw.
29. At door arm rest cup, remove cup liner and 1 (P-2) screw.
National Locksmith Automobile Association IssueNo.126•9
30. Using the HPC AST6 Door clip removal tool, remove door panel (8
clips). Pull outward on door panel to remove.
31. Disconnect power window plug.
32. Peel back top corner of door panel liner to access door cavity.
10•AutomotiveEdge National Locksmith Automobile Association
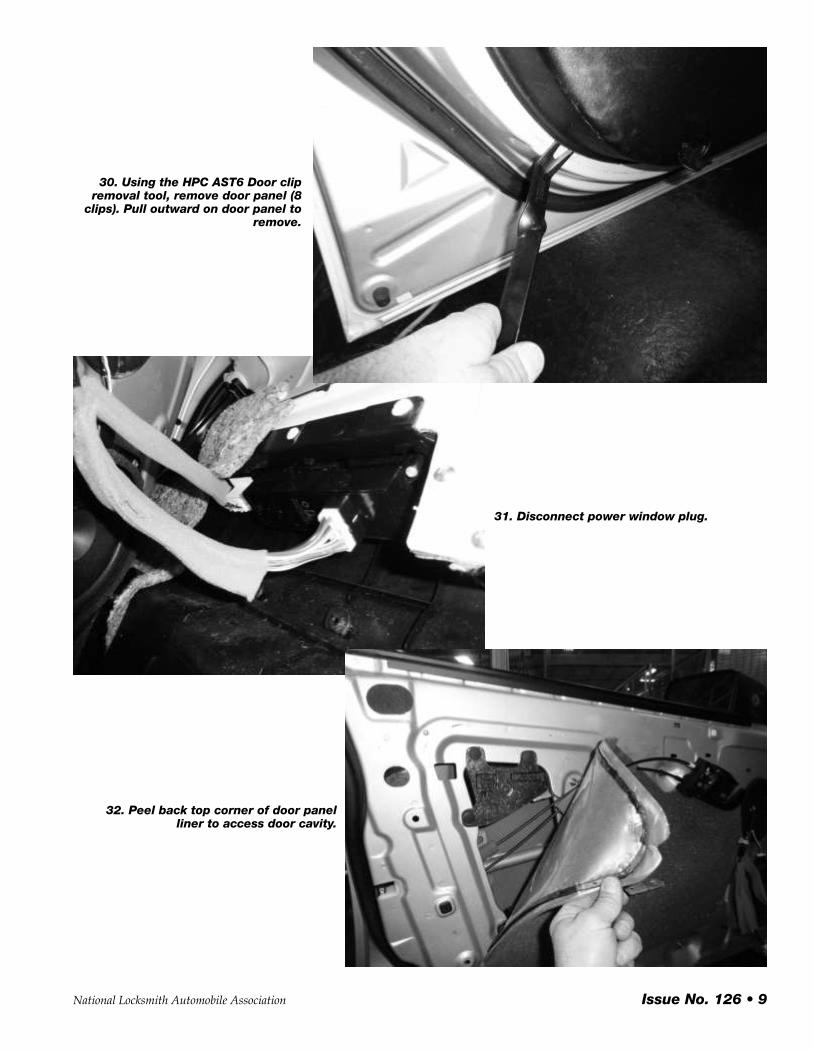
33. Remove small block (3 clips) to access door cavity.
34. Inside view of door lock and handle linkage.
35. To service door lock, first remove 3 (10mm) screws holding door handle to door from inside door cavity. Carefully pull outward on door handle and disconnect handle linkage (yellow snap clip).

National Locksmith Automobile Association IssueNo.126•11
36. Pull back on wire c-clip to free door cylinder.
37. Picture of wire c-clip pulled back to free cylinder.
38. Remove handle from door, hinged at opposite side of lock.
39. Disconnect linkage from lock.

12•AutomotiveEdge National Locksmith Automobile Association
40. Carefully disconnect power lock actuator from cylinder.
41. Picture of door lock.
42. To disassemble door lock, remove c-clip, driver, washer
and clock spring.
43. Remove steel face cap to remove core.

National Locksmith Automobile Association IssueNo.126•13
44. Picture of door lock core.
45. Picture of door lock
parts.
46. Tumblers: 4 / Tumbler Positions: 4-8. Vehicle Code on Cylinder: None.
GloveBoxRemoval

14•AutomotiveEdge National Locksmith Automobile Association
47. Remove 2 (T-20) screws to remove lock.
48. Picture of glove boxlock.
49. Remove plastic face cap to remove core.

National Locksmith Automobile Association IssueNo.126•15
50. Locate and depress holding tumbler (first position) to remove core.
51.Pictureofgloveboxlockcore.
52. Picture of front of vehicle.
53. Picture of rear of vehicle.
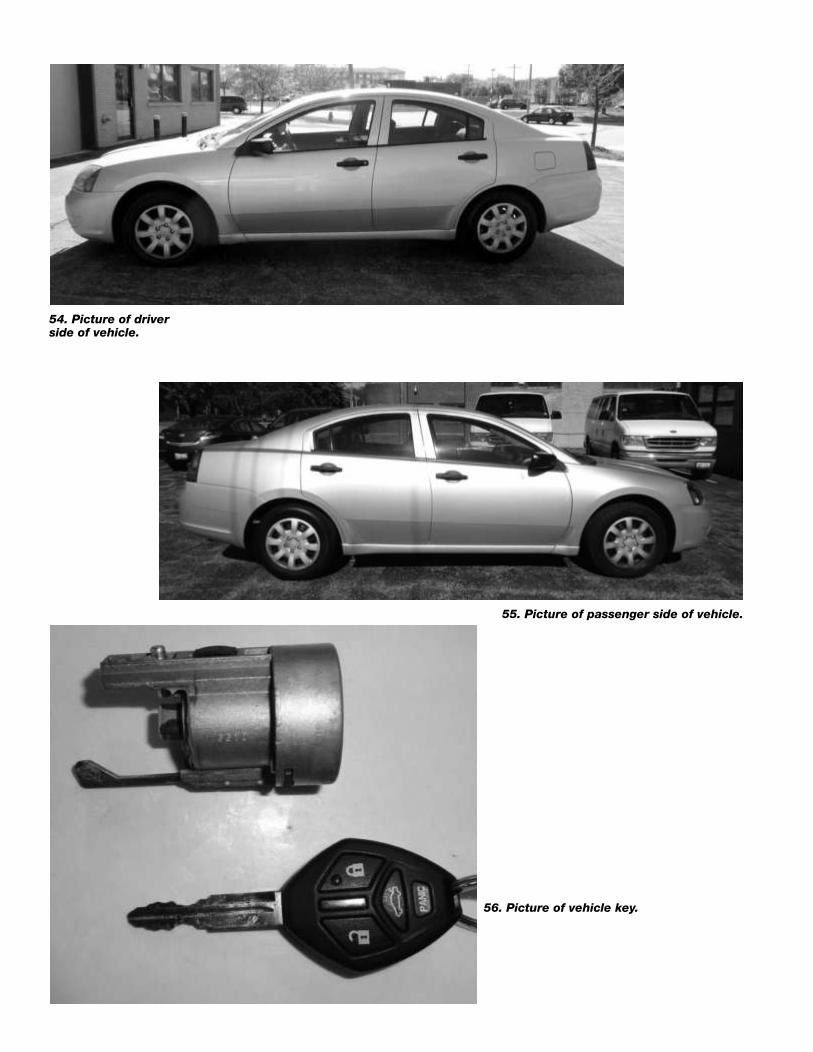
54. Picture of driver side of vehicle.
55. Picture of passenger side of vehicle.
56. Picture of vehicle key.