2005 - RENAULT CLIO III€¦ · Nr katalogowy R/033 Marka od 2005/09 -> Renault Clio III 96-111...
8
Cat. No. 1200Kg 75Kg RENAULT CLIO III 2005 - R/033 e20*94/20*0446*00 7,00kN
Transcript of 2005 - RENAULT CLIO III€¦ · Nr katalogowy R/033 Marka od 2005/09 -> Renault Clio III 96-111...

Cat. No.
1200Kg 75Kg
RENAULT CLIO III2005 -
R/033
e20*94/20*0446*00
7,00kN

���
����
0Km 1000Km
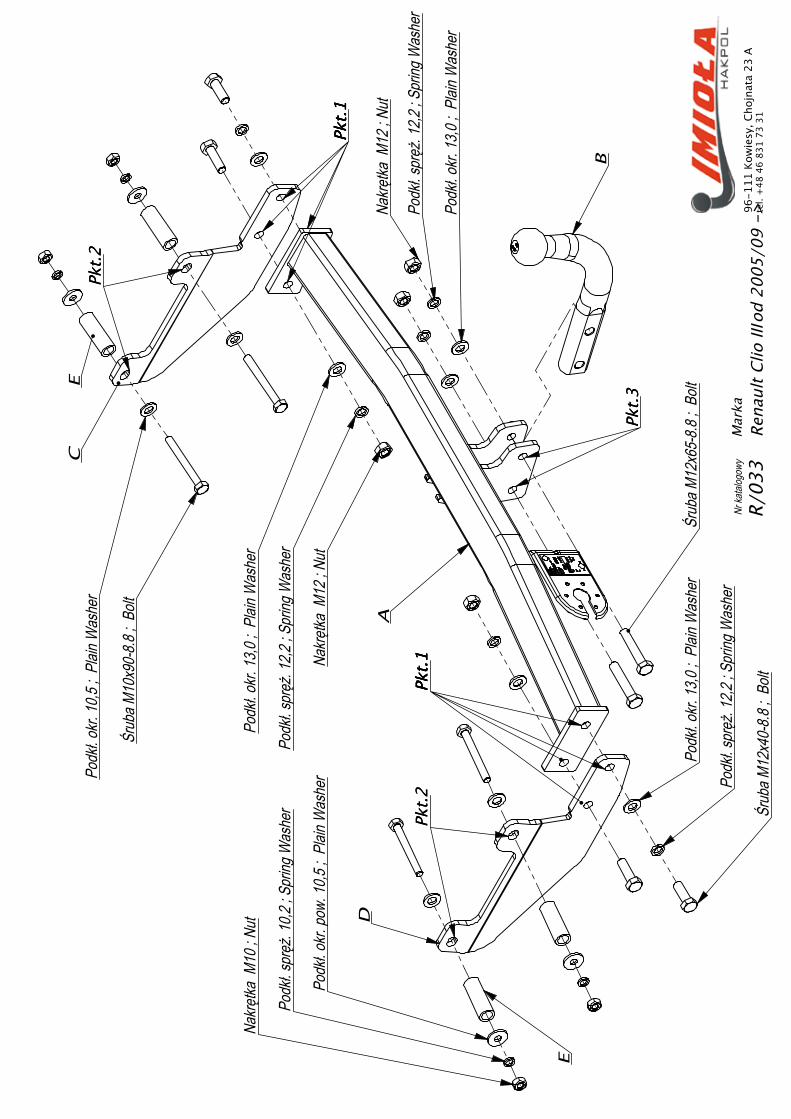
Moment skręcający dla śrub i nakrętek (8.8) Torgue settings for nuts and bolts (8.8)
M8
M10
M12
M14
M16
25Nm
55Nm
85Nm
135Nm
195Nm

x1
B
C
x1
x1
A
M12x65 8.8
M12
M12M10
2
4
M12M10
646
8
M12x40 8.8 4M10x90 8.8 4
M10 4Dx1Ex4Fx1
Nakrętka M10 ; Nut
Nakrętka M12 ; Nut
Nakrętka M12 ; Nut
Śruba M10x90-8.8 ; Bolt
Śruba M12x65-8.8 ; Bolt
Śruba M12x40-8.8 ; Bolt
Podkł. spręż. 10,2 ; Spring Washer
Podkł. spręż. 12,2 ; Spring Washer
Podkł. spręż. 12,2 ; Spring Washer
Podkł. spręż. 12,2 ; Spring Washer
Podkł. okr. 13,0 ; Plain Washer
Podkł. okr. 13,0 ; Plain Washer
Podkł. okr. 13,0 ; Plain Washer
Podkł. okr. 10,5 ; Plain Washer
Podkł. okr. pow. 10,5 ; Plain Washer
A
B
C
D
E
E
Pkt.1Pkt.1Pkt.1Pkt.1
Pkt.1Pkt.1Pkt.1Pkt.1
Pkt.2Pkt.2
Pkt.2Pkt.2
Pkt.3Pkt.3
Nakrę
tka M
10 ; N
ut
Nakrę
tka M
12 ; N
ut
Nakrę
tka M
12 ; N
ut
Śrub
a M10
x90-
8.8 ;
Bolt
Śrub
a M12
x65-
8.8 ;
Bolt
Śrub
a M12
x40-
8.8 ;
Bolt
Podk
ł. spr
ęż. 1
0,2 ; S
pring
Was
her
Podk
ł. spr
ęż. 1
2,2 ; S
pring
Was
her
Podk
ł. spr
ęż. 1
2,2 ; S
pring
Was
her
Podk
ł. spr
ęż. 1
2,2 ; S
pring
Was
her
Podk
ł. okr.
13,0
; Plai
n Was
her
Podk
ł. okr.
13,0
; Plai
n Was
her
Podk
ł. okr.
13,0
; Plai
n Was
her
Podk
ł. okr.
10,5
; Plai
n Was
her
Podk
ł. okr.
pow.
10,5
; Plai
n Was
her
A
B
C
D
E
E
Pkt.1
Pkt.1
Pkt.1
Pkt.1
Pkt.1
Pkt.1
Pkt.1
Pkt.1
Pkt.2
Pkt.2
Pkt.2
Pkt.2
Pkt.3
Pkt.3
Nr ka
talog
owy
R/03
3M
arka
od 2
005/
09 -
>Re
naul
t Clio
III
96-1
11 K
owie
sy, C
hojn
ata
23 A
tel.
+48
46
831
73 3
1

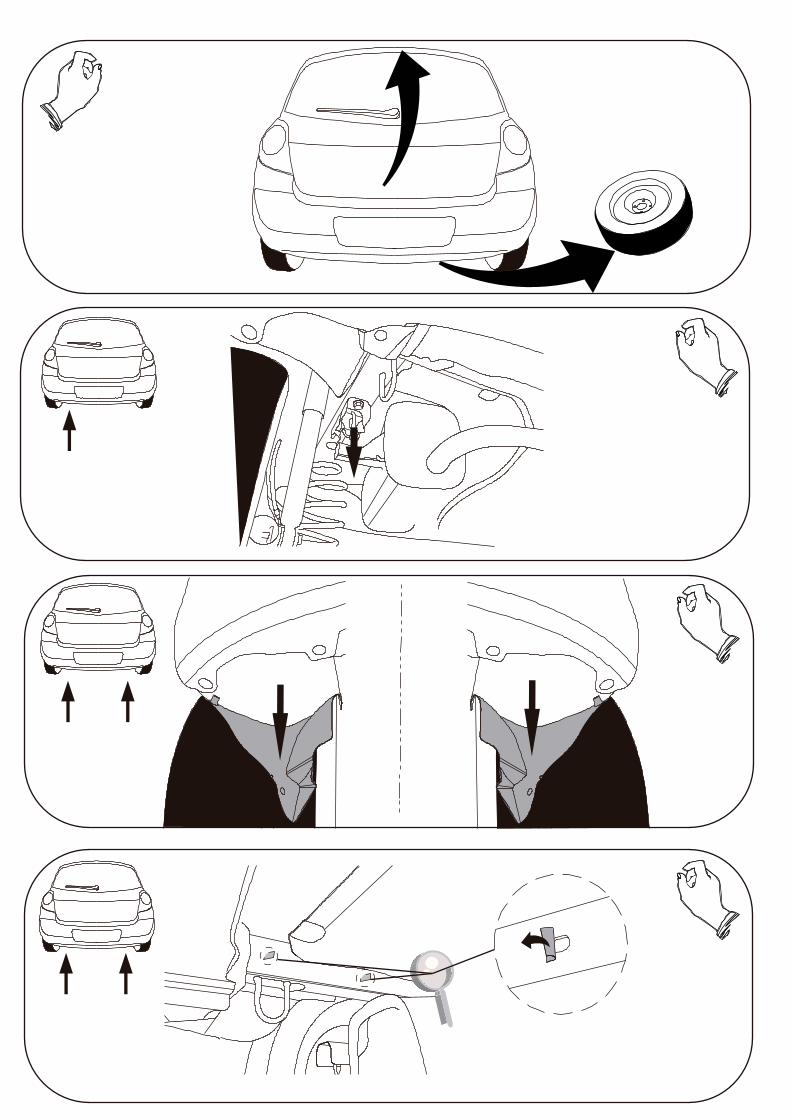
• Odkręcić koło zapasowe.• Poluzować nadkole z prawej strony samochodu.• W fabryczne otwory w podłużnicach od zewnętrznej strony włożyć tuleje dystansowe.• Od wewnętrznej strony podłużnic przykręcić elementy haka C i D do podłużnic śrubami M10x90 8.8 (pkt 2)• Do elementów haka C i D przykręcić belkę haka A śrubami M12x35 8.8 (pkt 1).• Przykręcić kulę i blachę gniazda elektrycznego śrubami M12x65 8.8 (pkt 3).• Dokręcić wszystkie śruby z momentem wg tabeli.• Dokręcić nadkole, przykręcić koło zapasowe.• Podłączyć instalację elektryczną.
• Unscrew the spare wheel.• Loosen the wheel guard plate on the right of the car.• Insert distance sleeves in the technological holes in the metal clamps from the outside.• Screw the elements C and D to the metal clamps from the inside of the metal clamps with bolts M10x90 8.8 (point 2).• Screw the main bar A to the elements C and D with bolts M12x35 8.8 (point 1).• Fix the ball and electric plate with bolts M12x65 8.8 (point 3).• Tighten all the bolts according to the torque setting- see the table.• Screw the wheel guard plate and assemble the spare wheel.• Connect the electric wires.
• Placer les douilles d'écartement dans les ouvertures de longerons,• Visser les éléments d'attache C aux longerons par les boulons M10x100, 8.8 (point 1),• Visser les éléments C et D à la traverse d'attache A par les boulons M12x35 8.8 (point 2),• Serrer tous les boulons avec un couple de serrage selon tableau,• Visser le crochet d'attelage et socle de prise électrique,• Raccorder le circuit électrique.

M10x90 x4
M10 x4
M10 x8
M10 x4
M12x40 x4
M12 x4
M12 x4
M12 x2
E x4

M12x65 x2
M12 x2
M12 x2
M12 x2