2002 Book Repair Manual - AbeBooks€¦ · Techniques described in this booklet are designed to...
32
and Protection! Compliments of Brodart Library Supplies and Furnishings
Transcript of 2002 Book Repair Manual - AbeBooks€¦ · Techniques described in this booklet are designed to...

and Protection!
Compliments ofBrodart Library Supplies
and Furnishings

Need more information?
U.S. & INTERNATIONAL CUSTOMERS:Brodart Company
100 North Road, PO Box 300McElhattan, PA 17748
1-888-820-4377 or FAX 1-800-283-60871-570-769-3265 or FAX 1-570-769-5100
www.brodart.com
CANADIAN CUSTOMERS:Brodart Ltd.
109 Roy BoulevardBrantford, Ontario N3R 7K1
1-800-265-8470 or FAX 1-800-363-04831-519-759-4350 or FAX 1-519-759-1144
www.brodart.ca
Proper book maintenance is as important today as it was years ago when Brodart invented acetatebook jacket covers. To help keep today's books looking better and circulating longer, we offer thiscomplimentary illustrated guide to techniques and materials for simple, effective book repair andprotection. All materials shown have been thoroughly tested.
Techniques described in this booklet are designed to extend the shelf life and circulation of yourgeneral collection books. Rare and valuable books require professional preservation techniquesand products beyond the scope of this booklet.
Note: This book repair booklet is used in the U.S. and Canada and may contain English spellings different from those in Canada.
See Brodart's current full-line catalog for prices and ordering information. If you require additionalBook Repair Booklets (at no charge) or a current Brodart Library Supplies and Furnishings Catalog,please contact us at:
Your expert in bookrepair and protection!
22
Click on the Library Supplies and Furnishings link.

Table of Contents
Anatomy of a Book . . . . . . . . . . . . . . . . . . . . . . .4Making Book Weights . . . . . . . . . . . . . . . . . . . . .5Breaking in New Books . . . . . . . . . . . . . . . . . . . .6Labeling and Protecting Your Labels . . . . . . . . . .7Reinforcing Book Hinges . . . . . . . . . . . . . . . . . . .8Protecting Hardcover Books . . . . . . . . . . . . . .9-10Protecting Paperbacks . . . . . . . . . . . . . . . . . .11-13Protecting Magazines . . . . . . . . . . . . . . . . . . . . .14Binding Pamphlets . . . . . . . . . . . . . . . . . . . . . . .15Cleaning Marked Pages . . . . . . . . . . . . . . . . . . .16Replacing a Loose Page . . . . . . . . . . . . . . . . .17-18Replacing a Loose Signature . . . . . . . . . . . . . . .19Repairing a Torn Page . . . . . . . . . . . . . . . . . .20-21Repairing Loose Hinges . . . . . . . . . . . . . . . . . . .22Repairing Broken Hinges . . . . . . . . . . . . . . . .23-25Repairing Damaged Corners . . . . . . . . . . . . . . .26Repairing Worn Spines . . . . . . . . . . . . . . . . .27-28Book Repair Kits . . . . . . . . . . . . . . . . . . . . . . . . .29Glossary . . . . . . . . . . . . . . . . . . . . . . . . . . . . .30-31
33
To find Brodart products shown in this booklet:❶ Visit us online
and do a keyword or part number search.
❷ Call us to request a free catalog.
❸ Call our knowledgeable customer service team for product guidance.
In the U.S.: 1-888-820-4377www.brodart.com
In Canada: 1-800-265-8470www.brodart.ca
Click on the Library Supplies and Furnishings link.

Anatomy of a Book
For definitions of terms,see glossary on pages 30-31.
SPINE INLAYCOVERBOARD
SUPERPASTE CLOTH
ENDPAPER
HINGES
COVER CLOTH TURN-IN
LEDGE FLYLEAF
SIGNATURES
STITCHING
PAPER LINING
COVERSPINE
TUBE
CONTENTS
CREASE
SUPER
BOTTOM CAP
HEADER CAP
GUTTER
44
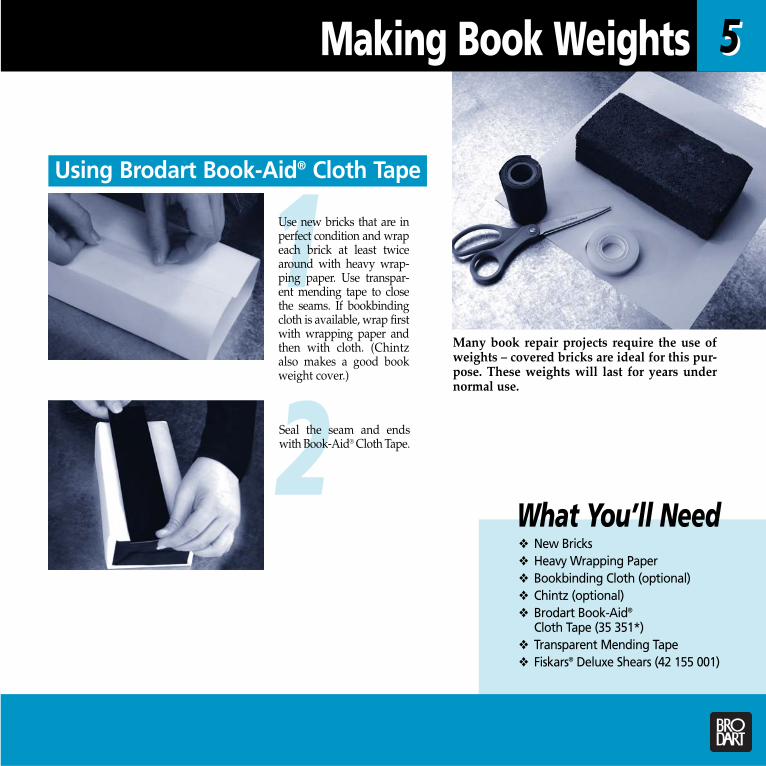
What You’ll Need❖ New Bricks❖ Heavy Wrapping Paper❖ Bookbinding Cloth (optional)❖ Chintz (optional)❖ Brodart Book-Aid®
Cloth Tape (35 351*)❖ Transparent Mending Tape❖ Fiskars® Deluxe Shears (42 155 001)
Making Book Weights
1
2
Use new bricks that are inperfect condition and wrapeach brick at least twicearound with heavy wrap-ping paper. Use transpar-ent mending tape to closethe seams. If bookbindingcloth is available, wrap firstwith wrapping paper andthen with cloth. (Chintzalso makes a good bookweight cover.)
Seal the seam and endswith Book-Aid® Cloth Tape.
Many book repair projects require the use ofweights – covered bricks are ideal for this pur-pose. These weights will last for years undernormal use.
55
Using Brodart Book-Aid® Cloth Tape

Breaking in New Books
Proper "breaking-in" will lengthen the life of any new book, as wellas any newly repaired book. This process will remove some of thestiffness that is typical of most new books and lessen the danger ofbreaking the binding by creating a gradual curvature to the tube sec-tion of the spine. Here's how to "break-in" a book properly:
This is the best preventative maintenance you can do for your books.
66
1
2
Holding the contentsupright, stand the book onits spine. Run your thumb,index finger or bone foldergently along the hinge ofeach cover.
Then, alternating frontand back, firmly but gen-tly press five or ten pagesdown at a time. Whenyou reach the middle ofthe book, the pagesshould lay open flat.

Labeling and Protecting Your Labels
Choosing Labels and Protectors
• Keep label information readable longer.• Keep your labels clean and free from dirt and damage.• Offer fade resistance and additional adhesion to difficult surfaces.• Eliminate labels lifting and peeling.• Brodart label protectors are available in four convenient formats,
three thicknesses, and five materials. See our full-line catalog or go online to find the label protectors you need.
Use Brodart Quality Label Protectors to:
For maximum adhesion, apply labels and protectors to a clean,dry surface. Then burnish entire label with a bone folder toensure full adhesive contact with the surface. Avoid using handlotion on hands.
Applying Labels and Protectors
Most labels are available in five different styles: spine labels, pro-cessing sets, general office use or mailing labels, acid-free for useon rare books, and SuperBond aggressive labels for difficult label-ing surfaces.
When choosing a label protector size find one that will overlap thelabel by at least 1/8" over the top and bottom, and also overlapthe label sizes, past the hinge onto the front and back of the bookby 1/2".
Refer to our full-line catalog or go online for a guide that will helpyou choose label styles.
77
Shown: Brodart Product Cat.# 55 229*

What You’ll Need❖ Fiskars® Deluxe Shears (42 155 001)❖ Brodart Super Hinge Tape
(32 155 001)❖ Ruler❖ Genuine Bone Folder (42 051 001)
Reinforcing book hinges will save you time and money – you won't have to repair them in the future. Flexible yet durable, Super Hinge Tape is the best choice for hinge reinforcements and repairs.
Reinforcing Book Hinges
12
Cut two strips of 1” wideSuper Hinge Tape 1/4”shorter than the spine ofthe book.
Pick up one of the stripsand remove one side ofthe split-back liner. Wrapthe tape around yourruler, adhesive side out,and press the tape in thebook’s hinge.
4Burnish tape with a bonefolder or your finger toensure proper adhesion.
5Repeat steps two to fouron the other spine hinge.
88
Using Brodart Super Hinge Tape
3Remove the other half ofthe liner and press thetape into place.

What You’ll Need❖ Brodart Book Jacket Cover ❖ Genuine Bone Folder (42 051 001)❖ Scotch™ Premium Filament Tape
(optional) (32 398 001, 002)
Protecting Hardcover Books
12
Choose a clean, flat surfaceto work on. Select cover forappropriate size. Removethe jacket from your book.
Place the cover, clear plasticside down, on the surface.Slide your book's paperjacket, printed side down,between the clear plasticand its reinforcing paper.
3Position the top edge ofthe book's jacket snuglyagainst the top edge of thecover – where the clearplastic and reinforcingpaper are glued together.
5Reposition the coveredbook jacket around yourtreasured hardcover book.
Applying Brodart Book Jacket Covers
OPTIONAL: If necessary,tape may be used to anchordust jackets to book.
Brodart has the widest selection of Book Jacket Cover sizes and styles! For help selecting the Book Jacket Cover that’s right for you, call today for our FREE Book Jacket Cover Selection Guide or visit us online! In the U.S.: 1-888-820-4377 • www.brodart.com In Canada: 1-800-265-8470 • www.brodart.ca
4Fold the bottom excess clearplastic and reinforcingpaper (together) along thebottom edge of the book'sjacket. Carefully crease withyour finger or a bone folder.
Brodart Book Jacket Covers are available with orwithout attaching tabs, in archival quality andwith an easy-to-use perforated paper liner.
99

What You’ll Need❖ Brodart Clear Film Roll ❖ Fiskars® Deluxe Shears (42 155 001)❖ Genuine Bone Folder (42 051 001)
Protecting Hardcover Books
Make the book-covering process even easier with a convenient Brodart Book Jacket Roll Dispenser.For additional protection, some collectors and rare book dealers select a Clear Film Roll that’s 1/4” taller than the book they’re covering.
Using Brodart Clear Film Rollsfor Book Jacket Covers
By using Brodart Clear Film Rolls you caneliminate waste – and save money – by cuttingthem to the exact size you need. 1Choose a Clear Film Roll
that is the same height asthe book and cut a cover2" longer than the dustjacket. Use a bone folderto crease the mylar at thespine and cover edges.
END FLAP SPINE
CREASES
1010
2Apply to book. Creases,static and generous endflaps will keep cover onbook. Never use tape.

What You’ll Need❖ Brodart DuraCover Self-Adhesive Book
Cover (11 300*) or Brodart Dura-Guard Adjustable Book Cover (11 113*)
❖ Pencil❖ Brodart Personal-Size
Paper Cutter (42 150 001)❖ Plastic Squeegee (11 120 001)
Protecting Paperbacks
A paperback protected with a DuraCover Self-Adhesive Book Cover is just as durable as a hardcover.Use a plastic squeegee to keep air bubbles from forming inside the cover during application.
1/2” 12
Trace book height andwidth (less 1/2”) onto rigidlaminate. Trace book heightonto flexible spine lami-nate. Trim to size with aPersonal-Size Paper Cutter.
Peel away release linerand apply rigid laminateto book with a plasticsqueegee, leaving a 1/2”space on spine side.Repeat on opposite cover.
3Peel away release liner onflexible laminate, centeron book spine and apply.
Using Brodart DuraCover Self-Adhesive Book Covers(Permanent)
1111
Also Try. . . Brodart Dura-GuardAdjustable Book Covers
A one-piece cover featuring a rigid10-mil front and back, flexible2-mil spine and spine slit liner
for even easier application!

What You’ll Need❖ Brodart Plasti-Kleer®
DuraSaver® (10-mil: 11 065*; 7.5-mil, Matte Finish: 11 066*; 7.5-mil, Clear Finish: 11 060*)
Protecting Paperbacks
Using Brodart Plasti-Kleer®
DuraSavers® (Reusable)
12
Separate the Plasti-Kleer®
DuraSaver® into two piecesby gently pulling apart.
Insert front cover of bookinto slot of larger pieceand back cover intosmaller piece.
3Close the book and pullback the release liner.
4Press down adhesive stripon book cover to sealtogether.
Reusable covers can be removed easily and reapplied to other books of the same size.We also offer Crystal Shield® reusable covers.
1212

What You’ll Need❖ Brodart Self-Adhesive Laminate❖ Fiskars® Deluxe Shears (42 155 001)❖ Genuine Bone Folder (42 051 001)
or Plastic Squeegee (11 120 001)
Protecting PaperbacksUsing Brodart Self-Adhesive Laminate (Permanent)
12
Lay open paperback onSelf-Adhesive Laminate.Using grid printed onbacking paper as yourguide, cut laminate to size,leaving 1” on all sides.
Peel release liner off morethan half of the laminate.
34
Position the book spine inthe center of the laminatefilm, then turn book overonto the exposed adhesive.
Cut off corners of laminateat a 45-degree angle andslit the spine. Trim off endsat spine.
5Fold remaining film overonto inside cover. Pressdown and smooth filmwith a bone folder.
6Burnish all surfaces with abone folder or plasticsqueegee to keep air bub-bles from forming insidethe laminate.
You can also use Self-Adhesive Laminate to protect maps, posters, valuable documents and more.Save the scraps! You can use them to reinforce hinges, corners and spines.
1313

❖ Brodart Clear Tape, 2" wide(32 245 004)
❖ Fiskars® Deluxe Shears (42 155 001)❖ Genuine Bone Folder (42 051 001)❖ Kapco Easy Hold™
Reinforcement Strips (51 125 001)❖ Scotch™ 3M 845 Taping/Reinforcing
System (34 350 001)
What You’ll Need
Protecting Magazines
12
Use 3M 845 Taping/Rein-forcing system to reinforcespine of magazine with 2"wide Clear Tape.
Use the bone folder tosmooth the tape and createa crease on the spine.
3Open magazine to thecenter fold. Remove therelease liner from an EasyHold™ ReinforcementStrip. Press bottom halfinto place.
4Wrap the other half of striparound the outside of maga-zine. Repeat at bottom ofmagazine.
Using Kapco Easy Hold™ Reinforcement Strips and Brodart Clear Tape
Clear Tape reinforces periodicals without hiding important information.For brand-new magazines, steps one and two are sufficient to ensure longer circulation life.
Using Magazine BindersBrodart has an extensive selection of binders for yourmagazines’ protection, including basic plastic covers andlocking versions with 3M security strips. You will evenfind multiple-copy magazine binders to keep your mag-azines together all year. Please check out the magazinebinder section in our full-line catalog or online.
1414

Using Brodart Pamphlet Binders
2Use a paste brush to mois-ten the center strips in theBinder with Bind-Art®.
3Insert the pamphlet. Folddown center strips andlet dry.
1Select the correct size Binderfor your pamphlet, leaving1/2" – 1" extra in width.
What You’ll Need❖ Brodart Pamphlet Binder❖ Paste Brush (42 072 001,
42 074 001, 42 407 001, 42 404 001)❖ Brodart Bind-Art® Adhesive
(40 405 001)
Binding Pamphlets
Brodart Pamphlet Binders are available in manydifferent styles and colors. See our full-line cat-alog or visit us online for all we have to offer.
Make sure the binder is at least 1/2" wider than the pamphlet to fully protect pamphlet pages.
1515

What You’ll Need❖ Art-Gum Eraser❖ Plastic Eraser❖ Steel Eraser (knife) (55 404 001)❖ Liquid Ink Eradicator❖ Fine-Grade Sandpaper❖ Book Cleaner (75 224 001)❖ Document Cleaning Pad
(55 197 001)
Most pencil marks caneasily be removed with anart-gum or plastic eraser.Avoid wrinkling the pageby rubbing from the innermargin outward.
Food, gum and crayon markings are much more difficult toremove. Using a plastic eraser, the best that can be expected isremoval of the top layer, which will at least keep it from smearingthe opposite page. If stuck between pages, the markings cansometimes be removed by placing the book in a freezer (to makeforeign material brittle); then use a steel eraser (knife) to gentlychip away foreign material.
Ink marks are best removed with a sharp steel eraser (knife), unlessthe ink has penetrated the paper too deeply. Then it would be bestto try a commercial liquid ink eradicator (available at any stationerystore). However, these will only remove regular, fountain pen inkmarks; commercial ink eradicators will not affect ballpoint pen inkmarks. If you cannot remove the ballpoint pen ink marks with a steeleraser, it is best to leave them alone.
Some children's books are made with washable, plastic-coatedpaper. To remove markings, follow the washing instructions thatare provided with most washable books.
A book's page edges can become very dirty after much handling.A simple and effective way to clean them is to run a fine-gradesandpaper over them. To get at the edges, lay the book on yourworktable and open the front cover. With the sandpaperwrapped around your fingers (or a small block of wood), rub thepage edges (top, bottom, and side) until clean. You'll be sur-prised at the bright "new look" your book will have.
Book cleaner or documentcleaning pads can also beused to remove dirt,marks and smoke filmfrom pages.
Removing Pencil Marks Removing Ink Marks
Cleaning Marked Pages
Cleaning Children's Books
Cleaning Book Edges
Removing Food, Gum andCrayon Markings
To get rid of musty odors, seal book in a zip-lock bag with either baking soda or unscented kitty litterfor a week or two.
1616

Using Brodart Polyester Tape
What You’ll Need❖ Brodart Polyester Tape, 3/4”
or 11⁄4” wide (32 364*)❖ Fiskars® Deluxe Shears (42 155 001)❖ Brodart Personal-Size Paper Cutter
(42 150 001)
If you have many loose pages within a signature, you can glue them together instead of trying to re-insert them one at a time. (See page 19 for instructions.)
Replacing a Loose Page
12
Use shears to cut twostrips of Polyester Tape1/4” shorter than thebook’s spine.
Trim about 1/8” off theragged page edges with aPersonal-Size Paper Cutter.
34
Remove the release linerfrom one of the strips oftape and press strip intoplace along the inside edgeof the page.
Anchor tape in hinge ofbook, and press tapeagainst the page.
5Turn to the other side ofthe page and repeat stepsthree and four.
1717

What You’ll Need❖ Brodart Personal-Size Paper Cutter
(42 150 001)❖ Waxed Paper
(42 030 002, 42 030 003)❖ Paste Brush (42 072 001,
42 074 001, 42 407 001, 42 404 001)❖ Brodart Bind-Art® Adhesive
(40 405 001) or Acid-Free Bind-Art®
Adhesive (40 415 002)❖ H-Band (37 117*)❖ Book Weight (see instructions to
make your own on page 5)
Replacing a Loose Page
Use a Personal-Size Paper Cutter on damaged edges to ensure that the cut is straight and sharp.For an archival-quality repair, use Acid-Free Bind-Art® Adhesive.
Using Brodart Bind-Art® Adhesive
12
To tip in a loose page, firsttrim about 1/8” off theragged page edges with aPersonal-Size Paper Cutter.
Place waxed paper on bothpages to protect them.
34
Use a paste brush to apply athin line of Bind-Art® wherepage is to be inserted.
Insert loose page, makingsure it is right side up.
5Close book , wrap with anH-band and place under abook weight to dry.
1818

What You’ll Need❖ Book Repair Knife (42 050 001)❖ Brodart Bind-Art® Adhesive
(40 405 001)❖ Brodart Perforated Hinge
Cloth Tape (42 036 005)❖ Fiskars® Deluxe Shears (42 155 001)❖ Paste Brush (42 072 001,
42 074 001, 42 407 001, 42 404 001)❖ Waxed Paper (42 030 002, 42 030 003) ❖ Book Weight (see instructions to
make your own on page 5)❖ Brodart Personal-Size Paper Cutter
(optional) (42 150 001)
Replacing a Loose Signature
12
Using a book repair knife,scrape loose paper andglue from the back of thesignature.
If pages within the signa-ture are loose, use a pastebrush to apply a smallamount of Bind-Art® alongthe edge and reassemble.Let dry.
3
4
Cut a piece of 3/4” widePerforated Hinge ClothTape to the same length asthe signature. Using a damppaste brush, moisten oneside of the tape with Bind-Art® and place the signatureon the tape.
Moisten the other side ofthe tape with Bind-Art®
and replace the signaturein the book.
5Place a sheet of waxedpaper on each side of thesignature, close the bookand place under a bookweight overnight.
When scraping loose paper and glue from the signature, be careful not to remove any remaining stitching from the back. Before gluing the pages into the book, make sure they are the correct width. If not, trim the margin with a Personal-Size Paper Cutter.
Using Brodart Perforated Hinge Cloth Tape
1919

What You’ll Need❖ Scotch™ Magic™ Transparent Tape
(32 320 001, 32 338 001)❖ Fiskars® Deluxe Shears (42 155 001)❖ Genuine Bone Folder (42 051 001)❖ Filmoplast® P Repair Tape
(optional) (55 217 001, 55 190 001)
Repairing a Torn Page
If you accidentally place the tape in the wrong spot, don't try to remove it. Simply smooth the tape with a bone folder and repeat the process. For an archival-quality repair, use acid-free Filmoplast® P Repair Tape.
1Center tape over the tearand apply. Trim away anytape that hangs over thetop of the page.
23
Using a bone folder,smooth tape to remove anyair bubbles or wrinkles.
Repeat the process on theother side of the samepage using a second stripof tape.
Using Scotch™ Magic™
Transparent Tape
2020

What You’ll Need❖ Waxed Paper
(42 030 002, 42 030 003)❖ Brodart Bind-Art® Adhesive
(40 405 001) or Acid-Free Bind-Art® Adhesive (40 415 002)
❖ Paste Brush (42 072 001, 42 074 001, 42 407 001, 42 404 001)
❖ Book Weight (see instructions to make your own on page 5)
Repairing a Torn Page
Using Brodart Bind-Art® Adhesive
Make sure you wash your paste brush thoroughly with water when done or the adhesive will solidify on the bristles. For an archival-quality repair, use Acid-Free Bind-Art® Adhesive.
12
Prepare two pieces ofwaxed paper larger thanthe tear and place one ofthem under the tear.
Using a paste brush, applya light coat of Bind-Art®
along the tear and makesure the words on thepage are lined up.
34Place the second piece ofwaxed paper on top of thetear and close the book.Place under a book weightand let dry.
When dry, remove thewaxed paper. If the paperdoes not lift off easily, allowmore time for drying.
2121

What You’ll Need❖ Knitting Needle ❖ Brodart Bind-Art® Adhesive
(40 405 001) or Acid-Free Bind-Art®
Adhesive (40 415 002)❖ Waxed Paper
(42 030 002, 42 030 003)❖ Fiskars® Deluxe Shears (42 155 001)❖ Brodart Super Hinge Tape
(32 155 001)❖ Genuine Bone Folder (42 051 001)❖ Book Weight (see instructions to
make your own on page 5)
Repairing Loose Hinges
Be careful not to get adhesive on the spine of the book while working the needle inside.For an archival-quality repair, use Acid-Free Bind-Art® Adhesive.
12
Place a rolled piece ofwaxed paper inside thetube of the book. Coat aknitting needle withBind-Art® and insert care-fully between the endpaper and the cover.
Cut two strips of SuperHinge Tape to the lengthof the book and apply tothe inside hinges of thefront and back covers.Gently crease the hingesusing a bone folder.
4Close the book and use abone folder to crease thehinge. Wipe off any Bind-Art® that may leak out.
5Place knitting needles injoints on front and backcovers and leave under abook weight to dry.
Using Brodart Bind-Art® Adhesive
3Place waxed paper in theinside cover to preventthe excess Bind-Art® fromsticking to the end paper.
2222

What You’ll Need❖ Stanley Saddle-Stitch Booklet
Stapler (42 084 011) or a Long Reach Stapler (37 248 001)
❖ Scotch™ Premium Filament Tape,1/4” wide (32 398 001)
❖ Scotch™ 3M 845 Taping/ Reinforcing System (34 350 001)
❖ Brodart Clear Tape, 2” wide (32 245 004)
❖ Genuine Bone Folder (42 051 001)❖ Magazine Binder (optional)
Repairing Broken Hinges on Magazines
Brodart's easy-to-use Magazine Binders will protect your periodicals from everyday wear and tear––and significantly extend their shelf life. If the original staples left holes in the magazine,you may want to start by applying Clear Tape to the spine. This will hold the new staples in place.
12
Using a Saddle-StitchBooklet Stapler or a longreach stapler, re-attach thecover of the magazine.
Open magazine to centerand apply a 1/4” wide stripof Premium Filament Tapeover inside staples using the3M 845 Taping/ReinforcingSystem. Fold the excess tapeover top and bottom edges.
3Reinforce the spine byapplying a 2" wide strip ofClear Tape.
Using Brodart Clear Tape
4Close the magazine andcrease the spine with abone folder.
2323

What You’ll Need❖ Book Repair Knife (42 050 001)❖ Paste Brush (42 072 001,
42 074 001, 42 407 001, 42 404 001)❖ Brodart Bind-Art® Adhesive
(40 405 001)❖ Waxed Paper (42 030 002, 42 030 003) ❖ H-Bands (37 117*)❖ Brodart Super Hinge Tape
(32 155 001)❖ Fiskars® Deluxe Shears (42 155 001)
Repairing Broken Hinges on Paperbacks
To help ward off future damage, reinforce a book's hinges when it is still new.
12
Use a book repair knife toremove loose paper anddried glue from theexposed signatures.
Using a paste brush, applya light coat of Bind-Art® tothe signatures and let dry.
34
Place waxed paper insidethe front and back coversand replace the signatures.
Wrap the book with H-bands and set asideovernight.
5When the glue has dried, cuttwo strips of Super HingeTape the length of the spineand reinforce the book'shinges. (See "RepairingLoose Hinges," p. 22.)
Using Brodart Bind-Art® Adhesive
2424

What You’ll Need❖ Book Repair Knife (42 050 001)❖ Brodart Single-Stitched Binder
Tape (42 037 010, 42 037 011)❖ Fiskars® Deluxe Shears (42 155 001)❖ Brodart Bind-Art® Adhesive
(40 405 001)❖ Paste Brush (42 072 001,
42 074 001, 42 407 001, 42 404 001)❖ Genuine Bone Folder (42 051 001)❖ Waxed Paper (42 030 002, 42 030 003) ❖ Book Weight (see instructions to
make your own on page 5)
Repairing Broken Hinges on Hardcovers
12
If the super is not split allthe way, use a book repairknife to slit the remain-der. Remove loose paperand glue from theexposed signatures.
34
Use a paste brush to applyBind-Art® to the oppositesurface of the tape (twoflaps). Press the spine coveragainst the glued tape(back of the signatures) andhold for a few seconds.
Attach the remaining flapto the end paper. Smooththe tape with a bone folder.
5Place waxed paperbetween the end paperand the flyleaf and closethe book.
Using Brodart Single-Stitched Binder Tape
Allow the adhesive to dry after each step of the repair process.If both front and back hinges are broken, repeat the process on each one.
6Place under a book weightto dry.
2525
Cut a piece of Single-StitchedBinder Tape the length of thebook’s contents. Apply Bind-Art® to one surface of thetape (two flaps). Fit one flapover the flyleaf and affix theother flap to the back of thesignatures.

Repairing Damaged Corners
Before attempting repairs with adhesive materials, make sure the surface of the book is clean. A clean surface facilitates strong adhesion. (See page 16 for cleaning tips.)You can make your own book corners and wings using Brodart Book-Aid® Cloth Tape.
12
Before applying a Book-Aid® Reddi-Corner or Tyvek® Corner to yourbook, use a paste brush to apply acoat of Bind-Art® to the end paper toreinforce it. Let dry and place theBook-Aid® Reddi-Corner or Tyvek®
Corner on the outside point of thebook’s cover.
Fold sides around book to com-pletely cover the corner andsmooth with a bone folder toensure good adhesion.
Using Brodart Book-Aid®
Reddi-Cornersor Tyvek® Corners
Using Brodart Book-Aid®
Book Repair Wingsor Tyvek® Wings 1
2
Apply the Book-Aid® Book RepairWing or Tyvek® Wing to the topspine with the wing tips pointingup.
Open the book and fold the wingtips over the cover. Smooth with abone folder to ensure good adhe-sion. Repeat the process on thebottom spine.
2626
What You’ll Need❖ Brodart Bind-Art® Adhesive
(40 405 001)❖ Brodart Book-Aid® Reddi-Corner
(35 070*, 35 070 006) or Tyvek® Corner (32 151*)
❖ Genuine Bone Folder (42 051 001)❖ Paste Brush (42 072 001, 42 074 001,
42 407 001, 42 404 001)
What You’ll Need❖ Genuine Bone Folder (42 051 001)❖ Brodart Book-Aid® Book Repair
Wings (35 050*, 35 050 006)or Tyvek® Wings (32 150*)

Repairing Worn SpinesUsing Brodart Premium Book-Aid® Cloth Tape with Release Backing
12
Use shears to cut the oldspine of the book. Only cutthrough the creases—notthrough the book’s hinges.
Use a book repair knife toscrape loose paper ordried glue from the backsof the signatures and theedge of the contents.Apply a generous coat ofBind-Art® to the backs ofthe signatures.
3
4
Cut a piece of PremiumBook-Aid® Cloth Tapewith Release Backing 11⁄2”wider than the old spineand 11⁄2” longer than thecover. Remove the releasebacking and place thetape—adhesive side up—on your worktable.
Cut a strip of Kraft paperas long as a side cover andas wide as the backs of thesignatures. Press the paperdown firmly in the centerof the tape.
5Make one cut at each end ofthe tape. Cut lengthwise tothe edge of the Kraft paper,but 1/8” to the side of thepaper. Fold the top and bot-tom center flaps down ontothe Kraft paper and smoothwith a bone folder.
6Pick up the contents andalign the backs of the sig-natures on the Kraftpaper. Attach the ClothTape to each cover.
Continued on the next page . . .
2727

What You’ll Need❖ Fiskars® Deluxe Shears (42 155 001)❖ Book Repair Knife (42 050 001)❖ Brodart Bind-Art® Adhesive
(40 405 001) or Acid-Free Bind-Art®
Adhesive (40 415 002)❖ Paste Brush (42 072 001,
42 074 001, 42 407 001, 42 404 001)❖ Brodart Premium Book-Aid® Cloth
Tape with Release Backing(35 354*)
❖ Kraft Paper❖ Genuine Bone Folder (42 051 001)
Repairing Worn Spines
For an archival-quality repair, use Acid-Free Bind-Art® Adhesive.If the spine of the book is still solid, just apply Cloth Tape to protect it.
7Place the book on its sideand use a bone folder tosmooth the tape downonto the cover. Repeat onthe other side. 8Open the book and fold
the four outer tape flapsonto the end paper, press-ing tape flat with the bonefolder.
2828

Book Repair Kits
Basic Book Repair Kit (42 530 001)Includes the basic products needed to perform book mending or maintenance.Kit includes:
• 1 Brodart Book Repair Manual. • 1 roll Brodart Economy Cloth Tape, 3" x 3 yds., Black. • 2 rolls Brodart Economy Cloth Tape, 2" x 3 yds., 1 each Red and Blue.• 1 roll Scotch™ Magic™ Transparent Tape, 3/4" x 36 yds.• 1 roll Paper Hinge Tape, 1" x 60 yds. • 24 Transparent Brodart Book-Aid® Book Repair Wings.• 96 Transparent Brodart Book-Aid® Reddi-Corners.• Ten 12" x 12" Paste Cloths.• Twenty sheets 6" x 9" Waxed Paper.• 8 oz. Brodart Bind-Art® Adhesive.
Deluxe Book Repair Kit (42 529 001)Includes all the products needed to complete all types of book careand repairs.Kit includes:
• 1 Brodart Book Repair Manual.• 2 rolls Brodart Economy Cloth Tape with Release Liner,
3" x 15 yds., 1 each of Black and Blue.• 2 rolls Brodart Economy Cloth Tape, 2" x 15 yds.,
1 each of Green and Red.• 1 roll Scotch™ 3M 845 Book Tape, 3" x 15 yds.• 1 roll Scotch™ Magic™ Transparent Tape, 3/4" x 36 yds.• 1 roll Paper Hinge Tape, 1" x 60 yds.• 1 roll Tyvek® Single-Stitched Binder Tape, 11⁄2" x 25 ft.• 24 Transparent Brodart Book-Aid® Book Repair Wings. • 96 Transparent Brodart Book-Aid® Reddi-Corners.• 8 oz. Brodart Bind-Art® Adhesive.• Twenty 12" x 12" Paste Cloths.• Fifty sheets 6" x 9" Waxed Paper.• Fifty 6" x 9" End Sheets.• 10 H-Bands, Natural color.• 1 Carrying Case.
Book Repair Tool Kit (42 528 001)Includes all the tools needed to keep your book collection in good condition.
Kit includes one each of the following:
• Genuine Bone Folder.• Fiskars® Deluxe Shears.• X-ACTO Knife.• Paste Brush, 1/2" x 12".• Paste Brush, 1/2" x 6".• Sewing Awl Kit.• Processing Apron.
See our catalog for prices and ordering information. If you requiremore Book Repair Booklets (at no charge) or the current BrodartLibrary Supplies and Furnishings Catalog, contact us at:
U.S.: www.brodart.com 1-888-820-4377Canada: www.brodart.ca 1-800-265-8470
2929

Glossary3030Archival: Acid-free materials that are not harmful
to a book.
Bone Folder: Tool for applying tape and covers, also used to fold and crease paper. Similar to squeegee.
Book Jackets: See-through polyester, polypropylene, or vinyl film for wrapping around books with or without dust jackets.
Bottom Cap: The base of the book spine.
Casing: The simple cover of a book, not yet covered with cloth or leather.
Contents: All the signatures of a book.
Cotton Gloves: Worn to protect books and papers during repairs or handling. If they get soiled, they may be washed by hand with a mild detergent.
Crease: The two grooves in a book's outside case that run head to tail, front to back.
Document For cleaning book jackets, covers Cleaning Pad: or pages. Removes dust, dirt and mold.
Contains a soft, grit-free powder that absorbs dirt and cleans surfaces. Brush away any residue of the powder with a mending brush.
Dust Jacket: The paper cover that wraps around the outside of a book and folds inside the boards. It is usually printed and may have illustrations. It protects the book’s cover and spine from wear and light.
End Paper: A folded sheet of paper, one half of which is glued to the inside front or back cover of the book. The other leaf extends freely and serves as the first or last page of the book.
Flyleaf: The free half of the end paper of a book, it forms the first or last page of the book.
Foxing: The brownish spots that appear on paper over time if the paper is not acid-free.
Paste Brush: A brush that is used to apply adhesive to larger surfaces, such as bookplates and labels, or to apply adhesive to the spine of a book.
"H"-Band: A special double rubber band thatcan be used to apply even pressure over the surface of a book. Used to allow glue to set-up properly.
Header Cap: The top-most part of the book spine.
Hinge: The joint between a book's covers and contents.
Knitting Needle: Used to repair loose covers and to push adhesive down in to joints.

Glossary 3131Ledge: The section of the backs of the
signatures of a book directly underneath a book’s creases. The ledge takes the opening and closing strain off the signature.
Paper Lining: The paper used for lining the backs of the signatures of books.
pH-Neutral An acid-free adhesive that has excellentAdhesive: lay-flat properties and dries clear.
Polyvinyl acetate (PVA) formula is fast setting. This adhesive was formulated specifically for preservation materials and will not become brittle with age.
Polyester: A common name for the plastic polyethylene terephthalate. Its characteristics include transparency, colorlessness, and high tensile strength. Polyester is the preferred material for repairing books because in addition to the protection it provides, over time it will not cause the problems that often occur with materials like polypropylene or vinyl.
Polyethylene: A chemically stable, highly flexible, transparent or translucent plastic.
Polypropylene: A stiff, heat-resistant, chemically stable plastic.
Saddle Stitched: A style of binding magazines or periodicalsconsisting of four, or multiples of four, pages folded from a single sheet and stitched in the center.
Side Cover: One of two sides of a casing. A side cover consists of a coverboard and a section of cover cloth.
Signature: Four (or multiples of four) pages folded from a single sheet of paper and stitched together.
Spine: The surface of a book that usually faces outward when a book sits on a shelf.
Spine Inlay: A strip of paper glued to the inside of a book's spine to provide extra strength.
Stitching: The thread holding a signature together.
Super: The thin, loosely woven, open-meshed cotton fabric that forms the hinge between the cover and pages of a book.
Tape: Tape can be made from a wide variety of materials, including polyester, polypropylene, polyethylene, paper, Tyvek®, or cloth. The type of book repair will dictate the type of tape that is used.
Tube: The open space between a book's spine and the backs of the signatures.
Vinyl: A material that is very soft so it conforms easily, and is also inexpensive. The biggest problem is that over time, chemicals in the vinyl will migrate into adhesive, making it gummy, and over time the vinyl will turn yellow, dry out and crack.

Go online for additional Help Guides:Selecting and Applying Book Jacket Covers • Paperback Book Cover Protection
Bar Coding • Archival Tips • Selecting LaminatesSelecting a Laminator • Selecting Binders • Selecting Labels and Protectors
www.brodart.com www.brodart.ca
Your partner in creating innovative solutions for libraries.
Click on the Library Supplies and Furnishings link.