2. Casing and Tubing
16
Section 2 Casing and Tubing Table of Contents Introduction................................................................................................................................................2-3 Topic Areas ............................................................................................................................................ 2-3 Learning Objectives ............................................................................................................................... 2-3 Unit A: Casing and Tubing Uses ............................................................................................................... 2-3 Unit A Quiz ............................................................................................................................................ 2-4 Unit B: Typical Casing Strings .................................................................................................................. 2-5 Conductor Casing...................................................................................................................................2-5 Surface Casing........................................................................................................................................2-5 Protective Casing (Intermediate Casing)................................................................................................2-6 Production Casing .................................................................................................................................. 2-6 Liners......................................................................................................................................................2-7 Tubing String..........................................................................................................................................2-8 Unit B Quiz ............................................................................................................................................ 2-9 Unit C: Casing and Tubing Threads ........................................................................................................ 2-10 Casing Threads.....................................................................................................................................2-10 Tubing Threads .................................................................................................................................... 2-11 Thread Selection...................................................................................................................................2-12 Make-Up Torque Selection .................................................................................................................. 2-12 Thread Care .......................................................................................................................................... 2-13 Unit C Quiz .......................................................................................................................................... 2-14 Answers to Unit Quizzes ......................................................................................................................... 2-15 2 • 1 Cementing 1
-
Upload
ali-aliiev -
Category
Documents
-
view
269 -
download
1
Transcript of 2. Casing and Tubing

8/13/2019 2. Casing and Tubing
http://slidepdf.com/reader/full/2-casing-and-tubing 1/16
Section 2
Casing and Tubing
Table of Contents
Introduction................................................................................................................................................2-3
Topic Areas ............................................................................................................................................ 2-3
Learning Objectives ...............................................................................................................................2-3
Unit A: Casing and Tubing Uses ...............................................................................................................2-3
Unit A Quiz ............................................................................................................................................ 2-4Unit B: Typical Casing Strings ..................................................................................................................2-5
Conductor Casing...................................................................................................................................2-5
Surface Casing........................................................................................................................................2-5
Protective Casing (Intermediate Casing)................................................................................................2-6
Production Casing ..................................................................................................................................2-6
Liners......................................................................................................................................................2-7
Tubing String..........................................................................................................................................2-8
Unit B Quiz ............................................................................................................................................ 2-9
Unit C: Casing and Tubing Threads ........................................................................................................ 2-10
Casing Threads.....................................................................................................................................2-10
Tubing Threads ....................................................................................................................................2-11
Thread Selection...................................................................................................................................2-12Make-Up Torque Selection ..................................................................................................................2-12
Thread Care .......................................................................................................................................... 2-13
Unit C Quiz .......................................................................................................................................... 2-14
Answers to Unit Quizzes ......................................................................................................................... 2-15
2 • 1 Cementing 1

8/13/2019 2. Casing and Tubing
http://slidepdf.com/reader/full/2-casing-and-tubing 2/16
Casing and Tubing
Use for Section Notes…
2 • 2 Cementing 1

8/13/2019 2. Casing and Tubing
http://slidepdf.com/reader/full/2-casing-and-tubing 3/16
Casing and Tubing
Introduction
For well operations to take place, lengths of
tubular goods are joined together and run down-
hole. Then, surface and downhole equipment
can be connected so that drilling and cementing
operations can proceed.
Due to the nature of our work, Halliburton
personnel must be familiar with basic drilling
operations. An understanding of the factorsinvolved in making up joints of casing, tubing,
and drill pipe will help you work more
effectively with customers as well as better
understand the ways in which Halliburton
equipment is used with these tubular goods.
Topic Areas
This section presents the following topics:
A. Casing and Tubing Uses
B. Couplings and Threads
C. Casing and Tubing Threads
Learning Objectives
Upon completion of this section, you should be
familiar with the
• Purpose and use of tubular goods
• Types of threads and how to select and care
for them
Unit A: Casing and Tubing Uses
Casing design involves three major steps:
1. Determining the sizes and lengths of casingstrings you will run
2. Calculating the type and size of loading
conditions
3. Choosing the weights and grades of casing
that will not fail when exposed to these
loads
This section will discuss the basics for
developing a casing program. An ideal casing
string design allows you to control common and
uncommon well conditions safely and
economically. Specifically, the casing program
should be appropriate for the geological
environment and allow safe well production.
Although it would be easy to choose a single
casing weight and grade to satisfy most well
conditions, you might be going to unnecessary
expense depending on the complexity of the
well.
A casing designer’s main job is to select the
weight and grades of casing that will be juststrong enough to withstand the loading
conditions of the well. Since casing is madefrom steel pipe, cost generally increases with
weight, but tensile strength and grade change
also affect prices. When selecting casing sizes
and final weights and grades, consider the
availability of tubular goods. You may not be
able to purchase certain types of casing in your
area. In extreme cases, you may have to base the
casing design on what is available; the main goal
is to simply make sure the specific string is
suitable for the well.To plan a well, you must first choose a
casing/bit system. When choosing this system,
you should consider
• Past experience with the area
• Geological factors
• Abnormal pressure
2 • 3 Cementing 1

8/13/2019 2. Casing and Tubing
http://slidepdf.com/reader/full/2-casing-and-tubing 4/16
Casing and Tubing
• Troublesome zones (such as salt) and
sloughing shale
• Lost circulation zones
Remember, the casing size and weight chosen
will determine casing inside diameter (ID). This,
in turn affects maximum bit diameter and limitsthe size of the next casing string.
The basic loading conditions on a casing or
tubing string that must be considered are
collapse, burst, and tension. All pipe designs
must carry a safety factor that considers the
uncertainty of the magnitude of these forces.
The Red Book ( Halliburton Cementing Tables)
lists collapse and burst (internal yield)
limitations for common pipe sizes and grades. In
addition, the Redbook provides limitations on
the tensile force (parallel to the axis of thecasing string) that is allowed for different pipe
sizes, grades, and coupling types. Tensile force
on the casing also has an effect upon the
collapse and burst values.
You may also encounter compression and
bending forces, which often occur in non-
vertical holes. The degree to which these forces
are exerted will also effect the burst and collapseresistance of the pipe. Another secondary
condition is load change during cementing due
to the placement of fluids of differing densities.
API bulletins, as well as the Redbook , contain
minimum burst, collapse, and tension casing
values. To use API’s monogram, casing
manufactures must use minimum standards set
by the API. Non-API casing is often
manufactured using the same standards, but for
critical wells, be sure that the material meets all
API standards.
Unit A Quiz
Fill in the blanks with one or more words to check your progress in Unit A.
1. The casing program should be appropriate for the __________________________ and allow safe
well production.
2. The casing size and weight chosen will determine casing ________________________.
3. The basic loading conditions on a casing or tubing string that must be considered are
______________, ________________, and _______________.
2 • 4 Cementing 1

8/13/2019 2. Casing and Tubing
http://slidepdf.com/reader/full/2-casing-and-tubing 5/16
Casing and Tubing
Unit B: Typical Casing Strings
In this unit, we will describe the purpose and use
of tubular goods used in a typical well.
Conductor Casing
Conductor Casing
Reservoir
Figure 2.1 - Conductor Casing
The conductor casing prevents washouts of
poorly consolidated surface soil and rock while
drilling the surface hole. Should the surface
erode, or become unstable, drilling rig stability
is compromised.
Conductor casing normally has a large diameter
(16 to 30 in.). It is either set with a spud rig or
driven to the point of refusal (150 to 250
blows/ft) with a drive or vibration hammer.
Setting depths is normally 90 to 150 ft and rarely
deeper that 300 ft.
Conductor casing allows you to install a diverter
system, and provides a flow line high enough to
allow mud return to steel mud pits while drilling
the surface hole. A blowout preventer (BOP)
may sit on the conductor casing above a large-
diameter (± 10 in.) vent pipe. If shallow
hydrocarbons are found, and the well flows, you
can close the BOP and divert flow away from
the rig. If such a shallow flow is encountered,
the well should not be completely shut in. It islikely, in most cases, that insufficient pipe is set
to prevent fluids or gas from breaking around
the outside of the conductor casing to surface. In
other words, the diverter system protects the rig
and personnel until the problem can be
corrected.
Surface Casing
The surface casing string (Fig. 2.2) is designed
to protect formations near the surface fromdeeper drilling conditions. The surface casing
string has several important functions. First, it
protects shallow freshwater sands from
contamination by drilling fluids and produced
fluids. Surface casing is cemented back to the
surface so freshwater zones will have a cement
sheath and a steel casing to protect them. Depth
and cement requirements are mandated by
regulatory agencies.
Surface casing allows you to drill to the next
casing seat. BOPs are nippled up on the surfacecasing; the well can be controlled if abnormal
conditions cause an inflow of formation fluid to
the wellbore. The surface casing is designed so
that the casing can be totally shut in using
surface equipment. When drilling into abnormal
pressure, casing seats must be able to withstand
increasing mud weights. Casing should be set
deep enough to prevent broaching to the surface.
Finally, surface casing supports all casing strings
run in the well.
2 • 5 Cementing 1

8/13/2019 2. Casing and Tubing
http://slidepdf.com/reader/full/2-casing-and-tubing 6/16
Casing and Tubing
Conductor
Casing
Surface
Casing
Cement
Reservoir
Conductor
Casing
Surface
Casing
Intermediate
Casing
Cement
Cement
Reservoir
Figure 2.2 - Surface Casing (Set inside theconductor casing)
Figure 2.3 - Protective Casing (Set insidethe surface casing and extending from total
depth to surface)
Protective Casing (IntermediateCasing)
One major advantage of protective casing is that
it allows underbalanced drilling of deeper
formations and isolates troublesome ones. It
allows you to isolate sloughing shales,
abnormally pressured saltwater flows, and
formations that contaminate the mud to prevent
interference during drilling operations
A protective (intermediate) casing string (Fig.
2.3) provides hole integrity during later drilling
operations. This intermediate string protects
formations behind it from high mud weights. It
also prevents drilling fluid contamination during
underbalanced drilling. Specifically, it performsthe functions covered in the following
paragraphs.
Production Casing
The production casing string (oil string) (Fig.
2.4) is set and cemented through the producing
zone and acts as a backup for the tubing string
during production. It is the primary string
responsible for isolating the desired production
interval(s). This string must be able to withstand
full wellhead shut-in pressure if the tubing leaks
or fails.
A protective casing string allows you to control
the well when encountering subsurface pressure
higher than the mud weight. If this takes place,
and fluid (or gas) enters the wellbore, drilling
fluid will be forced from the wellbore at surface.
The petroleum industry refers to this as a "kick".
In order to stop the formation-to-wellbore fluid
flow, the surface control equipment must be
closed or partially choked off. A positive surface
pressure will result. The protective casing isdesigned to withstand this pressure. Since it
covers low fracture gradient formations, it
maintains wellbore integrity during well-
kicking. Protective casing also allows you to
control the well if it is swabbed in, or if gas
purges all drilling fluids form the well.
After cementing the production casing, holes
(perforations) are made in the casing (andcement sheath) which allows fluid to enter the
wellbore. This is most often accomplished using
explosive charges ran on wireline units provided
by the logging service line.
When replacing the tubing or downhole tools
during well maintenance operations, you must
make sure the production casing will allow you
2 • 6 Cementing 1

8/13/2019 2. Casing and Tubing
http://slidepdf.com/reader/full/2-casing-and-tubing 7/16
Casing and Tubing
to kill the well (offset bottom hole pressure with
fluid hydrostatic head), circulate workover
fluids, and conduct some pressure testing.
Casing in general and production casing/liners
specifically, allow for a wellbore with consistent
known internal diameter. This is critical whenutilizing special downhole tools that require
these conditions. These tools are commonly
inserted into the casing during completion and
production operations in order to obtain
wellbore isolation at desired points.
In some areas, conditions may allow you to use
small diameter lines; in these instances,
production casing is set for well fluid
production. In other words, these are tubingless
completions – there is no backup string.
Conductor
Casing
SurfaceCasing
IntermediateCasing
ProductionCasing
Casing ShoeCement
Cement
Cement
Reservoir
Figure 2.4 - Production casing (Last fullstring of casing, set from total depth tosurface).
Liners
In the past, it was common to have severalstrings of casing in a deep well. All these strings
extended from the wellhead to different depths.
However, another method was devised to
accommodate varying well conditions. This
time- and money-saving method involves the
hanging of a casing string from the bottom of a
cemented casing string. These hanging casing
strings are called liners and they are used in
almost every deep well completion.
Four types of liners will be described briefly to
begin this section:
• Drilling (or protective) liners
• Production liners
• Stub liners
• Scab liners
Drilling Liners
A drilling liner (Fig. 2.5) is a string of casing
that is hung from another casing of a larger
diameter which has already been cemented
downhole. It is used to case off open holes sothat deeper drilling may be performed. A drilling
liner serves to
• help control water or gas production
• isolate lost-circulation zones
• isolate high-pressure zones.
A drilling liner is subject to the same design
conditions as protective casing, and it provides
the same protections. Multiple drilling liners
may be required. As with all liners, the top of
the casing does not extend to the surface, but is“hung off” at some point in the previous casing
string.
Figure 2.5 - Protective or Drilling liner (Setinside protective casing at current hole totaldepth, but does not extend to surface)
2 • 7 Cementing 1
8/13/2019 2. Casing and Tubing
http://slidepdf.com/reader/full/2-casing-and-tubing 8/16
Casing and Tubing
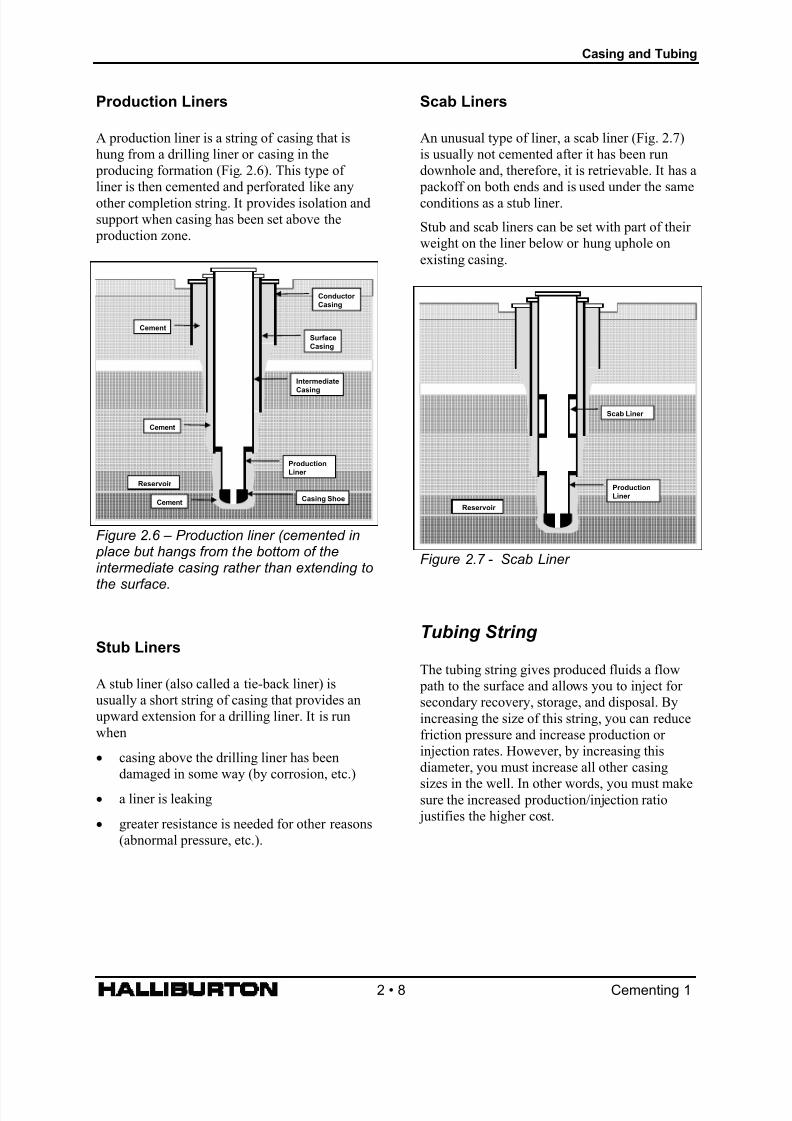
Production Liners Scab Liners
A production liner is a string of casing that is
hung from a drilling liner or casing in the
producing formation (Fig. 2.6). This type of
liner is then cemented and perforated like any
other completion string. It provides isolation and
support when casing has been set above the
production zone.
An unusual type of liner, a scab liner (Fig. 2.7)
is usually not cemented after it has been run
downhole and, therefore, it is retrievable. It has a
packoff on both ends and is used under the same
conditions as a stub liner.
Stub and scab liners can be set with part of their
weight on the liner below or hung uphole on
existing casing.
Conductor
Casing
Surface
Casing
Intermediate
Casing
Production
Liner
Casing ShoeCement
Cement
Cement
Reservoir
Production
Liner
Reservoir
Scab Liner
Figure 2.6 – Production liner (cemented in place but hangs from the bottom of theintermediate casing rather than extending to
the surface.
Figure 2.7 - Scab Liner
Tubing StringStub Liners
The tubing string gives produced fluids a flow
path to the surface and allows you to inject for
secondary recovery, storage, and disposal. By
increasing the size of this string, you can reduce
friction pressure and increase production or
injection rates. However, by increasing this
diameter, you must increase all other casing
sizes in the well. In other words, you must makesure the increased production/injection ratio
justifies the higher cost.
A stub liner (also called a tie-back liner) is
usually a short string of casing that provides an
upward extension for a drilling liner. It is run
when
• casing above the drilling liner has been
damaged in some way (by corrosion, etc.)
• a liner is leaking
• greater resistance is needed for other reasons
(abnormal pressure, etc.).
2 • 8 Cementing 1

8/13/2019 2. Casing and Tubing
http://slidepdf.com/reader/full/2-casing-and-tubing 9/16
Casing and Tubing
Unit B Quiz
Fill in the blanks with one or more words to check your progress in Unit B.
1. The first string in the well may be ___________ or ___________ casing. If the top soil is erodible,
then ___________ casing will be the first type run.
2. The conductor prevents ______________ under the rig.
3. Sometimes, conductor casing is set by simply _________________________ it into the ground.
However, if the soil is too hard, then the hole will be _____________ for it.
4. ____________ casing supports all casing strings run in the well.
5. Protective casing is also know as _____________________ casing.
6. A hanging casing string is called a ____________.
2 • 9 Cementing 1

8/13/2019 2. Casing and Tubing
http://slidepdf.com/reader/full/2-casing-and-tubing 10/16
Casing and Tubing
Unit C: Casing and Tubing Threads
Nearly all tubular goods used in completing a
well come in joints that vary from 30 to 40 ft in
length. Joints have threads machined into their
ends which serve to hold the string together.
Different types of tubular goods have threads
which differ in size, shape, and in the way they
seal and make up to hold pressure.
• Make-Up Torque selection
• Thread Care.
Casing Threads
Casing threads appear on both ends on the
outside of a joint of casing. Lengths of casing
are made up by using a collar (Fig. 2.9). A joint
screws into one end of the collar, while the next
joint screws into the other end. Most casing
threads are not upset, that is flared, as are many
tubing threads.
Cut on a taper, the threaded pin end and box endscrew together (Fig. 2.8). As the makeup torque
increases, the pin threads(which have less metal
than the box threads) begin to conform to the
box. Continued makeup causes additional
yielding until the pin end is wedged tightly intothe box. In this way, joints of tubular goods are
sealed together. Tensile loads and internal
pressures cannot easily force the separation of
the joined segments.
Figure 2.9 – Casing Joints and Collar
The most common threads (Fig. 2.10) in use
today for casing connections are:
• 8 round (8rd) thread has 8 rounded threads
per inchFigure 2.8 – Pin End and Box End
• Extreme line (Xline) thread has square
threads*
Since 1928, threads have been regulated by theAmerican Petroleum Institute (API). There are
five important areas of thread types, selection,
and care.
• Buttress thread has square threads.
• Casing Threads
• Tubing Threads
• Thread Selection
2 • 10 Cementing 1

8/13/2019 2. Casing and Tubing
http://slidepdf.com/reader/full/2-casing-and-tubing 11/16
Casing and Tubing
* Number of threads per inch varies basedupon the OD of the pipe.
Fig. 2.10 – Comparison of thread types.
Tubing Threads
The tubing or production string provides a flow path to the surface for produced fluids. Tubing is
not cemented into place as is casing. Therefore,
the threads on tubing joints and collars (Figure
2.11) are designed to withstand great tensile
loads and internal pressures. Like casing joints,
tubing has threads on both ends.Figure 2.11 – Tubing Joints and Collar
Two types of tubing threads (Figure 2.12) are
• External Upset (EU) – used in most wells
for added strength
•
Non-Upset – used in shallower wells and onthe surface.
Figure 2.12 – External and non-upset tubingthreads.
2 • 11 Cementing 1

8/13/2019 2. Casing and Tubing
http://slidepdf.com/reader/full/2-casing-and-tubing 12/16
Casing and Tubing
Thread Selection
When working with the customer's casing,
tubing or drill pipe, it’s up to Halliburton
personnel to be sure that service equipment fits
the tubulars. Selection of the proper pin size(changeover from the casing/tubing to
Halliburton discharge piping) can sometimes be
difficult for the beginner.
In selecting the proper pin for casing, tubing or
drill pipe, the following information is needed:
• What type of thread is on the string?Figure 2.13- Caliper and ruler
• What is the outside diameter (OD) of the
pipe on the string? (For drill pipe you wouldneed to know the OD of the tool joint or
coupling).
Make-Up Torque SelectionThe type of thread varies depending upon which
type of pipe the customer has in the hole. The
OD tells you what size pin you need to connect
to the customer’s pipe.
To avoid stripping threads by applying too much
torque and to avoid loose connections by
applying too little torque, it is necessary to be
aware of optimum torque levels for the type of
tubular goods with which you’re working.
Charts, published by the API, are available to
help you.
For example, if you know the customer has 5 ½
inch 8rd casing, your equipment should also
have an OD of 5 ½ inches and 8 round threads
per inch.
As an example, let’s assume that you want to
make up a float collar on the customer’s casing.
The casing has this stamp: 5 ½ in. casing,
15.5lb/ft, J-55, grade, 8rd, long thread.
On location, check the specifications, which arestenciled on the side of the joints. If the joints
are not marked, you’ll need a caliper tool (Fig.
2.13) and ruler to identify pin dimensions.
To use the make-up torque charts, you need to
know all the information provided by this stamp.
The stamp tells you that the casing has:
• An outside diameter (OD) of 5 ½ inches
• 15.5 lb/ft nominal weight, threads and
coupling
• J-55 grade
• 8 round threads per inch
• long thread.
2 • 12 Cementing 1

8/13/2019 2. Casing and Tubing
http://slidepdf.com/reader/full/2-casing-and-tubing 13/16
Casing and Tubing
Torque, ft-lb
Short Thread Long ThreadSizeOutside
Diameterin.
NominalWeight,Threads
andCouplinglb per ft Grade Optimum Minimum Maximum Optimum Minimum Maximum
5 ½ 14.00
14.0015.5017.00
14.0015.5017.00
H-40
J-55J-55J-55
K-55K-55K-55
1300
172020202290
189022202520
980
129015201720
142016701890
1630
215025302860
236027803150
__
__21702470
__23902720
__
16301850
17902040 __
__
__27103090
__29903400
6 5/8 20.00
20.0024.00
20.0024.00
H-40
J-55J-55
K-55K-55
1840
24503140
26703420
1380
18402360
20002570
__
30603930
33404280
__
26603400
29003720
__
20002550
21802790
__
33304250
36304650
Using this information, you can look up the
optimum, minimum, and maximum torque to be
applied when making connections with this
casing. To do this,
• find the chart for casing and your thread
size.
• The first column of this chart is labeled
“Size:Outside Diameter.” Find the columnfor 5 ½ in. OD casing.
• Columns 2 and 3 are labeled “Nominal
Weight, Threads and Coupling lb per ft” and
“Grade.” Find the row for the casing you’re
working with (15.5 lb/ft and Grade J-55).
• Columns 7, 8 and 9 are labeled “Long
Thread,” and Optimum,” Minimum,” and
“Maximum” torque levels. For the casing
you’re working with, these levels are 2170,
1630, 2710 ft-lb, respectively. Thus, proper
torque for this casing is between 1630 and2710 ft-lb, and 2170 ft-lb is the best torque
to apply.
Thread Care
When working with both surfaces and down-
hole equipment, you should be careful to protectthe threads. Because of the tremendous pressure
this equipment is designed to withstand, taking
care of thread could mean the prevention of a
serious accident and injury.
Before taking a piece of equipment to location,
you should
• Carefully remove the thread protectors.
• Inspect the threads for damage (sometimes
diesel fuel or a solvent will be needed to
remove grease to inspect for damage). Look
for galling, cracking, or cross-threading. If
you’re not sure, check with your supervisor.
• Put on safety glasses and clean the threadsusing a wire brush.
• If the threads will be chemically welded
(with Halliburton Weld-A), bentonite gel
will be needed along with a wire brush to
remove all grease from the threads on the
equipment as well as on the casing. Check to
see that all welds have met established API
codes.
2 • 13 Cementing 1

8/13/2019 2. Casing and Tubing
http://slidepdf.com/reader/full/2-casing-and-tubing 14/16
Casing and Tubing
After a piece of equipment has been inspected,
equal care should be taken in its use:
• Never allow threads to hit metal or hard
objects.
• Never drop or throw equipment.
• Be aware of proper torque when making up
a piece of equipment.
• Place wrenches close to the threads but not
on them.
After you’ve finished using the equipment,
reinspect it for damage. Be sure to clean the
thread protectors and carefully reattach them to
the equipment.
Remember, if you have a question about the
condition of a thread, ask a supervisor. One blown out pin could not only cause an accident,
but could also leave you with a workstring full
of cement.
Unit C Quiz
Fill in the blanks with one or more words to check your progress in Unit C.
1. Threads have been regulated by the _______________ for over 50 years.
2. As a connection is screwed together, the pin threads begin to ______________ to the box threads.
Eventually, the pin end is ________ tightly into the box, which produces a __________ against
internal pressure.
3. Both the ____________ and____________ types of casing threads are square-shaped.
4. The two main questions you need to answer when choosing the proper pin size for casing or tubing
are: What is the type of ______________ on the string, and what is the ______________ of the pipe
on the string?
5. When inspecting threads, you should look for _________________, __________________, and
___________________.
2 • 14 Cementing 1

8/13/2019 2. Casing and Tubing
http://slidepdf.com/reader/full/2-casing-and-tubing 15/16
Casing and Tubing
Answers to Unit Quizzes
Items from Unit A Quiz Refer toPage
1. geological environment 2-3
2. inside diameter (ID) 2-4
3. collapse, burst, tension 2-4
Items from Unit B Quiz Refer toPage
1. conductor, surface, conductor 2-5,6
2. washout (or erosion) 2-5
3. driven, drilled 2-5
4. Surface 2-6
5. intermediate 2-6
6. liner 2-8
Items from Unit C Quiz Refer toPage
1. API 2-10
2. conform, wedged, seal 2-10
3. buttress, extreme line 2-10
4. thread, outside diameter 2-12
5. galling, cracking, cross-threading 2-13
2 • 15 Cementing 1

8/13/2019 2. Casing and Tubing
http://slidepdf.com/reader/full/2-casing-and-tubing 16/16
Casing and Tubing