2-6 PLAYERS - Wizards Corporatemedia.wizards.com/2017/avalon_hill/AA_Aniversary_Rulebook.pdfChina,...
32
AGE 12 + 2-6 PLAYERS ®
Transcript of 2-6 PLAYERS - Wizards Corporatemedia.wizards.com/2017/avalon_hill/AA_Aniversary_Rulebook.pdfChina,...
AGE 12+2-6 PLAYERS
®

2
The word came by telephone— Axis & Allies® was to be one of three
games to mark the 50th anniversary of Avalon Hill®. My mission was clear: build a game worthy of this anniversary from the ground up. I would have the opportunity to design a very special Axis & Allies Anniversary Edition.
First and foremost, design and provide a larger game board. Next, include individual storage trays the likes of which had never been seen before. And what better occassion to add new
national units like the Chinese and Italians? As it turned out, this was only the beginning of many new features.
Why not have a new starting date for the game? Avalon Hill brand manager Brian Hart and I discussed a 1939 scenario. This idea came with many undesirable problems, however. The game would automatically be much longer to play. The United States would not participate in the game for the first three or four turns. The game would suffer from a rather slow and very predictable start. This, and several other issues, would prove to be too problematic from a game point of view.
The war did not become truly global until the Japanese attacked Pearl Harbor. We finally decided that this infamous date would be our starting point . . . well almost. As it turned out, by way of some serious lobbying from one of my playtest groups, we concluded that turn one would include both the Japanese attack at Pearl Harbor as well as the German attack on Russia (Operation Barbarossa). This would really start the game off with a bang.
To really make it interesting, I wanted to include a second scenario. The first scenario would be the 1941 start time (the Axis attack), and the second would be the traditional 1942 date (the Axis high water mark).
Both would require different set-up situations. Initial playtesting quickly discovered that this strategy would yield two completely different games in one box and ultimately twice the work. I wanted to reach out to the Axis & Allies community for help and dependable feedback, and so I did.
I was fortunate enough to have the right playtest groups ready and willing to volunteer for the job. As it turned out, these playtesters (see game credits) were highly experienced veteran players of the game. As a consequence, experts from all across the United States and Europe were testing and probing for game problems.
One important aspect of the game that I wanted to address was the ahistorical tendency for the Japanese to attack Russia. I did not mind if this attack occurred late in the game—who knows, if things had gone differently during the actual war, perhaps the Japanese would have attacked Russia. The solution I settled on was to add additional territories and units between the Japanese forces and Moscow. The real-world translation of these additional territories is the seemingly endless miles that exist between Asia and Moscow.
At some point in the development stage I stumbled onto an idea . . . “National Objectives & Bonus Income.” Why not incorporate into the game the stated historical objectives of the real countries involved in the war? If a controlling player manages to achieve certain objectives, that player should be rewarded with bonus income! For example, the stated objective declared by Imperial Japan to the rest of the world was, “The Greater East Asia Co-Prosperity Sphere.” If the Japanese player manages to achieve the actual stated Japanese goals, he or she is rewarded with additional IPCs. Pursuing objectives that provide mid-game income bonuses creates a more historical game pattern for all. I think the game now looks and feels more historical than ever.
The addition of Italy as a power is something I have wanted to do for a long time. It certainly is not one of the major powers, but if played as a separately controlled power, Italy can be an important partner of the Axis alliance. It also nicely rounds off the numbers and makes this otherwise five-player game into a six-player game. Protected by Germany in the north, Italy can now be the dominant industrial power in the Mediterranean, the Middle East, and of course, Africa.
China, on the other hand, was not designed to be a self-standing power. Chinese units will continue to be controlled by the American player, but it sure looks and feels like a separate power.
There are also lots of other changes that this game brings to the table. For example, the submarine and transport rules have been considerably changed. Also, the basic IPC price structure for ships has been reduced. This may make for more ships on the board. Weapons development has been reworked as well. It is also optional in that players can elect to play with them or not.
Finally, after months of playtesting, I turned the game over to Wizards of the Coast®. This was not the end of the process. The internal Wizards’ design team began their work of fine-tuning the monster.
I am excited about this new version of Axis & Allies. It is indeed worthy of the honor of marking Avalon Hill’s 50th anniversary. I think it will prove to be a fascinating new puzzle to solve.
—Larry Harris
ANNIVERSARY EDITION DESIGNER NOTES:

3
Game Components ........................................................................................ 5
Setup ...................................................................................................................... 9
China Rules ...................................................................................................... 10
Order of Play .................................................................................................... 11
Phase 1: Research & Development .......................................................... 11
Phase 2: Purchase Units ........................................................................... 13
Phase 3: Combat Move ............................................................................ 13
Special Combat Movement .................................................... 15
Phase 4: Conduct Combat ........................................................................ 16
Strategic Bombing Raids ........................................................ 17
Amphibious Assaults .............................................................. 17
General Combat ...................................................................... 18
Multinational Forces............................................................... 21
Phase 5: Noncombat Move ...................................................................... 21
Phase 6: Mobilize New Units .................................................................. 22
Phase 7: Collect Income .......................................................................... 22
National Objectives & Bonus Income ................................... 22
Winning the Game ........................................................................................ 24
Unit Profiles ..................................................................................................... 24
TABLE OF CONTENTS
Game Design: Larry HarrisGame Development: Nate HeissRulebook Development: Larry Harris, Bill McQuillan, and Cal MooreAdditional Rulebook Development: Scott Van Essen External Playtesters: Kevin Chapman, Melanie Chapman, Eric Christoff, Terry Dunn, Martin Frick, Randy Heath, Dan Kersey, Dr. Christian Schuh, Gregory Smorey, Craig Yope, and Alex and his Deutscher Axis & Allies KlubInternal Playtesters: Mons Johnson, Rich Baker, Graeme Hopkins, Bill McQuillan, Cormac Russell, Mike Turian, and Steve WarnerEditing: Cal Moore
Art Direction: Blake BeasleyCover Illustration: Jim ButcherGraphic Designer: Leon CortezCalligraphy: Todd GamblePhotography: Allison Shinkle and Katie Wright
Brand Management: Brian Hart, Shelly MazzanobleBrand Direction: Nathan StewartProduction Management: Godot Gutierre, Cynda Callaway, Tom WanerstrandPrepress Management: Jefferson DunlapProject Management: Heather Fleming
Collectors who lent us militaria and firearms for packaging: Bruce Anderson, Blake Beasley, Richard Coonradt, Tom Coonradt, Brian Dumas, and Barry Holldorf.
Thanks to all of our project team members and the many others too numerous to mention who have contributed to this product.
CREDITS

4
A Note About The Cover ArtWe wanted the Axis & Allies Anniversary Edition to stand out in every way possible. So we knew we needed to have illustrator/artist Jim Butcher, who created the artwork for the original Axis & Allies box cover, create the cover for this version too.
ARTIST BIO - JIM BUTCHER
Besides having done the original artwork for the game, Jim’s experience with military work is exceptional. After honing his skills at the Maryland Institute College of Art in 1962 where he majored in graphic design and painting, he began his art career with the United States Marine Corps in Vietnam, serving as an official USMC combat artist. He focused on covering the air war and the personnel who worked with the aircraft, which at times took him into combat situations.
After receiving an honorable discharge in 1969, he continued his career in art, opening his own business and receiving commissions from various companies and government entities. His work includes commissions from British Aerospace, Unicolor Corp., and NASA, for projects such as the commemoration of 75 years of U.S. Marine Corp Aviation, a mural for the Tuskeegee Airman Museum in Detroit, Michigan, and numerous space-related events such as the Apollo Series, the Viking Mission, and the space shuttle operations.
Summary of PlayAxis & Allies can be played by up to six players. The game depicts a two-sided conflict, so if you have more than two players, split them up into the Axis side and the Allies side.
The Allied powers include the United States, United Kingdom, and Soviet Union. The Axis powers include Germany, Japan, and Italy. In a six-player game, each player controls one world power. If fewer people play, some will control more than one power.
Each turn you take for a power, you choose which units to build for that power and whether or not to risk funds into research (if playing with the optional weapons development rules). Then you move your attacking units into hostile spaces and resolve those attacks using dice rolls.
After combat, you may make noncombat moves with your units that did not take part in combat that turn. Finally, you place the units you purchased at the beginning of your turn and then collect your income for the turn, including income gained from any newly conquered territories.
How to WinWhen the Axis side or the Allies side collectively holds 15 victory city tokens at the end of a complete round of play, that side wins the game.
Adjusting Game LengthIf you want a shorter game, play to 13 victory city tokens. If you are up for a longer game, play to a complete victory of all 18 victory city tokens.
If you opt for one of these alternatives, be sure all players agree to it before you start the game.
OBJECT OF THE GAME
5
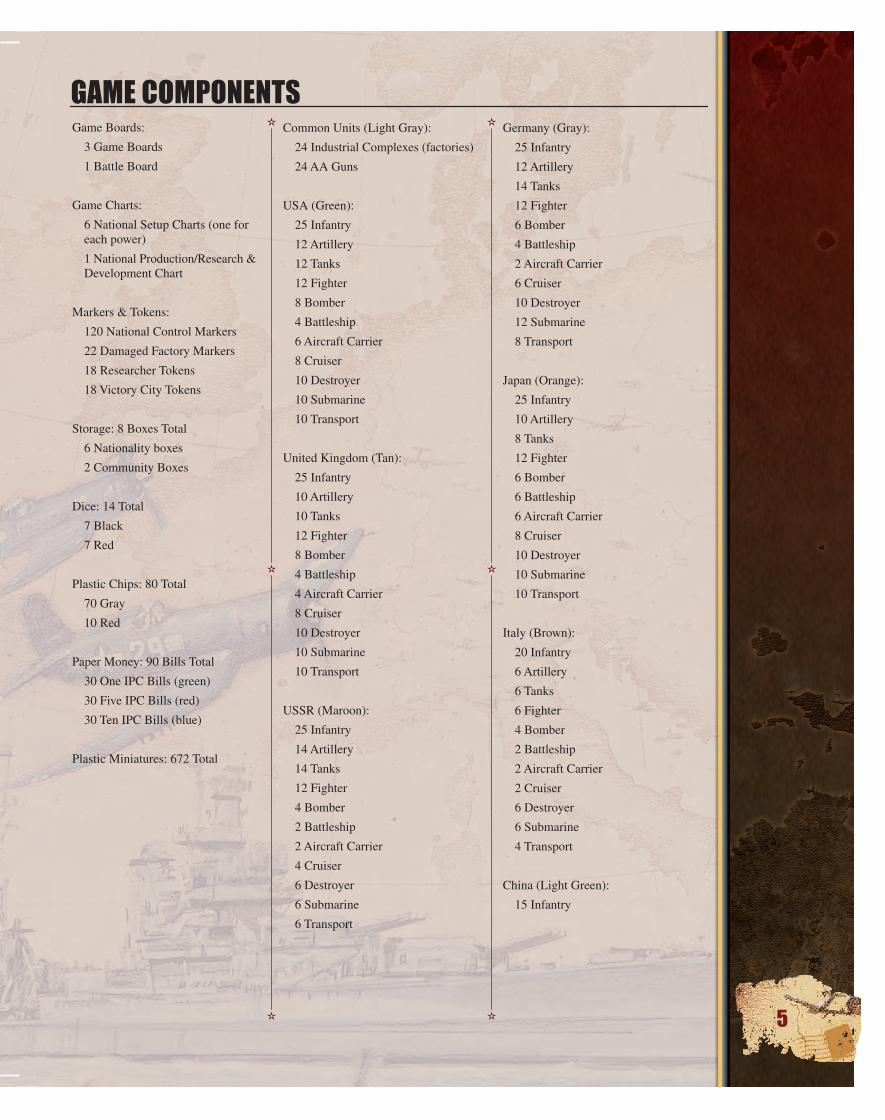
Game Boards:
3 Game Boards
1 Battle Board
Game Charts:
6 National Setup Charts (one for each power)
1 National Production/Research & Development Chart
Markers & Tokens:
120 National Control Markers
22 Damaged Factory Markers
18 Researcher Tokens
18 Victory City Tokens
Storage: 8 Boxes Total
6 Nationality boxes
2 Community Boxes
Dice: 14 Total
7 Black
7 Red
Plastic Chips: 80 Total
70 Gray
10 Red
Paper Money: 90 Bills Total
30 One IPC Bills (green)
30 Five IPC Bills (red)
30 Ten IPC Bills (blue)
Plastic Miniatures: 672 Total
Common Units (Light Gray):
24 Industrial Complexes (factories)
24 AA Guns
USA (Green):
25 Infantry
12 Artillery
12 Tanks
12 Fighter
8 Bomber
4 Battleship
6 Aircraft Carrier
8 Cruiser
10 Destroyer
10 Submarine
10 Transport
United Kingdom (Tan):
25 Infantry
10 Artillery
10 Tanks
12 Fighter
8 Bomber
4 Battleship
4 Aircraft Carrier
8 Cruiser
10 Destroyer
10 Submarine
10 Transport
USSR (Maroon):
25 Infantry
14 Artillery
14 Tanks
12 Fighter
4 Bomber
2 Battleship
2 Aircraft Carrier
4 Cruiser
6 Destroyer
6 Submarine
6 Transport
Germany (Gray):
25 Infantry
12 Artillery
14 Tanks
12 Fighter
6 Bomber
4 Battleship
2 Aircraft Carrier
6 Cruiser
10 Destroyer
12 Submarine
8 Transport
Japan (Orange):
25 Infantry
10 Artillery
8 Tanks
12 Fighter
6 Bomber
6 Battleship
6 Aircraft Carrier
8 Cruiser
10 Destroyer
10 Submarine
10 Transport
Italy (Brown):
20 Infantry
6 Artillery
6 Tanks
6 Fighter
4 Bomber
2 Battleship
2 Aircraft Carrier
2 Cruiser
6 Destroyer
6 Submarine
4 Transport
China (Light Green):
15 Infantry
GAME COMPONENTS

6
Territories The national control symbols on the spaces on the game board show which power controls those spaces at the start of the game. When the rules refer to the “original controller” of a territory, they mean the power whose symbol is printed on the territory (China is the original controller of Manchuria and Kiangsu). In the 1942 game scenario, German and Japanese players will place some of their national control markers on top of some of the national control symbols presented on the map. This updates the 1941 map to the 1942 scenario (but the original controllers of these territories remains unchanged).
All other spaces are neutral, such as Turkey or Mongolia, and are not aligned with any power. Neutral territories are distinct in that they have neither IPC nor national control symbols. They represent areas that are impassable for political or geographic reasons. You cannot attack neutral territories, move into them, or move over them with air units. Neutral territories do not have income values.
Most territories have an income value ranging from 1 to 12. This is the number of industrial production certificates (IPCs) they produce each turn for their controller. A few territories, such as Gibraltar, have no income value.
Each territory exists in one of three conditions:
Friendly: A territory with a control marker owned by you or a friendly power (one on your side).
Hostile: A territory with a control marker owned by an enemy power (one on the opposing side).
Neutral: A territory that has no IPC value or national control symbol and that is not controlled by any power. The neutral territories are: Northern South America, Peruvian Central, Argentina/Chile, Eire, Sweden, Switzerland, Spain, Sahara, Angola, Mozambique, Turkey, Saudia Arabia, Afganistan, Himalaya, and Mongolia.
Game BoardThe game board is a reflection of the world in 1941. It is divided into spaces by border lines. Land spaces are “territories” and sea spaces are “sea zones.”
GAME COMPONENTS (continued)
Sea ZonesSea zones are either friendly or hostile. Friendly sea zones contain no enemy surface warships. Hostile sea zones contain enemy surface warships. Note that the presence of enemy submarines and/or transports does not count for the purposes of determining whether or not a sea zone is hostile.

7
Since an ally controls Panama, this British destroyer can move through the canal.
The German cruiser cannot pass through the Suez
Canal because Germany does not control Egypt.
Movement Between SpacesUnits can move between adjacent spaces (those that share a common border).
The game board wraps around horizontally. Territories and sea zones on the right edge of the board are adjacent to territories and sea zones on the left edge. (Note that Western Canada connects to Eastern Canada; Central United States connects to Eastern United States; Mexico connects to Panama; sea zone 20 connects to sea zone 55; sea zone 21 connects to sea zone 44; and sea zone 25 connects to sea zone 43.) The top and bottom edges of the board do not wrap around.
IslandsAn island is a single territory located entirely inside one sea zone. A sea zone can contain at most one group of islands, which is considered one territory. It is not possible to split up land-based units so that they are on different islands in the same group. Islands that have no name label, such as the one in sea zone 14, are not game spaces and may not have units moved onto them.
Canals There are two canals—artificial waterways that connect two larger bodies of water—on the game board. The Panama Canal connects the Pacific Ocean to the Atlantic Ocean, while the Suez Canal connects the Mediterranean Sea to the Indian Ocean. A canal is not considered a space, so it doesn’t block land movement: Land units can move freely between Trans-Jordan and Egypt. Panama is one territory: No land movement points are required to cross the canal within Panama.
If you want to move sea units through a canal, your side (but not necessarily your power) must control it at the start of your turn (that is, you cannot use it the turn you capture it). The side that controls Panama controls the Panama Canal. The side that controls both Egypt and Trans-Jordan controls the Suez Canal. If one side controls Egypt and the other controls Trans-Jordan, the Suez is closed to sea units.
The movement of air units is completely unaffected by canals, whether they are moving over land or sea. They can pass between sea zones connected by the canal regardless of which side controls it.
Victory CitiesOn the map are 18 victory cities, all crucial to the war effort. The selection of the 18 victory cities was based on historical importance of the city at the time. “Importance” could be measured in terms of strategic location, industrial base, resources, or other important strategic factors. Each city has a corresponding victory city token, which are exchanged as those territories are won or lost.
GAME COMPONENTS (continued)

8
National Control Markers National control markers indicate status in the game. They mark conquered territories and record other information on the game’s charts.
Battle BoardThe battle board is a large card with columns that list attacking and defending units and their combat strengths. When combat occurs, the players involved place their units on the battle board.
Industrial Production Certificates These certificates (called IPCs) are the money of the game and represent capacity for military production.
Combat Forces Each power is color-coded as follows:
Green United States of America Gray GermanyTan United Kingdom Orange JapanMaroon Soviet Union Brown ItalyLight Green China
Two other units, antiaircraft guns and industrial complexes, are light gray and not color-coded to a particular power. These can change hands during play.
National Production/Research & Development Chart This chart shows each power’s production level and technological advances. The national production chart is used to track each power’s national production level throughout the game. Whenever you develop a new technology, place one of your power’s control markers inside the appropriate advancement box on the research & development chart.
National Setup Charts These charts (one for each power) list the number and type of units to be placed in the corresponding power’s territories and sea zones. Each power’s national objectives are shown on the back of the chart.
Plastic Chips Use these chips to save space in overcrowded zones. Putting a gray chip under a unit shows that there is one additional unit of that unit type on the space. Putting a red chip under a unit shows that there are five additional units of that unit type on the space.
Example: A destroyer with one gray chip under it counts as two destroyers. An infantry with one gray and one red chip under it counts as seven infantry.
If you do not have enough pieces to top off all your stacks, simply use any identifying item, such as a piece of paper with the unit type written on it. The number of stacks is not limited by the number of plastic pieces available.

9
POWER STARTING VICTORY CITY TOKENS STARTING IPCS
Germany Berlin, Paris, and Warsaw 31
Japan Tokyo and Shanghai 17
Italy Rome 10
United States Washington, San Francisco, Honolulu, and Manila 40
United Kingdom London, Calcutta, Sydney, Hong Kong, and Ottawa 43
Soviet Union Moscow, Stalingrad, and Leningrad 30
POWER STARTING VICTORY CITY TOKENS STARTING IPCS
Germany Berlin, Paris, and Warsaw 37
Japan Tokyo, Shanghai, Hong Kong, and Manila 31
Italy Rome 10
United States Washington, San Francisco, and Honolulu. 38
United Kingdom London, Calcutta, Sydney, and Ottawa 31
Soviet Union Moscow, Stalingrad, and Leningrad 24
SETUP
1941 ScenarioThe Axis players begin with 6 victory city tokens, and the Allies begin with 12.
1942 ScenarioThe Axis players begin with 8 victory city tokens, and the Allies begin with 10.
Board setup for 1942 scenario: The game board reflects the 1941 scenario. If you would prefer to play the 1942 scenario, you will need to place some national control markers to reflect the historical situation for that year. The placement of these markers is indicated on the German and Japanese national setup charts for 1942. Put the markers on top of the existing national control symbols shown on the game board.
• Place the game board in thecenter of the table. The Alliesplayers should sit near its top(northern) edge, and the Axisplayers should sit along thebottom (southern) edge.
• Place the battle board next tothe game board, and the dicenext to the battle board.
• Place the national production/research & development chart nextto the game board. For each poweryou are playing, place that power’scorresponding control markeron the matching space on thechart. (It should match the totalof the circled numbers in territoriesyou control.) Choose one playerto be in charge of tracking changesin national production throughoutthe game.
• Separate the industrialproduction certificates (IPCs)by denomination (1, 5, and10). Choose one player to bethe banker and give allremaining IPCs to that player.
• Each player takes the victorycity tokens and IPCs thatcorrespond to the powersthat player represents and tothe scenario being played(shown below), be it 1941or 1942. If one player controlsmultiple powers, thosepowers’ IPCs must be keptseparate throughout the game.
• Assign a power or powers toeach player. If a single playerplays multiple powers, eachof those powers needs to be onthe same side (Axis or Allies).In a six-player game, Italyshould have its own dedicatedplayer. In a game with less thansix players, the player who isplaying Germany should alsoplay Italy. If a player controlsmultiple powers, that playermust keep each power’sresources separate.
• Take the national setup chartand all the control markersand plastic pieces that belongto your power. You can findsetup and cost information foryour units on the nationalsetup chart.

1 0
China was an important power in the war, but unlike the other major powers, it was not an industrialized nation at the time. For this reason, it receives special treatment in the Anniversary Edition. Also, some of the normal rules apply to China in slightly different ways.
China and its units are controlled by the U.S. player, but for game purposes it is considered a separate power and its resources cannot be mixed. The U.S. player takes China’s turn at the same time as the U.S. turn but Chinese unit combat and movement are done separately from the U.S. forces. The U.S. player must complete the Combat Move and Conduct Combat phases for Chinese forces before beginning the Combat Move phase for U.S. forces, or vice versa.
Chinese territories on the game board have a Nationalist Chinese national control symbol on them. Some of these territories begin the game already under Japanese control. They are still considered Chinese territories for purposes of original control. The IPC values printed on the Chinese territories indicate the number of IPCs an Axis player will receive when taking control of the territory.
The Chinese army represented in the game does not receive IPCs for income or use IPCs to generate new units. Instead, during the Purchase Units phase at the beginning of the U.S. turn, set aside one new Chinese infantry unit for every two Chinese territories that are not under Axis control (rounded down.)
The U.S. player places the new Chinese units at the same time that the new U.S. units are placed. New units may only be placed on Chinese-controlled territories (including those captured in the current turn) that already contain less than three Chinese units (including the Flying Tigers fighter, see below). Any number of new units may be placed in such a territory, regardless of the number already there.
Chinese units have a limited range of occupation, shown by the Chinese national control symbol (this includes the Japanese-occupied territories of Kiangsu and Manchuria). Chinese units cannot be loaded onto transports.
Kwangtung is a special case. While it is not a Chinese territory and cannot be controlled by China, Chinese forces can attack Axis units there and occupy it, but the IPCs generated go to the United Kingdom. This is the only non-Chinese territory that Chinese units may occupy. (Note: If the United Kingdom’s capital is held by the Axis when China captures Kwangtung, China may control it and have it count toward earning infantry units until the United Kingdom is liberated.)
At the beginning of the game, China has a U.S. fighter unit located on the map. This represents the American volunteer group—the Flying Tigers. This fighter is considered part of the Chinese forces for purposes of movement and combat. It cannot leave the territories that Chinese occupation is restricted to, even to attack and return. If it is destroyed, the U.S. player cannot purchase a new fighter unit for China.
CHINA RULES
China can control Manchuria and
Kiangsu.
Chinese forces can occupy Kwangtung, but they
cannot control it unless the United Kingdom’s capital
is held by the Axis.

1 1
Phase 1: Research & DevelopmentNote: This is an optional rule—players should decide whether or not this phase will be included in their game.
In this phase, you may attempt to develop improved military technology. To do so, you buy researchers that give you a chance for a scientific breakthrough. Each researcher token will grant you one die that provides a chance for a breakthrough.
Research & Development Sequence
1. Buy researcher tokens
2. Roll research dice
3. Roll breakthrough die
4. Mark developments
Step 1: Buy Researcher Tokens
Each researcher token costs 5 IPCs. Buy as many as you wish, including none.
Step 2: Roll Research Dice
For each researcher you have, roll one die.
Success: If you roll at least one “6,” you have successfully made a technological breakthrough. Discard all your researcher tokens and continue to step 3.
Failure: If you do not roll a “6,” your research has failed. Keep all your researcher tokens and continue to the Purchase Units phase of the turn.
Step 3. Roll Breakthrough Die
If you rolled a “6” on any research die, choose one of the two breakthrough charts (next page) and roll a die to see which technological advance you get. You can only receive one advance each turn. If you have already received the same result on a previous turn, reroll until you get a new technological advance. Once you have received all the advances on a chart, you cannot gain any more advances from that chart.
Axis & Allies is played in rounds. One round consists of each power taking a turn.
The order that players take turns depends on the scenario:
1941 Scenario
1. Germany
2. Soviet Union
3. Japan
4. United Kingdom
5. Italy
6. United States
1942 Scenario
1. Japan
2. Soviet Union
3. Germany
4. United Kingdom
5. Italy
6. United States
If you control more than one power, keep those powers’ income and units separate. You can conduct operations for only one power at a time.
Turn Sequence
Each power’s turn consists of seven phases, which take place in a fixed sequence. You must collect income if you can, but all other parts of the turn sequence are voluntary. After each power finishes a turn, play then passes to the next power.
1. Research & Development(Optional Rule)
2. Purchase Units
3. Combat Move
4. Conduct Combat
5. Noncombat Move
6. Mobilize New Units
7. Collect Income
At the end of the United States player’s turn, check for victory. If neither side has won, begin a new round of play.
ORDER OF PLAY

1 2
Step 4: Mark Developments
If your research was successful, place one of your national control markers inside the appropriate advancement box on the research & development chart. Your development becomes effective immediately.
Any number of powers may develop the same technology, but powers cannot share their technology.
BREAKTHROUGH CHART 1
1. Advanced Artillery. Each of your artilleryunits can now provide greater support. One artilleryunit can support two infantry per attack. Two infantrywhen coupled with one artillery unit each have anattack value of 2.
2. Rockets. Your antiaircraft guns are now rocketlaunchers. In addition to its normal combat function,during the strategic bombing raid step of yourConduct Combat phase each turn, each of yourantiaircraft guns can make a single rocket attackagainst an enemy industrial complex within 3 spacesof it. This attack does 1d6 damage to that complex. Ineach turn, only one AA gun per territory may launchrockets, and each industrial complex can be attackedby only one rocket launcher. Rockets may not be firedover neutral territories.
3. Paratroopers. Each of your bombers can act as atransport for one infantry during combat movement,but it must stop in the first hostile territory it enters,ending its movement. Both units must begin theirmovement in the same territory. The infantry isdropped after any antiaircraft fire is resolved, soif the bomber is hit, the infantry it carries is alsodestroyed. The bomber may still attack during theConduct Combat phase, but it cannot make a strategicbombing run in a turn that it transports an infantryunit. If attacking along with land units from adjacentterritories, paratroopers may retreat as normal.
4. Increased Factory Production. Each of yourindustrial complexes in a territory worth 3 or moreIPCs can now produce two additional units beyondits listed IPC value. For example, Germany with 10IPCs can now produce 12 units. Also, when repairinga damaged industrial complex (removing damagemarkers), you can remove two damage markers at atime for the cost of 1 IPC (half price). The maximumdamage that can be inflicted on your industrialcomplexes is not increased.
5. War Bonds. During your Collect Income phase,roll 1d6 and collect that many additional IPCs.
6. Mechanized Infantry. Each infantry that ismatched up with a tank can move two spaces alongwith the tank.
BREAKTHROUGH CHART 2
1. Super Submarines. The attack value of yoursubmarines is now 3 instead of 2. The defense valueof your submarines remains at 1.
2. Jet Fighters. The attack value of your fightersis now 4 instead of 3.
3. Improved Shipyards. Your sea units are nowcheaper to build. Use these revised costs:
Unit IPC cost
Battleship 17Aircraft Carrier 11Cruiser 10Destroyer 7Transport 6Submarine 5
4. Radar. Your antiaircraft gun fire now hits on a 1or 2 instead of just a 1.
5. Long-Range Aircraft. Your fighters are nowlong-range fighters, and your bombers are nowlong-range bombers. Your fighters’ range increasesfrom 4 to 6. Your bombers’ range increases from6 to 8.
6. Heavy Bombers. Your bombers are now heavybombers. You roll two dice for each bomber andselect the best result when you attack or make astrategic bombing raid. On defense, your bombersstill roll only a single die.

1 3
Air units can move through a
hostile space as if it was
friendly.Land units must end their
movement when they encounter a hostile territory.
Blitzing tanks are an exception (see
pg. 16).
Phase 2: Purchase Units In this phase, you may spend IPCs for additional units to be used in future turns. All the units on your power’s national setup chart are available for purchase. A unit’s price in IPCs is listed in the cost column next to the unit’s name.
Each industrial complex can only produce as many new units as the IPC value indicated on the territory in which it is located. For example, Germany can produce 10 units per turn.
Industrial complexes are subject to strategic bombing raids and rockets. For each damage marker an industrial complex has under it during the Mobilize New Units phase, it can produce one less unit.
Purchase Units Sequence
1. Order units
2. Pay for units & repairs
3. Place units in mobilization zone
Step 1: Order Units
Select all the units you wish to buy. You may buy as many units as you can afford, regardless of which units you started the game with. If a unit type is not available (because those units are all in play), you can still purchase additional units of that type, however all of the players must agree on the method of representation (markers, coins, slips of paper, etc.) for those units.
Step 2. Pay for Units & Repairs
Pay IPCs to the bank equal to the total cost of the purchased units.
You can also pay to remove damage markers from under industrial complexes that have been damaged. Each damage marker costs 1 IPC to remove. Repairs take effect immediately.
Step 3: Place Units in Mobilization Zone
Place the purchased units in the mobilization zone on the game board (located in the South Atlantic Ocean). You cannot use these units right away, but you will deploy them later in the turn.
Phase 3: Combat MoveMove as many of your units into as many hostile territories and hostile sea zones as you wish. Movement into a hostile territory counts as combat movement, whether that territory is occupied or not. You can move into a single hostile space from different spaces, as long as each moving unit can reach that space with a legal move.
You may move units through friendly spaces en route to hostile spaces during this phase. However, units cannot end their move in friendly spaces during the Combat Move phase except in four instances:
• Tanks that have blitzed through an unoccupied hostile space,
• Sea units that will be participating in an amphibious assault from an uncontested sea zone,
• Units moving from a hostile sea zone to escape combat as their combat move, and
• Units moving into a sea zone containing only enemy submarines and/or transports in order to attack those units.
If you move all of your units out of a territory you control, you still retain control of that territory until the enemy moves into and

1 4
Sea units other than submarines must end their movement when they encounter a hostile sea zone. The destroyer must stop in this zone, however,
the submarine can pass through safely since the enemy unit is not a destroyer.
Units cannot move into
neutral territories.
Amphibious assault movement occurs during the Combat Move phase. After your transport loads units, your battleship must destroy the enemy destroyer in sea combat
in order to clear the hostile sea zone so that the transport can offload into France. If there had been only defending submarines and/or transports, the attacking U.S.
player could have ignored those units, or could have conducted sea combat.
captures it (the territory remains in control of the power that controlled it at the start of the turn).
Units cannot move into or through neutral territories.
Units from the same side can freely share territories, sea zones, and space on aircraft carriers and transports with one another. These shared events must be agreed upon by both powers.
All combat movement is considered to take place at the same time: Thus, you cannot move a unit, then conduct combat, then move that unit again during this phase. You cannot move additional units into an embattled space once an attack has begun.
A land or sea unit may move a number of spaces up to its move value. Most units must stop when they enter a hostile space. Thus, a unit with a move value of 2 could move into a friendly space and then a hostile space, or just into a hostile space.
An enemy submarine and/or transport does not block any of your units’ movement, nor does it prevent loading or offloading in that sea zone. You are not required to attack an enemy submarine or transport that shares a sea zone with you if that sea zone contains only enemy submarines and/or transports.
Sea Units Starting in Hostile Sea ZonesAt the beginning of the Combat Move phase, you may already have sea units in spaces containing enemy units that were there at the start of your turn. For example, an enemy may have built new surface warships in a sea zone where you have sea units. When your turn comes around again, you are sharing a sea zone with enemy forces.
If you are sharing a sea zone with enemy surface warships (not submarines and/or transports), this situation requires you to do one of the following:
• Remain in the sea zone and conduct combat,
• Leave the sea zone, load units if desired, and conduct combat elsewhere,
• Leave the sea zone to load units and return to the same sea zone to conduct combat (you cannot load units in a hostile sea zone), or
• Leave the sea zone and conduct no combat.
Once these sea units have moved and/or participated in combat, they cannot move or participate in the Noncombat Move phase of the turn.
Air UnitsAn air unit that moves in this phase must generally reserve part of its move value for the Noncombat Move phase, at which point it must return to a safe landing spot using its remaining movement.
An air unit’s movement in any complete turn is limited to its total move value. Thus, a bomber with a normal move value of 6 cannot move six spaces to get to a hostile space. It must save at least one movement point to get to a neighboring friendly territory where it can land. A fighter can move its full four spaces to attack instead of saving movement, but only if a carrier could be there by the conclusion of the Mobilize New Units phase. (See Unit Profiles: Air Units, pg. 26.)
Air units attacking territories with antiaircraft guns will be fired upon. (See Unit Profiles: Antiaircraft Guns, pg. 25.) This doesn’t include territories containing antiaircraft guns that are only being flown over.
Amphibious Assaults If you want to make any amphibious assaults during the Conduct Combat phase, you announce your intent to do so during this phase. An amphibious assault takes place when you attack a coastal territory from a non-hostile sea zone by offloading land units from transports into that target territory (or make a joint attack with both seaborne units that are offloading and other units).

1 5
In this example, a Japanese destroyer is present, so the submarines have to stop
their movement and attack.
The fighter moves independently of the
carrier to attack a territory this turn. The
carrier moves to attack a transport, but is
still in a space where the fighter can land
during the Noncombat Move phase.
Submarines can move through or into a hostile sea zone containing enemy warships without attacking.
Moving transports and their cargo into a sea zone from which you plan to make an amphibious assault counts as a combat move, even if there are no defending surface warships there. This is also true of any battleships and/or cruisers that will support the assault.
During the Conduct Combat phase, you can only launch amphibious assaults that you announced during this phase. (See Conduct Combat: Amphibious Assaults, pg. 17.)
Special Combat MovementA number of units can make special moves during this phase. These are described in detail below. (For complete information on each combat unit’s capabilities, see Unit Profiles, pg. 24.)
Aircraft Carriers Any fighters belonging to an aircraft carrier launch before the carrier moves and move independently of the carrier. These fighters can make a combat move from the carrier’s sea zone, or they can remain in the sea zone until the Noncombat Move phase.
Guest fighters belonging to a friendly power on board another power’s carrier must remain on board as cargo if the carrier moves.They cannot take part in combat and are destroyed if the carrier is destroyed.
Whether it moves during the Combat Move or Noncombat Move phase, an aircraft carrier allows friendly fighters to land on it in the sea zone where it finishes its move.
Submarines Submarines are capable of moving undetected due to their ability to submerge. For this reason, they have special movement rules. If there are no enemy destroyers present, a submarine may move through a sea zone containing enemy warships without stopping. However, if a submarine enters a sea zone containing an enemy destroyer during the Combat Move phase, its movement ends immediately and combat will result.
This ability of submarines to avoid detection also allows enemy ships to ignore their presence. Any sea zone that contains only enemy submarines (and/or transports) does not stop the movement of a sea unit. Sea units ending their combat movement in a sea zone containing only enemy submarines may choose to attack them or not. Sea units may also end their noncombat movement in a sea zone containing only enemy submarines.

1 6
You can blitz a tank through a territory if that territory is hostile but unoccupied. Remember to place
your control marker in the blitzed territory.
You must stop the tank’s movement when it encounters any enemy units, including antiaircraft
guns and industrial complexes, so this tank cannot blitz.
Tanks and Blitzing A tank can “blitz” by moving through an unoccupied hostile territory as the first part of a move that can end in a friendly or hostile territory. The complete move must occur during the Combat Move phase. The tank establishes control of the first territory (place one of your control markers there) before it moves to the next.
Remember to adjust the national production levels as you blitz. A tank that encounters enemy units, including an antiaircraft gun or an industrial complex, in the first territory it enters must stop there and may not blitz.
Transports If a transport encounters hostile surface warships (not enemy submarines and/or transports) AFTER it begins to move (not counting the sea zone it started in), its movement for that turn ends, and it must stop there and conduct sea combat.
A transport may load units while in any friendly sea zone along its route, including the sea zone it started in. If a transport loads land units during the Combat Move phase, it must offload those units to attack a hostile territory as part of an amphibious assault during the Conduct Combat phase or it must retreat during the sea combat step of the amphibious assault sequence while attempting to do so. A transport that is part of an amphibious assault must end its movement in a friendly sea zone (or one that will become friendly as a result of sea combat) from which it can conduct the assault.
Any land units aboard a transport are considered cargo until they offload. Cargo cannot take part in sea combat and is destroyed if the transport is destroyed.
Any units can pass through a sea zone containing only transports during the Combat Move phase. However, if a warship chooses to sink an unescorted transport, that warship must end its move in that sea zone.
Phase 4: Conduct CombatIn this phase, you conduct combat against opposing units using the following sequence:
Combat Sequence
1. Strategic bombing raids
2. Amphibious assaults
3. General combat
A number of units have special rules that modify or overwrite the combat rules in this section. See Unit Profiles, pg. 24, for combat rules associated with each type of unit.
At no time may an Allied power attack another Allied power, or an Axis power attack another Axis power.

1 7
When the bombers make a raid against the industrial complex, the antiaircraft gun in
that territory makes an attack against each bomber doing so. A roll of 1 destroys the bomber on the left. The surviving bomber
then makes an attack against the industrial complex, getting a 3 on the roll for 3 damage.
After a successful sea combat, the U.S.
transport offloads a tank and infantry against the one German infantry. At this point, the units
move to the battle board to see who wins the
combat. The tank has an attack value of 3, and the attacking infantry has an attack value of 1, while the defending infantry’s
defense value is 2.
1. Strategic Bombing RaidsDuring this step, you may bomb the enemy’s industrial complexes with your bombers. A strategic bombing raid is an economic attack. The attacking bombers will cause a number of points of damage to the target complexes equal to the total rolled on the dice used for the attack.
After resolving any antiaircraft fire (see Unit Profiles: Antiaircraft Guns, pg. 25), surviving bombers each roll one die (or two dice, selecting the best result, for heavy bombers). The total rolled on the dice is the number of damage markers that are placed under the attacked industrial complex. An industrial complex cannot receive more total damage than twice the IPC value of the territory on which it is located. Any excess damage is not applied.
A bomber that performed a strategic bombing raid cannot participate in any other combat this turn and must return to a friendly territory during the Noncombat Move phase.
2. Amphibious AssaultsDuring this step you will resolve each amphibious assault you announced during the Combat Move phase. If you did not announce an amphibious assault, go to General Combat (see pg. 18).
Amphibious Assault Sequence
1. Sea combat
2. Battleship & cruiser bombardment
3. Land combat
Step 1. Sea Combat: If there are defending warships, sea combat must occur. If there are only defending submarines and/or transports, the attacker may choose to ignore those units or conduct sea combat.
If sea combat occurs, all attacking and defending sea and air units present must participate in the battle. Conduct the sea combat using the rules for General Combat (see pg. 18), then go to step 3 (land combat).
If no sea combat occurs, go to step 2 (bombardment).
Step 2. Battleship & Cruiser Bombardment: If there was NOT a combat (choosing to destroy enemy transports or attacking enemy submarines in step 1 above counts as a combat) in the sea zone from which you are offloading units from transports, any accompanying battleships and cruisers in that sea zone may conduct a one-time bombardment of one coastal territory or island group being attacked. The number of ships that can make bombardment attacks is limited to one ship per land unit being offloaded from the transports into that coastal territory. If more than one territory is being assaulted from a sea zone and there are multiple battleships and/or cruisers, each ship may support only one assault. However, the ships’ bombardment may be split in any way that the attacker chooses, so long as the number of ships supporting each assault doesn’t exceed the number of seaborne land units in that assault.
Roll one die for each battleship and cruiser. Battleships hit on a “4” or less, and cruisers hit on a “3” or less (their attack numbers). For each hit, the defender moves a defending unit to the casualty zone of the battle board (used for land combat, below). These casualties will be able to defend during the land combat step before they are eliminated.
Step 3. Land Combat: If there was no sea battle or the sea zone has been cleared of all defending enemy units except transports and submerged submarines, and the attacker still has land units committed to the coastal territory, move all attacking and defending units to the battle board and conduct combat using the general combat rules (on the next page).Remember to put casualties from bombardment (if any) in the casualty zone.
Attacking land units can come from the ocean (seaborne), and they can come from neighboring territories that are adjacent to the attacked territory. Any land units offloading from a single transport can only be offloaded into a single hostile territory.
If no land units (carried as cargo) survived the sea combat, or if the attacking sea units withdrew from the sea combat, then any other units that were designated to participate in the land attack (including air units) must still conduct one round of land combat in a regular attack on the intended hostile territory before they can retreat.

1 8
The attacking units come from two territories. All units are moved to the battle board. After the attacking and defending units fire and remove casualties,
the attacker may choose to retreat.
If the attacker does not have any attacking land units left the amphibious assault is over.
Keep the attacking overland land units and seaborne land units separated on the battle board. Attacking seaborne units cannot retreat. Attacking overland land and air units can retreat (between rounds of combat). All attacking overland land units must retreat together as a group. They can only retreat to a territory from which at least one of them entered the contested territory. They must all retreat at the same time and to the same place. A retreat may happen at the conclusion of any round of combat.
Attacking air units, whether involved in the sea combat or the attack on the coastal territory, may retreat according to the normal rules (they land during the Noncombat Move phase). If they do so, the attacking air units must all disengage at the same time.
Air units and overland units (if any) must retreat at the same time.
Air Units: Each attacking air unit may participate in the sea battle or the attack on the coastal territory; it cannot do both. The attacking player must declare which air units are involved in each part of the attack and cannot change their assignments later. At the end of the amphibious assault, all air units remain in place; they will land during the Noncombat Move phase.
Air units defending in a territory can only fight in that territory. They cannot participate in the sea combat.
3. General CombatIn this step, you resolve combat in each space that contains your units and either contains enemy units or is enemy-controlled.
Combat is resolved by firing (rolling dice) according to a standard sequence. Combat in each space takes place at the same time, but each affected territory or sea zone is resolved separately and completely before resolving combat in the next contested space. The attacker decides the order of spaces in which each combat occurs. No new units may enter as reinforcements once combat has begun.
Attacking and defending units in each space are considered to fire at the same time, but for ease of play you roll dice in sequence: attacker first, then defender.
If you moved any land units into unoccupied hostile territories or hostile territories that contain only industrial complexes and/or antiaircraft guns, no actual combat is necessary. Simply skip to step 7 (Conclude combat) for each of these territories.
General Combat Sequence
1. Place units on battle board 4. Defending units fire 7. Conclude combat
2. Submarine Surprise Strike or Submerge 5. Remove defender’s casualties
3. Attacking units fire 6. Press attack or retreat
Step 1. Place Units on Battle Board
The battle board has two sides, labeled “Attacker” and “Defender.” Place all your attacking units and all defending units from the battle onto their respective sides, in the numbered columns that contain those units’ names and silhouettes. The number in a unit’s column identifies that unit’s attack or defense value. An attacking infantry’s attack value is 1, for example, and a defending infantry is 2.
In a sea battle, place any cargo (whether your own units or an ally’s) beside the sea unit that is carrying it. Cargo does not roll, nor can it take a hit. It is lost with the sea unit carrying it if that unit is destroyed.
If you are attacking into a sea zone that contains friendly units, your ally’s units are not brought onto the battle board, but remain out of play for this turn.
Step 2. Submarine Surprise Strike or Submerge (sea battles only)
This step is specific to attacking and defending submarines. If there is no opposing destroyer in the battle, before all other units fire and resolve casualties (steps 3 through 5), both attacking and defending submarines can choose to either make a Surprise Strike or Submerge.(See “Surprise Strike” and “Submerge” in Unit Profiles: Submarines, pg. 30.)

1 9
After one round of attacks, the attacking player decides to retreat, but the destroyer must retreat to one of the sea zones the
attacking forces came from.
Defenseless Transports: In a sea battle, if the defender has only transports remaining and the attacker still has units
capable of attacking, the defending transports are all destroyed, along with
their cargo. You do not have to continue rolling dice until all the transports receive
hits—this will speed up combats.This also occurs if the only combat units remaining can’t hit each other. For example, the defender has only
transports and submarines remaining, and the attacker has only air units
remaining, the air units and submarines cannot hit each other, so the transports
are defenseless. At this point, defenseless transports are all destroyed,
along with their cargo. Attacking transports are not usually considered
defenseless, since they generally have the option of retreating. If they can’t retreat, they are treated the same as
defending transports. Remember, however, that destroying defenseless transports in this way still counts as combat for the purpose of offshore
bombardment and similar rules.
Step 3. Attacking Units Fire
Roll one die for each attacking unit with an attack value that did not fire or submerge in step 2. Roll for units with the same attack value at the same time. For example, roll all units with an attack value of “3” at the same time.
An attacking unit scores a hit if you roll its attack value or less.
After the attacking player has rolled for all attacking units, the defender chooses one unit for each hit scored and moves it to the casualty zone. (It will return fire in the next step of combat.) As many hits as possible must be assigned. For instance, if 1 cruiser and 2 submarines attack a carrier with a fighter and score 3 hits, the defender must assign the cruiser hit to the fighter and the submarine hits to the carrier. The defender may not assign the cruiser hit to the carrier, as the subs cannot hit the fighter and 1 sub hit would be lost.
Step 4. Defending Units Fire
All the units on the defender’s side that did not fire or submerge in step 2 roll one die for each unit with a defense value (including units in the casualty zone). Roll for units with the same defense value at the same time.
A defending unit scores a hit if you roll its defense value or less.
After the defender has rolled for each defending unit with a defense value, the attacker chooses one unit for each hit scored and removes it from play, returning it to the storage tray. As with defender casualties (see above), as many hits as possible must be assigned.
Step 5. Remove Defender’s Casualties
Remove the defender’s units in the casualty zone from play, returning them to the storage tray.
Step 6. Press Attack or Retreat
Combat rounds (steps 2–5) continue unless one of the following two conditions occurs (in this order):
Condition A—Attacker and/or Defender Loses All Units
Once all units that can either fire at a valid target or retreat on one or both sides have been destroyed, the combat ends.
If a player has combat units remaining on the battle board, that player wins the combat. Players that have units remaining on the battle board return those units to the contested space on the game board.
In a sea battle, if both sides have only transports remaining, the attacker’s transports may remain in the contested sea zone or retreat per the rules in Condition B below, if possible.
Condition B—Attacker Retreats
The attacker (never the defender) can retreat during this step. Move all attacking land and sea units in that combat on the battle board to a single adjacent friendly space from or through which at least one attacking land or sea unit moved. In the case of sea units, that space must have been friendly at the start of the turn. All such units must retreat together to the same territory or sea zone, regardless of where they came from.
Retreating air units remain in the contested space temporarily. They complete their retreat movement during the Noncombat Move phase using the same rules as an air unit involved in a successful battle.

2 0
Step 7. Conclude Combat
If you win a combat as the attacker in a territory and you have one or more surviving land units there, you take control of it. Otherwise, it remains in the defender’s control. (If all units on both sides were destroyed, the territory remains in the defender’s control.) Sea units cannot take control of a territory; they must stay at sea.
Air units cannot capture a territory. If your attack force has only air units remaining, you cannot occupy the territory you attacked, even if there are no enemy units remaining. Air units must return to a friendly territory (fighters may also land on a friendly carrier). They do so during the Noncombat Move phase. Until then, they stay at the space where they fought.
If you have captured the territory, place your control marker on the territory and adjust the control markers on the national production chart. Your national production increases by the value of the captured territory; the loser’s production decreases by the same amount.
An antiaircraft gun or industrial complex in the captured territory remains there but now belongs to your side (see Liberating a Territory, below). If you capture an antiaircraft gun, you cannot move it in the Noncombat Move phase of the same turn. If you capture an industrial complex, you cannot mobilize new units there until your next turn. Any damage previously inflicted on an industrial complex remains in place until it is repaired.
Liberating a Territory If you capture a territory that was originally controlled by another member of your side, you “liberate” the territory. You do not take control of it; instead, the original controller regains the territory and its income. Antiaircraft guns or industrial complexes in that territory revert to the original controller of the territory.
If the original controller’s capital is in enemy hands at the end of the turn in which you would otherwise have liberated the territory, you capture the territory, collect income from the newly captured territory, and use any industrial complex there until the original controller’s capital is liberated. You also take ownership of any antiaircraft gun in that territory.
Capturing and Liberating Capitals If you capture a territory containing an enemy capital (Washington, Moscow, London, Berlin, Rome, or Tokyo), follow the same rules as for capturing a territory. Add the captured territory’s income value to your national production.
In addition, you collect all unspent IPCs from the original owner of the captured capital (but not subsequent powers controlling that capital). For example, if Germany conquers Moscow while the Soviet Union’s player is holding 18 IPCs, those IPCs are immediately transferred to Germany’s player. You collect these IPCs even if your own capital is in enemy hands. But if the United Kingdom’s player then takes Moscow, that player would not collect IPCs from Germany’s player.
The original controller of the captured capital is still in the game but cannot collect income from any territories he or she still controls and cannot buy new units and/or research technologies until the capital is liberated (any unmobilized units and/or researcher tokens are lost). That player skips all but the Combat Move, Conduct Combat, and Noncombat Move phases until the capital is liberated. If that power or one on its side liberates the capital, the original controller can once again collect income from territories he or she controls, including territories reverting control to him or her.
If a capital is liberated, the industrial complex and any antiaircraft guns in that capital territory revert ownership to the original controller of the capital. Other territories and industrial complexes that were originally controlled by the newly liberated capital’s controller but are in the hands of friendly powers also revert control immediately. You do not collect IPCs from the controlling power when you liberate a capital. For example, if the United Kingdom’s player takes Moscow from Germany’s player, Germany’s player does not surrender any IPCs.. Antiaircraft guns outside the newly liberated capital territory remain under their pre-liberation ownership.
Capturing a Victory City When you capture a territory containing an enemy victory city, take possession of its corresponding victory city token.
If at the end of the round after the U.S. player’s turn your side controls enough victory cities to achieve the victory condition you decided upon at the start of the game, your side wins.

2 1
Multinational ForcesUnits on the same side can share a territory or sea zone, constituting a multinational force. Such forces can defend together, but they cannot attack together. (This does not mean powers can share income; only the power that controls a territory collects income for that territory.)
A multinational force cannot attack the same space together, because each power moves and attacks with its own units only on its own turn. Any units in a sea zone in which a battle occurs that belong to an ally of the attacker (other than cargo on an attacker’s ship) cannot participate in the battle in any way. Such units cannot be taken as losses in the sea combat and have no effect on defending submarines.
An attacking fighter may launch from an aircraft carrier owned by an ally, but the ally’s carrier cannot move until its owner’s turn. Similarly, an attacking carrier can carry an ally’s fighter as cargo, but the ally’s fighter cannot participate in an attack by that carrier.
An attacking land unit can assault a coastal territory from an ally’s transport, but only on the attacking land unit owner’s turn.
Multinational Defense: When a space containing a multinational force is attacked, all its units defend together. The attacker fires first as usual. If a hit is scored, the defenders mutually determine the casualty. If they cannot agree, the attacker chooses. Each defender rolls separately for his or her units.
Transporting Multinational Forces: Transports belonging to a friendly power can load and offload your land units. This is a three-step process:
1. You load your land units aboard the friendly transport on your turn.
2. The transport’s owner moves it (or not) on that player’s turn.
3. You offload your land units on your next turn.
Phase 5: Noncombat Move In this phase, you can move any of your units that did not move in the Combat Move phase or participate in combat during your turn. This is a good time to gather your units, either to strengthen vulnerable territories or to reinforce units at the front. You will also land all your aircraft that participated in and survived the Conduct Combat phase.
Only aircraft and submarines may move through hostile spaces during this phase.
Where Units Can Move Land Units: Land units can move into any friendly territories, including territories that were captured in the current turn. They cannot move into hostile territories (not even those that contain no combat units but are enemy-controlled). Note, this is the only phase in which antiaircraft guns can move.
Air Units: An air unit must end its move in an eligible landing space. Bombers and fighters may land in any territory that was friendly at the start of your turn.
Only fighters may land in a sea zone with a friendly carrier present. A landing spot must be available on the carrier. Additionally:
• A fighter may land in a sea zone (even a hostile one) that is adjacent to an industrial complex you own if you will be placingan aircraft carrier that you previously purchased in that zone.
• Once any fighter lands on a carrier, movement for BOTH units ends.
• You must have a carrier move, remain in place, or be placed (new carriers only) to pick up a fighter thatwould end its noncombat movement in a sea zone. You cannot deliberately move any air unit out of rangeof a potential safe landing space.
Aircraft that cannot move to an eligible landing space by the end of the Noncombat Move phase are destroyed.
Neither bombers nor fighters may land in any territory that was hostile at the start of your turn, including any territory that was just captured by you this turn.
Sea Units: Sea units can move through any friendly sea zone. They cannot move into or through hostile sea zones.
Transports can move to friendly coastal territories and load or offload cargo, unless they loaded, moved, or offloaded, or were involved in combat during the Combat Move or Conduct Combat phase.
Aircraft carriers can move to sea zones to allow friendly fighters to land. They must move there, range permitting, if they did not move in the Combat Move phase and the friendly sea zone is the only valid landing zone for the fighters. An aircraft carrier must end its move once a fighter has landed on it.

2 2
Phase 6: Mobilize New Units If you purchased new units, you must now move all of them from the mobilization zone on the game board to eligible spaces you have controlled since the start of your turn, with the following exceptions (below). You cannot yet use industrial complexes that you captured this turn.
Restrictions on Placement For each industrial complex, you can mobilize only as many units as the IPC income value of the territory containing the industrial complex. This limit includes units mobilized in sea zones adjacent to the industrial complex. For example, Germany can mobilize 10 units.
Each damage marker under an industrial complex means one less new unit can enter the game at that factory.
You cannot place your new units at an industrial complex owned by a friendly power, unless that power’s capital is in enemy control and you have taken control of the industrial complex from an enemy power after the friendly power’s capital was captured.
Place land units and bombers only in territories containing eligible industrial complexes. Land units cannot enter play on transports.
Place sea units only in sea zones adjacent to territories containing eligible industrial complexes. New sea units can enter play even in a hostile sea zone. No combat occurs because the Conduct Combat phase is over.
Place fighters into territories containing an industrial complex controlled by your power from the start of your turn, or on an aircraft carrier owned by your power in a sea zone (even a hostile one) adjacent to a territory with such an industrial complex. The aircraft carrier may be either a new one or an existing one already in place. You cannot place a new fighter on a carrier owned by a friendly power.
Place new industrial complexes in any territory that you have controlled since the start of your turn and that has an income value of at least 1. You cannot have more than one industrial complex per territory.
In the event that you purchased more units than you can actually mobilize due to production limitations, the excess units are not lost. You can place them on one of your future turns during your Mobilize New Units phase.
Phase 7: Collect Income In this phase, you earn production income to finance future attacks and strategies. Look up your power’s national production level (indicated by your control marker) on the national production chart and collect that number of IPCs from the bank.
If your capital is under an enemy power’s control, you cannot collect income nor can you collect bonus income. A power cannot lend or give IPCs to another power, even if both powers are on the same side.
In addition, you may have reached your national objectives. A power reaching its national objectives is experiencing an uplifting positive effect across the board—higher morale coupled with renewed vigor. This awards your economy an extra boost of 5 or more IPCs per turn and is called “bonus income.”
National Objectives & Bonus Income Note: This is an optional rule—players should decide whether or not this rule will be included in their game.
While the goal of the game is to capture victory cities, each power also has one or more objectives related to its historic objectives. These objectives, if achieved, will grant you bonus income.
The Allies, especially the United States and the United Kingdom, seemed able to meld their individual objectives into one common cause—the complete and unconditional surrender of the Axis. This was also the official position of the Soviet Union, but unlike the United States and the United Kingdom, the Soviets had world communism in mind as well.
Germany had its “Lebensraum”, Japan’s was “The Greater East Asia Co-Prosperity Sphere,” and Italy’s stated objective was turning the Mediterranean Sea and the territories that border it into “Mare Nostrum.”
In recognition of these known national objectives, each country that reaches its individual national objectives will receive a bonus sum of IPCs each turn.
Here are the national objectives for each power and their income bonus (also shown on the back of each national setup chart):

2 3
Axis Powers
The United States: “The Arsenal of Democracy”
The United States was not always the industrial giant that it suddenly became. The conversion from a peacetime industry to a wartime one was done practically overnight. Nonetheless, the reality of this historical phenomenon proved to be one of the undeniable strategic realities of World War II.
• Gain 5 IPCs if Allied powerscontrol all of the followingterritories: Western United States,Central United States, and EasternUnited States.
• Gain 5 IPCs if Allied powerscontrol the Philippine Islands.
• Gain 5 IPCs if Allied powerscontrol France.
• Gain 5 IPCs if Allied powerscontrol at least three of thefollowing territories: Midway,Wake Island, Hawaiian Islands,and/or Solomon Islands.
Allied PowersThe United Kingdom: “The British Empire”
At the time the war broke out, the United Kingdom had stretched its empire around the world. But the empire was stretched thin and was trying to retain its control on its old centers of power.
• Gain 5 IPCs if Allied powerscontrol all of the followingterritories: Eastern Canada,Western Canada, Gibraltar, Egypt,Australia, and Union of SouthAfrica.
• Gain 5 IPCs if Allied powerscontrol any territory originallyunder Japan’s control.
• Gain 5 IPCs if Allied powerscontrol at least one of thefollowing territories: Franceand/or Balkans.
Soviet Union: “The Great Patriotic War”
In June of 1941, Germany launched Operation Barbarossa. German forces soon laid seige to Leningrad and stood within sight of the Kremlin. As Russia’s fear of foreign invasion grew, a security buffer of foreign territory became a Soviet objective.
• Gain 10 IPCs if Allied powerscontrol at least three of thefollowing territories: Norway,Finland, Poland, Bulgaria/Romania, Czechoslovakia/Hungary, and/or Balkans.
• Gain 5 IPCs if no other Alliedforces are present in a territorycontrolled by the Soviet Unionand if the Soviets controlArchangel.
Germany: “Lebensraum”
Living Space. Extra space was needed for the growth of the German population for a greater Germany. This space would be found in the East.
• Gain 5 IPCs if Axis powerscontrol all of the followingterritories: France, NorthwesternEurope, Germany,Czechoslovakia/Hungary,Bulgaria/Romania, and Poland.
• Gain 5 IPCs if Axis powerscontrol at least three of thefollowing territories: Baltic States,East Poland, Ukraine, EasternUkraine, and/or Belorussia.
• Gain 5 IPCs if Axis powerscontrol at least one of thefollowing territories: KareliaS.S.R. and/or Caucasus.
Japan: “The Greater East Asia Co-Prosperity Sphere”
Asia for the Asians. The stated objective was to create a self-sufficient “block of Asian nations led by the Japanese and free of Western Powers.”
• Gain 5 IPCs if Axis powerscontrol all of the followingterritories: Manchuria, Kiangsu,and French Indo-China/Thailand.
• Gain 5 IPCs if Axis powerscontrol at least four of thefollowing territories: Kwangtung,East Indies, Borneo, PhilippineIslands, New Guinea, and/orSolomon Islands.
• Gain 5 IPCs if Axis powers controlat least one of the followingterritories: Hawaiian Islands,Australia, and/or India.
Italy: “Mare Nostrum”
Our Sea. Mussolini wanted to re-establish the greatness of the Roman Empire. This could best be demonstrated by controlling the entire Mediterranean Sea.
• Gain 5 IPCs if Axis powerscontrol all of the followingterritories: Italy, Balkans,Morocco/Algeria, and Libya,and no enemy surface warshipsare in sea zones 13, 14, and 15.(See Sea Units, pg. 28 forinformation on surface warships.)
• Gain 5 IPCs if Axis powerscontrol at least three of thefollowing territories: Egypt,Trans-Jordan, France, and/orGibraltar.
24
UNIT PROFILES This section provides detailed information for each unit in the game. Each entry has a short description, then lists the unit’s cost in IPCs and its attack, defense, and move values. Each unit type also has special abilities, which are summarized below its statistics. The following profiles do not take into account any special abilities attributed to the different units as a result of weapons development.
Land UnitsInfantry, artillery, tanks, and antiaircraft guns can attack and/or defend only in territories. Only infantry, artillery, and tanks can capture hostile territories. All but industrial complexes can be carried by transports. Industrial complexes are located in territories but cannot move, attack, defend, or be transported.
Infantry Description: Basic land units that are strong on defense.
Cost: 3
Attack: 1 (2 when supported by artillery)
Defense: 2
Move: 1
Special Abilities
Supported by Artillery: When an infantry unit attacks along with an artillery unit, the infantry’s attack value increases from 1 to 2. Each infantry must be matched one-for-one with a supporting artillery unit. If your infantry outnumber your artillery, the excess infantry units still have an attack value of 1. For example, if you attack with two artillery and five infantry, two of your infantry have an attack value of 2, and the rest, 1. Infantry are not supported by artillery on defense.
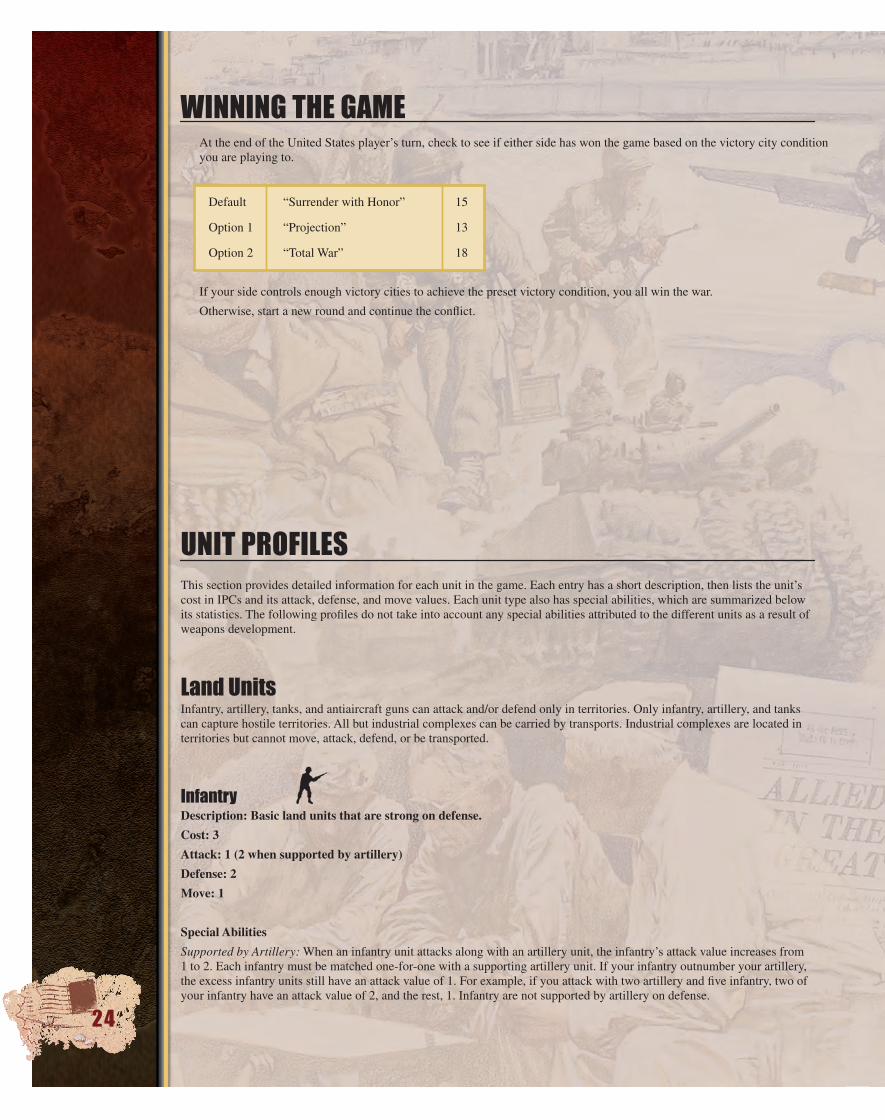
At the end of the United States player’s turn, check to see if either side has won the game based on the victory city condition you are playing to.
Default “Surrender with Honor” 15
Option 1 “Projection” 13
Option 2 “Total War” 18
If your side controls enough victory cities to achieve the preset victory condition, you all win the war.
Otherwise, start a new round and continue the conflict.
WINNING THE GAME

2 5
Artillery Description: Provides extra punch and supports infantry attacks.
Cost: 4
Attack: 2
Defense: 2
Move: 1
Special Abilities
Support Infantry: When an infantry unit attacks along with an artillery unit, the infantry’s attack value increases from 1 to 2. Each infantry must be matched one-for-one with a supporting artillery unit. Artillery does not support infantry on defense.
Tanks Description: Heavy-hitting and fast-moving units.
Cost: 5
Attack: 3
Defense: 3
Move: 2
Special Abilities
Blitz: Tanks can “blitz” by moving through an unoccupied hostile territory as the first part of a two-space move that can end in a friendly or hostile territory. This complete move must occur during the Combat Move phase. By blitzing, the tank establishes control of the first territory before it moves to the next. The second territory can be friendly or hostile, or even the territory the tank came from. A tank that encounters enemy units in the first territory it enters must stop there, even if the unit is an antiaircraft gun or industrial complex.
Antiaircraft Guns Description: These units represent extensive antiaircraft defenses.
Cost: 6
Attack: —
Defense: 1
Move: 1 (noncombat only)
Special Abilities
Limited Move: An antiaircraft gun cannot move during the Combat Move phase (other than being carried on a transport if the antiaircraft gun was loaded on a prior turn).
Shoot Down Air Units: An antiaircraft gun may only fire at an air unit when that unit attacks the territory containing that antiaircraft gun. Antiaircraft guns fire only before the first round of combat and are then returned to the game board. Roll one die for each air unit doing so (if there is more than one antiaircraft gun in a territory, only one can fire, even if the others are controlled by different powers). On a roll of 1, that air unit is destroyed and immediately removed from the game. If all the aircraft are the same, fighters or bombers, there is no need to differentiate them. However, if there is a mix of fighters and bombers, you must assign specific dice rolls to specific aircraft by indicating which aircraft is being rolled for and rolling the die. A roll of 1 destroys the specified aircraft. This special attack is made immediately before normal combat occurs in the territory containing the antiaircraft gun.
Subject to Capture: If a territory is captured, any antiaircraft guns there are also captured. Their new owner is the player controlling the territory at the end of that turn. They can be used by their new owner in future combat. Antiaircraft guns are never destroyed, except when a transport carrying one is sunk. If you move an antiaircraft gun into a territory controlled by a friendly power, place one of your control markers under it.

2 6
Industrial Complexes Description: These factories are a point of entry for newly produced units.
Cost: 15
Attack: N/A
Defense: N/A
Move: Cannot move.
Special Abilities
Cannot Attack, Defend, or Move: An industrial complex cannot attack, defend, or move. It cannot be transported. It is not placed on the battle board.
Mobilization Sites: You may mobilize units only in territories containing industrial complexes you have controlled since the start of your turn. You can mobilize only a number of units up to the income value of the territory containing the industrial complex (for example, an industrial complex built in Eastern Canada may mobilize up to three units per turn). You can place new industrial complexes in any territory that you have controlled since the start of your turn and that has an income value of at least 1. There cannot be more than one industrial complex per territory.
Damaged Factories (Industrial Complexes): Bombers and rockets can damage industrial complexes directly. Damage markers are placed under the targeted industrial complex. For each damage marker that is under a given industrial complex, one less unit can be mobilized by that factory. Total damage to an industrial complex cannot exceed twice the IPC value of the territory on which the factory is located. Industrial complexes are never destroyed. They can be heavily damaged, however, and can be damaged to the point where they have at least as many damage markers as they have production ability. In this case, no new units can enter the game through that factory until it is repaired.
Damage markers can be removed at a cost of 1 IPC each. These repairs are paid for (and the damage markers are removed) during the Purchase Units phase of the turn.
Usable by Invading Forces: If a territory is captured, an industrial complex there is also captured. The capturing player can use it on the turn after it is captured, but any existing damage markers remain under the industrial complex.
You cannot place your new units at an industrial complex owned by a friendly power, unless that power’s capital is in enemy hands. Even if you liberate a territory with an industrial complex in it, you cannot use the complex; the original controller can use it on his or her next turn.
Air UnitsFighters and bombers can attack and defend in territories. Both can attack in sea zones. Fighters stationed on carriers can defend in sea zones. Both can land only in friendly territories and fighters can land on friendly aircraft carriers. Your air units cannot land in territories you just captured, whether they were involved in the combat or not. Air units can move through hostile territories and sea zones as if they were friendly. However, they are exposed to antiaircraft fire during combat whenever they attack a hostile territory that contains an antiaircraft gun.
To determine movement range, count each space your air unit enters “after takeoff.” When moving over water from a coastal territory or an island group, count the first sea zone entered as one space. When flying to an island group, count the surrounding sea zone and the island group itself as one space each. (An island is considered a territory within a sea zone; air units based on an island cannot defend the surrounding sea zone.) When moving a fighter from a carrier, do not count the carrier’s sea zone as the first space—your fighter is in that sea zone already. In other words, each time an air unit crosses a boundary between spaces, whether territories or sea zones, it uses one movement point.. To participate in combat, a fighter must take off from its carrier before the carrier moves, otherwise it is cargo.
You cannot deliberately send air units into combat situations that place them out of range of a place to land afterward. In the Combat Move phase, prior to rolling any battles, you must be able to demonstrate some possible way (however remote the possibility is) for all your attacking air units to land safely that turn. This could include a combination of combat moves. It could also include noncombat moves by a carrier or the mobilization of a new carrier. If it does include noncombat moves by a carrier, then the carrier cannot move in the Combat Move phase.
In order to demonstrate that an air unit MAY have a safe landing zone, you may assume that all of your attacking rolls will be hits, and all defending rolls will be misses. You cannot, however, use a planned retreat of any carrier to demonstrate a possible safe landing zone for any fighter. Once possible landing spaces for all attacking air units have been demonstrated, you have no obligation to guarantee those landing zones for air units in the course of battle. For example, aircraft carriers may freely retreat or be taken as casualties, even if doing so leaves air units with no place to land after combat (such air units will be destroyed at the end of the Noncombat Move phase). However, during Noncombat Movement you must provide for safe landing of as many air units as remains possible after all combats are resolved.

2 7
If you declared that a carrier will move during the Noncombat Move phase to provide a safe landing zone for a fighter moved in the Combat Move phase, you must follow through and move the carrier to its planned location in the Noncombat Move phase unless the fighter has landed safely elsewhere or has been destroyed before then or a combat required to clear an intervening sea zone failed to do so. Likewise, if you declared that a new carrier will be mobilized to provide a safe landing zone for a fighter, it must be mobilized in that sea zone unless the fighter has landed safely elsewhere or has been destroyed.
Air units can hit submarines only if a friendly destroyer is in the battle. Whenever a round of combat starts and there is no enemy destroyer, submarines cannot be hit by air units.
Fighters Description: These basic air units have strong defense and considerable range.
Cost: 10
Attack: 3
Defense: 4
Move: 4
Special Abilities
Land on Aircraft Carriers: Fighters can be carried by aircraft carriers. Up to two fighters can be on a friendly aircraft carrier at a time. A fighter must be launched from the carrier’s initial position to participate in combat this turn. However, it may land on a carrier in the Noncombat Move phase (even if retreating) or during any other noncombat move. (A fighter cannot land on a carrier during the carrier’s movement.) Your aircraft carrier can move to a sea zone where one of your fighters has ended its move (and in fact, it must do so if it is able) but cannot move any farther that turn.
A fighter based on a defending carrier must land on the same carrier if possible after the battle. If that carrier is destroyed in combat it must try to land elsewhere. It must land on a different friendly carrier in the same sea zone, move one space to a friendly territory or aircraft carrier, or be destroyed. This movement occurs during the Noncombat Move phase, before the acting player makes any noncombat movements. Carrier-based fighters are always considered to be defending in the air, even if only submarines are attacking and the fighters cannot hit them because there is no defending destroyer.
Each of your fighters based on your attacking carrier launches before combat movement (even if it is not participating in combat) and can retreat to a friendly territory or carrier within range if it survives combat. If any fighter is not in an eligible landing space by the end of the Noncombat Move phase, it is destroyed. (Note that an eligible landing space may include a sea zone in which a new carrier will be placed in the Mobilize New Units phase, as long as there is a landing space available on it.)
Bombers Description: These aircraft are major offensive weapons with long-range capabilities.
Cost: 12
Attack: 4
Defense: 1
Move: 6
Special Abilities
Strategic Bombing Raids: A bomber can either participate in normal combat or make an economic attack against an enemy industrial complex. Such an attack on an industrial complex is a Strategic Bombing Raid (see Strategic Bombing Raids, pg. 17). The maximum total damage strategic bombing raids can inflict on one industrial complex is twice the territory’s IPC value.

2 8
Sea UnitsBattleships, aircraft carriers, cruisers, destroyers, transports, and submarines move, attack, and defend in sea zones. They cannot move into territories. For the sake of these rules, the following are surface warships: battleships, carriers, cruisers, and destroyers. Transports are not part of the group called warships. Submarines are warships, but they are not surface warships.
All sea units can move up to two sea zones. They cannot move into or through hostile sea zones. If enemy units other than submarines and transports occupy a sea zone, the sea zone is hostile and your sea units end their movement and enter combat. Submarines are an exception: They can pass through a hostile sea zone without stopping, unless there is an enemy destroyer present (see Destroyers, pg. 29).
Some sea units can carry other units. Transports can carry only land units. Aircraft carriers can carry up to two fighters.
Battleships Description: These units are the strongest and most durable warships.
Cost: 20
Attack: 4
Defense: 4
Move: 2
Special Abilities
Two Hits to Destroy: Attacking and defending battleships require two hits to destroy. If a battleship is hit once, even by a submarine’s Surprise Strike, turn it on its side to mark its damaged status. In the case of an attacking battleship, do not remove it from play unless it takes a second hit in the same combat. In the case of a defending battleship, do not move it to the casualty zone of the battle board unless it takes a second hit in the same combat. If a battleship survives a combat having taken one hit, return it upright to the game board.
Offshore Bombardment: Your battleships and cruisers can conduct offshore bombardment during an amphibious assault. (see Amphibious Assaults - Step 2. Battleship and Cruiser Bombardment, pg. 17)
Aircraft Carriers Description: These are huge warships capable of carrying fighter aircraft.
Cost: 14
Attack: 1
Defense: 2
Move: 2
Special Abilities
Carry Fighters: An aircraft carrier can carry up to two fighters, including those belonging to friendly powers. Fighters from friendly powers can take off from and land on your carriers, but only during that power’s turn. Any fighters belonging to the aircraft carrier owner move independently of the carrier. These fighters can make a combat move from the carrier’s original sea zone, or they can remain in the original sea zone until the Noncombat Move phase. Fighters belonging to friendly powers on attacking carriers are always treated as cargo, since it is not their turn. Your aircraft carrier can move to or remain in a sea zone where one of your fighters will end its noncombat move (and must do so if it is able).
Fighter Defense: Whenever a carrier is attacked, its fighters (even those belonging to friendly powers) are considered to be defending in the air and fight normally, even if only submarines are attacking and the fighters cannot hit them because there is no defending destroyer. (However, a fighter cannot be chosen as a casualty from a submarine hit, because submarines can attack only sea units.)
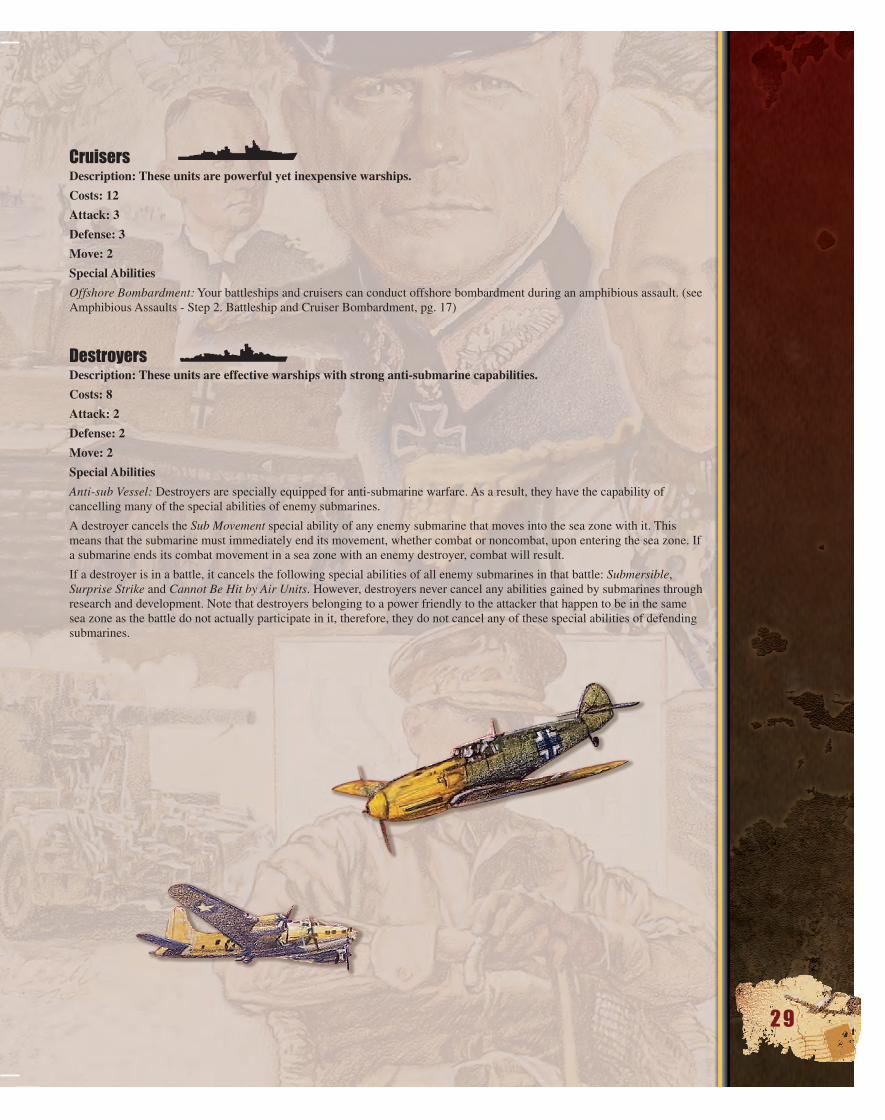
2 9
CruisersDescription: These units are powerful yet inexpensive warships.
Costs: 12
Attack: 3
Defense: 3
Move: 2
Special Abilities
Offshore Bombardment: Your battleships and cruisers can conduct offshore bombardment during an amphibious assault. (see Amphibious Assaults - Step 2. Battleship and Cruiser Bombardment, pg. 17)
Destroyers Description: These units are effective warships with strong anti-submarine capabilities.
Costs: 8
Attack: 2
Defense: 2
Move: 2
Special Abilities
Anti-sub Vessel: Destroyers are specially equipped for anti-submarine warfare. As a result, they have the capability of cancelling many of the special abilities of enemy submarines.
A destroyer cancels the Sub Movement special ability of any enemy submarine that moves into the sea zone with it. This means that the submarine must immediately end its movement, whether combat or noncombat, upon entering the sea zone. If a submarine ends its combat movement in a sea zone with an enemy destroyer, combat will result.
If a destroyer is in a battle, it cancels the following special abilities of all enemy submarines in that battle: Submersible, Surprise Strike and Cannot Be Hit by Air Units. However, destroyers never cancel any abilities gained by submarines through research and development. Note that destroyers belonging to a power friendly to the attacker that happen to be in the same sea zone as the battle do not actually participate in it, therefore, they do not cancel any of these special abilities of defending submarines.

3 0
Submarines Description: These units are submersible warships with unique capabilities.
Cost: 6
Attack: 2
Defense: 1
Move: 2
Special Abilities
Submarines have several special abilities. Most of them are either cancelled or stopped by the presence of an enemy destroyer.
Submersible: A submarine has the option of submerging. It can do this anytime it would otherwise make a Surprise Strike (see below). The decision is made before any dice are rolled by either side (the attacker decides first) and takes effect immediately. When a submarine submerges, it’s immediately removed from the battle board and placed back on the map. As a result, it can no longer fire or take hits in that combat. However, a submarine can’t submerge if an enemy destroyer is present in the battle.
Surprise Strike: Submarines make their attack and defense rolls before any other units, and players must remove casualties hit by submarines before those units get a chance to make an attack or defense roll (with some exceptions - see below). This special roll happens during the Submarine Surprise Strike or Submerge step. If both players have submarines, all the submarines get to fire a surprise strike before taking casualties. Any hits made during this attack that do not destroy units (such as battleships) remain in effect until the end of the combat.
How submarines conduct combat: If there is no opposing destroyer on the battle board, submarines can either make a Surprise Strike or submerge during the Submarine Surprise Strike or Submerge step of the General Combat sequence. However, if there is an opposing destroyer, they will participate in combat during either the Attacking Units Fire step or the Defending Units Fire step of the General Combat sequence. Remove each submerging submarine from the battle board and place it on the game board in the contested sea zone. Roll one die for each attacking submarine conducting a surprise strike.
After the attacking player has rolled for all attacking submarines, the defender chooses one sea unit (submarines cannot hit air units) for each hit scored and moves it to the casualty zone.
Roll one die for each defending submarine conducting a surprise strike (including those in the casualty zone).
After the defending player has rolled for all defending submarines, the attacker chooses one sea unit (submarines cannot hit air units) for each hit scored and removes it from play.
Finally, remove the defender’s units in the casualty zone from play.
Sub Movement: Submarines treat hostile sea zones as if they were friendly for purposes of both combat and noncombat movement. However, if a submarine enters a sea zone containing an enemy destroyer, its movement ends immediately. If it ends its combat move in a hostile sea zone, combat will occur.
Does Not Block Enemy Movement: The“stealth” ability of submarines also allows enemy ships to ignore their presence. Any sea zone that contains only enemy submarines does not stop the movement of a sea unit. Sea units ending their combat movement in a sea zone containing only enemy submarines may choose to attack them or not. Sea units may also end their noncombat movement in a sea zone containing only enemy submarines.
Cannot Hit Air Units: When attacking or defending, submarines cannot hit air units.
Cannot Be Hit by Air Units: When attacking or defending, hits scored by air units cannot be assigned to submarines unless there is a destroyer friendly to the air units in the battle.

3 1
Transports Description: Can transport land units across water.
Cost: 7
Attack: 0
Defense: 0
Move: 2
Special Abilities
No Combat Value: Even though a transport can attack or defend, either alone or with other units, it has a combat value of 0. This means that a transport cannot fire in the attacking units’ or the defending units’ fire steps. Transports may not attack in a sea battle without being accompanied by at least one unit with an attack value.
Doesn’t Block Enemy Movement: Any sea zone that contains only enemy transports does not stop the movement of a sea unit. Air or sea units (other than transports) ending their combat movement in a sea zone containing only enemy transports automatically destroy those transports (unless they are ignoring them to support an amphibious assault instead). This counts as a sea combat for those sea units. Sea units may also end their noncombat movement in a sea zone containing only enemy transports.
Chosen Last: Transports may only be chosen as a casualty if there are no other eligible units. Normally this will occur when only transports are left, but it may also occur under other circumstances. For example, fighters attacking transports and submerged submarines will hit the transports because they cannot hit the submarines without an attacking destroyer present.
Carry Land Units: A transport may carry land units belonging to you or to friendly powers. Its capacity is any one land unit, plus one additional infantry. Thus, a full transport may carry a tank and an infantry, an artillery and an infantry, an antiaircraft gun and an infantry, or two infantry. A transport cannot carry an industrial complex. Land units on a transport are cargo; they cannot attack or defend while at sea and are destroyed if their transport is destroyed.
Loading and Offloading: A transport can load cargo from one or two territories in or adjacent to friendly sea zones before, during, and after it moves. A transport can pick up cargo, move one sea zone, pick up more cargo, move one more sea zone, and offload the cargo at the end of its movement. It may also remain at sea with the cargo still aboard (but only if the cargo remaining aboard was loaded in a previous turn, was loaded this turn in the Noncombat Move phase, or was loaded this turn for an amphibious assault from which the transport retreated).
Loading onto and/or offloading from a transport counts as a land unit’s entire move; it cannot move before loading or after offloading. Place the land units alongside the transport in the sea zone. If the transport moves in the Noncombat Move phase, any number of units aboard may offload into a single friendly territory.
Land units belonging to friendly powers must load on their owner’s turn, be carried on your turn, and offload on a later turn of their owner. This is true even if the transport remains in the same sea zone
Whenever a transport offloads, it cannot move again that turn. If a transport retreats, it cannot offload that turn. A transport cannot offload in two territories during a single turn, nor can it offload cargo onto another transport. A transport cannot load or offload while in a hostile sea zone. Remember that hostile sea zones contain enemy units, but that for purposes of determining the status of a sea zone, submarines and transports are ignored.
A transport can load and offload units without moving from the friendly sea zone it is in (this is known as “bridging”). Each such transport is still limited to its cargo capacity. It can offload in only one territory, and once it offloads, it cannot move, load, or offload again that turn.
Amphibious Assaults: A transport can take part in an amphibious assault step of the Conduct Combat phase. That is the only time a transport can offload into a hostile territory.
During an amphibious assault, a transport must either offload all units that were loaded during the Combat Move phase or retreat during sea combat. It may also offload any number of units owned by the attacking power that already were on board at the start of the turn.

Questions?www.wizards.com/customerservice
Wizards of the Coast, Inc.P.O. Box 707
Renton WA 98057-0707U.S.A.
Tel: 1-800-324-6496 (within the U.S.)1-206-624-0933 (outside the U.S.)
Seven Days a Week9am - 5pm (Pacific Time)
Italian: [email protected]: [email protected]: [email protected]: [email protected]
Russian: [email protected] America: [email protected]
Japanese: [email protected] Pacific: [email protected]
AvalonHill.com
©2004, 2008 Wizards of the Coast LLC, P.O. Box 707, Renton, WA 98057-0707, U.S.A. Manufactured by: Hasbro SA, Rue Emile-Boéchat 31, 2800 Delémont, CH. Represented by: Hasbro Europe, 4 The Square,
Stockley Park, Uxbridge, Middlesex, UB11 1ET, UK. MADE IN CHINA. The Wizards of the Coast logo is a trademark of Wizards of the Coast LLC in the U.S.A. and other countries. Hasbro, Axis & Allies, Avalon Hill and their logos are trademarks of HASBRO, Inc. and are used with permission. ® denotes Reg. U.S. Pat. &
TM Office. All rights reserved. ©2004, 2008 Hasbro. Color of parts may vary from those pictured. For Europe: Hasbro UK Ltd, P.O. Box 43, Newport, NP19 4YD, UK. Importé au Canada par Wizards of the Coast, Inc., P.O.
Box 707, Renton WA 98057-0707, U.S.A. FABRIQUÉ IN CHINE
Please retain company details for future reference.
300C3972000001 EN
®