15 minute stretching workout (gnv64)
130
minute 15 > > G e t r e a l r e s u l t s a n y t i m e , a n y w h e r e > > stretching workout Suzanne Martin PT, DPT
-
Upload
mystretchingvital -
Category
Documents
-
view
222 -
download
4
description
Workout Stretching
Transcript of 15 minute stretching workout (gnv64)

minute15
>
> G
et rea
l resu
lts anytime, anywhere >
> stretching workout
Suzanne Martin PT, DPT

US_001_AD442.indd 1 24/2/09 16:00:35001_AD442.indd 1 09/07/2009 16:17

US_001_AD442.indd 1 24/2/09 16:00:35

US_002-003_AD442.indd 2 17/2/09 20:18:41

US_002-003_AD442.indd 3 17/2/09 20:18:57
Suzanne Martin P.T., D.P.T.
minute15>>
stretching workout

US_004-005_AD442.indd 4 17/2/09 20:26:12
London, New York, Melbourne, Munich, and Delhi
For H.G.
Project Editor Hilary Mandleberg Project Art Editor Helen McTeerSenior Editor Jennifer Latham Senior Art Editor Susan DowningManaging Editor Dawn Henderson Managing Art Editor Christine KeiltyArt Director Peter Luff Publisher Mary-Clare Jerram Stills Photography Ruth Jenkinson DTP Designer Sonia Charbonnier Production Controller Alice Holloway Senior Production Editor Jennifer MurrayUS Editor Jenny Siklós
DVD produced for Dorling Kindersley byChrome Productions www.chromeproductions.comDirector Joel Mishcon Producer Hannah ChandlerDOP Benedict Spence Camera Benedict Spence, Joe McNally, Jon KassellCamera assistant May Hyman Production Assistant Sam RowlandGaffer Larry Deacon, Jonathan Spencer Music Felix ErskineHair and Makeup Rachel Jones Voice-over Suzanne PirretVoice-over Recording Ben Jones
First American edition, 2010
Published in the United States byDK Publishing, 375 Hudson StreetNew York, New York 10014
09 10 11 12 10 9 8 7 6 5 4 3 2 1
AD442—January 2010
Copyright © 2010 Dorling Kindersley LimitedText copyright © 2010 Suzanne Martin
Health warningAll participants in fitness activities must assume the responsibility for their own actions and safety. If you have any health problems or medical conditions, consult with your physician before undertaking any of the activities set out in this book. The information contained in this book cannot replace sound judgement and good decision making, which can help reduce risk of injury.
All rights reserved.
Without limiting the rights under copyright reserved above, no part of this publication may be reproduced, stored in or introduced into a retrieval system, or transmitted, in any form, or by any means (electronic, mechanical, photocopying, recording, or otherwise), without the prior written permission of both the copyright owner and the above publisher of this book.
Published in Great Britain by Dorling Kindersley Limited
A catalog record for this book is available from the Library of Congress
ISBN 978-0-7566-5728–4
DK books are available at special discounts when purchased in bulk for sales promotions, premiums, fund-raising, or educational use. For details, contact: DK Publishing Special Markets, 375 Hudson Street, New York, New York 10014 or [email protected]
Printed and bound in China by Shek Wah Tong Printing Press Ltd.
Discover more atwww.dk.com
US_004-005_AD442.indd 4 13/07/2009 14:52

US_004-005_AD442.indd 5 17/2/09 20:26:27
contentsAuthor Foreword 6
How to Use this Book 8
Defining the Stretch 10
Muscle Connections 12
Flexibility and Posture 14
Imagery as a Tool 16
Wake up the Stretch 18
Wake up the Stretch Summary 34
Wake up the Stretch FAQs 40
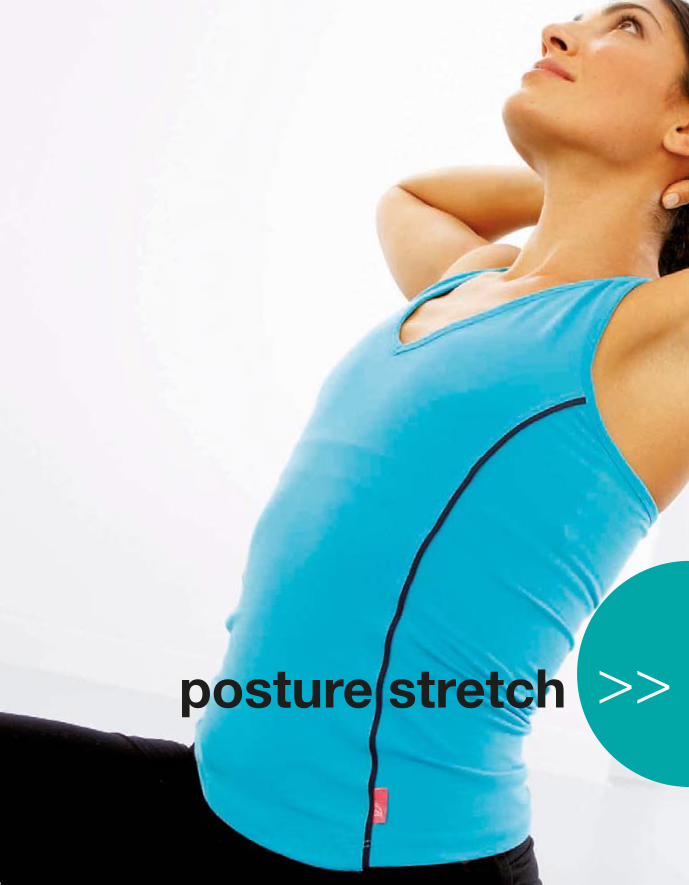
Posture Stretch 42
Posture Stretch Summary 58
Posture Stretch FAQs 64
Flexibility Stretch 66
Flexibility Stretch Summary 82
Flexibility Stretch FAQs 88
Strength Stretch 90
Strength Stretch 106
Strength Stretch FAQs 112
Moving On 114
Modify as Needed 116
Stretches for Everyday Life 118
Relaxation Techniques 120
Strategies for Healthy Living 122
Useful Resources 124
Index 126
Acknowledgments 128
US_004-005_AD442.indd 5 13/07/2009 14:52

US_006-007-Foreword.indd 6 16/2/09 21:58:50
6 author foreword Here it is! Thanks to all of you who enjoyed my first Stretching
book, and especially, to all of you who contacted me to request
more Stretching and succeeded in exerting your influence in
spurring the production of this book. Here are four themes with
stretches that have been a part of my regimen for years. A special
welcome to those of you new to stretching. May you become a
lifelong convert!
Stretching is an integral part of body maintenance, as essential
as brushing your teeth. Please don’t be misled into thinking of it
as a competitive sport, where more is better. This is not the case.
Stretching is for everyone, male or female, naturally flexible or
uncomfortably stiff. Correct stretching changes how your whole
body looks, as well as providing pain relief and reducing stress.
Keep your mind open. Some of the instructions given may seem
prescriptive, but that is because the effectiveness of the stretches
lies in the set-up. Many people spend years in the gym, yet never
seem to gain results. They don’t pay attention to their set-up.
Look hard at the pictures and tips. The explanations will help
you to organize the exercise concepts in your mind, which will help
you to organize the efforts in your body to gain the greatest effect.
This may take time, so be patient.

US_006-007-Foreword.indd 7 16/2/09 21:58:50
7
The stretches will reveal where your body needs help.
Observe and compare one side of your body to the other. Can
you feel both sides “organizing themselves” into the movement or
position? Is any body part talking to you? Please remember that
our supple models are only demonstrators. Follow the instructions,
mimic the basic shapes, and understand the cues. Then take the
movements farther. Internalize them until you can feel every bone
inside your body. Learn to compare the way your body stretches
today to the way it stretched yesterday. Don’t compare it with the
model’s body.
Learn to see your body as it is. The famous composer
Stravinsky once said that once he knew his limitations, then
he could become creative. Until we see our bodies as they really
are, and respect their individuality, we won’t bring about change.
Take the challenge. Construct a new, improved you. These
simple exercises hold a key to your body’s potential. Permanent
change happens one little increment at a time. Each 15-minute
segment will bring you closer to a more wonderful you. Enjoy.

21 3
1413 17
3 4 5
315 16
US_008-009_AD442.indd 8 17/2/09 20:45:14
8 how to use this book Stretch toward a new you! Each of the four programs in this book uses
stretching to develop different aspects of your body. Think of those
aspects like the facets of a diamond, honed with precision by the
diamond cutter so each one sparkles and makes a glorious whole.
This book shows you how to transform your body—and your life—through stretching. Each stretch can stand by itself, but when done in sequence, you will experience a powerful cumulative effect. To start, read the introduction to each program to get an idea of its theme. Then watch the demonstration on the DVD, which demonstrates all four programs and is designed to be used with the book. As you watch, page references to the book flash up on the screen. Refer to these for more detailed instruction.
Next, try the program for yourself, then read the FAQs pages and annotations, and study the “feel-it-here” patches on the exercise pages to learn more and make the moves more your own.
Certain stretches will be harder for some people than for others, depending upon experience and body type. Remember, there’s always an easier way to get into a harder move, so use the modification suggestions in the FAQs pages and on pp116–117. Remember, too, that you need to do a variety of motions in many different planes in order to identify weak links in your body.
There’s no such thing as an easy exercise. Any exercise or stretch, however simple it may seem, brings greater benefits the more mindfully you do it.
The gatefoldsThe gatefolds help you see each stretch sequence as a whole. Once you’ve watched the DVD, and examined the modifications and tips for each exercise, the gatefold will help reinforce the sense of the sequence and gives you a quick at-a-glance
reference. More importantly, when working without the DVD, you can also use the gatefold to prolong a stretch and linger from stretch to stretch, embellishing and savoring each as times permits.
Safety issuesBe sure to get permission from your healthcare provider prior to beginning a new exercise program. The advice and exercises are not intended to be a substitute for individual medical help.
At-a-glance gatefolds demonstrate the flow of each
program, providing a quick reference so you can perform
a neat, succinct, 15-minute sequence.
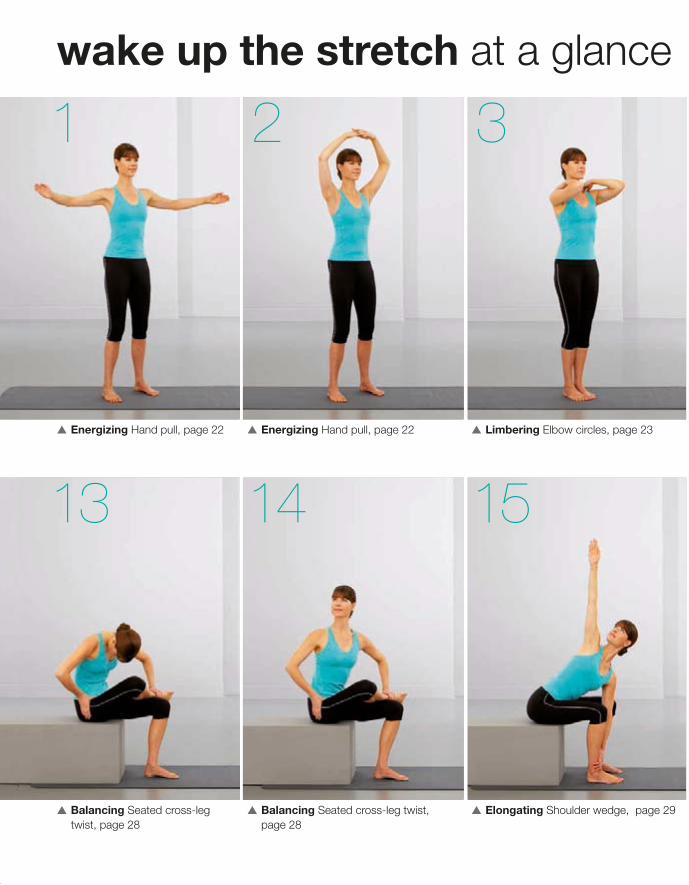
Energizing Hand pull, page 22Energizing Hand pull, page 22
wake up the stretch at a glance
Balancing Seated cross-leg twist, page 28
Balancing Seated cross-leg twist, page 28
Coordinating Alligator/Cat, page 30
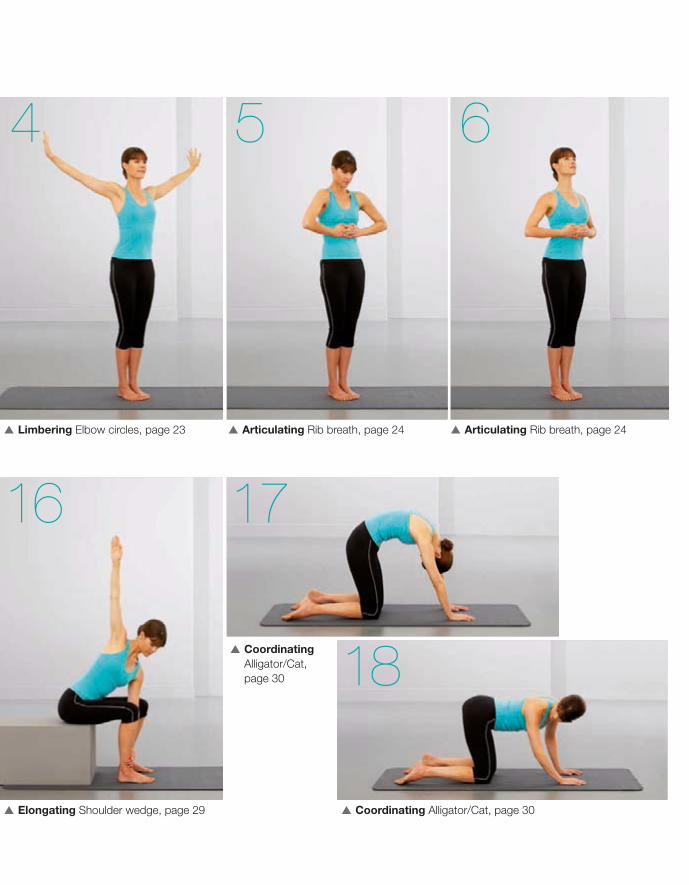
Limbering Elbow circles, page 23 Limbering Elbow circles, page 23 Articulating R
Elongating Shoulder wedge, page 29 Elongating Shoulder wedge, page 29

10 11
18
17
2422
2321
9 126 75 8
20
19
9
10
11
12
US_008-009_AD442.indd 9 17/2/09 20:45:36
9
“Feel-it-here” patches in some of the illustrations
to the steps reveal the particular areas of your body
that the stretch is working on—and where you are
most likely to feel the benefits.
annotations provide extra cues, tips, and insights
the gatefold shows all the exercises in the program
Coordinating Alligator/Cat, page 30
Coordinating Alligator/Cat, page 30
Powering Modified cobra, page 32
Lengthening Lift & bow, page 26 Opening Seated cat, page 27 Opening Seated cat, page 27
Powering Modified cobra, page 32
Lengthening Shoulder ovals, page 33
Lengthening Shoulder ovals, page 33
Lengthening Lift & bow, page 26Articulating Rib breath, page 24 Coordinating Side reach, page 25 Coordinating Side reach, page 25Articulating Rib breath, page 24
Opening Arm fans, page 31
Opening Arm fans, page 31
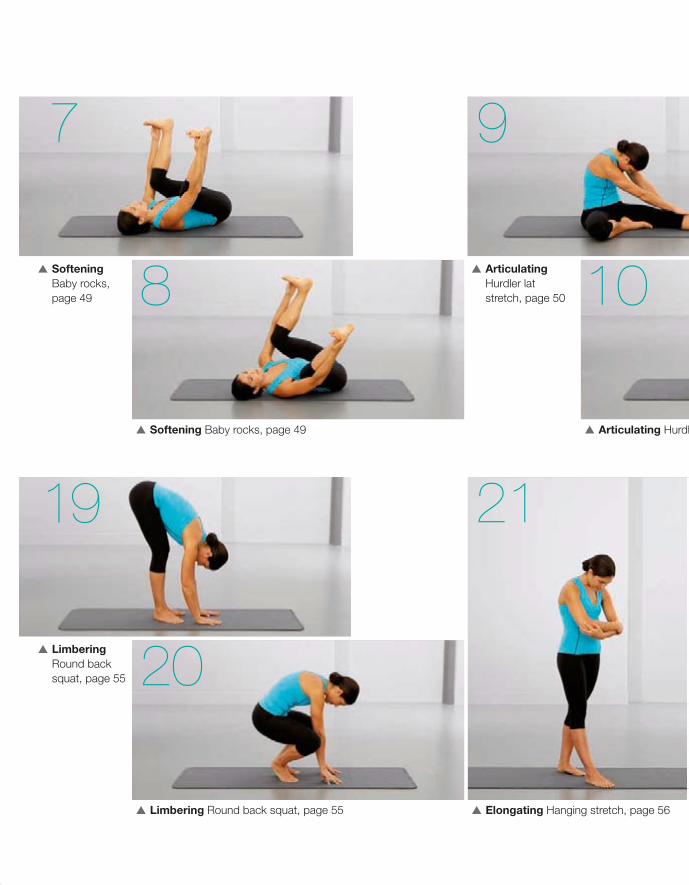
energizing balance point stretcharticulating hurdler lat stretch 50
Balance point stretch Remain sitting. Bend your knees, slide a hand underneath each thigh, and lift your feet off the floor,
finding your point of balance. You will probably need to lean back a little. Use padding underneath your bottom if you need it. Roll your shoulder blades down
the back and pull with your arms to hold yourself up. Inhale and bow your
head, rounding your back.
Hurdler lat stretch Come to a sitting position with both legs comfortably out to the sides. Tuck one foot in toward the groin and reach
both hands over toward the extended leg. Sit evenly on your sitbones. Hold wherever it feels comfortable,
either at the knee or lower down if you can. Bring both shoulders parallel to the floor. Breathe in, round into your back, and lower your head. Resist the stretch by holding firmly with the hands, on the outside of the leg.
Exhale, pull forward with your hands, round the back even more, and look toward your navel. Repeat 2 more times,
then release your hands, roll your shoulders, and repeat on the other side.
press calf down
51
posture stretch posture stretch
Squeeze your sitbones together and pull down on your arms. Sit tall and lift your groin muscles toward your head (see p17).
Repeat 5 more times, breathing in as you round, and exhaling as you sit tall.
feel it here
feel it here
tuck pelvis under
pullpull and lift
US_010-011_AD442.indd 10 16/2/09 21:58:14
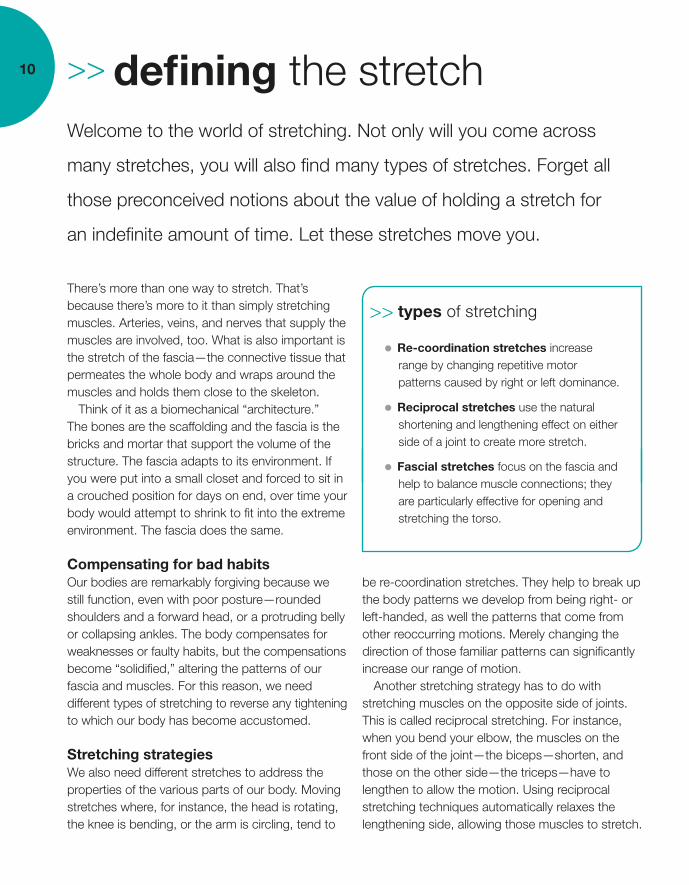
10 defining the stretch Welcome to the world of stretching. Not only will you come across
many stretches, you will also find many types of stretches. Forget all
those preconceived notions about the value of holding a stretch for
an indefinite amount of time. Let these stretches move you.
There’s more than one way to stretch. That’s because there’s more to it than simply stretching muscles. Arteries, veins, and nerves that supply the muscles are involved, too. What is also important is the stretch of the fascia—the connective tissue that permeates the whole body and wraps around the muscles and holds them close to the skeleton.
Think of it as a biomechanical “architecture.” The bones are the scaffolding and the fascia is the bricks and mortar that support the volume of the structure. The fascia adapts to its environment. If you were put into a small closet and forced to sit in a crouched position for days on end, over time your body would attempt to shrink to fit into the extreme environment. The fascia does the same.
Compensating for bad habitsOur bodies are remarkably forgiving because we still function, even with poor posture—rounded shoulders and a forward head, or a protruding belly or collapsing ankles. The body compensates for weaknesses or faulty habits, but the compensations become “solidified,” altering the patterns of our fascia and muscles. For this reason, we need different types of stretching to reverse any tightening to which our body has become accustomed.
Stretching strategiesWe also need different stretches to address the properties of the various parts of our body. Moving stretches where, for instance, the head is rotating, the knee is bending, or the arm is circling, tend to
Re-coordination stretches increase range by changing repetitive motor patterns caused by right or left dominance.
Reciprocal stretches use the natural shortening and lengthening effect on either side of a joint to create more stretch.
Fascial stretches focus on the fascia and help to balance muscle connections; they are particularly effective for opening and stretching the torso.
types of stretching
be re-coordination stretches. They help to break up the body patterns we develop from being right- or left-handed, as well the patterns that come from other reoccurring motions. Merely changing the direction of those familiar patterns can significantly increase our range of motion.
Another stretching strategy has to do with stretching muscles on the opposite side of joints. This is called reciprocal stretching. For instance, when you bend your elbow, the muscles on the front side of the joint—the biceps—shorten, and those on the other side—the triceps—have to lengthen to allow the motion. Using reciprocal stretching techniques automatically relaxes the lengthening side, allowing those muscles to stretch.
US_010-011_AD442.indd 10 13/07/2009 14:53

US_010-011_AD442.indd 11 16/2/09 21:58:21
11
The devil’s in the detail. Find the precision you need
for each stretch by studying the demonstrations and
imagining the cues.
Stretching the fasciaOther types of stretches work on stretching the fascia in several ways. Stretching the spine using a breathing and rippling action helps to stretch the torso from horizontal segment to horizontal segment. Another fascial stretch works on stretching the muscle connection chain that runs from the waist, down the back of the leg, and into the foot (see pp12–13). This program also includes
some stretches specifically designed to glide the arm and leg nerves in their sheaths, which allows greater ease of motion. The details make the difference; read the instructions carefully to find the precision that will give you your best stretch.
US_010-011_AD442.indd 11 13/07/2009 14:54

US_012-013_AD442.indd 12 18/2/09 22:32:09
12 muscle connections Proper positioning of the arms, legs, and head helps us to physically
find the link between muscle and connective tissue. Using focus and
intent when we line these extremities up with the torso gives us a
powerful tool for changing body posture and developing litheness.
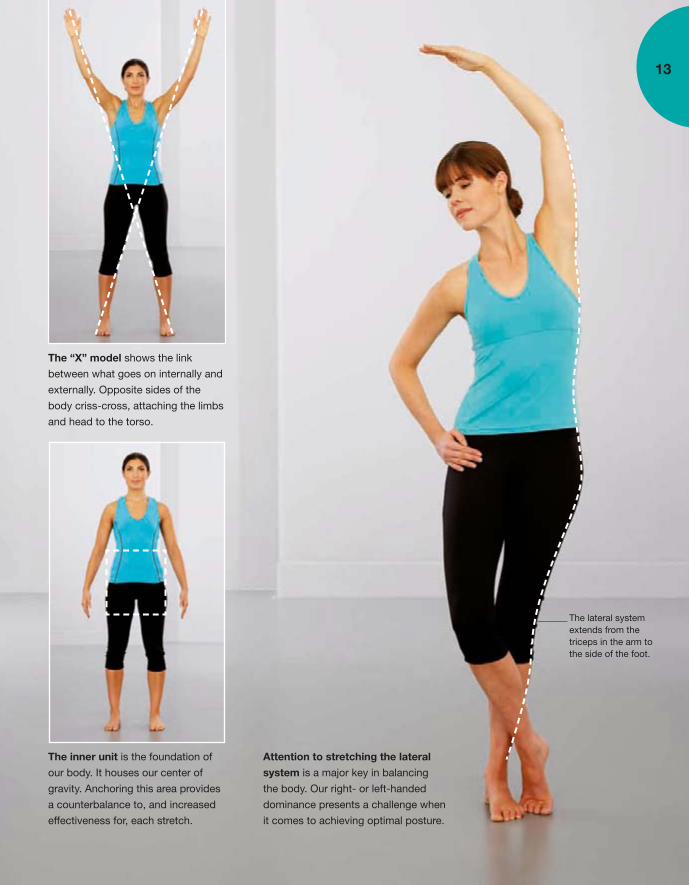
The science of biomechanics identifies various structural body connections and physical forces that are involved in body function. In order to devise appropriate exercises, it is necessary to use our knowledge of the nature of our body parts (how plastic, or changeable, the various components are) to create the effect we need. Three important structural connections in the body that we have to consider are the “X” model, the inner unit, and the lateral system.
The “X” modelThe “X” model shows the connection between what is going on externally and the inner unit (see below). It shows how the limbs are connected with each other and how these connections pass right through the inner unit. Think deep; think three-dimensional. The right arm, for example, is connected to the left leg and vice versa. The positioning of the head, which can weigh up to 15 pounds (6.8kg), is also important. Tipping it in any direction activates an intricate system of overlapping muscles that bind the head into the trunk yet allow a marvelous telescoping range to the neck.
The inner unit Various groups of muscles form the inner unit. These are the muscles at the bottom of the torso (the pelvic floor), the deep abdominal muscles, the transverse abdominals at the sides of the abdomen, the deep low-back muscles, the multifidi (a group
of muscles either side of the spine), and the muscles deep inside the rib cage (the diaphragm).
Working the muscles of the inner unit correctly—with good form—promotes low-back and pelvic health. The exercise instructions also help you to use the inner unit as a stabilizing foundation, giving more precision when you stretch the external parts.
The lateral system The lateral system connects the muscles and fascia (see p10) that run down the sides of the body. Think of it as a long road running from the triceps in the upper arm, past the armpit, down the side of the ribs and waist, extending down the side of the leg past the thigh and shin, and ending at the side of the foot. This lateral system is often overlooked, but opening it through stretching is key to balancing the body and improving posture.
Coordination between opposing limbs and the trunk is demonstrated by the “X” model concept.
Precision in stretching is created by achieving stabilization of the inner unit, which provides a firm foundation.
Elongation of the lateral system promotes symmetry and balance.
pulling it all together
US_012-013_AD442.indd 12 13/07/2009 14:53
US_012-013_AD442.indd 13 18/2/09 22:32:51
13
The inner unit is the foundation of
our body. It houses our center of
gravity. Anchoring this area provides
a counterbalance to, and increased
effectiveness for, each stretch.
Attention to stretching the lateral
system is a major key in balancing
the body. Our right- or left-handed
dominance presents a challenge when
it comes to achieving optimal posture.
The lateral system extends from the triceps in the arm to the side of the foot.
The “X” model shows the link
between what goes on internally and
externally. Opposite sides of the
body criss-cross, attaching the limbs
and head to the torso.
US_012-013_AD442.indd 13 13/07/2009 14:53

US_014-015_AD442.indd 14 16/2/09 21:57:46
14 flexibility and posture Genetics dictate how flexible you are and also your postural body type.
Stiffness and over-flexibility both cause aches, pains, and difficulty in
day-to-day activities. Explore your flexibility with these easy tests, and
strive to find your best neutral posture.
Gravity has a greater impact upon our posture when we are upright in sitting or standing. If we give in to it, the “segments” of our body collapse (see below left). The result is that our muscles are out of balance and our joints are misaligned.
Stretching counterbalances this and helps you develop a good neutral posture. You start by using good form and working the muscles of the inner
unit (see p12). This helps you stretch the chest and shorten the upper back muscles, open the low back and engage the abs, as well as stretch the front of the hips and thighs, and the calves.
Practicing sitting and standing tall also solidifies our intent to push vertically upward against the force of gravity. The beauty of this formula is that it applies to all body types and levels of flexibility.
Gravity breaks us into unbalanced
segments (far left). The head falls
forward. The chest shortens and
sinks, and the upper back rounds.
The low back tightens and collapses,
and the abdomen protrudes. The
front of the thighs and hips tighten,
while the hip extensors slacken.
Body weight lists back on the heels,
shortening the calves.
The goal is to balance the segments
and achieve neutral posture, with a
straight line running from the head
through the pelvis (left). Note
especially how the weight of the
heavy head is now balanced directly
over the pelvis, which houses our
center of gravity. This alignment
puts the least amount of strain on
the spine as well as the other joints
in the body.
US_014-015_AD442.indd 14 13/07/2009 14:54

US_014-015_AD442.indd 15 16/2/09 21:57:53
15
Test the mobility of your shoulders and upper back. Lie
on the floor with your arms bent and your forearms parallel
with the sides of you head. Your muscles are over-tight if
your head and forearms do not touch the floor.
50º
35º 0º
120º
90º
70º
Test the mobility of your hips. Lie on your back
and raise first one leg, then the other. If you can
only raise your leg to a 70° angle or less, it
indicates over-tightness of your muscles at the
back of your leg and hip. Being able to lift each
leg to a 90° angle helps prevent low-back pain
when sitting. It also prevents walking with an
unbalanced gait, which causes leg and back
problems. Raising your leg to a 120° angle
indicates an exceptional degree of mobility.
Test the mobility of your spine, rib cage, and neck.
From a seated position, cross your arms, put each hand
on the opposite shoulder, and rotate your torso. Note how
far you can go. Anything less than 35˚ indicates that your
muscles are over-tight. Being right-handed or left-handed
affects how far you can rotate.
US_014-015_AD442.indd 15 13/07/2009 14:54

16 imagery as a tool Use imagery as a tool to help create precision and a sense of the inner
layers of your body in your stretches. Connecting everyday concepts to
the exercises gives your stretches an effective edge. Strive to internalize
the cues. They hold the key to true physical transformation.
Actors, musicians, and dancers use imagery to help them “act out” their message. Children play imaginary roles in imaginary settings to prepare for adult life. As adults, we can employ imagery to help us make our exercise more effective.
The exercise programs in this book contain some imagery cues that ask you to use your imagination. Focus on them to help coordinate your muscles and access the deeper connections of your body. For example, “Lift the imaginary swimming-pool water” asks you to press upward in the abdomen when you’re lying on your front. Mention of “smile lines” is a cue for you to hold your hips in true extension when lying down, and give you the range of motion you need to achieve a neutral pelvis. When you get it right, two arcs separate the buttocks from the upper thighs or hamstrings (see below).
By training these deeper muscles to engage as you perform your stretching exercises, you also train them to engage when you carry out your everyday activities. Although some images apply to certain body positions, such as finding the smile lines while lying on your front, you can also relate to them in other positions. In other words, you can find your smile lines when you’re standing, too. They can help you find your neutral posture (see p14).
The imagery I use is truly the key to taking your exercise life into your daily life. Study the pictures in the exercises on these two pages, and start a lifelong habit of using your body more completely.
Imagining water pushing up against the abdomen
deepens abdominal connections. Visualizing “smile lines”
stabilizes the pelvis and brings precision into hip stretches.
“swimming-pool water”
“smile lines”

US_016-017_AD442.indd 17 16/2/09 21:57:36
17
Preserve your natural low-back curve by
sitting forward on your sitbones. Simultaneously
pull the navel to the spine to sandwich the waist
with a corset of muscles.
Lift the groin. The floor of the pelvis should be
buoyed upward like the air filling a parachute.
Feel the lift, like an elevator ascending up the
spine toward the head.
Coordinate the stretch between your
head and legs. Reach your head out of the
collarbones, like a turtle reaching its head
out of a shell. At the same time, balance
and reach out through the top foot.

15
US_018-019_AD442.indd 18 16/2/09 22:30:09
minute

US_018-019_AD442.indd 19 18/2/09 10:39:21
wake up the stretch
Start to master your stretch Think three-dimensionally Focus on body sensations Breathe smoothly and deeply

US_020-021_AD442.indd 20 16/2/09 22:31:37
20 wake up the stretch Your stretch journey starts with a sequence that creates suppleness
and wakes up your stretch. No matter what your level, as you stretch
your whole body, you’ll find the fluid motion of this sequence as slinky
as a long cat yawn. Try to imagine that you’re “joining the dots” as you
weave your way through each and every movement.
Stretching is a skill that everyone can master. This sequence emphasizes the various techniques you’ll need and the sensory elements of stretch that together will help to make your stretch possible. Being able to identify muscle tone is a crucial first step. Next, learning to stabilize one part of the body while another moves away from the stabilizing part is key to the effectiveness of a lengthening stretch. Breathing into tight body areas such as the back of the rib cage demands discipline and focus. Loosening and circling motions help to oil the joints and loosen restrictive connective tissue, thus prompting muscles to expand and contract. Re-coordination exercises (see p10) make new ranges of motion a possibility for everyone.
The exercisesFeel as much of your body as you can in the Hand pull. Memorize this muscular feeling and strive to carry that feeling into the rest of the sequence. Make the Elbow circles as sensory and luscious as if you were moving through a pool of honey. Direct the flow of your breath very specifically into any tight parts of the diaphragm. This exercise may feel difficult at first, but it can give you a very satisfying sense of relaxation. The seated exercises may seem easy, but use the surface and structure of the chair to explore your orientation in space. Notice the relationship of your hip, rib, head, arm, and leg placements.
Internalize your stretches by giving as much detailed focus to your body sensations as possible.
Try to imagine the infrastructure—the skeletal part that is moving—such as your arms moving against your upper torso.
Work to identify which parts are anchoring and which parts are moving.
Strive to feel the entire path of the motion, not just the end points.
Breathe in long, flowing, time-released breaths, as suggested by the guide music; be sure not to hold your breath.
tips for wake up the stretch
The physical boundary of the chair not only provides landmarks so you can judge how far a stretch is moving, it can also give you a sense of your deep muscles, which can help if you feel your movement is restricted. Sitting on a firm surface is also a sneaky way to feel some input up into your sitbones. This pressure gives a neurological stimulus to your “righting” reflex, which helps you to lengthen up against gravity. The Seated cross-leg
US_020-021_AD442.indd 20 13/07/2009 14:55

US_020-021_AD442.indd 21 16/2/09 22:31:53
21
Simple stretching positions while sitting can bring about
big changes when you perform them with coordination,
precision, and intent.
twist and Shoulder wedge also show you how to press one body part against another to increase the stretch, as well as adding a strengthening element to your stretches. On the other end of the scale are the Shoulder ovals. They demonstrate an instance where learning to respect a joint’s boundary is of great importance, since neck, arms, and shoulders tend to be more sensitive to injury thanks to their potential for extreme movement. The Shoulder ovals also provide a superb nerve stretch and glide—a nerve glide being a movement that creates frictionless motion of the nerve. This, ultimately, will increase the range of movement of the whole of your upper body.
US_020-021_AD442.indd 21 13/07/2009 14:55

21
US_022-023_AD442.indd 22 16/2/09 22:32:43
energizing hand pull 22
Hand pull Stand with your hands by your hips, feet just past shoulder-width apart, and toes firmly planted into the
floor. Feel as if your legs are pressing outward. Lift your groin muscles toward the head (see p17) and firm your hips. Slowly exhale as you open your arms to the sides, turning your palms forward.
feel it here
wake up the stretch
Clasp your hands overhead in an “O” shape, then pull on the hands as if you are trying to pull them
apart. Feel as if you are pulling your hands and feet away from each other as you take 2 long breaths. Keep the shape as you exhale and relax for 2 more breaths. Repeat the pull, then relax.
pull
push apart

3 4
US_022-023_AD442.indd 23 16/2/09 22:33:06
limbering elbow circles 23
wake up the stretch
Elbow circles Bring your feet and inner thighs completely together and
place your hands at your hips, with your palms facing forward. Inhale, and fold your elbows to take your fingertips to your shoulders, pointing the elbows forward.
Exhale, lift the elbows, and smoothly circle the hands up and diagonally behind you. Repeat 3 more times.
feel it here
press the thighs together
hold the abs
lift up

5 6
US_024-025_AD442.indd 24 16/2/09 22:33:39
articulating rib breath 24
Rib breath Keep your legs firmly together as you clasp your hands on the
front of your rib cage and try to pinch the crest of the rib cage together. Lift your groin muscles toward the head and stand tall. Then inhale and bring the elbows forward, depressing your chest
and breathing into the back of the rib cage.
press the ankles together
wake up the stretch
Reverse the movement. Exhale, open the chest, lengthen up through your head, and look
diagonally upward. Allow your elbows to come backward. Repeat 2 more times, inhaling as you bring the elbows forward, and exhaling as you open the chest. Release your hands and shake them gently to release any tension in them.
feel it here
round the back

7 8
US_024-025_AD442.indd 25 16/2/09 22:40:01
coordinating side reach
Side reach Keep your legs in the same position as you firm
your hips and lift your abs up and into the spine. Inhale and reach one arm up and the other down, with palms facing in toward your body.
25
wake up the stretch
Intensify the stretch by bending the knee slightly on the side of the raised hand
and by looking down toward the lower hand. Feel as if someone is pulling your middle finger to the ceiling. Then exhale, straighten the knee, and slowly turn your face forward. Repeat, then change sides and repeat 2 times on
the other side. Let your arm come down and relax.
bend the knee
look down
reach up

9 10
US_026-027_AD442.indd 26 16/2/09 22:34:11
lengthening lift & bow26
Lift & bow Sit on the edge of a chair with your feet hip-width apart. Feel
your sitbones pressing equally on the seat. Sit tall, lift your groin muscles toward your head, then hold onto one thigh and lift the knee toward the ceiling. Inhale, then lift up into your waist and bow your head toward your knee.
Exhale and reverse, lifting your chest and face diagonally up toward the ceiling. Repeat 2 more times, inhaling
as you bow, and exhaling as you lift. Lower the foot to the floor and repeat on the other side.
feel it here
wake up the stretch
feel it here
look up and out
look at the navel

11 12
US_026-027_AD442.indd 27 16/2/09 22:34:30
opening seated cat
press the toes down
27
wake up the stretch
Seated cat Remain sitting toward the edge of your seat. Extend one foot out on the floor in front of you, keeping
the knee a little bent, and pressing the sole and big toe of the foot firmly on the floor. Place your hands on the same thigh. Inhale as you round your back.
Exhale and reverse the curve. Start from the lower back, and move through the middle and upper back
with a ripple effect to lift the chest and face diagonally toward the ceiling. Inhale, round and repeat, then repeat the whole stretch on the other side. Roll your shoulders and release.
lift the chest

13 14
US_028-029_AD442.indd 28 16/2/09 22:35:29
balancing seated cross-leg twist 28
Seated cross-leg twist Remain seated, cross one foot on top of the
opposite thigh, and hold onto your ankle with the other hand. Place the same hand as your crossed leg on your hip. Inhale, lift your groin muscles toward the head, lengthen your spine, and bow your head toward your knee.
Exhale, lift your chest, and turn your torso toward your crossed leg. Look past your shoulder. Repeat 2 more
times, inhaling as you bow and exhaling as you lift, then repeat 3 times on the other side. Slowly release the leg, come out of the position, and gently move your back to release any tension.
wake up the stretch
feel it here
hold the abs
pull the foot
1615
US_028-029_AD442.indd 29 16/2/09 22:35:49
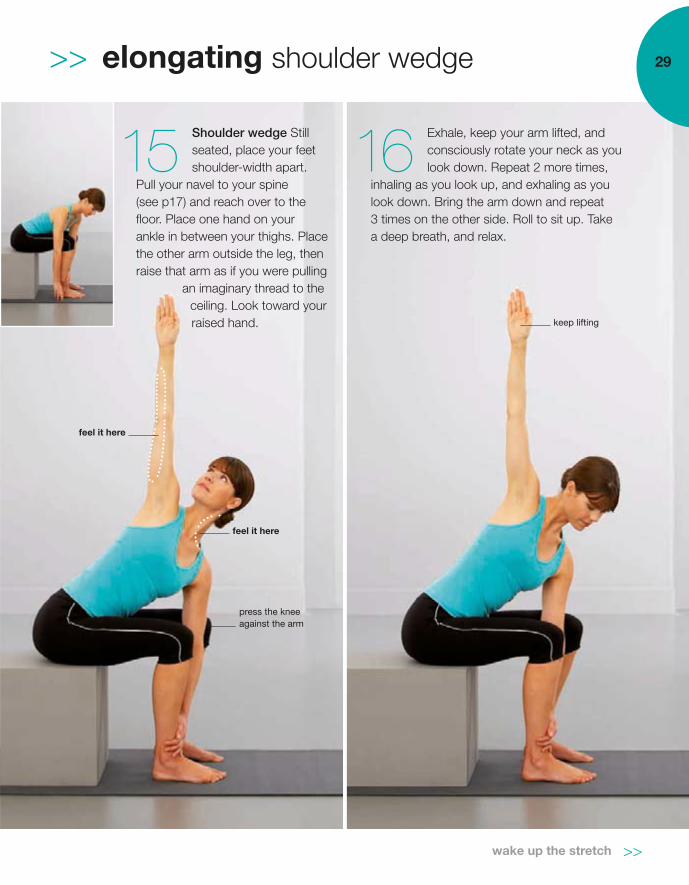
elongating shoulder wedge
Shoulder wedge Still seated, place your feet shoulder-width apart.
Pull your navel to your spine (see p17) and reach over to the floor. Place one hand on your ankle in between your thighs. Place the other arm outside the leg, then raise that arm as if you were pulling
an imaginary thread to the ceiling. Look toward your raised hand.
29
wake up the stretch
Exhale, keep your arm lifted, and consciously rotate your neck as you look down. Repeat 2 more times,
inhaling as you look up, and exhaling as you look down. Bring the arm down and repeat 3 times on the other side. Roll to sit up. Take a deep breath, and relax.
feel it here
feel it here
press the knee against the arm
keep lifting
18
17
US_030-031_AD442.indd 30 16/2/09 22:36:18
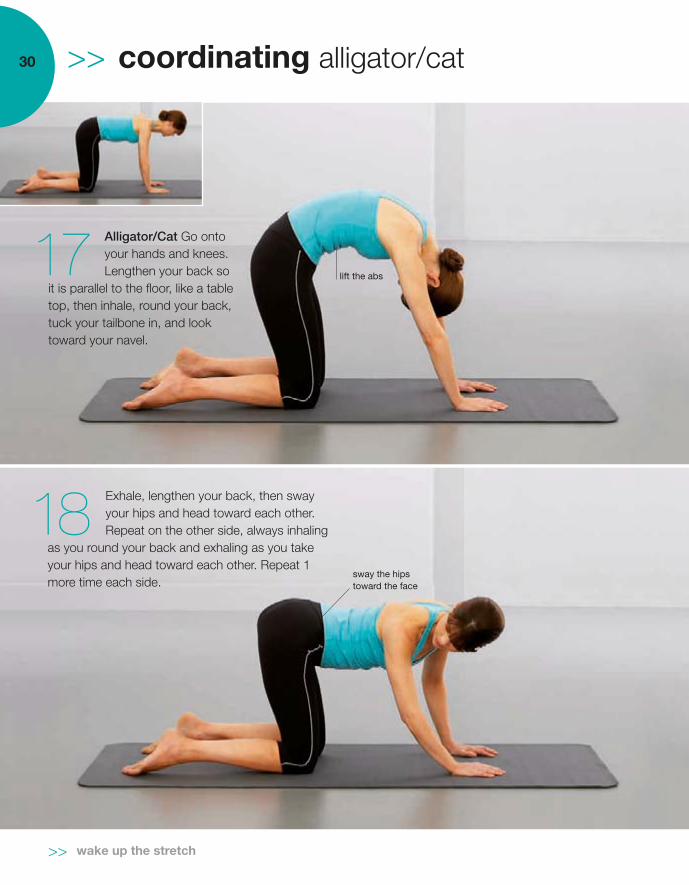
coordinating alligator/cat30
Alligator/Cat Go onto your hands and knees. Lengthen your back so
it is parallel to the floor, like a table top, then inhale, round your back, tuck your tailbone in, and look toward your navel.
Exhale, lengthen your back, then sway your hips and head toward each other. Repeat on the other side, always inhaling
as you round your back and exhaling as you take your hips and head toward each other. Repeat 1 more time each side.
wake up the stretch
lift the abs
sway the hips toward the face

19
20
opening arm fans
Arm fans Lie on one side, bend your legs, and lengthen your groin muscles toward your head. Pull your navel to your spine, then reach your arms along the floor, bringing the
palms of your hands together in front of your face. Focus your eyes on your top hand as you raise it toward the ceiling, creating a rainbow shape.
touch the knees together
feel it here
31
wake up the stretch
Continue moving the arm and reach behind you to the floor, allowing your shoulders and torso to rotate with the arm. Try not to move your knees. Exhale, then reach up
with the hand as you reverse, “painting the ceiling” with your fingertips until your hands are together again. Repeat 2 more times, inhaling as you open the arm, exhaling as you bring the palms together again. Roll over to the other side and repeat.
feel it here
eyes follow the hand
eyes still follow the hand

21
22
US_032-033_AD442.1.indd 32 16/2/09 22:37:43
powering modified cobra 32
Modified cobra Go onto your stomach, firm and tighten your hips, and feel the smile lines (see p16) between your glutes
and your hamstrings. Lift the groin muscles toward the head. Feel the imaginary swimming-pool water lifting your abdomen off the floor (see p16). Reach your hands out onto the floor in front of you.
Inhale as you drag your hands along the floor toward your shoulders, keeping the abdomen tight and lifting your front
body so your ribs come off the floor. Exhale, slide the arms out in front of you, and take your face back to the floor. Repeat, then relax and breathe normally.
wake up the stretch
lift the abs
lift the ribs off the mat
tuck the tail

24
23
lengthening shoulder ovals
Sweep the chest across the floor, past center toward the other hand, then exhale and continue circling in the same direction as you
round your back. Your shoulders should be describing an oval in space. Keep going in the same direction for 2 more ovals, then change direction and reverse for 2 more ovals.
point the fingers inward
wake up the stretch
Shoulder ovals Tighten the waist, lift the hips, and come up to a perfect hands and knees position. Point the fingers of the
hands in toward each other, then inhale and reach one shoulder down toward the opposite hand.
feel it here
don’t force
make an oval
33
1
US_034-035_AD442.indd 34 16/2/09 22:38:39
wake up the stretch

15
US_034-035_AD442.indd 35 16/2/09 22:38:58
minute summary
21 3
1413
3 4
315 1
US_036-039_AD442.indd 36 19/2/09 12:52:28
▲ Energizing Hand pull, page 22▲ Energizing Hand pull, page 22
wake up the stretch at a glance
▲ Balancing Seated cross-leg twist, page 28
▲ Balancing Seated cross-leg twist, page 28
▲ Limbering Elbow circles, page 23 ▲ L
▲ Elongating Shoulder wedge, page 29 ▲ E
18
17
4 65
16
US_036-039_AD442.indd 37 19/2/09 12:52:52
▲ Coordinating Alligator/Cat, page 30
▲ Coordinating Alligator/Cat, page 30
▲ Limbering Elbow circles, page 23 ▲ Articulating Rib breath, page 24▲ Articulating Rib breath, page 24
9 ▲ Elongating Shoulder wedge, page 29

1
22
21
97 8
20
19
US_036-039_AD442.indd 38 19/2/09 12:53:15
▲ Powering Modified cobra, page 32
▲ L
▲ Powering Modified co
▲ Lengthening Lift & bow, page 26▲ Coordinating Side reach, page 25 ▲ Coordinating Side reach, page 25
▲ Opening Arm fans, page 31
▲ Opening Arm fans, page 31

10 11
24
23
12
US_036-039_AD442.indd 39 16/2/09 23:25:20
▲ Lengthening Lift & bow, page 26 ▲ Opening Seated cat, page 27 ▲ Opening Seated cat, page 27
dified cobra, page 32
▲ Lengthening Shoulder ovals, page 33
▲ Lengthening Shoulder ovals, page 33

wake up the stretch FAQsThe wake up the stretch program is excellent for beginners as well
as for someone looking for a lighter, more gentle stretch. During this
first program, learn to create focus by coordinating inner and outer
muscles through the use of the cues and imagery.
In the Rib breath exercise, it seems as if nothing is moving. What can I do?You have to have faith that something is happening. The deep connective tissue and the big domelike breathing muscle, the diaphragm, tend to be tight in the back of the rib cage on most people. It’s a lot easier to see movement in the front part. Try coughing or sniffing repetitively; feel the action of the diaphragm and ribs in the front. It’s anatomically not possible to have a great deal of motion in the back, but in this exercise we begin by cinching the front of the dome, which forces the back to stretch.
How do I know I’m doing the Side reach correctly?First be sure you are following the instructions correctly. You have to pull upward very strongly with the armpit, arm, and hand while you bend your knee. It’s not going to be a comfortable feeling once you add the turn of the head. The purpose of this exercise is to start opening the rib cage, neck, and shoulders. This is a very dense area and it’s hard to tease apart the separate parts.
How is the Hand pull a stretch?This overhead pull is a sneaky way to stretch the sides of the torso, especially around the armpits, as well as stretching the sides of the hips and legs. Some people will not be able even to reach their hands together in an overhead position, so this exercise makes a great starting point. It’s possible that one half of your pelvis is tighter than the other. As you push the legs away from each other, you are beginning to equalize each side, balancing right with left.
40

US_040-041_AD442.indd 41 16/2/09 23:28:40
When I’m sitting, I can barely lift my knee toward my head in Lift & bow, but the model’s knee is almost touching. Am I still stretching?Absolutely. The important part of this stretch is the lengthening and softening of the spine. I jokingly call this “marinating” the spine. Moving the head up and down also helps to move the spinal cord, which is healthy for the nervous system. Think of it as flossing your nerves. They need to stretch and glide, too.
The Shoulder ovals are confusing. How do I start?This is an extremely effective exercise for the nerves of the arms and neck. Many people don’t realize how much restriction they have in their shoulders until they develop a problem. So persist. Start slow. Follow the exact instructions. Sometimes it’s helpful to brace your hands on a table and start there first to get the idea of the flow of the movement. Precision is best, but sometimes you just have to gyrate a bit first.
My back doesn’t make a round shape like the model’s in the Alligator/Cat. What should I do?Have faith. Rome wasn’t built in a day. Just by attempting the exercise and imagining the shapes you will begin, little by little, to loosen up your back. After just a few weeks, you’ll notice your back will feel better and you’ll be able to bend and move more easily in everyday life.
The model in the Modified cobra is getting way more off of the floor than I am. Does it matter?Again, less can be more in this instance, too. Intent goes a long way when we are meeting the boundaries of our limitations. The whole idea is to find out how far you can go in a certain direction. Honor that limitation; don’t force it. But meet the boundary, watch the model, and think of the direction of the motion, not so much the endpoint.
41

15
US_042-043_AD442.indd 42 25/2/09 14:45:33
minute
US_042-043_AD442.indd 43 25/2/09 14:45:54
posture stretch Find your centerElongate your waistExtend up against the force of gravity

US_044-045_AD442.indd 44 16/2/09 23:47:37
44 posture stretch We all desire healthy posture. Although we live in an imperfect world,
nearly perfect posture can be achieved by methodically balancing our
bodies against gravity’s pull. Where the body leads, the mind goes.
Improving posture will uplift your outlook on life as well as giving you
confidence and endurance against everyday stresses.
Stretching for healthy posture means fighting against the pull of gravity. If we do not work against gravity’s pull, then the longer we live, the more bent and deformed we become. A typical gravitational pull creates a forward-jutting chin, a tight chest, and rounded shoulders. Carrying on down the body, the abdomen becomes lax and the low back becomes tighter. A domino effect continues on into the legs, shortening the front of the thighs and creating a loose area around the glutes. The end-result is an off-center line, with tight calves causing the body weight to fall back into the heels (see p14). It’s no wonder joints wear out before their time. We’re all living longer, so our joints—which are a key factor in our quality of life—are important to us. The value of healthy posture cannot be stressed too much. Not only do we achieve a pleasing cosmetic effect by standing upright, we also increase our vitality, since standing well promotes optimal lung capacity, which provides more oxygen for the brain to function well.
The exercisesThe Posture stretch sequence follows a muscle-balancing formula as well as reinforcing the neurodevelopmental sequence—in other words, the basic movement patterns that get an infant from lying down to standing and walking. The Posture stretch sequence uses all the positions that infants must achieve on their journey to walking.
Focus on the ultimate goal of elongating your entire body in every exercise.
Notice how each exercise builds toward firm, upright posture.
Modify when needed. Be sensible and use extra padding under the knees if they are tender.
Enhance balance by focusing your eyes on a fixed object or by holding onto furniture, if necessary.
In the final standing exercise, focus first on stretching out and elongating your waist as you lengthen your ribs up and off the pelvis; locate your head weight over the center of gravity in the pelvic bowl.
tips for posture stretch
Starting with exercises lying on the back, trunk control is developed which enables optimum control of the limbs. Pay special attention to the various parts of the front of the trunk in the Elongations. Notice how the “W’s” exercise straightens and elongates you, combating the typical fetal curling position many adopt when

US_044-045_AD442.indd 45 16/2/09 23:47:54
45
Kneeling positions help lengthen the front of the
body, counteracting hip tightness from prolonged
sitting and the slump and fatigue associated
with prolonged standing.
asleep. Next, the Hurdler lat stretch balances both sides of the back of the waist. The Balance point stretch literally pushes the trunk and head up against gravity. Most of us don’t notice how our back is pulling us down because our legs compensate, taking up most of the slack in the system. The Sidelying waist stretch stretches the deep muscles we use to stand and walk; be sure to pull the abdomen strongly up and into the spine to get the most benefit from this intense twist.
Progressing to kneeling on both knees usually shows us how tight the front of our thighs and hips can be. The Lunge opener prepares the body for full standing and evens out our walking pattern so that it is not lop-sided. Squatting and then alternating the motion by reaching the hips upward in the Round back squat gives balance and leg strength as well as stretch. The rolling-back motion of the Hanging stretch lets the body register the weight of the trunk and head above the waist. These body parts are heavy, and need to be placed precisely above the firm foundation of the lower body. Ending with a Top-to-toe stretch coalesces the whole body, helping you to stand tall against the ever-present force of gravity.

1
2
US_046-047_AD442.indd 46 16/2/09 23:51:42
centering elongations 46
Elongations Lie on your back, with your legs hip-width apart. Reach your arms beyond your head on the floor and clasp your hands.
Inhale and stretch your hands and feet away from each other. Simultaneously press your low back and ribs against the floor.
Exhale as you relax, then inhale and stretch again. Finally, exhale and relax one more time.
press the low back down
posture stretch

3
4
US_046-047_AD442.indd 47 16/2/09 23:52:04
stabilizing “W’s”
press the forearms down
47
posture stretch
“W’s” Stay on your back. Reach your arms out to the sides and bend your elbows to 90° with the backs of your
hands and forearms toward the floor. If they don’t touch the floor, don’t force them. Inhale, then press the back of your head, forearms, shoulders, low back, and thighs into the floor.
Exhale and relax, releasing all the tension. Repeat by inhaling and pressing, and exhaling and releasing.

5
6
US_048-049_AD442.indd 48 16/2/09 23:50:37
accentuating “C” stretch 48
“C” stretch Still lying on your back, reach your arms up beyond your head on the floor. Take one wrist and, keeping your
shoulders against the floor, inhale and pull the wrist toward the opposite side, sliding your upper body slightly along the floor in the same direction.
At the same time, cross the leg opposite to the held wrist over the other leg, and slide your legs in the same direction. This
adds an extra stretch and helps to make a letter “C” with your body. Stay, inhale, and tense your abdominal muscles, then exhale and lengthen into the “C.” Hold for 4 breath cycles. Lengthen and release, move back to center, and repeat on the other side. Thump the thighs to release the low back. Repeat on both sides, then thump the thighs one more time.
keep pulling the wrist
posture stretch
pull the legs

7
8
US_048-049_AD442.indd 49 16/2/09 23:50:57
softening baby rocks
Baby rocks Remain on your back. Exhale, press your back against the floor, and slowly slide your
feet toward your hips. Lift your feet, one at a time, and hold onto them from outside your legs, keeping your knees bent. If you can’t reach your feet, hold onto your shins.
keep the head on the floor
49
posture stretch
Inhale, pull one knee down toward the floor, and rock toward that side. Then, exhale and release to return
to center. Repeat, rocking to the other side, then repeat for 2 more sets.
feel it here

9
10
articulating hurdler lat stretch 50
Hurdler lat stretch Come to a sitting position with both legs comfortably out to the sides. Tuck one foot in toward the groin and reach
both hands over toward the extended leg. Sit evenly on your sitbones. Hold wherever it feels comfortable,
either at the knee or lower down if you can. Bring both shoulders parallel to the floor. Breathe in, round into your back, and lower your head. Resist the stretch by holding firmly with the hands, on the outside of the leg.
Exhale, pull forward with your hands, round the back even more, and look toward your navel. Repeat 2 more times,
then release your hands, roll your shoulders, and repeat on the other side.
press the calf down
posture stretch
feel it here
tuck the pelvis under
pull

11
12
US_050-051_AD442.indd 51 16/2/09 23:49:14
energizing balance point stretch
Balance point stretch Remain sitting. Bend your knees, slide a hand underneath each thigh, and lift your feet off the floor,
finding your point of balance. You will probably need to lean back a little. Use padding underneath your bottom if you need it. Roll your shoulder blades down
the back and pull with your arms to hold yourself up. Inhale and bow your
head, rounding your back.
51
posture stretch
Squeeze your sitbones together and pull down on your arms. Sit tall and lift your groin muscles toward your head (see p17).
Repeat 5 more times, breathing in as you round, and exhaling as you sit tall.
feel it here
pull and lift

14
13
US_052-053_AD442.indd 52 16/2/09 23:52:45
elongating sidelying waist stretch 52
Exhale. Tighten and firm the hips as you roll them backward. Repeat 2 more times, inhaling as you rotate the hips forward, and
exhaling as you roll them back. Turn to the other side and repeat.
posture stretch
Sidelying waist stretch Lie on your side with your torso and legs in a straight line, feet pointed. Prop yourself up on your
hands, one hand a little behind you. Lift your groin muscles toward your head, and lift your ears toward the ceiling. Inhale, lifting your abs as you rotate the hips forward. Look toward your feet.
point the feet
hips forward
hips backward
feel it here
15 16
US_052-053_AD442.indd 53 23/2/09 11:36:06
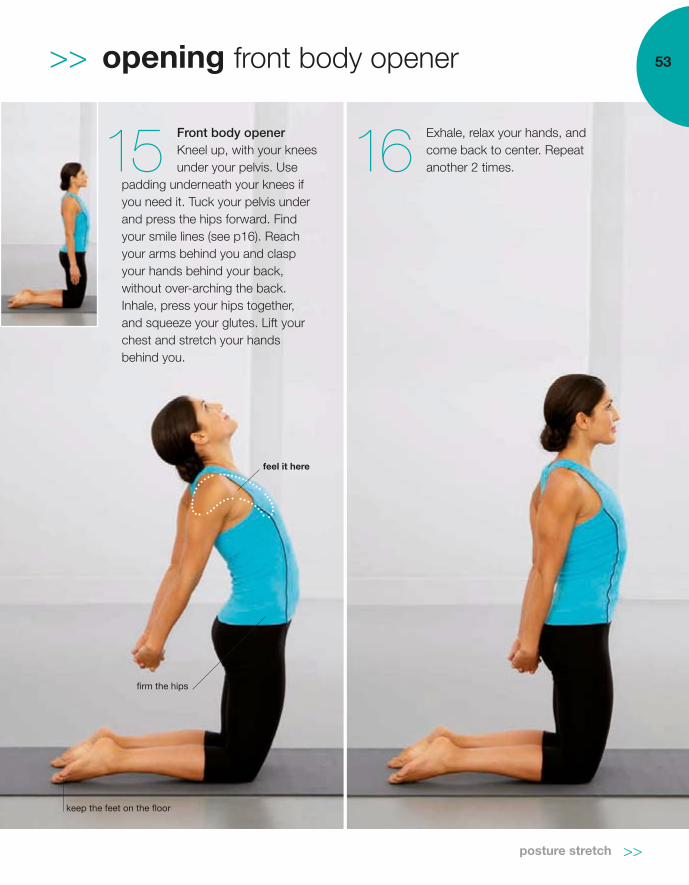
opening front body opener
Front body opener Kneel up, with your knees under your pelvis. Use
padding underneath your knees if you need it. Tuck your pelvis under and press the hips forward. Find your smile lines (see p16). Reach your arms behind you and clasp your hands behind your back, without over-arching the back. Inhale, press your hips together, and squeeze your glutes. Lift your chest and stretch your hands behind you.
keep the feet on the floor
feel it here
53
posture stretch
Exhale, relax your hands, and come back to center. Repeat another 2 times.
firm the hips

17
18
US_054-055_AD442.indd 54 17/2/09 11:34:30
coordinating lunge opener54
Lunge opener Come onto your hands and knees. Reach one foot forward, take the other leg back, and lean onto the front leg.
Lift the groin muscles toward the head and tuck the pelvis under. Clasp the hands and reach them behind your head, holding onto your skull with the heels of the hands. Inhale, open the elbows, and lift the chest.
Exhale. Bring the elbows to point to the front and down. Repeat, then take the other foot forward and repeat.
feel it here
posture stretch
feel it here
hold the abs

20
19
US_054-055_AD442.indd 55 17/2/09 11:34:55
limbering round back squat
take the feet in a “V”
55
posture stretch
Take a long, slow exhalation as you round your back, tuck your hips in, and lower them toward
the heels again, still keeping your head down. Repeat 2 more times.
Round back squat Come into a squatting position on the balls of your feet.
Let your knees open and allow your heels to touch slightly and come off the floor. Bring your hips down toward your heels, then lean more into your hands, place your palms on the floor, and inhale as you lift the hips upward as far as you can. Keep your head down, heels up, and your knees slightly bent.
allow heels to lift
feel it here
tuck the tail

21 22
US_056-057_AD442.indd 56 16/2/09 23:59:22
elongating hanging stretch56
take the feet a hand-width
apart
posture stretch
Hanging stretch Roll up to standing and place one foot ahead of
the other, about your foot’s distance and a hand-width apart. Hold onto something if you cannot keep your balance, otherwise fold your arms in front of you and hold onto your elbows. Firm the hips and pull your navel to your spine (see p17). Inhale, then tuck your chin under and round
your upper back, allowing your head to hang.
Exhale, scoop deeper into your spine, and lower your head to hip-
height as if you were going over an imaginary fence. Repeat 2 more times, then change legs and repeat on the other side.
stay on the front leg
keep the tail tucked

23 24
centering top-to-toe stretch
press the ankles together
posture stretch
Top-to-toe stretch Roll up to standing. Bring your legs
completely together, press the inner thighs together, and lift your groin muscles toward your head. Reach your arms sideways, then take them overhead. Clasp the thumbs and press the palms together. Keep reaching up through your arms, squeezing the head, and pressing down into your feet for 4 breath cycles.
Lower your arms and shake them gently to release the tension.
Repeat, then gently move your body to relax any tension.
squeeze the legs together
57
1
US_058-059_AD442.indd 58 25/2/09 14:41:47
posture stretch

15
US_058-059_AD442.indd 59 25/2/09 14:42:07
minute summary

2 4
31
14
13 15 1
US_060-063_AD442.indd 60 18/2/09 13:23:23
▲ Stabilizing “W’s,” page
posture stretch at a glance
▲ Centering Elongations, page 46
▲ Centering Elongations, page 46
▲ Stabilizing “W’s,” page 47
▲ Elongating Sidelying waist stretch, page 52
▲ Elongating Sidelying waist stretch, page 52
▲ Opening Front body opener, page 53 ▲ O

6
5
18
1716
US_060-063_AD442.indd 61 18/2/09 13:24:18
W’s,” page 47
▲ Accentuating “C” stretch, page 48
▲ Coordinating Lunge opener, page 54
▲ Accentuating “C” stretch, page 48
▲ Coordinating Lunge opener, page 54
▲ Opening Front body opener, page 53
7
8 10
9
20
19 221
US_060-063_AD442.indd 62 18/2/09 13:24:48
▲ Softening Baby rocks, page 49
▲ Softening Baby rocks, page 49
▲ Articulating Hurdler lat stretch, page 50
▲ Articulating Hurdler la
▲ Limbering Round back squat, page 55
▲ Limbering Round back squat, page 55 ▲ E▲ Elongating Hanging stretch, page 56

12
11
22 23 24
US_060-063_AD442.indd 63 17/2/09 11:38:47
urdler lat stretch, page 50
▲ Energizing Balance point stretch, page 51
▲ Energizing Balance point stretch, page 51
▲ Elongating Hanging stretch, page 56 ▲ Centering Top-to-toe stretch, page 57 ▲ Centering Top-to-toe stretch, page 57
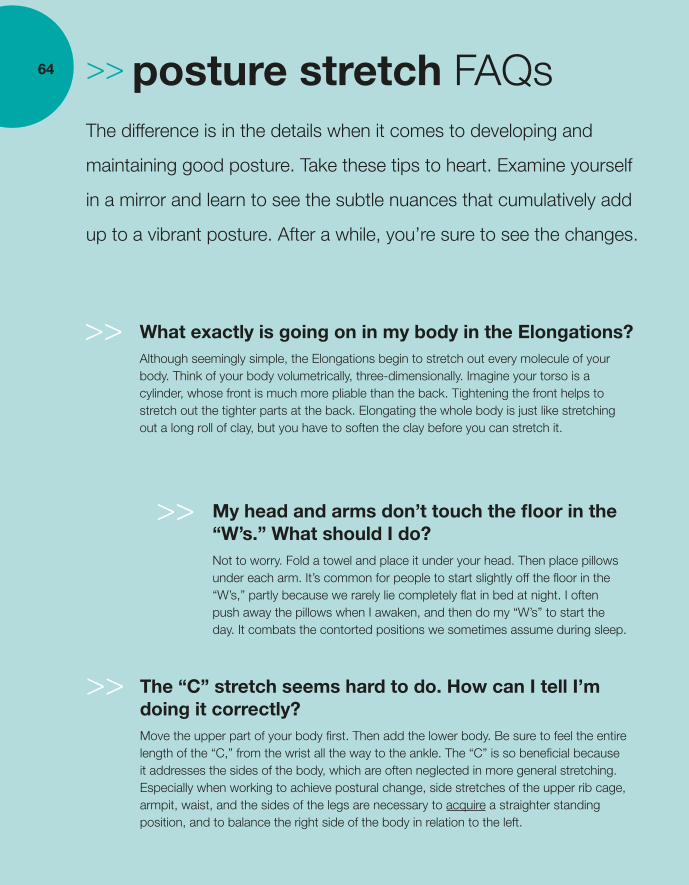
posture stretch FAQsThe difference is in the details when it comes to developing and
maintaining good posture. Take these tips to heart. Examine yourself
in a mirror and learn to see the subtle nuances that cumulatively add
up to a vibrant posture. After a while, you’re sure to see the changes.
My head and arms don’t touch the floor in the “W’s.” What should I do?Not to worry. Fold a towel and place it under your head. Then place pillows under each arm. It’s common for people to start slightly off the floor in the “W’s,” partly because we rarely lie completely flat in bed at night. I often push away the pillows when I awaken, and then do my “W’s” to start the day. It combats the contorted positions we sometimes assume during sleep.
The “C” stretch seems hard to do. How can I tell I’m doing it correctly?Move the upper part of your body first. Then add the lower body. Be sure to feel the entire length of the “C,” from the wrist all the way to the ankle. The “C” is so beneficial because it addresses the sides of the body, which are often neglected in more general stretching. Especially when working to achieve postural change, side stretches of the upper rib cage, armpit, waist, and the sides of the legs are necessary to acquire a straighter standing position, and to balance the right side of the body in relation to the left.
What exactly is going on in my body in the Elongations?Although seemingly simple, the Elongations begin to stretch out every molecule of your body. Think of your body volumetrically, three-dimensionally. Imagine your torso is a cylinder, whose front is much more pliable than the back. Tightening the front helps to stretch out the tighter parts at the back. Elongating the whole body is just like stretching out a long roll of clay, but you have to soften the clay before you can stretch it.
64

US_064-065_AD442.indd 65 17/2/09 00:01:47
The Sidelying waist stretch is hard to feel. How can I intensify it?Make sure you are lifting your groin muscles strongly toward your head. Press your hips forward. The side of the body nearest the floor is again making a long “C” shape. So work to make it as long as possible, reaching your bottom foot away from the ear on the same side. Increase the top curve of the “C” by lifting your uppermost ear toward the ceiling. Use the hands to twist your hips in relation to the shoulders.
How do I do the Hanging stretch if my back feels as if it’s moving in chunks?This is a common issue for many people when they start to work with their spine. Think of the spine as being like a child’s wooden segmented toy snake. The chunks you feel are groups of those segments moving together, instead of individually. Try to keep thinking about rolling over an imaginary fence and keep imagining the individual parts of the spine moving in turn—the neck, the upper back, the middle back.
What must I focus on in kneeling stretches? All I can think about is the pressure on my knees.First of all, use padding if you feel any discomfort, then you can concentrate on finding your smile lines (see p16). Try to press the hips forward and press each knee equally into the floor. This is a great position for gaining low-back strength, and to help to straighten out any leg-length problems.
What do I do if I can’t straighten out my hips in the Front body opener?Don’t panic. There’s always another way. Kneel on padding if your knees are too sensitive. Usually a mat or folded towel works best. Sometimes pillows are worse because the knees dig into them. Next, squeeze your buttock cheeks together and tighten your glutes, to stretch the front of the hips. Still need help? Balance by holding onto a piece of furniture, press down on your hands, and lift your chest.
65

15
US_066-067_AD442.indd 66 17/2/09 00:03:26
minute

US_066-067_AD442.indd 67 17/2/09 00:03:42
flexibility stretch Delve into a deeper stretchChallenge the low back, hips, and legsWork the hips to open the body fully

US_068-069_AD442.indd 68 17/2/09 00:06:47
68 flexibility stretch Flexibility is best understood as developing your own potential. Each
body is unique, with its own set of bone shapes and muscle lengths.
Take the challenge here to continue opening your entire body through
the gateway of the hips. Hip suppleness is essential to spinal health.
The best way to achieve full body flexibility is to take on the challenge of the low back, hips, and legs. Many people give up when they feel they are not flexible in the hamstrings, but remember that the body also comprises fascial tissue (see p10) that, among other roles, ties the biomechanics of the upper body to that of the lower body. Now that you’ve done some loosening and lengthening of your whole body, it’s time to focus on a deeper opening of your lower body. This sequence offers more moves that combine stretches with circular, rotational movements. It may require more modification than the first two workouts. Have heart. Challenging yourself with many different exercises will help you to identify your weak areas. There is always a back door to a movement—a way in which you can break it down and simply perform parts of it until they transform into old, familiar friends. Then you can join them together again and you’re there!
The exercisesThe Knee pumps prepare the legs and hips for the next moves. Part of my daily ritual, Knee pumps help to keep my knees and sciatic nerves—the long nerve along the backs of the legs—supple. There is no harm, and it is very beneficial, if you take the extra time to increase the repetitions to as many as 20 on each leg.
The Quad stretch, Thigh sweep, Fouetté stretch, and Figure 4 stretch are absolutely essential to my personal regimen. Go slow at first
Suspend judgment about your hip and leg stretch. Slow, steady persistence pays off. Look to yourself, and in yourself, for comparison.
Be sure to energize your upper body as well as your lower body to create the necessary full-body connection.
Always use straps, belts, or bands to modify when needed.
Changing the length of tight, stiff muscles takes time. If your body type is overly flexible, tighten yourself and make the motion or position smaller so as not to over-stretch.
tips for flexibility stretch
and take care to observe the transitions from one movement to the next. Work hard to make these transitions smooth; they are actually additional stretches that help to give the sequence its three-dimensional element.
Challenge yourself to master the sequence by imagining you are coaching someone and have to demonstrate and explain each move to them. Being a teacher forces you to think about the nature of each movement and is the best way to clarify them in your own mind.
US_068-069_AD442.indd 68 13/07/2009 14:55

US_068-069_AD442.indd 69 17/2/09 00:07:03
69
The Cobbler stretch is the gateway to opening the stretch
of the hips. In this position, it is important to respect the
“voice” of the knees and not over-stretch.
When you get to Lying hamstring stretch and Advancing frogs, work hard to coordinate all the various parts. It may seem overwhelming to think of them all at once, so first start with the obvious—the basic shape. Again, modify, modify, modify. Rome wasn’t built in a day. The next two moves, the Straddle and the Pull-the-thread lunge give you a bit of a rest.
Do try the Angel flight stretch. Remember, your shape and range will be different than our beautiful model’s, so start low and slow. This stretch is the ultimate in opening the entire front of the pelvis and thighs. Stick with it, and I promise you will transform beyond all your expectations.
US_068-069_AD442.indd 69 13/07/2009 14:55

1
2
US_070-071_AD442.indd 70 18/2/09 12:53:07
limbering knee pumps 70
Knee pumps Lie on your back with the soles of your feet on the floor. Lift one foot and hold behind your
thigh. Cup and hold the back of your head with the other hand. Inhale as you tuck your chin and slightly lift your head and shoulders. Press your head into your hand. At the same time, straighten the raised knee slightly.
Exhale, press your back into the floor, and bend the raised knee at the same time as you lower
the foot and head. Repeat, then open the knees slightly to make a “V” shape. Inhale, and repeat the raising and lowering of the head and leg 2 more times. Repeat on the other side.
flexibility stretch
flex the foot
gently lift the head

3
4
US_070-071_AD442.indd 71 18/2/09 12:53:35
energizing baby rolls 71
flexibility stretch
Baby rolls Still lying on your back, exhale, press your back down, and roll onto one side,
bending your knees. Hold your knees, then inhale as you start to roll to the other side, straightening the top knee, then the bottom knee.
When you are lying flat on your back, your legs will be open in a brief straddle. Press down
on the inner thighs to increase the stretch. Exhale as you bend the top knee and then the bottom knee to roll onto the other side. Continue rolling side to side for 3 sets.
feel it herepress the abs
to the floor
press on the inner thighs

5
6
US_072-073_AD442.indd 72 18/2/09 12:55:18
elongating cobbler stretch 72
Cobbler stretch Come to a sitting position, take your feet close to the groin, and
hold onto your ankles. Sit on a rolled blanket or towel if it helps you to sit up straight (see p117). Inhale and lift the shoulders, then slump and round your back, allowing your knees to lift.
Exhale and roll your shoulders back and down. Press the knees down
toward the floor, as you pull your feet in closer to the groin and lift yourself so you sit taller. Repeat 3 more times.
flexibility stretch
sit tall
feel it here

7
8
US_072-073_AD442.indd 73 18/2/09 12:56:06
articulating quad stretch
feel it here
73
flexibility stretch
Quad stretch Lie on your side and bend both knees up toward your chest. Hold onto
your bottom knee. Use a pillow under your neck if you feel any strain (see p117). Inhale, hold onto your top ankle, and pull your top knee gently toward your chest.
Exhale, then smoothly pull your top knee back. Do not let the bottom knee be pulled
backward by the top leg. Stay, then pull backward a little more on the top knee. Repeat. Release your ankle and go onto your back, then return to your side and straighten your legs.
pull the knee toward the face

9
10
US_074-075_AD442.indd 74 18/2/09 12:56:43
elongating thigh sweep 74
Thigh sweep Take your arms overhead on the floor and bend your top knee backward. Hold the wrist on the side of the bent leg,
then inhale and slowly pull your wrist out and beyond your head as you roll backward toward the floor. Do not force it, and remember to modify the position of the knee if you find it uncomfortable.
Exhale, tuck your pelvis under, pull your wrist again, and roll to face forward toward the floor. Repeat, inhaling as you roll
backward and exhaling as you roll forward.
feel it here
feel it here
flexibility stretch
pull the wrist
face the floor
tuck the hips under

11
12
US_074-075_AD442.indd 75 18/2/09 12:57:08
stimulating fouetté stretch 75
flexibility stretch
Fouetté stretch Still lying on your side, reach your top leg and foot toward the ceiling. Hold onto the calf if you can, or higher up the leg
if that is uncomfortable. Lengthen and lift the bottom leg off of the floor. Lift your groin muscles toward your head (see p17), lengthen the neck and lift the head. Reach out of the collarbones (see p17). Pull your navel to your spine (see p17). Tighten your glutes and press your hips forward.
Inhale and slowly roll onto your back. Pull the leg into the hip. Stay and breathe. Repeat one more time.
feel it here
reach head away from the foot
pull the leg into the hip
press the calf into the floor
feel it here
13
14
US_076-077_AD442.indd 76 18/2/09 12:54:13
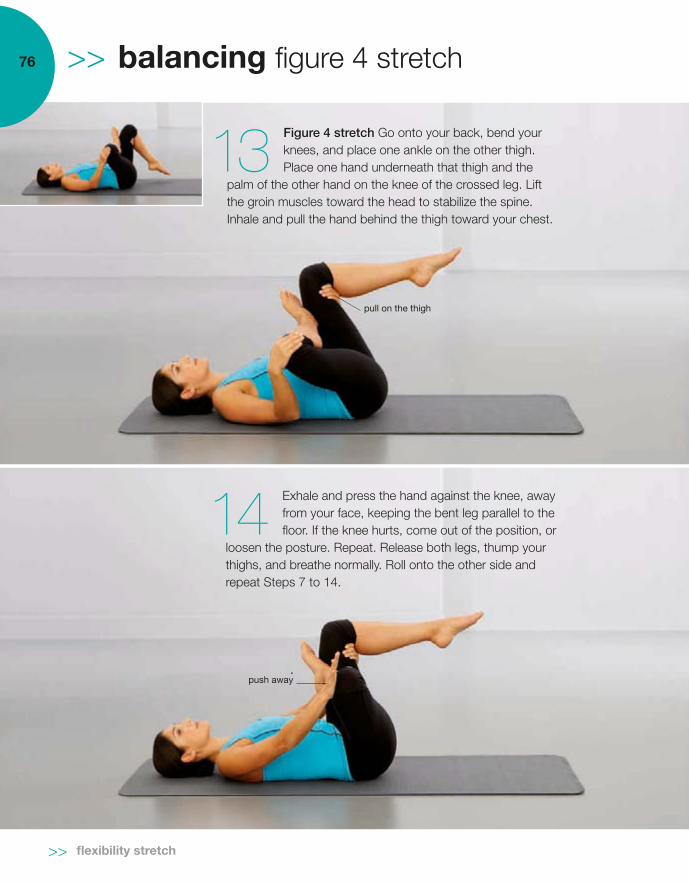
balancing figure 4 stretch 76
Figure 4 stretch Go onto your back, bend your knees, and place one ankle on the other thigh. Place one hand underneath that thigh and the
palm of the other hand on the knee of the crossed leg. Lift the groin muscles toward the head to stabilize the spine. Inhale and pull the hand behind the thigh toward your chest.
Exhale and press the hand against the knee, away from your face, keeping the bent leg parallel to the floor. If the knee hurts, come out of the position, or
loosen the posture. Repeat. Release both legs, thump your thighs, and breathe normally. Roll onto the other side and repeat Steps 7 to 14.
flexibility stretch
pull on the thigh
push away

15
16
US_076-077_AD442.indd 77 18/2/09 12:54:41
coordinating lying hamstring stretch
tuck the chin
77
flexibility stretch
Lying hamstring stretch Still lying on your back, bend both knees, anchor your pelvis to the floor, lift your groin muscles toward
your head, and pull your navel to your spine. Exhale, press your back into the floor, and lift one leg to the ceiling. Take the opposite hand to the lifted leg and hold the outside edge of the lifted foot, or hold lower down the leg if needed. Place the other hand on your thigh, just next to the knee. Inhale and straighten the bottom leg, pressing the calf down to the floor.
Exhale and lift the head. Gently press the hand on the thigh away from you. The top foot pulls your leg into the hip
socket. Stay for 2 breath cycles, then repeat on the other side. Gently release the legs and thump your thighs against the floor.
feel it here
pull the foot
press the calf into the floor
17
18
US_078-079_AD442.indd 78 18/2/09 12:58:40
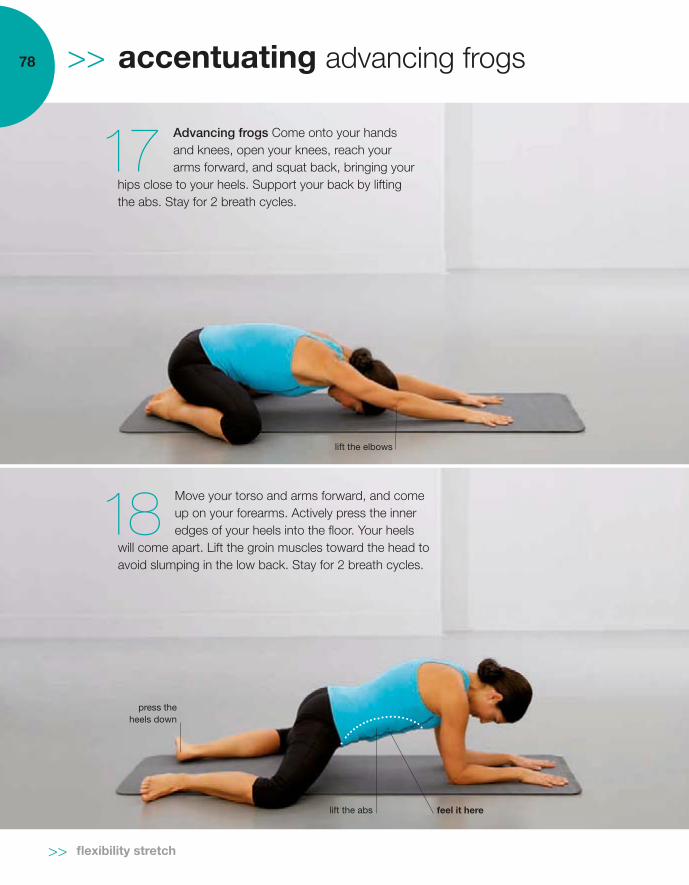
accentuating advancing frogs 78
Advancing frogs Come onto your hands and knees, open your knees, reach your arms forward, and squat back, bringing your
hips close to your heels. Support your back by lifting the abs. Stay for 2 breath cycles.
Move your torso and arms forward, and come up on your forearms. Actively press the inner edges of your heels into the floor. Your heels
will come apart. Lift the groin muscles toward the head to avoid slumping in the low back. Stay for 2 breath cycles.
lift the abs feel it here
flexibility stretch
lift the elbows
press the heels down

19
20
US_078-079_AD442.indd 79 18/2/09 12:59:03
lengthening straddle
press the calves down
79
flexibility stretch
Straddle Come to a sitting position, sitting evenly on your sitbones, with your legs open to at least a 90° angle,
and with your toes pulled toward your head. Lift your back and open your chest. Sit on a rolled blanket or towel if it helps you to sit up straight, or bend your knees. Lift the groin muscles up toward the head. Open your arms strongly sideways and reach out through the head, legs, and arms.
Inhale and reach up and over an imaginary fence to one side. Rest the lower hand on the floor behind
the outstretched leg. Firm your waist. Exhale, then return to center by “painting the ceiling” with your top arm. Repeat on the other side, then release. Gently roll your shoulders to relax.
sit tall
lean on the back hand
reach through the middle finger
pull the navel to the spine

21
22
US_080-081_AD442_2.indd 80 18/2/09 12:57:38
Pull-the-thread lunge Go onto yourhands and knees, take one leg infront, and lean into it, palms either side
of the front foot. Line up the bent-leg knee andtoes straight ahead in front of the hip. Press thefoot into the floor. Extend the other leg straightbehind you and tuck the pelvis under strongly.
Pull an imaginary thread up to theceiling with the hand on the sideof the extended leg. Look up at
the hand and press down into the floor with theother hand. Stay for 2 breath cycles. Take thehand down to the floor, then repeat with theother leg in front.
stabilizing pull-the-thread lunge 80
flexibility stretch
tuck the tail under
tighten the waist
look at the “thread”

23
24
Angel flight stretch Lie on your stomach, face turned to one side. Feel the imaginary swimming-pool water lifting your abdomen
off the floor (see p16). Press the tailbone down toward the heels. Inhale, then reach back and bend the knees to hold onto your ankles.
Exhale, press your feet against your hands, and lift your chest and thighs off the floor to make a bowlike shape. Stay
for 2 breath cycles, then release your hands and feet and relax for another 2 breath cycles, breathing deeply.
powering angel flight stretch
lift the abspress the pelvis to the floor
flexibility stretch
press the feet against the hands
81

1
US_082-083_AD442.indd 82 25/2/09 14:44:25
flexibility stretch
15
US_082-083_AD442.indd 83 25/2/09 14:44:46
minute summary

2 4
16
15
1
14
13
3
4
3
US_084-087_AD442.indd 84 18/2/09 13:28:16
flexibility stretch at a glance
▲ Limbering Knee pumps, page 70
▲ Coordinating Lying ha
▲ Limbering Knee pumps, page 70
▲ Coordinating Lying hamstring stretch, page 77
▲ Balancing Figure 4 stretch, page 76
▲ Balancing Figure 4 stretch, page 76
▲ Energizing Baby rolls,
▲ Energizing Baby rolls, page 71
4 6
5
18
17
US_084-087_AD442.indd 85 18/2/09 13:29:09
Lying hamstring stretch, page 77
▲ Elongating Cobbler stretch, page 72
▲ Accentuating Advancing frogs, page 78
▲ Elongating Cobbler stretch, page 72
▲ Accentuating Advancing frogs, page 78
aby rolls, page 71

8
7
20
19
10
9
21
22
21
US_084-087_AD442.indd 86 18/2/09 13:29:44
▲ Articulating Quad stretch, page 73
▲ Stabilizing Pull-the-thread lunge, page 80
▲ Articulating Quad stretch, page 73
▲ Stabilizing Pull-the-thr▲ Lengthening Straddle, page 79
▲ Lengthening Straddle, page 79
▲ Elongating Thigh sweep, page 74
▲ Elongating Thigh swe

24
23
12
11
22
US_084-087_AD442_2.indd 87 18/2/09 13:03:21
ll-the-thread lunge, page 80
▲ Powering Angel flight stretch, page 81
▲ Powering Angel flight stretch, page 81
igh sweep, page 74
▲ Stimulating Fouetté stretch, page 75
▲ Stimulating Fouetté stretch, page 75

flexibility stretch FAQsThis program begins the true challenge to developing your potential
to stretch, so take extra care not to force or strain. Here are some
common questions and tips about how to modify positions that seem
impossible and how to direct the stretch into the proper location for
the best effect.
Why do I have to hold onto the bottom knee in the Quad stretch?Holding the bottom knee ensures that the stretch is being directed into the front of the hip joint and not into the waist line. It may seem awkward at first, but with time it will become natural. Work hard to find the line between the buttocks and the hamstrings as you pull the foot backward. This will help you to gain the best possible stretch of the front of the dense thigh.
What do I do if my knee hurts in the Thigh sweep?Always make sure your knee is not over-stretching in any of the stretches. You should never feel pain directly in the knee. If it does hurt, you can simply straighten the leg on top, open your legs slightly, and brace them against the floor. Then, tighten your hips and press them forward as you pull on the wrist, turning the chest forward and back.
What do the Knee pumps stretch?The Knee pumps stretch many parts of the hips and legs. The inner thigh and hamstring muscles are the most obvious. Not so obvious are the sciatic nerves, the big nerves that run from the pelvis into the legs. Adding the head lifts to the knee movements adds even more stretch. Combining different body parts in one exercise helps to stretch the fascia, the connective bands that hold the body structures together as though they were wrapped in plastic wrap (see pp10–11).
88
US_088-089_AD442.indd 89 17/2/09 09:40:31
What does “fouetté” mean, and what does this exercise achieve?It means “whipped” and the action is easy to see when a ballet dancer performs a fouetté. The movement gives a three-dimensional stretch deep inside your hip. You have to imagine the internal roundness of the hip joint, the way the head of the thigh bone moves in the socket of the pelvis. The circular movement created by the Fouetté stretch improves the mobility of that joint and of your entire pelvis.
I can’t even remotely begin to get into the Angel flight stretch. Can you help?This is a challenging exercise, even for veteran stretchers. Again, the use of a belt can help here. You can even start by holding one leg, then the other since there are two repetitions of the exercise. An alternative is to lie on your stomach on the floor with your feet behind you over a sofa seat. Then press your hands against the floor and lift your chest as in the Modified cobra (see p32).
I only feel pressure in my knees in Advancing frogs. Where should I feel the stretch?First, try to get your knees as open as possible and place the weight on the inside of the knees, not on top of the kneecaps. You should feel the stretch deep in the innermost fold of the leg at the groin. Be sure to keep the waist lifted since that takes pressure off the inner thigh. Use your hands and forearms to direct the pressure back and down toward the inner thigh.
Is it necessary for me to hold the outside of the opposite foot in the Lying hamstring stretch? I can’t reach it.This is an instance where having a stretching strap can come in handy. A bathrobe belt also works well. Loop the belt around your foot and hold it with the hand on the opposite side. Do press the other hand against the thigh of the lifted leg, even if you cannot straighten the leg. You have to start somewhere. You can and will improve.
89
US_088-089_AD442.indd 89 13/07/2009 14:56

15
US_090-091_AD442.indd 90 17/2/09 09:43:39
minute
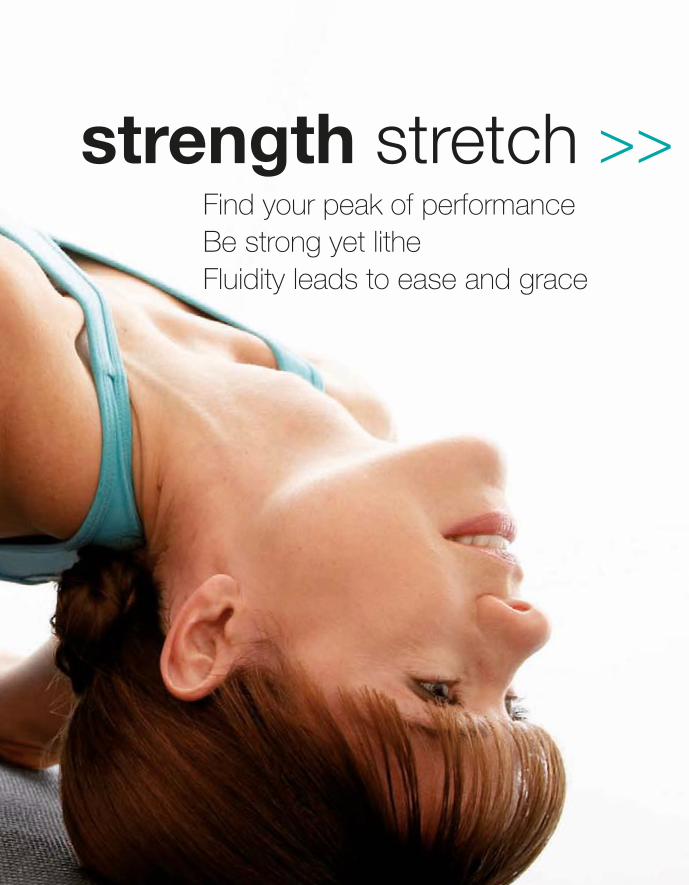
US_090-091_AD442.indd 91 23/2/09 11:38:52
strength stretch Find your peak of performanceBe strong yet litheFluidity leads to ease and grace
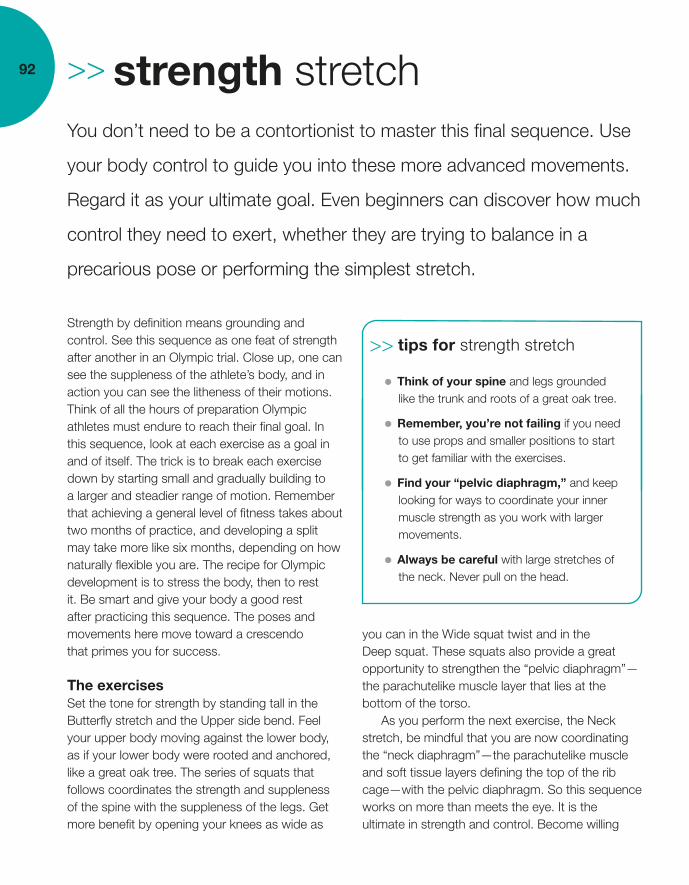
US_092-093_AD442.indd 92 17/2/09 09:50:30
92 strength stretchYou don’t need to be a contortionist to master this final sequence. Use
your body control to guide you into these more advanced movements.
Regard it as your ultimate goal. Even beginners can discover how much
control they need to exert, whether they are trying to balance in a
precarious pose or performing the simplest stretch.
Strength by definition means grounding and control. See this sequence as one feat of strength after another in an Olympic trial. Close up, one can see the suppleness of the athlete’s body, and in action you can see the litheness of their motions. Think of all the hours of preparation Olympic athletes must endure to reach their final goal. In this sequence, look at each exercise as a goal in and of itself. The trick is to break each exercise down by starting small and gradually building to a larger and steadier range of motion. Remember that achieving a general level of fitness takes about two months of practice, and developing a split may take more like six months, depending on how naturally flexible you are. The recipe for Olympic development is to stress the body, then to rest it. Be smart and give your body a good rest after practicing this sequence. The poses and movements here move toward a crescendo that primes you for success.
The exercisesSet the tone for strength by standing tall in the Butterfly stretch and the Upper side bend. Feel your upper body moving against the lower body, as if your lower body were rooted and anchored, like a great oak tree. The series of squats that follows coordinates the strength and suppleness of the spine with the suppleness of the legs. Get more benefit by opening your knees as wide as
Think of your spine and legs grounded like the trunk and roots of a great oak tree.
Remember, you’re not failing if you need to use props and smaller positions to start to get familiar with the exercises.
Find your “pelvic diaphragm,” and keep looking for ways to coordinate your inner muscle strength as you work with larger movements.
Always be careful with large stretches of the neck. Never pull on the head.
tips for strength stretch
you can in the Wide squat twist and in the Deep squat. These squats also provide a great opportunity to strengthen the “pelvic diaphragm”—the parachutelike muscle layer that lies at the bottom of the torso. As you perform the next exercise, the Neck stretch, be mindful that you are now coordinating the “neck diaphragm”—the parachutelike muscle and soft tissue layers defining the top of the rib cage—with the pelvic diaphragm. So this sequence works on more than meets the eye. It is the ultimate in strength and control. Become willing
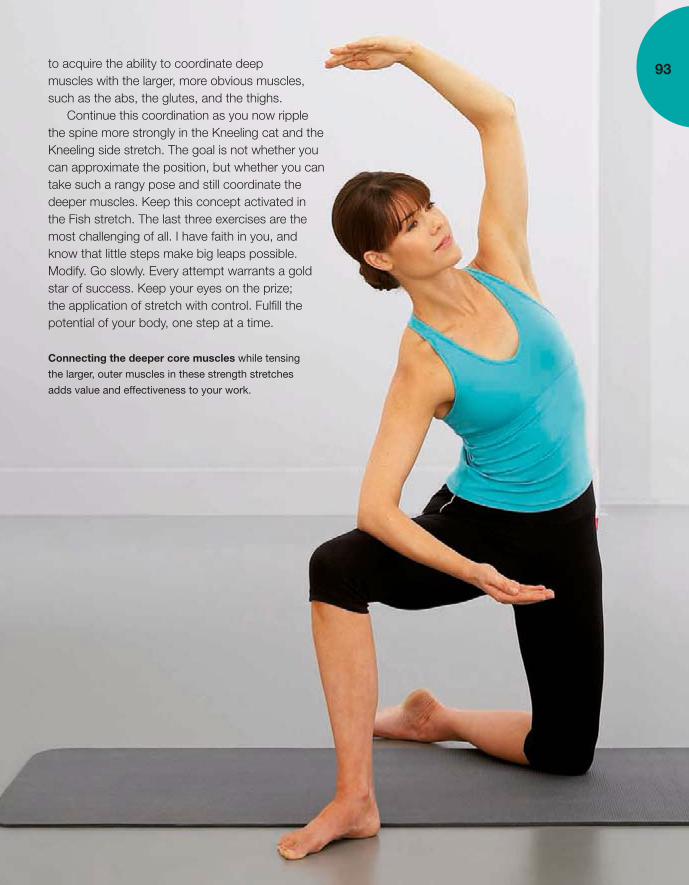
US_092-093_AD442.indd 93 17/2/09 09:50:50
93
Connecting the deeper core muscles while tensing
the larger, outer muscles in these strength stretches
adds value and effectiveness to your work.
to acquire the ability to coordinate deep muscles with the larger, more obvious muscles, such as the abs, the glutes, and the thighs. Continue this coordination as you now ripple the spine more strongly in the Kneeling cat and the Kneeling side stretch. The goal is not whether you can approximate the position, but whether you can take such a rangy pose and still coordinate the deeper muscles. Keep this concept activated in the Fish stretch. The last three exercises are the most challenging of all. I have faith in you, and know that little steps make big leaps possible. Modify. Go slowly. Every attempt warrants a gold star of success. Keep your eyes on the prize; the application of stretch with control. Fulfill the potential of your body, one step at a time.

1 2
US_094-095_AD442.indd 94 17/2/09 09:52:57
limbering butterfly stretch 94
Butterfly stretch Stand with legs completely together and pressing the base of the big and little toes,
and the middle of the heel of both feet on the floor. Lift your groin muscles toward the head (see p17). Pull your navel to your spine (see p17). Clasp your hands behind your head, inhale, and lift up and forward from your waist. Simultaneously bow your head, bend your knees, and bring the elbows toward each other.
Exhale, straighten the legs, and stretch up and out of your waist, fanning the
elbows open. Reach out through the points of the elbows and feel as if your breastbone is being pulled up toward the ceiling. Repeat, then relax and shake the hands.
anchor the feet
feel it here
strength stretch
feel it here

3 4
US_094-095_AD442.indd 95 17/2/09 09:53:18
opening upper side bend 95
strength stretch
Upper side bend Still with your legs completely together, renew your
form. Lift the groin muscles toward the head, and pull the abs up and into your spine. Clasp your hands behind your head.
Inhale and lift up and out of the rib cage, over an imaginary fence under one armpit. Tilt
one elbow down toward the floor, the other up toward the ceiling. Exhale and take your shoulders back to center. Feel a “V” of strength from the small of the low back to the points of the elbows. Repeat on the other side, and then repeat one more set.
anchor the feet
tighten the abs
lift over the “fence”
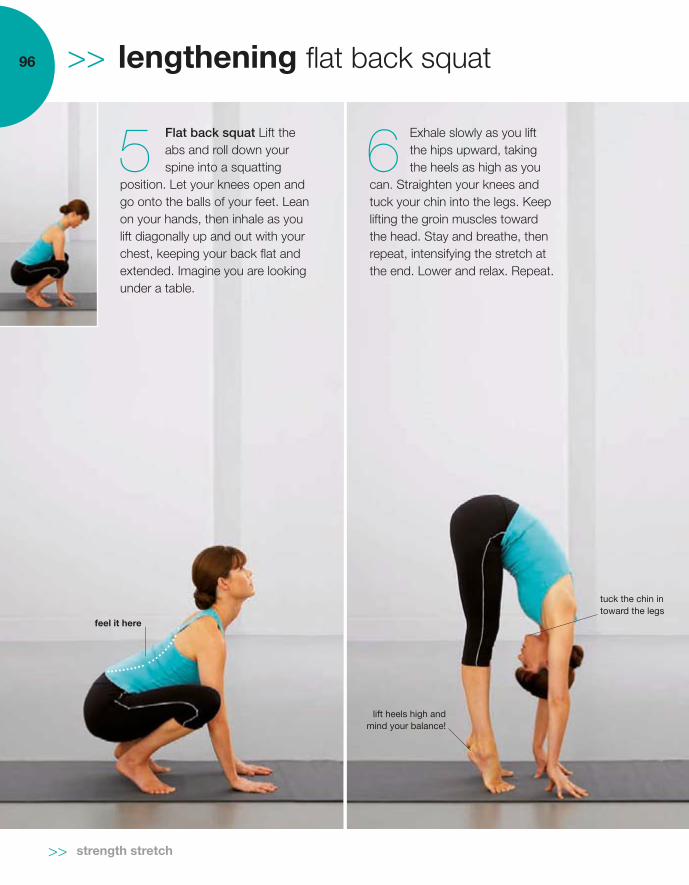
65
US_096-097_AD442.indd 96 23/2/09 11:43:13
lengthening flat back squat 96
Exhale slowly as you lift the hips upward, taking the heels as high as you
can. Straighten your knees and tuck your chin into the legs. Keep lifting the groin muscles toward the head. Stay and breathe, then repeat, intensifying the stretch at the end. Lower and relax. Repeat.
Flat back squat Lift the abs and roll down your spine into a squatting
position. Let your knees open and go onto the balls of your feet. Lean on your hands, then inhale as you lift diagonally up and out with your chest, keeping your back flat and extended. Imagine you are looking under a table.
lift heels high and mind your balance!
feel it here
strength stretch
tuck the chin in toward the legs
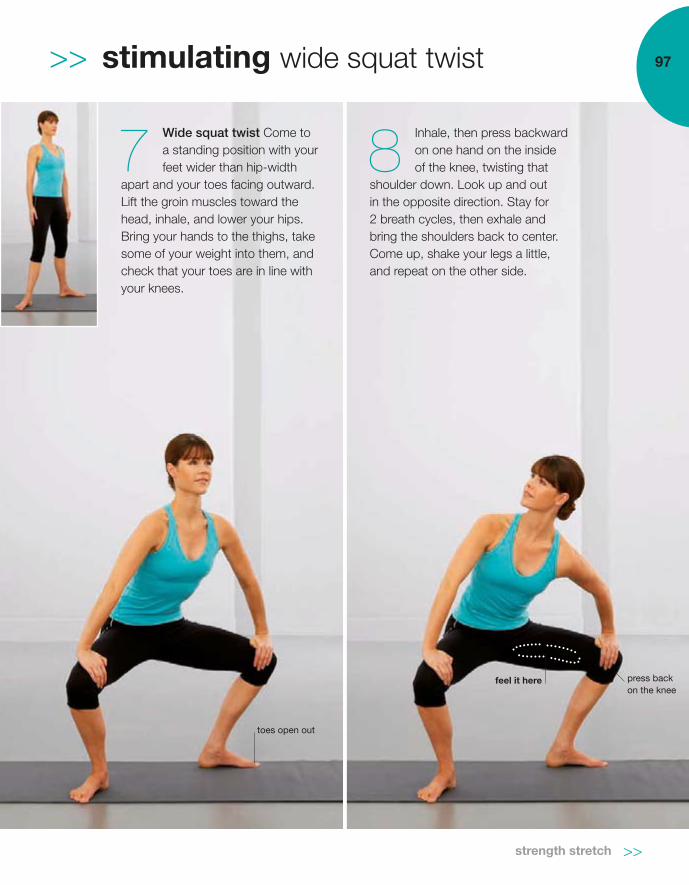
87
US_096-097_AD442.indd 97 17/2/09 09:55:37
stimulating wide squat twist
toes open out
97
strength stretch
Inhale, then press backward on one hand on the inside of the knee, twisting that
shoulder down. Look up and out in the opposite direction. Stay for 2 breath cycles, then exhale and bring the shoulders back to center. Come up, shake your legs a little, and repeat on the other side.
Wide squat twist Come to a standing position with your feet wider than hip-width
apart and your toes facing outward. Lift the groin muscles toward the head, inhale, and lower your hips. Bring your hands to the thighs, take some of your weight into them, and check that your toes are in line with your knees.
feel it here press back on the knee

10
9
US_098-099_AD442.indd 98 17/2/09 09:57:41
sustaining deep squat 98
Keep lifting the groin muscles, then press your elbows back
against the inner thighs. Stay, then slowly come up, gently shake your hands and legs, and relax.
Deep squat Resume the wide position of the legs, with your feet wider
than hip-width apart and your toes facing outward. Inhale, lift the groin muscles toward the head, and slowly lower your hips.
Hold onto your ankles or hold higher up the legs if that is more comfortable.
press the elbows backward
hold the ankles firmly
strength stretch

12
11
US_098-099_AD442.indd 99 17/2/09 09:58:00
articulating neck stretch
feel it here
99
strength stretch
Gently turn the head diagonally upward and lift the eye focus.
Breathe into the new area of tightness in your neck to release it. Carefully turn the face forward, undrape your arm, rub your neck, and gently roll your shoulders. Repeat on the other side.
Neck stretch Find a comfortable sitting position on the floor, preferably with
legs crossed. Sit on a rolled blanket or towel if it helps you to sit up straight. Place one hand, palm up, underneath the sitting bone. Drape the other arm over the head to reach the ear. Breathe into the area between the ear and the tip of the shoulder. Inhale, then tilt the chin diagonally down.
sit on the hand, palm upward

14
13
US_100-101_AD442.indd 100 17/2/09 10:00:18
elongating kneeling cat 100
Open your mouth, exhale from the back of the throat, lengthen your low back, then start arching your
back and lifting your chest. Imagine you are looking under a table. Repeat, inhaling and rounding, and exhaling and arching. Repeat on the other side.
Kneeling cat Come onto your hands and knees. Reach one foot forward into a lunge position,
hands on the floor either side of the front leg. Make sure the toes of the front foot are flat on the floor. Tuck the pelvis under and lean toward the back leg. Inhale, round the back, and look at the navel.
toes stay down
strength stretch
feel it here

1615
US_100-101_AD442.indd 101 17/2/09 10:00:39
balancing kneeling side stretch 101
strength stretch
Tuck your pelvis under and reach your top arm up and over toward the bent leg. Rest your lower
forearm on the thigh of the bent leg. Reach up and out through the third finger of the top arm. Lift the groin muscles toward the head. Stay for 3 breath cycles, then repeat on the other side.
Kneeling side stretch Starting on your hands and knees, take one leg
diagonally in front, knee bent, sole of the foot on the floor. Turn both legs out slightly, lower the head, and take the arms in front of you, touching your middle fingers together. Then roll up through the spine and fan your arms open sideways.
feel it here
feel it here
feel it here

18
17
US_102-103_AD442.indd 102 17/2/09 10:02:50
centering fish stretch 102
Roll your shoulder blades back and down, then press down on your forearms and arch your back more to come up
onto the top of your head. Put as little pressure on the head as possible. Stay for 1 long breath cycle. Relax, then repeat.
Fish stretch Lie on your back, knees bent, soles of the feet on the floor.
Place your palms on the floor by your hips. Exhale, then gently press the low back forward and arch your back slightly.
arch the lower back
strength stretch
minimal pressure on the head

20
19
US_102-103_AD442.indd 103 17/2/09 10:03:08
powering thigh lunge
stand on the toes
103
feel it here
strength stretch
Tuck the toes of the back foot under, lengthen the leg back behind you, and straighten the
back knee. Lift the groin muscles toward the head and, balancing, place one hand and then the other on the front thigh. Press the hands down on the thigh and lift the chest. Stay for 2 breath cycles. Exhale and release, then repeat on the other side.
Thigh lunge Go onto your hands and knees. Lengthen your back so it is parallel to the floor, like a table top.
Reach one foot forward into a lunge position and take your hands to the floor either side of the foot.
firm the hips

22
21
US_104-105_AD442.indd 104 17/2/09 11:43:22
coordinating pigeon arabesque 104
balance on the thigh
strength stretch
Hold your position and reach the arm on the same side as the back leg out in front of you. Reach the arm on the bent
leg side out to the side. Stretch up through the head. Stay for 2 breath cycles. Switch legs and repeat.
Pigeon arabesque Sit with one leg bent back and the other bent forward.
Your legs should make the letter “Z” with your back knee touching the front foot. Place your hands on the floor in front of you. Straighten the back leg behind you, with the knee pointing toward the floor. Lift your groin muscles toward your head.
tuck the tail under

24
23
energizing the split
use the hands if necessary
strength stretch
Switch legs, resume the “Z” sit, lengthen the back leg behind you, and renew your form. Find your
balance, reach your hands behind you, clasp them, and try to straighten your elbows. If you prefer, you can stay with hands at your sides for balance. Stay for 2 breath cycles, then release. Come onto your back and thump your thighs.
The split Switch legs and resume the “Z” sit, then lengthen
the back leg behind you. Lift your groin muscles toward your head and pull your navel to your spine. Lean on your hands.
feel it herefeel it here
tighten the abs
105

1
US_106-107_AD442.indd 106 17/2/09 10:05:30
strength stretch

15
US_106-107_AD442.indd 107 24/2/09 15:41:19
minute summary

14
13
4321
15 1
US_108-111_AD442.indd 108 18/2/09 13:32:42
▲ Opening Upper side bend, page 95 ▲
strength stretch at a glance
▲ Limbering Butterfly stretch, page 94▲ Limbering Butterfly stretch, page 94
▲ Balancing Kneeling side stretch, page 101
▲
▲ Elongating Kneeling cat, page 100
▲ Elongating Kneeling cat, page 100

4 65
18
1716
US_108-111_AD442.indd 109 18/2/09 13:33:06
▲ Opening Upper side bend, page 95 ▲ Lengthening Flat back squat, page 96▲ Lengthening Flat back squat, page 96
▲ Centering Fish stretch, page 102
▲ Centering Fish stretch, page 102▲ Balancing Kneeling side stretch, page 101

197 8
2019
2
21
US_108-111_AD442.indd 110 18/2/09 13:33:31
▲ Coordinating Pigeon arabesque, page 104
▲ S▲ Sustaining Deep squat, page 98▲ Stimulating Wide squat twist, page 97
▲ Stimulating Wide squat twist, page 97
▲ Powering Thigh lunge, page 103
▲ Powering Thigh lunge, page 103

10
12
11
2422
23
US_108-111_AD442.indd 111 17/2/09 11:48:43
▲ Sustaining Deep squat, page 98
▲ Coordinating Pigeon arabesque, page 104
▲ Energizing The split, page 105
▲ Energizing The split, page 105
▲ Articulating Neck stretch, page 99
▲ Articulating Neck stretch, page 99

strength stretch FAQsHonesty and attention to detail are what make all the difference
when it comes to bringing true strength to your stretch. Physical
development takes time, so be patient. Here are some common
questions and answers to help you in your quest to find your true
physical potential.
What if my hips don’t go down very far in the Wide squat twist and the Deep squat?Just go down as far as you feel you can support the position. You’ll still get a great groin stretch. Another option would be to hold onto a chair or other piece of furniture to steady yourself. Then you might find that you are able to bend more deeply into the squats. Consistent practice definitely makes for improvement in this stretch.
My head doesn’t bend well to the side for the Neck stretch. Should I pull harder?First of all, never pull on the head; let gravity and the simple weight of the arm do the work. Over time it will open up. This is an exercise that truly requires precision and care in its execution. It gives a fabulous stretch of the different muscles of the neck. To access all those muscles, be sure to keep the head bent to the side, however slightly, as you turn your face.
I get dizzy during the Flat back squat. Is there anything I can do to prevent the dizziness?Dizziness is common when people first start doing upside-down exercises. The inner ear may not be used to inverting the head, and this is why you may feel some dizziness. But it’s healthy to move the head in different orientations in an active movement for a limited time. The eyes usually control most of our balance. Simply keeping your eyes open, and going slowly will help your body to accommodate to the position.
112

US_112-113_AD442.indd 113 17/2/09 10:07:20
I’m not feeling much stretch in the Kneeling cat. How can I find the stretch?A common mistake here is to let the weight of the hip move toward the front leg. Be sure to keep the hips moving backward, especially as you lift the chest upward. Another tip is to literally stick your buttocks back and up, trying to arch the low back as you lift your chest. Yet another tip is to keep your chest as low as possible to the leg throughout the exercise.
Is going into The split necessary to consider myself really flexible?Not really. As with the Fish stretch, body type often determines how naturally flexible you are. The main goal is a comfortable, pain-free body. Sometimes flexibility is undesirable, especially if a person’s level of strength is too low to sustain the increased range of motion. A lithe body is preferable to a loose, disorganized body. That’s why it’s so important to emphasize the strength aspect as you develop your stretch.
How can there be both stretch and strength in one exercise? Strength is found in stretches by tensing the muscles in noncollapsed positions. Inversions and bending the spine over closed legs use your body weight as resistance to aid strengthening. Different bodily orientations, and moving hard-to-reach areas such as the rib cage create comprehensive strength. Strengthening many small parts leads to greater strength overall.
I feel as if I’m not going anywhere in the Fish stretch. Is there some trick to it?Some people’s body types mean they are able to arch their low back better than other people. It’s purely structural. Don’t ever force a position. If you can’t get the stretch in this area, try propping a firm pillow or ball in between your shoulder blades. Practice by placing it there, bracing yourself onto your forearms, and squeezing between the shoulder blades for several breaths.
113

15 minute

US_114-115_AD442.indd 115 17/2/09 10:09:30
moving on Life propels us into forward motion and change Incorporate stretching for a healthy life

US_116-117_AD442.indd 116 17/2/09 11:51:25
116 modify as neededIt’s not a failing to change an exercise to suit your needs, whether it’s
because of pain, age, or stiffness. There’s a back door to every stretch.
Nor is it cheating to use props and modifications. It’s just plain wise.
The body can move in multiple directions with a great deal of ease, yet people are often deterred from doing stretching exercises because they worry about feeling discouraged. We would all love to look like the models featured in this book, but use them to help you see the stretching exercises clearly, not to compare yourself with them.
Some of the stretches may feel a little strange or unusual, especially if you are new to exercise. Part of the reason we stretch in unusual positions is to identify our weak links, so pay attention and focus on what feels too tight, too loose, or painful.
If an exercise doesn’t feel right, there’s always a way to make it more accessible. Some people have trouble sitting on the floor because they have tight hamstrings, glutes, or tightness in the low back, or a combination of one or more of these. Sitting on a foot stool, ottoman, towel, or bolster can give just the lift needed to make the stretch possible.
Knees should never hurt during stretching. If they
feel painful, support them on pillows or bolsters to
take the pressure off. Another tip for this pose is to
move the feet farther away from the groin.

US_116-117_AD442.indd 117 19/2/09 13:00:22
117Pay special attention to your knees and monitor them for signs of pain or discomfort. “No pain, no gain” definitely does not apply to these complex joints. If you need to, prop them up with pillows when you are sitting to take the strain off the ligaments. If they feel tender when you kneel on them in weight-bearing positions, support them with some form of padding. Straighten them out of a bent-leg position if it’s uncomfortable. If one of the knees refuses to straighten, as it might in the Lying hamstring stretch (see p77), use a towel, belt, or strap to reach the foot.
You can increase or decrease the intensity of a stretch as it suits you (perhaps your body feels different on different days or at different times of day) by pulling or extending more or less. Breathing and relaxing help you stretch farther. Alternatively, try modulating the intensity of a stretch by elongating in a progression from one to ten, and then reducing it. The level of intensity should never go into the “strain zone” and you should not have extreme pain after you have performed your stretches. Remember: compare only yourself to yourself to make the greatest gain.
Help for different stretches. A towel over
the toes acts as a strap for a hamstring
stretch—elastic exercise bands don’t work
as well. A book under the pelvis (right,
above) will help you to sit forward on the
sitbones. A rolled towel placed under the
head straightens the neck and helps you
avoid neck pain (right, center). A towel is
excellent as padding when you are kneeling
(right, below).

US_118-119_AD442.indd 118 25/2/09 14:49:54
118 stretches for everyday life It’s easy to take your stretches into everyday life. Notice how you move
when you are grooming, dressing, even cooking and cleaning, and turn
each movement into a stretch. And think “office” as well as “home” to
get the most out of your stretch regime.
Look at the ways your body moves in everyday life. Notice how different movements feel, such as brushing your hair or pulling on a sweater or pants. Does the task feel comfortable? Do you have the same range of motion from one side to another? How does it feel to bend over to reach to a pet? Let your answers to these questions guide you to set yourself goals that will make an action a little easier or smoother.
Gradual changesChanges to the way we move happen gradually over time. Diminishing range of motion creeps up on people of every age. A student notices writing arm and shoulders tightening during a long exam. A young mother notices a tight chest or sore low
back as she holds or reaches down to a toddler. Older adults notice they can’t bend to the floor or reach up into cupboards as easily as in times past. Your adaptable bodyLife’s distractions, such as being preoccupied with a demanding job, with a new baby, or with having to juggle a long commute with household duties can sideline us from regular physical activity. Then suddenly we notice a change and start to worry that our bodies are not as mobile as they once were.
The good news is that your body is adaptable. It changes to accept what the environment is telling it to do. If you inadvertently restrict its motions—for instance, by sitting for long periods—it adapts to the smaller, less frequent motions. Conversely, it can re-adapt. That’s why it’s important to find ways in everyday life to get an extra little bit of stretch. Small changes can keep your body healthy over time.
In a crowded scheduleIt’s commendable to devote an hour or two a day to getting exercise, but not everyone can do that. Our 15-minute programs make it possible to get exercise, even with the most crowded schedule. Yet neither should you overlook the power of taking 25 seconds—four breath cycles—to feel the stretch in an everyday position or movement. This will add to your overall physical wellbeing. Using this strategy during those overwhelming times of life, when every second appears to be accountable, will pay off handsomely.
Brushing your hair is a great way to stretch the shoulders
and chest. Try switching the brush to your nondominant
hand to balance each side of the body.

US_118-119_AD442.indd 119 17/2/09 10:13:59
119
Reach a little farther
Stretch your legs and hips
Renew your posture at the office
everyday stretches
Putting on your socks is a good time for a hamstring
stretch. Simply lift the leg, or reach over to it, bow the
head, and take a few breaths.
An everyday habit
Take a twist break at the office. Cross one leg over the
other and turn in the direction of the crossed leg, just
as in our Seated cross-leg twist (see p28).

US_120-121_AD442.indd 120 17/2/09 10:16:17
120 relaxation techniques Relaxation takes discipline in a busy world. Chores, obligations, and
crises sap energy reserves and present road blocks to emotional
balance. Try these scheduled and unscheduled calming techniques
to make relaxation a priority in your life.
Relaxation is great for renewing the body, mind, and spirit. During every waking hour we expend our physical and mental energy, so we need to replenish it. Take a cue from professional athletes who aim for peak fitness. They know that the key to achieving optimal functioning lies in alternating periods of stress with times of relief and rest.
We all need a certain amount of stress in our lives to challenge and motivate us. But we also need to shake off any fatigue on a regular basis to avoid chronic weariness.
Sleep and restIt’s important for us all to renew our resources with nightly sleep and timely rest. Developing a healthy nightly ritual is essential in establishing an optimal renewal plan. Make your bedroom a sanctuary by creating a soothing, quiet place with your favorite
Use the contract–release method to lessen the tensions
in your body. One by one, tighten and release each body
part. End by tensing your whole body (inset, below), then
let go and breathe deeply (main picture, below).

US_120-121_AD442.indd 121 27/2/09 20:58:12
121
To cope with life’s ups and downs
Manage your stress
Develop good sleep hygiene
tips for
Using stretching to help you relax
Practice deep breathing. The diaphragmatic breath is
found by placing your fingers at the bottom of your breast
bone and sniffing or coughing a few times. Inhale deeply;
feel the rib cage expand.

US_122-123_AD442.indd 122 19/2/09 09:06:23
122 strategies for healthy living We all strive to achieve a good quality of life, whether we’re just starting
out or have reached retirement. Work, play, good nutrition, and the
ability to relish the joys and cope with the disappointments of life are all
a part of the equation that will bring us health and contentment.
Wouldn’t you rather live in a high-functioning, optimal way than a low-functioning one? Physically, we need energy to meet the demands of the day. We want to move around and lift and bend without pain or limitation, which is where the stretching programs in this book come into play. Mentally, we want to be alert and keep our homes and jobs running well. Emotionally, it is preferable to be stable, acting instead of reacting, in our family and professional encounters.
Balance and positivityThere are many things in life that we cannot control, so focus on those you can. A good starting point is a healthy, well-balanced diet. Eat five servings of fruits and vegetables and about three 3-ounce servings of protein (meat, fish, dairy, eggs, grains, legumes, nuts) per day. Also limit your intake of starches (potatoes and bread) and fats (butter and oils). Doctors recommend that we eat six small meals a day. This ignites the metabolism, provides brain food, and promotes a steady emotional state.
Another key is to balance your activities between work and play. Work may be essential for a living but don’t make it your life. Take up a hobby. Walk outdoors; breathe deeply. Even developing a sense of humor adds play into the day. Nurture your rest and sleep habits (see p120). Relaxation techniques, meditation, and good, sound sleep are building blocks that add to the foundation of health. Finally, never forget that you choose your attitude. A positive attitude rises to the challenge
Be proactive in balancing healthy nutrition, activity, and rest.
Select fresh seasonal foods. Divide your plate in two. Fill one half of it with fruits or vegetables. Then split the other half between a protein and a serving of starch.
Balance work with play. Find a hobby and your funny bone. Cherish family and friends. Get outdoors. Take time to rest and recharge.
Protect and nurture a positive outlook. See how it helps you deal with life’s challenges and “failed experiments.”
The perfect hobby presents a challenge and gives an
opportunity for mastery outside your regular routine.
Taking your stretching to another level, perhaps by joining
a yoga class, will challenge you to go farther and find your
inner grace and balance. You might be surprised by what
you achieve when you “go for it.”
of discouragement and changing circumstances, Aggressively preserve your positive outlook; seek out positive people. And acknowledge the big picture of life, with its cycle of peaks and valleys.
adding quality to your life
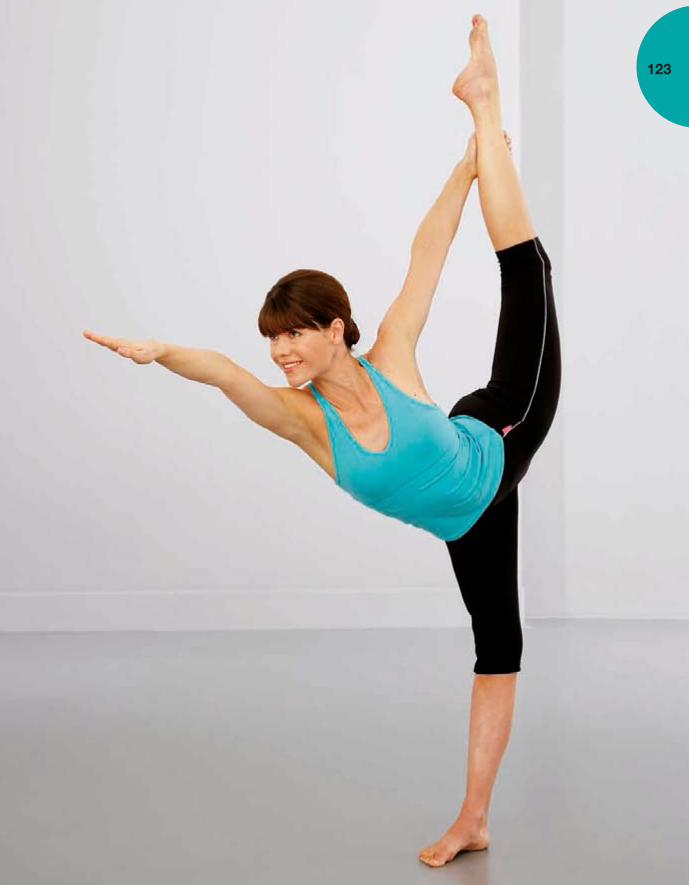
US_122-123_AD442.indd 123 19/2/09 09:06:54
123

US_124-125_AD442.indd 124 24/2/09 14:35:21
124 useful resources
Taking a proactive stance toward your health care will pay off royally.
A comprehensive program of health care entails first getting your own
team of health-care practitioners together, as well as organizing your
own health-care strategy for healthy living.
Stretching comes under several categories and can be integrated into other programs such as fitness, Pilates, physiotherapy, yoga, and dance. Here are some resources to get you started.
Fitness
American Council on ExerciseAceFitness.orgThe American Council on Exercise® is a nonprofit organization committed to enriching quality of life through safe and effective exercise and physical activity. As America’s Authority on Fitness, ACE protects the public by setting certification and continuing education standards for fitness professionals.
American College of Sports Medicineacsm.orgACSM is devoted to public awareness and education about the benefits of physical activity for people of all ages, from all occupations.
Pilates
Pilates Method Alliancepilatesmethodalliance.orgThe Pilates Method Alliance (PMA) is the international not-for-profit professional association for the Pilates method. The PMA’s mission is to protect the public by establishing certification and continuing education standards for Pilates professionals.
Yoga
Iyengar Yoga Associationiyengar-yoga.comThe Iyengar method of yoga is initially learned through the in-depth study of asanas (posture) and pranayama (breath control). Mr. Iyengar has systematized over 200 classical yoga asanas and 14 different types of pranayamas. These have been structured and categorized so as to allow a beginner to progress surely and safely from basic postures to the most advanced as they gain flexibility, strength, and sensitivity in mind, body, and spirit.
Ashtanga Yoga Institutekpjayi.orgAshtanga Yoga is an ancient system of yoga that was taught by Vamana Rishi in the Yoga Korunta. This text was imparted to Sri T. Krishnamacharya in the early 1900s by his guru Rama Mohan Brahmachari, and was later passed down to Pattabhi Jois.
Anusara Yogaanusara.com.Anusara (a-nu-sar-a), means “flowing with grace,” “going with the flow,” “following your heart.” Founded by John Friend in 1997, Anusara Yoga is a powerful hatha yoga system that unifies a Tantric philosophy of Intrinsic Goodness with Universal Principles of Alignment™.
Physical therapy
apta.orgThe American Physical Therapy Association (APTA) is a national professional organization representing more than 72,000 members. Its goal is to foster

US_124-125_AD442.indd 125 16/2/09 23:33:19
125advancements in physical therapy practice, research, and education. Look for its “Find a PT” section to help you find a PT in your area.
Nutrition
nutridiary.comThis free online food and exercise diary will help you analyze and chart your diet and activity level so that you can attain your diet goals. Whether you want to maintain, lose, or gain weight, having a goal and keeping track is a great motivator to stick with a healthy eating and exercise program.
drclydewilson.comDr. Clyde Wilson is a former Stanford University instructor and runs the Sports Medicine Institute in Palo Alto, California. He is an expert in human performance, and his website offers free downloads on optimal nutrition for general health as well as athletic nutrition.
Exercise for postural problems
The following useful DVDs are published by Suzanne Martin’s company Pilates Therapeutics LLC (pilatestherapeutics.com).
Pilates Therapeutics® The Upper Core: Exercises for a Pain-Free Life (2002)This DVD was developed to respond to the prevalence of repetitive stress injuries of the
shoulders, arms, and hands that have accompanied our increased use of computers.
Pilates Therapeutics® The Pelvic Core: More Exercise for a Pain-Free Life (2002) This DVD focuses on 24 balancing exercises to help low back and pelvic pain, knee problems, and post-pregnancy restoration.
Pilates Therapeutics® The Scoliosis Management SeriesScoliosis Series Part 1: Management & Improvement featuring Wall Springs (2006)Part 1 is designed to help persons who have scoliosis, or abnormal curvature of the spine.
Scoliosis Series Part 2: Breathing Exercises as Part of Scoliosis Management (2007)Part 2 continues the concepts for managing scoliosis from Part 1, but focuses on breathing for long-term management.
Other DVDs by Suzanne Martin
Pilates Therapeutics® A Step-Wise Approach to Post-Natal Restoration (2007)This DVD is designed to be of use to any woman who has given birth in the last 18 months or will give birth.
Pilates Therapeutics® Breast Cancer Survivor’s Guide to Physical Restoration (2007)This DVD is for women who have
had or will have surgeries related to breast cancer treatment.
Other publications by Suzanne Martin
Stretching (Dorling Kindersley 2005)A best-seller, Stretching is a comprehensive guidebook. Starting with a full-body catalog of stretches, Stretching helps beginners as well as advanced stretchers to find the appropriate routine for individual needs. Sections include a 3-week postural program, how to begin stretching, stretches for everyday activities and sports, as well as therapeutic stretches for arms, and the low back.
Don’t miss out on the award-winning Stretching Card Deck created from the original 2005 edition.
15 Minute Better Back Workout (Dorling Kindersley 2008)Better Back has four 15-minute workouts based on the Pilates Method. Each section has 12 exercises that are explained in detail with photography and text as well as demonstrated on an included DVD. Each section consists of a warm-up, and specific abdominal and back exercises.
To contact Suzanne Martintotalbodydevelopment.com

US_126-127_AD442.indd 126 24/2/09 14:35:51
126 index
A advancing frogs 78, 89 alligator/cat 30, 41 angel flight stretch 81, 89 arabesque, pigeon 104 arms arm fans 31 elbow circles 23 hand pull 22, 40 “X” model 12, 13 B baby rocks 49 baby rolls 71 back breath and ripple stretch 11 flexibility 15 grounding 92 low-back curve 17 stretching 11 balance 12 balance point stretch 51 posture stretch 44 biomechanics 12 breath and ripple effect, stretching spine 11 breathing breathing into tight body areas 20 relaxation techniques 121 rib breath 24, 40 brushing hair 118 butterfly stretch 94 C “C” stretch 48, 64 cat alligator/cat 30, 41 kneeling cat 100, 113 seated cat 27 changing exercises 116–17
circling motions 20 cobbler stretch 68–9, 72 cobra, modified 32, 41 connections, muscles 12–13 connective tissue 10 contract-relax technique 120, 121 coordination 10, 12 strength stretches 92–3 cross-leg twist, seated 28 D deep squat 98, 112 diaphragm 40 breathing exercises 121 diet 122 dizziness 112 Eelbow circles 23 elongations 46, 64 equipment see propseveryday life, stretches in 118–19 F fascia, stretching 10, 11 figure 4 stretch 76 fish stretch 102, 113 flat back squat 96, 112 flexibility 14–15, 66–89 fouetté stretch 75, 89 frogs, advancing 78, 89 front body opener 53, 65 G gravity, effects on posture 14, 44 grounding 92
H hair, brushing 118
hamstrings flexibility 68 lying hamstring stretch 77, 89 hand pull 22, 40 hanging stretch 56, 65 head neck exercises 112 posture 14 “X” model 12, 13 hips, flexibility 15 hurdler lat stretch 50 I imagery cues 16–17 inner unit 12, 13 J joints loosening and circling motions 20 posture 44 reciprocal stretching 10 K kneeling positions 45, 65 kneeling cat 100, 113 kneeling side stretch 101 knees discomfort 116, 117 flexibility 68 knee pumps 70, 88 L lat stretch, hurdler 50 lateral system 12, 13 legs flexibility 68 fouetté stretch 75, 89 grounding 92 knee pumps 70, 88 lying hamstring stretch 77, 89

US_126-127_AD442.indd 127 16/2/09 23:34:00
127 the split 105, 113 thigh lunge 103 thigh sweep 74, 88 using props 117 “X” model 12, 13 lift and bow 26, 41 loosening motions 20 lunges lunge opener 54 pull-the-thread lunge 80 thigh lunge 103 lying hamstring stretch 77, 89 M metabolism 122 modified cobra 32, 41 modifying exercises 116–17 moving stretches 10 muscles connections 12–13 contract-relax technique 120, 121 inner unit 12, 13 reciprocal stretching 10 N neck stretch 99, 112 “neck diaphragm” 92 O office stretches 119 P pain 116, 117 “pelvic diaphragm” 92 pigeon arabesque 104 posture 14, 42–65 precision 12 props flexibility exercises 68 protecting knees 116, 117 sitting positions 116, 117 strength stretches 92 pull-the-thread lunge 80
Q quad stretch 73, 88 R re-coordination stretches 10 reciprocal stretching 10 reflex, “righting” 20 relaxation 120–21 rest 121 rib breath 24, 40 “righting” reflex 20 rocks, baby 49 rolls, baby 71 round back squat 55 S sciatic nerves 68, 88 seated cat 27 seated cross-leg twist 28 shoulders shoulder ovals 33, 41 shoulder wedge 29 side reach 25, 40 side stretch, kneeling 101 sidelying waist stretch 52, 65 sitting positions office stretches 119 physical boundaries 20–21 posture 14 props 116, 117 sleep 121, 122 smile lines, imagery cues 16 spine breath and ripple stretch 11 flexibility 15 grounding 92 low-back curve 17 stretching 11 the split 105, 113 squatting 45 deep squat 98, 112 flat back squat 96, 112 round back squat 55 wide squat twist 97, 112 stabilizing body 20
standing posture 14 stiffness 14 straddle 79 “strain zone” 117 strength stretch 90–113 stress 120–21 swimming-pool water, imagery cues 16 symmetry 12 T thigh lunge 103 thigh sweep 74, 88 top-to-toe stretch 57 torso 11 twists office stretches 119 seated cross-leg twist 28 wide squat twist 97, 112 U upper side bend 95 upside-down exercises, dizziness 112 W waist stretch, sidelying 52, 65 wake up the stretch 18–41 water, imagery cues 16 work office stretches 119 work-life balance 122 “W’s” 47, 64 X “X” model 12, 13

US_128_AD442.indd 128 24/2/09 14:36:11
128 acknowledgmentsAuthor’s Acknowledgments So many thanks to all my teachers, mentors, clients, and students who challenged me to break a movement down into its essence so that I can now pass it on to you. Thanks to my scoliosis and injuries that forced me to find ways to help myself and then to help others. Thanks to DK for being willing to include many concepts and unusual images in this book and to communicate them around the world. A special thanks to Hilary Mandleberg, Jenny Latham, Mary-Clare Jerram, Miranda Fenton, Helen McTeer, Ruth Jenkinson, and Anne Fisher and Susan Downing for their patience, and for working so hard to help me realize my dreams.
Suzanne is a doctor of physical therapy and a gold-certified Pilates expert. A former dancer, she is a Master trainer certified by the American Council on Exercise. She is published in Dance Magazine, Dance Studio Life, Dorling Kindersley, and the Journal of Dance Medicine and Science, among others. She is also well known within the world of
Publisher’s AcknowledgmentsDorling Kindersley thanks photographer Ruth Jenkinson and her assistant Carly Churchill; Viv Riley at Touch Studios; the models Sam Magee and Tara Lee; Rachel Jones for the hair and makeup; sweatyBetty for the loan of exercise clothing; Peter Kirkham for proofreading, and Hilary Bird for the index.
about Suzanne MartinPilates, dance, and physical therapy. Suzanne is the lead physical therapist for the Smuin Ballet in San Francisco and maintains a private practice, Total Body Development, in Alameda, California.
For more information, check her websitewww.totalbodydevelopment.com