13630DHV Cricket Coaching Manual V3 - Discovery · Junior cricket coaching manual P r of e s or Tim...
84
Primary school coaching manual
Transcript of 13630DHV Cricket Coaching Manual V3 - Discovery · Junior cricket coaching manual P r of e s or Tim...
Primaryschool
coaching manual

2 | Discovery Vitality 2 | Discovery Vitality
3Introduc onThe purpose of the Junior cricket coaching manual
4Understanding the gameThe aim of cricketSafety
5Planning your prac cePrac ce and dura onPu ng the prac ce together
6Warm-up ac vi esSuitable warm-up ac vi es for cricket
11Skills development and trainingA detailed descrip on of the skills required for the game
Ac vi esA list and explana on of ac vi es that can be used to develop these skills
39
57The Warm-downTips on how to warm down
57Evalua onA checklist you can use to evaluate your players’ skills and abili es
77Glossary of termsA list of important cricket terms.
65Appendix: Rules, posi ons and equipmentA summary of the rules, posi ons and equipment used in cricket
coaching manual contents
A CATHSSETA-accredited training provider. 613/P/000126/2008
3Discovery Vitality | 3Discovery Vitality |
Many factors in modern society have resulted in children and adults becoming increasingly inac ve and this has had an alarming eff ect on their health. Regular physical ac vity plays an important role in the preven on and treatment of many lifestyle-related diseases such as coronary artery disease, strokes and type 2 diabetes (non-insulin dependent diabetes). Sports are a great way to encourage children to get more physically ac ve and healthy, and that’s why Discovery Vitality has developed a series of sports manuals for primary schools in South Africa.
The purpose of the Junior cricket coaching manualThis manual provides teachers and coaches with relevant informa on on how to coach cricket so that children get the maximum benefi ts from playing the sport – ge ng physically ac ve, healthy and fi t. The focus of the manual is on developing the basic skills needed for juniors (up to the age of 12) to become competent cricket players. The main focus is on providing exercises and drills to help you plan your prac ce and develop skills, rather than to give a comprehensive framework of the rules and tac cs of the game. Professor Tim Noakes of the Sports Science Ins tute of South Africa has a dream to make South African children the fi est in the world by 2020. He believes that through ini a ves like the Vitality Schools Programme we can reach this goal. You too can play a part in making this vision a reality!
Introduce your learners to the exci ng game of cricketCricket is a very popular sport that appeals to children of all shapes and sizes. It involves running, ba ng, fi elding and bowling and other movements that build fi tness of the heart and lungs. It also s mulates balanced muscular development for growing bodies.
Introduc onJunior cricketcoaching manual
Professor Tim Noakes
We wish to change our na on’s children by ins lling in them the desire to be more ac ve, not just now but for all their lives. We aim to achieve this by teaching each child a competence in and passion for at least one sport. This we will do by building a sports coaching culture for our children ...
Vitality HealthStyle (Pty) Ltd, registra on number: 1999/007736/07, trading as Discovery Vitality. An authorised fi nancial services provider.

4 | Discovery Vitality
The aim of cricketThe aim of cricket is to score more runs than the opposing team, or to bowl out the opposing team before it reaches the target of runs set by your team. Two teams of 11 players take turns to bat and bowl. The players that are ba ng try to score as many runs as they can by hi ng the ball around an oval fi eld. The other team must get them out by bowling the ball overarm at the stumps at either end of a 22-yard (20,12 m) area called a pitch. The bowling team can get the batsmen out by dismissing them in several diff erent ways (see pages 68 - 69). Once the ba ng team has reached the end of its innings, the side that was bowling will come in to bat and the side that was ba ng will fi eld and bowl.Refer to page 77 for a defi ni on of cricket terms used in this manual.
SafetyCricket is a game where a hard ball is thrown at a person at a high speed, so there is a risk of injury. Nevertheless, this risk is greatly reduced if the coach and players take proper safety measures. Here are some precau ons you can take to ensure your players’ safety: Warm up: Sprains, which are one of the most common forms of cricket injuries, can be prevented by adequately warming up before a game. Refer to page 6 for a list of warm-up ac vi es to prepare players for games.Another important piece of equipment is a fi rst-aid kit, which should always be at hand when a game is in play. If players get injured, make sure that they receive the correct treatment before they return to the fi eld. The fi eld: Injuries in cricket can also be prevented by checking the fi eld of play for any hazards such as broken glass, nails and other sharp objects.Heat: In hot condi ons the body can lose 2–3 l of fl uid through perspira on in an hour. A game of cricket can go on for several hours, so it is important to make sure that you have adequate supplies of water available for players. Also ensure that players wear hats and that they use sunblock.
Understanding the game
5Discovery Vitality |
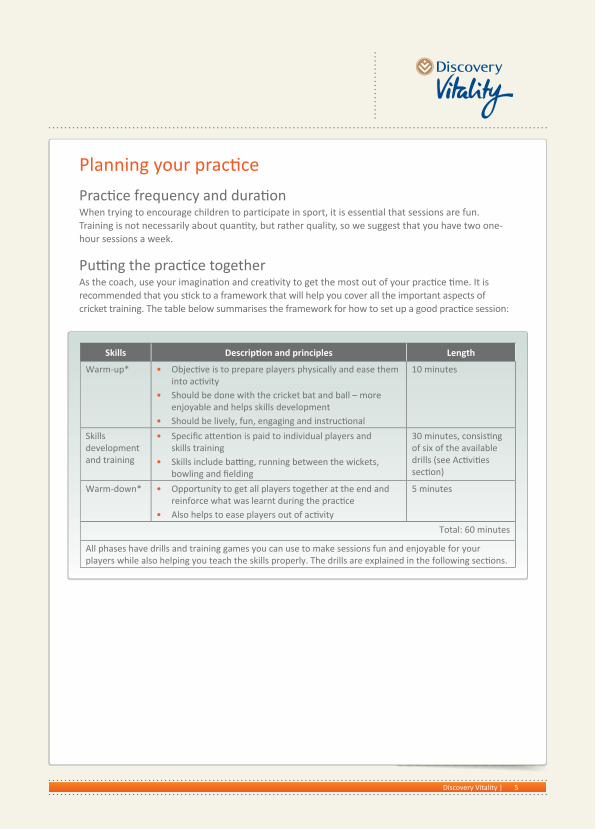
Prac ce frequency and dura onWhen trying to encourage children to par cipate in sport, it is essen al that sessions are fun. Training is not necessarily about quan ty, but rather quality, so we suggest that you have two one-hour sessions a week.
Pu ng the prac ce togetherAs the coach, use your imagina on and crea vity to get the most out of your prac ce me. It is recommended that you s ck to a framework that will help you cover all the important aspects of cricket training. The table below summarises the framework for how to set up a good prac ce session:
Planning your prac ce
Skills Descrip on and principles Length
Warm-up* • Objec ve is to prepare players physically and ease them into ac vity
• Should be done with the cricket bat and ball – more enjoyable and helps skills development
• Should be lively, fun, engaging and instruc onal
10 minutes
Skills development and training
• Specifi c a en on is paid to individual players and skills training
• Skills include ba ng, running between the wickets, bowling and fi elding
30 minutes, consis ng of six of the available drills (see Ac vi es sec on)
Warm-down* • Opportunity to get all players together at the end and reinforce what was learnt during the prac ce
• Also helps to ease players out of ac vity
5 minutes
Total: 60 minutes
All phases have drills and training games you can use to make sessions fun and enjoyable for your players while also helping you teach the skills properly. The drills are explained in the following sec ons.
6 | Discovery Vitality
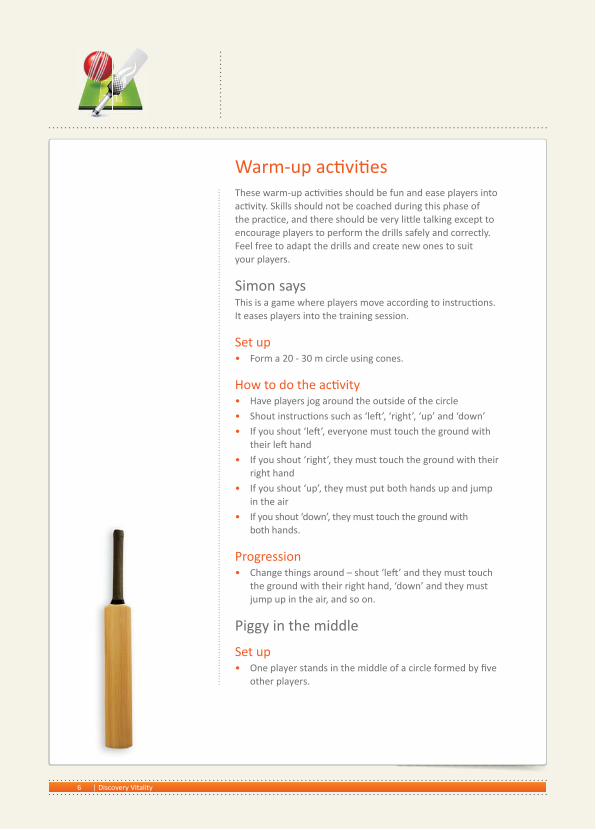
These warm-up ac vi es should be fun and ease players into ac vity. Skills should not be coached during this phase of the prac ce, and there should be very li le talking except to encourage players to perform the drills safely and correctly. Feel free to adapt the drills and create new ones to suit your players.
Simon saysThis is a game where players move according to instruc ons. It eases players into the training session.
Set up• Form a 20 - 30 m circle using cones.
How to do the ac vity• Have players jog around the outside of the circle• Shout instruc ons such as ‘le ’, ‘right’, ‘up’ and ‘down’• If you shout ‘le ’, everyone must touch the ground with their le hand• If you shout ‘right’, they must touch the ground with their right hand• If you shout ‘up’, they must put both hands up and jump in the air• If you shout ‘down’, they must touch the ground with both hands.
Progression• Change things around – shout ‘le ’ and they must touch
the ground with their right hand, ‘down’ and they must jump up in the air, and so on.
Piggy in the middle
Set up• One player stands in the middle of a circle formed by fi ve
other players.
Warm-up ac vi es
7Discovery Vitality |
How to do the ac vity• One of the players forming the circle throws a ball to the player in the middle• The player in the middle catches the ball and throws it to the next player. This next player then
throws the ball back to the player in the middle, who then throws it to the following player• The drill con nues un l 10 catches have been completed by each of the players forming the circle.
Progression• Start off using tennis or slaz balls to build players’ confi dence and then progress to a hard ball.
Ball-passing
Set up• Players stand in a circle.
How to do the ac vity• A ball is passed clockwise around the circle• When the coach shouts ‘change’, players start passing the ball an -clockwise.
Progression• To make the game more diffi cult, introduce at least three diff erent kinds of balls, such as soccer,
rugby, cricket and/or tennis balls
• When players are more confi dent at passing and catching, introduce a golf ball.
Posi ons in the diagrams that follow:F = Fielder B = Batsman WK = Wicket-keeper C = Coach.
8 | Discovery Vitality
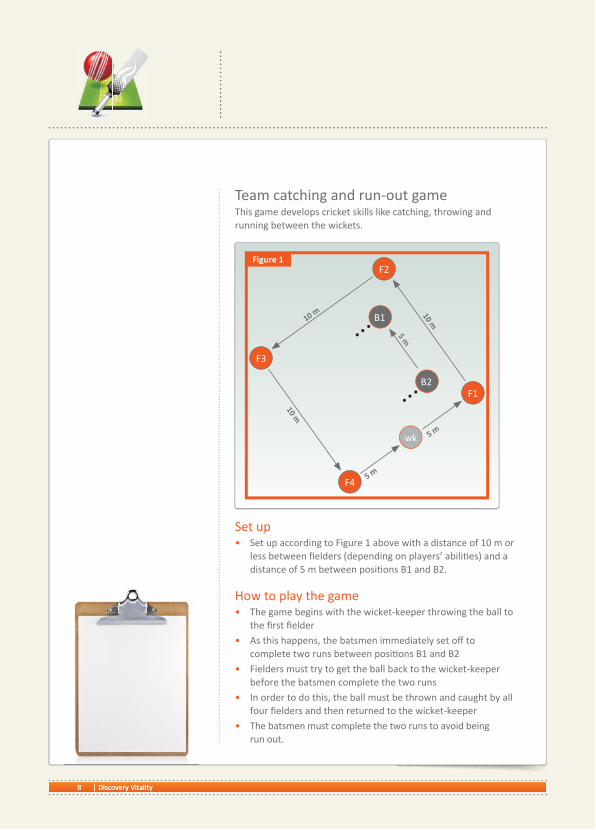
Team catching and run-out gameThis game develops cricket skills like catching, throwing and running between the wickets.
Set up• Set up according to Figure 1 above with a distance of 10 m or
less between fi elders (depending on players’ abili es) and a distance of 5 m between posi ons B1 and B2.
How to play the game• The game begins with the wicket-keeper throwing the ball to
the fi rst fi elder• As this happens, the batsmen immediately set off to
complete two runs between posi ons B1 and B2• Fielders must try to get the ball back to the wicket-keeper
before the batsmen complete the two runs• In order to do this, the ball must be thrown and caught by all
four fi elders and then returned to the wicket-keeper• The batsmen must complete the two runs to avoid being
run out.
8 | Discovery Vitality
Figure 1
wk
10 m
10 m
10 m
5 m
5 m
5 m
F2
F3
F1
F4
B2
B1
9Discovery Vitality |
Progression• Instead of throwing and catching, players can use rolling and ground-fi elding so that the game
con nues non-stop un l the batsmen are run out• Adjust the length of the pitch so that there is a close race between the ball and the batsman.
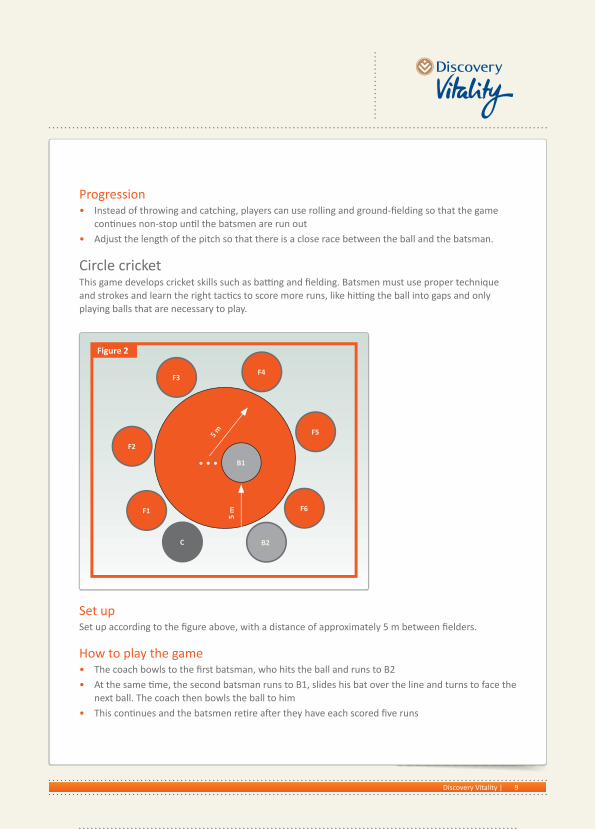
Circle cricket This game develops cricket skills such as ba ng and fi elding. Batsmen must use proper technique and strokes and learn the right tac cs to score more runs, like hi ng the ball into gaps and only playing balls that are necessary to play.
Set upSet up according to the fi gure above, with a distance of approximately 5 m between fi elders.
How to play the game• The coach bowls to the fi rst batsman, who hits the ball and runs to B2 • At the same me, the second batsman runs to B1, slides his bat over the line and turns to face the
next ball. The coach then bowls the ball to him • This con nues and the batsmen re re a er they have each scored fi ve runs
5 m
5 m
B1
B2
F6
F5
F4F3
F2
F1
C
Figure 2

10 | Discovery Vitality
• The fi elders must limit the number of runs scored by an cipa ng where the batsman will hit the ball
• If the fi elder catches the ball without a bounce a er it is hit, the batsman is out
• Fielders must a empt to run out the batsman by returning the ball quickly to the in-fi elders or by trying to hit the stumps directly
• Fielders can surround the batsman, but they must keep out of the 5 m circle (see Figure 2)
• If a batsman is run out, the next player comes in to bat.
Progression• Increase the number of runs the batsman can get before having to re re• Increase/decrease the number of fi elders, the size of the
circle and the running area so that there is a close race between the ball and the batsman.

11Discovery Vitality |
Skills development and training should be the focus of your prac ce sessions so that the basic skills of cricket can be taught. The aim with young players is to spend about 70% of the me focusing on skills development and only 30% on compe on. This way, drills are fun and s mula ng and not too compe ve. It is important that players don’t wait in lines where they get bored – you should have a ‘no queue’ policy during your prac ces! Make it a priority to teach the skills on both the le and right sides so that players become equally capable on each side. Remember to get crea ve.
A ributes of a good playerA good cricket player has a ributes that include:
Cricket skills Skills for cricket include ba ng, bowling and fi elding.
Ba ng skills include: • Good balance• Hand-eye coordina on• An cipa on.
Bowling skills include: • A good run-up, which involves: - Equal stride pa ern - Up and down arm movements• Gather (see page 25)• Strong legs to absorb back-foot and front-foot impact• High release• Forward momentum and follow-through • Good aim.
Fielding skills include:
Skills development and training
• Speed• Strength• Power• Hand-eye coordina on
• Balance• Agility• Flexibility• Endurance.
• Speed• Agility• Good depth percep on
• Strong arm• Good judgement• An cipa on and reac on.

12 | Discovery Vitality 12 | Discovery Vitality
Cricket skills
Teaching correct technique
Ba ngThe basic technique for ba ng requires the correct grip, stance, step and backswing, and knowing how to play defensive and a acking shots.
GripOne way for a player to obtain the basic recommended grip is to lay the bat down on its face (fl at side) with the handle facing him and then pick it up with both hands close together in the middle of the handle. The Vs, formed between the thumb and index fi nger of each hand, are aligned between the splice and outside edge of the bat. The top hand grips the bat ghtly and the bo om hand is loose.
Figure 3a
Figure 3b

13Discovery Vitality |
StanceYoung cricketers should be advised to adopt a stance which they fi nd most comfortable.
c
Figure 4a
Figure 4c
Figure 4b
Keep eyes level and head s ll
Keep feet parallel and either side of the crease
Keep knees slightly bent
Rest the toe of the bat on the centre guard mark

14 | Discovery Vitality
The following is an explana on of how to teach the correct stance:• The batsman should posi on his head so that it does not aff ect
his balance. It should be upright and in the bowlers’ channel• Eyes should be kept level• Shoulders should be slightly open for be er head posi on• Hands should be posi oned in line with, but slightly away
from, the front pad• Hips should be directed side-on to the bowler• Make sure that the knees are relaxed and slightly bent to
allow for be er movement• Feet should be shoulder-width apart, aligned straight and
parallel to the popping crease • The bat should be kept on the ground behind or in between
the feet • Ensure that weight is on the balls of the feet and evenly
distributed between the right and le legs.
Benefi ts of this stance:• The body is in a posi on that allows for quick and easy
movement, and a more effi cient forwards and backwards mo on
• There is be er balance of the body during the shot• The body is relaxed.
Step and backswing As the bowler runs in, the batsman prepares to strike the ball by taking a step and swinging the bat upward. The following is an explana on of how to teach the step and backswing:• Use the top hand to li the bat up in the direc on of second slip
(for fi elding posi ons, see Figure 41b on page 71) • The top of the backswing is reached when the step is completed• At the top of the backswing the wrists cock (especially the wrist
of the top hand), the bat face opens up to point and the back elbow is relaxed (not tucked in)
14 | Discovery Vitality
15Discovery Vitality |
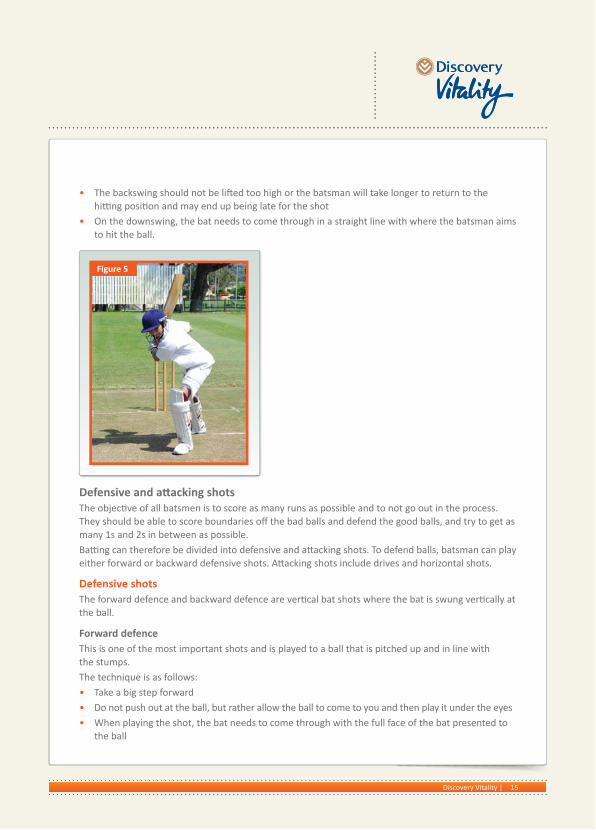
Defensive and a acking shotsThe objec ve of all batsmen is to score as many runs as possible and to not go out in the process. They should be able to score boundaries off the bad balls and defend the good balls, and try to get as many 1s and 2s in between as possible.Ba ng can therefore be divided into defensive and a acking shots. To defend balls, batsman can play either forward or backward defensive shots. A acking shots include drives and horizontal shots.
Defensive shots The forward defence and backward defence are ver cal bat shots where the bat is swung ver cally at the ball.
Forward defenceThis is one of the most important shots and is played to a ball that is pitched up and in line with the stumps. The technique is as follows:• Take a big step forward• Do not push out at the ball, but rather allow the ball to come to you and then play it under the eyes• When playing the shot, the bat needs to come through with the full face of the bat presented to
the ball
• The backswing should not be li ed too high or the batsman will take longer to return to the hi ng posi on and may end up being late for the shot
• On the downswing, the bat needs to come through in a straight line with where the batsman aims to hit the ball.
Figure 5

• The bat should be placed at a downward angle to keep the ball on the ground
• The top hand should be in control when the shot is played• Weight must be over the front foot• The back leg must be straight and the front knee bent• The bat should be next to the pad of the front leg, leaving
no gap• Note the posi on of the back foot in Figure 6b.
16 | Discovery Vitality
Figure 6a Figure 6b
17Discovery Vitality |
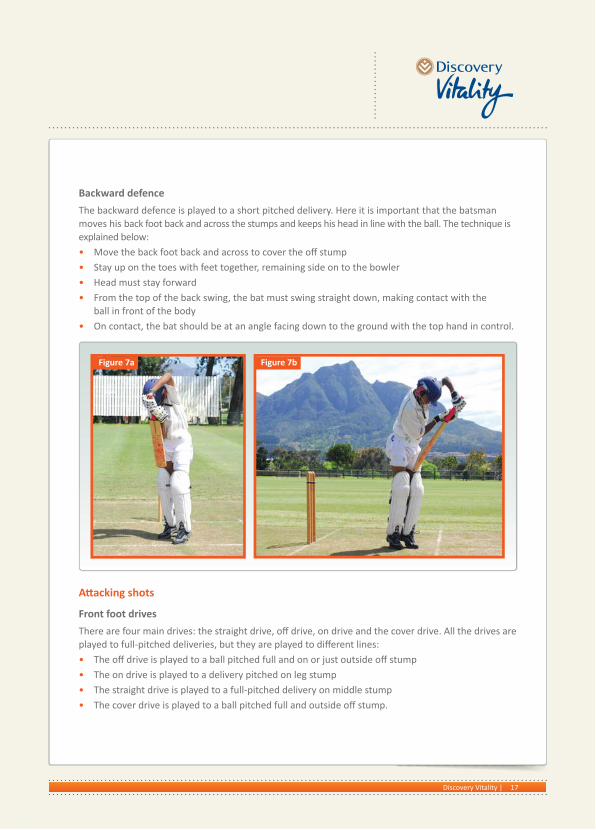
Backward defence
The backward defence is played to a short pitched delivery. Here it is important that the batsman moves his back foot back and across the stumps and keeps his head in line with the ball. The technique is explained below:• Move the back foot back and across to cover the off stump• Stay up on the toes with feet together, remaining side on to the bowler• Head must stay forward• From the top of the back swing, the bat must swing straight down, making contact with the
ball in front of the body• On contact, the bat should be at an angle facing down to the ground with the top hand in control.
A acking shots
Front foot drives
There are four main drives: the straight drive, off drive, on drive and the cover drive. All the drives are played to full-pitched deliveries, but they are played to diff erent lines:• The off drive is played to a ball pitched full and on or just outside off stump• The on drive is played to a delivery pitched on leg stump• The straight drive is played to a full-pitched delivery on middle stump • The cover drive is played to a ball pitched full and outside off stump.
Figure 7a Figure 7b
18 | Discovery Vitality
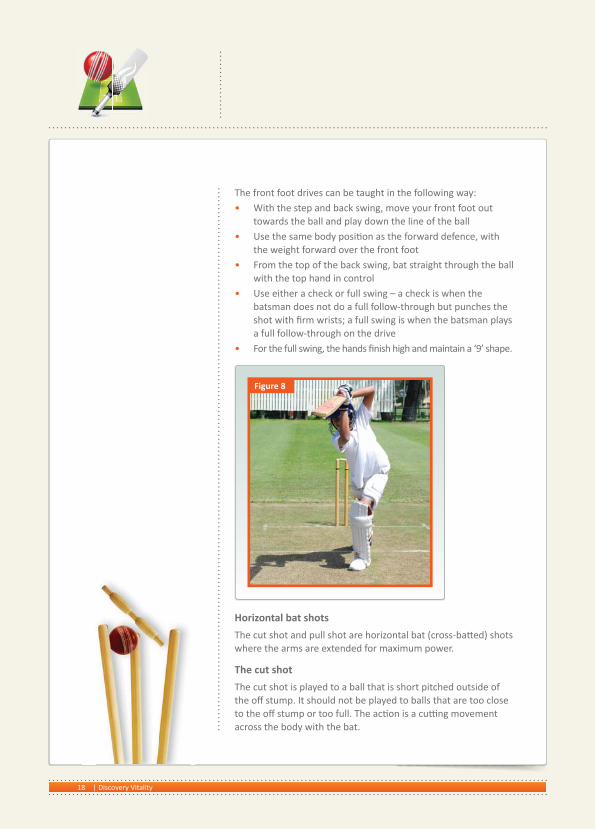
The front foot drives can be taught in the following way:• With the step and back swing, move your front foot out
towards the ball and play down the line of the ball• Use the same body posi on as the forward defence, with
the weight forward over the front foot• From the top of the back swing, bat straight through the ball
with the top hand in control• Use either a check or full swing – a check is when the
batsman does not do a full follow-through but punches the shot with fi rm wrists; a full swing is when the batsman plays a full follow-through on the drive
• For the full swing, the hands fi nish high and maintain a ‘9’ shape.
Horizontal bat shots
The cut shot and pull shot are horizontal bat (cross-ba ed) shots where the arms are extended for maximum power.
The cut shot
The cut shot is played to a ball that is short pitched outside of the off stump. It should not be played to balls that are too close to the off stump or too full. The ac on is a cu ng movement across the body with the bat.
Figure 8

19Discovery Vitality |
It can be taught in the following way:• The step and backswing is back and across the stumps covering off stump, with the head facing
towards point • Keep feet apart and remain on the balls of the feet• Cross-bat full swing of the bat (ie swing the bat horizontally at the ball)• Swing from high to low to keep the ball on the ground so the player doesn’t get caught out • The bat face should be slightly closed at contact and the arms should be fully extended.
Figure 9a Figure 9b

20 | Discovery Vitality
bb
The pull shot
This stroke is an a acking shot and is played to a short-pitched delivery that bounces between waist and chest height on the leg side. This shot is played to a spin bowler or medium pacer. It should not be played to a fast bowler. The technique is as follows:• The step and backswing is back and across the stumps
covering off stump• Weight must stay centred• The head must not move with the feet• Keep feet apart and remain on the balls of the feet• Extend the arms and hit the ball with a full swing of the bat• Swing from high to low to keep the ball on the ground so the
player doesn’t get caught out. It is advised that you do not teach young players to pull through the air, as this is more appropriate for high-school coaching. It is important that young players fi rst learn to pull on the ground through this area (be er players will do this naturally)
• The bat face should be slightly closed at contact and the arms fully extended.
Figure 10
21Discovery Vitality |
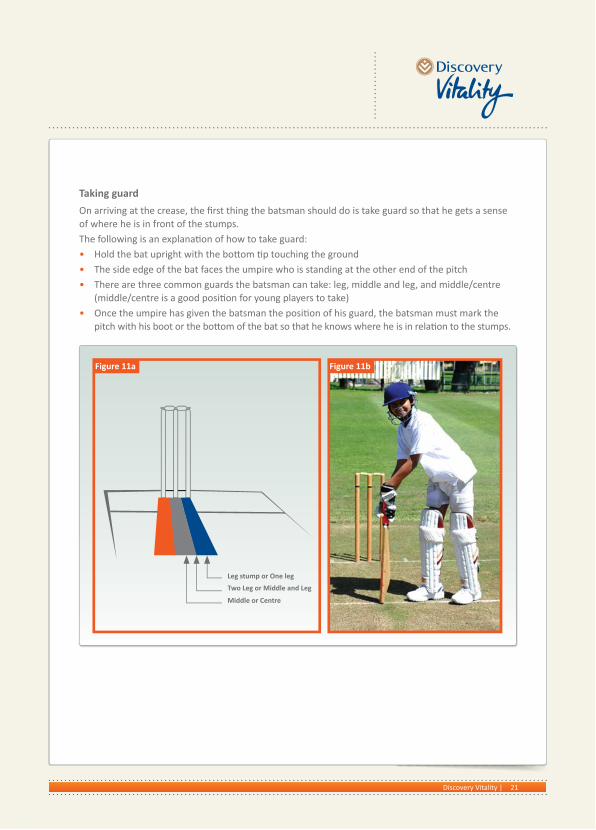
Taking guard
On arriving at the crease, the fi rst thing the batsman should do is take guard so that he gets a sense of where he is in front of the stumps. The following is an explana on of how to take guard:• Hold the bat upright with the bo om p touching the ground• The side edge of the bat faces the umpire who is standing at the other end of the pitch • There are three common guards the batsman can take: leg, middle and leg, and middle/centre
(middle/centre is a good posi on for young players to take)• Once the umpire has given the batsman the posi on of his guard, the batsman must mark the
pitch with his boot or the bo om of the bat so that he knows where he is in rela on to the stumps.
Leg stump or One leg
Two Leg or Middle and Leg
Middle or Centre
Figure 11a Figure 11b

22 | Discovery Vitality
Running between the wickets
Running between the wickets in cricket requires good technique gained through experience, as well as the batsmen’s ability to trust one another’s judgements when making a call for a run. ‘Calling’ and ‘running and turning’ are aspects of running between the wickets that must be considered when coaching this skill.
Calling• Use loud and clear calls: ‘yes’, ‘no’ and ‘wait’• Know who has the responsibility to call. It is the striker’s
responsibility to call if he can see where the ball has gone, whether it is in front of or behind the wicket. The non-striker only calls if the striker cannot see where the ball has gone
• Players need to take responsibility when running to the danger end• Be ready to accept calls• Don’t hesitate.
Running and turning• When the bowler is preparing to bowl, the non-striker must
back up (walk out of the crease as the bowler releases the ball) so that he is ready to run
• If there is no run available, the non-striker must quickly return back to the crease
Figure 12a

23Discovery Vitality |
• Run in straight lines off the centre of the pitch• Carry the bat with both hands whenever possible• Face the fi elder when turning• Get low to increase speed when stopping and turning • Ground the bat, sliding it across the popping crease as the run is completed.
Figure 12b
Figure 12c
Figure 12d

24 | Discovery Vitality
BowlingThe bowling ac on is a smooth and con nuous mo on that begins from the moment the bowler leaves his mark at the start of his run-up, un l he slows down to a stop at the end of his follow-through. For coaching purposes, we have broken it down into the following fundamentals:• Grip• Run-up• Gather/Bound• Back-foot impact• Front-foot impact• Release • Follow-through.
Fast and medium-pace bowlingAt U12 level, the coach should control the number of overs bowled by a player in a prac ce session, as well as a game. For this age group, a limit of two four-over spells is recommended with a break of one hour. Bowlers should not bowl for more than 30 minutes for each prac ce session. This should consist of fi ve minutes of light, reduced-pace bowling, followed by 25 minutes of speed (coach-controlled) bowling.
Grip• The ball is gripped between the fi rst two fi ngers and the thumb • The index and middle fi ngers can be held together, but it is
best to keep them slightly apart • The thumb should be on the seam • The ball should not be too deep in the hand.
Figure 13a Figure 13b

25Discovery Vitality |
Run-up• It is called a run-up! Do exactly that• Make sure feet follow a normal running pa ern• Keep hands above the waist• Keep arms close to the body (not swinging across it)• Lean the body forward.
Gather/BoundThe jump is probably the most important part of the bowling ac on because it sets up the rest of the ac on.• Jump forward• Do not lean back excessively – in fact, rather lean slightly forward• Start with hands below the shoulders and move them gradually higher• Keep the head and body upright.
25Discovery Vitality |
Figure 14a Figure 14b
Figure 15a Figure 15b

Back-foot impact
The alignment of the back foot, hips and shoulders taken at back-foot impact / landing is the most important considera on here. The body could be posi oned side-on, front-on or semi-open to the batsman.
Side-on• Place the back foot parallel to the bowling crease at impact• Align hips and shoulders towards the wickets and 90 degrees to the back foot• Look over the front shoulder• Lean back slightly• The front foot should point forward.
Front-on• The back foot lands poin ng straight down the wicket• Align hips and shoulders towards extra cover and 90 degrees to the back foot• Look inside the front arm.
26 | Discovery Vitality
Figure 16a Figure 16b
Figure 17a Figure 17b
27Discovery Vitality |
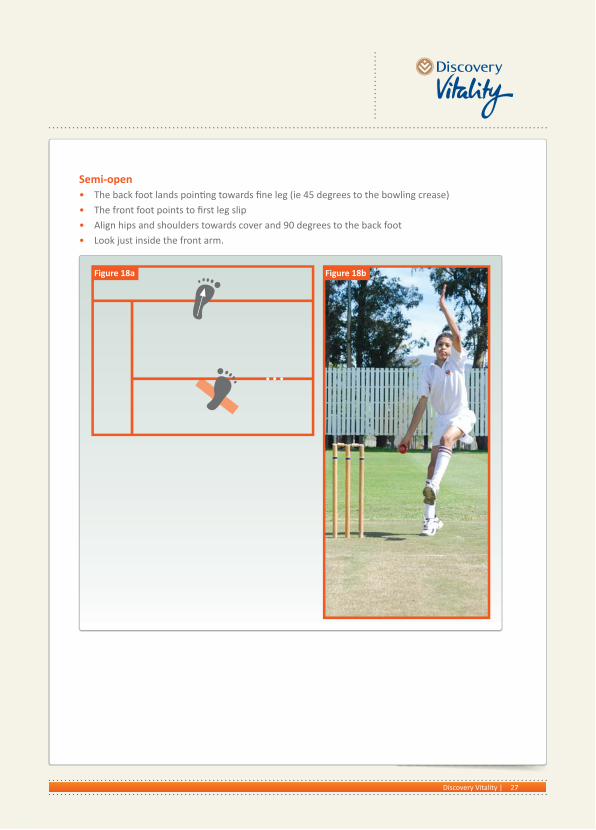
Semi-open• The back foot lands poin ng towards fi ne leg (ie 45 degrees to the bowling crease)• The front foot points to fi rst leg slip• Align hips and shoulders towards cover and 90 degrees to the back foot• Look just inside the front arm.
Figure 18a Figure 18b

28 | Discovery Vitality
Front-foot impact• Brace the front leg to support the rota on of the shoulders• Rotate the shoulders ver cally towards the batsman.
Figure 19a
Figure 19b

29Discovery Vitality |
Release• Release the ball from the highest possible point• Place the wrist in the correct posi on for the desired delivery.
Follow-throughThe follow-through helps to slow the body down, prevent injury and assist in accuracy.• Follow through straight• Make sure that shoulders and arms follow through completely.
Spin bowlingIt is recommended that spin bowlers vary the pace and fl ight of the balls they bowl so that batsmen will struggle to read the delivery. Spin bowlers can be divided into two groups:• Finger spinners – off -spin (the ball bounces and spins into the right-handed batsman)• Wrist spinners – leg spin (the ball bounces and spins away from the right-handed batsman).
Figure 20 Figure 21

Finger spinThe off -break is a type of delivery the fi nger spin bowler bowls most of the me. This can be right arm off spin, which spins the ball into the right-handed batsman, or le arm off spin, called le -arm orthodox and spins the ball away from the right-handed batsmen. The technique is as follows: • The ball is spun by the index fi nger• To generate spin (rota ons) on the ball, rather than simply pu ng the ball out there, the bowler
must be energe c in the delivery • More bounce in ac on• Side-on ac on• Short delivery stride• The pivot (when the back leg and hip drives over the front leg) is caused by the straight back hip
and knee drive, which puts more spin on the ball• Release the ball from a good height.
Wrist spinA right-handed wrist spin is known as the leg spin. This makes the ball spin from right to le on the pitch at the point of delivery. It spins away from the leg-side of the right-handed batsman. A le -handed wrist spin is known as le -arm unorthodox spin bowling and spins sharply towards the leg-side of the right-handed batsman. • The ball is spun by the ring fi nger• Side-on ac on• The jump is key• Long delivery stride• Strong shoulder rota on with hip and knee drive• PEP – power, energy, pivot (when the back leg and hip drives over the front leg).
30 | Discovery Vitality
Figure 22a Figure 22b

31Discovery Vitality |
Bowling lengthsBowling lengths will vary according to the height of the bowler, the speed of bowling and the state of the pitch. The following diagram shows the various lengths a bowler can bowl.
Bouncer
Short pitchedGood length
Full pitchedYorker
Good length
Yorker
Full length
Full toss
Short pitched
Figure 23a
Figure 23b

32 | Discovery Vitality
FieldingA player will probably spend more me fi elding in cricket than ba ng or bowling, so it is important that coaches make this aspect of the game fun and exci ng to learn. Fielding prac ce sessions should always be done at a high intensity and should prepare players for match situa ons.
Skills required for various fi elding posi ons• Specialist slip fi elders need fast reac ons and an acroba c
agility to take catches that may come quickly and from various angles
• Expert cover fi elders need speed and agility to cut off poten al boundary shots and throw the ball fast and accurately over the stumps to the wicket-keeper
• Deep fi elders have good judgement for high catches and a strong throwing arm to return the ball quickly and prevent boundaries
• The wicket-keeper has special skills that are unique within any cricket team. He stands behind the wickets and catches all balls that pass the batsman.
Cut-off playersMost junior players are not able to throw directly from the boundary to the wicket-keeper, so a cut-off player is used. The cut-off player posi ons himself between the player fi elding the ball and the pitch. Once the ball is fi elded, the fi elder throws it to the cut-off player who then throws the ball to the keeper or bowler. This is called a relay throw.
Backing upAnother important point with regards to fi elding is backing up. When a throw comes into a bowler or keeper, the ball might slip past him and miss the stumps. When this happens, in order to prevent more runs from being scored by the batsman, a player should back up behind the bowler or wicket-keeper (ie the player should stand roughly fi ve to 10 metres behind the wicket-keeper or bowler so they can gather in the ball should it go past the stumps and the keeper or bowler).

33Discovery Vitality |
The side of the fi eld the throw is coming from will determine which fi elder will do the backing up. For example, if the ball is hit to the off side and is then thrown to the bowler’s end, the fi elder at mid on should do the backing up behind the bowler. The following ps can be used to teach backing up:• Expect every ball to come to you• Unless you are in a close catching posi on, walk in towards the batsman as the bowler runs in to
bowl• Always back up in case a team mate misses the ball • Keep an eye on the ball at all mes• Release the ball as soon as it is fi elded and return it to the wicket-keeper or bowler• When you are about to throw, line up your feet with the target • Create straight lines • Vision: determine where to throw the ball • Make sure you are comfortable when fi elding• For safety purposes, warm up properly before fi elding (keep the arm healthy) • Maintain speed and accuracy.
Close catchingFor close catches it is very important for fi elders to focus on the game and the ball. They should remain s ll while keeping an eye on the ball as it leaves the bowler’s arms and goes onto the bat. The following is an explana on of how to teach close catches:• Generally, fi ngers should point downwards
with the hands forming a cup shape; however, when the ball is at roughly chest height, it will need to be caught with fi ngers poin ng upwards
• Always use two hands• Keep eyes on the ball• Keep the head s ll with eyes level.
Figure 24
34 | Discovery Vitality
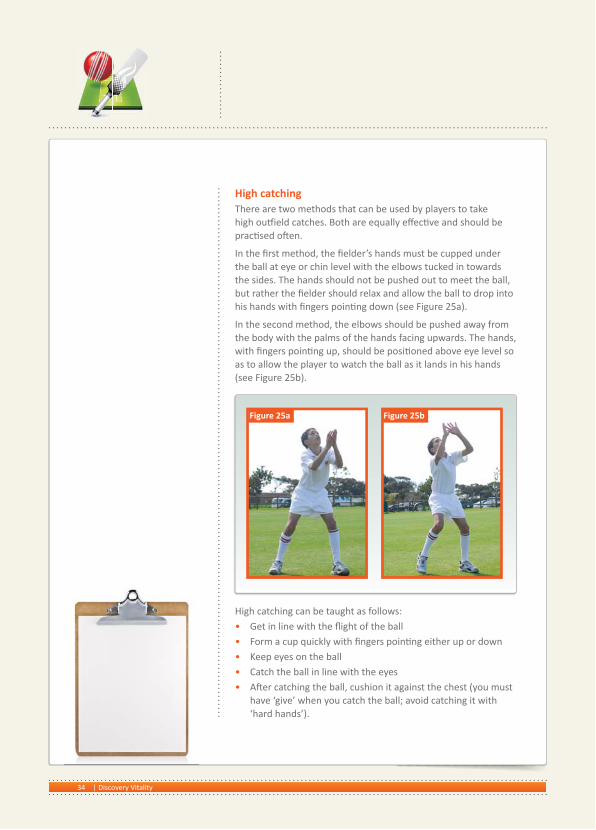
High catchingThere are two methods that can be used by players to take high ou ield catches. Both are equally eff ec ve and should be prac sed o en.
In the fi rst method, the fi elder’s hands must be cupped under the ball at eye or chin level with the elbows tucked in towards the sides. The hands should not be pushed out to meet the ball, but rather the fi elder should relax and allow the ball to drop into his hands with fi ngers poin ng down (see Figure 25a).
In the second method, the elbows should be pushed away from the body with the palms of the hands facing upwards. The hands, with fi ngers poin ng up, should be posi oned above eye level so as to allow the player to watch the ball as it lands in his hands (see Figure 25b).
High catching can be taught as follows:• Get in line with the fl ight of the ball• Form a cup quickly with fi ngers poin ng either up or down• Keep eyes on the ball• Catch the ball in line with the eyes• A er catching the ball, cushion it against the chest (you must
have ‘give’ when you catch the ball; avoid catching it with ‘hard hands’).
Figure 25a Figure 25b
35Discovery Vitality |
Ground fi elding
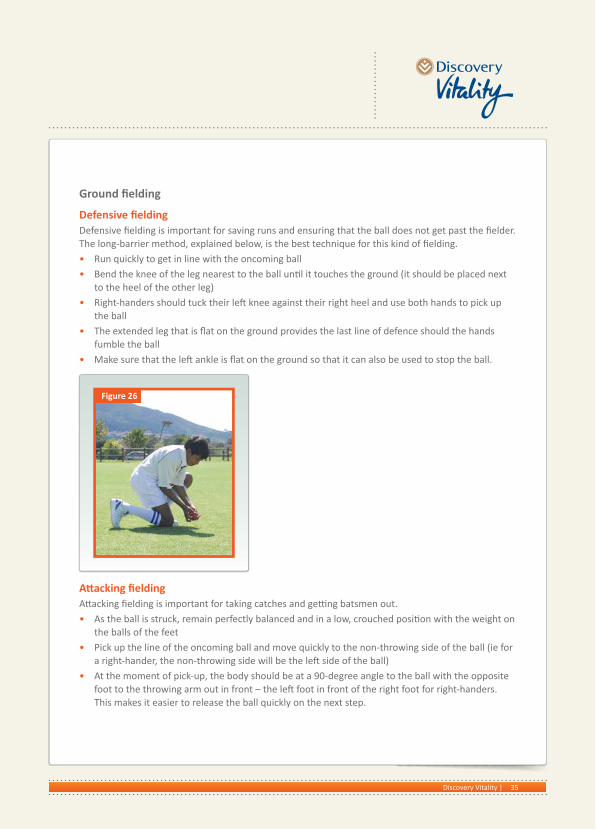
Defensive fi eldingDefensive fi elding is important for saving runs and ensuring that the ball does not get past the fi elder. The long-barrier method, explained below, is the best technique for this kind of fi elding.• Run quickly to get in line with the oncoming ball• Bend the knee of the leg nearest to the ball un l it touches the ground (it should be placed next
to the heel of the other leg)• Right-handers should tuck their le knee against their right heel and use both hands to pick up
the ball• The extended leg that is fl at on the ground provides the last line of defence should the hands
fumble the ball• Make sure that the le ankle is fl at on the ground so that it can also be used to stop the ball.
A acking fi eldingA acking fi elding is important for taking catches and ge ng batsmen out. • As the ball is struck, remain perfectly balanced and in a low, crouched posi on with the weight on
the balls of the feet• Pick up the line of the oncoming ball and move quickly to the non-throwing side of the ball (ie for
a right-hander, the non-throwing side will be the le side of the ball)• At the moment of pick-up, the body should be at a 90-degree angle to the ball with the opposite
foot to the throwing arm out in front – the le foot in front of the right foot for right-handers. This makes it easier to release the ball quickly on the next step.
Figure 26

36 | Discovery Vitality
Throwing• The fi elder picks up the ball just in front of the right foot,
with the le leg out in front and the non-throwing arm outstretched at shoulder level poin ng towards the target
• The body weight should be transferred from the back foot to the front foot as the throw is completed
• The throw should be aimed at the wicket-keeper’s gloves and should not bounce before it reaches him.
Underarm throwThis type of throw is used for posi ons close to the bowler or wicket-keeper. • Keep an eye on the ball and stay in a low body posi on• Feet should point in the direc on of the throw• The foot on the side of the throwing arm should be forward
(the right foot for right-handers)• Release the ball in the direc on of the stumps, extending
arm and hand out towards the target while maintaining a low body posi on
• There should only be a very slight backswing in the release.
Overarm throwThis type of throw is used for posi ons further away from the bowler or wicket-keeper (ie posi ons on the ou ield). • The ball will come in fast, so you need to get into a posi on
that allows for fast movements in all direc ons. The best posi on to get into when expec ng the ball is the split step
• The forearm of the throwing arm should be set up at 90 degrees to the upper arm and shoulder
• The palm of the hand must be facing away and the ball gripped across the seam
• The arm should be on a ver cal plane at release (ver cal release) • Create straight lines to target • Vision: look at where you intend to throw the ball • Maintain balance • Don’t rush or arms will drop.

37Discovery Vitality |
Wicket-keepingThe wicket-keeper is probably the most important fi elder in cricket. This player makes the fi elding team look dy by moving quickly to the stumps and catching the ball cleanly. He plays a crucial role for running out batsman, and is also in an ideal posi on to guide bowlers as to the strengths and weaknesses of batsmen.Wicket-keepers have to apply all the diff erent aspects required in fi elding (fi tness, agility and an cipa on). They must also maintain a high level of concentra on, enthusiasm and posi oning.
Posi oningThe wicket-keeper should posi on himself so that he has a clear view of the ball and can take it at about waist height. The ball should not bounce in front of the keeper before he catches it. If this does happen, it is because he is standing too far back and needs to move slightly forward.
Standing back and standing upWhen the wicket-keeper is standing back, he is posi oned further back from the stumps ready for balls from fast and medium-pace bowlers. Standing up, on the other hand, is when the wicket-keeper is right up close to the stumps, in a good posi on for stumping. If the wicket-keeper is highly skilled, he will adopt this posi on for balls from spinners or even medium-pace bowlers.
Figure 27a Figure 27cFigure 27b

38 | Discovery Vitality
Standing back
Stance:• Stay slightly crouched • Keep feet about shoulder-width apart • Posi on body to the off side of the batsman• Keep weight on the balls of the feet • Make sure that hands are relaxed.
Figure 28a Figure 28b
Taking the ball when standing back:• Keep the head and body behind the line of
the ball • Keep the hands low• The body rises with the bounce of the ball • Fingers point in a downward direc on • The keeper watches the ball into his hands
and takes the ball on the inside of the hip.
Standing up
Stance:• Stay crouched but comfortable • Posi on body slightly to the off side of
the batsman • Keep weight on the balls of the feet • Hands should be relaxed.
Figure 29
39Discovery Vitality |
Glove workAnother important aspect of wicket-keeping is glove work, which helps the wicket-keeper to make a clean catch of the ball. When catching the ball, the wicket-keeper should posi on his gloves either towards the ground, the sky or to the side, depending on the height and direc on of the delivery. In order to do this, the keeper needs to stay alert and keep his eyes on the ball right from the moment the ball leaves the bowler’s arms.
All the ac vi es can be used to help you design prac ces for your team. See the diagrams for more instruc on on how to teach each ac vity. As you grow in experience and knowledge, you’ll be able to modify some of these ac vi es and make them more challenging and exci ng for players. Pay very close a en on to the proper technique for each ac vity.
Ac vity summary The table below shows all the ac vi es explained in the following sec on, indica ng which skills can be taught using each ac vity.
Ac vi es
Skills Ba ng Bowling Fielding
Drill le er and name Basic technique
Basic cricket strokes
Running between the wickets
Basic technique
Basic technique
Wicket-keeping
A. Running relays PB. Running on the pitch P PC. Balance PD. Front-foot driving PE. Back-foot defence PF. The cut shot P PG. The pull shot P PH. The hook shot P PI. Rock and bowl PJ. Gather and explode PK. Pulling down P

40 | Discovery Vitality
Skills Ba ng Bowling Fielding
Drill le er and name Basic technique
Basic cricket strokes
Running between the wickets
Basic technique
Basic technique
Wicket-keeping
L. Walk and bowl PM. Run up and bowl PN. Mul ple ball throws P PO. Piggy in the middle PP. High catches P PQ. Ground fi elding PR. Field and underarm
throwP
S. Sprint off PT. High balls PU. Off side and leg side
takesP
V. Pairs cricket P P P P P P
Posi ons in the diagrams for the ac vi es:
F = Fielders
B = Batsman
WK = Wicket-keeper
C = Coach
T = Thrower
= Stump
= Cone
= Player.

41Discovery Vitality |
10 m
Run 2 singles
Ba ng
Running relaysA
Figure 30
Set up• Divide players into two equal groups and have them line up one behind the other in their
groups, as shown in Figure 30 below• Set up a cone 10 m away from each group• The players will need to carry their cricket bats for this ac vity.
How to do the ac vity• When the coach blows the whistle, the players at the front of the line must run to the
cone opposite their group and then back again• All players should complete two singles facing a par cular direc on (off or leg side) • Once the fi rst player has completed his two singles, the next one begins• The team that completes this the quickest, wins• Encourage players to swap the bat between the le and right hand while running so
they can get into posi on to face the next ball when reaching the stumps. If a player fails to change hands while running, the single does not count and he will have to start from the beginning.

42 | Discovery Vitality
Running on the pitch
In this ac vity, players prac se running between the wickets with a partner out on the pitch.
Set up• Divide players into two groups, with one team ba ng and
the other fi elding • The fi elders stand on the boundary of the fi eld (±40 m from
the pitch).
How to do the ac vity• The coach rolls out a ball to the fi elding team • As the coach releases the ball, the fi rst batsman in the
ba ng team sets off for two runs, turning and changing hands in the correct manner
• At the same me, the fi elder a empts to pick up the ball, pass it to the keeper and run out the batsman
• Once the batsman has been run out, the next batsman and keeper come in to play.
B
Fielding team
Ba ng team
W
BC
F
Figure 31

43Discovery Vitality |
Balance
In cricket it is very important to have a fi rm base of support and balance when playing all strokes.
Set up• Place a cone on the batsman’s off side in front of him and another one on the off side
behind him, and then two cones straight and one to the leg side• The cones should be placed approximately a metre away from him in each direc on,
depending on the batsman’s height or size of stride• Place a ball on each cone.
How to do the ac vity• The coach shouts out which ball the player should a empt to hit • As the player steps forward to hit the ball, the coach should look out for the following: - Is the batsman’s head over the ball? - Is his front foot next to the ball?
Varia on• Instead of hi ng a sta onary ball on a cone, the coach can throw underhand to players to
play off , straight and on drives• So balls such as tennis or slaz balls can be used to build players’ confi dence.
C

44 | Discovery Vitality
Front-foot driving
There are three ways to teach players how to execute the front-foot drive. The following sequence should be used: a) Sta onary ball b) Dropped ball c) Lobbed ball.
a) Sta onary ball
Set up• Place a ball on a cone in line with middle stump.
How to do the ac vity• The batsman steps forward and hits the ball through in
line with middle stump for a straight drive
Progression• Start off with the ball in front of the player and progress
to the posi ons for the off drive and on drive• Set up mul ple cones and then instruct players to hit the
diff erent cones in order (on, off , cover and straight drives).
Figure 32
D
45Discovery Vitality |
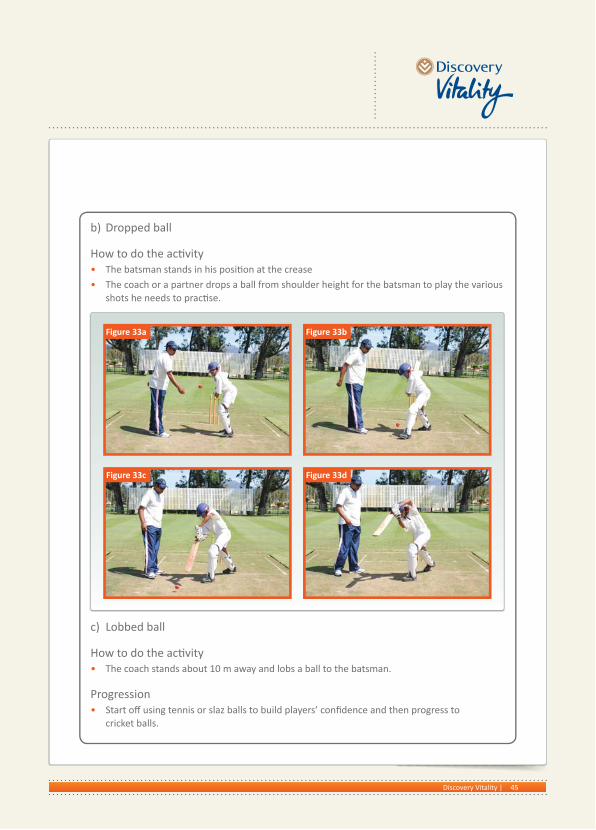
b) Dropped ball
How to do the ac vity• The batsman stands in his posi on at the crease • The coach or a partner drops a ball from shoulder height for the batsman to play the various
shots he needs to prac se.
c) Lobbed ball
How to do the ac vity• The coach stands about 10 m away and lobs a ball to the batsman.
Progression• Start off using tennis or slaz balls to build players’ confi dence and then progress to
cricket balls.
Figure 33a Figure 33b
Figure 33c Figure 33d

46 | Discovery Vitality
Back foot defence
The main aim of this drill is to teach young players to protect their wickets and leave wide balls that are not on the stumps.
Set up• Set up the session as shown in the picture below• The target area the thrower must aim at should be marked out using cones • The thrower should be about 10 steps away from the batsman and should indicate to the
batsman when he will release the ball.
How to do the ac vity• Each player gets about 10 throws and, if the player hasn’t been bowled or caught by the
fi elders, they then rotate clockwise• Ideally, there should be two or three rounds where each player gets a chance to prac se
the shot.
E
3 m
T
F
W
F4 m
B
Figure 34
47Discovery Vitality |
The cut shot
Set up• The batsman’s target area is about 10 m wide with the ou ielders about 15 m away from
the batsman • Set out a cone the thrower can aim at in order to increase the accuracy of his throw.
How to do the ac vity• The thrower needs to throw the ball as a full toss between waist and shoulder height• The batsman must play the cut shot towards the fi elders• Each player must have a decent opportunity to prac se fi elding in each posi on (F), so make
players change posi ons a er every 10 balls • There should be three or four rounds of this.
Varia ons • Use tennis or slaz balls and progress to cricket balls when players are more confi dent• Instead of having a thrower, a high tee may be used from which the batsman can hit
the ball.
Figure 35
T
W
F
Line of throw
B
15 m10 m
F
F

48 | Discovery Vitality
The pull shot
Set up• The target area is about 10 m wide with the ou ielders about 15 m away from
the batsman • Set out a cone the thrower can aim at in order to increase the accuracy of his throw.
How to do the ac vity• The thrower needs to throw the ball as a full toss between waist and shoulder height• The batsman must play the pull shot towards the fi elders• Each player must have a decent opportunity to prac se fi elding in each posi on (F), so
make players change posi ons a er every 10 balls • There should be three or four rounds of this.
Varia ons • Use tennis or slaz balls and progress to cricket balls when players are more confi dent• Instead of having a thrower, a high tee may be used from which the batsman can hit
the ball.
W
FF F
T
10 m
15 m
B
G
Figure 36

49Discovery Vitality |
The hook shot
Use the same ac vity as for the pull shot, but move the cones slightly behind square and have the thrower pitch shorter balls.
How to do the ac vity• Stand sideways with the feet shoulder-width apart, the front arm held up high and the
bowling arm beside the back leg• The bowler rocks his weight from back to front leg as the arm comes over straight and
close to the ear • The bowling arm follows through across the body and the other arm pulls down past
the hip.
The aim of this ac vity is to teach the player to release the ball with a straight arm, and also to focus on the direc on and length he is required to bowl.
How to do the ac vity• The bowler’s feet are together, his hands are against his chest and his front knee is li ed• As the bowler begins to step forward, the arms unfold, the le arm is held up high and
the right arm, with the ball, is rotated past the hip and upwards past the ear.
Bowling When teaching young players how to bowl, it is a good idea to break the ac on up into separate steps.
Rock and bowl
Gather and explode
H
I
J
50 | Discovery Vitality
Pulling down
How to do the ac vity• Stand with legs apart and the toe of the back foot on the ground• Li the le arm up high so that you are looking at the
target from behind your elbow• With the ball next to the back knee, pull the le arm
down with the elbow coming past the hip, and swing the bowling arm over straight and release the ball.
Walk and bowl
How to do the ac vity• Stand a few steps away from the bowling crease • Step forward with the le leg, then the right leg and then again the le • Then bring the right leg across to land parallel with the
crease so the body is in a side-on posi on • The le arm is pulled up high and then pulled down as the
bowling arm comes over.
Run up and bowl
How to do the ac vity• The run-up is measured by star ng with the feet on the
bowling crease facing the opposite direc on to the target • Run away from the crease and, when it feels right, jump
and bowl. Note where the back foot lands and mark this spot. This should be done with the eyes closed
• Pace the number of steps out from this point to the crease and record this for future reference.
K
L
M
51Discovery Vitality |
Set up • Cones are set out in a diamond shape with a ball placed on each one• Divide players into one group of wicket-keepers and another group of fi elders.
How to do the ac vity• The wicket-keeper stands over a cone with a stump in front of him • The fi elder runs out picking up the balls in a set order and throws them towards the
stump and keeper as quickly and accurately as possible• Once they are done, the next wicket-keeper and fi elder have a turn• Con nue the drill un l you feel the skill has been done properly.
Varia ons• Increase the number of balls in the drill• Change the order in which the balls are picked up • Use both underarm and overarm throws• Vary the number of stumps that need to be hit.
Set up • One player stands in the middle of a circle formed by fi ve other players.
How to do the ac vity• The players on the outside of the circle throw catches to the player in the middle.
This player con nues to throw the ball to the next player un l 10 catches have been completed.
Fielding
Mul ple ball throws
Piggy in the middle
N
O
52 | Discovery Vitality
High catches
How to do the ac vity• Instead of the coach hi ng high balls, get players to work
in pairs and throw high catches over various heights and distances to each other.
Progression• The coach hits balls in the air while shou ng diff erent
commands, such as ‘le hand only’, ‘clap twice’ or ‘touch the ground’
• Whatever command the coach shouts, the player must follow it before taking the catch
• The coach could even shout two commands for a single catch.
Ground fi elding
Set up• The coach and wicket-keeper stand at one end of the fi eld • Place a stump in front of the keeper• The fi elders will stand in a queue about 20 m away from the coach.
How to do the ac vity• The coach rolls a ball along the ground to the fi rst fi elder• Once the ball has been picked up, the fi elder throws it to
the keeper at the stump• The fi elder then proceeds to run around the stump while
the coach throws the ball out to the next fi elder• A er running around the stump, the fi elder goes to the
back of the queue and the next fi elder comes in to receive the ball from the coach
• Do six rounds of this ac vity.
P
Q
53Discovery Vitality |
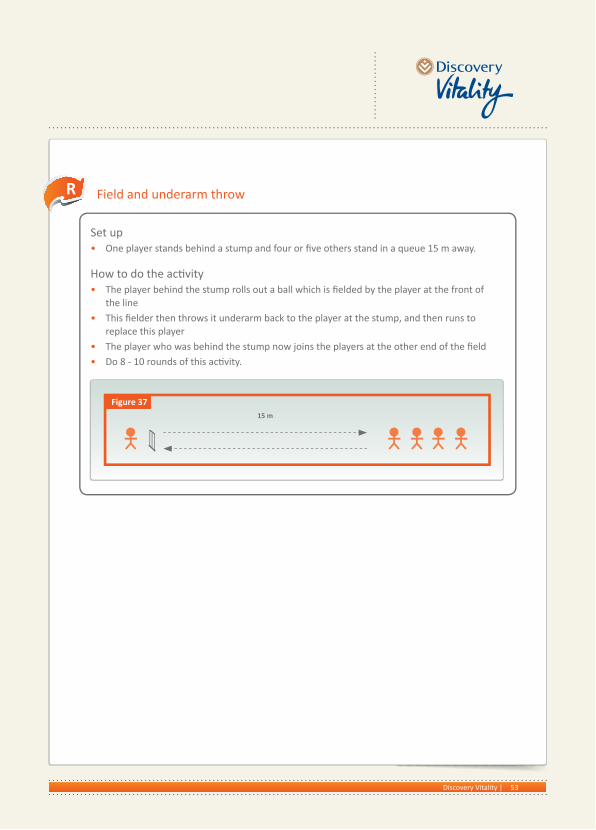
Set up• One player stands behind a stump and four or fi ve others stand in a queue 15 m away.
How to do the ac vity• The player behind the stump rolls out a ball which is fi elded by the player at the front of
the line • This fi elder then throws it underarm back to the player at the stump, and then runs to
replace this player• The player who was behind the stump now joins the players at the other end of the fi eld• Do 8 - 10 rounds of this ac vity.
Field and underarm throw R
15 m
Figure 37
54 | Discovery Vitality
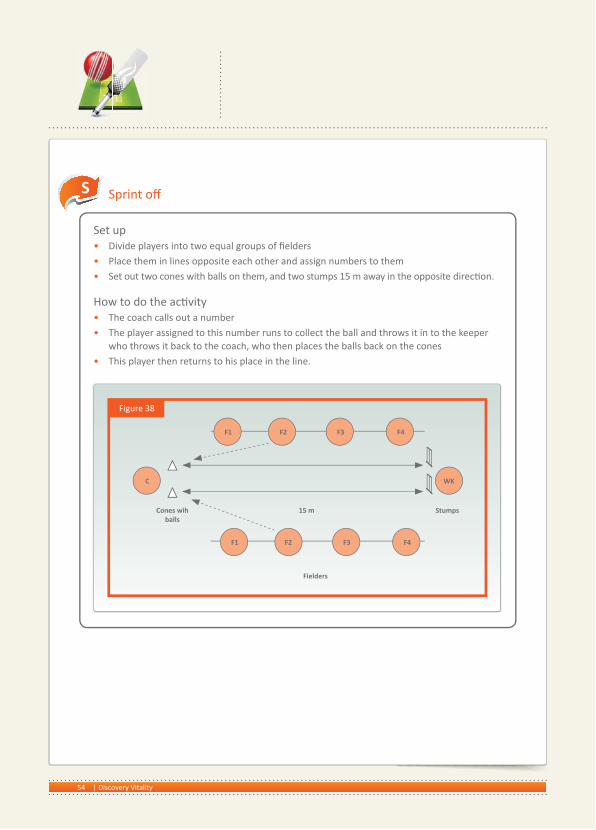
Fielders
15 mCones wih balls
Stumps
C WK
F1 F2 F3 F4
F1 F2 F3 F4
Figure 38
Sprint off
Set up• Divide players into two equal groups of fi elders• Place them in lines opposite each other and assign numbers to them• Set out two cones with balls on them, and two stumps 15 m away in the opposite direc on.
How to do the ac vity• The coach calls out a number • The player assigned to this number runs to collect the ball and throws it in to the keeper
who throws it back to the coach, who then places the balls back on the cones• This player then returns to his place in the line.
S

55Discovery Vitality |
How to do the ac vity• The keeper stands in a crouched posi on• The coach hits the ball into the air and the keeper turns, calls for the ball and a empts to
catch it • Repeat for 10 catches.
Wicket-keeping
High balls
How to do the ac vity• The keeper stands crouched behind the stumps and the coach stands halfway down the
pitch in front of the stumps • The coach can either throw the ball on the bounce into the keeper, or hit it with the bat
so the keeper takes the ball at waist height• This can be done with 10 balls on the off side and 10 on the leg side, with the keeper
standing at various distances away from the stumps.
Off side and leg side takes
T
U
56 | Discovery Vitality
Pairs cricket
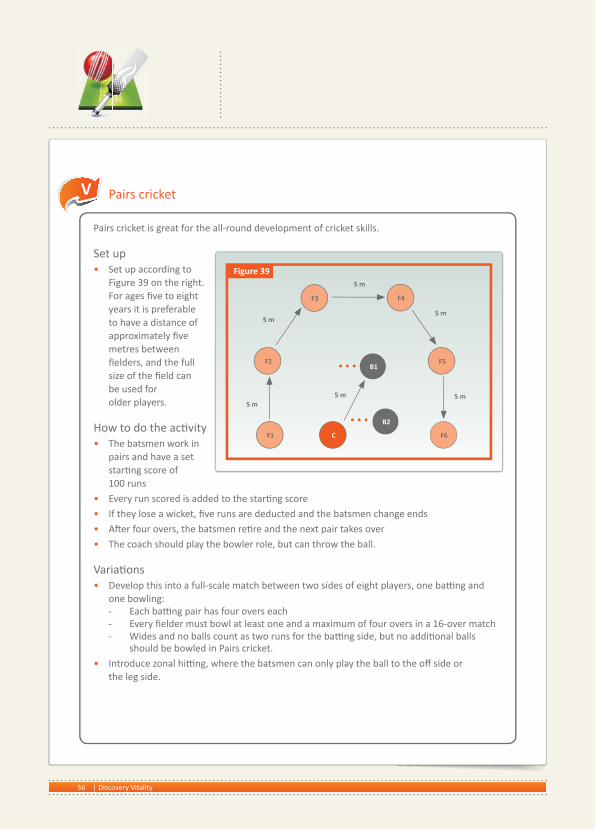
Pairs cricket is great for the all-round development of cricket skills.
Set up• Set up according to
Figure 39 on the right. For ages fi ve to eight years it is preferable to have a distance of approximately fi ve metres between fi elders, and the full size of the fi eld can be used for older players.
How to do the ac vity• The batsmen work in pairs and have a set star ng score of 100 runs• Every run scored is added to the star ng score• If they lose a wicket, fi ve runs are deducted and the batsmen change ends• A er four overs, the batsmen re re and the next pair takes over• The coach should play the bowler role, but can throw the ball.
Varia ons• Develop this into a full-scale match between two sides of eight players, one ba ng and
one bowling: - Each ba ng pair has four overs each - Every fi elder must bowl at least one and a maximum of four overs in a 16-over match - Wides and no balls count as two runs for the ba ng side, but no addi onal balls
should be bowled in Pairs cricket. • Introduce zonal hi ng, where the batsmen can only play the ball to the off side or
the leg side.
V
F1 C
B2
B1F2
F3
5 m5 m
5 m
5 m
F4
F5
F6
5 m
5 m
Figure 39

57Discovery Vitality |
A good way to wrap up the session is a light warm-down, which includes reinforcing key skills and aspects of the session. For the warm-down, you can use some of the ac vi es that were included in the warm-up. You can also give homework so learners can prac se on their own. This can consist of developing one of the skills you’ve taught them that day, such as fi elding, bowling, ba ng or running between the wickets. (See the General coaching manual for more informa on on the warm-down.)
Pu ng it togetherWe helped you put a prac ce session together by providing a number of examples of drills and ac vi es you could choose from for your prac ce. Remember that these are guidelines only and you should feel free to adapt the drills and create new ones depending on your players.
Evalua on One of the coach’s most important tasks is to evaluate players. At every prac ce session you will watch and observe, looking for players who are learning and those who are ba ling with certain skills.
For you to be a successful coach, it is absolutely vital that you constantly no ce which of the players are struggling with skills so you can address problems early. Typically, these problems involve diffi culty in execu ng the key components of a skill and a tendency to fall back into bad habits (like not gripping the ball correctly when bowling, or not holding the bat in the correct hand when running between the wickets, etc).
The checklist on the following pages is a summary of some of the key coaching points that were explained in detail in the skills and ac vi es sec ons earlier. We recommend that you pay very close a en on to all the skill descrip ons, and use the checklist as an evalua on for individual players.
Checklist
The Warm-down
Ba ng Yes No
Grip • Are the Vs, formed between the thumb and index fi ngers of each hand, aligned between the splice and outside edge of the bat?
• Does the batsman’s top hand grip the bat ghtly and is his bo om hand loose?

58 | Discovery Vitality
Ba ng (con nued) Yes No
Stance • Is the batsman’s head upright and in the bowler’s channel?
• Are his eyes kept level?
• Are his shoulders kept slightly open, allowing for be er head posi on?
• Are his hands posi oned opposite the knee of his front leg, slightly away from the pad?
• Are his hips directed side on to the bowler?
• Are his knees relaxed and slightly bent to allow for be er movement?
• Are his feet placed shoulder-width apart, aligned straight and parallel to the popping crease?
• Is the bat kept on the ground behind or in between his feet?
• Is his weight evenly distributed between his right and le legs?
Step and backswing
• Is the batsman’s top hand used to li the bat up in the direc on of second slip?
• Is the top of the backswing reached when the step is completed?
• At the top of the backswing, do his wrists cock (especially the wrist of his top hand)?
• Does the bat face open up to point?
• Is his back elbow relaxed (not tucked in)?
• Is the backswing li ed up to a height that allows the batsman to quickly return to the hi ng posi on?
• On the downswing, does the bat come through in a straight line with where the batsman aims to hit the ball?
Forward defence
• Does the batsman take a big step forward when playing the shot?
• Does he allow the ball to come to him?
• Does he play the shot under his eyes?
• When playing the shot, does the bat come through straight with the full face of the bat presented to the ball?
• Is the bat placed at a downward angle so the ball is kept on the ground?
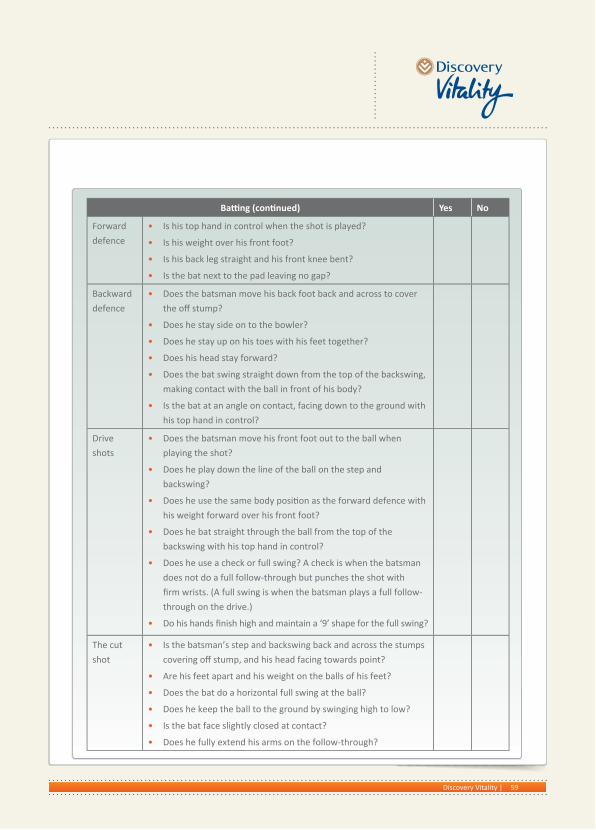
59Discovery Vitality |
Ba ng (con nued) Yes No
Forward defence
• Is his top hand in control when the shot is played?
• Is his weight over his front foot?
• Is his back leg straight and his front knee bent?
• Is the bat next to the pad leaving no gap?
Backward defence
• Does the batsman move his back foot back and across to cover the off stump?
• Does he stay side on to the bowler?
• Does he stay up on his toes with his feet together?
• Does his head stay forward?
• Does the bat swing straight down from the top of the backswing, making contact with the ball in front of his body?
• Is the bat at an angle on contact, facing down to the ground with his top hand in control?
Drive shots
• Does the batsman move his front foot out to the ball when playing the shot?
• Does he play down the line of the ball on the step and backswing?
• Does he use the same body posi on as the forward defence with his weight forward over his front foot?
• Does he bat straight through the ball from the top of the backswing with his top hand in control?
• Does he use a check or full swing? A check is when the batsman does not do a full follow-through but punches the shot with fi rm wrists. (A full swing is when the batsman plays a full follow-through on the drive.)
• Do his hands fi nish high and maintain a ‘9’ shape for the full swing?
The cut shot
• Is the batsman’s step and backswing back and across the stumps covering off stump, and his head facing towards point?
• Are his feet apart and his weight on the balls of his feet?
• Does the bat do a horizontal full swing at the ball?
• Does he keep the ball to the ground by swinging high to low?
• Is the bat face slightly closed at contact?
• Does he fully extend his arms on the follow-through?

60 | Discovery Vitality
Ba ng (con nued) Yes No
The pull shot
• Is the batsman’s step and backswing back and across the stumps, covering off stump?
• Does his head stay s ll while his feet move?
• Are his feet apart and his weight on the balls of his feet?
• Is the bat face slightly closed at contact?
• Does he fully extend his arms on the follow-through?
• Does he keep the ball to the ground by swinging high to low?
• Does the bat do a horizontal full swing at the ball?
Running between the wickets Yes No
Calling • Does the batsman use loud and clear calls: ‘yes’, ‘no’ and ‘wait’.
• Does he know whose responsibility it is to call?
• Is he ready to accept calls?
Running and turning
• As the bowler prepares to bowl, does the non-striker back up or walk out of the crease as the bowler releases the ball so that he is ready to run?
• If there is no run available, does the non-striker move back to the crease quickly?
• Does the batsman run in straight lines off the centre of the pitch?
• Does he carry the bat with both hands whenever possible?
• Does he face the fi eld, where the ball is, when turning?
• Does he get low so as to increase speed when running and turning?
• Does he ground the bat by sliding it across the popping crease as the run is completed?
Bowling Yes No
Grip • Does the bowler grip the ball between his fi rst two fi ngers and thumb?
• Are his index and middle fi ngers slightly apart on the ball?
• Is his thumb on the seam?
• Is the ball not too deep in his hand?
Run-up • Do the bowler’s feet follow a normal running pa ern?
• Are his hands kept above his waist?
• Are his arms kept close to his body (not swinging across)?
• Does he lean his body forward for the run-up?
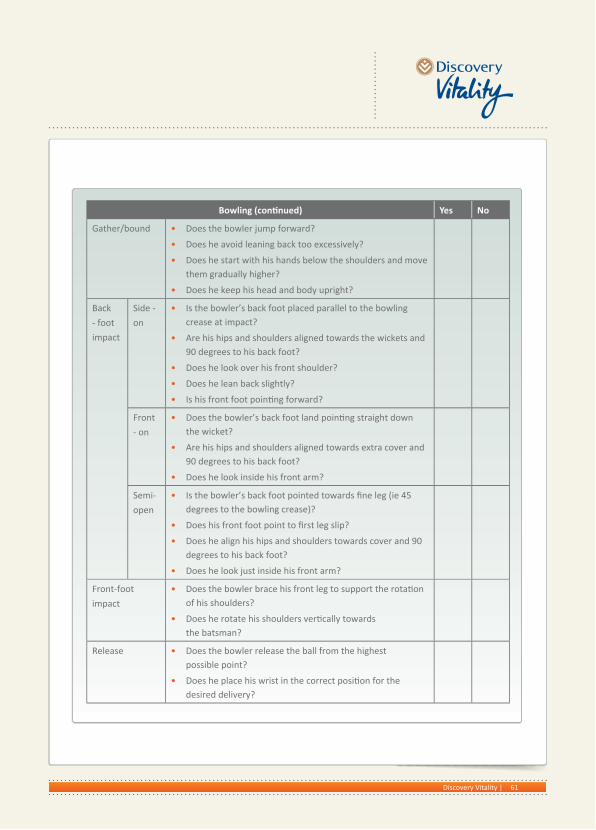
61Discovery Vitality |
Bowling (con nued) Yes No
Gather/bound • Does the bowler jump forward?
• Does he avoid leaning back too excessively?
• Does he start with his hands below the shoulders and move them gradually higher?
• Does he keep his head and body upright?
Back - foot impact
Side - on
• Is the bowler’s back foot placed parallel to the bowling crease at impact?
• Are his hips and shoulders aligned towards the wickets and 90 degrees to his back foot?
• Does he look over his front shoulder?
• Does he lean back slightly?
• Is his front foot poin ng forward?
Front - on
• Does the bowler’s back foot land poin ng straight down the wicket?
• Are his hips and shoulders aligned towards extra cover and 90 degrees to his back foot?
• Does he look inside his front arm?
Semi-open
• Is the bowler’s back foot pointed towards fi ne leg (ie 45 degrees to the bowling crease)?
• Does his front foot point to fi rst leg slip?
• Does he align his hips and shoulders towards cover and 90 degrees to his back foot?
• Does he look just inside his front arm?
Front-foot impact
• Does the bowler brace his front leg to support the rota on of his shoulders?
• Does he rotate his shoulders ver cally towards the batsman?
Release • Does the bowler release the ball from the highest possible point?
• Does he place his wrist in the correct posi on for the desired delivery?
62 | Discovery Vitality
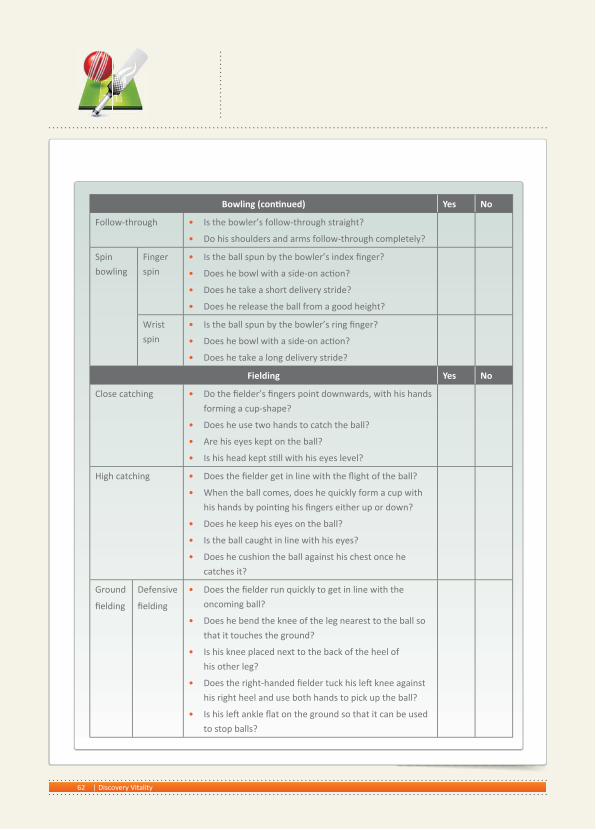
Bowling (con nued) Yes No
Follow-through • Is the bowler’s follow-through straight?
• Do his shoulders and arms follow-through completely?
Spin bowling
Finger spin
• Is the ball spun by the bowler’s index fi nger?
• Does he bowl with a side-on ac on?
• Does he take a short delivery stride?
• Does he release the ball from a good height?
Wrist spin
• Is the ball spun by the bowler’s ring fi nger?
• Does he bowl with a side-on ac on?
• Does he take a long delivery stride?
Fielding Yes No
Close catching • Do the fi elder’s fi ngers point downwards, with his hands forming a cup-shape?
• Does he use two hands to catch the ball?
• Are his eyes kept on the ball?
• Is his head kept s ll with his eyes level?
High catching • Does the fi elder get in line with the fl ight of the ball?
• When the ball comes, does he quickly form a cup with his hands by poin ng his fi ngers either up or down?
• Does he keep his eyes on the ball?
• Is the ball caught in line with his eyes?
• Does he cushion the ball against his chest once he catches it?
Ground
fi elding
Defensive
fi elding
• Does the fi elder run quickly to get in line with the oncoming ball?
• Does he bend the knee of the leg nearest to the ball so that it touches the ground?
• Is his knee placed next to the back of the heel of his other leg?
• Does the right-handed fi elder tuck his le knee against his right heel and use both hands to pick up the ball?
• Is his le ankle fl at on the ground so that it can be usedto stop balls?

63Discovery Vitality |
Fielding (con nued) Yes No
Ground
fi elding
A acking fi elding
• As the ball is struck, is the fi elder perfectly balanced and in a low, crouched posi on with the weight on the balls of his feet?
• Does he pick up the line of the oncoming ball and move quickly onto a line near the non-throwing side of the ball?
• Does his body remain perpendicular to the ball when it is picked up?
• At the moment he picks up the ball, is the opposite foot of his throwing arm ahead of his other foot – the le foot ahead of the right foot for right-handers?
Throwing • Is the bowler’s le leg out in front and his non-throwing arm outstretched at shoulder level poin ng towards the target?
• Is his body weight transferred from his back foot to his front foot as the throw is completed?
• Is the throw aimed at the wicket-keeper’s gloves and does it reach him before it bounces?
Underarm throw • Do the fi elder’s feet point in the direc on of the throw?
• Is the foot on the side of his throwing arm forward?
• Does he maintain a low body posi on and extend his arm and hand out at the target as he releases the ball?
Overarm throw • Is the fi elder in a posi on that allows for fast movements in all direc ons?
• Is the forearm of his throwing arm set up at 90 degrees to his upper arm and shoulder?
• Is the palm of his hand facing away and does he grip the ball across the seam?
• Is his arm on a ver cal plane at release?
• Does he create straight lines to target?
• Does he maintain balance and avoid rushing so that his arm doesn’t drop?
64 | Discovery Vitality
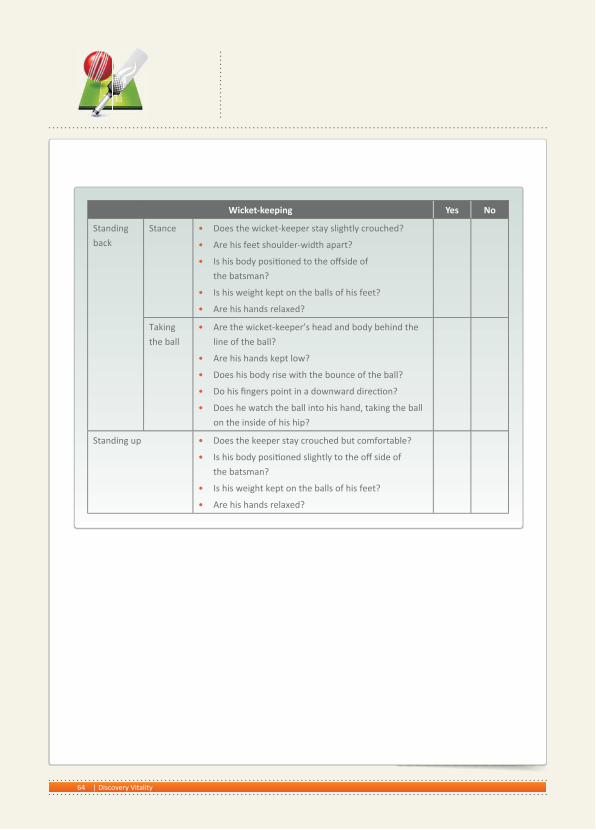
Wicket-keeping Yes No
Standing back
Stance • Does the wicket-keeper stay slightly crouched?
• Are his feet shoulder-width apart?
• Is his body posi oned to the off side of the batsman?
• Is his weight kept on the balls of his feet?
• Are his hands relaxed?
Taking the ball
• Are the wicket-keeper’s head and body behind the line of the ball?
• Are his hands kept low?
• Does his body rise with the bounce of the ball?
• Do his fi ngers point in a downward direc on?
• Does he watch the ball into his hand, taking the ball on the inside of his hip?
Standing up • Does the keeper stay crouched but comfortable?
• Is his body posi oned slightly to the off side of the batsman?
• Is his weight kept on the balls of his feet?
• Are his hands relaxed?
65Discovery Vitality |
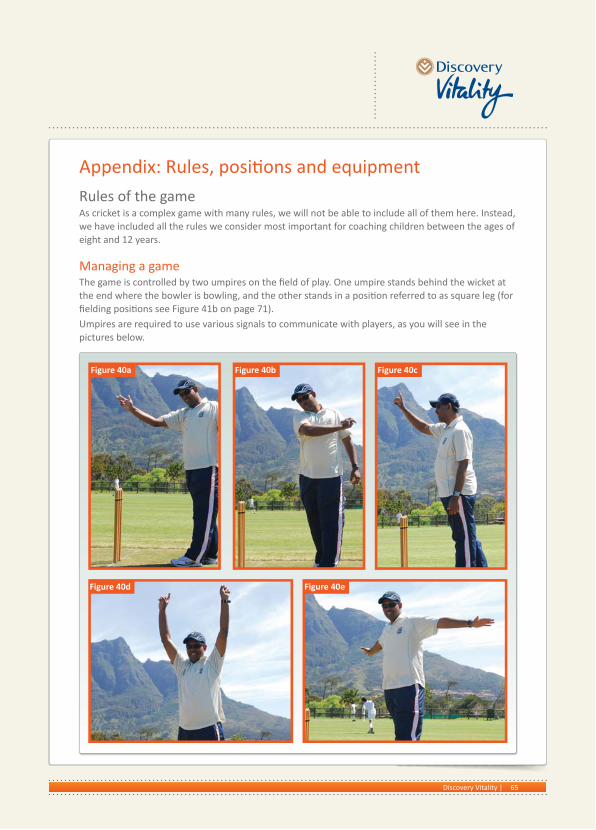
Rules of the game As cricket is a complex game with many rules, we will not be able to include all of them here. Instead, we have included all the rules we consider most important for coaching children between the ages of eight and 12 years.
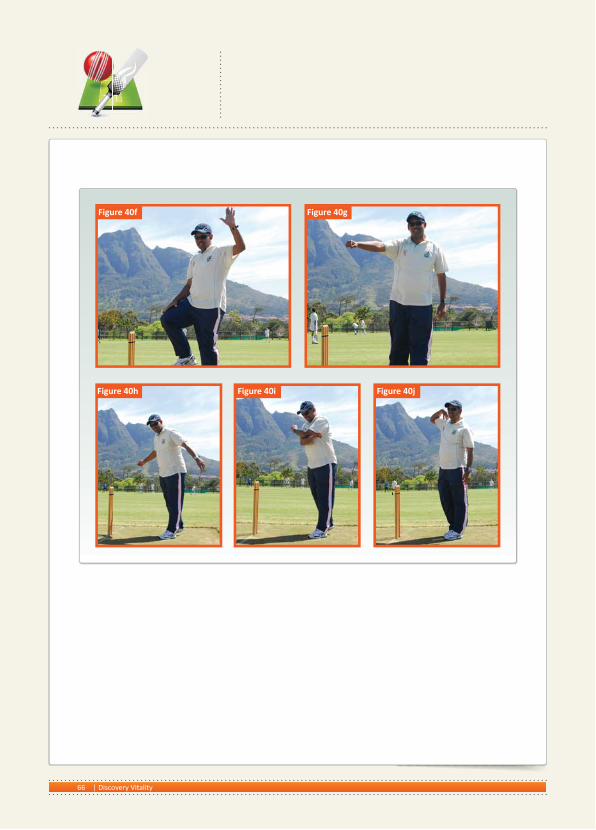
Managing a gameThe game is controlled by two umpires on the fi eld of play. One umpire stands behind the wicket at the end where the bowler is bowling, and the other stands in a posi on referred to as square leg (for fi elding posi ons see Figure 41b on page 71). Umpires are required to use various signals to communicate with players, as you will see in the pictures below.
Appendix: Rules, posi ons and equipment
Figure 40a Figure 40b Figure 40c
Figure 40d Figure 40e
66 | Discovery Vitality
Figure 40f Figure 40g
Figure 40h Figure 40i Figure 40j

67Discovery Vitality |
Star ng the gameBefore the game commences, the two captains of the opposing teams take to the fi eld and toss a coin to decide which of the teams will bat or bowl fi rst. It is usually the home captain or coach who fl ips the coin and the away captain or coach who makes the call. The winner of the coin toss then decides whether his team will bat or bowl fi rst. This is usually discussed between the captain and coach before the game.
The umpire’s job begins when the batsman comes in to take guard (leg, middle and leg and middle, as explained on page 21). Once the batsman has marked it out, the umpire needs to tell him how many balls are le in the over and inform him of the bowling style. The batsman only needs to know if the bowler is going over or around the wicket and if he is bowling with his right or le arm. The bowler should not bowl un l the batsman is ready.
RunsA batsman scores a run by hi ng a ball and running across the length of the pitch. A run is scored each me one length of the pitch is run – so if the batsman and his partner complete two lengths of the pitch, two runs are scored.
Fours and sixesIf the batsman strikes the ball and it passes over the boundary with at least one bounce, the batsman is accredited with four runs. If the ball is hit in the air and lands on the other side of the boundary without a bounce, six runs are added to the tally of the ba ng team.
Extras and byesIn cricket, runs may also be scored without the batsman hi ng the ball. These fall into the category of extras. If the wicket-keeper fails to stop a ball that has not touched the batsman’s body or bat and the batsman completes lengths of the pitch, then byes are scored. That is, one run is awarded for every length of the pitch completed and four runs are scored if the ball crosses the boundary.
68 | Discovery Vitality
Wides and no ballsIf the ball is bowled beyond the batsman’s reach and he cannot play a legi mate cricket shot, the delivery is deemed to be a ‘wide’ delivery. One run is then added to the ba ng team’s total.
An umpire may call a ‘no ball’ if the bowler fails to keep any part of his front foot behind the bowling crease when bowling. If the heel of the bowler is touching the line, or if the bowler’s back foot cuts the line of the return crease, this is also deemed a no ball (see Figure 42 on page 72). A no ball may also be called if the delivery fails to bounce and reaches the batsman above waist height.
For a no ball, one run is added to the ba ng team’s score. If any runs are scored off the no ball, these runs will be added to the batsman’s tally as well as the team’s total, but the no ball will s ll be added as an extra run.
For both wides and no balls, the delivery is bowled again, so there may be seven or eight deliveries in one over.
Ge ng outThe batsman can be dismissed in several ways: Bowled: This happens when the bowler bowls the ball and it hits the stumps and knocks off the bails. If the ball hits the wicket and the bails remain in place, the batsman is not out. Caught out: A er the batsman hits the ball the fi elder catches the ball before it touches the ground, while the ball is s ll in the fi eld of play. It is also out if the ball comes off the batsman’s hand or glove, or below the wrist that is holding the bat, and is caught by a fi elder.Run out: This happens when the batsman a empts to make a run and the fi elder removes the bails with the ball at the end the batsman is running to before he reaches his crease.Hit wicket: This happens when the batsman stands on or hits the stumps when he is in the process of trying to hit, hi ng or trying to avoid the bowled ball or he sets off for a run. If this happens, the batsman is given out.Stumped: This happens when the wicket-keeper dislodges the bails with the ball in hand when, in a emp ng to hit the ball, the batsman moves out of his crease.
69Discovery Vitality |
Leg before wicket (LBW): The aim of this rule is to prevent batsmen from using their bodies rather than their bats to stop the ball from hi ng the wicket to avoid being bowled out. Simply put, the rule holds that a batsman will be out LBW if the umpire believes the ball would have gone on to hit the stumps had it not fi rst hit the batsman’s pad or body.When making the decision of whether the batsman is out LBW, the umpire needs to take several factors into considera on:• The batsman should be given out if: 1. The ball struck the batsman on the pads or body in front of the stumps and it was pitched in
line with the stumps; and 2. The ball hit the batsman outside the line of the off stump and the batsman made no a empt
to hit the ball. So long as the ball was going on to hit the stumps, the batsman is out.• The batsman should not be given out if: 1. The ball bounces outside leg stump. Even if the ball was going on to hit the stumps, and even
if the batsman made no a empt to hit the ball, he can s ll not be given out in this case; 2. The ball hit the bat or the hand holding the bat before hi ng the pads or body; 3. The bowler bowled a no ball; and 4. The ball hit the batsman outside the line of the off stump and he made a genuine a empt to
hit the ball.
Posi onsCricket is played between two teams with 11 players on each side. Each team has a twel h man who may be called upon if one of the players gets injured. The twel h man can only take part in the fi elding and may not bowl, act as captain or keep wicket. At junior level, with prior consulta on with the other coach, both players may be able to play (ie one could be selected to bat and the other to bowl and fi eld).
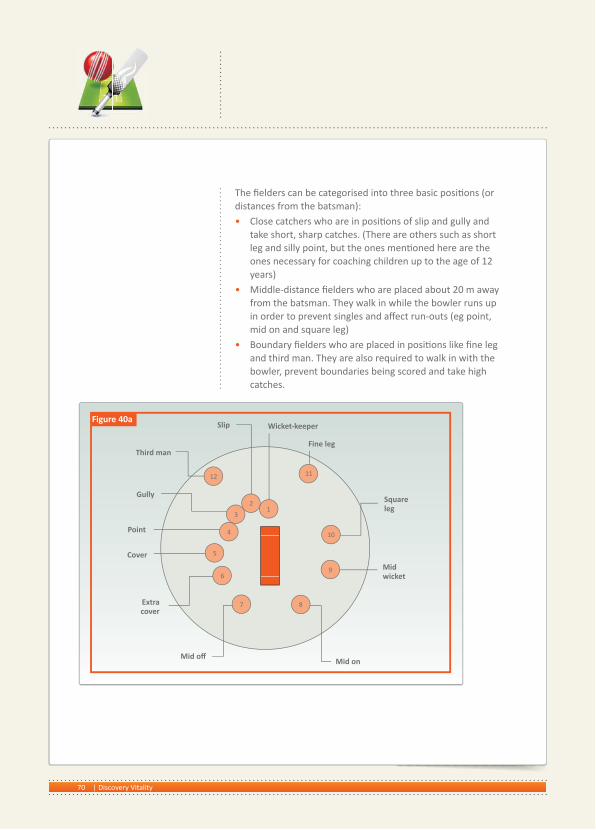
Fielding posi onsFielding is just as important as ba ng and bowling. The fi elders can restrict the number of runs scored by the ba ng team, thereby pu ng their team in a be er posi on to win the game.
All 11 of the fi elders take the fi eld together and are placed by the captain or coach in their respec ve posi ons. The most common posi ons are mid on, mid-off , cover, deep cover point, point, midwicket, square leg, third man and fi ne leg (see Figure 40a on the next page).
One of the players is also required to play wicket-keeper. His posi on is behind the wicket of the on-strike batsman. The wicket-keeper has a specialised role that is not usually changed during the game (unless he is injured). The wicket-keeper is also the only fi elder who is allowed to wear special gloves and pads to cover his legs.
70 | Discovery Vitality
The fi elders can be categorised into three basic posi ons (or distances from the batsman):• Close catchers who are in posi ons of slip and gully and
take short, sharp catches. (There are others such as short leg and silly point, but the ones men oned here are the ones necessary for coaching children up to the age of 12 years)
• Middle-distance fi elders who are placed about 20 m away from the batsman. They walk in while the bowler runs up in order to prevent singles and aff ect run-outs (eg point, mid on and square leg)
• Boundary fi elders who are placed in posi ons like fi ne leg and third man. They are also required to walk in with the bowler, prevent boundaries being scored and take high catches.
Gully
Third man
Slip
Point
Cover
Extracover
Mid off Mid on
Midwicket
Squareleg
Fine leg
Wicket-keeper
12
12
3
4
5
6
7 8
9
10
11
Figure 40a

71Discovery Vitality |
Toward “wide”
Toward “fi ne”
Toward “fi ne”
Toward “wide”
Toward “square”
Backward
LEG (ON) SIDE
GullyFourth slip
Third slipSecond slipFirst slip
Short legMid
wicket
Sillymid onShort
mid on
Squareleg
Deep backwardsquare leg
Long/Fineleg
Third man
Deep gully
Deep midwicket
Deep squareleg
Mid onLong on
BatsmanNon-strikerUmpires
Bowler
B
B
N
N
U
U
U
Standard cricket fi elding posi ons (for right-handed batsmen)
Wicket-keeper
DeepcoverDeep
extra cover
Long off Extra cover
Mid off Shortmid off Silly
mid off
Sillypoint
Batsman’s safe line
Forward
OFF SIDE
Cover point
Deep point
PointCover
Figure 40b
Fielding posi ons in terms of distance from the batsman
Close catches
Inner ring
Boundary
Figure 40c

72 | Discovery Vitality
Playing fi eldCricket is played on a grass fi eld of variable size and shape (round or oval). The main area of ac on on the cricket fi eld is the pitch.
The size of the pitch varies according to the age of the players. For instance, U11s play on a 18.29 m pitch, U12s and U13s play on a 19.2 m pitch, and children over the age of 13 play on a pitch that is 20.12 m long (see Figure 42 below). Pitches can either be synthe c or turf pitches.
Wickets are placed at either end of the pitch. Each set consists of three wooden stumps placed in a straight line and two wooden cross-pieces placed on top of the stumps, which are referred to as bails. The wickets are required to be 22.86 cm wide and the stumps should be 71.1 cm above the ground. When all three stumps are placed in the ground they need to be close enough together to prevent the ball from passing between them.
20.12 m
Returncrease
Poppingcrease
Bowling crease
Stumps
Figure 42
73Discovery Vitality |
Equipment
Balls
A leather ball is used, which diff ers in size according to the diff erent age groups. For U11s and U13s, 135 g balls are used during the game, while heavier 156 g balls are used from U14 upwards. There are many other balls available for young cricket players where leather balls are considered unsuitable. For instance, plas c balls can be used to help players develop skills when they are afraid to catch or bat with a hard cricket ball. Slazenger (Slaz) balls may also be used for this purpose.
Protec ve gearAs men oned previously, none of the ou ielders except the wicket-keeper are allowed to wear any form of protec on on their hands. He is required to wear special protec ve gloves (see Figure 43a on page 75) and may even wear inners underneath the gloves for added protec on. The wicket-keeper is also required to wear pads while fi elding. These are generally smaller than the usual ba ng pads as the keeper needs to be able to move rela vely quickly across the fi eld. Another important piece of equipment for the keeper is a protector (see “Protectors” on the next page).
BatsCricket bats are made from wood (mostly English willow or cashmere willow). For senior players bats may vary in length, shape and thickness to suit individual diff erences. When selec ng bats for juniors there are a few important factors to consider: Length: The ideal length for a bat is the inside measurement of the batsman’s trousers. Bats that come up to the batsman’s hip will disrupt his technique.Weight: It is very important that young players choose bats that are light-weight. A way to gauge if the bat is the correct weight is to ask the child to li the bat with his non-dominant hand and to hold it out horizontally for one minute. If this can be done without eff ort or diffi culty, the bat is the correct weight.
Ba ng glovesBa ng gloves help batsmen grip their bats and also serve to protect their hands. Players should choose comfortable, well-fi ng gloves.
Pads (leg protec on)Pads are worn by both batsmen and the wicket-keeper. Ba ng pads are generally made from light-weight materials so that it is easier for the batsman to run. Pads should be selected according to the type of ball used. Pads need to be the right size: if they are too small they won’t provide adequate protec on for players, and if they are too big they may hinder the player’s ability to run between the wickets.
Helmets The helmet provides protec on for the skull and face. Helmets are made from light-weight fi breglass and the grill is made from metal. The grill of the helmet should be adjusted so that the space between the top of the grill and the peak of the helmet should be smaller than the ball.

74 | Discovery Vitality
ProtectorsThese are made from durable plas c and come in a large range of sizes. This piece of equipment should be obtained by every team member, and players should be encouraged to wear them when ba ng. Wicket-keepers are also required to use this piece of equipment. The protector is worn underneath a snug undergarment to keep it in posi on.
Your coaching sessions will also need• A whistle• A set of cones• Baseball mi .

75Discovery Vitality |
Figure 43a
Figure 43c
Figure 43e
Figure 43b
Figure 43d
Figure 43f

76 | Discovery Vitality
Figure 43g
Figure 43i
Figure 43k
Figure 43h
Figure 43j
Figure 43l
77Discovery Vitality |
Glossary of terms used in cricketAll-rounder: A player adept at both ba ng and bowling. In the modern era, this term can also refer to a wicket-keeper who is good at ba ng.Appeal: A loud call to the umpire to give the batsman out. The call is usually “Howzat!”Around the wicket or round the wicket: A right-handed bowler passing to the right of the stumps during his bowling ac on (vice versa for le -handed bowlers).Bouncer: A fast, short-pitched delivery that rises up near the batsman’s head.Boundary: 1. The rope that demarcates the perimeter of the grounds.2. Where there is no rope, the perimeter of the grounds can be used to indicate the boundary.3. Sign boards, marked tyres, cones or even bricks can also be used to demarcate the boundary.4. The boundary is used to determine four runs and six runs collec vely.Bye: A run that is made without the ball touching the bat (eg leg byes). For more detail, see page 67.Century: An individual score of at least 100 runs, a signifi cant landmark for a batsman. Crease: One of several lines on the pitch near the stumps (the popping crease, the return crease and the bowling crease; see Figure 42 on page 72). It usually refers to the popping crease.Dead ball:1. The state of play in between deliveries in which batsmen may not score runs or be given out.2. Called when the ball becomes lodged in the batsman’s clothing or equipment.3. Called when the ball is (or is about to be) bowled when the batsman is not yet ready.4. Called when a bowler aborts his run-up without making a delivery.5. Called when the batsmen a empt to run leg byes a er the ball has struck the batsman’s body,
but is deemed to have not off ered a shot.Dot ball: A delivery bowled without any runs scored off it, so called because it is recorded in the score book with a single dot.Duck: A score of zero. The batsman goes out without having scored a run.Extras: The batsman scores runs without having hit the ball.Four: A shot that reaches the boundary a er touching the ground, so called because it is a score of four runs to the ba ng side.Guard: This is the fi rst thing the batsman will ask for when he arrives at the wicket. He will ask the umpire for the posi on of the stumps and mark this with his bat or foot (see page 21). Half century: An individual score of over 50 runs.Handled the ball: A batsman can be given out if he wilfully handles the ball while in play.Hat-trick: A bowler taking a wicket off each of three consecu ve deliveries he bowls in a single match (whether in the same over or split up into two consecu ve overs, or two overs in two diff erent spells, or even spread across two innings of a test match or fi rst-class cricket game).Hit the ball twice: This happens when a batsman, a er he strikes the ball or it is stopped by any part of him, wilfully strikes the ball again. If this is done inten onally, the batsman is out.
78 | Discovery Vitality
Innings: The team that is ba ng has a set number of overs in which to bat. The end of the innings is reached either when the allo ed overs are fi nished or when all the batsmen are out. When this happens, the side that was bowling comes in to bat and the side that was ba ng will take the fi eld.Keep the strike: On the last ball of the over, the batsmen arrange runs so that one of them will face the fi rst ball of the next over. It is referred to as ‘shepherd the strike’ when they con nue to do this to protect a less skilful batsman. Leg before wicket (LBW): A way of dismissing a batsman. In brief, the batsman is out if, in the opinion of the umpire, the ball hits any part of the batsman’s body (usually the leg) before hi ng the bat or the hand holding the bat, and would have gone on to hit the stumps. (For more detail, see page 69).Leg break: A leg spin delivery which, for a right-handed bowler and a right-handed batsman, will turn from the leg side to the off side (it usually spins away from the batsman).Leg bye: Extras taken a er a delivery has hit any part of the body of the batsman other than the bat or the gloved hand that holds the bat. If the batsman makes no a empt to play the ball with the bat, leg byes may not be scored.Leg side: The side of the fi eld behind the batsman as he takes his stance at the wicket (the le -hand side for right-handed batsman). Maiden over: An over in which no runs are scored off the bat, and no ‘wides’ or ‘no balls’ are bowled. It is considered a good performance for a bowler and maiden overs are tracked as part of a bowling analysis.Not out: If the team’s innings is over and the batsman has not been dismissed, he is said to be ‘not out’. No ball: An illegal delivery – usually because of the bowler overstepping the popping crease – in which an extra is scored for the ba ng side. (For more detail, see page 68).Obstruc ng the fi eld: A batsman wilfully obstructs an opposing fi elder either by word or ac on.Over: The delivery of six consecu ve balls by one bowler.Over rate: The number of overs bowled per hour.Over the wicket: A right-handed bowler bowls to the le of the stumps, and vice versa for a le -handed bowler.
79Discovery Vitality |
Popping crease: One of two lines in the fi eld where the wickets are posi oned (the other line is the bowling crease). A batsman who does not have either the bat or some part of his body touching the ground behind the popping crease is considered out of his ground and is in danger of being dismissed as ‘run out’ or ‘stumped’.Pull: A shot played to the leg side to a short pitched delivery between mid-wicket and backward square leg. Rotate the strike: The batsmen look to make singles wherever possible in order to ensure that they are both con nually facing deliveries and making runs. The opposite of this is ‘farm the strike’.Round the wicket: This is when a right-handed bowler bowls to the right of the stumps. The opposite of this is ‘over the wicket’.Run out: A dismissal by a member of the fi elding side who breaks the wicket while the batsman is outside his crease in the process of making a run.Run rate: The average number of runs scored per over.Runner: A player from the ba ng side assis ng an injured batsman in running between the wickets. The runner must wear and carry the same equipment as the batsman. The injured batsman s ll needs to stay in his ground. Both the injured batsman and the runner can be run out.Short run: This happens if the batsman fails to ground his bat behind the popping crease while making a run. Sightscreen: A large board placed behind the bowler beyond the boundary, used to provide contrast to the ball and aid the striker in seeing the ball when it is delivered. Typically it is coloured white to contrast a red ball or black to contrast a white ball. Striker: The batsman who faces the deliveries bowled.Stroke: An a empt by the batsman to play a delivery.Stump: 1. One of the three ver cal posts making up the wicket (‘off stump’, ‘middle stump’ and ‘leg stump’).2. A way of dismissing a batsman.3. The term ‘stumps’ refers to the end of a day’s play.Target: The score the team ba ng second has to score to beat their opponents. This is one run more than the tally of runs scored by the team ba ng fi rst.Timed out: An incoming batsman must step onto the fi eld of play within two minutes of the last batsman being dismissed.Twel h man: Tradi onally, this is the fi rst subs tute player who fi elds when a member of the fi elding side is injured. Wide: A delivery that passes illegally wide of the wicket and an extra is scored for the ba ng side. A wide does not count as one of the six valid deliveries that must be made in each over; an extra ball must be bowled for each wide. (For more detail, see page 68.)Yorker: A (usually fast) delivery that is pitched very close to the batsman. The intent is for it to bounce exactly underneath his bat or on his toes in the block hole. A perfectly-pitched fast Yorker is almost impossible to keep out. A bad Yorker can turn into a half-volley (too short) or a full toss (too full).

80 | Discovery Vitality
Discovery has endeavoured to ensure that all the informa on contained in this manual is accurate and based on credible clinical and scien fi c research. Discovery cannot however, be held responsible for any injury, loss or damages that may result from reliance on the informa on, and, by u lising the informa on, you specifi cally waive any claim you may have against Discovery in this regard. You are advised that each individual has their own unique clinical make-up and while the lesson plans were designed with all individuals in mind, some may respond diff erently to others. You are therefore advised to take due cau on when par cipa ng in any of the ac vi es recommended.

81Discovery Vitality |
Notes

82 | Discovery Vitality
Notes

83Discovery Vitality |
Notes

GM_13630DHV_28/06/12
Discovery Vitality | 155 West Street | Sandton | 0860 109 939 | www.vitalityschools.co.za | [email protected]