133 to 193-Final - INFLIBNET Centre
222
Transcript of 133 to 193-Final - INFLIBNET Centre


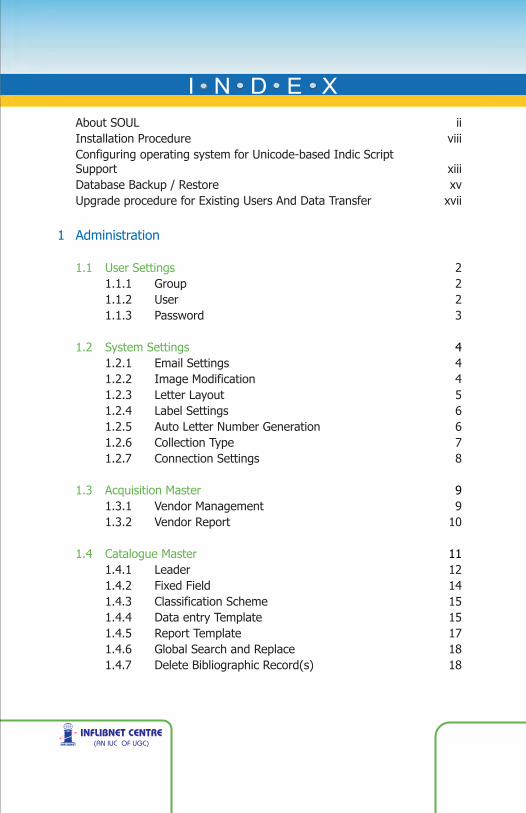
I N D E XAbout SOUL iiInstallation Procedure viiiConfiguring operating system for Unicode-based Indic Script Support xiiiDatabase Backup / Restore xvUpgrade procedure for Existing Users And Data Transfer xvii
21.1.1 Group 21.1.2 User 21.1.3 Password 3
1.2.1 Email Settings 41.2.2 Image Modification 41.2.3 Letter Layout 51.2.4 Label Settings 61.2.5 Auto Letter Number Generation 61.2.6 Collection Type 71.2.7 Connection Settings 8
1.3.1 Vendor Management 91.3.2 Vendor Report 10
1.4.1 Leader 121.4.2 Fixed Field 141.4.3 Classification Scheme 151.4.4 Data entry Template 151.4.5 Report Template 171.4.6 Global Search and Replace 181.4.7 Delete Bibliographic Record(s) 18
1 Administration
1.1 User Settings
1.2 System Settings 4
1.3 Acquisition Master 9
1.4 Catalogue Master 11
I N D E X

I N D E X1.5 Circulation Master
1.6 Serials Master
1.7 General Master
2.1 Suggestion
191.5.1 Category 191.5.2 Calendar 231.5.3 Member Typed 241.5.4 Customise Member Card 241.5.5 Reset Transaction 261.5.6 Circulation Master Report 26
261.6.1 Vendor 271.6.2 Frequency 271.6.3 Delivery Mode 281.6.4 Binding Type 281.6.5 Edition 291.6.6 Serial Master Reports 29
1.6.6.1 Vendor Report 301.6.6.2 Frequency Report 301.6.6.3 Delivery Report 30
311.7.1 Currency 321.7.2 Budget 331.7.3 Budget Transfer 361.7.4 Institute Detail 371.7.5 Country Master 401.7.6 Language Master 411.7.7 Subject Master 411.7.8 Physical Media Master 431.7.9 New Library 431.7.10 General Master Reports 45
472.1.1 New Request 472.1.2 Gratis Items 49
2 Acquisition
I N D E X

I N D E X2.1.3 Select for Approval 492.1.4 Approval Process 502.1.5 Direct Approval 512.1.6 Export & Delete Rejected Item 512.1.7 Letter of Approval 52
532.2.1 New Order 532.2.2 Cancel Order 552.2.3 Direct Order 552.2.4 Purchase Order 572.2.5 Reminder Letter 572.2.6 Order Report 57
582.3.1 Receive Order 582.3.2 Accessioning of Items 592.3.3 Accessioning Report 622.3.4 Barcode 62
622.4.1 Invoice Process 632.4.2 Payment Process 652.4.3 Payment Settlement 662.4.4 Refund Process 672.4.5 Forwarding Letter of Account 682.4.6 Invoice Report 692.4.7 Payment Report 692.4.8 Refund Report 69
703.1.1 Title In-Process 723.1.2 Data Operation 73
2.1.8 Request Listing 52
2.2 Orders
2.3 Accessioning
2.4 Payment
3.1 Cataloguing
3 Catalogue
I N D E X

I N D E X3.2 Import/Export
3.3 User Services
3.4 Reports
4.1 Membership 90
4.2 Transaction 96
833.2.1 Import from MARC 833.2.2 Export to MARC 843.2.3 CCF to MARC 853.2.4 MARCXML to SOUL 863.2.5 Add Accession no to Imported Data 86
863.3.1 Current Awareness/Bibliographic Service 86
873.4.1 Basic 873.4.2 Advance 873.4.3 Spine Label 883.4.4 Book Card 88
4.1.1 New Member 904.1.2 Copy Member 924.1.3 Search Member 924.1.4 Delete Member 934.1.5 Renewal 944.1.6 No-Due Certificate 954.1.7 Member Card 954.1.8 Member Listing 95
4.2.1 Transaction Menu 964.2.2 Search by Title 1024.2.3 Overdue Charges 1034.2.4 Book Bank Issue/Return 1034.2.5 Reminder 1044.2.6 Circulation Group 1044.2.7 Stock Verification 1054.2.8 Member Login 107
4 Circulation
I N D E X

I N D E X4.2.9 Book Transfer 1074.2.10 Items Issued Over a Period 1084.2.11 Items Returned Over a Period 1084.2.12 Items Reserved Over a Period 1084.2.13 Overdue Item List 1084.2.14 Fine Payers List 1094.2.15 Pending Dues 1094.2.16 Other Issues 1094.2.17 Group Issue Report 1094.2.18 Stock Verification 1094.2.19 Member Log List 110
1104.3.1 Borrowing Book 1114.3.2 Lending Book 115
1174.4.1 Lost 1174.4.2 Binding 1194.4.3 Damaged 1214.4.4 Missing 1224.4.5 Withdrawal 1234.4.6 Status Report 1234.4.7 Maintenance Report 123
1255.1.1 MARC 21 Entry Edit 1255.1.2 Title Entry 1275.1.3 Title Update 1285.1.4 Article Indexing 1295.1.5 Title Report 1305.1.6 Title Holding Report 131
4.3 ILL
4.4 Maintenance
5.1 Titles
5 Serial Control
I N D E X
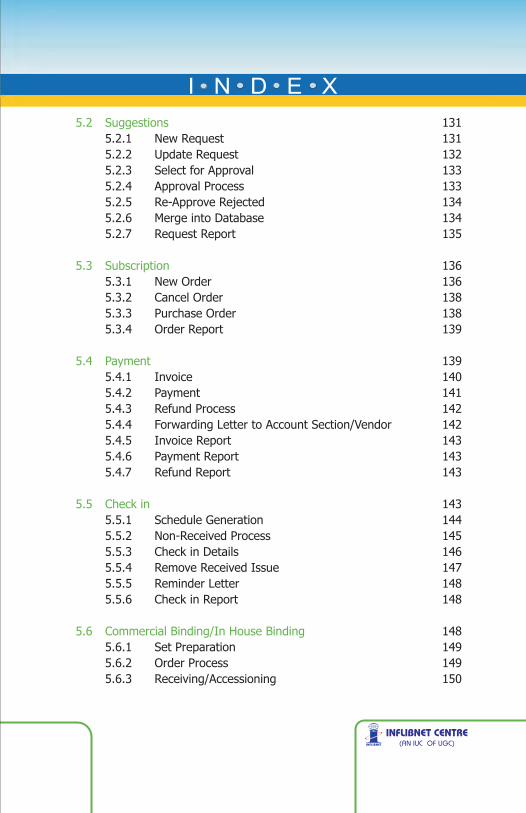
I N D E X5.2 Suggestions
5.3 Subscription
5.4 Payment
5.5 Check in
5.6 Commercial Binding/In House Binding
1315.2.1 New Request 1315.2.2 Update Request 1325.2.3 Select for Approval 1335.2.4 Approval Process 1335.2.5 Re-Approve Rejected 1345.2.6 Merge into Database 1345.2.7 Request Report 135
1365.3.1 New Order 1365.3.2 Cancel Order 1385.3.3 Purchase Order 1385.3.4 Order Report 139
1395.4.1 Invoice 1405.4.2 Payment 1415.4.3 Refund Process 1425.4.4 Forwarding Letter to Account Section/Vendor 1425.4.5 Invoice Report 1435.4.6 Payment Report 1435.4.7 Refund Report 143
1435.5.1 Schedule Generation 144
5.5.3 Check in Details 1465.5.4 Remove Received Issue 1475.5.5 Reminder Letter 1485.5.6 Check in Report 148
1485.6.1 Set Preparation 1495.6.2 Order Process 1495.6.3 Receiving/Accessioning 150
5.5.2 Non-Received Process 145
I N D E X

I N D E X5.6.4 Invoice Process 1515.6.5 Payment 1525.6.6 Binding Reports 152
6.1 Simple Search 1546.2 Boolean Search 1576.3 Advance Boolean 1576.4 Member OPAC 158
159189
6 OPAC 153
Keyword IndexAPPENDIX
I N D E X

ii
Software for University Libraries (SOUL) is a state-of-the-art integrated library management software designed and developed by the INFLIBNET Centre based on requirements of college and university libraries. It is a user-friendly software developed to work under client-server environment. The software is compliant to international standards for bibliographic formats, networking and circulation protocols. After a comprehensive study, discussions and deliberations with the senior library professionals of the country, the software was designed to automate all housekeeping operations in a library. The software is suitable not only for the academic libraries, but also for all types and sizes of libraries, even school libraries. The first version of software i.e. SOUL 1.0 was released during CALIBER 2000. The database of the SOUL 1.0 was designed on MS-SQL and was compatible with MS SQL Server 7.0 or higher. The latest version of the software i.e. SOUL 2.0 has been designed for latest versions of MS-SQL and MySQL (or any other popular RDBMS). SOUL 2.0 is compliant to international standards such as MARC 21 bibliographic format, Unicode-based Universal Character Sets for multilingual bibliographic records and NCIP 2.0/ SIP2 based protocols for electronic surveillance and control.
About SOUL 2.0
Major Features and Functions
Major features and functionalities of SOUL 2.0 are as
follows:
k
k
k
UNICODE-based multilingual support for Indian and foreign languages;Compliant to International Standards such as MARC21, AACR-2, MARCXML;Compliant to NCIP 2.0 and SIP2 protocol for RFID and other related applications especially for electronic surveillance and self check-out & check-in;

iii
k
k
k
k
k
k
k
k
k
k
k
k
k
k
k
k
k
Client-server based architecture, user-friendly interface that does not require extensive training;Supports multi-platform for bibliographic database such as My SQL, MS-SQL or any other RDBMS;Supports cataloguing of electronic resources such as e-journals, e-books, virtually any type of material;Supports requirements of digital library and facilitate link to full-text articles and other digital objects;Supports online copy cataloguing from MARC21 bibliographic database;Provides default templates for data entry of different type of documents. User can also customize their own data entry templates for different type of documents;Provides freedom to users for generating reports of their choice and format along with template and query parameters;Supports ground-level practical requirements of the libraries such as stock verification, book bank, vigorous maintenance functions, transaction level enhanced security, etc.;Provides facility to send reports through e-mail, allows users to save the reports in various formats such as PDF, Excel, MARCXML, etc.;Highly versatile and user-friendly OPAC with simple and advanced search. OPAC users can export their search results into PDF, MS Excel, and MARCXML format;Supports authority files of personal name and corporate body ;Supports data exchange through ISO-2709 standard;Update form Software as well as offline update;Global Search and replaceProvides simple budgeting system and single window operation for all major circulation functions;Strong region-wise support for maintenance through regional coordinators. Strong online and offline support by e-mail, chat and through dedicated telephone line during office hours; andAvailable at an affordable cost with strong institutional support.

iv
The SOUL 2.0 consists of the following modules. Each module has further been divided into sub-modules to cater to its functional requirements:
The in-built network feature of the software will allow multiple libraries of the same university to function together as well as access to the distributed databases installed at university libraries and union catalogue mounted at INFLIBNET using VSAT network.
k
k
k
k
k
k
AcquisitionCatalogueCirculationOPACSerial ControlAdministration
The module enables library staff to handle all the major functions, such as
Suggestions Management;Order Processing, Cancellation and Reminders;Receipt, Payment and Budgetary control;Master files such as Currency, Vendors, Publishers etc.; andReports.
k
k
k
k
k
Catalogue
Catalogue module is used for retrospective conversion of library resources. It also facilitates library staff to process of the newly acquired library resources. The strong features of catalogue module are:
Modules
Acquisition

v
k
k
k
k
k
k
Allows cataloguer to create their own templates for data entry of different library resources;Different templates for leaders and fixed fields of MARC21;Allows user-generated customized reports;Facilitates authority database of person name, corporate body, subject headings and series name;Supports copy cataloguing in MARC21 format by using ISO-2709 standard;Master database of publishers;
Circulation
This module takes care of all possible functions of circulation. Sufficient care has been taken in designing this module starting from membership management, maintenance and status of library items, transaction, ILL, overdue charges, renewals & reminders, search status and report generation according to the status of the items. The circulation module is fully compliant with the NISO Circulation and Interchange Protocol (NCIP) version 2.0 as well as SIP2 for electronic surveillance and RFID based transaction of the items. Major functions of the circulation modules are:
Membership;Transaction;Inter-library loan;Overdue charges;Reminder;Search status;Maintenance of the items such as binding, lost, replace, missing, withdrawl, etc.; andReport generation based on the various requirements.
k
k
k
k
k
k
k
k

vi
One of the major attractions of SOUL is its robust On-line Public Access Catalogue (OPAC). The OPAC has simple and advanced search facility with the minimum information for each item including author, title, corporate body, conference name, subject headings, keywords, class number, series name, accession number or combination of any of two or more information regarding the item. Major functions provided in the OPAC module are:
Simple Search;Boolean Search;Advanced Boolean Search;Displaying and downloading of records in MS Excel, PDF or MARCXML; andSearch support for the items that are in the acquition process in the library.
k
k
k
k
k
On-line Public Access Catalogue (OPAC)
Serial Control
Managing serials is the most complicated job for a library. The module keeps track of serials in the library effectively and efficiently. The searial control module is developed based on the KARDEX system and the following functions built into it:
Suggestions;Master databases;Subscriptions;Check-in of individual issues of journals;Payment, reminder, binding, and title history;Export / import by using ISO 2709 bibliographic exchange format;Article indexing of journal/book articles;Cataloguing of electronic journals; andKeeps track of the history changes of the journals.
k
k
k
k
k
k
k
k
k

vii
In addition to the features available in the Administration Module of the SOUL 1.0, some more features have been added to the administration module of the SOUL 2.0 as per inputs from the various SOUL users and requirements of the library staff. The module has been divided into three major sub modules for accommodating the new features. These three sub-modules are User Management, System Parameters and Masters. The Administration Module provides the following:
Grouping of users based on the policy;Transactional rights over the systems;Transaction level security to users;Various configuration settings such as labels, e-mail and other parameters related to the software use; andCommon master databases being used in modules.
k
k
k
k
k
Administration

viii
Pre-Requisites
Minimum Hardware Requirements
Supported Operating System Platforms
Other Pre Requisites
k
k
k
k
k
k
k
k
Processor Type : PIV or HigherProcessor Speed : 1 GHz or HigherRAM : Minimum 512 MB (1 GB Recommended)Free Hard Disk Space : 400 MB (Minimum)
Windows XP SP3 , Windows Vista , Windows 2003 Server, Windows 2008 Server (Latest Service Packs are always recommended)
Windows Installer Version 3.1 Dot Net framework Version 2.0Microsoft Data Access Components Version 2.8 (SP1)Microsoft Report Viewer 2005
To install all pre-requisites together please execute setup.exe from “PreReq” folder in your CD
Installation Procedure
Installation
Installation of SOUL 2.0 has been divided into following three parts:
1. Database Installation2. Application Installation3. Utility Installation
SOUL 2.0 can be installed on multiple RDBMS platforms. Present version of software has been tested on Microsoft SQL Server 200x and MySQL 5.x.
1. Database Installation

Server Name <Name of your system where Database Engine hasbeen installed>
Database Name
< Name of the database where you want to store SOUL data>
User Name
< Enter ‘sa’ if you have not created any user>
Password
< Keep 'soul20' in case of default installation or replace
with your password>
ix
Installation of database server is must before installing SOUL 2.0 application. The system on which you install RDBMS will become server for you that, installation can be done based on back-end database that you wish to use. Choose one of the following three options:
User does not have any RDBMS Installed
SOUL 2.0 is bundled with database engine which is based on Microsoft SQL Server 2005 Express. This database engine will be enough for libraries with smaller collection. This database engine can be installed by running setup.exe from “S20DBEN” folder of your CD. After setting it up, please follow the steps mentioned in option II.
Note : Set your server to listen TCP/IP by going in to Programs > Microsoft SQL Server > Configuration manger > Network Configuration > Protocols for MS SQL Server > TCP/IP Set to Enable.
User is having SQL Server 200x installed on server
As you have already installed database engine, now you need to create a new database and install default values, to do this, please run setup.exe from “S20DBCR” folder of your CD.In this screen you will be prompted to enter Server Name, Database Name, Username, Password.
Enter following values:
Option I :
Option II :
x
Proceed further by pressing next button. Your database will be created which you can use to refer in your ODBC Settings.
Now you will be required to create an ODBC entry pointing to your database. Please refer section “Creating ODBC entry” for more help.
User is having MySQL [or any other RDBMS]
If you wish to use any other RDBMS for database, create a new Database by any name, and execute the script provided in “Scripts” folder from CD.
Create an ODBC entry pointing to your database. Please refere section “Creating ODBC entry” for more help.
SOUL server utility is required for authentication of your package; SOUL Software Application will not run without installing this package. To install this utility, please run setup.exe from S20SERV” folder from your CD.
Here you will be prompted to enter your ID Key given by INFLIBNET Centre, then click on “next” button to complete installation. Once Installation is complete Soul Server application will start automatically. To activate product click on “Generate Handshake Key” button, Which will give you a unique handshake key. By supplying this key to INFLIBNET Centre you will get an activation key in return. Enter that key into your Soul Server Application & click on “Activate Product” to activate your Soul application. After entering activation key, one can start using product.
Note: You will be allowed to work for 7 days without activation.
Option III:
A. SOUL 2.0 Server Installation
B. SOUL 2.0 Application Installation
2. Application Installation

xi
SOUL 2.0 application can be installed by clicking setup.exe from “S20APP” folder.
After installation, while executing you will be asked to choose database through ODBC.
Go to control panel Open “Administrative Tools” Open “Data Sources (ODBC)” Select “User DSN” Tab, click on add button You will be asked to choose your database driver, here make a selection as per your database server type as explained in above cases (In case of default install choose “SQL server”)Enter your ODBC name, and name of your server and click “next” Choose authentication type ( For option I it will be SQL Server authentication) Enter Login Name and Password (For option I it will 'sa' and 'soul20' ) You will be prompted to choose name of your database, please enter the name of database that have created.
When you will run the SOUL 2.0 application for the first time, you will be prompted to enter DSN (Data Source Name), Here you have to choose the ODBC entry which you have created in earlier step. This will enable your application to connect to the database. You will also be prompted to enter IP address of the machine where 'SOUL Server' application has been installed, please enter IP Address in proper format.
This utility has been exclusively made for users who are changing from their earlier edition of SOUL to SOUL 2.0, To get this utility installed please execute setup.exe from “S20DBTR” folder. One can execute
3. Creating ODBC Entry
k
k
k
k
k
k
k
k
k
4. Running the Application First Time
5. Installing Data Transfer Utility

xii
this utility by going into programs > INFLIBNET Center > SOUL Data Transfer
Note: Before installing WebOPAC please check that IIS 6 or higher has been enabled in your system, for enabling IIS, please refer to your Operating System documentation.
To have WebOPAC installed in your server please execute setup.exe from “S20WEB” folder. There are instances that some of IIS configuration may not allow direct installation of WebOPAC due to authentication issues. In such cases, please copy entire 'WebOPAC' folder to your IIS's web root, create an application using IIS Administration.
The next step is to edit 'web.config' file which is available in 'WebOPAC' folder, please look for the following lines and feed-in the values which are marked as bold:
<addkey="ConnectionString"value="DSN=<YOURDSN>;UID=<YOURSQLUSERID>;PWD=<YOURSQLPASSWORD>;DATABASE=<YOUR SOUL DATABASE>;"/>
Please note that for security reasons it is recommended to create a separate 'System DSN' as explained in “Creating ODBC” section and assign different user name and password to your SOUL database.
To Install NCIP 2.0 Server please execute setup.exe from “S20NCIP” folder
To install SIP 2.0 Server please execute setup.exe from “S20SIP” folder
6. Installing Web OPAC
7. Installing NCIP 2.0 Server
8. Installing SIP 2 Server

xiii
SOUL 2.0 supports entry in almost all Unicode-based languages. However, to work with Indian languages Indic support must be enabled in your operating system. Following are the steps given below for enabling Indic support for your operating systems;
a. Install at least one Unicode font in your system, associated with the language that you want to view correctly, or install a Unicode font which contains large character set for many different languages.
b. Go to Start > Control Panel. c. If you are in "Category View", select the icon that says "Date,
Time, Language and Regional Options" and then select "Regional and Language Options".
d. If you are in “Classic View”, select the icon that says "Regional and Language Options".
e. Select the "Languages" tab and make sure you select the option saying "Install files for complex script and right-to-left languages (including Thai)". A confirmation message should now appear - press "OK" on this confirmation message.
f. Allow the OS to install necessary files from the Windows XP CD and then reboot, if prompted.
Windows XP has inbuilt InScript Keyboards for nearly all Indian languages. You can add them via Control Panel. You must follow the steps above before you perform the remaining steps.
Windows XP and Server 2003
Configuring Indic text
Inputting Indic text
Configuring your operating system for
Unicode-based Indic Script Support

xiv
a. In the "Regional and Language Options", click the "Languages" tab.
b. Click on the "Details" tab. c. Click the "Add" button to add a keyboard for your particular
language. d. In the drop-down box, select your required Indian language. e. Make sure the check box labelled "Keyboard layout/IME" is
selected and ensure you select an appropriate keyboard. f. Now select "OK" to save changes.
You can use the combination ALT + SHIFT to switch between different keyboard layouts (e.g. from a UK Keyboard to Gujarati and vice-versa). If you want a language bar, you can select it by pressing the "Language Bar..." button on the "Text Services and Input Languages" dialog and then selecting "Show the language bar on my desktop". The language bar enables you to visually select the keyboard layout you are using.
For the people who are not able to use the above InScript Keyboard, there are some other Keyboard Drivers available. For Phonetic typing BarahaIME (http://www.baraha.com) is suggested and for Remington typing IndicIME (http://www.bhashaindia.com) is suggested.
Indic IME 1 (v5.x) is available from Microsoft Bhasha India portal. This supports Hindi Scripts, Gujarati, Kannada and Tamil. Indic IME 1 gives the user a choice between a number of keyboards including Phonetic, InScript and Remington.
You do not need to do anything to enable viewing of Indic text.
Windows Vista, like Windows XP, has inbuilt InScript keyboards for nearly all Indian languages. You can add them via the Control Panel.
Windows Vista
Viewing Indic text
Inputting Indic text

xv
a. Go to Start > Control Panel b. If you are in normal view, select Change keyboards or other
input methods from under Clock, Language and Region. c. If you are in Classic view, select Regional and Language
Options. d. Select the Keyboards and Languages tab if it is not already
selected. e. Select the Change keyboards... button. f. Choose you desired language(s) from the list and expand
them using the '+' sign. Then, expand the item which says Keyboard and tick your preferred keyboard layout(s).
g. Select OK, and OK again to save the changes
The hot key combination for switching between languages is Left Alt+Shift.
For Phonetic typing, BarahaIME and for Remington typing, IndicIME is suggested.
This utility is available in 'DBBack' folder of CD supplied to you. It has been exclusively made for those users who are using Database Engine supplied along with SOUL 2.0 software.
This utility can be used for taking backup from SQL Server and to restore it in the same or another SQL server. It must be installed in the system where SQL Server is installed.This utility facilitate user to perform backup/restore operation in the following two ways:
This option can be used for regular backup operations, You are requested to take backup more frequently if number of transactions are more.
.
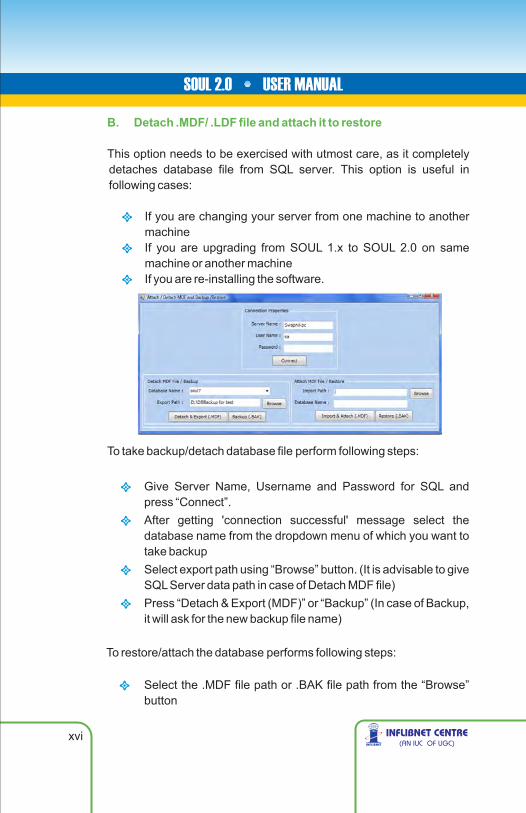
A. Create backup file (.BAK) and restore
Database Backup / Restore Utility
xvi
k
k
k
k
k
Give Server Name, Username and Password for SQL and press “Connect”.After getting 'connection successful' message select the database name from the dropdown menu of which you want to take backupSelect export path using “Browse” button. (It is advisable to give SQL Server data path in case of Detach MDF file)Press “Detach & Export (MDF)” or “Backup” (In case of Backup, it will ask for the new backup file name)
To restore/attach the database performs following steps:
Select the .MDF file path or .BAK file path from the “Browse” button
B. Detach .MDF/ .LDF file and attach it to restore
This option needs to be exercised with utmost care, as it completely detaches database file from SQL server. This option is useful in following cases:
If you are changing your server from one machine to another machineIf you are upgrading from SOUL 1.x to SOUL 2.0 on same machine or another machineIf you are re-installing the software.
To take backup/detach database file perform following steps:
k
k
k

xvii
k
k
Give the new database you want to restore as.Press “Import & Attach (.MDF)” or “Restore”
Note: In case of detach file backup it will detach the old database from the server, while in backup operation the old database will remain as it is.
Follow these procedures if you are having Network Version of SOUL 1.xIt is also recommended to take backup of existing system , before attempting installation of new version.
It is recommended to install SOUL 2.0 in new system (so for time being you can have both the system working in parallel).
After you have installed SOUL 2.0 in newer system, please take backup of your old database (which is available in MS SQL 200x) using backup/restore utility supplied, and restore the database on new system. Now your new system will be having two simultaneous database running over the system one will be of your old SOUL which will be having all the data and another will be of new SOUL 2.0 which is blank, execute data transfer utility for conversion from old database to newly created database.
In case if you want to install SOUL 2.0 in same system where you have installed SOUL 1.x, do not attempt to install database engine as you are already having SOUL database engine.
It is assumed that you have MS SQL Server 200x, therefore, you only need to create a new database(as explained in installation section) in your existing database engine and execute data transfer utility.
However continuing using SOUL 2.0 on MSDE 2000 platform is not being recommended, it is advisable to migrate to SQL Express 2005 or higher as soon as possible.
Upgrade Procedure for Existing Users

xviii
Data Transfer Utility
Data Transfer Utility is only required for those users who are using SOUL 1.0 and want to transfer their data to SOUL 2.0
SOUL 1.0 user can transfer whole database or part of their database as per their requirement
To transfer SOUL 1.0 data to SOUL 2.0 user should follow the below mentioned steps:
1. Create DSN to connect SOUL 1.0 Database
2. Create DSN to connect SOUL 2.0 Database
3. Select SOUL 1.0 DSN, give User Name and Password press “Connect to SOUL 1.0” button
4. Follow the same procedure to connect SOUL 2.0 DSN
5. Select the modules you want to transfer from SOUL1.0 Database as shown in figure.

xix
6. To transfer Catalogue records user have to mention Starting Record No, Ending Record No and Classification Scheme.
7. Press “Transfer” button.
It is advisable to transfer the data module wise (i.e. first of all choose General Master, transfer all the data, then choose Acquisition master and so on) rather than transfer it in to one click.
It is also advisable to transfer catalogue data in a bunch of 1000 records (i.e. 1 to 1000, then 1001 to 2000 and so on) to increase execution speed.

1
SOUL or any Library Management Software will work efficiently only if parameters (rules) for each operation are set before we start using it Live. These parameters are stored in the Set-up pages and can be accessed by selecting “Administration”. We must define rules (i.e. information on Vendors List, Budgets, Types of Resources, User Categories, Allocation of Accession Nos.etc), to configure the Software. Once these Rules for various processes are fed in the LMS (Library Management Software), it will function smoothly without any obstacles. Therefore, we will first set-up the requisite parameters by using options available from Administration Module.
Consult INFLIBNET SOUL Support Cell to understand the elements mentioned here and refer to Glossary at the end of the Manual. Here we can set rules and feed standard information needed for our LMS.
Select Administration from the menu which, in turn, provides following options:
1] User Settings 2] System Settings3] Acquisition Master 4] Catalogue Master5] Circulation Master 6] Serial Master7] General Master
1.0 Administration

2
1.1 User Settings
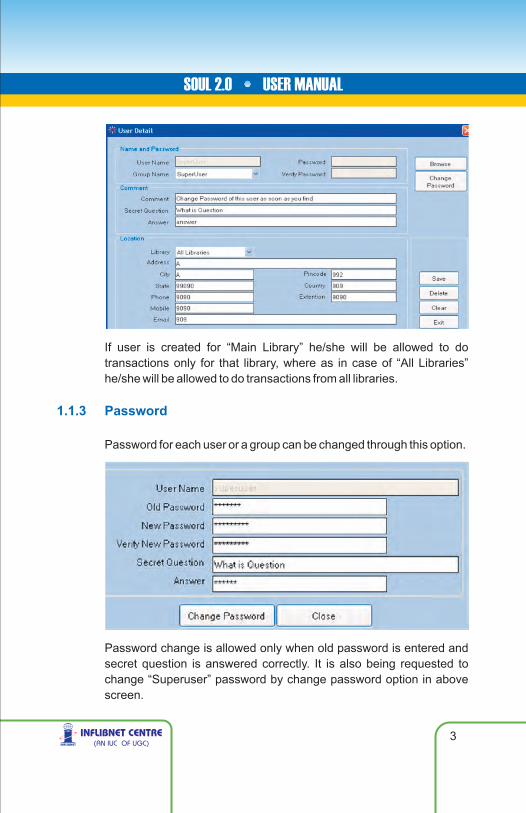
We can create new users of the SOUL software through this option. Requisite rights an be granted for each type of user. Please be ready with names of the users, password, module rights to be assigned to each type of user etc. You can also create a “Group of Users” to assign common rights to that Group.
It is recommended to create user group first, i.e. circulation user can be given only circulation rights. Please keep information on library administration groups ready before the rights are allocated e.g. circulation desk staff, books processing staff, serials control staff, IT Administrators (back-ups, system settings etc) and the modules to which you would like to assign rights to each of these Groups.
1.1.1 Group
1.1.2 User
After creating groups please create individual library system user pertaining to different groups. Rights assigned to that group will be automatically reflected to the newly created user.
3
If user is created for “Main Library” he/she will be allowed to do transactions only for that library, where as in case of “All Libraries” he/she will be allowed to do transactions from all libraries.
Password for each user or a group can be changed through this option.
Password change is allowed only when old password is entered and secret question is answered correctly. It is also being requested to change “Superuser” password by change password option in above screen.
1.1.3 Password

1.2 System Settings
1.2.1 Email Settings
1.2.2 Image Setup / Modification
Email settings allows to set-up an e-mail account from where the e-mails will be sent to the Users, Vendors or Institutions/Departments. This also allows to set-up masters for different types of letters, like standard reminder, letters to vendor, members etc.
Please consult your system administration for e-mail parameters/configuration.
You will be able to insert Institute's Logo or standard header image which will be used for any outgoing communication like Letter heads,
4

Membership Cards etc. The image can be selected using this option. Image uploaded through this option will be available as letter head and member card logo, If one wants to print letters on pre- printed stationary or if you don't want default image printed please select a blank picture with white background.
The following standard letters are available for use. You can also modify its text if needed, these letters will appear with Standard Header logo image uploaded using earlier option.
You will have options to modify following letters.
1.2.3 Letter Layout
5

6
1.2.4 Label Settings
You can design a template for the standard stationery labels – e.g. address-labels, barcode labels, spine labels of requisite size.
There are per-defined standard settings for Barcode, Book Card, Spine Label etc. You can also add new sizes as per your requirement and save them for future use.
1.2.5 Auto Letter Number Generation
This option will allow you to set standard reference, which should appear before dis patch sr.no. (e.g. INFLIB/ABD/ACQ/0809/781) in each type of standard communication you will be sending from the system. Set the reference code in this form.
7
In label settings only those labels which are having status as active will be displayed in letters and other communications, apart from any string, following interpretation will be taken for auto number generation, it will also append numeric sequence number after the prefix you have specified.
DD – Date (Numeric)
DDD- First Three Character of the day (i.e. MON,TUE...)
DDDD – Full Day Name (i.e. Monday, Tuesday ...)
MM – Month (Numeric)
MMM – First three characters of month (i.e JAN,FEB....)
MMMM – Full Month Name (i.e. January, February ....)
YY – Year (Numeric)
YYYY – Year (Numeric Four Digits)
Type of collections a library has includes Lending, Reference, Special Collection, Textbooks, Junior Books, DVDs etc.
The prefix selected for collection code will automatically appear before the accession number to separate the collection from each other in case of auto generation of accession number in acquisition. Defining collection type is also useful in case of membership category privileges while enabling “On-Premises” and “Overnight Issue” and number of reservations allowed for that category.
This is one-time information. Once we start processing the resources under each collection, changing the prefix/collection code will affect
1.2.6 Collection Type

8
stability of the system, please ensure you have given proper thought before assigning the codes and prefix alphabets to specific type of collection.
SOUL application needs to get connected with database server, Using this option one can specify the connection settings. This option is applicable only if you have multiple SOUL databases, you will have to restart your application after changing the connection to have effect of new database connection.
1.2.7 Connection Settings

9
1.3 Acquisition Master
1.3.1 Vendor Management
Vendors are the resources suppliers to the Library. Resources (stock) like Books, multi-media CDs, e-books, on-line databases are purchased by the library from these vendors. Vendor Management allows to store information about the vendors with whom the library deals frequently. The categorisation (Vendor Status) of each vendor is necessary. Providing master information will facilitate us to send letters, orders, reminders, emails etc to them. Vendors main categories are :

10
Supplier: The details of the Supplier (who is not a publisher) are stored here. Publisher: The details of the Publisher (who is not a supplier) are stored here.
Supplier-Publisher: The details of the Publisher who is also a Supplier are stored here. Blacklisted: The Supplier/Publisher/Binder are blacklisted due to various reasons are recorded here. Please do not delete the records of such parties - just categorise them as 'Blacklisted'. This will avoid any future transactions with these vendors.Binder: Choose the appropriate category (Vendor Status) when you are creating records for 'Binders' with whom Library deals with frequently.
You can always add new records to the vendors list. System will automatically assign unique identification Code for each vendor based on their status.
Select 'Browse' from the bottom menu-bar. It will allow you to browse all the vendors, click on the desired vendor from the list and modify or delete record (if needed) and press 'Save' button.
Selecting this option under 'General Master' can generate complete List of vendors. You can apply various combinations for display and search for the vendors by ticking the appropriate box(s) and selecting option from the drop-down menu.
To Edit Vendors Details or Delete Records
1.3.2 Vendor Report

11
If more number of fields are selected for display, it will be desirable to have the report in landscape, to have this, please choose landscape mode from page setup of report viewer.
SOUL uses the MARC format. Catalogue Administration needs knowledge of MARC standard and a bit of understanding how records are identified when they are searched for any purpose. Please refer to Appendix on MARC for understanding its mechanism.
Please DO NOT make any changes in the templates or values against any field, unless you are confident of the changes you are making.
Values against each tag in the templates under Catalogue Master take care of identifying the records, separating or grouping them when the user (including staff) seeks any information from the system. These templates will be ready with values needed in a standard library practices. Please ensure you are familiar with the values against each tag in these templates.
1.4 Catalogue Master

12
1.4.1 Leader
MARC records can be distinguished for various types of material by the specific codes used in Leader/06 (Type of Record) . The leader of a MARC record identifies number of bibliographic record types including following.
? Language material ? Non- musical sound recording -
? Manuscript language material
? Musical sound recording
? Computer file
?
Projected medium
? Cartographic material
?
Two -dimensional
non - projectable graphic
? Manuscript cartographic material ?
-
Three artefactdimensional or natural objects
? Notated music
? Kit
? Manuscript music ? Mixed material
MARC21 Tag Groups
Tag Group Function
0xx Bibliographic control numbers and coded information
1xx Main entries
2xx Titles, edition and imprint information, etc.
3xx Physical description, etc.
4xx Series statements
5xx Notes
6xx Subject access entries
7xx Added entries other than subject or series and linking fields
8xx Series added entries and holdings
9xx Local use fields
13
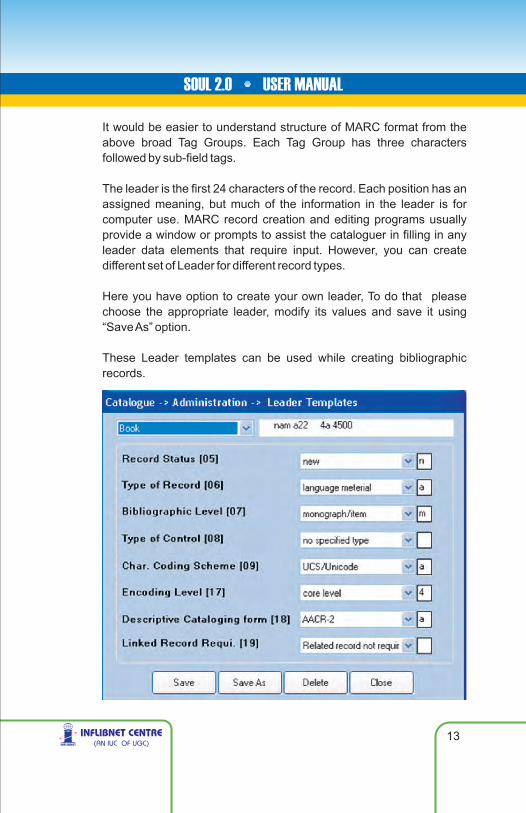
It would be easier to understand structure of MARC format from the above broad Tag Groups. Each Tag Group has three characters followed by sub-field tags.
The leader is the first 24 characters of the record. Each position has an assigned meaning, but much of the information in the leader is for computer use. MARC record creation and editing programs usually provide a window or prompts to assist the cataloguer in filling in any leader data elements that require input. However, you can create different set of Leader for different record types.
Here you have option to create your own leader, To do that please choose the appropriate leader, modify its values and save it using “Save As” option.
These Leader templates can be used while creating bibliographic records.
14
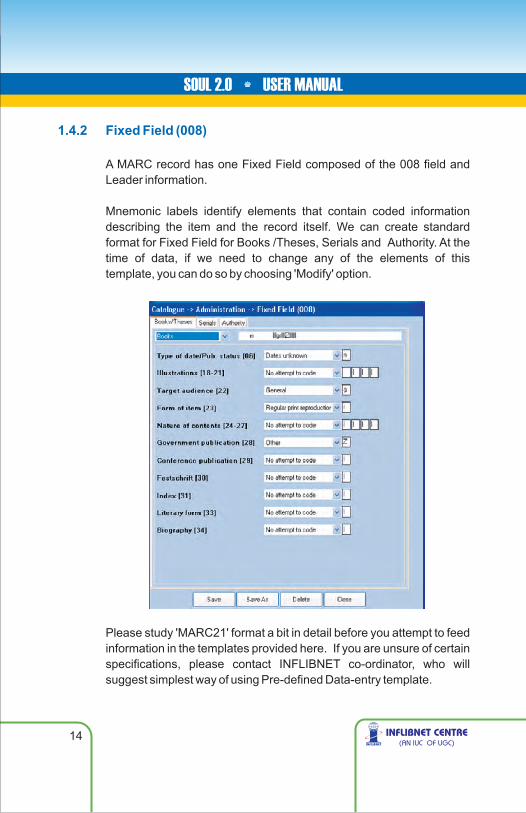
1.4.2 Fixed Field (008)
A MARC record has one Fixed Field composed of the 008 field and Leader information.
Mnemonic labels identify elements that contain coded information describing the item and the record itself. We can create standard format for Fixed Field for Books /Theses, Serials and Authority. At the time of data, if we need to change any of the elements of this template, you can do so by choosing 'Modify' option.
Please study 'MARC21' format a bit in detail before you attempt to feed information in the templates provided here. If you are unsure of certain specifications, please contact INFLIBNET co-ordinator, who will suggest simplest way of using Pre-defined Data-entry template.
15
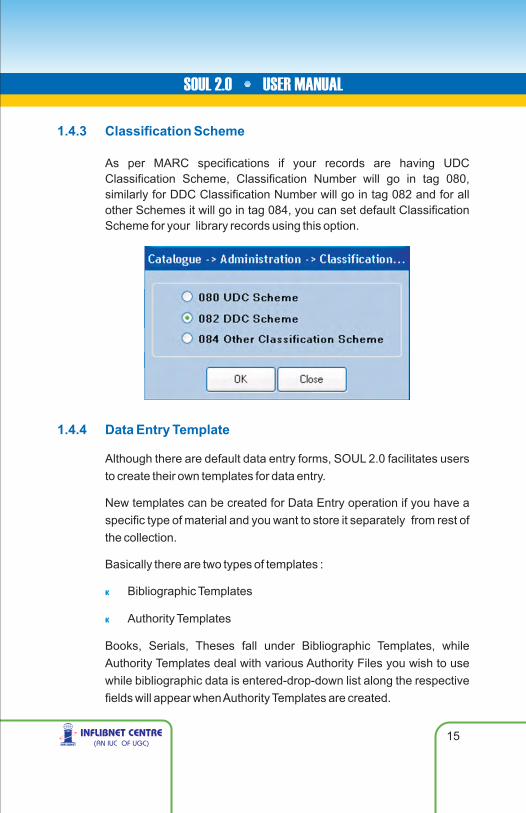
1.4.3 Classification Scheme
As per MARC specifications if your records are having UDC Classification Scheme, Classification Number will go in tag 080, similarly for DDC Classification Number will go in tag 082 and for all other Schemes it will go in tag 084, you can set default Classification Scheme for your library records using this option.
1.4.4 Data Entry Template
Although there are default data entry forms, SOUL 2.0 facilitates users to create their own templates for data entry.
New templates can be created for Data Entry operation if you have a specific type of material and you want to store it separately from rest of the collection.
Basically there are two types of templates :
Bibliographic Templates
Authority Templates
Books, Serials, Theses fall under Bibliographic Templates, while Authority Templates deal with various Authority Files you wish to use while bibliographic data is entered-drop-down list along the respective fields will appear when Authority Templates are created.
k
k

16
Data-Entry templates for following types of collection are being supplied by default;
1] Books2] Serials3] Theses
MARC format is used to deal with these Templates. Please refer to MARC manual for understanding description for each encoded Tag.To create new template use the following steps
First “Choose template type” you want to create (i.e. Bibliographic or Authority)
Then select “Template Option” Which enables you to choose any of the four options, i.e. New Template, New
Template Based on Existing, Edit Template and Delete Template
In case of “New Template” enter template name, else choose existing template you want to edit/delete or create a copy.
!!
!!!!
!!
k
k
k
k
17
Now choose corresponding MARC tag and press OK button, on left hand side you will have selection options for “Subfields” in your chosen tag, select/deselect the subfields as per your requirement, and then click add to template.
Similarly do this operations for all the tags and corresponding subfields to create your own template.
List of available templates can be seen by pressing “List Template” button.
This option allows you to create new template or Add/Edit/Delete existing templates. You can select any of the field of your choice and view the report using Catalogue->Reports->Basic Report/Advance Report.
Choose “New Template”, “Edit/View Template” or “Delete Template” from template administration option.
Enter template name and remark fields and select the report height and width.
Then select the fields which you want to display from the left side list box and drop it to the report layout area.
You can also resize the fields which you have selected
Please note that while entering page size one should enter size in “inches” only without specifying the unit of measurement.
1.4.5 Report Template
Create New Template for Report
k
k
k
k
k
k
k

18
1.4.6 Global Search and Replace
1.4.7 Delete Bibliographic Record (s)
Global Search and Replace option can be used selectively. Information in specified fields of all the records in the database can be corrected at one 'Go' with the help this option. For example, there may be occasions when we need to replace all the Dewey Class Nos. based on new edition (e.g. 001.64 was replaced by 004 in DDC20), or may be you need to correct Subject Term which was wrongly entered in some records. You also have an option to Search and Replace individual records after ensuring that the records chosen for correction are the right ones.
Please ensure you use this option with thorough understanding of its effects and be selective in using it.
Delete Bibliographic Records will allow you to delete range of records at one stroke. This option can be used when you are sure that certain records needs deletion rather than corrections.

19
you want to delete all imported records together.
To avoid mishaps of deleting records unknowingly please retain this authority only with the 'superuser' - and password should never be shared for any reason and no other user should be allowed to customise 'Administration' options.
Circulation Master will allow you to create structure of parameters needed to take care of circulation operation in the library. You should have data or your member categories and privileges, list of holidays etc. ready with you before you start filling in the Circulation Master.
Categories of various types of users are created and stored in this Master with their borrowing/usage rights/privileges.
Various Types of Users – UG Students, PG Students, PG Part-time Students, Faculty (Permanent), Visiting Faculty, Office Staff, Library Sc. Department Staff, Other Institution's Staff/Faculty and there can be many more. You will be able to set-up borrowing privileges for each type of category here.
This option is also useful in case you have imported bulk records, and
1.5 Circulation Master
1.5.1 Category

20
Feed appropriate information in requisite rows and columns created for
each type of category and save the data each time you update the
details.
Categories of members you want to create e.g. 00 for Undergraduate
students, 01 for Postgraduate students, 10 for Faculty Members etc.,
their membership duration e.g. 1/2/3 years or may be 30 years (Life
Time) for faculty members – membership subscription (if any), deposit,
maximum amount can accumulate against each category towards
overdue charges/any other charges; maximum no. of items allowed for
various types of borrowing material and the expiry date for that
category.
In the field named “Maximum Allowed Items” if no value is entered,
member belonging to that category can get total number of items
issued as sum of total items specified in “Maximum Allowed” for each
type of material. If user enters some value as “Maximum Allowed

21
Items”, this value will work as upper cap of total items, e.g. If you have
entered “Max Allowed Item” as 3, and in “Privileges” if you have entered
“Max Allowed” for books and theses as 3 and 2 respectively, In this
case, system will restrict maximum issues to 3, by-passing the total
allowable items as 5, So the member belonging the that category can
either 2 Books and 1 Theses, or all 3 Books or 1 Books and 2 Theses
i.e. limiting total number of items by 3.
“Category End Date” field can be set to semester/session end date for respective category to have auto effect in “Membership End Date” in Member Entry Form” of Circulation.

22
Privileges based on type of material you can allot privileges to each category of members e.g. UG Student will be allowed to borrow Textual Documents, maximum 2 nos. for 30 days; maximum reservations allowed 5 nos., each reservation will be kept aside for them for a period of 5 days; Overdue Charges (Fine) of Re.1/- per day per item (Phase I) and Rs.2/- per day per item in Phase II. Default Charges of Fine – Re.1/- per day per item. Likewise for all the categories of members this info is necessary.
To add/modify privileges for different type of materials click on “Add” or “Update” button, choose corresponding type of material and enter values as described above.
If your library has to assign Privileges based on Collection Type (optional), Click the corresponding tab and fill the requisite information.

23
Privileges based on collection type allows you to define type of collection that can be issued to each type of category for parameters such as “On Premises Issue” and time period e.g. UG student will be allowed to borrow only “General” and “Textbooks” but not “Reference” or “Special Collection”; while faculty may be allowed to borrow all types of collection. While UG students may be allowed to borrow “Special Collection” only on the library premises up to 4.00 pm and “Reference Collection” overnight for one day (may be with faculty permission).
Calendar is used for storing official public holidays declared for the library. It will allow you to select weekly-off for the library will be closed. The information stored here will be used to skip the due date of the material loaned (due date is calculated based on the privileges set for each category of member). The format for storing holiday details as follows.
1.5.2 Calendar

24
1.5.3 Member Type
This option is useful especially for book bank, here one can specify issue privileges based on type of member, these parameters will have effect in “Book Bank Issue” in Circulation module. Here one can give restrictions in terms of either “Maximum Money” and “Maximum Books” or both, At some libraries issues under Book Bank is restricted by total number of books, in this case one can enter maximum books, In case if you want to restrict number of book received by the total accumulated money, enter maximum money, issues under book bank can also be controlled by specifying both the values.
The date entered in “End Date” field will be default due date for issues under book bank category.
1.5.4 Customise Member Card
This option allows you to create new template or Add/Edit/Delete existing templates meant for printing membership number, barcodes, membership identity cards with requisite membership information etc.

25
The template facilitates customization of size of various data fields for membership card.
To create template for membership card
Choose “New Template”, “Edit/View Template” or “Delete Template” from template administration option.
Enter template name and remark fields and select the report height and width.
Then select the fields which you want to display on member card from the left side list box and drop it to the report layout area.
If you want to print the instruction on member card, write it in the right side panel.
You can check the preview of the template using member card option in circulation module.
k
k
k
k

26
1.5.5 Reset Transaction
1.5.6 Circulation Master Report
This operation allows user to clear transaction status of selected member, it will clear all the issued, reserved books, financial dues of member selected. This operation needs to be exercised only with administrator privileges.
We can generate two reports from Circulation Masters :
1] Institute List (with its Depts etc)
2] Membership Categories List
Serials Master needs standard/common data elements for the periodicals, journals, newspapers, magazines and serials that a library subscribes to. There are various types of collections – like Reference, Special Collection, and Bound Volumes of these periodicals.
Information needed for Serials Master includes Names of the vendors Frequency of the serials, Delivery Modes (Airmail, Surface Mail, Courier etc) Binding Agencies and types of Serials Collections (Reference, Special, BVs, Rare) etc.
1.6 Serials Master

27
1.6.1 Vendor (Publisher/Supplier/Binder)
1.6.2 Frequency
Serials Vendors can be of two types i.e., publishers (directsubscription) and Suppliers (Agencies). Binding Agents (Binders) is yet another types of vendor that are required for binding serials.
Arrival schedule for check-in of serial is generated based on the information provided in publication frequency master. Therefore i t i s necessary to codify various types of frequencies of the journals subscribed by the library. Even irregular frequency is a one type of frequency – assign code for these journals. Users are requested not to delete any value from this master as it will reflect on status of a continuing publication.

28
1.6.3 Delivery Mode
1.6.4 Binding Type
Serials are received through various Delivery Modes. Assign unique code to each type of mode – e.g. A for Airmail, C for Courier etc.
In large libraries specific type of binding is used for ease of identification and to separate Bound Volumes Collection from other BVs. This master takes care or three aspects,
1. Colour of binding: if you want to specify colour, prefix the code with “C”

29
2. Type of Binding: if you want to specify type of binding e.g. cloth, leather etc. Prefix “T” in code
3. Embossing type prefix “E”
Entries in above form will get reflected at time of order process for binding of serials.
We receive serials, which are published from India or abroad. To differentiate Indian editions from International editions, we should assign code for specific journal. All the assigned codes are stored in the Edition Master window (e.g.F – International edition, I – Indian edition, A – Asian edition, E – European edition etc).
We can generate variety of reports from these masters such as:Vendor Report; Frequency Report and Delivery Report.
1.6.5 Edition
1.6.6 Serials Master Reports
30
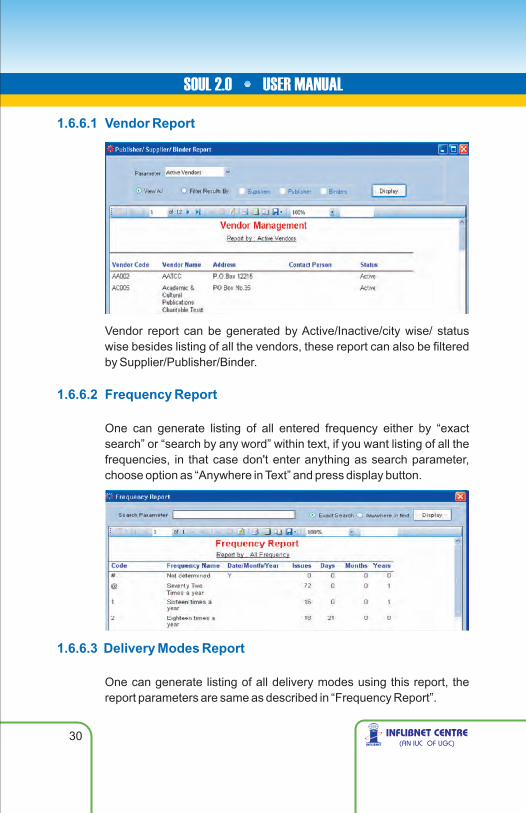
1.6.6.1 Vendor Report
1.6.6.2 Frequency Report
1.6.6.3 Delivery Modes Report
Vendor report can be generated by Active/Inactive/city wise/ status wise besides listing of all the vendors, these report can also be filtered by Supplier/Publisher/Binder.
One can generate listing of all entered frequency either by “exact search” or “search by any word” within text, if you want listing of all the frequencies, in that case don't enter anything as search parameter, choose option as “Anywhere in Text” and press display button.
One can generate listing of all delivery modes using this report, the report parameters are same as described in “Frequency Report”.

31
1.7 General Master
General Master provides options depicted in menu bar reproduced below
Please ensure following info/data is ready before we start feeding information in the respective options which are self-explanatory.
Default Currency (Indian Rupees), Conversion rates for frequently used foreign currencies.
Income Budget– Year-wise funds available under various Grants, e.g. UGC, State, Central Budget, Dept budgets etc.Expenditure Budget Heads- e.g. Books, Periodicals, Newspapers, Binding, Online subscriptions, e Books, Multimedia etc. Or may be allocations to variousBranches/Departments
Master/Head/Central Institute, various Departments, Courses offered etc.
Currency :
Budget :
Institute :

32
Subjects :
Physical Media
Standard List of Subject Headings assigned to each Class No.
Various Types of material in the Library – e.g. printed books, multimedia CDs, audio-visuals,charts, videos, periodicals and Bound Volumes etc.
Set default currency as needed – (in our case it may be Indian Rupees). Entry in “Currency Master” is reflected mainly at ordering and invoicing process. It is recommended to always update the conversion rates for commonly used currencies – may be every month. This option also allows us to add new currency with its code and its Conversion Rate, if needed. Currencies of most of the countries are already stored here with their respective codes – please note down the codes for frequently needed currencies for your Library, such as US Dollar, British Pound, Euro etc. It will be useful while entering data in Acquisition/Cataloguing.
:
1.7.1 Currency
Add :
Modify :
Select Currency Management -> Enter Currency Code -> Currency -> Country -> Date -> Conversion Rate –> and 'Save'. If Code/Country it will allow you to add the new currency with requisite details.
Double click on the first column of the currency you wish to modify edit details and click 'Save'.

33
Delete : To delete any record, double click on first column, select the currency you wish to delete. 'Delete' button will get activated. Click it to delete the desired currency permanently from the database.
In 'Browse' mode if you click on any column in the window, the data in that column will get sorted.
This is a crucial master. The information under various budget heads (Income and Expenditure) is stored here. In a college or a university, there are number of departments/centres. There are number of separate budgets from which a library adds resources to its collection. There are a number of budget heads. You can Add, Delete, Modify, Income and Expenditure heads. Feed information about the amounts allocated etc in this from this master sheet. Since Many decisions depend upon the latest balances available under various heads –Ensure you have correct details stored here. Access to this master should be restricted to authorised users dealing with budgets. SOUL facilitates multiple sources of Income and Expense head as explained in following case;
Let us take one practical example typical to a University Library:In 2008-09 a university library received (Income) grants from UGC (Rs.5,00,000/-) and from State Govt (Rs.2,00,000/-), Apart from that there is a special grant for Physics (Rs 1,00,000) from some other sources. Out of this different Expenditure Heads are created based on either norms or decisions of the Library Committee. The decisions are as follows
1. Allocate Rs. 3,00,000/- for Books from UGC Grant2. Allocate Rs. 2,00,000/- for Serials from UGC Grant3. Allocate Rs. 1,25,000/- for Books from State Govt. Grant4. Allocate Rs. 75,000/- for Serials from State Govt. Grant5. Apart from Special Grant for Physics (Rs. 1,00,000) allocate
50,000 more from books budget to enhance the budget for physics.
1.7.2 Budget

34
Now at the outset create three “Income Heads” by selecting 'Add' option and filling up total grants under each head. Allocate appropriate code to each of the heads mentioned above when you enter information on each fields.
Now create all the “Expenditure Heads” below Income Heads – and then apportion requisite amounts to each of the heads (Income and Expense).
To receive/add amount in Income Head, please click “Add” button under income tab, you will be prompted with following pop-up entry screen in which the received amount can be entered.
50,000
3,00,000
2,00,000
1,00,000
1,25,000
75,000
ExpenseHead
Books Budget
ExpenseHead
Physics Books
ExpenseHead
Serial Budget
Income HeadUGC Grant5,00,000
Income HeadSpecial Grant for Physics
1,00,000
Income HeadState Govt. Grant
2,00,000

35
Source of amount in “Expense Head” can be either from Income or Expense head, to enter amount in expense head, first choose “Expenditure” tab and then choose proper source of amount (Either income or expense) and fill-in requisite details as per your selection criteria.
IT staff or the library system administrator should take help of the Head Librarian or the Dy. Librarian before making any changes to the information stored here. Please remember that there are chances of getting misleading reports if the Master information is not correctly
fed-in. Amounts of Orders, Payments made, ad-hoc grants etc are deducted or added from the opening balances stored here.
36
In Nutshell, To Create new Income/Expenditure Head, select 'Budget' -> On left side box of Budget Process screen click <Add>, Enter 'Code' and 'Heading' for Income/Expenditure as needed.
To Apportion amounts received against/allocated to each Income/ Expenditure Head, select 'Budget' - > On right side box of Budget Process window click <Add>, select appropriate Head from the drop-down menu, fill-up the amounts on Allocation of Budget window and <Save> to update the figures.
To Reallocate/transfer of amounts from one head to another please use 'Budget Transfer' option from the top menu Bar.The consolidated budget report can be generated any time by selecting 'Budget Report' option.
There may be occasions (mainly during the last few months of the financial year) when you may have to transfer some unspent amounts of some of the Budgets to other Budget Heads. In some cases you may have to transfer unspent budgets to next financial year.
Use Budget Transfer option to make any changes in the already allocated/apportioned Budget Heads. Please note that you can also use transfer options for carry forward budget to next year within same budget head.
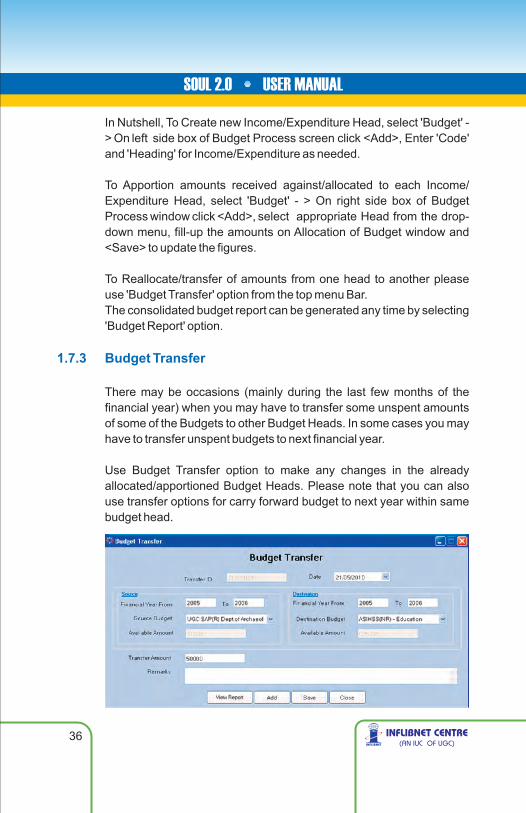
1.7.3 Budget Transfer
37
In Nutshell, to transfer/reallocate amounts from one Income/ Expense Head to another;
1] Specify Financial Year of the Source Budget Head2] Select Source Budget Head from drop-down Menu3] Available amount will automatically appear4] Specify amount needed to be transferred5] Feed authorisation information in 'Remark'6] Choose Financial Year of the Destination Budget Head7] Select Destination Budget Head from drop-down Menu8] Save the record 'Budget updated message will appear.
1.7.4 Institute Detail
Under this master option, we store detailed tree-branch information of our Institute/University/College/Library, its various Departments or there might be separate Courses or Designations. The operations are almost self-explanatory while creating, modifying or deleting information from these records.
Please ensure following data is ready before we start feeding information.
Name of the Institution : University / College / CentreNames of the Faculties : e.g. Arts, Commerce, Law, ScienceNames of the Departments: e.g. Sociology, Psychology, Physics,
Accounting etc.Names of the Courses : e.g. Under Graduate, PG Diploma,
PhD, PG, etc.
Following typical University tree-structure will explain the logic observed by SOUL in creating the hierarchical relationship between various departments and its courses and the end-user. Follow top-down sequence to fill up the requisite information in required fields.
38
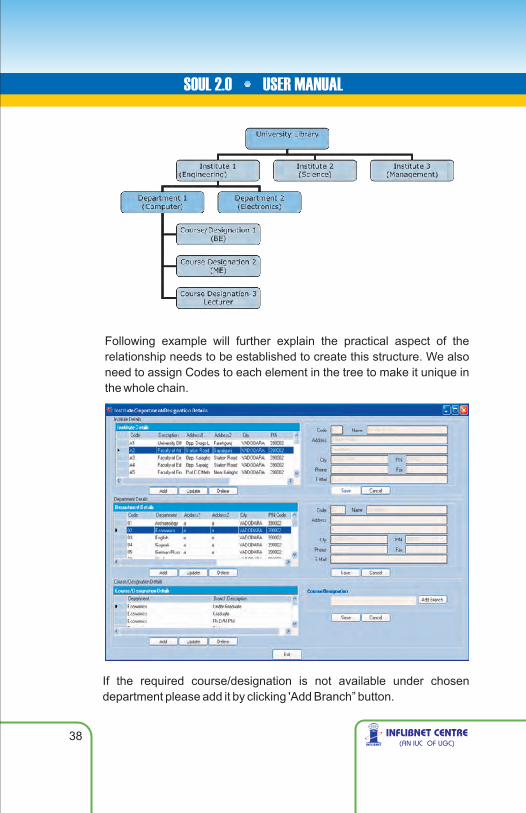
Following example will further explain the practical aspect of the relationship needs to be established to create this structure. We also need to assign Codes to each element in the tree to make it unique in the whole chain.
If the required course/designation is not available under chosen department please add it by clicking 'Add Branch” button.

39
Course/Designation Details
The data in this window needs to be entered with proper codes. Please ensure you have exhaustive list of all the details. You will be allowed to add new codes but you will not be able to delete any of the codes later, once you start using them in the live conditions.
In Nutshell, To Create a new Institute / new Branch select 'Add' and assign unique code, fill-up requisite details like address etc and 'Save'.
To Create a new Department under that Institute/Branch, bring the highlighter on the row of the newly created Institute/Branch in the upper-window, and select 'Add' in the left middle window meant for department details – assign new code and feed address etc and Save'.
To Create a new Course/Designation under new Department, bring the highlighter on the row of the newly created department in the bottom window, and click 'Add Branch' in the right window – after feeding appropriate information, click 'Save'.
To Update (or Edit/rectify) information in any of the records, follow the same steps mentioned above, but click 'Update' instead of 'Add'. Please do not forget to 'Save' corrected/updated details.

40
To Delete any of the branches, follow the same steps mentioned to Add/Update information, but click 'Delete' to remove the record from the database.
'Please remember – SOUL will not allow you to delete the Institute unless the department and branches below have no records, i.e. the institute will be deleted only if there are no members,no course/designations/department, entered below the respective head.
Reports / Lists
You can always generate master list of the records under institute details by selecting institute report.
You can choose default country by selecting this option. You can 'Add' new country and it's code by feeding information here. You can select default country by ticking the box against the country code.
1.7.5 Country Master

41
Codes have been allocated to all the countries of the world. If you have to 'Add' new country then this option can be used. If you need to delete any country for any reason click on the country code line and click 'Delete' and click 'Save' to effect the change that you have made in the master records.
You can choose default language by selecting this option. You can 'Add' newlanguage and it's code by feeding information here. Codes for most of the languages of the world are already fed in. You have option to Add' and 'Delete' any of the codes for the language. Language entered here will be available for your bibliographic records.
1.7.6 Language Master
1.7.7 Subject Master
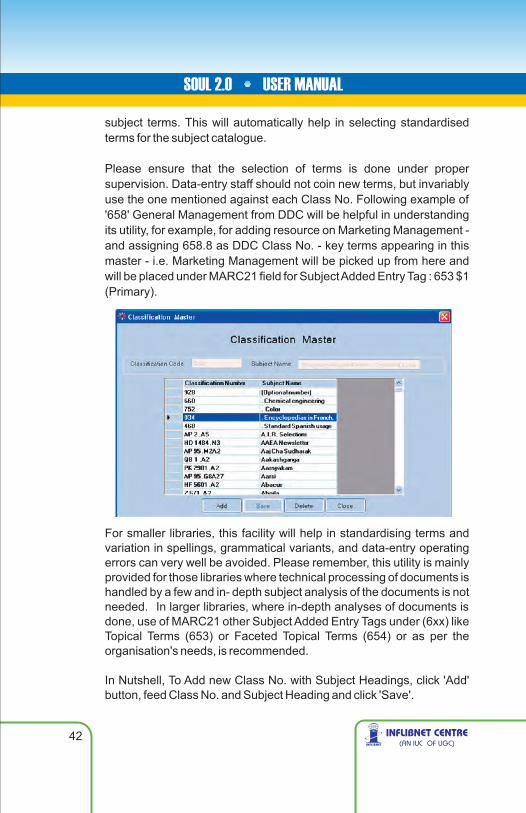
Screen under this menu-option allows you to feed Class No. to take advantage of the subject searches conducted and also to pick-up Subject-Heading while creating records for the titles added.
This is a unique facility of SOUL. Standard Keywords, Subject Headings fed-in Classification Master will be automatically picked up and placed under 'Uncontrolled Terms' (subject headings) when new record is created for the resource titles. It is just like an Authority File for
42
subject terms. This will automatically help in selecting standardised terms for the subject catalogue.
Please ensure that the selection of terms is done under proper supervision. Data-entry staff should not coin new terms, but invariably use the one mentioned against each Class No. Following example of '658' General Management from DDC will be helpful in understanding its utility, for example, for adding resource on Marketing Management - and assigning 658.8 as DDC Class No. - key terms appearing in this master - i.e. Marketing Management will be picked up from here and will be placed under MARC21 field for Subject Added Entry Tag : 653 $1 (Primary).
For smaller libraries, this facility will help in standardising terms and variation in spellings, grammatical variants, and data-entry operating errors can very well be avoided. Please remember, this utility is mainly provided for those libraries where technical processing of documents is handled by a few and in- depth subject analysis of the documents is not needed. In larger libraries, where in-depth analyses of documents is done, use of MARC21 other Subject Added Entry Tags under (6xx) like Topical Terms (653) or Faceted Topical Terms (654) or as per the organisation's needs, is recommended.
In Nutshell, To Add new Class No. with Subject Headings, click 'Add' button, feed Class No. and Subject Heading and click 'Save'.

43
To Modify any Class No., you will have to delete the entry for that Class No. and add new Class No. with appropriate Subject Heading(s).
To Delete any Class No., just select the row and click 'Delete' button.
Please ensure you have all correct Subject Headings against each Class No., including its spellings before you start data operation.
You have to assign specific codes to variety of items (resources) to the type of stock library has. These codes will be used later when individual records for various items are created. You can add new codes, using this option.
It is also recommended not to delete any existing codes as it may affect stability of the circulation system, as circulation rights are defined in context to type of material.
You can add Library/Institute that becomes a member of our library. To facilitate Inter Library Loans, one should feed details of that Library/Institute. The details to be fed are self-explanatory.
1.7.8 Physical Media Master
1.7.9 New Library (for Inter Library Loan/External Institutional Members)
44
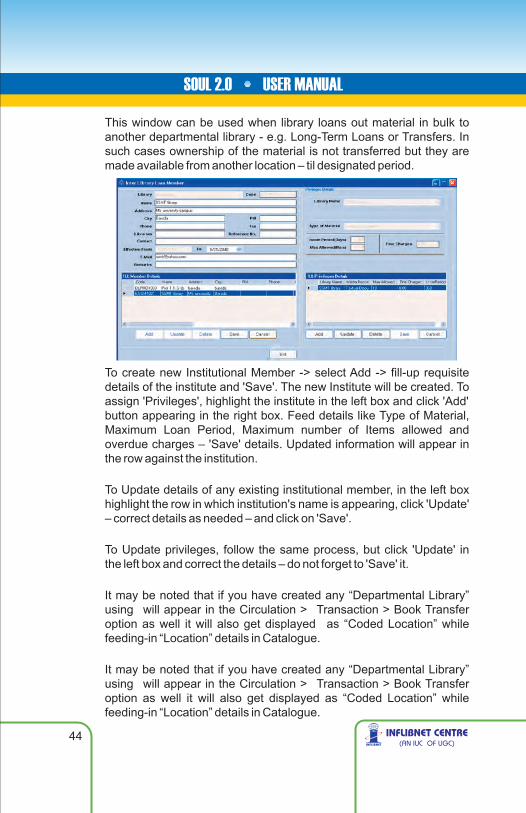
This window can be used when library loans out material in bulk to another departmental library - e.g. Long-Term Loans or Transfers. In such cases ownership of the material is not transferred but they are made available from another location – til designated period.
To create new Institutional Member -> select Add -> fill-up requisite details of the institute and 'Save'. The new Institute will be created. To assign 'Privileges', highlight the institute in the left box and click 'Add' button appearing in the right box. Feed details like Type of Material, Maximum Loan Period, Maximum number of Items allowed and overdue charges – 'Save' details. Updated information will appear in the row against the institution.
To Update details of any existing institutional member, in the left box highlight the row in which institution's name is appearing, click 'Update' – correct details as needed – and click on 'Save'.
To Update privileges, follow the same process, but click 'Update' in the left box and correct the details – do not forget to 'Save' it.
It may be noted that if you have created any “Departmental Library” using will appear in the Circulation > Transaction > Book Transfer option as well it will also get displayed as “Coded Location” while feeding-in “Location” details in Catalogue.
It may be noted that if you have created any “Departmental Library” using will appear in the Circulation > Transaction > Book Transfer option as well it will also get displayed as “Coded Location” while feeding-in “Location” details in Catalogue.

45
In Nutshell, To Add new Institute as a member, select 'Add' option from left column of the window. Feed appropriate details and click 'Save'.
To Edit/Update details of the existing institute, select 'Update' option from left column of the window, update/correct the details and click 'Save'.
To Delete record of any institute, click on the institute appearing in ILL member box, and click 'Delete'. 'Are you sure' message will appear. If there are any records/transactions pending against that institute, you will not be allowed to delete the record for that institute.
ILL privileges are to be entered in the right column of the screen provided.
You will be able to take out the following reports from this General Master by clicking respective button under the General Master menu.
1.7.10 General Master Reports
To display all entered currency, their codes and conversion rates
To see current status of each budget head.
For listing of all budget transfer operation carried out between specific period
To see hierarchical list of Institutes, Departments and Branch within each institute
Currency Report
Budget Report
Budget Transfer Report
Institute Report.

46
The library acquires resources based on suggestions/ recommendations made by its users (in use of Academic Libraries) faculty/library committee members/students. Some libraries do select resources proactively by analysing statistics extracted from MIS (Management Information System) and going through the publishers lists or their websites.
Main task of the LIS staff is to input the suggestions/ recommendations received, into the system along with the name and/or membership number of the user (faculty/student). This helps us in informing the requester as soon as the suggested item is added in the library or its current status. Therefore before creating the suggestion record, you should have following information ready with you:
Accurate name of the author and correct title of the item (along with other details like edition, ISBN, broad subject, year of publication, type of document etc)Name of the faculty/student (along with the Membership No./Department)Budget details (Department Budget / Central Library Budget / Faculty Budget etc.) along with budget code against which purchases are to be madeNow click <Acquisition> and select the first option <Suggestion Management>, you get following screen with sub-options:
k
k
k
k
1] Request 2] Gratis Item3] Select for Approval 4] Approval Process5] Direct Approval 6] Export/Delete Rejected7] Letter of Approval
2.0 Acquisition

47
From these sub-menus you will be able to successfully manage the complete process of ordering, right from creating records for suggestions received, to placing the order with designated vendors.
This module deals with suggestion management comprising of request processing and the approval of the same.
It is assumed that you have filled up 'Master' information of currency, departments, vendors, etc (if not, please select option under Administration –> Acquisition Master etc. and create requisite Master Records for each of the options).
2.1 Suggestions
2.1.1 New Request
Now select 'Request' from the options and you get following screen for creating records for the suggestions received:
SOUL will automatically allocate system-generated unique sequential Request No. You have an option to feed date of request and the department (from the drop-down menu) and other requisite details.

48
If you want to process requests for “On Approval” items, you are requested to choose request status as “On Approval” in this case you will be prompted to select supplier from whom you have received “On Approval” items.
Before you process any new addition request – please ensure that the title is not already on order or on stock. Feed details of the requested title and select 'Duplicate Check'. 'Duplicate Check' can be performed by selecting one option or variety of combinations of 'Title', 'Author', 'ISBN', 'In Process', 'Catalogue'. 'Duplicate Check' should be done to take decision on whether the suggested title is already on our stock or in 'On Order' file. 'Duplicate Check' examples:
If user wants to enter request for same title again, the data can be obtained in request window by double clicking the desired title.
Once you decide on the suggestion, select 'Save' if 'Suggestion' is accepted and library has process it further for “Approval”.
In case if you want to modify existing suggestion, please choose browse button, here you can filter out particular requests by various criteria e.g. Request Number, Requester, Department, etc.

49
Always remember to 'Save' the request – else the record will not be created.
'Gratis' is a donation of document to the library – and you need to accession it. The details required from the screen shown below are straightforward. It would be a good idea to print slips ready with details needed for such additions – it will help in putting the data accurately without wasting time on looking for the details in each case.
2.1.2 Gratis Item
2.1.3 Select for Approval
The next natural step is to get the received suggestions approved from the concerned department or the librarian or the library committee. You may not send all the suggestions for approval to one department/ committee – and, therefore, you will have to select the option Select for Approval' from the menu under Suggestion Management. This operation will allow you to select suggestions received for a specific department or to be charged to a specific budget-head. Choose

50
appropriately and 'Save' the approval list. You will be able to generate approval lists, department-wise or budget-wise. Once you get the department approval or budget-holders approval, you will initiate the approval process – to take care of final steps in placing orders.
Once you send the list of selected suggestions for approval to the library committee/department, you may receive approval for all the titles or a few may get rejected or may remain on Hold till next budget etc. Select 'Approval Process' to sort out such titles.
'Approval Process' consists of two steps for each title:
[i] Approved budget selection and no. of copies approved and[ii] Approved by (either a Library Committee meeting date, etc).
Click the box against titles(s) approved and fill in the approval copies.
Now as second step in 'Approval Process' you have to fill up details like 'Approved By'. For this purpose click 'Approve' – Pop-up Box of 'Approved By' will appear. Fill up appropriate details – and also the 'Remark' – meeting date / name of the officials etc. and click 'Save'.
This completes the process of 'Approval' – now the titles will be treated as 'To be Ordered'.
2.1.4 Approval Process
51
Please remember to follow the 'Approval Process' for all the titles entered using 'Gratis option'. Only 'Approved Gratis' items will be p laced d i rec t l y under 'Access ion ing ' poo l sk ipp ing'Ordering/Receiving' process as gratis items doesn't requires ordering and payment.
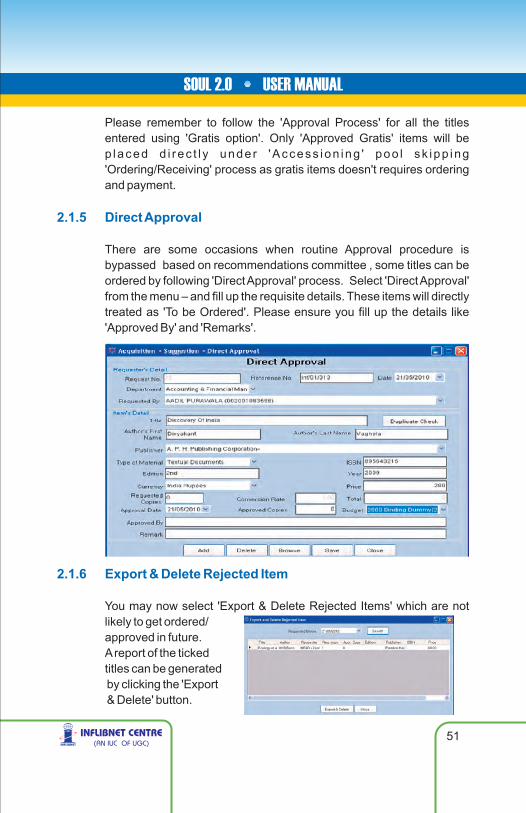
There are some occasions when routine Approval procedure is bypassed based on recommendations committee , some titles can be ordered by following 'Direct Approval' process. Select 'Direct Approval' from the menu – and fill up the requisite details. These items will directly treated as 'To be Ordered'. Please ensure you fill up the details like 'Approved By' and 'Remarks'.
2.1.5 Direct Approval
2.1.6 Export & Delete Rejected Item
You may now select 'Export & Delete Rejected Items' which are not likely to get ordered/approved in future.A report of the ticked titles can be generated by clicking the 'Export & Delete' button.
52
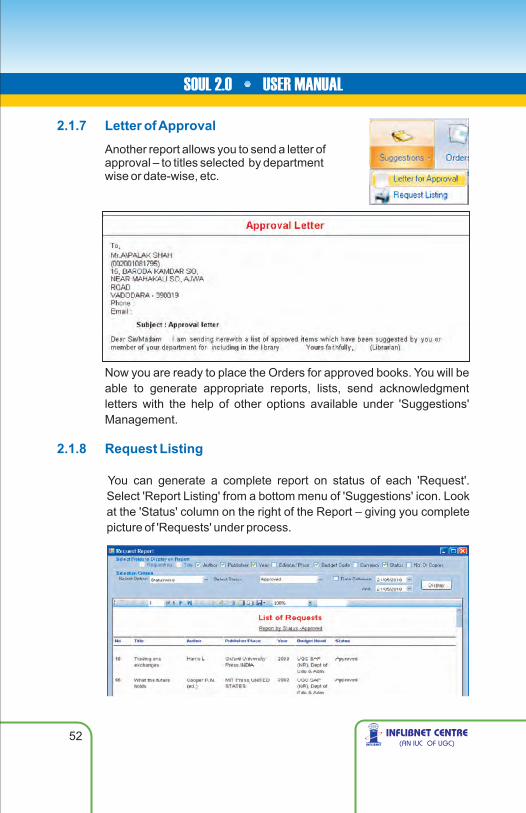
2.1.7 Letter of Approval
Another report allows you to send a letter of approval – to titles selected by department wise or date-wise, etc.
Now you are ready to place the Orders for approved books. You will be able to generate appropriate reports, lists, send acknowledgment letters with the help of other options available under 'Suggestions' Management.
You can generate a complete report on status of each 'Request'. Select 'Report Listing' from a bottom menu of 'Suggestions' icon. Look at the 'Status' column on the right of the Report – giving you complete picture of 'Requests' under process.
2.1.8 Request Listing

53
2. 2 Order
The titles brought into the system through 'Suggestion Management' are now ready for placing orders.
Orders Management allows you to
i] Place new order (which have passed through Approval Process)ii Place new order directly iii] Print/e-mail purchase order (with desired options)iv] Send reminder letter to vendors (for non-supply of orders)v] Cancel any specific order
Before you activate 'Order Management' process, please ensure data for all the vendors is already fed-in Acquisition Master under Administration Module.
Now select 'New Order' from the menu appearing after clicking 'Orders' and you will move to order process with following screen.
2.2.1 New Order

54
Order No., Order Reference, Order and Date are generated automatically based on the information provided in the master.
Now you have to place orders for the approved titles to different vendors depending on their 'Specialisation', e.g. some vendors specialise in supplying only IT books, some on social science, engineering, etc. Select the vendor from the drop-down menu with whom you wish to place the orders. Vendor's address and other details will automatically appear in the fields (as you have fed information in Vendors Master records).
Select 'Add Items'. Following screen will appear:
You have a choice to filter approved titles by department, budget, or a supplier. Select all or tick only the required titles for a specific vendor selected from earlier window. For example you may like to place order with Globe Publications for IT related titles from the above list. Tick mark only those titles and select 'Save' to proceed to the next step in placing the orders.
Once you finalise all the titles for order, please check the values of currency, conversion rate, copies to be ordered etc for each title. Press “Save” button to complete the process.
This will update the 'Order' file and you will either be able to print the orders and send print copy to the vendor or through e-mail.

55
2.2.2 Cancel Order
Before finally sending the orders, if you need to Cancel any of the titles from the generated 'Orders' – choose 'Cancel Order' and tick the items which you want to delete from the 'Order'. Cancelling Order is also necessary to release the committed budget blocked by the unsupplied orders, ( specially for books that vendor is unlikely to supply).
2.2.3 Direct Order
There may be occasions when you will have to place 'Direct Orders' with specified vendors, bypassing suggestion and approval process. SOUL allows you to do that with the help of 'Direct Order Process'. Following window deals with 'Direct Order' processing. Select vendor from the drop-down menu and enter expected date of delivery.

56
'Add item' will open the pop-up 'Direct Approval' window to place the direct order. You need to have Direct Approval (either from the Library Committee or the Head of the Department or appropriate authority). Mention the details in appropriate fields including budget details etc and Save.
The remaining steps are the same as in case of placing 'Orders'.
Now select 'Order Management Report' from the menu under order management. You will be able to print this report or even be able to send an e-mail attached with this report to whosoever you want to. You can also export / save the report in Excel or .PDF format. Filter on 'Orders' - 'Generated', 'Cancelled', 'Completed', 'Partial' can be applied as required.
You will be able to 'Print Order' by selecting appropriate option from the 'Order Management' menu. To 'Print Order' (or other reports), follow the options under “Order Management Report” that are self-explanatory.
All the reports have a facility to browse pages, print, save etc with appropriate buttons appearing on top of the report window.
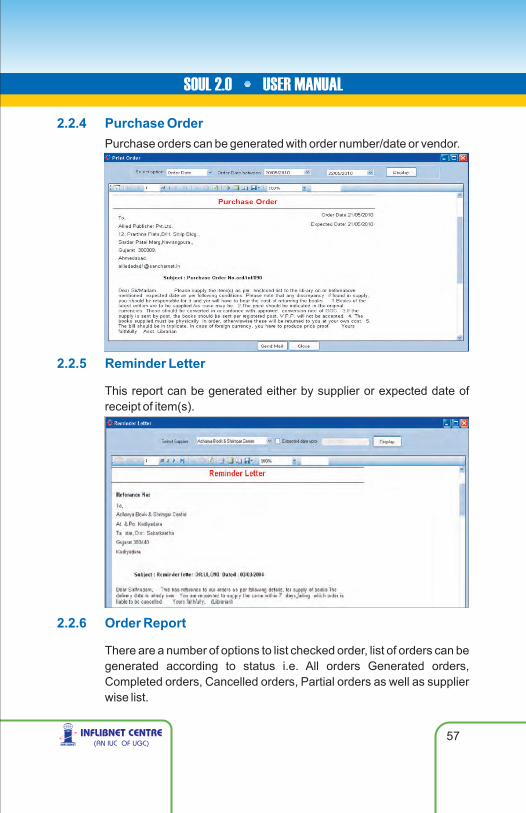
57
2.2.4 Purchase Order
Purchase orders can be generated with order number/date or vendor.
2.2.5 Reminder Letter
2.2.6 Order Report
This report can be generated either by supplier or expected date of receipt of item(s).
There are a number of options to list checked order, list of orders can be generated according to status i.e. All orders Generated orders, Completed orders, Cancelled orders, Partial orders as well as supplier wise list.

58
2.3 Accessioning
The natural sequence of operation after placing orders is 'Receive the Items' from the vendors. Vendors will start executing the orders either partially or fully. The accuracy is of paramount importance – when we 'Receive Order(s)'. Title, edition, author, publisher, price, ISBN – all details should be fed-in correctly. If there is any variation between the title ordered and title received, you have to enquire with the vendor and may have to get appropriate approval if the supplied book is to be accepted or not. However you can always receive titles less then order and pending titles can be received later using same process.
The titles for which orders have been placed will appear when you select either supplier's name or order no. You also can tick the box for all orders if you are not sure of either.
Find the titles, which were received – tick the box, fill-up no. of copies received. On the bottom menu-bar title summary will appear with requisite details. After ensuring that all the details are correct, click 'Receive'. You also have an option to choose to 'Receive Entire Order ' – if all the titles against that order have been received and are supplied appropriately.
2.3.1 Receive Order
If the item received is the last item to be received from that order – 'Order Closed' pop-up box will appear.
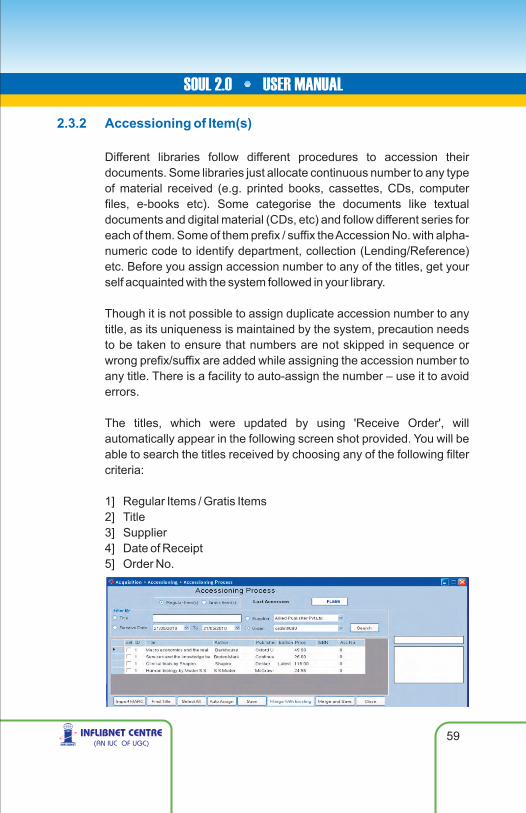
59
2.3.2 Accessioning of Item(s)
Different libraries follow different procedures to accession their documents. Some libraries just allocate continuous number to any type of material received (e.g. printed books, cassettes, CDs, computer files, e-books etc). Some categorise the documents like textual documents and digital material (CDs, etc) and follow different series for each of them. Some of them prefix / suffix the Accession No. with alpha-numeric code to identify department, collection (Lending/Reference) etc. Before you assign accession number to any of the titles, get your self acquainted with the system followed in your library.
Though it is not possible to assign duplicate accession number to any title, as its uniqueness is maintained by the system, precaution needs to be taken to ensure that numbers are not skipped in sequence or wrong prefix/suffix are added while assigning the accession number to any title. There is a facility to auto-assign the number – use it to avoid errors.
The titles, which were updated by using 'Receive Order', will automatically appear in the following screen shot provided. You will be able to search the titles received by choosing any of the following filter criteria:
1] Regular Items / Gratis Items2] Title3] Supplier4] Date of Receipt5] Order No.

60
You also have facilities to 'Import MARC' record (either from the clipboard or from the saved file) for any title you are accessioning (As shown in toolbar reproduced below). This will fill-up the blank fields for which you did not have complete information when the order was placed. Please refer to Cataloguing Module for understanding the mechanism to Import MARC records.
Find Title allows you to check whether you already have the title in your collection– if it is there then you will not create additional record for the title on hand – but will assign accession number and 'Merge with Existing' record.
When you click at 'Find Title', a pop-up window appear – feed the title you want to check – if you find the title which matches the title you are about to add/accession, double-click on it – vital fields of that title will appear in the blank box on right of the window of 'Accessioning Process'. You may cross-check the complete details of the highlighted title already on stock by clicking 'Show' button on 'Find Title' window.
Now you assign the accession number either by directly clicking the empty box under 'AccNo' column or use 'AutoAssign' option. Whichever way you assign the accession number – ensure it is absolutely correct – you will not be allowed to assign the same number again. As such mistakes committed here are irrevocable. Now if this title on hand already has a record in our database (Find Title), then instead of creating a new record, you have to choose the option 'Merge with Existing'.
Double-click on the title matching the title on hand in the above window. The details of title will appear in the small window on right.

61
If you have received multiple copies of single title, in that case you are requested to select all the titles and click on the button 'Merge and Save' this will create a single record with multiple accession numbers.
For the titles, which are not duplicate and you want to create new record for them, and if you wish to get the accession number automatically assigned from the previous sequence, select 'AutoAsign' accession number, feed appropriate data, if applicable prefix/suffix alphabet(s), and simply 'Save'. New catalogue record will be created with data elements available from the order form details. We will edit these details in cataloguing module using “Title in Process” option.
Please note that when you save accessioned records you will get a message as “A MARC record is also inserted with necessary tags filled, The record id is XXXX”, for each of the title, here XXXX will a system generated unique record number assigned to that record. You can use this record number for further operations in catalogue.

62
2.3.3 Accessioning Report
2.3.4 Barcode Report
This report enables you to view all the titles which has been accessioned, you can get this report by Order, Budget, Accession No as Prefix, Type of Material, Date and Range of Accession Numbers.
Using this option one can generate barcode for newly accessioned book , one can generate barcodes by same criteria's as mentioned in section 2.3.3, however there is an additional provision for generating reports by Accession Numbers, where one has to enter all theaccession numbers separated by comma for which barcode needs to be generate, the value entered as “Header” will appear on top of your barcode label (Please note that barcode labels are defined in Administration Module).
The next step in the reference is to process the payments for the items accessioned/received.'Payment Process' allows you to
i] Process the invoices for the titles receivedii] Complete payment process (Cash/Cheque/Accounts Dept)iii] Generate 'Credit Note' or 'Refund' amounts for 'Advance
Payments'iv] Forward the invoices to accounts department (Letter/e-mail)
Following reports can be generated from the 'Payment' Menu :
2.4 Payment
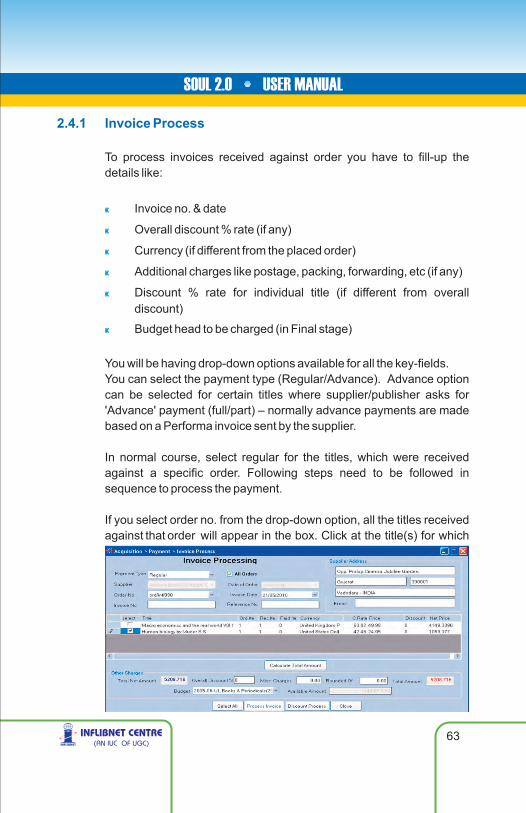
63
2.4.1 Invoice Process
To process invoices received against order you have to fill-up the details like:
Invoice no. & date
Overall discount % rate (if any)
Currency (if different from the placed order)
Additional charges like postage, packing, forwarding, etc (if any)
Discount % rate for individual title (if different from overall discount)
Budget head to be charged (in Final stage)
You will be having drop-down options available for all the key-fields.You can select the payment type (Regular/Advance). Advance option can be selected for certain titles where supplier/publisher asks for 'Advance' payment (full/part) – normally advance payments are made based on a Performa invoice sent by the supplier.
In normal course, select regular for the titles, which were received against a specific order. Following steps need to be followed in sequence to process the payment.
If you select order no. from the drop-down option, all the titles received against that order will appear in the box. Click at the title(s) for which
k
k
k
k
k
k

64
you are making payment (it will get highlighted). There might be occasions when discount rates are title-specific (e.g. Indian Editions, Asian Textbooks, South-Asia Editions, International Editions. In such cases, overall discount % will not be applicable. Select 'Discount Process' while the title is highlighted (or double click the title). Small pop-up box will appear as shown below. Feed requisite discount % - net amount is calculated automatically. Press 'Save' if all the details are correct.
Repeat the process till appropriate data for all titles in that invoice appears. This process automatically keeps on updating information in the corresponding fields.
Click 'Calculate Total Amount' after you complete the 'Discount Process' for all the titles received.
Now second part of the 'Invoice Processing' is as follows:
Some publishers/suppliers offer 'Overall Discount' which is over and above individual discounts. In such cases, feed the percentage. There might be some sundry charges on this invoice like postage/delivery charges etc. – if so feed the information in miscellaneous charges box. You are allowed to 'Round off' the final amount. Check the 'Budget' – this is the final opportunity to make any corrections for charging the invoice amount to specific budget. After checking the accuracy of information Click 'Process Invoice' - 'Invoice Generated' message-box will appear.

65
2.4.2 Payment Process
Once you process the invoice, depending upon the practice followed in your library, you have to make payments either in cash or by cheque/demand draft/credit card, processed within the library (by library's admin/accounts staff). In large set-ups the processed invoice (duly receipted with accessioning report) is sent to the Main Accounts Department of the College/University for payment.
Select 'Payment Process' and click 'Add Invoice' from the bottom menu-bar of the first screen.
The short details of available invoices will appear in the small pop-up box. Tick the box against the invoice – it will get highlighted. Click 'Add' button for selecting the invoice for payment.
Select appropriate option for 'Payment By' from the drop-down box.
If the payment processing is handled internally (i.e. from the Library's Accounts staff) fill-up appropriate payment details – Cheque/DD No., Bank Name, Branch, Bank charges (if applicable) and feed 'Forwarding Remarks' to elaborate payment details and Click 'Process Payment' button.

66
For payments, which are to be sent to accounts department – select appropriate choice from the drop-down options in 'Payment By' and click 'Process Payment' button.
'Payment Operation Completed' pop-up box will appear. Click 'OK' to complete the process.
The invoices which are sent to accounts department for processing the payments will either come back to the library with a cheque for the invoice amount or the accounts will send it directly to the supplier, with intimation to the library. In such cases, complete 'Payment Process' by selecting 'Payment Settlement' option. Feed appropriate information and click 'Save'.
2.4.3 Payment Settlement

67
2.4.4 Refund Process
There are some occasions, when advance payment amounts need to be adjusted in cases where final supply price is less than the 'Advance Payment' amount. In such cases, you have to initiate 'Refund Process'.
Click 'Add Item' on the first screen appearing, a pop-up box will appear with a drop-down option of order nos. Select appropriate Order and feed exact amount paid and 'Save'. The supplier's account will get updated automatically to the effect of exact amount paid.

68
Following reports can be taken out from the payment menu with variety of filters. All of them are self-explanatory
This report/letter will enable you to generate forwarding letter to Account Section for process of payment. One can generate this report by Invoice No/ Date or Supplier.
2.4.5 Forwarding Letter to Account Section for Payment

69
2.4.6 Invoice Report
One can generate invoice register supplier wise, Invoice report can be generated between range of dates as well as budget wise.This report will give you status of each invoice.
2.4.7 Payment Report
2.4.8 Refund Report
` This report will give you list of all the payments generated against each order and received invoice, one can generate this report by Supplier, Date and budget as report parameters.
This report facilitates user to generate the report of refunded amount between particular dates.

70
3.1 Cataloguing
Cataloguing is the most important module of the LMS from the point of view of retrieval of information. Retrieval of accurate/correct information depends upon how much care was taken while feeding accurate bibliographic data. Please ensure you follow international standards (like AACR) for field values and selection of keywords, subject-headings etc. SOUL uses MARC21 format to create records for the resources. MARC format will help us exchange information to and from other databases. MARC format supports several data field. Depending upon the size of the library and user-needs, you may choose selected important fields for your database. SOUL allows you to import data in MARC21 format too. This will also help you in saving data-entry effort and maintain accuracy (MARC records can be downloaded from LC (Library of Congress), IndCat (INFLIBNET Centre's Union database) or other OPACs for most of the foreign publications) – the mechanism is discussed later in this section.
The logical step after accessioning is to catalogue the documents received from the suppliers. There are two ways to technically process these resources - one is to Import MARC records from other OPACs available from well-known National Libraries like Library of Congress or IndCat (INFLIBNET). You only will have to check accuracy of the imported data and may have to customise certain field-values to your needs (like key-terms, price, ISBN – which might be of international/ foreign edition, in few cases Class Numbers to suit local users need, etc) before it becomes a part of SOUL database. The second is to manually input all the necessary data elements into appropriate fields of the options available.
3.0 Catalogue
71
You may remember that under Administration Module, you have created necessary data-entry templates needed for your library (you may use readily available MARC template with all the fields or the one customised for your library). Be consistent in using either of them.
To create and use templates, some in-depth knowledge of MARC21 format fields and its values is needed.You are used to simple rules of cataloguing, and choose few crucial bibliographical details (like Author (s), Title, Edition, Publisher, Year, Pagination, ISBN, Subject Terms, Accession No., Collection Code etc). But please remember, to exploit advantages of automation, you can learn importance of all MARC fields and feed necessary information in the designated places.
Only trained staff should be used for cataloguing modules data-entry function. Efficiency of retrieval from the database is directly proportional to the strict adherence to the international standards observed.
SOUL has a powerful and versatile search capabilities to search the database – with almost all the permutation, combinations of the fields to be searched with Boolean logic under Advanced Search.
Let us know how to use Pre-defined Data Entry Templates provided by the SOUL. If you are going to use 'Template Based Data Entry', lease ensure you are well versed with all the MARC21 fields and have experience in handling values for all the tags – You may like to refer to some of the examples screen-shots shown under 'Data Operation'. Following topics are covered under this module:
Cataloguing
Titles in Process Data Operation
Import/Export
Import from MARC Export to MARCCCF to MARC Add Accession No. To Imported DataMARCXML to SOUL
k k
k kk kk
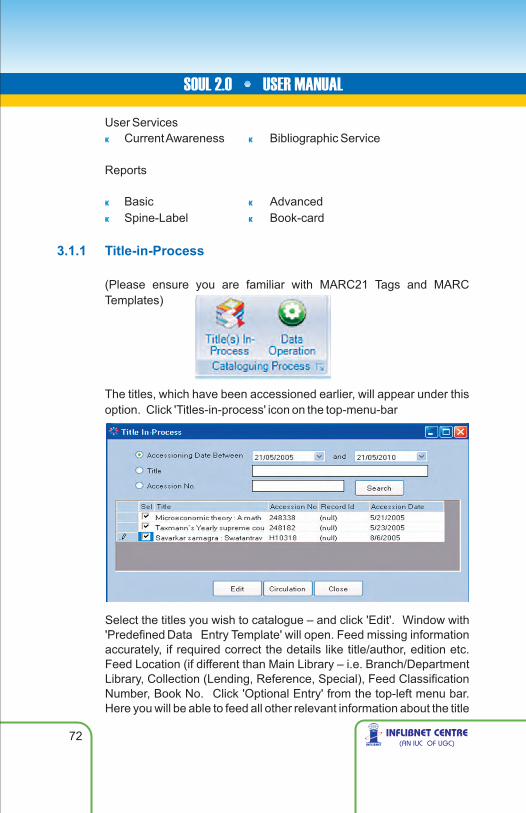
72
User ServicesCurrent Awareness Bibliographic Service
Reports
Basic AdvancedSpine-Label Book-card
(Please ensure you are familiar with MARC21 Tags and MARC Templates)
The titles, which have been accessioned earlier, will appear under this option. Click 'Titles-in-process' icon on the top-menu-bar
k k
k kk k
3.1.1 Title-in-Process
Select the titles you wish to catalogue – and click 'Edit'. Window with 'Predefined Data Entry Template' will open. Feed missing information accurately, if required correct the details like title/author, edition etc. Feed Location (if different than Main Library – i.e. Branch/Department Library, Collection (Lending, Reference, Special), Feed Classification Number, Book No. Click 'Optional Entry' from the top-left menu bar. Here you will be able to feed all other relevant information about the title
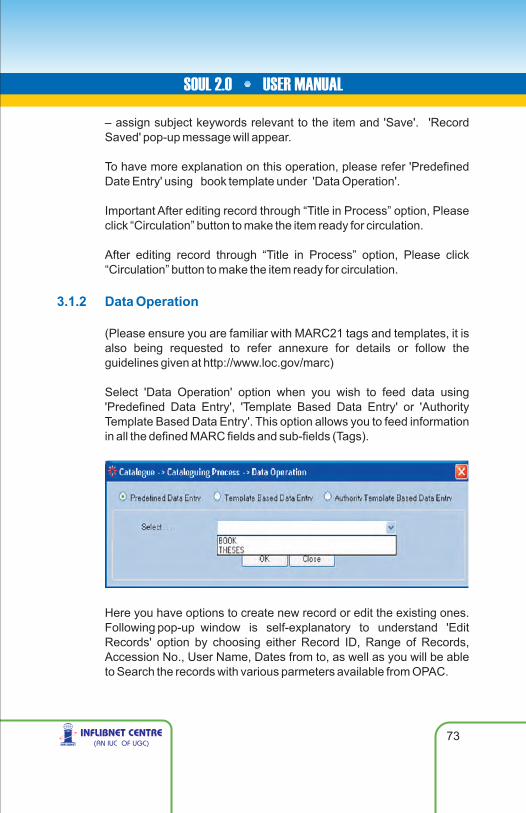
73
– assign subject keywords relevant to the item and 'Save'. 'Record Saved' pop-up message will appear.
To have more explanation on this operation, please refer 'Predefined Date Entry' using book template under 'Data Operation'.
Important After editing record through “Title in Process” option, Please click “Circulation” button to make the item ready for circulation.
After editing record through “Title in Process” option, Please click “Circulation” button to make the item ready for circulation.
(Please ensure you are familiar with MARC21 tags and templates, it is also being requested to refer annexure for details or follow the guidelines given at http://www.loc.gov/marc)
Select 'Data Operation' option when you wish to feed data using 'Predefined Data Entry', 'Template Based Data Entry' or 'Authority Template Based Data Entry'. This option allows you to feed information in all the defined MARC fields and sub-fields (Tags).
Here you have options to create new record or edit the existing ones. Following pop-up window is self-explanatory to understand 'Edit Records' option by choosing either Record ID, Range of Records, Accession No., User Name, Dates from to, as well as you will be able to Search the records with various parmeters available from OPAC.
3.1.2 Data Operation

74
Entering Leader and Fixed Field
Entering Title and Edition Statement
As explained in Administration Module leader and fixed fields are necessary elements for any record in MARC21 format, one can choose leader/fixed fields from predefined template by exploring the combo-box and choosing right type of document, If you want to modify leader/fixed fields specifically for the record you are entering please choose modify button and select appropriate values, please note that the changes done will have effect only in current record which you are creating.
Before entering the title statement fill in the indicators. For title first indicator suggests whether it is an added entry or not, where as second indicator is for non-filing characters, choose appropriate values as per your record. You can enter 'Title', 'Remainder of Title' and 'Statement of Responsibility' as shown in screen above. There is also provision to enter 'Edition' and 'Remainder of Edition Statement'.

75
First indicator in 'Corporate Name' suggests type of corporate name entry element, where as second indicator is undefined, choose the appropriate values. As indicated in screen shot above software have provision for entering 'Corporate Name'. If the document is related to some meeting etc, one can enter 'Number of Part/Section/Meeting' as well as 'Location' in the field provided. There are also provisions to enter 'Subordinate Unit' of corporate, 'Date of Meeting' and other miscellaneous information describing corporate contributor.
Entering Contributors
Personal Name
Corporate Name
Contributors are the persons/organisations involved in creation of content. Contributors of content may be Person, Corporate Body (Institutions), Meeting etc.
Please note that, for any document there will be only one main entry which will be saved as 1XX tag. Other contributors related with the document needs to be entered as “Added Entry”, if you want to have the contributor as added entry please tick “Added Entry” Check box which will be saved as 7XX tag of MARC Record.
First indicator in 'Personal Name' suggests type of personal name entry element, where as second indicator is usually undefined, choose the appropriate values and enter 'Personal Name' according to the recall value of the name, The filed “Relator Term” generally is for role of contributor, There is also provision to enter 'Date Associated With Name' and “Fuller Form of Name”.
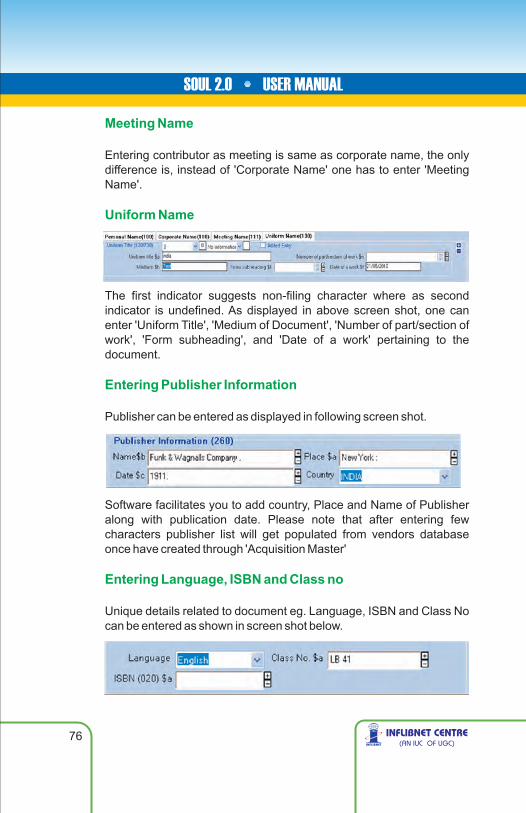
76
Meeting Name
Uniform Name
Entering Publisher Information
Entering Language, ISBN and Class no
Entering contributor as meeting is same as corporate name, the only difference is, instead of 'Corporate Name' one has to enter 'Meeting Name'.
The first indicator suggests non-filing character where as second indicator is undefined. As displayed in above screen shot, one can enter 'Uniform Title', 'Medium of Document', 'Number of part/section of work', 'Form subheading', and 'Date of a work' pertaining to the document.
Publisher can be entered as displayed in following screen shot.
Software facilitates you to add country, Place and Name of Publisher along with publication date. Please note that after entering few characters publisher list will get populated from vendors database once have created through 'Acquisition Master'
Unique details related to document eg. Language, ISBN and Class No can be entered as shown in screen shot below.

77
Please note that the language entered here will be reflected in multiple tags including fixed field of your MARC record.
According to MARC standard, physical attributes of document needs to be entered in tag 3XX. Software gives you provisions for entering Pagination, Illustrations, Dimensions and Accompanying Materials as shown in screen shot above.
According to MARC standard tag 852 is being used for holding information. In SOUL 2.0, this tag has been modified to address local requirements of the library.
Entering Physical Description
Entering Location
As displayed in above screen shot, as you repeat the tag by clicking '+', system generates new copy number itself, along with all possible default values except “Accession No” The first indicator specifies the shelving scheme and the second indicator indicates shelving order. Choose appropriate values according to your requirement.
In “Accession No” field one can enter accession number, please note that the accession number must be unique. Field “Material” indicates physical type of material of the document; values reflected in combo box are the values entered as “Physical Media” in General Masters of Administration Menu. You will also be able to see the status of that accession number, user is not allowed to modify the status as it affects stability of transaction system.
One can also specify collection type of the document using “Collection Tp” filed. Please note that “Material” and “Collection Tp” are also bound with user 'Category Privileges' and play pivotal role in 'Circulation'.
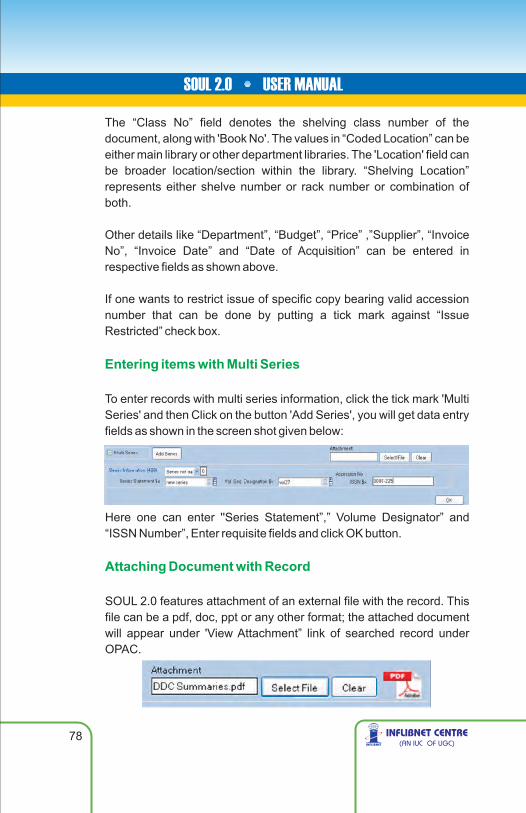
78
The “Class No” field denotes the shelving class number of the document, along with 'Book No'. The values in “Coded Location” can be either main library or other department libraries. The 'Location' field can be broader location/section within the library. “Shelving Location” represents either shelve number or rack number or combination of both.
Other details like “Department”, “Budget”, “Price” ,”Supplier”, “Invoice No”, “Invoice Date” and “Date of Acquisition” can be entered in respective fields as shown above.
If one wants to restrict issue of specific copy bearing valid accession number that can be done by putting a tick mark against “Issue Restricted” check box.
To enter records with multi series information, click the tick mark 'Multi Series' and then Click on the button 'Add Series', you will get data entry fields as shown in the screen shot given below:
Entering items with Multi Series
Here one can enter ''Series Statement”,” Volume Designator” and “ISSN Number”, Enter requisite fields and click OK button.
SOUL 2.0 features attachment of an external file with the record. This file can be a pdf, doc, ppt or any other format; the attached document will appear under 'View Attachment” link of searched record under OPAC.
Attaching Document with Record

79
To attach any document click on “Select File”, you will be prompted with a file browser window, in which one can select the desired file. At click of 'Save' in main data entry screen, the attached file will be uploaded to database.
If your record contains other types of titles apart from main title, one can enter using this option. This field can accommodate Portion of title, Parallel title, Distinctive title, Other title, Cover title, Added title, page title, Caption title, Running title, Spine title etc. You can choose type of title by choosing appropriate value of second indicator, where as first indicator acts as Note/added entry controller.
As shown in above screen, one can enter “Display Text”, “Title Proper/Short Title”, “Reminder of Title”, “Number of Specific Work” and “Name of Specific work”.
SOUL 2.0 has feature of rendering subject headings according to the various schemes under the number of fields available in 6XX tag of MARC. However, if any library wants to render keywords instead of subject headings according any schemes they can use tag 653 (Uncontrolled Term) as given in following screen shot.
Optional Fields Entering Other Titles (Varying form of Title)
Entering Subject Added Entries
Entering URL for Electronic Item
Using this field one can catalogue electronic resources by providing URL or the resource. The print document having electronic location can also be catalogued as shown in following screen shot.
·

80
Please note that while entering URL in this field, enter fully qualified URL specifying the protocol (i.e. http://, https://, ftp: etc) which will enable user to directly access that resource by clicking in OPAC.
Any information which needs to be provided to the users may be rendered under any of these tags.
Entering Various Notes
Editing Records
For editing catalogue records one can have multiple choices. User can edit records by Record ID, Range of Records, A particular accession number, By User Name, Range of Date Entered as well as by searching through OPAC by clicking 'Search' radio button. Please choose appropriate option to edit the record.
Pre Defined Data Entry (Theses)
SOUL 2.0 facilitates user to enter theses in specifically designed data entry screen as shown below:

81
Most of the fields are same as explained earlier, One can use Personal Name field (100) for entering the name of the researcher and personal name field 700 may be used for 'Guide' of theses, where as role of the persons (e.g. Guide/Research) may be rendered in corresponding “Relator Term” subfield.
Name of the Research Granting Institute will be rendered in “Corporate Name field” (710).
Abstract and type of degree should appear in corresponding fields of Note Section, which can be rendered by clicking “Add Note (5XX)” button.
Template based data entry enables you to enter bibliographic data as per template created by user. Please make sure that you have created data entry template as per your choice using Administration Module.
To enter data in user created template, please choose “Data Operation”, Click on 'Template Based Data Entry' option and choose the template which you have created. Please note that SOUL software has the default pre-defined templates for entering books, serials and theses.
Template Based Data Entry
After clicking OK button you will get data entry screen as defined in your template.

82
Authority Template Based Data Entry
There is similar procedure to create data base for authority file as explained above, Authority database created here will get reflected in pre-defined data entry sheet.
Following are typical examples of the various data-elements, which need to be put against the respective tags (fields & sub-fields) in the MARC record of a title. Please be consistent in using punctuation, capitalization based on International Standard Cataloguing Rules (like AACR). Please also refer to MARC21 Standards in the Appendix of the User-Guide.
In Nutshell, To Add, select 'New' from the Menu. Fill up appropriate details and 'Save'. Remember to note down 'Record ID' for future use.
To Modify, select 'Edit' and fill-up appropriate details like Record ID, Range of Records, Accession No., Username, Date range or search specific title to edit, in the pop-up window and 'Save' to effect the changes or 'Close' to ignore the changes.To Delete, select 'Edit', find requisite record through pop-up window
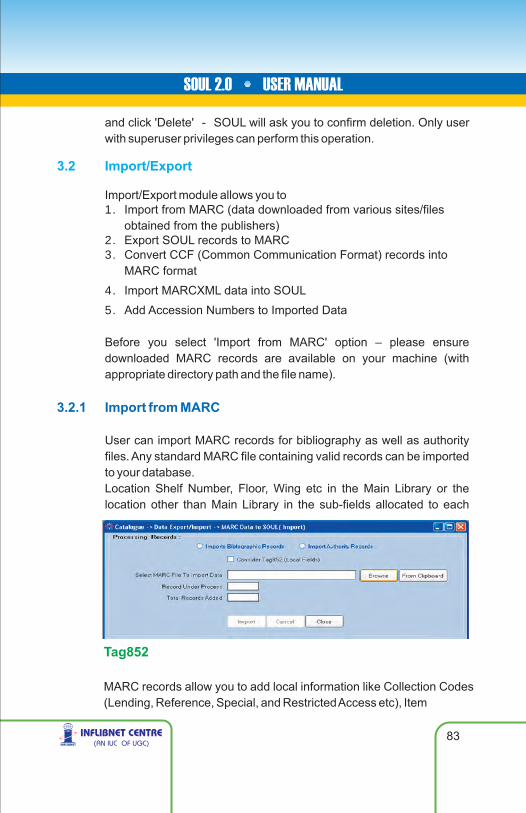
83
and click 'Delete' - SOUL will ask you to confirm deletion. Only user with superuser privileges can perform this operation.
Import/Export module allows you to 1. Import from MARC (data downloaded from various sites/files
obtained from the publishers)2. Export SOUL records to MARC3. Convert CCF (Common Communication Format) records into
MARC format4. Import MARCXML data into SOUL5. Add Accession Numbers to Imported Data
Before you select 'Import from MARC' option – please ensure downloaded MARC records are available on your machine (with appropriate directory path and the file name).
User can import MARC records for bibliography as well as authority files. Any standard MARC file containing valid records can be imported to your database.Location Shelf Number, Floor, Wing etc in the Main Library or the location other than Main Library in the sub-fields allocated to each
3.2 Import/Export
3.2.1 Import from MARC
Tag852
MARC records allow you to add local information like Collection Codes (Lending, Reference, Special, and Restricted Access etc), Item

84
identifier. In normal cases you will NOT use these fields for importing data – as you will feed information locally. Only in the cases where all the elements are relevant to our database, tick the box provided against consider Tag852, else keep it blank.
You can import data either from a stored file (use Browse option to locate the file) or 'From Clipboard'.Using 'Browse' Option
Select/feed path for the specific MARC file and click on 'Import' button.Using 'From Clipboard' Option
Open the file containing MARC records, select all the records using Edit > Select All option (or CTRL + A), copy all the records using Edit > Copy (Or CTRL + C), so all the records will be copied to your clip board.
Now click on 'From Clipboard' button and then click 'Import'. Records from the specified file will be added to the database mentioning no. of records under process and total records added (Along with Records Identification Number(s)).
This option will export your bibliography to MARC 21 format.
Select MARC File to Import Data
3.2.2 Export SOUL records to MARC

85
Tick appropriate boxes (if applicable), define the path and filename (remember to select .txt extension) and feed range of Record No(s) to be exported. Records will be exported into MARC format in a file mentioned in the path.
SOUL provides another option if you want to export selective records for larger library setups where acquisition is centralized, and after procurement items are distributed to various branch libraries. To do this please tick on “Consider Centralised Library Export Record”. On clicking this, the following screen shot will appear:
Now, if you want to export only those records that are located in main library (Or any other library: As per “Coded Location” Field of that record) and those records were created between specific dates, enter those parameters to export selected records.
You can also import CCF records into MARC format. Process is similar to Import from MARC. To perform this operation click on 'CCF to MARC' from main menu, you will get following screen.
3.2.3 CCF to MARC (SOUL 2.0)
Select the ISO file from which records have to be converted into MARC format and click on 'Import' button to import CCF records to SOUL database.

86
3.2.4 MARCXML to SOUL
3.2.5 Add Accession Number to the Imported Record
3.3.1 Current Awareness / Bibliographic Service
Process is the same as Import from MARC as mentioned before. Select the MARCXML file from which records have to be converted into MARC format and brought into SOUL Database. You will have a choice wether you want to import
SOUL allows you to assign Accession Numbers and also other 'Tag852' information to all the records added to the database to save time on editing individual records – please note that the status of all these records by default remains 'Available'.
Search titles by giving 'keyword(s)' or complete title – highlight the title - feed relevant Tag852 details as explained earlier and click on 'Save'.
3.3 User Services

87
In principle, 'Current Awareness Service' and 'Bibliographic Service' are the same – while CAS is generated periodically, Bibliographic Service is created 'On Demand'. Select appropriate options and provide filters if needed and generate the report. You will be able to save the report (in .pdf format/Excel), print it– and also send it by email to the users.
You may recall that, Report Definitions of these reports are set in Administration->Catalogue Master->Report Templates.
This Report is with limited number of fields with standard filters as follows:
You are requested to enter appropriate parameters and filters, as well as select the desired template and click on search button to get the report.
Allows you to use boolean operators by selecting requisite MARC fields, and the sub-fields too. There are good numbers of filters to limit your search based on user needs:
3.4 Reports
3.4.1 Basic Report
3.4.2 Advance Report
By Class Number By Subject HeadingBy Titles Recent TitlesBy Collection Type By DepartmentBy Language By LocationBy Shelving Location By Accession NumberBy Accession Number (Range)By Record ID By User name

88
3.4.3 Spine Labels / Barcode
3.4.4 Book Card
The report design definitions of all the above can be checked/edited. Report templates with required specifications (size of the labels, margins) are available at System Settings > Label Settings under Administration Option. Ensure that they match the required Print-page size, columns, etc.
Select the report criteria from the following options :
The report design definitions of all the above can be checked/edited. Report templates with required specifications (size of the labels, margins) are available at System Settings > Label Settings under Administration Option. Ensure that they match the required Print-page size, columns, etc.
Report can be generated by the following parameters:
Select the search criteria, title-mark the fields which you wish to display on the report and then click “Search”. User will be able to save, print and send email of generated report.
By Class Number By Subject HeadingBy Titles By Collection TypeBy Language By LocationBy Shelving Location By Accession Numbers (Values)By Accession Number (Prefix)By Accession Number (Range)By Record ID
By Class Number By Subject HeadingBy Titles By Collection TypeBy Language By LocationBy Shelving Location By Accession Numbers (Values)By Accession Number (Prefix)By Accession Number (Range)By Record ID
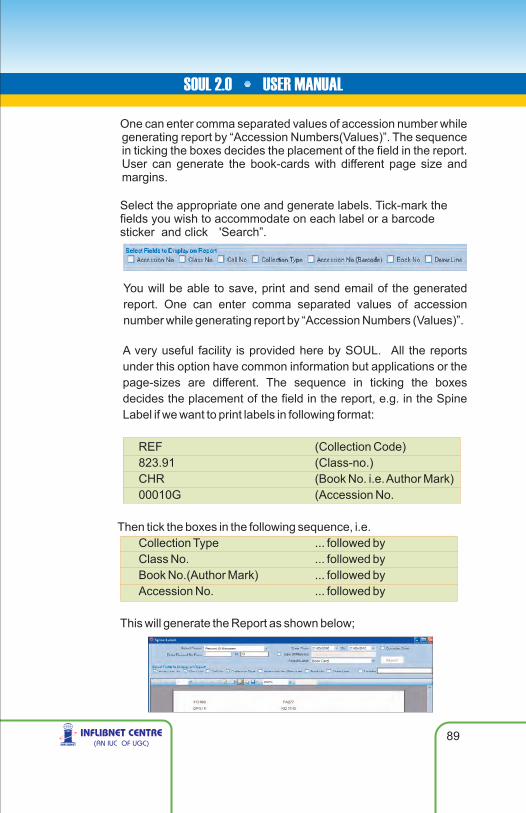
89
One can enter comma separated values of accession number while generating report by “Accession Numbers(Values)”. The sequencein ticking the boxes decides the placement of the field in the report. User can generate the book-cards with different page size and margins.
Select the appropriate one and generate labels. Tick-mark the fields you wish to accommodate on each label or a barcode sticker and click 'Search”.
You will be able to save, print and send email of the generated report. One can enter comma separated values of accession number while generating report by “Accession Numbers (Values)”.
A very useful facility is provided here by SOUL. All the reports under this option have common information but applications or the page-sizes are different. The sequence in ticking the boxes decides the placement of the field in the report, e.g. in the Spine Label if we want to print labels in following format:
REF (Collection Code)823.91 (Class-no.)CHR (Book No. i.e. Author Mark)00010G (Accession No.
Then tick the boxes in the following sequence, i.e.Collection Type ... followed by Class No. ... followed by Book No.(Author Mark) ... followed by Accession No. ... followed by
This will generate the Report as shown below;

90
The Circulation Module allows us to create/edit/delete/search User records, renew membership and also establish relationship between the user and resources–by creating transaction Records (Issue/Return/Renew), Reserve the Item(s), issue the items on ILL and get number of routine reports and some management reports.
This module deals with all operation related to library members, i.e. creation, deletion and modification of members
Select Add to create new membership record the drop down will be appearing for selecting Category, Institute, Departments and Course/Designation which has been created earlier under Administration Module of Circulation. Select appropriately and proceed.
4.1 Membership
4.1.1 New Member
4.0 Circulation
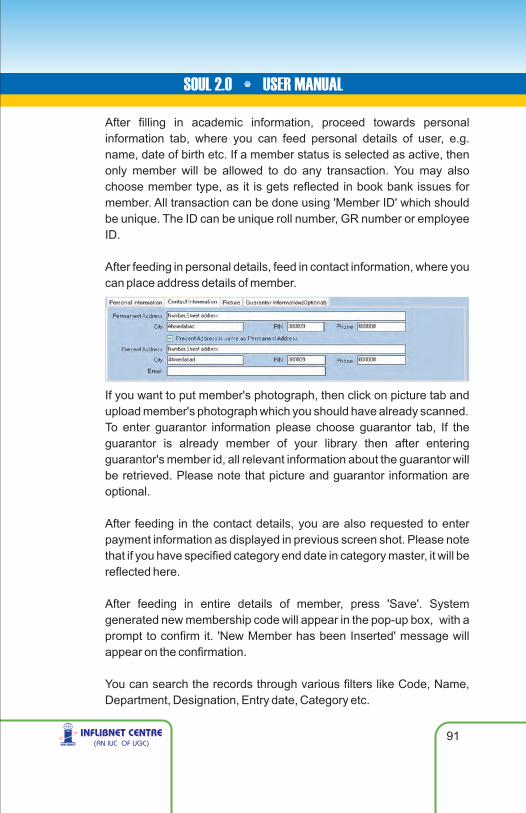
91
After filling in academic information, proceed towards personal information tab, where you can feed personal details of user, e.g. name, date of birth etc. If a member status is selected as active, then only member will be allowed to do any transaction. You may also choose member type, as it is gets reflected in book bank issues for member. All transaction can be done using 'Member ID' which should be unique. The ID can be unique roll number, GR number or employee ID.
After feeding in personal details, feed in contact information, where you can place address details of member.
If you want to put member's photograph, then click on picture tab and upload member's photograph which you should have already scanned.To enter guarantor information please choose guarantor tab, If the guarantor is already member of your library then after entering guarantor's member id, all relevant information about the guarantor will be retrieved. Please note that picture and guarantor information are optional.
After feeding in the contact details, you are also requested to enter payment information as displayed in previous screen shot. Please note that if you have specified category end date in category master, it will be reflected here.
After feeding in entire details of member, press 'Save'. System generated new membership code will appear in the pop-up box, with a prompt to confirm it. 'New Member has been Inserted' message will appear on the confirmation.
You can search the records through various filters like Code, Name, Department, Designation, Entry date, Category etc.
92
To update any member's detail select the member and click on 'Show Member' to edit.
You may copy an existing membership record and same it with new membership code. This option is useful when a library member is changing credentials by either shifting to another department or joining a new course.
To perform this operation, select Copy Member. Feed Member ID/Code. Details will appear – Select 'Update' – correct information, data, valid till date etc appropriately – and click 'Save'. Pop-up box with new membership code will appear. Select 'Yes' to confirm.
4.1.2 Copy Member
After doing this you will be able to change his academic details, and rest of the process is same as in case of creating new member.
You can search the Membership Records by choosing the option 'Search'. There are various filters to limit the search-results.These filters are Code, Name, Department, Designation, Entry date, Category.
4.1.3 Search Member
93
Once the member list is retrieved according to your search criteria, one can update the member by selecting the member and pressing 'Show Member' button, or directly issue 'No-Due Certificate' by pressing “No Due Certi” button.
There are two options for deleting membership record, you can either delete single member or delete entire group of members as mentioned below:
4.1.4 Delete Member
Single Member Deletion
Select the option, feed Membership ID or Member Code and press <Enter>. Membership details will appear in the box – after cross-checking, you can delete the record.
94
Group Membership Deletion
To delete entire group of member, click option “Group”. A window will appear as shown below, in this screen you need to enter Institute details, Department, Category, Course Designation and Entry Date Range after filling all information click on 'GO' button, list of members pertaining to chosen group will appear. To delete them select the member and press “Delete Group” button.
Please note that using this option, you can issue No-Due Certificate or, suspend member temporarily by clicking appropriate button.
Same as deletion, membership renewal can be done using two alternatives, single member and group options.
If you wish to Renew a single membership – feed Membership ID in the box provided and press <Enter> - Membership details will appear with 'Renewal' button at the bottom menu bar. Input renewal date, and click 'Renewal' button the Membership for further stipulated period.To renew Group of Members, filter criteria are same as “Group Deletion”.
4.1.5 Renewal

95
Filter out group of members and enter renewal date as “Valid upto” , select the members you want to renew and click on “Renewal Group” button.
You can issue no- dues certificate to Members in bulk. You have to select institute and then after select department of selected institute and select corresponding category and course/designation within department. Select range of member's entry date. Click on 'Go' button after specifying the member group. You will get listing of members. You can select member and generate no dues Certificate.
In this option, user can get the member card as per customized member card template in Administration Module>Circulation Master > Customise Member Card. One can get the report with different parameters life member ID, Member code and Member Entry date. Choose the template and click “show Report”. If user want to have border on library card, then tick “Border” checkbox.
In this report, you can get information of member. You can get member details using various filters like course/designation, institute,
4.1.6 No dues Certificate
4.1.7 Member Card
4.1.8 Member Listing

96
department, category, membership starting date, membership end date, member name, member code, member entry date etc.
Please note that, if you select entry date between option, you can get all members who were enrolled as member during the selected period. After selecting of option, click on 'Display' button for display the report.
This module enables you to do all the transactions as displayed below:
4.2 Circulation Transaction
4.2.1 Transaction Menu
Please do remember following short-cut keys for ease of operation:
97
Issuing Items [F3]
Click 'Issue' button or press 'F3' function key. Cursor will start blinking inside the Member Code/Member ID box. Scan the bar-coded membership card or feed the member ID/ code manually and press <Enter>. Membership details will appear on the screen.
After filling in membership details the curser will blink in Accession No. box – scan the barcode of the document (or feed the number manually) and press <Enter>. Important details of the title will appear in the box below. Click 'Issue' the document shown on the screen will get issued. If you have ticked the box against 'Print Issue Slip' (appearing at upper top side of the screen) command will be sent to the default printer automatically. Items lent will change their status to 'Issued'.
Please note that documents can only be issued when
I. If the membership is validII. No Overdue documentsIII. Number Of items already issued are less than the maximum
borrowing capacityIV. Member status is active (not Suspended or Cancelled or
Defaulter).V. No-dues certificate should not be issued.

98
If there are more number of items to be issued then member privileges then you will be prompted to remove one or more items, individual items can be removed by pressing “Remove Item” button, if you want to clear entire list then press “Remove all items button”.
If you have chosen items with more than one status i.e. Available, Issued, Reserved etc. In that case, only 'Available' books will be issued to member.
In case if you want to see status of issued item (i.e. to whom it has been issued etc,) the borrowing member tab will display the borrower details.
Similarly, if the book is reserved one can see the details by clicking 'Reservation Details' tab.
If one wants to see member's details, the 'Privilege Details' tab on bottom will display all the book issued to that member, his privilege details and all the books reserved by that member if any.
Return Items [F4]
Same window is used to get the items returned. First scan or feed all the items which needs to be return. On scanning or feeding Accession No., brief details of the title will appear in the box below – after confirmation click 'Return' or press <Enter>. The items will be returned.
If the book is being returned after due date, you will be prompted for taking over due charges. If you click yes on that message a new window as reproduced below will appear:

99
After confirming the fine amount and pressing 'Save' button, you will have two options, you can either print the fine slip, in case if the fine is to be paid some where else press 'Pay Later' button, if the fine is to be paid at circulation counter itself press 'Pay Now' button, screen reproduced below will appear:
This will enable to you collect the fine and print the receipt. Please note that you can collect amount equal to or less than fine amount, and rest of the fine can be settled later using “Over Due” transaction. After pressing save button you will be able to print the receipt.
This is a comprehensive option. Any member is normally allowed to renew the items at least once, if the borrowed titles are not reserved/claimed by the other members. Scan/Feed accession no. of
Renew Items [F6]

the title to be renewed, press <Enter>. Data of the user/member will automatically appear along. Click 'Renew' to renew the item for a further stipulated period (which will be calculated automatically depending upon category of a member).
To reserve an item which has been issued to any other borrower, click reserve button. Item will be reserved only if all the copies are issued and the member is allowed to reserve book as per his/her privileges.
Reserve Items [F7]
If the item has been reserved by multiple member; one can change the reservation priority by pressing 'Move Up' or 'Move Down' button, or cancel reservation by pressing “Cancel Reservation” button.
Besides Issue, Return, Renew and Reservation transaction, one can perform the following in-house maintenance transactions like:
Select the item and press corresponding button to change the status of that item. Further process of above maintenance transactions can be carried out in “Maintenance menu”.
If you want to generate recall/reminder notice for any issued item, select the item and press on 'Reminder' button, a letter will be generated which can be printed or e-mailed to the borrower of item(The text of reminder letter can be changed using Administration > System Settings > Letter Layout).
Lost
Damage
Missing
Withdraw
Reminders/Recall
100
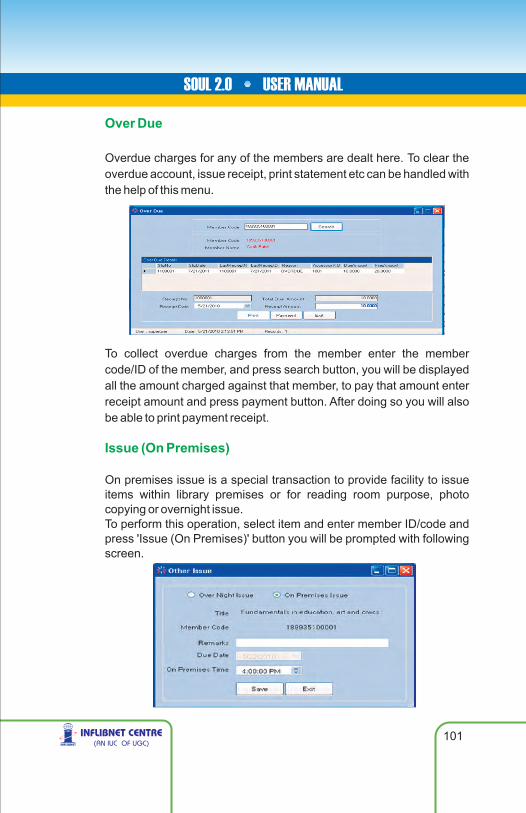
101
Over Due
Overdue charges for any of the members are dealt here. To clear the overdue account, issue receipt, print statement etc can be handled with the help of this menu.
To collect overdue charges from the member enter the member code/ID of the member, and press search button, you will be displayed all the amount charged against that member, to pay that amount enter receipt amount and press payment button. After doing so you will also be able to print payment receipt.
On premises issue is a special transaction to provide facility to issue items within library premises or for reading room purpose, photo copying or overnight issue. To perform this operation, select item and enter member ID/code and press 'Issue (On Premises)' button you will be prompted with following screen.
Issue (On Premises)

102
If you choose 'Over Night Issue' option, only due date will be displayed, in case of 'On Premises Issue', you will be prompted to enter time to return the item. Choose your desired option and click on 'Save' button. The selected item will be issued.
To return any item which has been issued either 'on premises' or 'overnight' just enter accession number and press return button, the item will be returned, if the item is overdue you will be prompted with fine calculation window.
There might be occasions when books will be return to the library after issue for various reasons. 'No Dues Certificate'. You can revoke 'No Dues Certificate' by searching the member, ticking the box against the record – in such cases click 'No Dues Certificate' button and “ ” message will appear. Click 'Yes' to reverse the status. Member will be able to start using the resources as usual (Only new membership code will be generated – old member ID can remain unchanged).
This option is useful when one want to find out contact details of borrowing member or institution of a specific title.
Return (On Premises)
No Dues Reverse Process
4.2.2 Search by Title
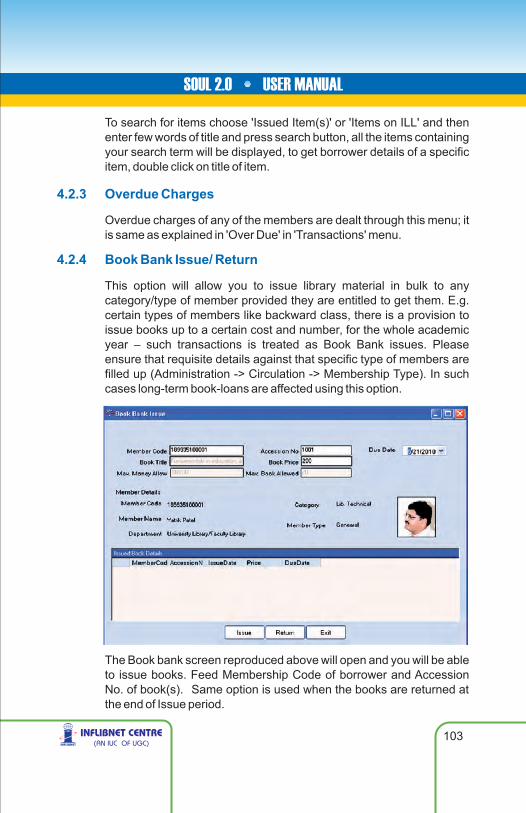
103
To search for items choose 'Issued Item(s)' or 'Items on ILL' and then enter few words of title and press search button, all the items containing your search term will be displayed, to get borrower details of a specific item, double click on title of item.
Overdue charges of any of the members are dealt through this menu; it is same as explained in 'Over Due' in 'Transactions' menu.
This option will allow you to issue library material in bulk to any category/type of member provided they are entitled to get them. E.g. certain types of members like backward class, there is a provision to issue books up to a certain cost and number, for the whole academic year – such transactions is treated as Book Bank issues. Please ensure that requisite details against that specific type of members are filled up (Administration -> Circulation -> Membership Type). In such cases long-term book-loans are affected using this option.
4.2.3 Overdue Charges
4.2.4 Book Bank Issue/ Return
The Book bank screen reproduced above will open and you will be able to issue books. Feed Membership Code of borrower and Accession No. of book(s). Same option is used when the books are returned at the end of Issue period.

104
4.2.5 Reminder
You will be able to generate reminders using this option. Due-date should be selected from the screen reproduced below.
After finding out your desired results, select the members which you want to send reminders and click on show button.
A Group-issue(s) can be exercised with the help of this option. This special options is for libraries, that issues items to a group of members rather than individual member.
4.2.6 Circulation Group
First of all you need to create group of members. To create a new group, click on 'Add Group' button, enter group name and all the members who are part of that group. By default first member entered will be treated as key member of the group, after entering all the members click on save button.

105
If you want to add/or delete specific members of the group, choose the group highlight the name of member to be deleted and click on 'delete'. To delete entire group click on 'Delete Group' button.
To perform issue/return transaction for the group, please choose group/issue return tab
Enter accession numbers of all the items you want to issue to a particular group, Select the specific group to which you want to issue the items, and then select the due date. By pressing issue button, similarly to return the items, enter all accession numbers and press return button.
Stock verification in many libraries is an annual process. Select this option to invoke stock verification process. Considering the large collection available in the libraries, the process has been designed.
In stock verification you can verify stock using shelving location of item(s). There are two way for stock verification in first method enter accession number manually.
4.2.7 Stock Verification

106
In second option you can directly import .csv file which contains accession number of documents whose availability has been verified. This option can be exercised by clicking on 'Imported Accession No.' button, click on 'browse' and select .csv file which you want to verify.
After selecting .csv file click on 'Import' button. You can see the list of item(s) at left side of form click on header where accession number is appearing, when you click on header you will see other list of item(s) at right side of form with title. Click on 'save' button, the imported file will be considered as verified. In case you need to clear existing verified item(s) then just click on 'Clear Stock Verification' button.
Note: for stock verification you must enter shelving location of item(s) in data-entry process. You can generate the verified annual stock of item(s).There are four type of report for verified stock.
In this report you can get list of item(s) which are not available in database (or not entered) e.g. you have procured the item(s) but you forgot data-entry of those item(s) but you found during stock verification.
In this report you can get list of all those item(s) for which status is deferred in database.
In this report you can get list of all those item(s) which are from different location. Suppose you have verified stock of Location A but original location of item(s) is Location B, so you will generate list of all item(s) which are not belong to Location A.
In this report you can get list of all those item(s) for which status is available on-shelf but they are not verified during verification.
Mismatch Accession
Mismatch Status
Mismatch Location
Available item(s)

107
4.2.8 Member Login
In many libraries, daily visits of the members need to be registered to keep track of daily footfall and members using the system. Once you invoke this option on the terminal near the entrance or on OPAC terminals of the Library, Members are supposed to scan the ID card or enter the ID Number manually and use the system.
Statistical reports can be generated from this menu option. Reports can be generated either by date, currently logged in members, or by a specific member code.
4.2.9 Book Transfer
This option is useful in the cases where large amount of collection is transferred from main library to sub libraries (department) or vice-versa. To perform this operation, first you have to select source library (where your collection originally belongs to) and the destination library (where you want to transfer your books), enter transfer date and enter/scan accession numbers of all the items and press 'Transfer Button'.

108
Please note that exercising this option will change Location field of bibliography of all selected items which has been transferred to other location physically.
One can see history of issued item(s).You can search issued item(s) by three criteria, i.e. Items issued during the specified period, member code, accession no. as well you can search item(s) of particular departmental library. After filling criteria as described above click on 'display' button.
You can see history of returned item(s) between specified period of return as well as you can search returned item of selected library.
You can see current reserved item(s) between specified period, You have to enter period and click on 'Display' button, you can generate reserved item(s) list. You can also get reserved item(s) of particular library.
You can generate a list of overdue items by member code, titles, and specified dates. You can also get over due item(s) list of particular library after selecting library.
4.2.10 Issued item(s) Over Period
4.2.11 Item(s) Returned Over Period
4.2.12 Item(s) Reserved Over Period
4.2.13 Overdue Item List
109
4.2.14 Fine Payers List
4.2.15 Pending Dues
4.2.16 Issue On-Premises/Over Night
4.2.17 Group Issue Report
4.2.18 Stock Verification
You can see list of all member who paid fine between specified periods. You have to enter range of dates and click on 'Display' button.
You can generate list of members with pending due You can list member using two parameters i.e. member code and dates. After filling these parameters click on 'Display' button.
You can see list of over-night issued item(s) as well as on premises issued item(s) or a combined list of two
You can get list of item(s) which are issued to a group. You can list item by three criteria i.e. all group ,single group, and for particular member . You can select any one parameter for getting list. After selecting any option click on 'Display' button, you will get list of Issued item(s) to Group.
One can generate the verified annual stock of item(s). There are four type of report for verified stock.
In this report you can get list of item(s) which are not available in database (or not entered ) e.g. you have procured the item(s) but y o u forgot date-entry of those item(s) but you found during stock verification.
Mismatch Accession

110
Mismatch Status
Mismatch Location
Available Item(s)
In this report you can get list of all those item(s) for which status is deferred in database.
In this report you can get list of all those item(s) which are from different location, Suppose you have verified stock of Location A but original location of item(s) is Location B, so you will generate list of all item(s) which are not belong to Location A.
In this report you can get list of all those item(s) for which status is available on shelf but they are not verified during verification.
Using this option, you can get report on number of members who visited the library as well as how many members are available in library at a given time. You can get a list of members between a given period and by members that are currently logged in, after selecting the criteria click on 'Show' button to get list of member with their logged in and logged out time .
4.3 ILL (Inter Library Loan)
4.2.19 Member Log List

4.3.1 Borrowing Item(s) on ILL
Steps involved in borrowing item from any external institute are
Input item Info into 'Request' – with ILL Institution detailsSend Request Letter to ILL InstitutionReceive ILL item from the ILL InstitutionSend arrival intimation to Member.Issued item to the Library Member Send Reminder Letter to Member to return ILL ItemRecord returns of the issued item by the memberReturn ILL Item to the ILL InstitutionGenerate requisite ILL reports
For procurement of any item from external library, usually request is being done by your own library member, to enter that request use click on request, and use following form reproduced below.
kkk
k
k
k
k
k
k
Entering a New Request
After entering brief bibliographical details of item to be bought, choose external library to which ILL request needs to be sent. Please note that the lists of external libraries are those libraries which you have entered as institutional libraries which you have entered in Administration module.

112
Send Request Letter to Library
After inputting request for item(s) repaired on ILL, you need to send request letter to external library to supply item under ILL. To do this, click on 'Request to Library' tab, select the library to which you want to send request and click on 'Show' button, a request letter will be displayed as shown below containing all requested items.
Receive ILL Item
After sending the ILL request, the external library may send you the requested item, to receive requested item, click on “Receive Items on ILL' tab you will be getting a screen as displayed below:
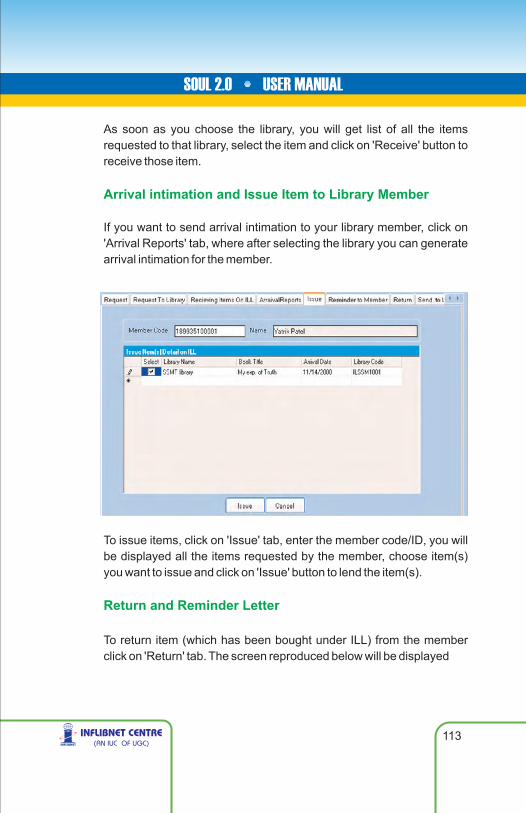
As soon as you choose the library, you will get list of all the items requested to that library, select the item and click on 'Receive' button to receive those item.
If you want to send arrival intimation to your library member, click on 'Arrival Reports' tab, where after selecting the library you can generate arrival intimation for the member.
Arrival intimation and Issue Item to Library Member
To issue items, click on 'Issue' tab, enter the member code/ID, you will be displayed all the items requested by the member, choose item(s) you want to issue and click on 'Issue' button to lend the item(s).
To return item (which has been bought under ILL) from the member click on 'Return' tab. The screen reproduced below will be displayed
Return and Reminder Letter
113

114
Enter member code/ID in above screen, you will get listing of all the items which has been issued to the member, select the items you want to return and click on 'Return' button.
In case if you want to generate reminder, click on 'Reminder to Member' tab, enter the member code/ID and click on 'show' button.
Once your member has returned the item, you may want to send it back to the library from where it was borrowed Click on 'Send to Library' tab to do so.
Send Items Back to Parent Library
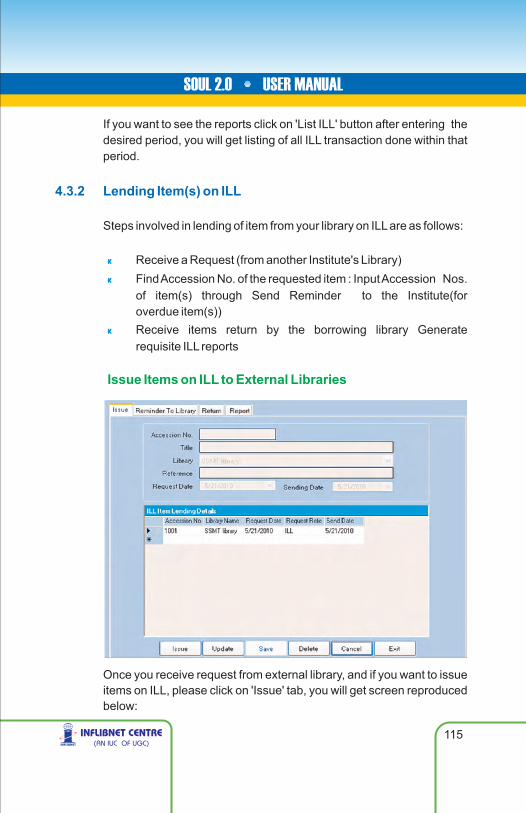
115
If you want to see the reports click on 'List ILL' button after entering the desired period, you will get listing of all ILL transaction done within that period.
Steps involved in lending of item from your library on ILL are as follows:
Receive a Request (from another Institute's Library)Find Accession No. of the requested item : Input Accession Nos. of item(s) through Send Reminder to the Institute(for overdue item(s))Receive items return by the borrowing library Generate requisite ILL reports
4.3.2 Lending Item(s) on ILL
k
k
k
Issue Items on ILL to External Libraries
Once you receive request from external library, and if you want to issue items on ILL, please click on 'Issue' tab, you will get screen reproduced below:
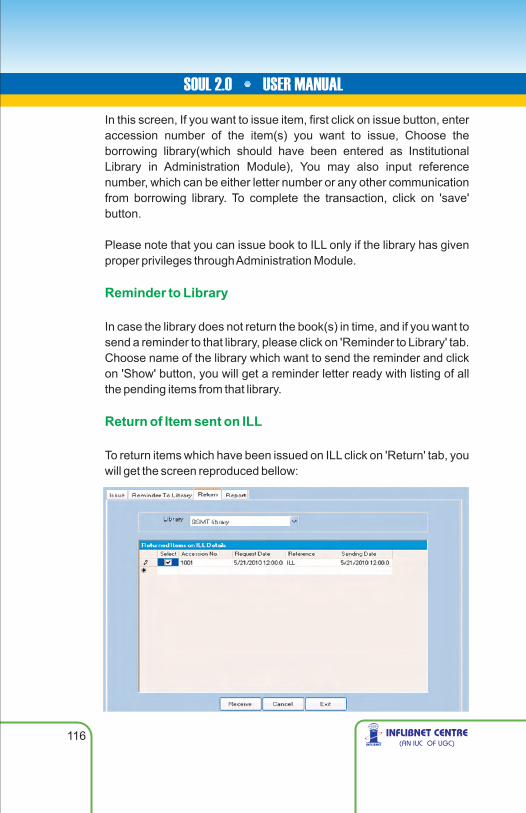
116
In this screen, If you want to issue item, first click on issue button, enter accession number of the item(s) you want to issue, Choose the borrowing library(which should have been entered as Institutional Library in Administration Module), You may also input reference number, which can be either letter number or any other communication from borrowing library. To complete the transaction, click on 'save' button.
Please note that you can issue book to ILL only if the library has given proper privileges through Administration Module.
In case the library does not return the book(s) in time, and if you want to send a reminder to that library, please click on 'Reminder to Library' tab. Choose name of the library which want to send the reminder and click on 'Show' button, you will get a reminder letter ready with listing of all the pending items from that library.
To return items which have been issued on ILL click on 'Return' tab, you will get the screen reproduced bellow:
Reminder to Library
Return of Item sent on ILL

117
To return item, choose the library to whom you have issued the item(s), you will be displayed list of all sent items issued to that library, choose the item you want to return and click on 'Receive' button.
To get listing of all the items which has been sent under ILL, please choose 'Report' tab, you will be prompted to enter duration for which you want to have report, click on 'Show' button to generate report of all the items issued under ILL.
The collection of a library is generally available to all the users. It's status remains either 'available' or 'issued'. But there are situations when some of the items are either temporarily NOT available on (taken out, Binding or Damaged hence taken off the shelves for Repair).Some item(s) are permanently removed from the collection – may be Reported Lost, Withdrawn due to various reasons (like – outdated, beyond repairs, missing or lost). In such cases we have to update the status of such items. This will help users latest status of a specific item.Choose appropriate action from the menu under Maintenance and update the Status of a specific item by entering the Accession No.
This option enables further operation on items which has been tagged as lost via 'Transaction' menu. If you click 'Lost' button of menu, you will get the screen reproduced below:
Report on ILL Lending
4.4 Maintenance
4.4.1 Lost Item(s)

118
Please note that any item which has been lost by any member, there are two options available, either member can replace the item or pay correct fine.
If member wants to replace the lost item, choose 'replace book' option from combo box on top, you will also be able to see listing of all items, select the item you want to replace and then click on 'Replacing Document' tab. You will get the screen reproduced below:
Enter the reason or remarks in field labelled 'Reason' and click on replace button, this book will again be available for circulation.
If member wants to pay for the cost of lost book, please choose “Amount Recovery” option instead of 'Replace Book', select the document as explained above and choose 'Slip Generation' tab, you will get the screen reproduce below:

119
Enter the amount you want to recover from member and click on payment button. Now finish the process by going in to 'Receipt Generation' tab, where you can generate a receipt and complete the amount recovery transaction.
Choose this option for sending titles for binding or for removing titles from circulation for binding.
Binding has been divided in following sub processes:
4.4.2 Binding
Choose the items for binding
Preparation of order for binding
Receiving and Invoicing of bound items
Payment processing for received invoices
Choose to Items of Binding
Using this option, member can choose the items which needs to be send for binding. To exercise this option click on “Select Accession #” tab you will get the screen.
In above screen enter/scan Accession Number one by one, click 'Binding' button when you are done, so all the items will be ready to be sent for binding.

120
Preparation of Order for Binding
To prepare Order for binding, enter order no, Budget Head, Binder's Name and Binding type, also enter price per document. Please note that the list of binders will be picked up from Administration Module's 'Serial Vendor master'. Tick mark the books you want to send for binding and click on' save' button.
Receiving and Invoicing of Bound items
This process enables you to receive the items which were sent for binding and process of the invoice. To receive item against a particular order, please select order number as shown in screen shot given above, enter the invoice number and other payment details, and choose the items you want to receive. Click on “Save” button to complete the process.

121
Payment Processing for Received Invoice
To process the payment of invoice received against binding order, click on “Payment” tab, the screen will enable you to choose invoice, enter payment details against that invoice to complete the payment process, click on “Save” button.
This option needs to be exercised when some items of library collection are damaged and you want to tag them so as to take out of OPAC/Circulation. Once you click 'Damaged' button the screen reproduced below will appear:
4.4.3 Damaged Item(s)
To tag any item as 'Damaged' enter/scan accession number of that item and press 'Damage' button, If one wants to re-introduce damaged item for circulation, select the item and press 'Repaired' button.
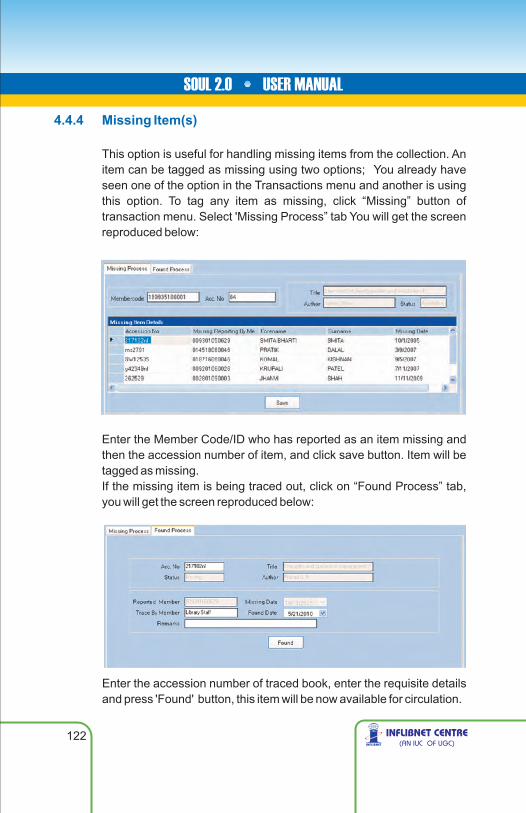
122
4.4.4 Missing Item(s)
This option is useful for handling missing items from the collection. An item can be tagged as missing using two options; You already have seen one of the option in the Transactions menu and another is using this option. To tag any item as missing, click “Missing” button of transaction menu. Select 'Missing Process” tab You will get the screen reproduced below:
Enter the Member Code/ID who has reported as an item missing and then the accession number of item, and click save button. Item will be tagged as missing.If the missing item is being traced out, click on “Found Process” tab, you will get the screen reproduced below:
Enter the accession number of traced book, enter the requisite details and press 'Found' button, this item will be now available for circulation.

123
4.4.5 Withdraw Item(s)
This option should be exercised when you want to withdraw item(s) (temporarily/permanently) from circulation. To withdraw item(s). Click on “Withdrawal Process” tab, enter/scan accession numbers of the items to be withdrawn and click on 'Withdraw' button as shown in the screen reproduced below:
To re-introduce withdrawn item click on “Re-Introduce” tab , you will be getting list of all the items which have been withdrawn. Select the item you want to re-introduce back and click on “Available” button.
User can get the status wise list this option.
One can get the list of lost, missing as binding items between two dates. Select option and enter two dates and click on “Display” to display the report.
4.4.6 Status Report
4.4.7 Maintenance Report

124
5.0 Serials Control
Please go through the recent definition of a Serial in MARC21 to understand its nature better. Also please get thoroughly familiar with the data elements (like other resources) of serials as a resource.
Serials/Journals are now called as 'Continuing Resources'. More apparently described now, the MARC categorises Serials, Journals and other similar type of resources as continuing Resources. Apart from data elements related to title of the journals, periodicals, serials, newspapers, the annual subscription, Vol.No., Issue No. etc. are entered into the data records of a collection.
SOUL has full-fledged module to tackle variety of issues associated with these type of resources. Please ensure the master data (Administration – Serial Master) is up-to-date in terms of data-entry window.
The process of selections of titles, approval process, placing orders etc remains more or less the same as the Books.
The serials control module has following seven sub modules
Titles (Serials)·SuggestionsSubscriptionPaymentCheck-inCommercial BindingIn-House Binding
k
k
k
k
k
k
k

5.1.1 MARC21 Entry/Edit
Entering Leader and Fixed Field
As explained in Administration Module leader and fixed fields are necessary elements for any record following MARC21.
125
You can choose leader/fixed fields from predefined template by exploring the combo-box and choosing right type of material, If you want to modify leader/fixed fields specifically for the record you are entering please choose modify button and select appropriate values,
5.1 Titles
All the serial titles (mainly those which are subscribed to by the Library), in all the formats (like print, electronic, CD-ROMs, online etc) are entered into the database in MARC21 format. Abridged functional version of MARC21 is available in Title Entry option. Please ensure that title details entered in either formats.

126
please note that the changes done will have effect only in current record which you are creating.
According to MARC21 the main title of a journal will be rendered in “Title Statement” tag representing 245 as shown in the screen produced below.
However, the software also has feature of including various other types of title e.g. Key Title, Publication Distribution, etc, Computer File Characteristics, Varying form of Title, Former Title, Abbreviated Title, etc. Please input in all the fields as per your requirement.
Entering Title Information
Other Information Related to Serials
Other information like Frequency, Date of Frequency, ISSN Number, Language, Country, Coden Designator, Holding Institution, Pagination, Illustrations, Dimensions Accompanying Materials and Date of Publications need to be entered as shown in screen reproduced above.
Local Information (MARC Tag 852) can be entered in same way as explained in data entry part of (Cataloguing Module)
Entering Local Information

Entering Optional Fields
Optional Entry Screen in serial has facilities for entering Subject Added Entries, Notes, Corporate Names, Electronic Location and Series Information, Entry of these fields will be same as explained in Data Entry section of Catalogue Module.
SOUL Facilitate users using to use only essintial fields. Titles must be entered in the given below form for further processing e.g. Ordering, Renewals of Order, Schedule Generation etc.
Title entry screen has provisions for entering Title, whether it is bound/indexed or not, type of subscription, Language, Department, Subject, Class No, ISSN, Coden, Location, Publisher and supplier details, mode of receipt, price details etc. as shown in screen reproduce above.
5.1.2 Title Entry
In second part of this title entry screen, user can enter delivery mode, status, frequency, volume and issue information, subscription details, parallel titles, language, physical medium, subject, keywords, URL Address, etc.
127
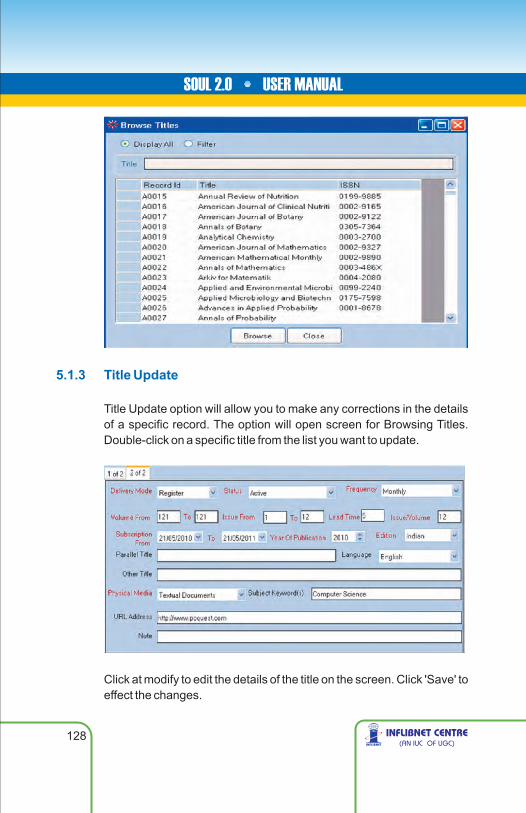
5.1.3 Title Update
Title Update option will allow you to make any corrections in the details of a specific record. The option will open screen for Browsing Titles. Double-click on a specific title from the list you want to update.
128
Click at modify to edit the details of the title on the screen. Click 'Save' to effect the changes.

Please do not forget to 'Save' if you have made any changes in the Title Holdings – details.
Article indexing is an additional feature of SOUL 2.0. Articles from the periodicals/ serials can be scanned and the files can be attached to the relevant records of the title using MARC-21 format.
Screen reproduced below appears when Article Indexing option is selected. Select the record by using Edit option where Record ID, Title etc can be searched to find specific record.
5.1.4 Article Indexing
Entering Holding Details of a Title
Option from this Update will allow you to store additional information about this Holding like Missing Issues etc in Notes format. To feed-in holding details of a title, please click on 'Title Holding' button, you will get screen shot as reproduced below, enter the requisite values.
129

For doing article indexing with the SOUL 2.0, you need to retrieve the journal by making search through title of the journal in the “search Host Item”[tag 773]. The system will retrieve the item in the window, where one needs to link the articles of the issue with the retrieved journals by using the 'Title Statement' representing tag 245 along with other associated information of the article such as author of the article, electronic location of the article or the full text of the article, if any available, in different formats such as .pdf, .doc, etc.
You may also attach the file by filling up details in 'Attachment' field appearing on the window. 'Save' to store the changes.
This option will enable you to generate report on titles. The report parameters are Location, Department, Subscription, Publisher, Supplier, Frequency, Delivery Mode, Class Number, Language and Subject.
5.1.5 Title Report
130
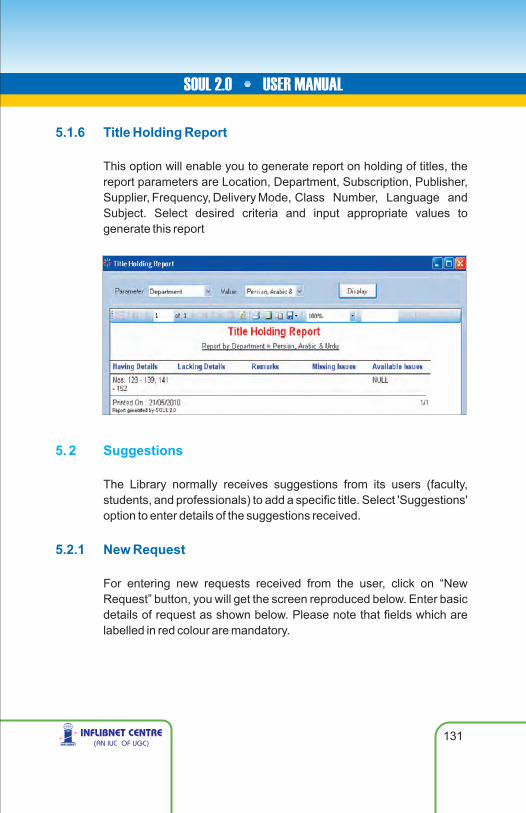
5.1.6 Title Holding Report
This option will enable you to generate report on holding of titles, the report parameters are Location, Department, Subscription, Publisher, Supplier, Frequency, Delivery Mode, Class Number, Language and Subject. Select desired criteria and input appropriate values to generate this report
The Library normally receives suggestions from its users (faculty, students, and professionals) to add a specific title. Select 'Suggestions' option to enter details of the suggestions received.
For entering new requests received from the user, click on “New Request” button, you will get the screen reproduced below. Enter basic details of request as shown below. Please note that fields which are labelled in red colour are mandatory.
5. 2 Suggestions
5.2.1 New Request
131

Find out the title of the request you want to update and double click on same (or click browse), you will be allowed to modify the details of your chosen request.
5.2.2 Update Request
To update any request that has been previously entered please click on “Update Request” button, you will be prompted with screen reproduced below.
132

133
5.2.3 Select for Approval
5.2.4 Approval Process
Once all the request has been entered, you need to send the list to Approval Committee or to the concerned authorities for approved. Choose the titles approval committee by using appropriate filter and click on save button.
Once you receive concurrence of approval authority for requested title, click on “Approval Process” button, list of all requested titles will be displayed as shown in screen reproduced below:
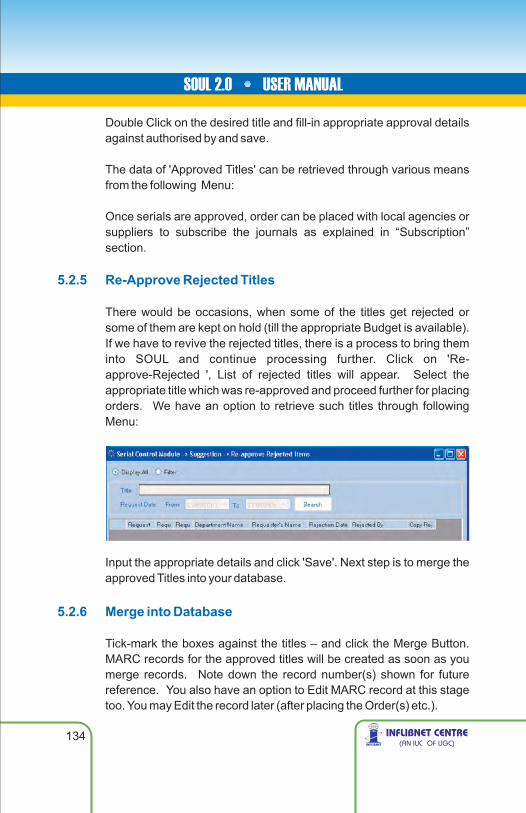
134
Double Click on the desired title and fill-in appropriate approval details against authorised by and save.
The data of 'Approved Titles' can be retrieved through various means from the following Menu:
Once serials are approved, order can be placed with local agencies or suppliers to subscribe the journals as explained in “Subscription” section.
There would be occasions, when some of the titles get rejected or some of them are kept on hold (till the appropriate Budget is available). If we have to revive the rejected titles, there is a process to bring them into SOUL and continue processing further. Click on 'Re-approve-Rejected ', List of rejected titles will appear. Select the appropriate title which was re-approved and proceed further for placing orders. We have an option to retrieve such titles through following Menu:
Input the appropriate details and click 'Save'. Next step is to merge the approved Titles into your database.
Tick-mark the boxes against the titles – and click the Merge Button. MARC records for the approved titles will be created as soon as you merge records. Note down the record number(s) shown for future reference. You also have an option to Edit MARC record at this stage too. You may Edit the record later (after placing the Order(s) etc.).
5.2.5 Re-Approve Rejected Titles
5.2.6 Merge into Database

135
Click 'Yes' if you wish to edit MARC record, else 'No'. (It would be useful to note down the record number created for each title. This will help you to edit the MARC record later .
You can print listing of all the requests by selecting appropriate filter criteria (Budget - wise, Department-wise or Date-wise) as shown in screen shot reproduced below.
5.2.7 Request Report

136
5.3 Subscriptions
Using this option you can place the order either directly with the publisher or with a supplier. Click on 'Subscriptions' to place order/renew subscription.
Select Order Process under Subscriptions Menu.
Order Process deals with raising order in the name of specific publisher/supplier. This menu also allows you to renew the subscription for the existing serials collection.
Order Process sequence is as follows:
First of all enter order number (It will be auto generated and has been enabled in letter number generation in Administration Module), Enter order date , Choose the publisher/vendor with whom you want to place the order Choose name of the supplier/publisher from list box, now you will need to chose type of order i.e. Firm Order, Standing Order or Temporary Order. You can also place, remarks if you want.
5.3.1 New Order

Usually titles will appear as per your chosen criteria of supplier/publisher, if you want to add more titles to an order for a particular supplier tick on “ Add titles from List” , and click on “ADD” button, approved titles will appear in the pop-up box – with an option to pick-up the ones for which you are placing the order. Tick-mark the ones you wish to add and Click 'Pick'. Once you pick-up the titles, they will appear in the window given above from where the Order Process was triggered.
Please ensure all the fields for given title are appropriately filled-up, Vol.no. (range), Issue (range) (if you have all the details). But remember - Delivery Mode field the mandatory delivery mode from the drop-down box – Airmail, Courier, Hand Delivery, Local, Parcel, Registered Post or Surface.
Click 'Save' button. Small pop-up box will appear with Order Value. as shown In screen shot.
Renewals process is very simple - Under Order Process option, just click Renew button available next to 'New'. You will get following screen
Renewals
137

Search the title to be renewed by supplier name or by title itself, enter old order number, fill-up correct details against each title (including renewal period) and click 'Save' followed by 'OK' in the pop-up box.
Click on “Save” button to complete the process.
5.3.2 Cancel Order
5.3.3 Purchase Order
This option can be exercised when you what is cancel the order either partially or fully. To perform this operation, click on “Cancellation of Order” button, you will be prompted with a window asking order number of order to be cancelled, fill in appropriate details, select the titles you want to cancel from that particular order, if you want to cancel entire order then tick on “Cancel Whole Order”. After selecting all the titles click on “Cancel Order” button to complete the operation.
Purchase order can be printed by clicking on “Purchase Order” button, one can print purchase orders by Order No, Order Date or Supplier. To print purchase order, fill in the appropriate values and click on display button.
138
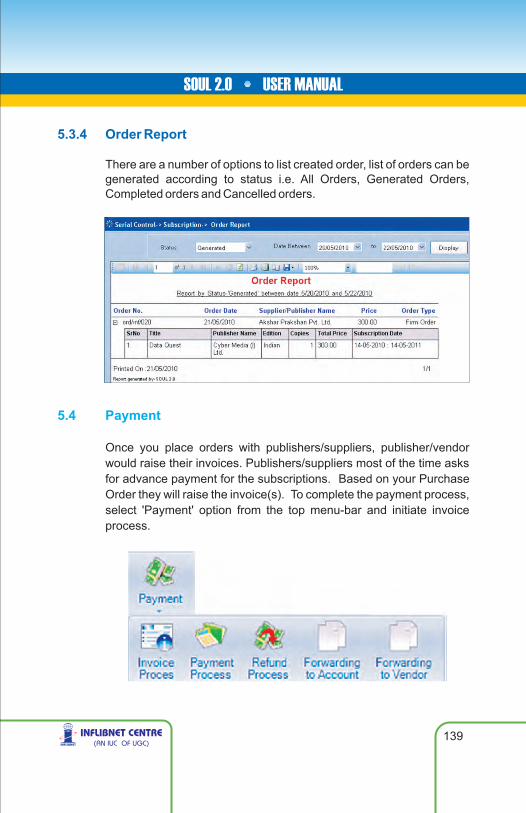
5.3.4 Order Report
There are a number of options to list created order, list of orders can be generated according to status i.e. All Orders, Generated Orders, Completed orders and Cancelled orders.
5.4 Payment
Once you place orders with publishers/suppliers, publisher/vendor would raise their invoices. Publishers/suppliers most of the time asks for advance payment for the subscriptions. Based on your Purchase Order they will raise the invoice(s). To complete the payment process, select 'Payment' option from the top menu-bar and initiate invoice process.
139

5.4.1 Invoice Process
As a first step in payment process, to enter invoice details against each order for which payment needs to be processed. Invoices can be entered either for all orders or standing orders. Please note that there may be cases in standing orders where invoice come after you have received serials.
Select the publisher/supplier from the drop-down menu – and click 'Search' button. All the orders placed with that publisher/supplier will appear with brief details.
Select the titles from the pop-up box for which invoice has been raised by the supplier/Publisher and 'Save'.
Fill-up Invoice No. and check whether all the other details are correct. On some titles we get discount (fixed percentage %) on published subscription rate. Fill-up the % rate in the discount column against each serial title. Click on 'Calculate Misc.Charges'. This will automatically calculate net price of the subscription. It will also appear in the 'Net Amount in INR' box on right side of the window.
You may also input other miscellaneous charges which are added to Subscription Cost.Normally they are handling charges and/or Postage etc. They are normally in lump sum. Click on 'Calculation of Misc. Charges' and input details in respective fields.
140

Invoice cost will be calculated automatically, cross check the same with physically received invoice. 'Save' the information and Close to keep the already fed details intact.
5.4.2 Payment Process
This operation needs to be exercised for entering payment details for received invoice. Select the vendor from the drop-down menu. All the invoices raised by that vendor will appear in the central window. Tick-mark the box against the invoice you are planning to pay. Feed amount payable (i.e. Amount of the Invoice) – and click 'Calculate'.
141

Select the option to make payment either in cash or by cheque/DD, credit card or (see 5.4.4 for forwarding letter to the accounts department of the institution for payment). Select appropriately and Save. Message of Payment Made appears.
Refund process is required in case where either publisher/vendor refunds amount to the institution for non-supply of certain issues or in case when the periodical ceases to publish. Find out the order number against which refund is received. Fill up the details with publisher's letter Reference No./date and Save. The amount mentioned against. Refund will get added to the 'Budget' against which this invoice was charged.
This option facilitates user to generate forwarding letter to Account Section requesting them to release the payment. One can generate this letter by Invoice No, Payment Date and supplier.
5.4.3 Refund Process
5.4.4 Forwarding Letter to Account/Vendor
142

5.4.5 Invoice Report
5.4.6 Payment Report
5.4.7 Refund Report
One can generate invoice register supplier wise, invoice report can be generated between range of dates as well as budget wise. This report will gave you status of each invoice.
This report will gave you list of all the payments generated against each order and received invoice, one can generate this report by supplier, date and budget as report parameters.
This option facilitates users to generate the report of refunded amount between particulars dates.
The next logical step is to receive the issues of subscribed serials. But before we proceeding further, ensure that all the records for the serials in database have correct details in MARC format. To initiate check-in process, first step is to generate schedule of ordered title.
5.5 Check-In
143

5.5.1 Schedule Generation
Ensure that the requisite details are filled up - especially volume no., issues from to, lead Time (i.e. no. of days to receive copy after publication), publication date range, and tick the boxes as required. If you have subscribed serial in middle of the year (i.e. not the full volume),tick mark the check box 'First Volume is not Full” and enter starting issue and volume.
Click on “Generate Schedule” button, “Save” the changes to complete the process.
There are some situations where arrival schedule of a title gets changed, in such cases you may need to review and modify previously generated schedule for that particular title. To do so select browse mode and choose Modify/Delete option. List of journals for which
If you have to modify the generated schedule
144

145
schedule has been generated will be available. Double click on the title and click 'Regenerate Schedule' button. A pop-up box will appear as reproduced in screen shot below
where you will be able to modify the details. Make the required changes and click Save.
Schedule will be generated with Issue Date, Expected Date and its status. Save the schedule and click 'Close'.
You also will be able to generate a report on Non-received Issues – based on the date of publication and expected date of receipt. Reminders to vendor/supplier/publisher can be generated based on the data stored in this schedule.
After trying all the means to obtain the non-received issues of certain periodicals update the status of all of them into Non-Received.
You can select titles by filtering them with title name or expected date, choose the issues you want to convert to “Non Received” and press “Convert to Non-Received” Button. This will get reflected in reminder reports.
5.5.2 Non Received Process
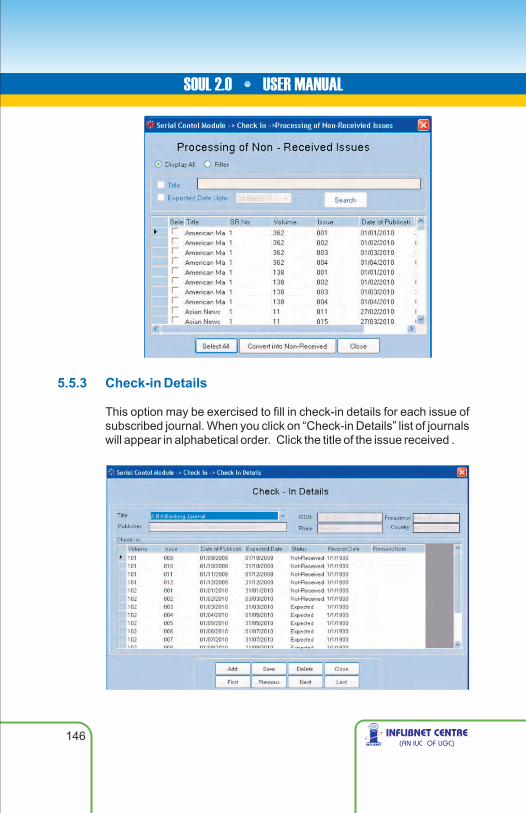
146
5.5.3 Check-in Details
This option may be exercised to fill in check-in details for each issue of subscribed journal. When you click on “Check-in Details” list of journals will appear in alphabetical order. Click the title of the issue received .

147
Choose the issue you have received physically, change the status from 'Expected' to 'Received' – Enter the date of receipt, write remarks if appropriate, correct other details if required and r 'Save' the updated record.
For additional issue(s), that are not part of generated schedule for a title, click on “Add” button, A pop-up box will appear – fill- up the correct details, change the status to received – write Remark if appropriate and 'Save' the updated record.
This option will enable you to remove all received issues in the past. To perform this operation click on “Remove Received” button.
5.5.4 Remove Received Issues

148
You will get list of all received issues. It is advisable to use filter like title or received dates.
Filter out your results using criteria according to your requirement and press “Export & Delete” button. You will be prompted to save the location of exported file (.csv) format, give desired location, a file will be created and your record will be deleted from the database.
The titles which were not received for long time and some of them may not be arriving at all,reports can be taken out for sending them to the suppliers/publishers. Select 'Reminder Letter' from the Top Menu-Bar, select proper filter (By supplier/publisher/expected date) and generate the reminders.
One can get the list of issues with different parameters like Expected Issues, Received Issues, Not Received Issues, Binded Issues or Any status. User can filter the list by title as well as user can list the issues between two dates.
Once the issues for one complete volume are received, you may like to send them for binding. Once received in Bound Volume format they will become a part of library's Main/Core reference collection. Therefore such individual issues will have to be removed from the general purpose collection. The process of removal can be performed by selecting specific titles, specifying the received dates and selecting the option 'Export & Delete'.
Binding modules facilitate us to send the issues of a specific journal for getting them properly bound. Various libraries follow different systems to monitor/stock such resources.
The Process of selection of titles and issues remains the same in case of commercial binding as well as in-house binding. They differ only because outside vendors (Binders) are paid for the Bound-Volume job-work. Therefore there is a process of raising order, invoice and payment by cheque/cash or through Accounts Department.
5.5.5 Reminder for Non-receipt / Missing Issues
5.5.6 Check-In Report
5.6 Commercial Binging/In House Binding

5.6.1 Preparation of Sets
5.6.2 Order Process
The first task in bound-volume journals is to identify the titles and making the sets of each volume published in a given period. Fill up appropriate details e.g. set number, ISSN No, binding type, colour and embossing text. 'Save' the records.
Use this option to create an order for the set prepared for binding. By clicking this option you will be able to see all un-ordered sets which you need to send for binding. Enter order number and dates, choose the budget head and tick the sets you want to send for binding, Enter the binding price against each set. Click on “Save” button to finish the operation. One can print order for binding from “Reports”.
149

5.6.3 Receiving / Accessioning
This option enables user to receive the sets which were ordered for binding.
Select the order numbers for which you want to receive the sets enter the requisite details like Accession No, date, class number and location.
150
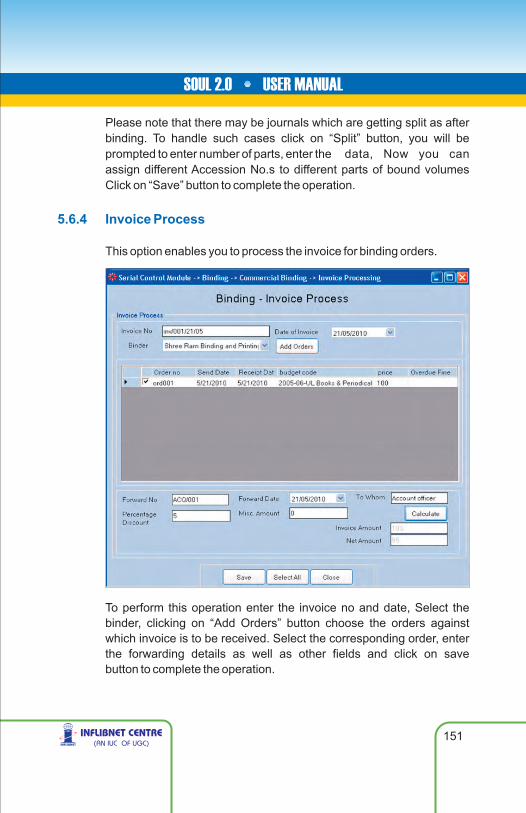
Please note that there may be journals which are getting split as after binding. To handle such cases click on “Split” button, you will be prompted to enter number of parts, enter the data, Now you can assign different Accession No.s to different parts of bound volumes Click on “Save” button to complete the operation.
This option enables you to process the invoice for binding orders.
5.6.4 Invoice Process
To perform this operation enter the invoice no and date, Select the binder, clicking on “Add Orders” button choose the orders against which invoice is to be received. Select the corresponding order, enter the forwarding details as well as other fields and click on save button to complete the operation.
151

5.6.5 Payment
5.6.6 Binding Reports
This option enables you to process the payment against received invoice. To perform this operation, select the binder for whom the payment is due. You will be able to see all the received invoices from that binder, tick mark against each invoice you want to pay as shown in screen reproduced below.
This interface also facilitates you to enter payment details i.e. receipt note no and date, Payment mode, bank details etc. along with forwarding remark. Please fill in requisite details and click on “Save” button to complete the operation.
Binding Module consists of binding reports, reminder to binder, purchase order, bound volume labels which are needed to handle Bound-Volumes efficiently.
152

OPAC is the end-result of all the effort we have made so far in creating and maintaining the database. This is the interface between the resources stocked in the library and the user-needs an efficient OPAC will fulfil all the information retrieval requirement of a user. It should be able to cater to all the needs of a 'novice' as well as an 'Expert' user. It should have options from simple search to Advance search like combination of using boolean operators between all the entry elements. SOUL has facility to approach the database with three different approach :
1] Simple Search (with fixed combinations of common fields)2] Boolean Search (Natural Language nomenclature but with AND,
OR operators to join the fields) ; and3] Advance Boolean (Combination of using Boolean operators
between any of the field tags from MARC records)
OPAC also has facilities to generate bibliographies. Online status of any item stocked, along with its location is available to save the time of the user.
6. 0 OPAC (Online Public Access Catalogue)
153

6.1 Simple Search
User can use following parameters to perform a simple search :
To perform search on any from any of the field listed above, select the field first and then enter your search term in text box .
If you want to filter your results by any specific type of material, please choose corresponding option by checking the option “Filter By Type of material”.
154

One can also choose “exact search” or “Any where in word”
If you want to search for your key term anywhere in the word/field, tick 'Any Where in the Word” where as “Exact Search” will give search results only if your search term is found in beginning of the field.
You can also restrict number of records by selecting corresponding number before pressing “Show Result” button.
Once results are retrieved, you can export selected titles in MARCXML format by pressing “MARCXML (Export)” button.
The detailed bibliography of search results can be seen by selecting the titles and pressing “Show” button, on clicking of show button a window will pop-up with default as basic view.
However, one can easily switch between 'Basic', 'Full' and 'MARC' view by choosing appropriate tab.
155
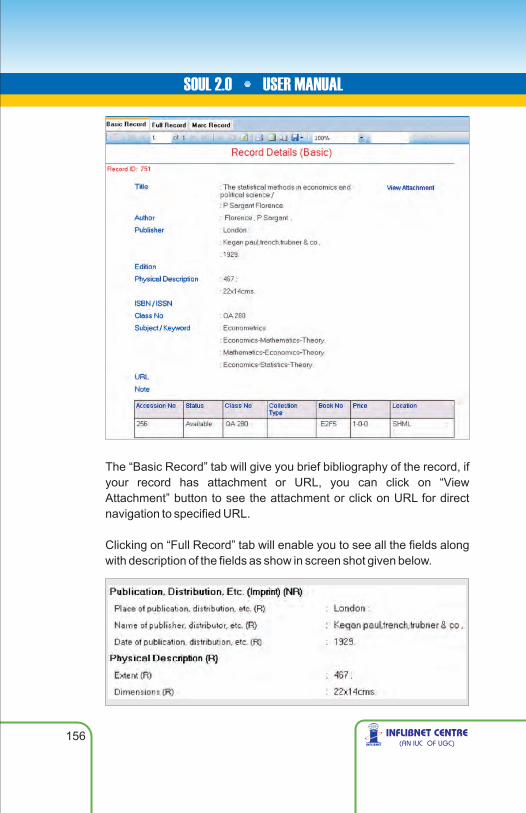
The “Basic Record” tab will give you brief bibliography of the record, if your record has attachment or URL, you can click on “View Attachment” button to see the attachment or click on URL for direct navigation to specified URL.
Clicking on “Full Record” tab will enable you to see all the fields along with description of the fields as show in screen shot given below.
156

“MARC Record” tab will enable you to see same record in MARC21 tags.
A versatile tool in the hands of a professional user, Boolean operators can be placed between commonly used sought fields for searching the resources stocked.
Here you can perform search by using three different search terms and two Boolean operators, rest of the functions are same as explained above.
Advance Boolean search option enable users to perform search through entire database using any of the MARC21 based tag. The operation in simple, first choose the tag you want to search for, then select the corresponding subfield (of that tag) enter the search term, select boolean operator and perform the search. One can use up to three search criteria and two boolean operators. Rest of the functionalities are same as explained in 'Basic Search'.
6.2 Boolean Search
6.3 Advance Boolean Search
157
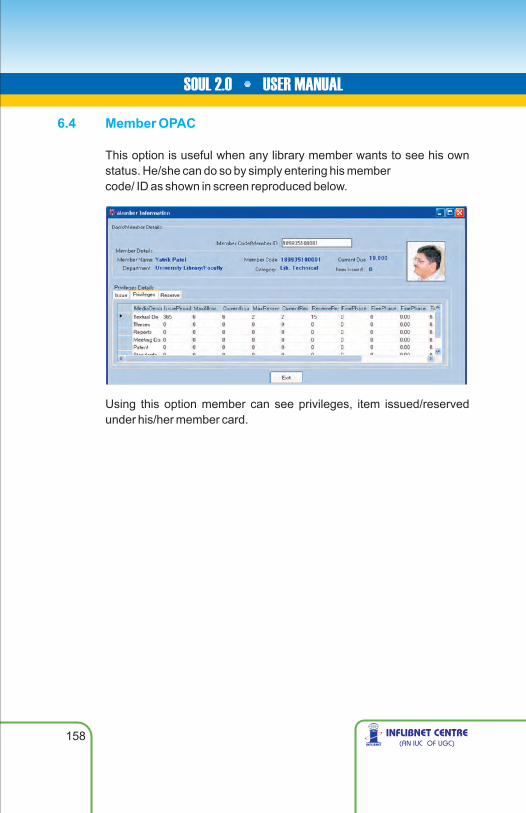
6.4 Member OPAC
This option is useful when any library member wants to see his own status. He/she can do so by simply entering his membercode/ ID as shown in screen reproduced below.
Using this option member can see privileges, item issued/reserved under his/her member card.
158

APPENDIX
MARC Bibliographic formats are standards for representing and communicating bibliographic and related information in machine-readable form. It is a global standard for 21st Century's library developed in collaboration with Library of Congress, Canadian Library Association and British Library, UK. The complete field-wise detailed description with latest updates on it is available on the website of Library of Congress at http://www.loc.gov/marc/. It has five different formats – Bibliographic, Authority, Holdings, Classification and Community. SOUL 2.0 has adopted to Bibliographic and Authority formats.
A MARC record involves three elements: the record structure, the content designation and the data content of the record. The structure of MARC record is an implementation of format for information Interchange – ISO-2709. Content designation defines the codes and conventions for data elements within a record and to support manipulation of those data. The data content of the most elements are defined outside the formats using AARC2, LCSH, Sears List of Subject Heading, and other classification schemes used by the library.
The organization of the MARC record is based on the record structure of the ISO-2709 exchange format. It is divided in three sections – the leader, the directory, and the variable fields. The leader consists of 24 characters, the directory consists of 12 characters containing the tag, starting position, and length of each field within the record. The directory ends with a hex value 1E representing field terminator and record ends with a hex value 1D representing record terminator. MARC21 distinguishes variable fields with variable fixed fields and variable data fields. SOUL 2.0 provides templates for leader and variable fixed fields (Tag 008), which can be selected from the combo-box. As explained in the manual, pre-defined leader and fixed fields are editable and cataloguers can modify according to item being catalogued. Variable data fields are included in the data entry template of the SOUL 2.0.
159

The Leader
Record status:
Type of Record:
Implementation-defined:
Character coding scheme:
Descriptive cataloguing form:
Linked record requirement:
Fixed Field
The leader represents following 24 characters (character positions 00 to 23) of the MARC 21 record. SOUL 2.0 has pre-defined leader for books, theses and serials databases. Apart from these pre-defined leaders, user can also create their own template of the leader for different kind of items. Out of these 24 characters, SOUL 2.0 users need to identify following character positions at the time of modifying the leader:
character position 05 represents ASCII graphic character which indicates the relation of the record to a file.
character position 06 represents ASCII graphic character which specifies the characteristics and defines the components of the record.
character position 07-08 reserve for bibliographic level (character position 07) and type of control (character position 08). Any position not defined contains blank.
character position 09 identifies the character coding scheme used in a record. In SOUL 2.0, it should always be a representing UCS/Unicode.Encoding level: character position 17 identifies the type of data encoding in the record.
character position 18 identifies the cataloguing scheme used for rendering the record. In SOUL 2.0, it should always be a representing AACR-2.
character position 19 represents either need of the related record or related record not required.
SOUL 2.0 has included fixed field 008 for creating MARC 21 records. 008 is fixed field with 40 characters (00 to 39). Out of 40 characters following characters have to be selected from the drop down menu by the cataloguer while either creating new template for the field or editing the pre-defined template of the fixed field. SOUL 2.0 has pre-defined fixed field 008 for different type of documents and it also
160

provides option for the user to create their own template. Following are the character positions that need to be looked into at the time creating or modifying:
: character position 06 represents either type of date or publication status.
character positions 18-21 represents illustrations of the items. Cataloguer needs to look at inside of the item for identifying the types of the illustrations such as maps, charts, tables, graph, etc.
character position 22 represents target audience of the item such as primary, adult, general, juvenile, etc.
: character position 23 identifies the physical format of the item such as microfilms, microfiche, large print, electronic, etc.
character position 24-27 represents nature of the contents identifying such as dictionary, encyclopaedia, atlas, handbooks, catalogue, technical report, treaties, etc.
character position 28 identifies the item either of govt. publication or not. In case of govt. publication, provides values for different kind of govt. publication such as national/federal, local, international governmental, etc.
character position 29 is for identifying the item either of conference publication or not.
character position 30 represents the value for either festschrift or not a festschrift item.
character position 31 is for either index or not an index item.
character position 33 indentifies the literary form of an item such as novel, short stories, drama, essays, poetry, etc.
character position 34 represents biographical information of an item such as autobiography, individual biography, collective biography, etc.
Type of date/Publication status
Illustrations:
Target Audience:
Form of Item
Nature of contents:
Government publication:
Conference publication:
Festschrift:
Index:
Literary form:
Biography:
161
Default MARC 21 Fields Used in the SOUL 2.0
Apart from the leader and the fixed field 008, SOUL 2.0 uses most of the important fields frequently us ed by the cataloguers. The fields which are included in the default template of SOUL 2.0 are given below. For full listings of all MARC 21 tags, indicators, and subfield codes, see MARC 21 Format for Bibliographic Data at http://www.loc.gov/marc/.
Definition and explanations term frequently used with regards to MARC21 records are as follows:
The tags (3-digit numbers) are followed by the names of the fields they represent. In this summary, and in the MARC 21 Format for Bibliographic Data, if a tag can appear more than once in one bibliographic record, it is labeled repeatable (R). If it can only be used once, it is labeled non-repeatable (NR). For example, a catalogue record can have several subjects, so the tags for subject added entries (6XX) are labeled repeatable (R).
The use of indicators is explained in fields where they are used. Indicators are one-digit numbers. Beginning with the 010 field, in every field -- following the tag -- are two character positions, one for Indicator 1 and one for Indicator 2. The indicators are not actually defined in all fields, however.It is possible that
a 2nd indicator will be used, while the 1st indicator remains undefined (or vice versa). When an indicator is undefined, the character position will be represented by the blank space (in the manual '#' is taken for representing blank space).
All the data in each field (beginning with the 010 field) is divided into subfields, each of which is preceded by a delimiter subfield code combination. The most common subfield codes used with each tag are shown. Each subfield code is preceded by the character $, signifying a delimiter. The name of the subfield follows the code.
Examples follow the explanation for each field. For clarity, one space has been placed between the tag and the first indicator, one space has been placed between the second indicator and the first delimiter- subfield code, and one space has been inserted between the delimiter-subfield code and the subfield data.
Tags:
Indicators:
Subfield codes:
Examples:
162
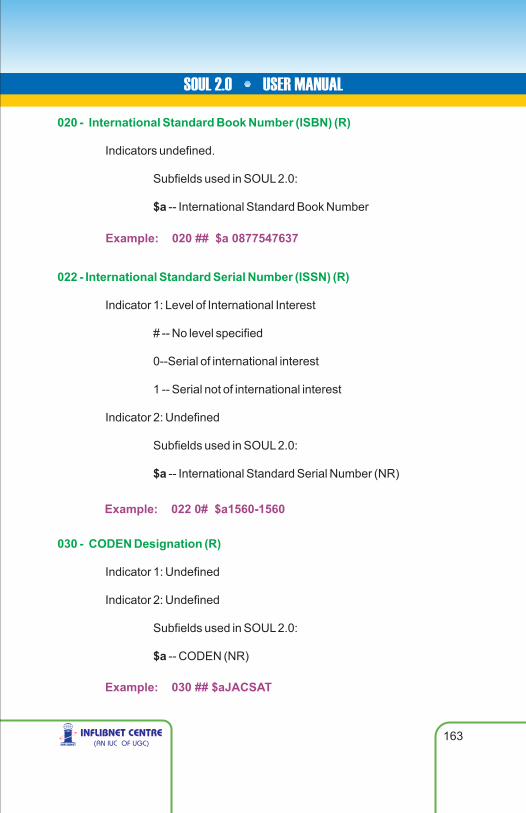
Example: 030 ## $aJACSAT
Example: 022 0# $a1560-1560
020 - International Standard Book Number (ISBN) (R)
022 - International Standard Serial Number (ISSN) (R)
030 - CODEN Designation (R)
Indicators undefined.
Subfields used in SOUL 2.0:
$a -- International Standard Book Number
Indicator 1: Level of International Interest
# -- No level specified
0--Serial of international interest
1 -- Serial not of international interest
Indicator 2: Undefined
Subfields used in SOUL 2.0:
$a -- International Standard Serial Number (NR)
Indicator 1: Undefined
Indicator 2: Undefined
Subfields used in SOUL 2.0:
$a -- CODEN (NR)
163
Example: 020 ## $a 0877547637

041 - Language Code (R)
100 - Main Entry -- Personal name -- (primary author) (NR)
Indicators not used.
Subfields used in SOUL 2.0:
$a -- Language
SOUL 2.0 is defined for any kind of the classification scheme. The classification scheme has to be selected by librarian at the time of installing the software. Above three schemes have been configured with the system. Any library who is using other than the UDC (Universal Decimal Classification) and DDC (Dewey Decimal Classification) schemes can use tag 084 (Other Classification Number). The library who is using Colon Classification can also use this system while putting the class number in the tag 084.
Indicators are not used.
Subfields used in SOUL 2.0
$a -- Class number
Indicator 1: Type of personal name entry element 0--Forename1 -- Surname (this is the most common form)3 -- Family name
080 Universal Decimal Classification Scheme (R)
082 Dewey Decimal Classification Scheme (R)
084 Other Classification Number (R)
164
Example: 041 ## $a eng
Example: 080/082/084 ## $a971.1/.2

Indicator 2 undefined.
Indicator 2 became obsolete in 1990. Older records may display 0 or 1
Subfields used in SOUL 2.0:
$a--Personal name
$d -- Dates associated with a name (generally, year of birth)
$e--Relator Term
$q -- Fuller form of name
Indicator 1: Type of corporate name entry element
0 -- Inverted name (not used with AACR2)
1-- Jurisdiction name
2 -- Name in direct order
Indicator 2: Type of added entry.
See Indicator 2 under 700
# -- No information provided
2 -- Analytical entry
Subfields used in SOUL 2.0:
$a -- Corporate name or jurisdiction name as entry element
$b -- Subordinate unit (R)
$c -- Location of meeting (NR)
$d -- Date of meeting or treaty signing (R)
$e -- Relator term (R)
$g -- Miscellaneous information (NR)
$n -- Number of part/section/meeting (R)
110 - Main Entry -- Corporate name ®
Example: 110 2# $a Sunburst Communications (Firm)
165
Example: 100 1# $a Gregory, Ruth W. $q (Ruth Wilhelme), $d 1910-
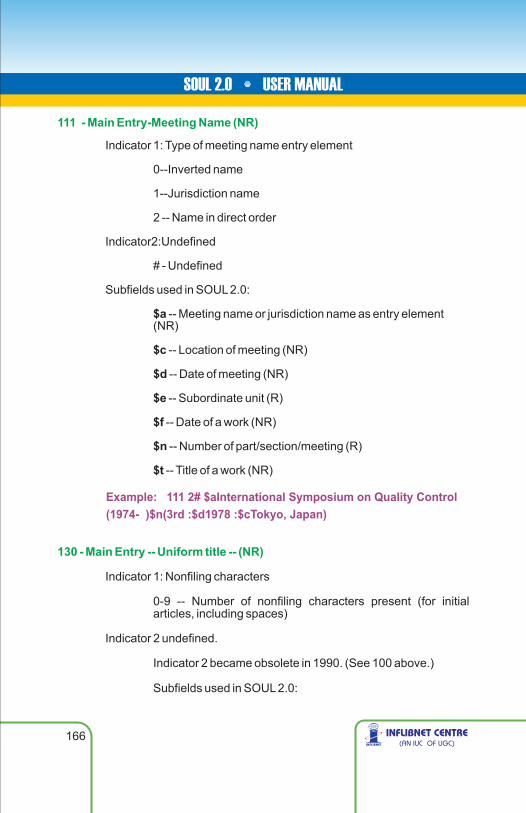
111 - Main Entry-Meeting Name (NR)
130 - Main Entry -- Uniform title -- (NR)
Indicator 1: Type of meeting name entry element
0--Inverted name
1--Jurisdiction name
2 -- Name in direct order
Indicator2:Undefined
# - Undefined
Subfields used in SOUL 2.0:
$a -- Meeting name or jurisdiction name as entry element (NR)
$c -- Location of meeting (NR)
$d -- Date of meeting (NR)
$e -- Subordinate unit (R)
$f -- Date of a work (NR)
$n -- Number of part/section/meeting (R)
$t -- Title of a work (NR)
Indicator 1: Nonfiling characters
0-9 -- Number of nonfiling characters present (for initial articles, including spaces)
Indicator 2 undefined.
Indicator 2 became obsolete in 1990. (See 100 above.)
Subfields used in SOUL 2.0:
166
Example: 111 2# $aInternational Symposium on Quality Control
(1974- )$n(3rd :$d1978 :$cTokyo, Japan)

$a -- Uniform title
$f -- Date of a work
$h -- Medium (NR)
$k -- Form subheading (R)
$n -- Number of part/section of a work (R)
Indicator 1: Title added entry
0 -- No added entry
1 -- Added entry
Indicator 2: Type of title
# -- Abbreviated key title
0 -- Other abbreviated title
Subfield used most often:
$a -- Abbreviated title (NR)
Indicator 1: Undefined
Indicator 2: Nonfiling characters
0 -- No nonfiling characters
1-9 -- Number of nonfiling characters
Subfield used in SOUL 2.0:
210 - Abbreviated title ®
222 - Key title (R)
167
Example: 130 0# $a Bible. $p O.T. $p Psalms.
Example: 210 0# $aManage. improv. cost reduct. goals

168
Example: 245 14 $a The DNA story :$b a documentary history of
gene cloning /$c James D. Watson, John Tooze.
Example: 222 #4 $aDer Öffentliche Dienst $b(Köln)
$a - Key title (NR)
$b - Qualifying information (NR)
Indicator 1 : Title added entry
0 - No Title added entry (Indicates a title main entry; i.e. no author is given)
1. – Title added entry (the proper indicator when an author given in 1XX; the most Common Situation)
Indicator 2 : Nonfiling characters
0-9– Number of nonfiling characters present, including
spaces; usually set at zero, except when the title begins
with an article; e.g. for the robe, t he second indicator would be set to 4. The letters T, h, e, and the space following them are then ignored in alphabetizing titles. The will be
automatically filed under “r” – for Robe.
Sub-fields used in SOUL 2.0
$a – Title proper$b – Reminder of title (subtitles, etc.)$c – Remainder of title page transcription/state of
responsibility.
245 - Title Statement (NR)

246 - Varying form of title (R)
247 - Former title (R)
Indicator 1: Note/title added entry controller
1 -- Note, title added entry
3 -- No note, title added entry
Indicator 2+: Type of title
# -- No information provided
0 -- Portion of title
1 -- Parallel title
4 -- Cover title
8 -- Spine title
Subfield used most often:
$i -- Display text (NR)
$a -- Title proper/short title (NR)
$b -- Remainder of title (NR)
$n -- Number of part/section of a work (R)
$p -- Name of part/section of a work (R)
Indicator 1: Title added entry
0 -- No added entry
1 -- Added entry
169
Example: 246 1# $jAlternate Issues Published with
Title : $a Chicago,Daily Teleraph

Indicator 2: Note controller
0 -- Display note
1 -- Do not display note
Subfield used most often:
$a -- Title (NR)
$b -- Remainder of title (NR)
$f -- Date or sequential designation (NR)
Indicators undefined.
Subfield used in SOUL 2.0:
$a -- Edition statement
$b -- Remainder of edition statement (NR)
Indicators undefined.
Subfield used in SOUL 2.0:
$a -- Computer file characteristics (NR)
250 - Edition statement (NR)
256 - Edition statement (NR)
170
Example: 250 ## $a 6th ed./$brevised by Dr. M.A.Gopinath
Example: 247 10 $aJournalism bulletin $fMar. 1924-Nov. 1927
Example: 256 ## $aComputer data (2 files : 876,000,
775,000 records).
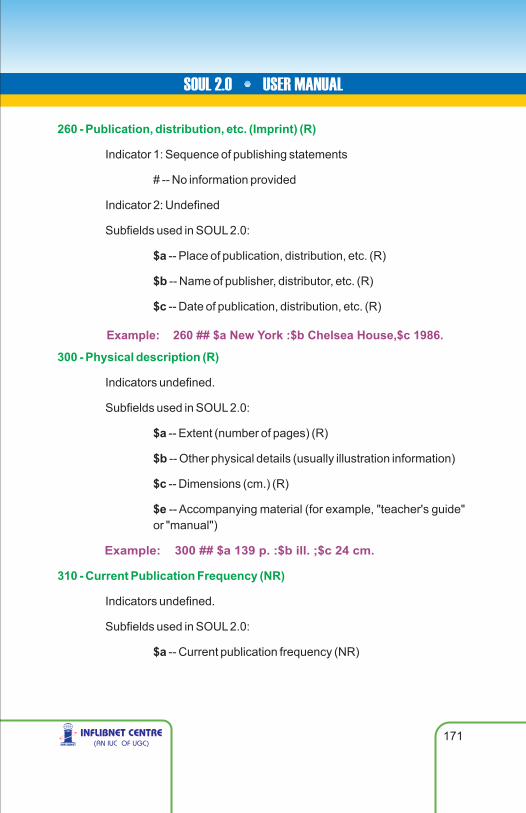
260 - Publication, distribution, etc. (Imprint) (R)
300 - Physical description (R)
310 - Current Publication Frequency (NR)
Indicator 1: Sequence of publishing statements
# -- No information provided
Indicator 2: Undefined
Subfields used in SOUL 2.0:
$a -- Place of publication, distribution, etc. (R)
$b -- Name of publisher, distributor, etc. (R)
$c -- Date of publication, distribution, etc. (R)
Indicators undefined.
Subfields used in SOUL 2.0:
$a -- Extent (number of pages) (R)
$b -- Other physical details (usually illustration information)
$c -- Dimensions (cm.) (R)
$e -- Accompanying material (for example, "teacher's guide" or "manual")
Indicators undefined.
Subfields used in SOUL 2.0:
$a -- Current publication frequency (NR)
171
Example: 300 ## $a 139 p. :$b ill. ;$c 24 cm.
Example: 260 ## $a New York :$b Chelsea House,$c 1986.
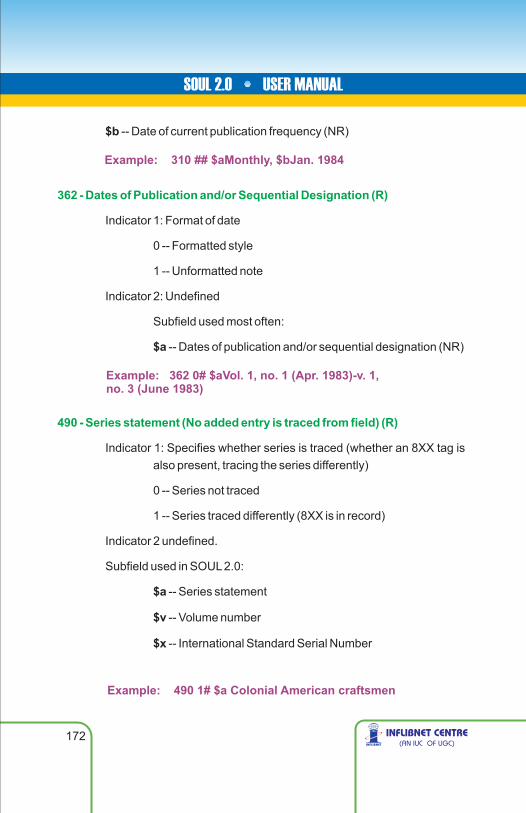
$b -- Date of current publication frequency (NR)
Indicator 1: Format of date
0 -- Formatted style
1 -- Unformatted note
Indicator 2: Undefined
Subfield used most often:
$a -- Dates of publication and/or sequential designation (NR)
Indicator 1: Specifies whether series is traced (whether an 8XX tag is also present, tracing the series differently)
0 -- Series not traced
1 -- Series traced differently (8XX is in record)
Indicator 2 undefined.
Subfield used in SOUL 2.0:
$a -- Series statement
$v -- Volume number
$x -- International Standard Serial Number
362 - Dates of Publication and/or Sequential Designation (R)
490 - Series statement (No added entry is traced from field) (R)
172
Example: 310 ## $aMonthly, $bJan. 1984
Example: 362 0# $aVol. 1, no. 1 (Apr. 1983)-v. 1,no. 3 (June 1983)
Example: 490 1# $a Colonial American craftsmen

500 - General note (R)
501 - With Note (R)
502 - Dissertation Note (R)
Indicators undefined.
Subfield used in SOUL 2.0:
$a -- General note (Used when no specialized note field has been defined for the information. Examples: Notes regarding the index; the source of the title; variations in title; descriptions of the nature, form, or scope of the item.)
Indicators are undefined
Subfield used in SOUL 2.0
$a -- With note
This field is used for theses database for rendering of thesis records.
Indicators are undefined
Subfield used in SOUL 2.0
$a -- Dissertation note
173
Example: 502 ## $a Thesis (Ph.D.) –Ravishankar University,
Raipur, 1986.
Example: 501 ## $a With: The reformed school / John Dury.
London : Printed for R. Wasnothe, [1850]
Example: 500 ## $a Includes index.
504 - Bibliography, etc. note (R)
505 - Formatted contents note (R)
510 - Citation/References Note (R)
Indicators undefined.
Subfield used in SOUL 2.0:
$a -- Bibliography, etc. note
Indicator 1: Type of contents note
0 -- Complete contents
1 -- Incomplete contents (used with multivolume set when some volumes are not yet published)
2 -- Partial contents
Indicator 2: Level of content designation
# -- Basic
Subfield used in SOUL 2.0:
$a -- Formatted contents note
Indicator 1: Coverage/location in source
0 - Coverage unknown
1 - Coverage complete
2 - Coverage is selective
174
Example: 504 ## $a Includes bibliographical references.
Example: 505 0# $a Pride and prejudice – Emma – Northanger Abbey
175
Example: 510 1# $aIndex Medicus,$x0019-3879,$bv1n1, 1984-
Example: 520 ## $aThis basic guide to parliamentary
procedure tells how to conduct and participate in a
meeting properly.
3 - Location in source not given
4 - Location in source given
Indicator 2: undefined (SOUL 2.0 defines it internally in system)
Subfields used in SOUL 2.0:
$a -- Name of source
$b -- Coverage of source
$c -- Location within source
$x -- International Standard Serial Number
Indicator 1: Display constant controller
# -- Summary
1 -- Review
2 -- Scope and content
3 -- Abstract
Indicator 2 undefined
Subfields used in SOUL 2.0:
$a -- Summary, abstract, or annotation
$b -- Expansion of summary note
520 - Summary, etc. note (R)

525 - Supplement Note (R)
546 - Language Note (R)
600 - Subject added entry -- Personal name (R)
Indicators undefined.
Subfield used in SOUL 2.0:
$a -- Supplement note
Indicators undefined.
Subfield used in SOUL 2.0:
$a -- Language note
Indicator 1: Type of personal name entry element
0 -- Forename
1 -- Surname (this is the most common form)
3 -- Family name
Indicator 2: Subject heading system/thesaurus (identifies the specific list or file which was used)
0 -- Library of Congress Subject Headings
1 -- LC subject headings for children's literature
2 -- Medical Subject Headings
3 -- National Agricultural Library subject authority file
176
Example: 546 ## $aIn Hungarian; summaries in French,
German, or Russian.
Example: 525 ## $aSupplements accompany some issues.
4 -- Source not specified
5 -- Canadian Subject Headings
6 -- Répertoire de vedettes-matière
(Note regarding Sear's List of subject headings: The MARC 21 format does not provide an assigned indicator. Therefore, an indicator of 4 is used.)
Subfields used in SOUL 2.0:
$a -- Personal name (surname and forename)
$d -- Dates associated with a name
$e -- Relator term
$q -- Fuller form of name
Indicator 1:Type of corporate name entry element
0 -- Inverted name (not used with AACR2)
1 -- Jurisdiction name
2 -- Name in direct order
Indicator 2: Subject heading system/thesaurus.
See indicator 2 under 600
Subfields used in SOUL 2.0:
$a -- Corporate name or jurisdiction name as entry element
610 - Subject added entry -- Corporate name (R)
177
Example: 600 10 $a Shakespeare, William, $d 1564-1616

$b -- Subordinate unit
$c -- Location of meeting
$d -- Date of meeting or treaty signing
$e -- Relator term
$n -- Number of part/section/meeting
$g -- Miscellaneous information
Indicator 1: Type of meeting name entry element
0 -- Inverted name
1 -- Jurisdiction name
2 -- Name in direct order
Indicator 2: Thesaurus
See Indicator 2 of 600
Subfields used in SOUL 2.0:
$a -- Meeting name or jurisdiction name as entry element (NR)
$c -- Location of meeting (NR)
$d -- Date of meeting (NR)
$e -- Subordinate unit (R)
$f -- Date of a work (NR)
$n -- Number of part/section/meeting (R)
$t -- Title of a work (NR)
611 - Subject Added Entry-Meeting Name (R)
178
Example: 610 10 $a United States. $b Army Air Forces
Example: 611 20$aVatican Council$n(2nd :$d1962-1965).
$tDecretumde presbyterorum ministerio et vita

630 - Subject Added Entry-Uniform Title (R)
648 - Subject Added Entry-Chronological Term (R)
Indicator 1:Nonfiling characters
0-9 - Number of nonfiling characters
Indicator 2:Thesaurus
See Indicator 2 of 600.
Subfields used in SOUL 2.0:
$a -- Uniform title
$f -- Date of a work
$h -- Medium
$k -- Form subheading
$n -- Number of part/section of a work
Indicator 1:undefined (SOUL 2.0 defines it internally in system)
Indicator 2:Thesaurus
See Indicator 2 of 600.
Subfields used in SOUL 2.0:
$a – Chronological term
$v -- Form subdivision (R)
$x -- General subdivision (R)
$y -- Chronological subdivision (R)
$z -- Geographic subdivision (R)
179
Example: 648 00 $a1900-1999.
Example: 630 00 $aBible.$kManuscripts.

650 - Subject added entry -- Topical term (R)
Indicator 1: Level of subject
# -- No information provided
0 -- No level specified
1 -- Primary
2 -- Secondary
Indicator 2: Subject heading system/thesaurus
See Indicator 2 of 600.
Subfields used in SOUL 2.0:
$a -- Topical term or geographic name entry element
$b -- Topical term following geographic name entry element
$c -- Location of event
$v -- Form subdivision (R)
$x -- General subdivision (R)
$y -- Chronological subdivision (R)
$z -- Geographic subdivision (R)
Notice that subfields $v, $x, and $z in the 650 field are repeatable. Subfields $v, $x, $y, and $z do not have to be in alphabetical order. They will be in the order prescribed by the subject heading scheme being used.
180
Example: 650 #0 $a Theater $z United States $v
Biography $v Dictionaries.

651 - Subject added entry -- Geographic name (R)
653 - Index Term-Uncontrolled (R)
Indicator 1: undefined. (SOUL 2.0 defines it internally in system)
Indicator 2: Subject heading system/thesaurus.
See indicator 2 under 600
Subfields used in SOUL 2.0:
$a -- Geographic name
$v -- Form subdivision (R)
$x -- General subdivision (R)
$y -- Chronological subdivision (R)
$z -- Geographic subdivision (R)
Notice that subfields $v, $x, and $z in the 651 field are repeatable. Subfields $v, $x, $y, and $z do not have to be in alphabetical order. They will be in the order prescribed by the subject heading scheme being used.
Indicator 1:Level of index term
# - No information provided
0 - No level specified
1 - Primary
2 - Secondary
Indicator 2: not defined in SOUL2.0.
Subfields used in SOUL 2.0:
$a -- Uncontrolled term (R)
181
Example: 651 #0 $a United States $x History $v Chronology.
Example: 653 ## $a India $a History.
182
Example: 654 0# $cr$alandscape gardens$cy$b18thcentury$
cz$bEngland.
654 - Subject Added Entry-Faceted Topical Terms (R)
700 - Added entry -- Personal name (R)
Indicator 1: Level of subject
# - No information provided
0 - No level specified
1 - Primary
2 - Secondary
Indicator 2: undefined. (SOUL 2.0 defines it internally in system)
Subfields used in SOUL 2.0:
$a -- Focus term (R)
$b – Non-focus term(R)
$c -- Facet/hierarchy designation (R)
$v -- Form subdivision (R)
$y -- Chronological subdivision (R)
$z -- Geographic subdivision (R)
Indicator 1: Type of personal name entry element
0 -- Forename
1 -- Surname (this is the most common form)
3 -- Family name
Indicator 2: Type of added entry
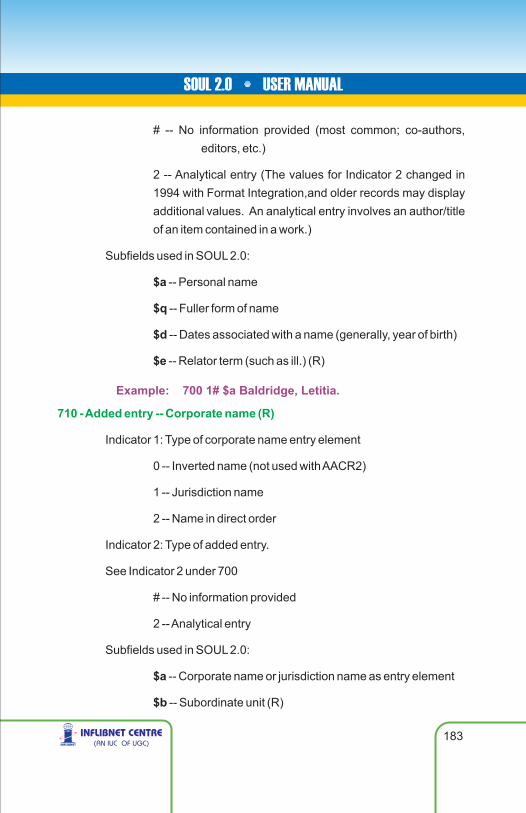
# -- No information provided (most common; co-authors, editors, etc.)
2 -- Analytical entry (The values for Indicator 2 changed in 1994 with Format Integration,and older records may display additional values. An analytical entry involves an author/title of an item contained in a work.)
Subfields used in SOUL 2.0:
$a -- Personal name
$q -- Fuller form of name
$d -- Dates associated with a name (generally, year of birth)
$e -- Relator term (such as ill.) (R)
Indicator 1: Type of corporate name entry element
0 -- Inverted name (not used with AACR2)
1 -- Jurisdiction name
2 -- Name in direct order
Indicator 2: Type of added entry.
See Indicator 2 under 700
# -- No information provided
2 -- Analytical entry
Subfields used in SOUL 2.0:
$a -- Corporate name or jurisdiction name as entry element
$b -- Subordinate unit (R)
710 - Added entry -- Corporate name (R)
183
Example: 700 1# $a Baldridge, Letitia.

$c -- Location of meeting (NR)
$d -- Date of meeting or treaty signing (R)
$e -- Relator term (R)
$g -- Miscellaneous information (NR)
$n -- Number of part/section/meeting (R)
Indicator 1: Type of meeting name entry element
0 -- Inverted name
1 -- Jurisdiction name
2 -- Name in direct order
Indicator 2:Type of added entry
# - No information provided
2 - Analytical entry
Subfields used in SOUL 2.0:
$a -- Meeting name or jurisdiction name as entry element (NR)
$c -- Location of meeting (NR)
$d -- Date of meeting (NR)
$e -- Subordinate unit (R)
$f -- Date of a work (NR)
$n -- Number of part/section/meeting (R)
$t -- Title of a work (NR)
711 - Added Entry -- Meeting Name (R)
184
Example: 710 2# $a Indian Institute of Technology $bMumbai
thExample: 711 2# $aInternational CALIBER 2009$n(7 :th $d25th to27 February 2009$cPondicherry University,
Puducherry)
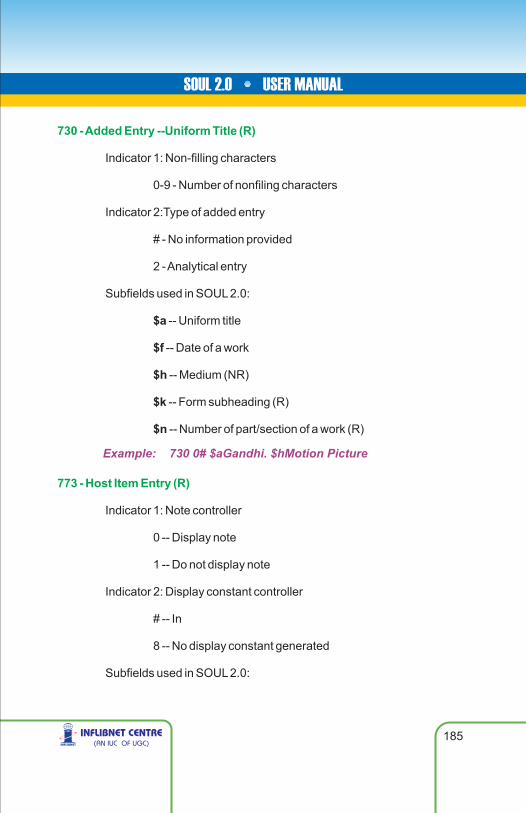
730 - Added Entry --Uniform Title (R)
773 - Host Item Entry (R)
Indicator 1: Non-filling characters
0-9 - Number of nonfiling characters
Indicator 2:Type of added entry
# - No information provided
2 - Analytical entry
Subfields used in SOUL 2.0:
$a -- Uniform title
$f -- Date of a work
$h -- Medium (NR)
$k -- Form subheading (R)
$n -- Number of part/section of a work (R)
Indicator 1: Note controller
0 -- Display note
1 -- Do not display note
Indicator 2: Display constant controller
# -- In
8 -- No display constant generated
Subfields used in SOUL 2.0:
185
Example: 730 0# $aGandhi. $hMotion Picture

$a – Main entry heading (NR)
$b – Edition (NR)
$d – Place, publisher and date of publication (NR)
$g – Relationship information (R)$h – Physical description
(NR)
$s – Uniform title (NR)
$t – Title (NR)
$w – Record control number (R)
$x – International Standard Serial Number (NR)
$y – CODEN Designation (NR)
Indicators undefined:
Subfields used in SOUL 2.0:
$a – Holding institution (R)
850 - Holding Institution (R)
186
Example: 773 0# $aHamilton, Milton W. (Milton Wheaton),
1901-$tSir William Johnson and the Indians of New
York.$d[Albany] : University of the State of New York, State
E d u c a t i o n D e p t . , O f f i c e o f S t a t e H i s t o r y ,
1967$w(DLC)###68066801# [Host item identified by author,
title, and record number.]
Example: 850 ## $aAAP$aCU

856 - Electronic Location and Access (R)
852 - Location (R)
Indicator 1: Access method
# - No information provided
0 - Email
1 - FTP
2 - Remote login (Telnet)
3 - Dial-up
Indicator 2: Relationship
# - No information provided
0 - Resource
1 - Version of resource
2 - Related resource
8 - No display constant generated
Subfields used in SOUL 2.0:
$u - Uniform Resource Identifier (R)
Indicator 1: Shelving scheme
# - No information provided
0 - Library of Congress classification
1 - Dewey Decimal classification
2 - National Library of Medicine classification
3 - Superintendent of Documents classification
4 - Shelving control number
187
Example: 856 0# $u ttp://www.inflibnet.ac.in/publication/

5 - Title
6 - Shelved separately
8 - Other scheme
Indicator 2: Shelving order
# - No information provided
0 - Not enumeration
1 - Primary enumeration
2 - Alternative enumeration
Subfields used in SOUL 2.0:
$p -- Piece Designation
$a -- Location
$b -- Collection Type
$c -- Shelving location
$f -- Coded location qualifier
$k -- Call number prefix
$m -- Call number suffix
$t -- Copy number
Following local information have been added in the Location field (852)
Material Type, Status of the item, Department, Budget, Price, Supplier, Invoice Number, Invoice Date, Date of Acquisition.
188
Example: 852 0# $p T101$bText book$k001.89$mTEL/RCH$f
Main Library$aStack Room$cGround Floor

189
Accessioning 58, 59Bound Serial 150Imported Data 86
Acquisition 46Master 9
ApprovalBook-Approve 50Book-Direct Approval 51Book-Selection 49Gratis Items 50Letter-Book 52Serial 132
Article Indexing 129Auto Assign
Accession No 59Auto Letter Number 6Barcode 88
Settings 6Bibliography Delete 18Bibliograpic Service 86Binder
see Vendor
BindingBook 119Serial-Commercial 149Serial-Inhouse 149Set Preparation 149
Binding Type 28Book bank 103Book Card 88
Settings 6
Book Transfer 107Budget 33
Allocation 35Expense Head 34Income Head 34Transfer 36
Calender 23Cataloguing 70
Export 84Import 83Master 11Template 15Data Entry 73Template-based 81Theses 80Title 74
Check in 144Update 145
Circulation 90Master 19
Circulation Group 104Class No 78Classification Scheme 15Collection Type 7Connection Settings 8Corporate Name 75Country 40Course/Designation 39Currency Master 32Current Awareness 86Daily Visitors 107Damaged
Keyword Index

190
Book 121Database Connection
see Connection Settings
Data-Entry 73Authority 82Template 15
Delivery Mode 28Department 38Departmental Library 43Discount
Invoice process 63Overall 63
Duplicate CheckNew Request 47
EditCatalogue 80Serial-Title 128
Edition MasterSerial 29
Email Settings 4Export 84
MARC 84Export & Delete
Rejected 51File Attachment 78Fixed Field 14,74,125Frequency 27General Master 31Global Replace 18Global Search 18Gratis Items 49Group Circulation
see Circulation Group
ILL 111Borrowing 111Lending 115New Library 43
ImportCatalogue 83CCF 85MARCXML 86
Import MARC 59,70,83Institute Detail 37Institutional Library 43Invoice Process
Book 63Bound Serial 151Discount 63Serial 140
IssueBook 97Book bank 103Book-On premises 101Group 104ILL Library 115
Issue SlipBook 97
LabelSettings 6
Language 41Leader 12,74,125Letter
Auto Number 6Book-Approval 52Header Image 4ILL Library 112Layout 5

191
Purchase Order-Book 57Purchase Order-Serial 139Reminder-Serial 147
Location 77Lost-Book 117Meeting Name 76Member
Category 19Privileges 19Type 24
Member CardCustomization 24Image Modification 4
Member Login 107Membership 90
Copy 92Delete -Group 93Delete -Single 93New 90Photo 90Renewal-Group 94Renewal-Single 94
Merge Record 59Missing
Book 122Serial-Issue 147
New RequestBook 47ILL 111Serial 131
No-Due Certificate 92,95,102Non-receipt
Serial 147Notes
Cataloguing 80OPAC 154
Boolean Search 157Member 158Simple Search 154
OrderReceive-Book 58Serial-Binding 149Serial-Cancel 138Serial-New 136Book 53Book-Cancel 55Book-Direct 55Book-New 53
Overdue Charges 101, 103Payment
Account Section-Book 68Account Section-Serial 142Book 63Book-Report 69Bound Serial 152Process-Book 65Serial 140Settlement 66
Personal Name 75Physical Description 77Physical Media 43Privileges
ILL Library 43Member 19
Publishersee Vendor
Cataloguing 76

192
Purchase Ordersee Letter
ReceiveBook 58ILL Book 112
Refund ProcessBook 67Serial 142
ReminderBook-Issued 100,104ILL Library 116Purchase Order 57
RenewBook-Issued 99Serial 137
ReportBinding 152Budget 45Budget Transfer 45Category List 26Check in 148Circulation 108Currency 45Delivery Mode 30Fine Payer 109Frequency 30Group issue 109Institute 45Institute Details 40Institute List 26Invoice-Book 69Issued 108Member 95Member Category 26
Member login 109On-premises issue 109Overdue 108Overdue Pending 109Payment-Book 69Request 51Reserved 108Returned 108Serial-Order 139Serial-Request 135Template 17Vendor-Acquisition 10Vendor-Serial 30Cataloguing 87Cataloguing-Advanced 87Cataloguing-Basic 87Serial-Holding 131
RequestILL Library 112
ReserveBook 100
Reset Transaction 26Return
Book 98Book- On premises 102Group 104ILL Book 114
Schedule GenerationSerial 144
Searchsee OPAC
Book 102Member 92
Serial 124

Master 27MARC Entry 125Merge to Database 134Title Entry 127Title Holding 129Title Holding 131
Series Statement 78Spine Label 88
Settings 6Stock Varification 105Subject Added Entry 79Subject Heading 41Subscription
Serial 136Suggestion
Acquisition 47Serial 131
Suppliersee Vendor
System Settings 4
193
TemplateAuthority 15Bibliography 15
Transaction 96Reset 26
Transfer-Booksee Book Transfer
Uniform Name 76URL 79User 2
Group 2Password 3
VendorAcquisition 9Serial 27
WithdrawalBook 123