12b Tutorial
33
Programming the Propeller with 12Blocks Hanno Sander V1.8 © HannoWare.com 2011 Introduction 12Blocks is a language and tool that makes it easy to program popular microcontrollers like the Parallax Propeller. A library of over 100 powerful blocks let's you quickly build games, robots, and more. Just assemble blocks onto the worksheet and then debug your program with built-in graphical tools. 12Blocks is ideal for classrooms, students, hobbyists and professionals who want to quickly and easily build electronic projects. With 12Blocks you can easily: • write programs by assembling blocks onto a worksheet • graphically debug programs with the built in real-time graphs • use wizards to customize graphical sprites, vectors and more for your program • change program parameters on the fly- without recompilation/reloading • interface with common sensors, peripherals, actuators and devices • integrate a microcontroller with other PC applications • transition to text based languages Program Library: 12Blocks makes it easy to share programs with others. Visit http://12blocks.com/howto and use the search tool to find a program that solves your problem. Users can upload circuit schematics, photos of their project, and the complete code for the program.
-
Upload
deborah-velazquez -
Category
Documents
-
view
38 -
download
2
description
12b Tutorial
Transcript of 12b Tutorial
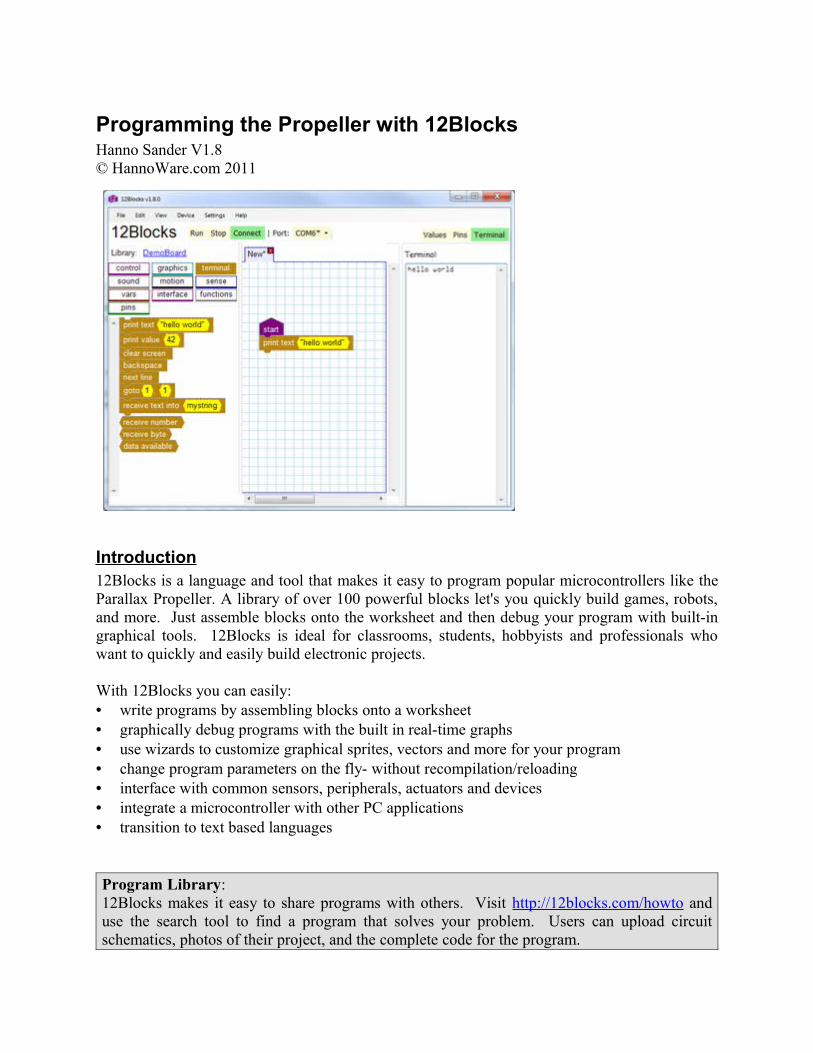
Programming the Propeller with 12Blocks Hanno Sander V1.8© HannoWare.com 2011
Introduction12Blocks is a language and tool that makes it easy to program popular microcontrollers like the Parallax Propeller. A library of over 100 powerful blocks let's you quickly build games, robots, and more. Just assemble blocks onto the worksheet and then debug your program with built-in graphical tools. 12Blocks is ideal for classrooms, students, hobbyists and professionals who want to quickly and easily build electronic projects.
With 12Blocks you can easily:• write programs by assembling blocks onto a worksheet• graphically debug programs with the built in real-time graphs • use wizards to customize graphical sprites, vectors and more for your program• change program parameters on the fly- without recompilation/reloading• interface with common sensors, peripherals, actuators and devices• integrate a microcontroller with other PC applications• transition to text based languages
Program Library: 12Blocks makes it easy to share programs with others. Visit http://12blocks.com/howto and use the search tool to find a program that solves your problem. Users can upload circuit schematics, photos of their project, and the complete code for the program.
12Blocks is easy and fun enough to be used by a 5 year old, but extensible and powerful enough to be used professionally. In this lab you’ll download and install 12Blocks in its 30 day evaluation mode and work through several sample programs that increase in complexity from a simple Hello World program to using arrays, functions, and event messages.
We’ll cover how to :• Graphically arrange blocks to create a program • Edit block parameters- wizards exist for vectors, sprites, speech, wav files• Change parameters while your program is running• Comment your program with blocks that include links to files or websites• Use multiple start blocks to write a multiprocessing program• Write programs that output graphics, play music, control servos and more• Define functions with arguments, local variables and return values• Program with synchronous and asynchronous event handlers• Customize the library by adding new blocks to implement new functionality• Use Hardware definition files to define pin usage and customize the block library• Share programs online with the 12Blocks community• View and edit a file created by 12Blocks as SPIN code in the Propeller Tool• Combine blocks and text as parameters for a block• View and change variable values in a running program using an oscilloscope interface• View pin activity using a graphical map and logic analyzer graph• Interact with a program using the terminal• Integrate with Python, Matlab, Excel, VB.NET, C# or other DDE/.NET aware applications
Videos: If you prefer watching videos to reading this document, check out our video tutorials at: http://12blocks.com/videos
Prerequisites1. Download 12Blocks from here: http://12blocks.com/download and install it. 2. Connect a Parallax Propeller to the PC using a USB cable.
Hardware: This tutorial was tested with a Parallax Propeller Demo Board available here:http://www.parallax.com/Store/ProductSearchResults/tabid/127/ProductID/340/List/1/Default.aspx?SortField=ProductName,ProductNameIf you’re using something else, make sure it’s using a 5Mhz crystal and is connected to your PC using a USB PropPlug. 12Blocks will run your programs on the first Propeller it finds-or manually select the COM port with the Port selector. If you require additional assistance check out our forums for help: http://forums.hannoware.com/
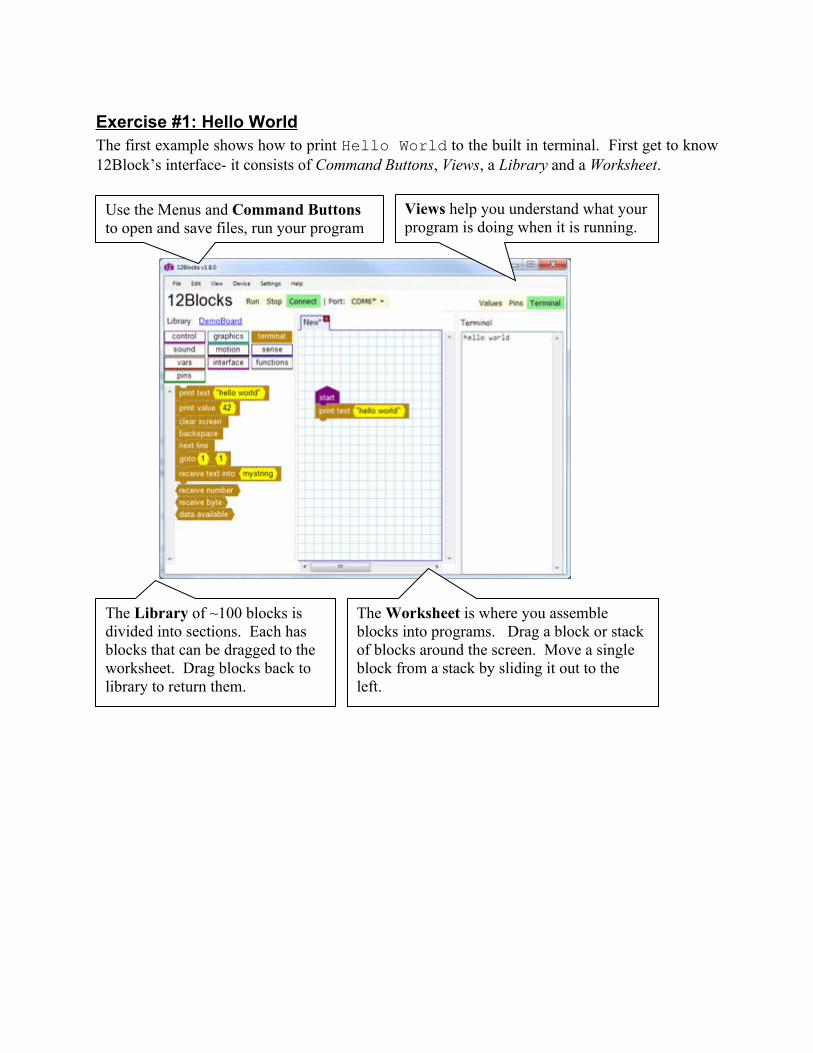
Exercise #1: Hello WorldThe first example shows how to print Hello World to the built in terminal. First get to know 12Block’s interface- it consists of Command Buttons, Views, a Library and a Worksheet.
The Worksheet is where you assemble blocks into programs. Drag a block or stack of blocks around the screen. Move a single block from a stack by sliding it out to the left.
The Library of ~100 blocks is divided into sections. Each has blocks that can be dragged to the worksheet. Drag blocks back to library to return them.
Views help you understand what your program is doing when it is running.
Use the Menus and Command Buttons to open and save files, run your program and more.
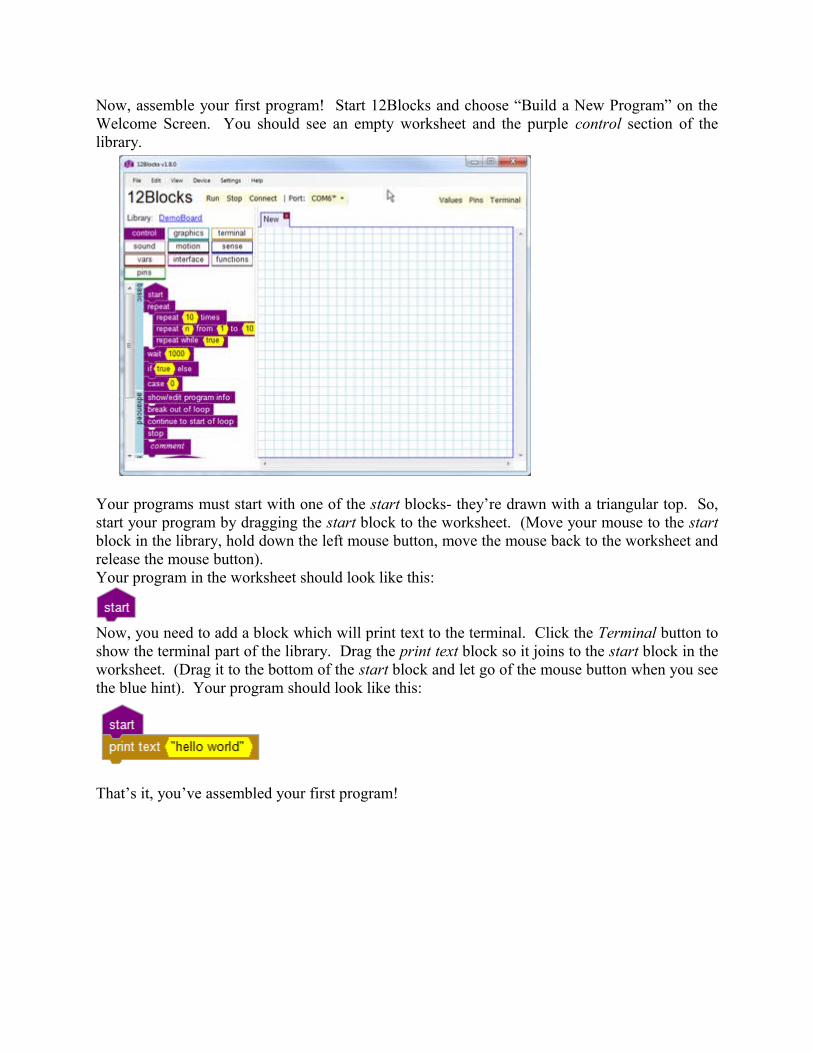
Now, assemble your first program! Start 12Blocks and choose “Build a New Program” on the Welcome Screen. You should see an empty worksheet and the purple control section of the library.
Your programs must start with one of the start blocks- they’re drawn with a triangular top. So, start your program by dragging the start block to the worksheet. (Move your mouse to the start block in the library, hold down the left mouse button, move the mouse back to the worksheet and release the mouse button). Your program in the worksheet should look like this:
Now, you need to add a block which will print text to the terminal. Click the Terminal button to show the terminal part of the library. Drag the print text block so it joins to the start block in the worksheet. (Drag it to the bottom of the start block and let go of the mouse button when you see the blue hint). Your program should look like this:
That’s it, you’ve assembled your first program!
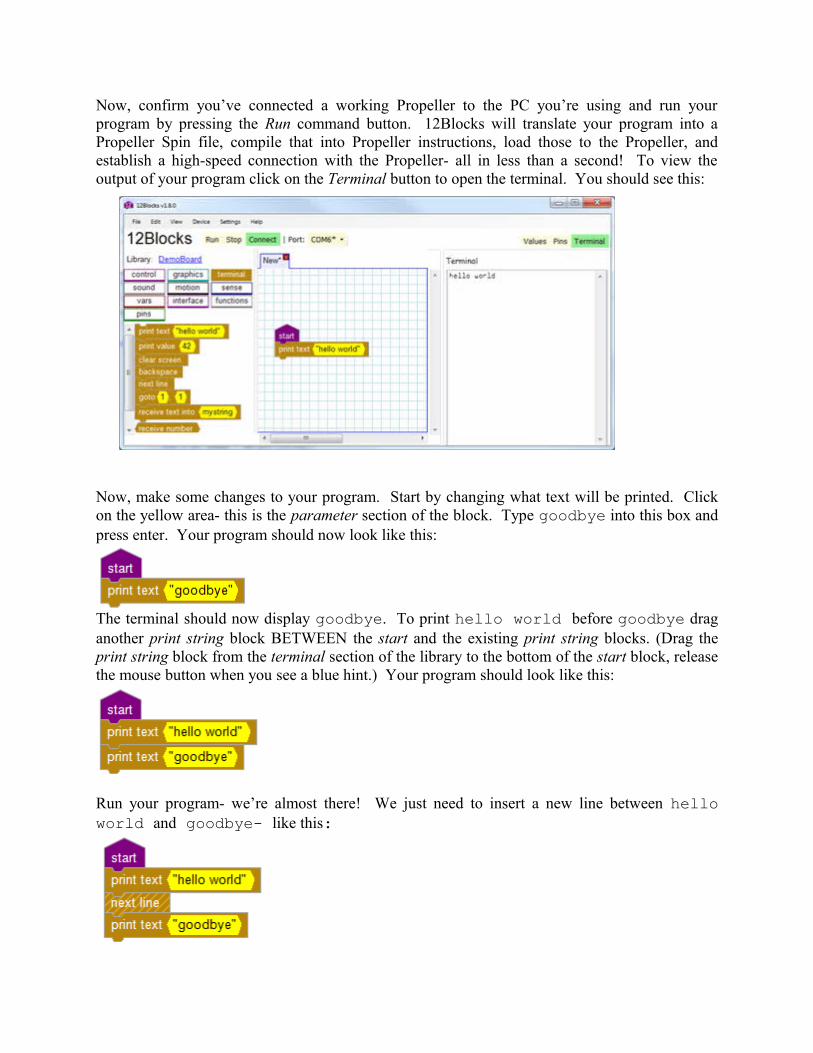
Now, confirm you’ve connected a working Propeller to the PC you’re using and run your program by pressing the Run command button. 12Blocks will translate your program into a Propeller Spin file, compile that into Propeller instructions, load those to the Propeller, and establish a high-speed connection with the Propeller- all in less than a second! To view the output of your program click on the Terminal button to open the terminal. You should see this:
Now, make some changes to your program. Start by changing what text will be printed. Click on the yellow area- this is the parameter section of the block. Type goodbye into this box and press enter. Your program should now look like this:
The terminal should now display goodbye. To print hello world before goodbye drag another print string block BETWEEN the start and the existing print string blocks. (Drag the print string block from the terminal section of the library to the bottom of the start block, release the mouse button when you see a blue hint.) Your program should look like this:
Run your program- we’re almost there! We just need to insert a new line between hello world and goodbye- like this:
You can also use special characters in the print text block- for example, “\n” inserts a new line. When you’re finished with your program, press the Save button. Name your file Hello World and hit the save button. To open your file in the future, press the Open button, select the Hello World file, and press the Open button.
Additional things to try:• If you make a mistake, click the Undo button to go back one action at a time. Click the Redo
button to go forwards.• Click the New command button to add a “New” worksheet.• Close a worksheet with the “x” next to it’s name.• Click Help->Reference to read the help manual.• If you don’t want to use a block anymore, drag it back to the library.
Directories: By default, 12Blocks installs program related files (12Blocks.exe, plugins, library definitions, etc) in “Program Files/12Blocks”. User files like Examples and Tutorials are stored in the “My Documents/12Blocks” folder.
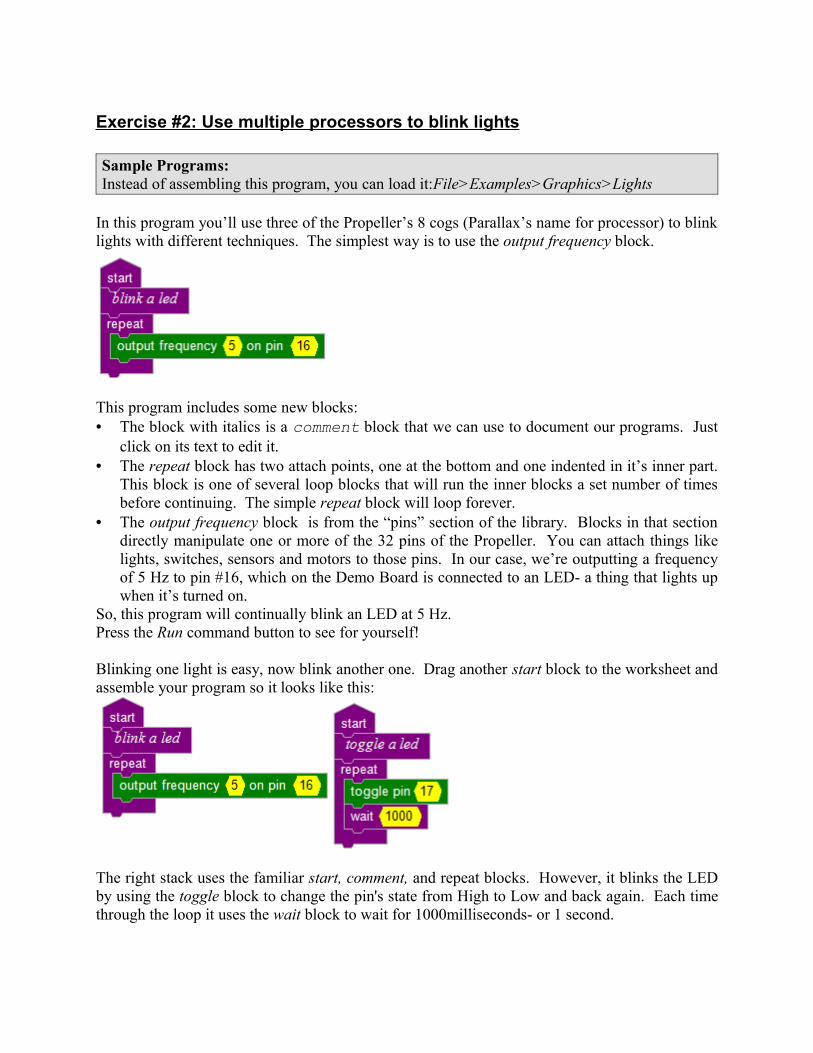
Exercise #2: Use multiple processors to blink lights
Sample Programs: Instead of assembling this program, you can load it:File>Examples>Graphics>Lights
In this program you’ll use three of the Propeller’s 8 cogs (Parallax’s name for processor) to blink lights with different techniques. The simplest way is to use the output frequency block.
This program includes some new blocks:• The block with italics is a comment block that we can use to document our programs. Just
click on its text to edit it. • The repeat block has two attach points, one at the bottom and one indented in it’s inner part.
This block is one of several loop blocks that will run the inner blocks a set number of times before continuing. The simple repeat block will loop forever.
• The output frequency block is from the “pins” section of the library. Blocks in that section directly manipulate one or more of the 32 pins of the Propeller. You can attach things like lights, switches, sensors and motors to those pins. In our case, we’re outputting a frequency of 5 Hz to pin #16, which on the Demo Board is connected to an LED- a thing that lights up when it’s turned on.
So, this program will continually blink an LED at 5 Hz.Press the Run command button to see for yourself!
Blinking one light is easy, now blink another one. Drag another start block to the worksheet and assemble your program so it looks like this:
The right stack uses the familiar start, comment, and repeat blocks. However, it blinks the LED by using the toggle block to change the pin's state from High to Low and back again. Each time through the loop it uses the wait block to wait for 1000milliseconds- or 1 second.

By using two start blocks, we’re using two “cogs” and running our program in parallel. This is a very powerful technique that makes the Propeller ideal for creating powerful programs- and 12Blocks makes it very easy to use.Press the Run button to see the two LED’s blink.
Now that your program is running, change the frequency from 5 to 11 by clicking on the yellow parameter field, typing 11 and pressing enter. You won’t need to stop and recompile, 12Blocks let’s you make changes to parameters with numbers while your program is running! You should see the LED blink more quickly. Now, change the frequency to 1000, a speed that’s too fast for your eyes to see. The LED will appear to be on all the time, so we need a tool to make sure the LED is actually blinking. Press the “View Pins” button and you should see this view:
Representation of the Propeller chip.Red pins are “on”, blue pins are “off”.
Use the Timescale Dial to determine the length of time you wish to look at. The current setting of 1ms/div is good for looking at our signal of 1000hz.
This “Logic” graph displays pins we use in our program: “tx,rx,16 and 17”. Notice how p16 toggles once every 1msec- or 1000 times/second.
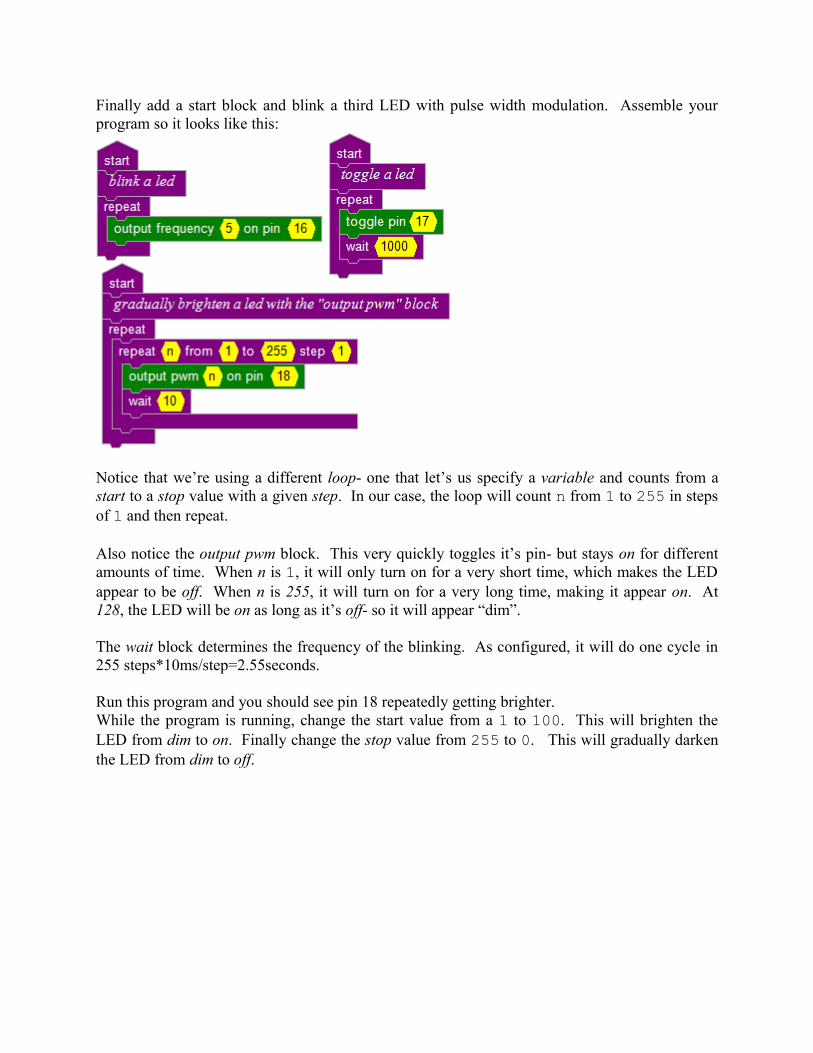
Finally add a start block and blink a third LED with pulse width modulation. Assemble your program so it looks like this:
Notice that we’re using a different loop- one that let’s us specify a variable and counts from a start to a stop value with a given step. In our case, the loop will count n from 1 to 255 in steps of 1 and then repeat.
Also notice the output pwm block. This very quickly toggles it’s pin- but stays on for different amounts of time. When n is 1, it will only turn on for a very short time, which makes the LED appear to be off. When n is 255, it will turn on for a very long time, making it appear on. At 128, the LED will be on as long as it’s off- so it will appear “dim”.
The wait block determines the frequency of the blinking. As configured, it will do one cycle in 255 steps*10ms/step=2.55seconds.
Run this program and you should see pin 18 repeatedly getting brighter.While the program is running, change the start value from a 1 to 100. This will brighten the LED from dim to on. Finally change the stop value from 255 to 0. This will gradually darken the LED from dim to off.
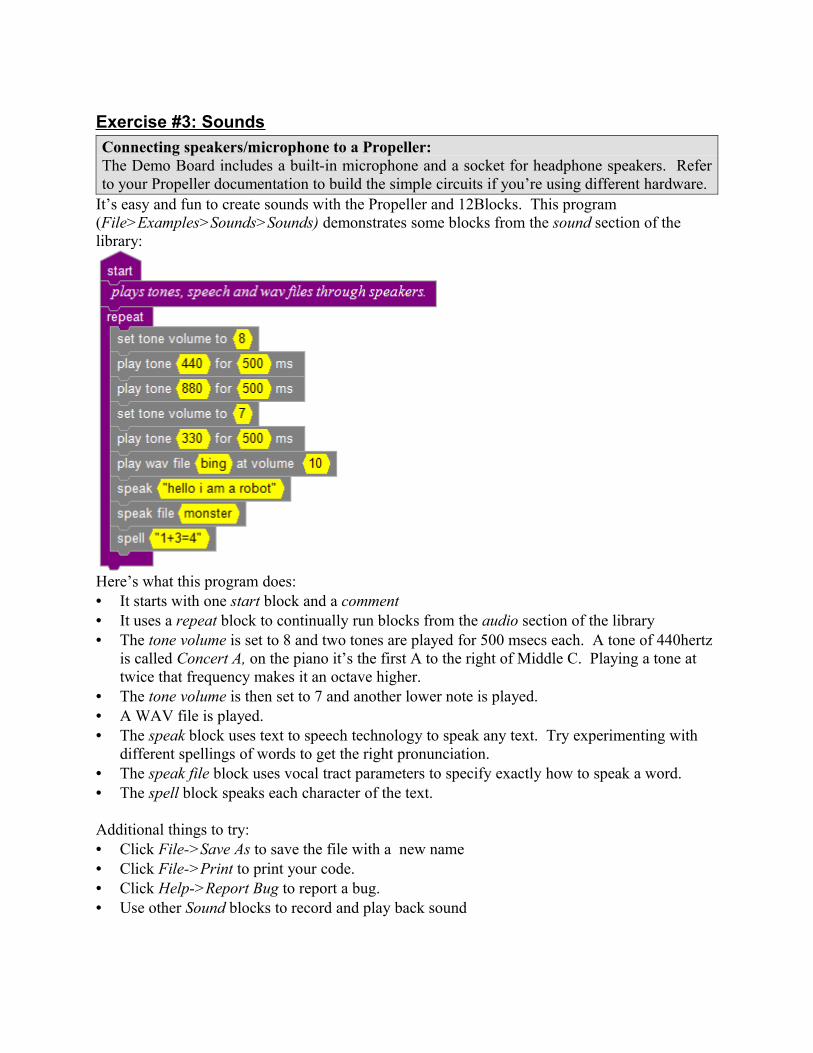
Exercise #3: SoundsConnecting speakers/microphone to a Propeller: The Demo Board includes a built-in microphone and a socket for headphone speakers. Refer to your Propeller documentation to build the simple circuits if you’re using different hardware.
It’s easy and fun to create sounds with the Propeller and 12Blocks. This program (File>Examples>Sounds>Sounds) demonstrates some blocks from the sound section of the library:
Here’s what this program does:• It starts with one start block and a comment• It uses a repeat block to continually run blocks from the audio section of the library• The tone volume is set to 8 and two tones are played for 500 msecs each. A tone of 440hertz
is called Concert A, on the piano it’s the first A to the right of Middle C. Playing a tone at twice that frequency makes it an octave higher.
• The tone volume is then set to 7 and another lower note is played.• A WAV file is played.• The speak block uses text to speech technology to speak any text. Try experimenting with
different spellings of words to get the right pronunciation.• The speak file block uses vocal tract parameters to specify exactly how to speak a word.• The spell block speaks each character of the text.
Additional things to try:• Click File->Save As to save the file with a new name• Click File->Print to print your code.• Click Help->Report Bug to report a bug.• Use other Sound blocks to record and play back sound
Exercise #4: GraphicsConnecting your Monitor/TV to a Propeller: The Demo Board includes a VGA connector for use with most computer monitors as well as a composite socket to connect to most TV’s. Refer to your Propeller documentation to build the simple resistor circuit if you’re using different hardware. 12Blocks supports graphics and text output to both VGA and TV monitors.Click Settings->Graphic Output to select which device you want to use.
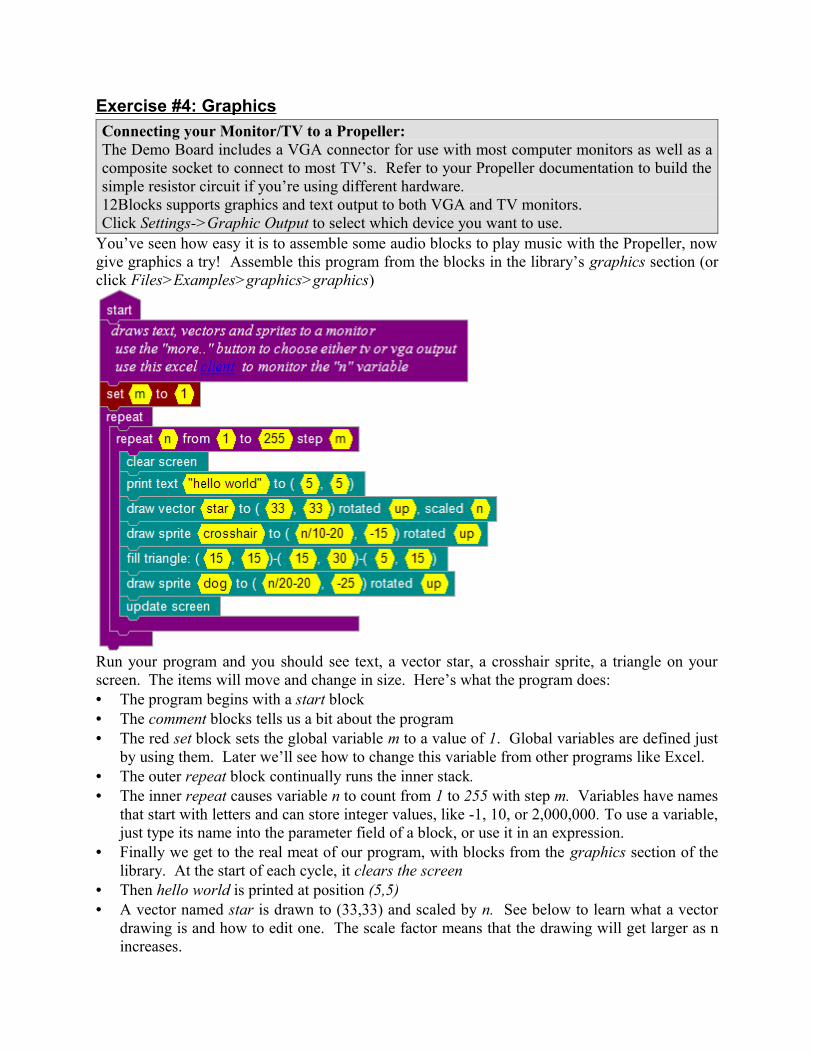
You’ve seen how easy it is to assemble some audio blocks to play music with the Propeller, now give graphics a try! Assemble this program from the blocks in the library’s graphics section (or click Files>Examples>graphics>graphics)
Run your program and you should see text, a vector star, a crosshair sprite, a triangle on your screen. The items will move and change in size. Here’s what the program does:• The program begins with a start block• The comment blocks tells us a bit about the program• The red set block sets the global variable m to a value of 1. Global variables are defined just
by using them. Later we’ll see how to change this variable from other programs like Excel. • The outer repeat block continually runs the inner stack.• The inner repeat causes variable n to count from 1 to 255 with step m. Variables have names
that start with letters and can store integer values, like -1, 10, or 2,000,000. To use a variable, just type its name into the parameter field of a block, or use it in an expression.
• Finally we get to the real meat of our program, with blocks from the graphics section of the library. At the start of each cycle, it clears the screen
• Then hello world is printed at position (5,5)• A vector named star is drawn to (33,33) and scaled by n. See below to learn what a vector
drawing is and how to edit one. The scale factor means that the drawing will get larger as n increases.
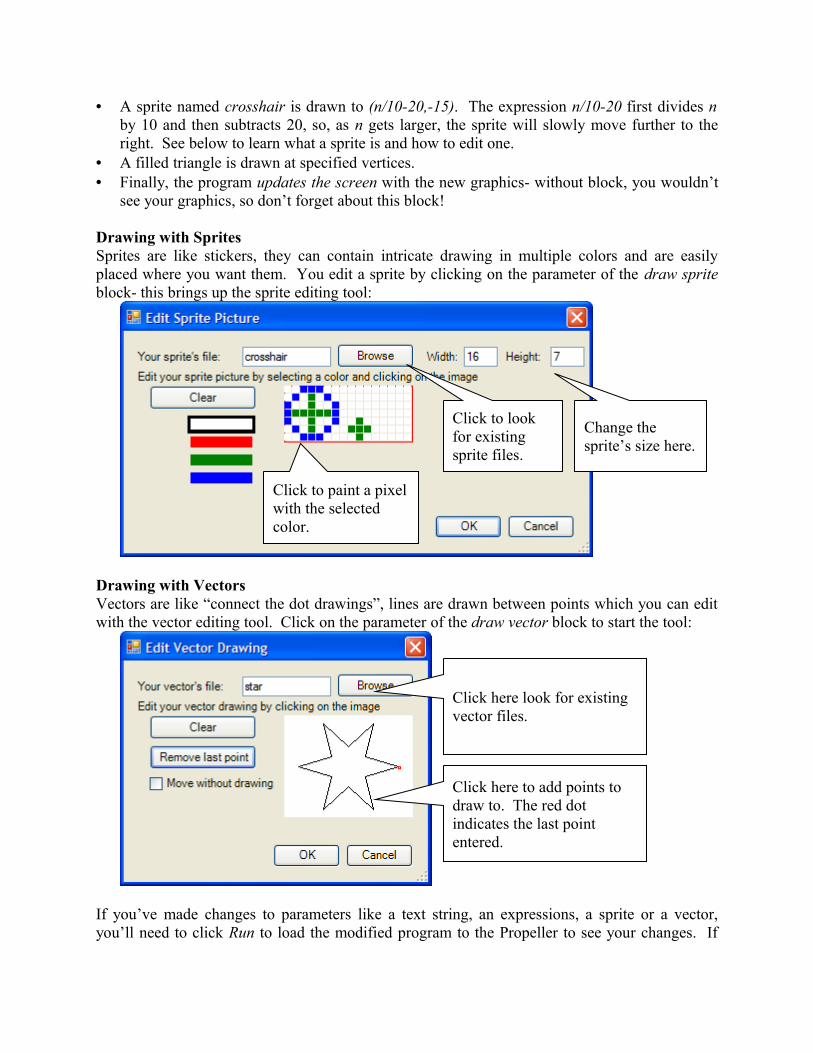
• A sprite named crosshair is drawn to (n/10-20,-15). The expression n/10-20 first divides n by 10 and then subtracts 20, so, as n gets larger, the sprite will slowly move further to the right. See below to learn what a sprite is and how to edit one.
• A filled triangle is drawn at specified vertices. • Finally, the program updates the screen with the new graphics- without block, you wouldn’t
see your graphics, so don’t forget about this block!
Drawing with SpritesSprites are like stickers, they can contain intricate drawing in multiple colors and are easily placed where you want them. You edit a sprite by clicking on the parameter of the draw sprite block- this brings up the sprite editing tool:
Drawing with VectorsVectors are like “connect the dot drawings”, lines are drawn between points which you can edit with the vector editing tool. Click on the parameter of the draw vector block to start the tool:
If you’ve made changes to parameters like a text string, an expressions, a sprite or a vector, you’ll need to click Run to load the modified program to the Propeller to see your changes. If
Click here to add points to draw to. The red dot indicates the last point entered.
Click here look for existing vector files.
Change the sprite’s size here.
Click to look for existing sprite files.
Click to paint a pixel with the selected color.
just changed a parameter from one number to another you’ll see the change right away- like moving an object or rotating it.
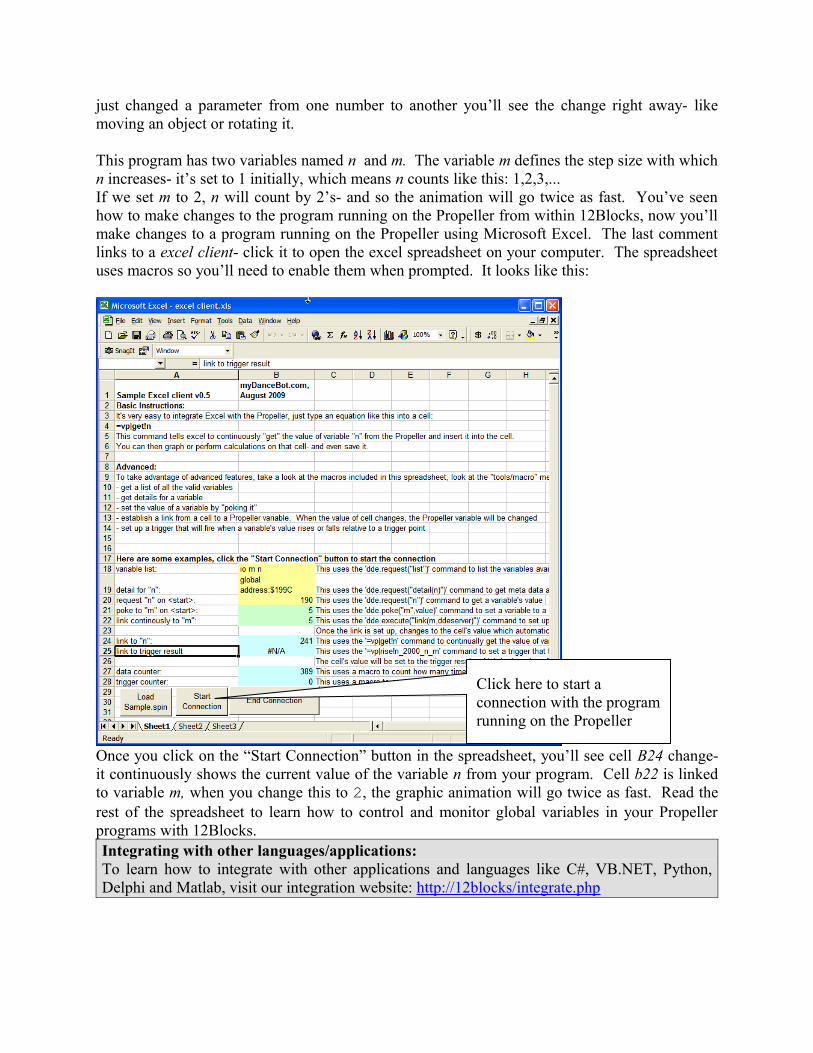
This program has two variables named n and m. The variable m defines the step size with which n increases- it’s set to 1 initially, which means n counts like this: 1,2,3,...If we set m to 2, n will count by 2’s- and so the animation will go twice as fast. You’ve seen how to make changes to the program running on the Propeller from within 12Blocks, now you’ll make changes to a program running on the Propeller using Microsoft Excel. The last comment links to a excel client- click it to open the excel spreadsheet on your computer. The spreadsheet uses macros so you’ll need to enable them when prompted. It looks like this:
Once you click on the “Start Connection” button in the spreadsheet, you’ll see cell B24 change- it continuously shows the current value of the variable n from your program. Cell b22 is linked to variable m, when you change this to 2, the graphic animation will go twice as fast. Read the rest of the spreadsheet to learn how to control and monitor global variables in your Propeller programs with 12Blocks. Integrating with other languages/applications: To learn how to integrate with other applications and languages like C#, VB.NET, Python, Delphi and Matlab, visit our integration website: http://12blocks/integrate.php
Click here to start a connection with the program running on the Propeller
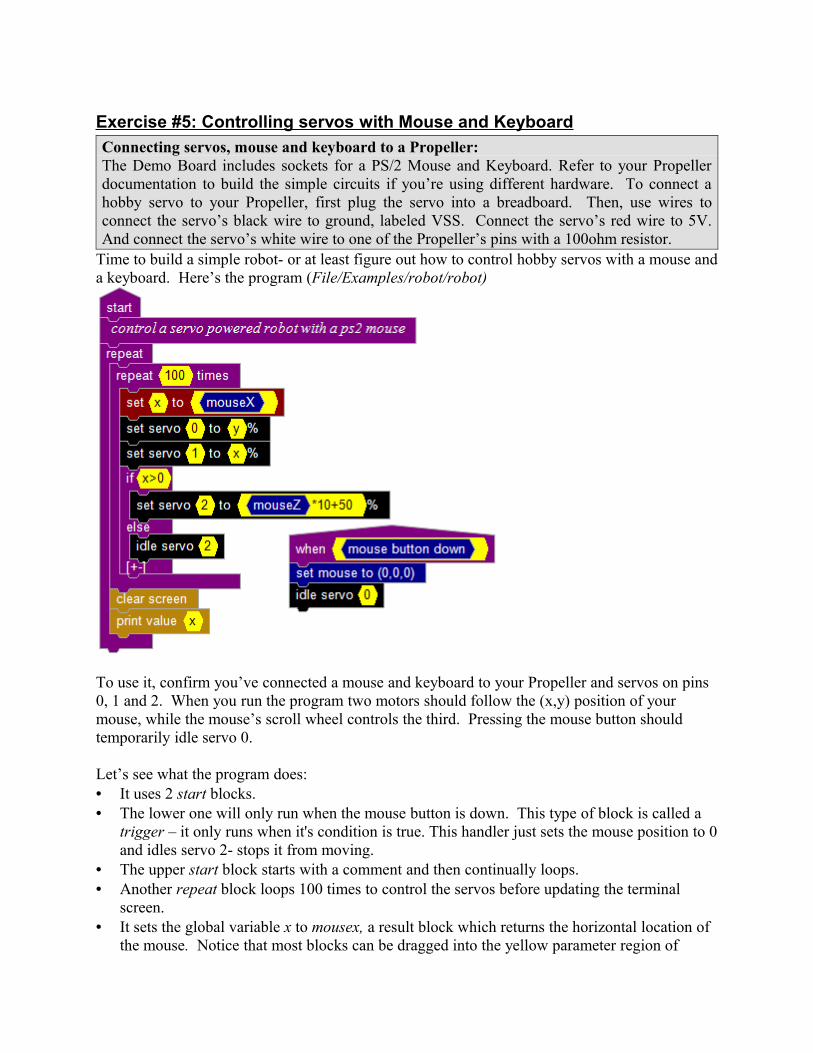
Exercise #5: Controlling servos with Mouse and KeyboardConnecting servos, mouse and keyboard to a Propeller: The Demo Board includes sockets for a PS/2 Mouse and Keyboard. Refer to your Propeller documentation to build the simple circuits if you’re using different hardware. To connect a hobby servo to your Propeller, first plug the servo into a breadboard. Then, use wires to connect the servo’s black wire to ground, labeled VSS. Connect the servo’s red wire to 5V. And connect the servo’s white wire to one of the Propeller’s pins with a 100ohm resistor.
Time to build a simple robot- or at least figure out how to control hobby servos with a mouse and a keyboard. Here’s the program (File/Examples/robot/robot)
To use it, confirm you’ve connected a mouse and keyboard to your Propeller and servos on pins 0, 1 and 2. When you run the program two motors should follow the (x,y) position of your mouse, while the mouse’s scroll wheel controls the third. Pressing the mouse button should temporarily idle servo 0.
Let’s see what the program does:• It uses 2 start blocks. • The lower one will only run when the mouse button is down. This type of block is called a
trigger – it only runs when it's condition is true. This handler just sets the mouse position to 0 and idles servo 2- stops it from moving.
• The upper start block starts with a comment and then continually loops.• Another repeat block loops 100 times to control the servos before updating the terminal
screen.• It sets the global variable x to mousex, a result block which returns the horizontal location of
the mouse. Notice that most blocks can be dragged into the yellow parameter region of
another block. The only blocks that can’t be parameters are blocks like “repeat” and “start”- that wouldn’t make sense. Some blocks, like mousex can only by placed into a parameter region- that’s why it doesn’t have any tabs.
• The setservo block from the motion section allows you to control the position of a servo or speed of a continuous rotation servo. There are also blocks to make your robot go forwards, backwards, and turn. We control one servo with the variable x, and the other with the mousey block. This allows you to control the robot's movements with the mouse.
• The if block uses logic to execute the blocks that meet the criteria. In this case, when x>0 (x is greater than 0) we set servo #2 to a position based on mouseZ- notice we can combine blocks and text in the parameter region. When x is not greater than 0 we idle servo 2.
• After the repeat block loops 1000 times, the terminal screen is cleared and the value of variable x is printed to the terminal.
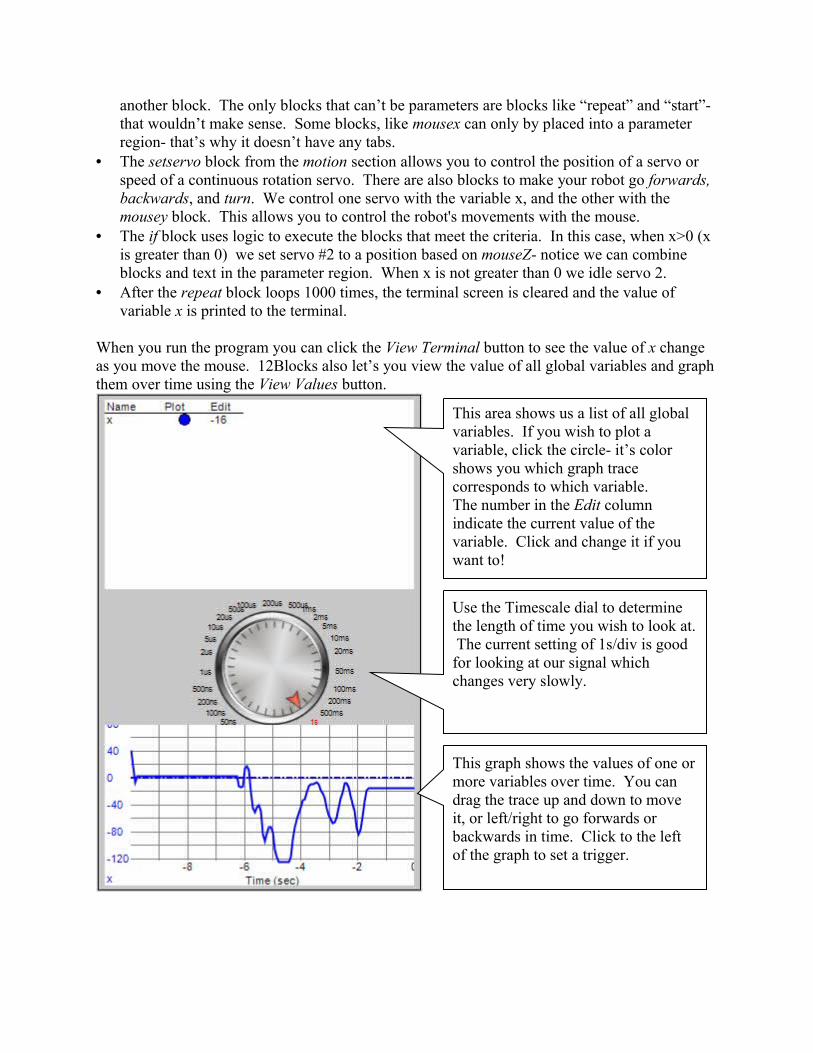
When you run the program you can click the View Terminal button to see the value of x change as you move the mouse. 12Blocks also let’s you view the value of all global variables and graph them over time using the View Values button.
This graph shows the values of one or more variables over time. You can drag the trace up and down to move it, or left/right to go forwards or backwards in time. Click to the left of the graph to set a trigger.
Use the Timescale dial to determine the length of time you wish to look at. The current setting of 1s/div is good for looking at our signal which changes very slowly.
This area shows us a list of all global variables. If you wish to plot a variable, click the circle- it’s color shows you which graph trace corresponds to which variable.The number in the Edit column indicate the current value of the variable. Click and change it if you want to!
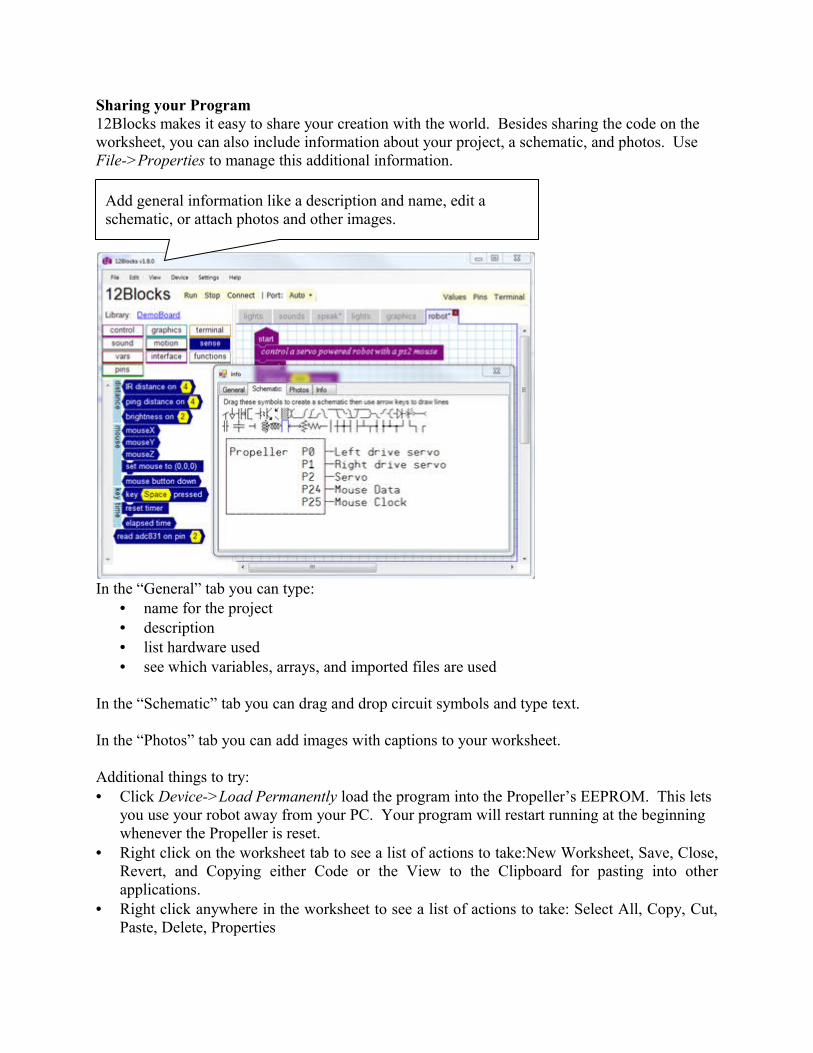
Sharing your Program12Blocks makes it easy to share your creation with the world. Besides sharing the code on the worksheet, you can also include information about your project, a schematic, and photos. Use File->Properties to manage this additional information.
In the “General” tab you can type:• name for the project• description• list hardware used• see which variables, arrays, and imported files are used
In the “Schematic” tab you can drag and drop circuit symbols and type text.
In the “Photos” tab you can add images with captions to your worksheet.
Additional things to try:• Click Device->Load Permanently load the program into the Propeller’s EEPROM. This lets
you use your robot away from your PC. Your program will restart running at the beginning whenever the Propeller is reset.
• Right click on the worksheet tab to see a list of actions to take:New Worksheet, Save, Close, Revert, and Copying either Code or the View to the Clipboard for pasting into other applications.
• Right click anywhere in the worksheet to see a list of actions to take: Select All, Copy, Cut, Paste, Delete, Properties
Add general information like a description and name, edit a schematic, or attach photos and other images.
Exercise #6: Calculating Fibonacci Numbers with FunctionsYou might have heard about the Fibonacci sequence in movies like “The DaVinci Code”. Let’s calculate some of the numbers with 12Blocks!
Here are the first numbers in this sequence- notice a pattern?0,1,1,2,3,5,8,13…
The first two numbers are 0 and 1, and after that the fibonacci number is the sum of two preceding fibonacci numbers. Mathematically, we can define that like this:
Fib(0)=0Fib(1)=1Fib(x)=Fib(x-1)+Fib(x-2)
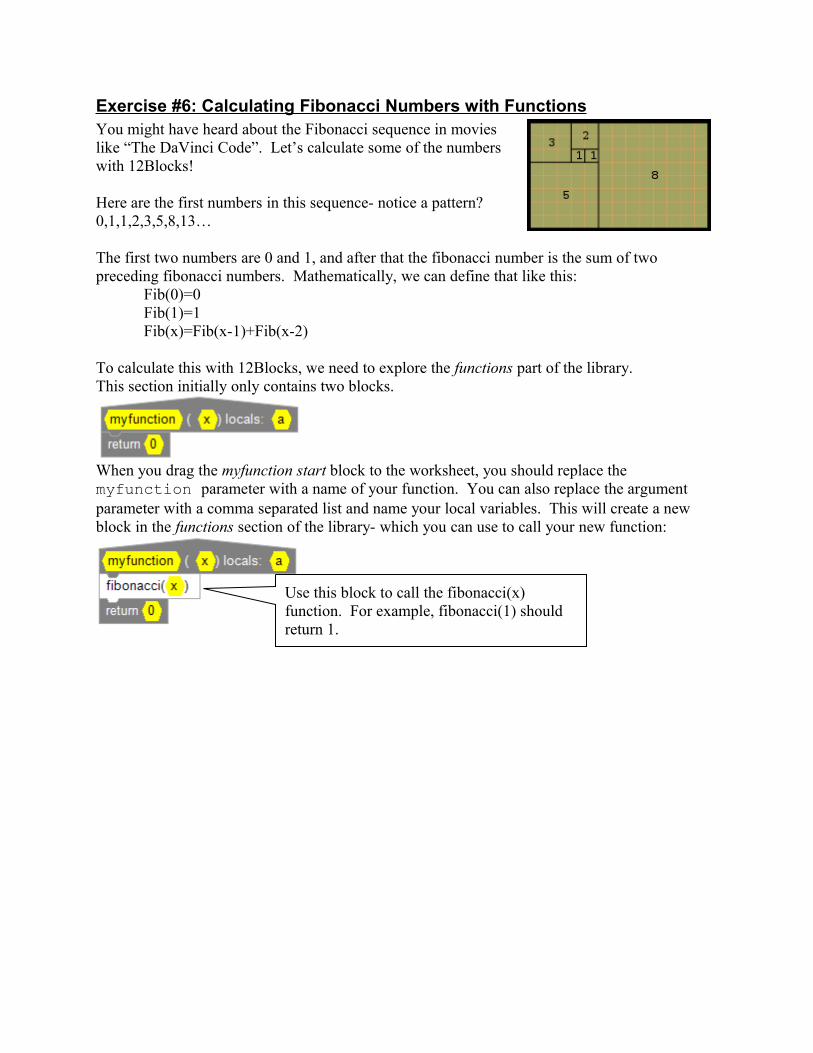
To calculate this with 12Blocks, we need to explore the functions part of the library.This section initially only contains two blocks.
When you drag the myfunction start block to the worksheet, you should replace the myfunction parameter with a name of your function. You can also replace the argument parameter with a comma separated list and name your local variables. This will create a new block in the functions section of the library- which you can use to call your new function:
T
Use this block to call the fibonacci(x) function. For example, fibonacci(1) should return 1.
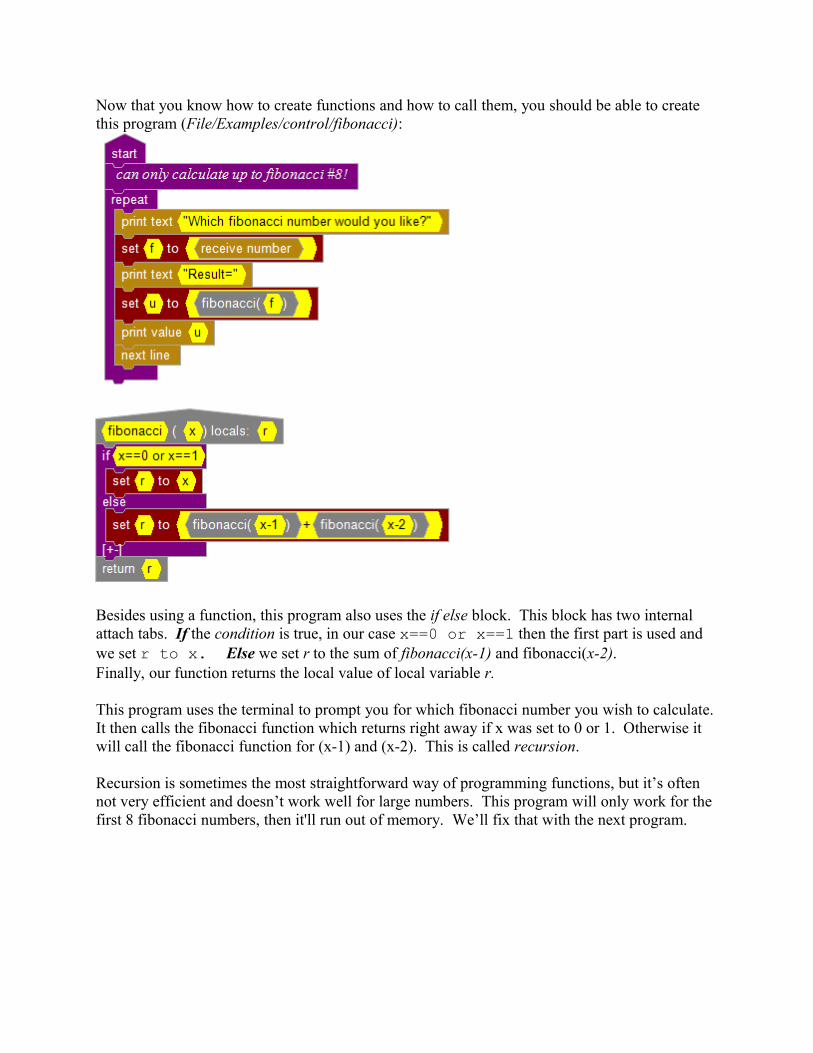
Now that you know how to create functions and how to call them, you should be able to create this program (File/Examples/control/fibonacci):
Besides using a function, this program also uses the if else block. This block has two internal attach tabs. If the condition is true, in our case x==0 or x==1 then the first part is used and we set r to x. Else we set r to the sum of fibonacci(x-1) and fibonacci(x-2).Finally, our function returns the local value of local variable r.
This program uses the terminal to prompt you for which fibonacci number you wish to calculate. It then calls the fibonacci function which returns right away if x was set to 0 or 1. Otherwise it will call the fibonacci function for (x-1) and (x-2). This is called recursion.
Recursion is sometimes the most straightforward way of programming functions, but it’s often not very efficient and doesn’t work well for large numbers. This program will only work for the first 8 fibonacci numbers, then it'll run out of memory. We’ll fix that with the next program.
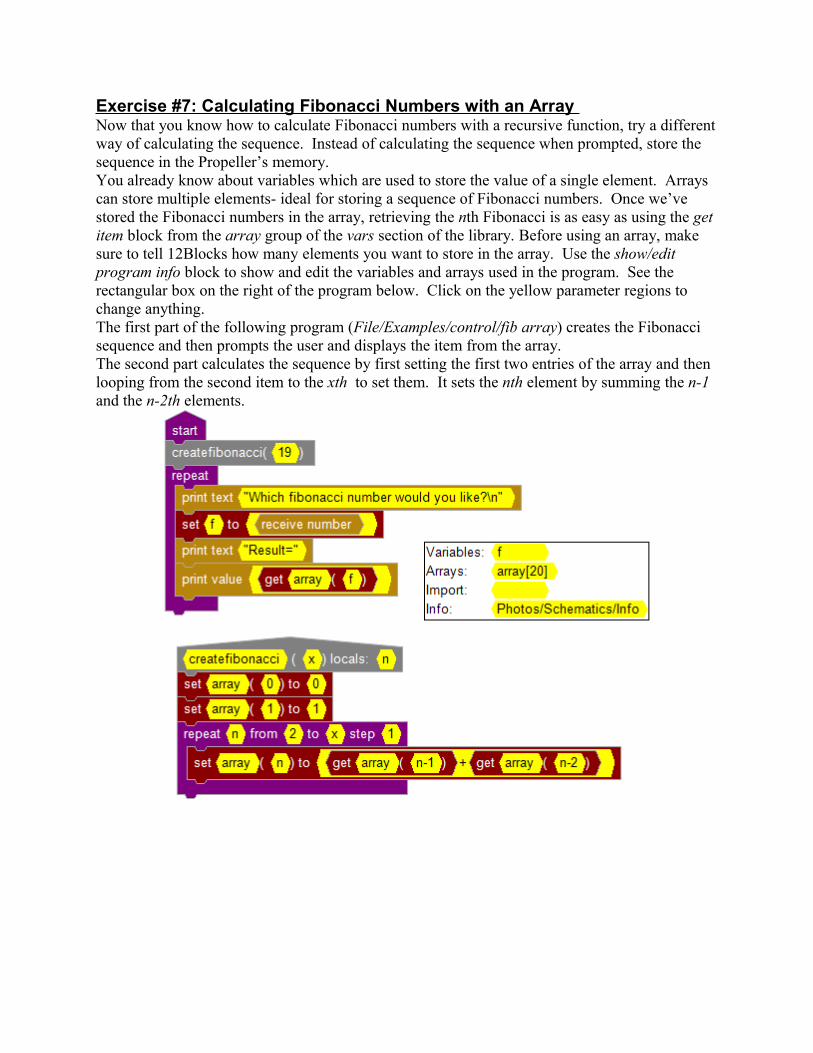
Exercise #7: Calculating Fibonacci Numbers with an Array Now that you know how to calculate Fibonacci numbers with a recursive function, try a different way of calculating the sequence. Instead of calculating the sequence when prompted, store the sequence in the Propeller’s memory. You already know about variables which are used to store the value of a single element. Arrays can store multiple elements- ideal for storing a sequence of Fibonacci numbers. Once we’ve stored the Fibonacci numbers in the array, retrieving the nth Fibonacci is as easy as using the get item block from the array group of the vars section of the library. Before using an array, make sure to tell 12Blocks how many elements you want to store in the array. Use the show/edit program info block to show and edit the variables and arrays used in the program. See the rectangular box on the right of the program below. Click on the yellow parameter regions to change anything.The first part of the following program (File/Examples/control/fib array) creates the Fibonacci sequence and then prompts the user and displays the item from the array. The second part calculates the sequence by first setting the first two entries of the array and then looping from the second item to the xth to set them. It sets the nth element by summing the n-1 and the n-2th elements.
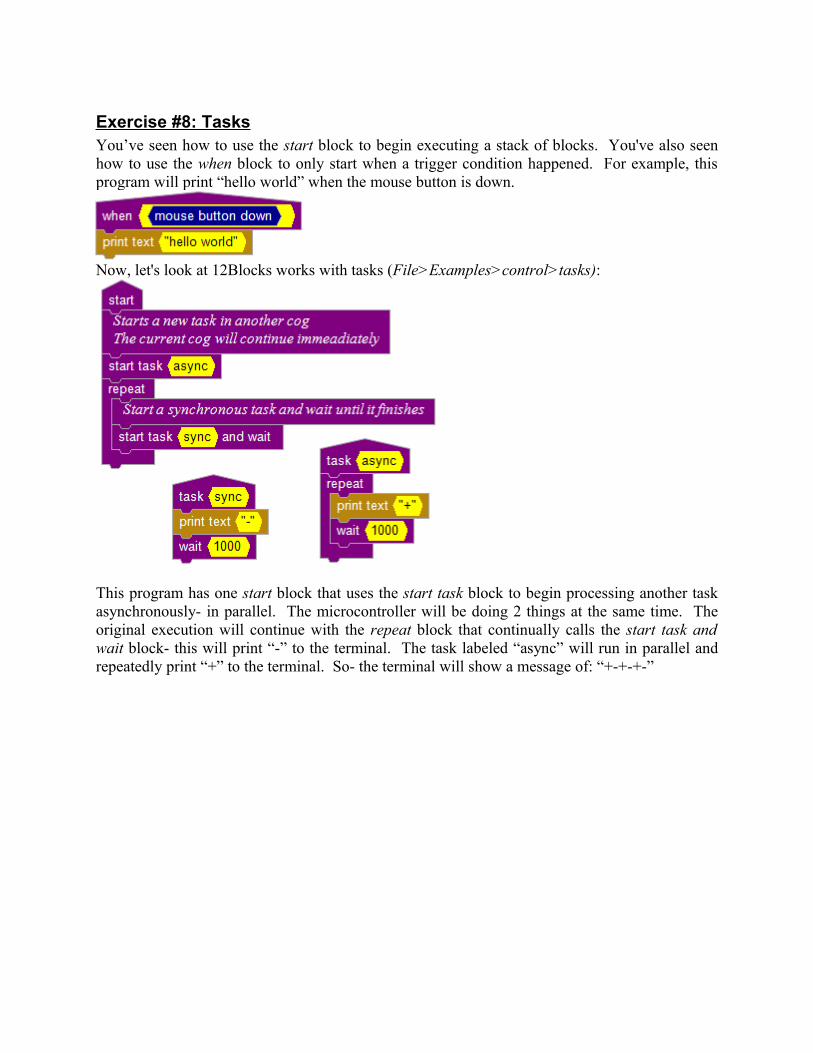
Exercise #8: TasksYou’ve seen how to use the start block to begin executing a stack of blocks. You've also seen how to use the when block to only start when a trigger condition happened. For example, this program will print “hello world” when the mouse button is down.
Now, let's look at 12Blocks works with tasks (File>Examples>control>tasks):
This program has one start block that uses the start task block to begin processing another task asynchronously- in parallel. The microcontroller will be doing 2 things at the same time. The original execution will continue with the repeat block that continually calls the start task and wait block- this will print “-” to the terminal. The task labeled “async” will run in parallel and repeatedly print “+” to the terminal. So- the terminal will show a message of: “+-+-+-”

Exercise #9: Serial CommunicationThe following program (File>Examples>sensor>serial) uses the serial communication blocks from the pins section of the library to send information from one cog to another. The top stack tells 12Blocks to quickly sample the IO pins, this let’s us view the resulting RS232 signal with the built-in logic analyzer at high speeds. The inner repeat loop sends one byte of data and then waits 500mSecs. Both the baud rate and mode are configurable. A mode of 1 will leave the pin high by default.
The bottom stack runs in another cog. It first prints a friendly greeting to 12Blocks’ terminal and then continually prints incoming data.

Exercise #10: State MachinesA state machine is a model of behavior with states and transitions between states. For example, a door has two states- open and closed. It also has two transitions- opening and closing. State machines can make it easier to program sophisticated behavior by letting you focus on what happens in one state at a time.
12Blocks includes 3 blocks to make state machines easy to use:• “when in state” Use this block as a start block to carry out actions that should be performed
when the state machine is in a specified state.• “set state to”: Use this block to transition to a new state specified by the parameter.• “run state machine”: Use this block to run one cycle of the state machine. The variable
which you pass to this block is used to keep track of the state machine’s state. By using multiple “run” blocks, each with their own variable, you can program multiple state machines.
The following program (File>Examples>control>StateMachine) illustrates a simple state machine.
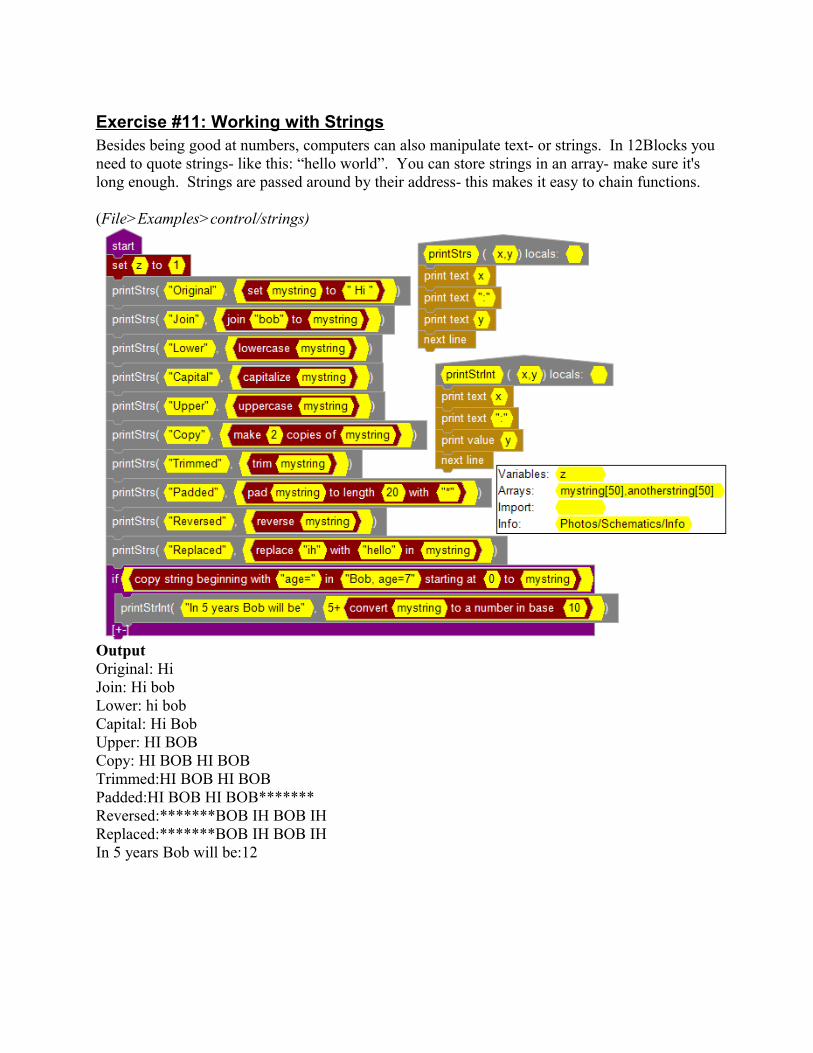
Exercise #11: Working with StringsBesides being good at numbers, computers can also manipulate text- or strings. In 12Blocks you need to quote strings- like this: “hello world”. You can store strings in an array- make sure it's long enough. Strings are passed around by their address- this makes it easy to chain functions.
(File>Examples>control/strings)
Output Original: Hi Join: Hi bobLower: hi bobCapital: Hi BobUpper: HI BOBCopy: HI BOB HI BOBTrimmed:HI BOB HI BOBPadded:HI BOB HI BOB*******Reversed:*******BOB IH BOB IHReplaced:*******BOB IH BOB IHIn 5 years Bob will be:12
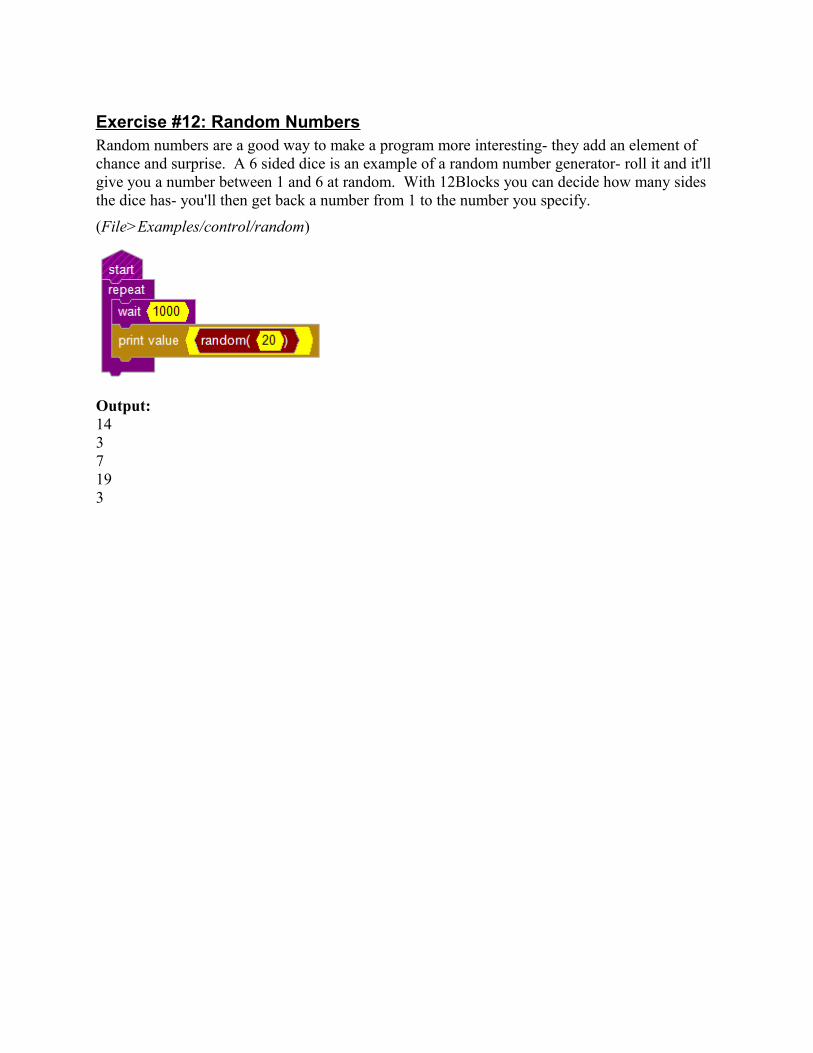
Exercise #12: Random NumbersRandom numbers are a good way to make a program more interesting- they add an element of chance and surprise. A 6 sided dice is an example of a random number generator- roll it and it'll give you a number between 1 and 6 at random. With 12Blocks you can decide how many sides the dice has- you'll then get back a number from 1 to the number you specify.
(File>Examples/control/random)
Output:1437193
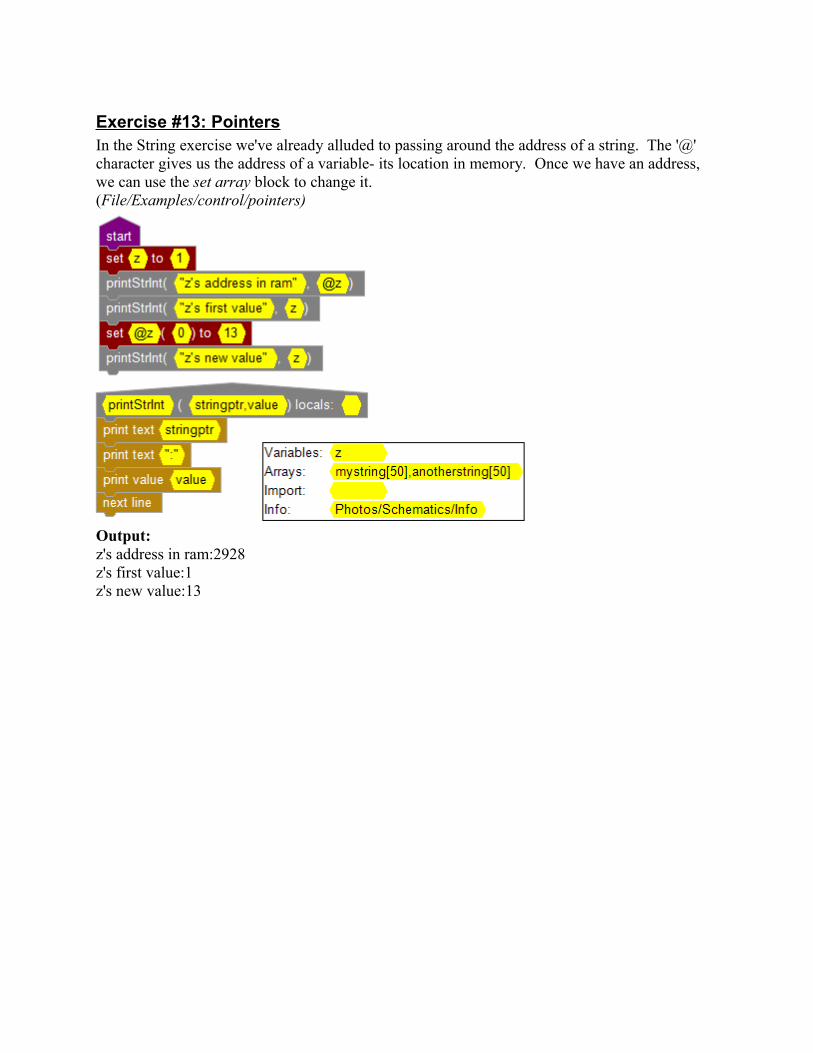
Exercise #13: PointersIn the String exercise we've already alluded to passing around the address of a string. The '@' character gives us the address of a variable- its location in memory. Once we have an address, we can use the set array block to change it.(File/Examples/control/pointers)
Output:z's address in ram:2928z's first value:1z's new value:13
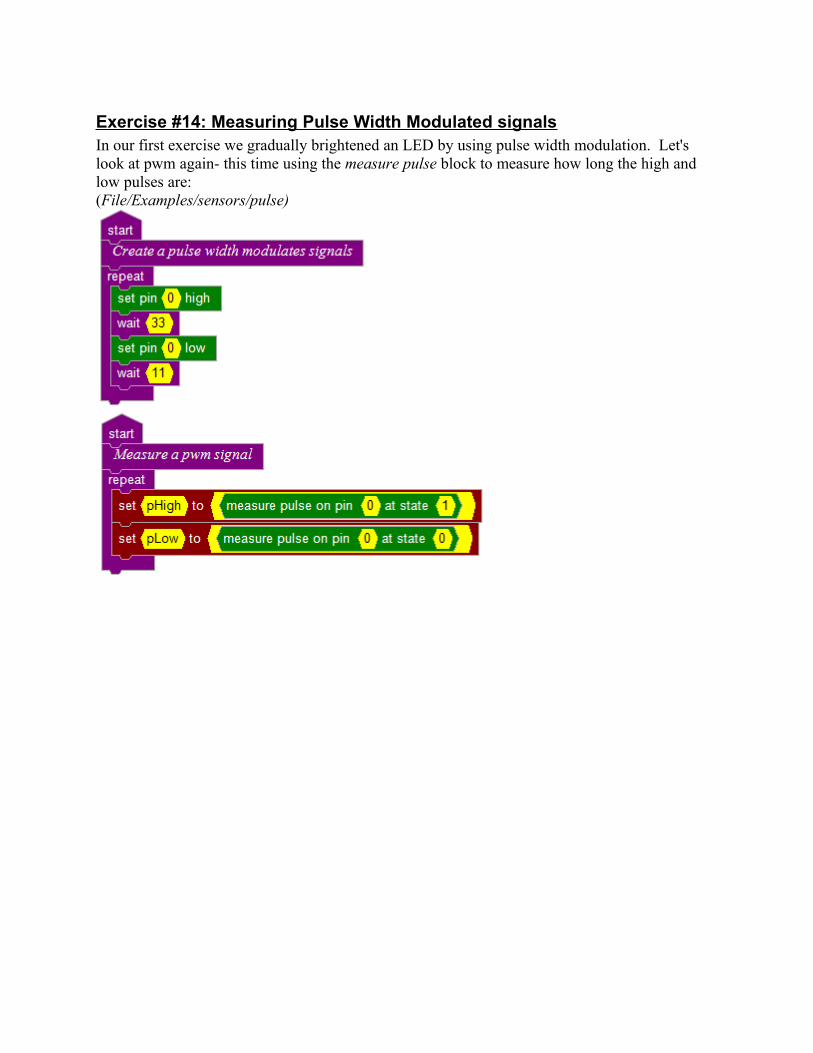
Exercise #14: Measuring Pulse Width Modulated signalsIn our first exercise we gradually brightened an LED by using pulse width modulation. Let's look at pwm again- this time using the measure pulse block to measure how long the high and low pulses are:(File/Examples/sensors/pulse)
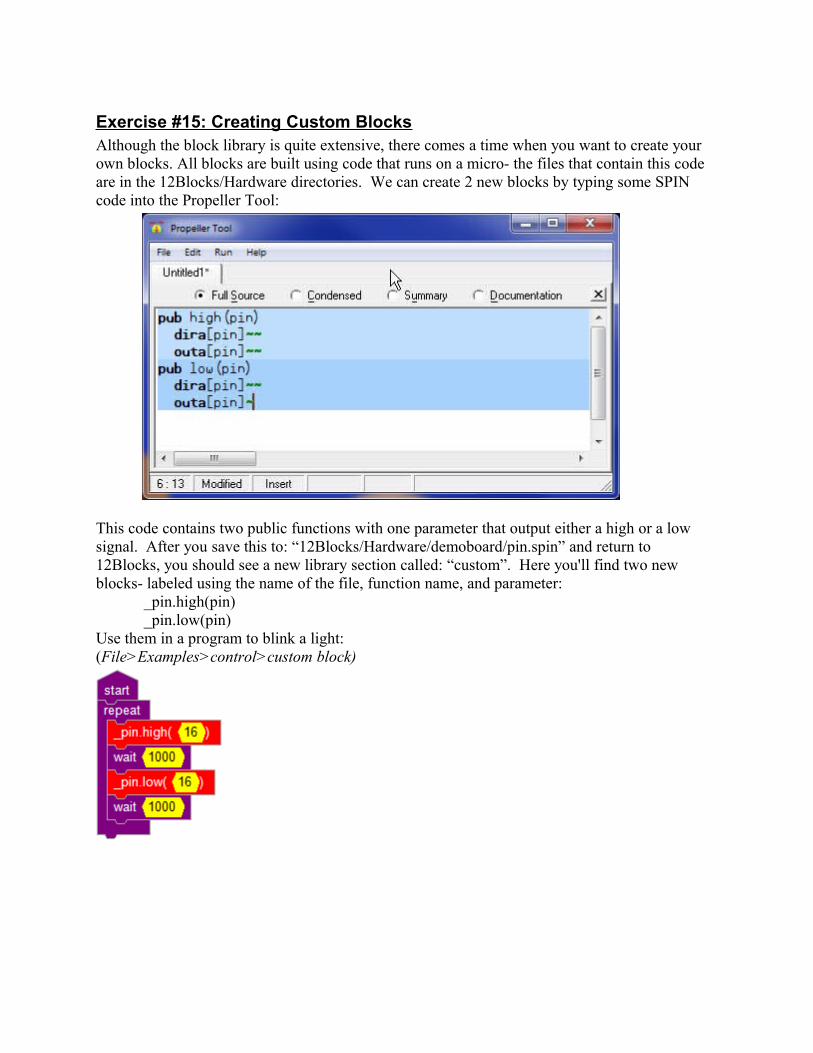
Exercise #15: Creating Custom BlocksAlthough the block library is quite extensive, there comes a time when you want to create your own blocks. All blocks are built using code that runs on a micro- the files that contain this code are in the 12Blocks/Hardware directories. We can create 2 new blocks by typing some SPIN code into the Propeller Tool:
This code contains two public functions with one parameter that output either a high or a low signal. After you save this to: “12Blocks/Hardware/demoboard/pin.spin” and return to 12Blocks, you should see a new library section called: “custom”. Here you'll find two new blocks- labeled using the name of the file, function name, and parameter:
_pin.high(pin)_pin.low(pin)
Use them in a program to blink a light:(File>Examples>control>custom block)
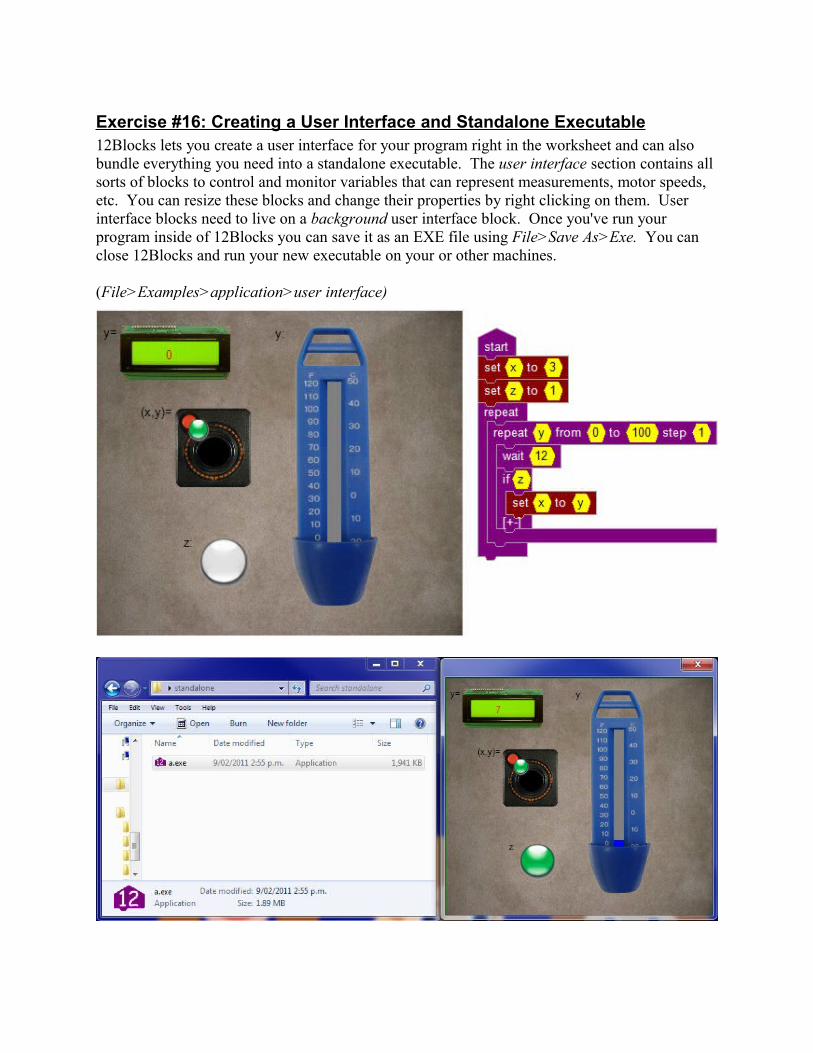
Exercise #16: Creating a User Interface and Standalone Executable12Blocks lets you create a user interface for your program right in the worksheet and can also bundle everything you need into a standalone executable. The user interface section contains all sorts of blocks to control and monitor variables that can represent measurements, motor speeds, etc. You can resize these blocks and change their properties by right clicking on them. User interface blocks need to live on a background user interface block. Once you've run your program inside of 12Blocks you can save it as an EXE file using File>Save As>Exe. You can close 12Blocks and run your new executable on your or other machines.
(File>Examples>application>user interface)
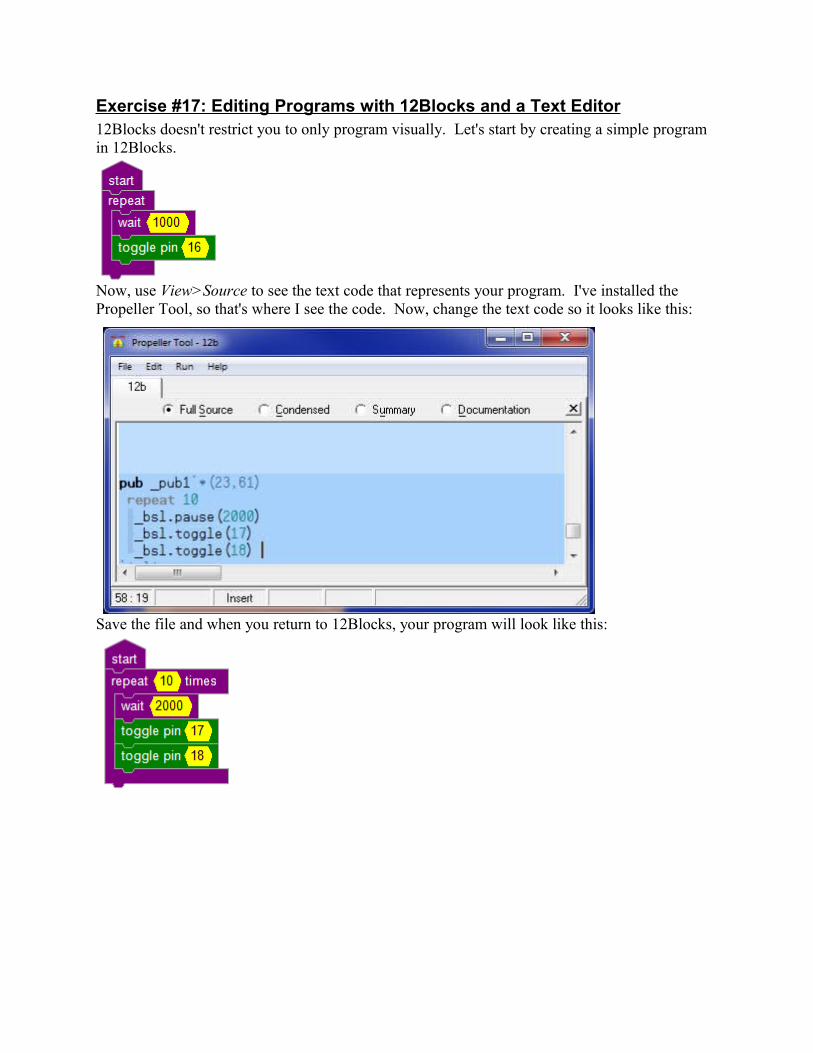
Exercise #17: Editing Programs with 12Blocks and a Text Editor12Blocks doesn't restrict you to only program visually. Let's start by creating a simple program in 12Blocks.
Now, use View>Source to see the text code that represents your program. I've installed the Propeller Tool, so that's where I see the code. Now, change the text code so it looks like this:
Save the file and when you return to 12Blocks, your program will look like this:
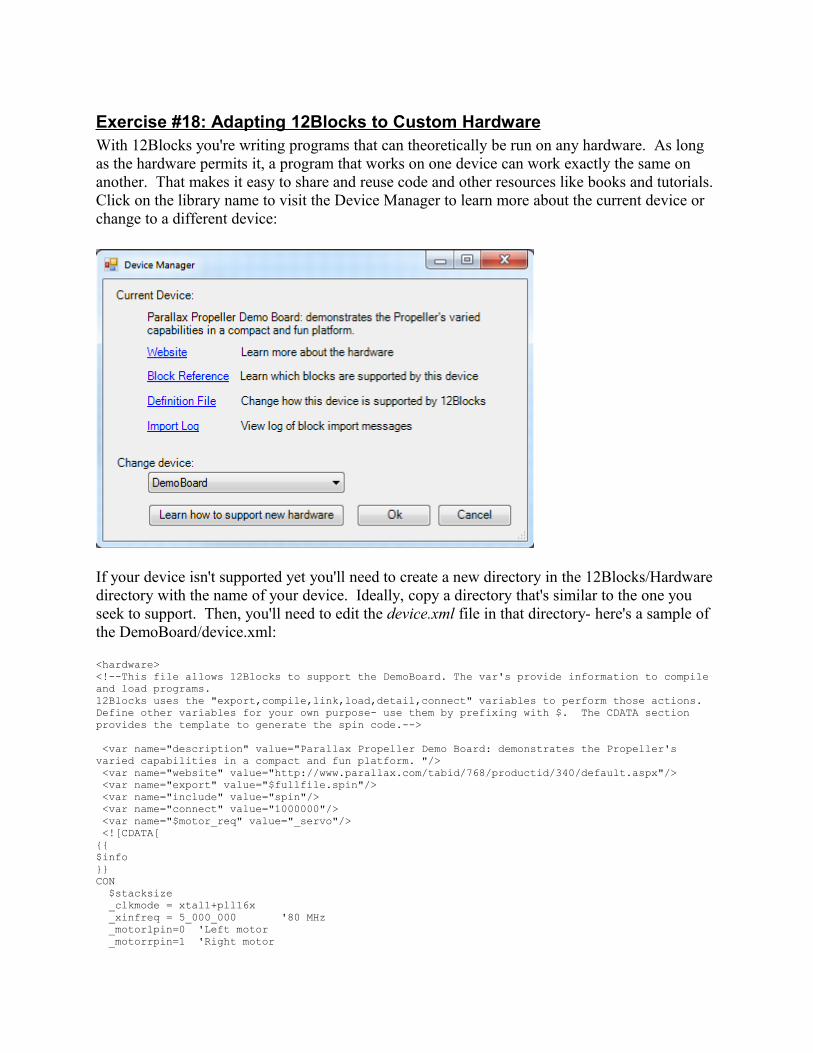
Exercise #18: Adapting 12Blocks to Custom HardwareWith 12Blocks you're writing programs that can theoretically be run on any hardware. As long as the hardware permits it, a program that works on one device can work exactly the same on another. That makes it easy to share and reuse code and other resources like books and tutorials. Click on the library name to visit the Device Manager to learn more about the current device or change to a different device:
If your device isn't supported yet you'll need to create a new directory in the 12Blocks/Hardware directory with the name of your device. Ideally, copy a directory that's similar to the one you seek to support. Then, you'll need to edit the device.xml file in that directory- here's a sample of the DemoBoard/device.xml:
<hardware><!--This file allows 12Blocks to support the DemoBoard. The var's provide information to compile and load programs. 12Blocks uses the "export,compile,link,load,detail,connect" variables to perform those actions. Define other variables for your own purpose- use them by prefixing with $. The CDATA section provides the template to generate the spin code.-->
<var name="description" value="Parallax Propeller Demo Board: demonstrates the Propeller's varied capabilities in a compact and fun platform. "/> <var name="website" value="http://www.parallax.com/tabid/768/productid/340/default.aspx"/> <var name="export" value="$fullfile.spin"/> <var name="include" value="spin"/> <var name="connect" value="1000000"/> <var name="$motor_req" value="_servo"/> <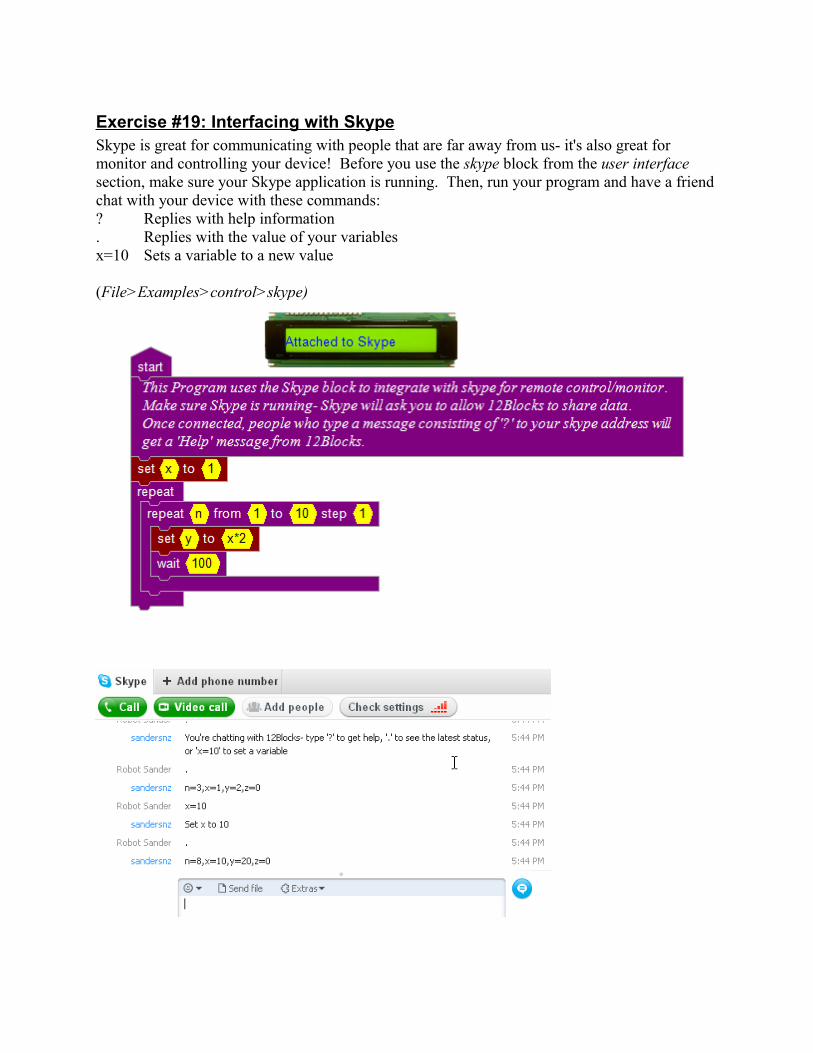
Exercise #19: Interfacing with SkypeSkype is great for communicating with people that are far away from us- it's also great for monitor and controlling your device! Before you use the skype block from the user interface section, make sure your Skype application is running. Then, run your program and have a friend chat with your device with these commands:? Replies with help information. Replies with the value of your variablesx=10 Sets a variable to a new value
(File>Examples>control>skype)
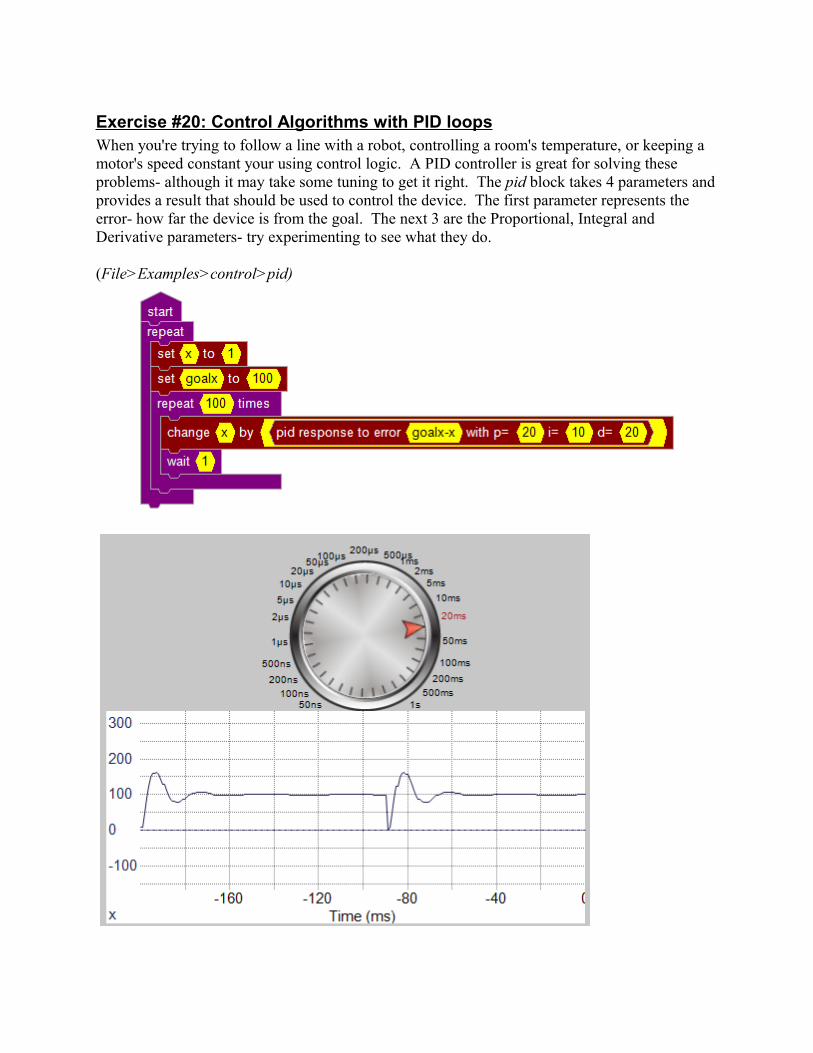
Exercise #20: Control Algorithms with PID loopsWhen you're trying to follow a line with a robot, controlling a room's temperature, or keeping a motor's speed constant your using control logic. A PID controller is great for solving these problems- although it may take some tuning to get it right. The pid block takes 4 parameters and provides a result that should be used to control the device. The first parameter represents the error- how far the device is from the goal. The next 3 are the Proportional, Integral and Derivative parameters- try experimenting to see what they do.
(File>Examples>control>pid)
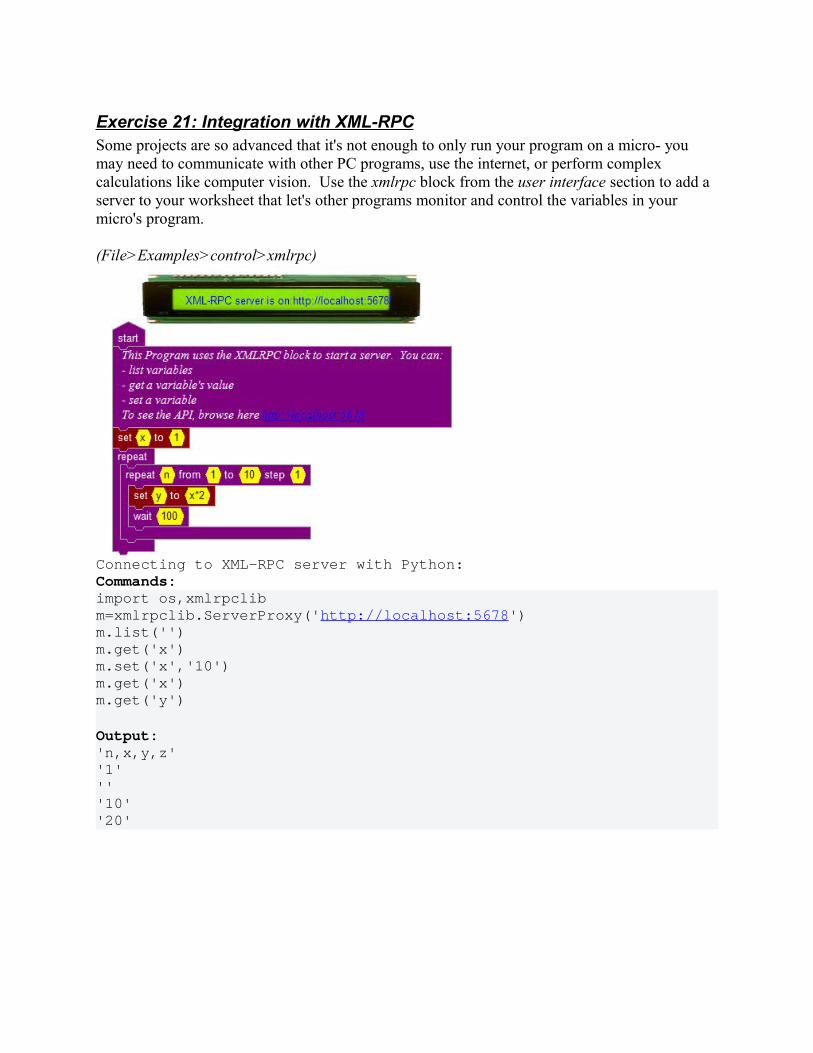
Exercise 21: Integration with XML-RPCSome projects are so advanced that it's not enough to only run your program on a micro- you may need to communicate with other PC programs, use the internet, or perform complex calculations like computer vision. Use the xmlrpc block from the user interface section to add a server to your worksheet that let's other programs monitor and control the variables in your micro's program.
(File>Examples>control>xmlrpc)
Connecting to XML-RPC server with Python:Commands:import os,xmlrpclibm=xmlrpclib.ServerProxy('http://localhost:5678')m.list('')m.get('x')m.set('x','10')m.get('x')m.get('y')
Output:'n,x,y,z''1''''10''20'