Body Piercing: Adding that “oomph” to your appearanceBody piercing

2306001
2205001
2305001
2234001
2204001
2236001
www.isi.at
iSi GmbHKürschnergasse4,1217Wien
AustriaTel.+43(1)25099-0
Fax+43(1)[email protected]
iSi Deutschland GmbHPostfach190360,42703Solingen
GermanyTel.+49(212)3970
Fax+49(212)[email protected]
iSi North America, Inc.175Route46WestFairfield,NJ07004
U.S.A.Tel.+1(800)4472426Tel.+1(973)2272426Fax+1(973)2279140
A B
C D
E
©20
10iS
iAr
t.Nr.
947
0135
00/
0210
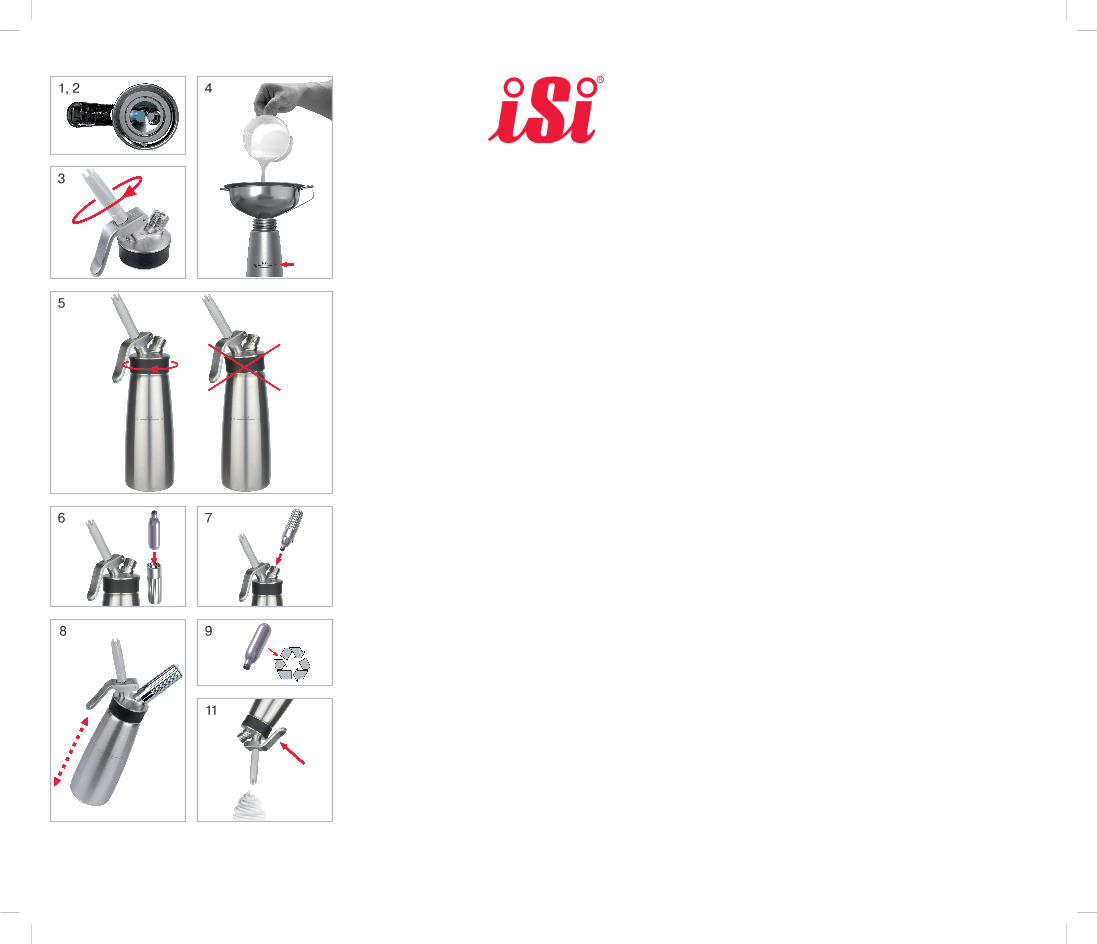
1,2 4
5
6
8
3
7
9
11
English►Cream charger has not been pierced
The charger used is not compatible▪ Only use original iSi cream chargers.
The charger was inserted incorrectly▪ Insert the charger correctly (review sequence on the
envelope, follow step 6).
The piercing unit has been damaged▪ Send the device to the iSi service center.
► The decorator tip cannot be removed
The decorator tip was screwed on too tightly▪ “Release pressure”. Follow step 2 of “Thorough clean-
ing”. If it is not possible to unscrew the decorator tip then send the device to the iSi service center.
▪ Do not screw the decorator tip on too tightly, only screw it on lightly until it no longer turns.
►It is difficult to screw on the charger holder
The charger used is not compatible▪ Only use original iSi cream chargers.
There is too much resistance between the threads of the charger holder and piercing unit▪ Regularly oil the charger holder thread (common oils
such as sunflower or olive oil should be used).
►Gas escapes through the valve or decorator tip during charging
The device was charged without the decorator tip attached▪ Ensure that the decorator tip is screwed onto the valve
before attaching the charger.
Gasket has been damaged▪ “Release pressure”. Replace the dispensing valve.
►Gas escapes between the bottle and the head during charging
There is no head gasket▪ “Release pressure”. Insert the head gasket into the
head.
The head gasket has been damaged▪ “Release pressure”. Replace the head gasket.
The head was not screwed on securely enough▪ Screw the head onto the bottle in accordance with
the instruction manual so that it is straight and sealed tightly.
Bottle has been damaged on the bottle thread▪ “Release pressure”. Send the device to the iSi service
center.
©20
10 iS
i Ar
t.Nr.
94 7
0401
00/
0210
By opting for the iSi Cream Profi Whip, you have chosen an innovative iSi quality product for the professional kitchen.
It can be used to prepare fresh whipped cream that is light and fluffy, whipped cream flavored with syrup and delicious light desserts in a matter of seconds. Yields up to twice the amount of whipped cream compared to other whipping methods.
WARNING The iSi Cream Profi Whip is not suitable for hot applications, soups, sauces or Espumas.
WARNING Only use original iSi cream chargers, which can be identified by the red iSi logo.
Product features▪ Suitable for cold applications▪ Durable stainless steel bottle with brushed finish▪ Max. filling volume of 0.5 L (one pint) or 1 L (one quart)▪ Head made from stainless steel with protective silicone grip
and removable stainless steel piston for easy cleaning▪ Lever with drip-stop▪ Head gasket with internal ring for easy removal▪ Decorator tip with stainless steel threads▪ Chrome charger holder▪ Easy to use cleaning brush▪ Dishwasher safe
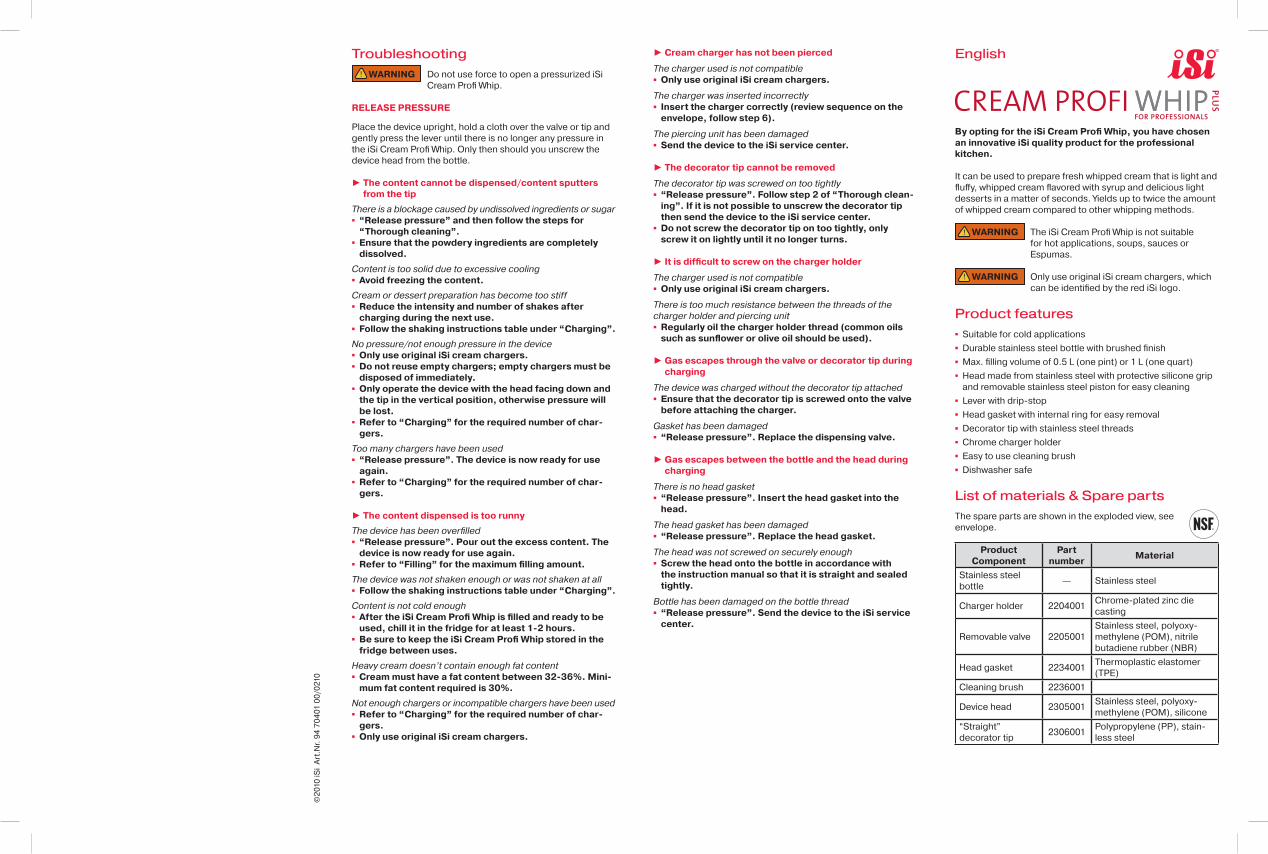
List of materials & Spare partsThe spare parts are shown in the exploded view, see envelope.
Product Component
Part number Material
Stainless steel bottle — Stainless steel
Charger holder 2204001 Chrome-plated zinc die casting
Removable valve 2205001Stainless steel, polyoxy-methylene (POM), nitrile butadiene rubber (NBR)
Head gasket 2234001 Thermoplastic elastomer (TPE)
Cleaning brush 2236001
Device head 2305001 Stainless steel, polyoxy-methylene (POM), silicone
“Straight” decorator tip 2306001 Polypropylene (PP), stain-
less steel
Troubleshooting WARNING Do not use force to open a pressurized iSi
Cream Profi Whip.
RELEASE PRESSURE
Place the device upright, hold a cloth over the valve or tip and gently press the lever until there is no longer any pressure in the iSi Cream Profi Whip. Only then should you unscrew the device head from the bottle.
►The content cannot be dispensed/content sputters from the tip
There is a blockage caused by undissolved ingredients or sugar▪ “Release pressure” and then follow the steps for
“Thorough cleaning”.▪ Ensure that the powdery ingredients are completely
dissolved.Content is too solid due to excessive cooling▪ Avoid freezing the content.Cream or dessert preparation has become too stiff▪ Reduce the intensity and number of shakes after
charging during the next use.▪ Follow the shaking instructions table under “Charging”.No pressure/not enough pressure in the device▪ Only use original iSi cream chargers.▪ Do not reuse empty chargers; empty chargers must be
disposed of immediately.▪ Only operate the device with the head facing down and
the tip in the vertical position, otherwise pressure will be lost.
▪ Refer to “Charging” for the required number of char-gers.
Too many chargers have been used▪ “Release pressure”. The device is now ready for use
again.▪ Refer to “Charging” for the required number of char-
gers.
►The content dispensed is too runnyThe device has been overfilled▪ “Release pressure”. Pour out the excess content. The
device is now ready for use again.▪ Refer to “Filling” for the maximum filling amount.The device was not shaken enough or was not shaken at all▪ Follow the shaking instructions table under “Charging”.Content is not cold enough▪ After the iSi Cream Profi Whip is filled and ready to be
used, chill it in the fridge for at least 1-2 hours.▪ Be sure to keep the iSi Cream Profi Whip stored in the
fridge between uses.Heavy cream doesn’t contain enough fat content▪ Cream must have a fat content between 32-36%. Mini-
mum fat content required is 30%.Not enough chargers or incompatible chargers have been used▪ Refer to “Charging” for the required number of char-
gers.▪ Only use original iSi cream chargers.
Safety instructions▪ Never apply force.▪ Follow the safety regulations on the charger packaging.▪ Protect the chargers from direct sunlight and heat above
50 °C/120 °F.▪ Store product components and chargers out of the reach of
children.▪ Only operate the device when it’s filled.▪ Only use the device for the purposes specified in this in-
struction manual.▪ Only combine device heads and bottles of the same device
type.▪ Never combine parts of the iSi Cream Profi Whip with parts
produced by other manufacturers.▪ Never attach the device head so that it is crooked.▪ Never lean your body over the device when screwing in the
charger.▪ Never unscrew the device head from a pressurized device.▪ Never use the lever as a carrying handle.▪ Never heat up the iSi Cream Profi Whip.▪ Never store a filled device in the freezer or deepfreezer
compartment.▪ The device is a pressure vessel. Dropping and/or damage
turn it into a source of hazard and it may not be used again. Have the device checked by the iSi service center.
▪ Only disassemble the iSi Cream Profi Whip in accordance with “Thorough cleaning”.
▪ Check the material compatibility of any cleaning/disinfectant solution that is used.
▪ Do not carry out any alterations to the iSi Cream Profi Whip. This will invalidate the warranty and lead to exclusion of li-ability.
▪ Read the instruction manual thoroughly and store it in a safe place to avoid operating errors.
Cleaning WARNING Check the material compatibility of the
cleaning/disinfectant solution used before cleaning (see “List of Materials”).
NOTE: For mechanical or manual cleaning, pay close atten-tion to ensure that the correct cleaning solution or combined disinfectant and cleaning solution is used. The reaction time and the selected temperature are crucial for proper cleaning results.
ThOROUGh CLEANING
NOTE: Follow the image sequence on the envelope.
A. Press the lever until the device is completely empty and has been depressurized. Remove the device head from the bottle.
B. Remove the decorator tip. In order to do this, hold the valve on the blue part of the interior of the head. Then pull the valve out of the head.
NOTE: In this model, the spring is fixed in the head and can-not be removed.
C. Remove the head gasket for basic cleaning.D. Rinse the product components with warm (not hot!) drink-
ing water and a commercial cleaning agent and clean the valve and decorator tip with the cleaning brush. Fully remove any fat or protein residues.
E. Put the product components in the dishwasher or wash by hand.
NOTE: Do not clean the charger holder in the dishwasher.NOTE: Never use special stainless steel cleaning agents, scouring agents or abrasive sponges/brushes.
DISINFECTION
All product parts which come into contact with food can be cleaned as normal and then disinfected. Observe the ap-propriate instructions for use for commercial cleaning and disinfectant agents.
INTERIM CLEANING
The decorator tip can be unscrewed at any time for periodic cleaning or it can be rinsed with drinking water while attached to the device.
QUICk CLEANING
1. Press the lever until the device is completely empty and has been depressurized. Remove the device head from the bottle.
2. With 0.5 L (one pint) or 1 L (one quart) warm water and 1 iSi charger follow steps 4 to 9 according to the “Instruc-tion manual”.
3. Vigorously and repeatedly press the lever (with the head facing down) to quickly empty the device and to ensure that the device is not pressurized.
4. Disassemble the iSi Cream Profi Whip into the individual product components.
NOTE: Quick cleaning is not a replacement for thorough cleaning.
For preparations with a low fat content (minimum 30%) or if the consistency is too soft, shake again if necessary.
9. Unscrew the charger holder and dispose of the empty charger.
NOTE: There may be a slight hissing sound when unscrew-ing the charger holder for reasons that are inherent to the system.
10. Repeat steps 6 to 9 when using a 1 L (one quart) device.NOTE: Only 1 iSi cream charger is required for filling the 0.5 L (one pint) device. The 1 L (one quart) device requires 2 iSi cream chargers for filling, even if there is a reduced filling amount.
DISPENSING
11. To dispense the contents turn the device “upside down” (with the decorator tip in the vertical position) and gently press the lever.
NOTE: Dispense a small amount to test the consistency.
Important instructions for use
GENERAL
▪ If the device is not held properly when dispensing (with the head facing down and the tip in the vertical position) then pressure may be lost, which will mean that it is not possible to completely empty the contents of the bottle.
▪ The cream/preparation should be cool when poured into the bottle.
WARNING Never store a filled device in the freezer or deep freezer compartment.
▪ The cream/dessert should be dispensed from the device as close as possible to the time of consumption.
▪ Periodically clean the decorator tip during use (every 1-2 hours).
▪ Regularly oil the charger holder thread and removable valve (common oils such as sunflower or olive oil should be used).
SERvICE
▪ Spare parts can be purchased individually at a low cost.
WARNING Do not carry out any alterations to the iSi Cream Profi Whip.
▪ Contact your local dealer to order spare parts.▪ Always send in a complete device for repairs (i.e. head and
bottle).
STORAGE
If the iSi Cream Profi Whip is not going to be used again im-mediately, allow the components to air dry in a clean place (do not rub with a cloth). Store the iSi Cream Profi Whip with all of the pieces disassembled and only handle clean (disinfected) parts with clean hands.NOTE: Observe valid food hygiene regulations.
Instruction manual
NOTE: Disassemble the device into the individual product components before using it for the first time. Remove the transportation lock from the valve piece. Carry out basic cleaning as described under „Thorough cleaning“.
PRIOR TO FILLING
NOTE: Follow the image sequence on the envelope.
1. Check whether the head gasket is inserted in the device head.
2. Insert the valve into the device head.3. Lightly (not too firmly) screw the decorator tip onto the
dispensing piston until it no longer turns.
FILLING
4. Fill the stainless steel bottle with the preparation.NOTE: The maximum filling amount is 0.5 L (one pint) or 1 L (one quart). Pay attention to the external filling line and label-ling on the base of the bottle. Do not overfill! The remaining empty space is required for optimum whipping results. Use a measuring cup.
Fully dissolve any sugar, powdered ingredients, etc. in the mixture before filling to avoid the formation of clumps. Do not use any ingredients with fruit pulp, cores or seeds.
ChARGING
5. Screw the device head onto the stainless steel bottle so that it is straight and sealed tightly.
WARNING Never attach the device head so that it is crooked.
6. Insert 1 original iSi cream charger into the charger holder as shown in figure 6.
NOTE: Never insert the charger if there is no decorator tip attached to the dispensing valve.
7. Screw on the charger holder (with charger inserted) to the device head until you hear all of the contents of the charger release into the bottle.
WARNING Never lean your body over the device when screwing in the charger.
WARNING The device is now pressurized.
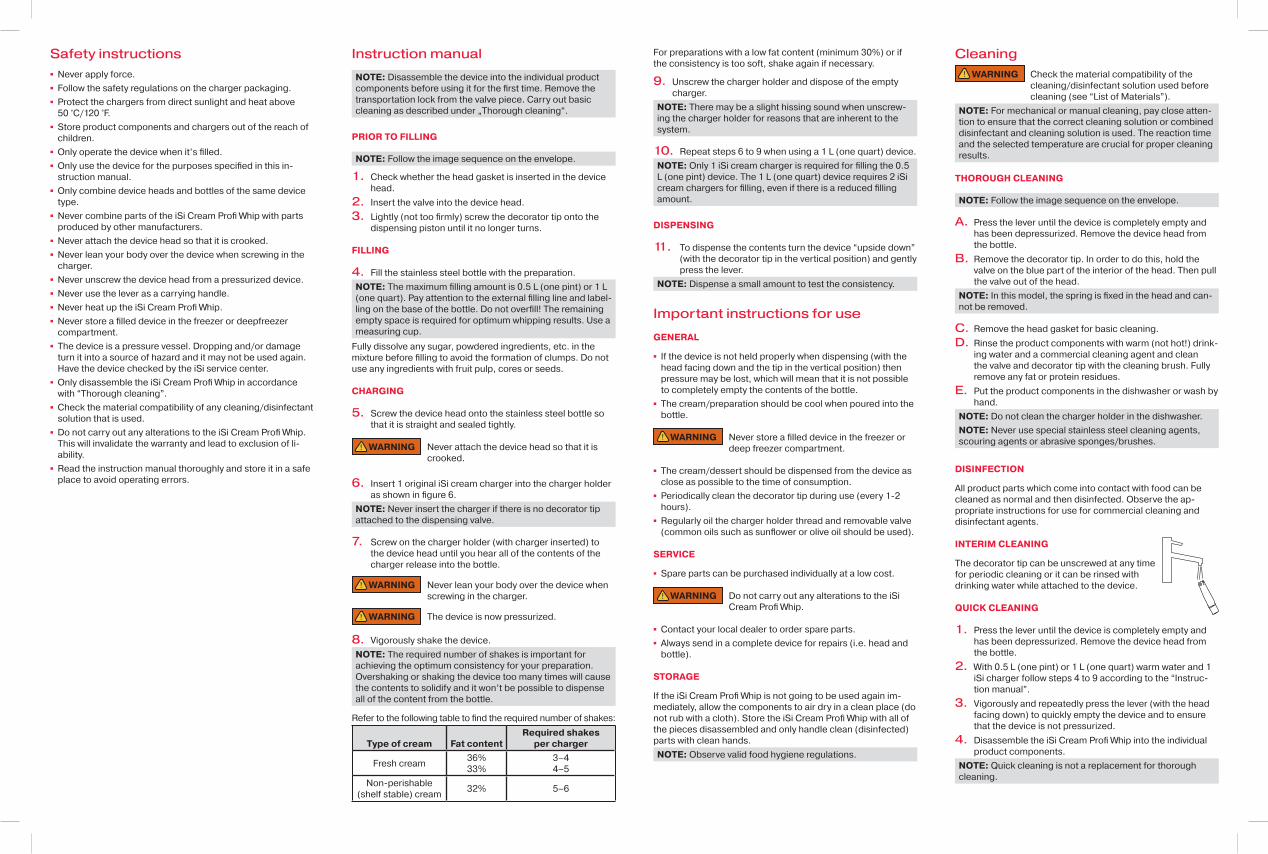
8. Vigorously shake the device.NOTE: The required number of shakes is important for achieving the optimum consistency for your preparation. Overshaking or shaking the device too many times will cause the contents to solidify and it won’t be possible to dispense all of the content from the bottle.
Refer to the following table to find the required number of shakes:
Type of cream Fat contentRequired shakes
per charger
Fresh cream 36%33%
3–44–5
Non-perishable (shelf stable) cream 32% 5–6