11 Free Vintage Patterns: How to Sew Retro-Inspired ...
70
Transcript of 11 Free Vintage Patterns: How to Sew Retro-Inspired ...
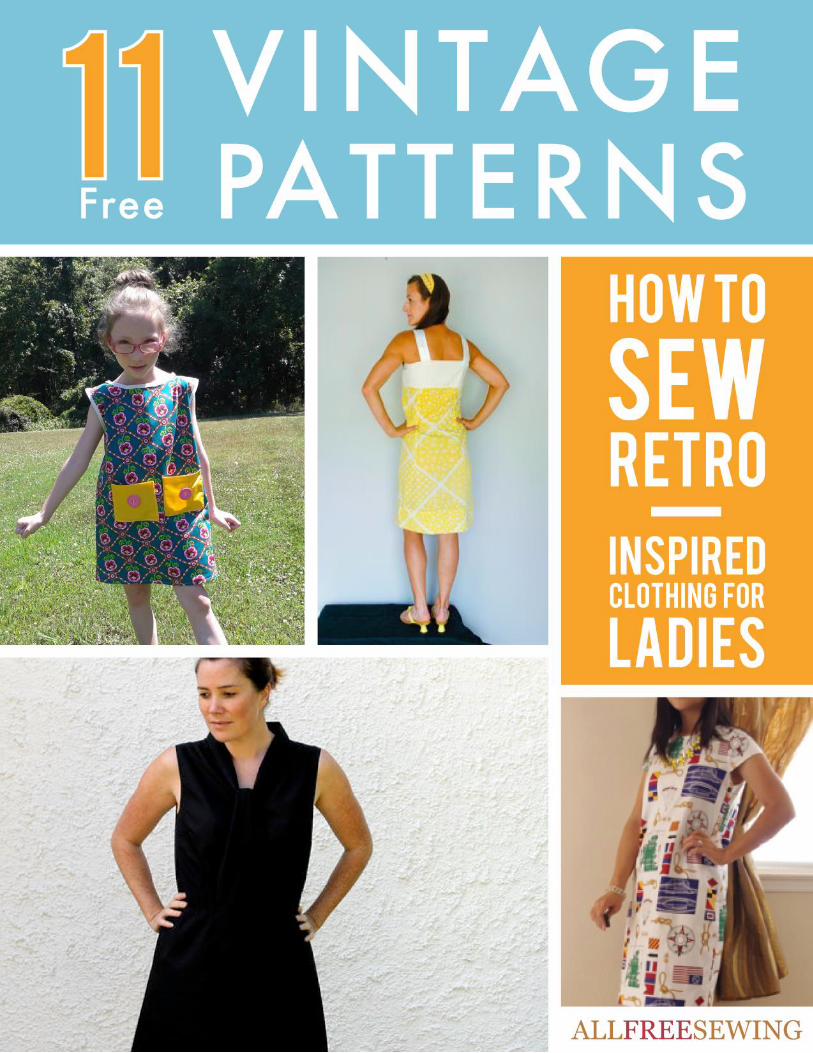

11 Free Vintage Patterns: How to Sew Retro-Inspired Clothing for Ladies
Copyright 2015 by Prime Publishing LLC
All rights reserved. No part of this book may be reproduced or transmitted in any form or by any means,
electronic or mechanical, including photocopying, recording, or by any information storage or retrieval
system, without written permission from the publisher, except in the case of brief quotations embodied
in critical articles and reviews.
Trademarks are property of their respective holders. When used, trademarks are for the benefit of the
trademark owner only.
Published by Prime Publishing LLC, 3400 Dundee Road, Northbrook, IL 60062 – www.primecp.com
Free Sewing Projects
Free Crochet Projects Free Knitting Projects Free Craft Projects
Free Sewing Projects Free Quilt Projects Free Jewelry Projects
Free Holiday Projects Free Christmas Projects
Free Crochet Afghan Projects
Free Paper Projects

11 Free Vintage Patterns
Find thousands of free sewing patterns, tips, tutorials and more at www.AllFreeSewing.com. 3
Letter from the Editors
Hi Sewists,
Within the last few years, an apparent movement towards all things thrifty has overtaken the fashion
world. From young groups of kids to old hands at style, old-fashioned fashion appears everywhere. Call
it the economy, call it a passing fad; the reason for reviving mom's flair takes a backseat when you
notice how thrifting has translated into vintage-inspired designs everywhere in the twenty-first century.
While quality resale stores are sometimes hard to come by, quality vintage sewing patterns aren't.
AllFreeSewing leafed through its pages and pulled together 11 Free Vintage Patterns: How to Sew Retro-
Inspired Clothing for Ladies. From this roundup, find everything from free sewing patterns for beginners
to projects for the more experienced hand. Both big and little, for adults and children, these old sewing
patterns are sure to become newfound favorites for you and yours. Gather your favorite retro prints,
fire up the old machine, and enjoy these tutorials on how to sew clothing.
Happy Sewing!
You can find additional beginner sewing projects and more at www.AllFreeSewing.com.
Our eBooks, like all our sewing projects, are absolutely FREE to members of our sewing community.
Please feel free to share with family and friends and ask them to sign up at our website for our
free e-mail newsletter.
Happy Sewing,
The Editors of AllFreeSewing
www.AllFreeSewing.com

11 Free Vintage Patterns
Find thousands of free sewing patterns, tips, tutorials and more at www.AllFreeSewing.com. 4
11 Free Vintage Patterns:
How to Sew Retro-Inspired Clothing for Ladies
Classic Dress Patterns .................................................. 5
Fabulous Mod Dress .......................................... 5
Little Miss Gingerbread Dress .......................... 13
Sweet and Simple Vintage Pillowcase Dress .... 29
Draped Maxi Dress ........................................... 34
Versatile Little Black Dress ............................... 37
2 Hour Shift Dress ............................................ 40
Groovy Tops to Sew .................................................. 46
The DIY Discotheque Top ................................. 46
The Scarf Tee .................................................... 50
Tweed-Front Sweater ...................................... 54
Other Vintage-Inspired Patterns ................................ 60
Classic Skirt....................................................... 60
Flapper Feather Headband .............................. 67

11 Free Vintage Patterns
Find thousands of free sewing patterns, tips, tutorials and more at www.AllFreeSewing.com. 5
Classic Dress Patterns
Fabulous Mod Dress By: Stacy from Stacy Sews and Schools Nothing conveys the swinging style of the 60s like this Fabulous Mod Dress. Get your girl gussied up in a rich print with a semi-A-line cut for full-fledged mod girl style. Despite the appearance of this gorgeous outfit, it's not difficult to complete this free dress pattern. Simply follow these easy-to-read instructions and sew a dress that, no matter what generation, always appears to be cutting edge. Vintage sewing patterns are not just for adults, and your girl is going to love looking adorably old school while wearing this dress pattern for sewing. Materials:
1 Yard of Fabric
2 Buttons
Double Fold Bias Tape
Scraps of Coordinating Fabric (for pockets)
Measurements - Child's chest, length for armholes, and length for dress
Directions:
1. Fold fabric ¼ width of chest + ½ ″. Fold going into a slight slant. The dress is slightly A-line.

11 Free Vintage Patterns
Find thousands of free sewing patterns, tips, tutorials and more at www.AllFreeSewing.com. 6
2. Cut length, width, and neck line.
3. Cut armholes.

11 Free Vintage Patterns
Find thousands of free sewing patterns, tips, tutorials and more at www.AllFreeSewing.com. 7
4. Take front dress piece and place over folded fabric. Cut back piece while using the front piece as a guide. You may want to pin it.
This is what you should have.

11 Free Vintage Patterns
Find thousands of free sewing patterns, tips, tutorials and more at www.AllFreeSewing.com. 8
5. Take your scraps and find something to use as a guide to cut them in the shape you want them to be. Cut four.
6. Pin two pieces together and sew up three sides. Do the same to the other two pieces. Turn right side out and press.

11 Free Vintage Patterns
Find thousands of free sewing patterns, tips, tutorials and more at www.AllFreeSewing.com. 9
7. Turn down ½ ″ from the top and press.
8. Figure out where you want to place your buttons on the pockets. Sew the buttons on.
9. Pin the pockets on the front and sew the three sides.

11 Free Vintage Patterns
Find thousands of free sewing patterns, tips, tutorials and more at www.AllFreeSewing.com. 10
10. Place the front and the back right sides together. Pin the tops of the dress and both sides. Sew them together. Press your seams.

11 Free Vintage Patterns
Find thousands of free sewing patterns, tips, tutorials and more at www.AllFreeSewing.com. 11
11. Open your bias tape and pin it around the neckline and armholes. Sew it in place and press.

11 Free Vintage Patterns
Find thousands of free sewing patterns, tips, tutorials and more at www.AllFreeSewing.com. 12
12. Turn a ½" over on the bottom, press, and turn it in another ½ ″. Press and pin. Sew your hem and press again!

11 Free Vintage Patterns
Find thousands of free sewing patterns, tips, tutorials and more at www.AllFreeSewing.com. 13
Little Miss Gingerbread Dress
By: Stacy from Stacy Sews and Schools
The Little Miss Gingerbread Dress unfailingly recalls
traditional American Christmas celebrations. With ruffled
sleeves, a tiered skirt, and rickrack embellishments, you'll
surely remember seeing these special occasion dresses on
your friends growing up. Loose-fitting and comfortable,
this free dress pattern will feel as great as it looks on your
little girl. Create this DIY dress in either a seasonal or
evergreen palette to fit your party needs. Celebrate your
next yuletide by making vintage patterns for sewing that
will give you a healthy dose of nostalgia with this free
sewing pattern.
Materials:
1 Shirt that Fits your Child Well
1 Yard of Gingerbread Men
¾ Yard of Brown and White Polka Dots
¼ Yard of Red Fabric for the Sash
Two Small Pieces of ¾ ″ Elastic
2 ft. of Red and White Polka Dot Ribbon
1 ft. of Red Rickrack
Three Small Red Buttons
Directions: 1. Fold over the fabric you want to use for the bodice of the dress. Place the folded shirt on top. Cut around the shirt leaving excess all around for your seam allowance.

11 Free Vintage Patterns
Find thousands of free sewing patterns, tips, tutorials and more at www.AllFreeSewing.com. 14
2. You will cut one back and one front. This is what they should look like:
3. Take a straight edge and cut the front bodice piece right down the middle.

11 Free Vintage Patterns
Find thousands of free sewing patterns, tips, tutorials and more at www.AllFreeSewing.com. 15
4. The bodice is fully lined. You need to cut the lining using the bodice pieces you already have as a guide. For the front bodice pieces it’s easier to just place those wrong sides together to cut. The back bodice piece can be placed on the fold.

11 Free Vintage Patterns
Find thousands of free sewing patterns, tips, tutorials and more at www.AllFreeSewing.com. 16
5. Cut the fabric for the bottom tier. Just cut two even lengths of the same fabric you are using for the bodice. You can make it as wide as you want depending on the height of your child and how long you would like the dress to be. The white lines indicate where the cuts for this tutorial were made.
6. Cut the top tier in your other fabric, making it the same width as the bottom tier. You will only need one piece for this tier.

11 Free Vintage Patterns
Find thousands of free sewing patterns, tips, tutorials and more at www.AllFreeSewing.com. 17
7. The length of the sleeve is all up to your preference, and any length will work just fine with the ruffle on the end. Using one of your bodice pieces as a guide, place your folded fabric under the guide and cut, leaving about ½" below the arm place on the bodice; cut straight across.
8. Cut the piece that makes up part of the ruffle on the sleeve. Cut two pieces that are 4” wide and the same length as your sleeve is round.

11 Free Vintage Patterns
Find thousands of free sewing patterns, tips, tutorials and more at www.AllFreeSewing.com. 18
Here are all the pieces that you have cut, plus the red ribbon.
9. Pin your back bodice pieces with right sides together. Sew up everything but the bottom. You can sew the shoulders if you want to.
10. Now, turn right-side-out and press!

11 Free Vintage Patterns
Find thousands of free sewing patterns, tips, tutorials and more at www.AllFreeSewing.com. 19
11. Pin your front bodice pieces with right sides together. Sew everything together except the bottom. Do the same to the other two front bodice pieces.
12. Turn right-side-out and press. Do the same to the other bodice piece.

11 Free Vintage Patterns
Find thousands of free sewing patterns, tips, tutorials and more at www.AllFreeSewing.com. 20
13. While your iron is still hot, go ahead and fold the long pieces in half for the sleeve edges and press.
14. Sew your front bodice pieces to your back bodice pieces at the tops and the sides. Turn the right side out and press.
15. Sew up the sleeve.

11 Free Vintage Patterns
Find thousands of free sewing patterns, tips, tutorials and more at www.AllFreeSewing.com. 21
16. Take your ribbon and pin it to the edges of the fabric strips that you cut for the sleeve embellishment.
17. Turn the sleeve inside-out and fold up the end 1 ½″ and press. Turn the sleeve right-side-out and pin the ribbon and gingerbread strip inside of the edge of the sleeve. Sew in place.
18. Sew the elastic casing in the end of the sleeve, leaving about 1″ for the elastic. Make sure to leave an opening to insert the elastic.

11 Free Vintage Patterns
Find thousands of free sewing patterns, tips, tutorials and more at www.AllFreeSewing.com. 22
19. Turn your bodice inside out and slide the sleeve into the armhole, pin and stitch in place.
20. Turn everything right side out and press.
21. Pin both ends of your elastic and either hold tightly to one end or pin it to you. Insert the elastic into the casing.

11 Free Vintage Patterns
Find thousands of free sewing patterns, tips, tutorials and more at www.AllFreeSewing.com. 23
22. Zigzag stitch the ends of the elastic.
23. Stitch the opening closed.

11 Free Vintage Patterns
Find thousands of free sewing patterns, tips, tutorials and more at www.AllFreeSewing.com. 24
24. If your buttonholer doesn't work, using the smallest zigzag stitch setting you can and a clear sewing foot helps tremendously. Take your ruler and mark out where you want your buttonholes to be. Use your (hopefully) proper working buttonholer. After you get your buttonholes in place, close up the front of the bodice and mark through the buttonholes for proper button placement. Sew on your buttons.
25. Pin the rickrack around the collar and sew in place. To save time you don’t have to switch out your bobbin, just switch out your top thread to match the rickrack.

11 Free Vintage Patterns
Find thousands of free sewing patterns, tips, tutorials and more at www.AllFreeSewing.com. 25
26. You can set aside the bodice for now.
27. Grab the two pieces that you cut for the bottom tier and sew them together on one side. Next, you need to run a line or two of gathering stitches at the top. Now, gather it up and pin it to the bottom of the fabric you will be using for the top tier. Pin it with the right sides together and gathers to the bottom, adjusting the gathers as needed. Sew in place.

11 Free Vintage Patterns
Find thousands of free sewing patterns, tips, tutorials and more at www.AllFreeSewing.com. 26
28. Run a line of gathering stitches in the top tier. Next, pin the gathered edge to the bottom of the bodice, right sides together. Sew in place. Turn the dress inside-out and sew up the skirt’s side seam.
29. Fold up the bottom of the skirt ½″ and press, then fold up again ¾″, press, and pin. Now sew your hem. Turn right-side-out and press.
11 Free Vintage Patterns
Find thousands of free sewing patterns, tips, tutorials and more at www.AllFreeSewing.com. 27
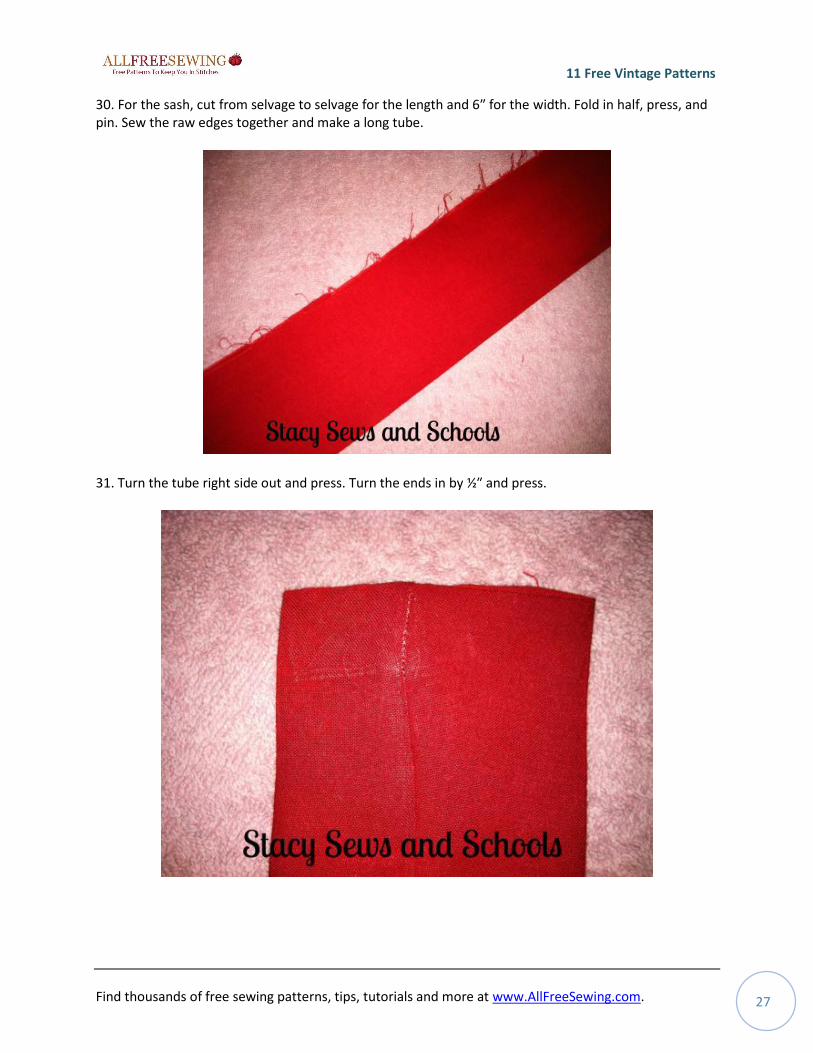
30. For the sash, cut from selvage to selvage for the length and 6″ for the width. Fold in half, press, and pin. Sew the raw edges together and make a long tube.
31. Turn the tube right side out and press. Turn the ends in by ½″ and press.

11 Free Vintage Patterns
Find thousands of free sewing patterns, tips, tutorials and more at www.AllFreeSewing.com. 28
32. You are done!
Plus, find more free sewing patterns for girls on AllFreeSewing.com. You will love collections like:
51 Free Sewing Patterns for Girls
56 Dress Patterns for Sewing
20 Free Printable Sewing Patterns
11 Free Vintage Patterns
Find thousands of free sewing patterns, tips, tutorials and more at www.AllFreeSewing.com. 29
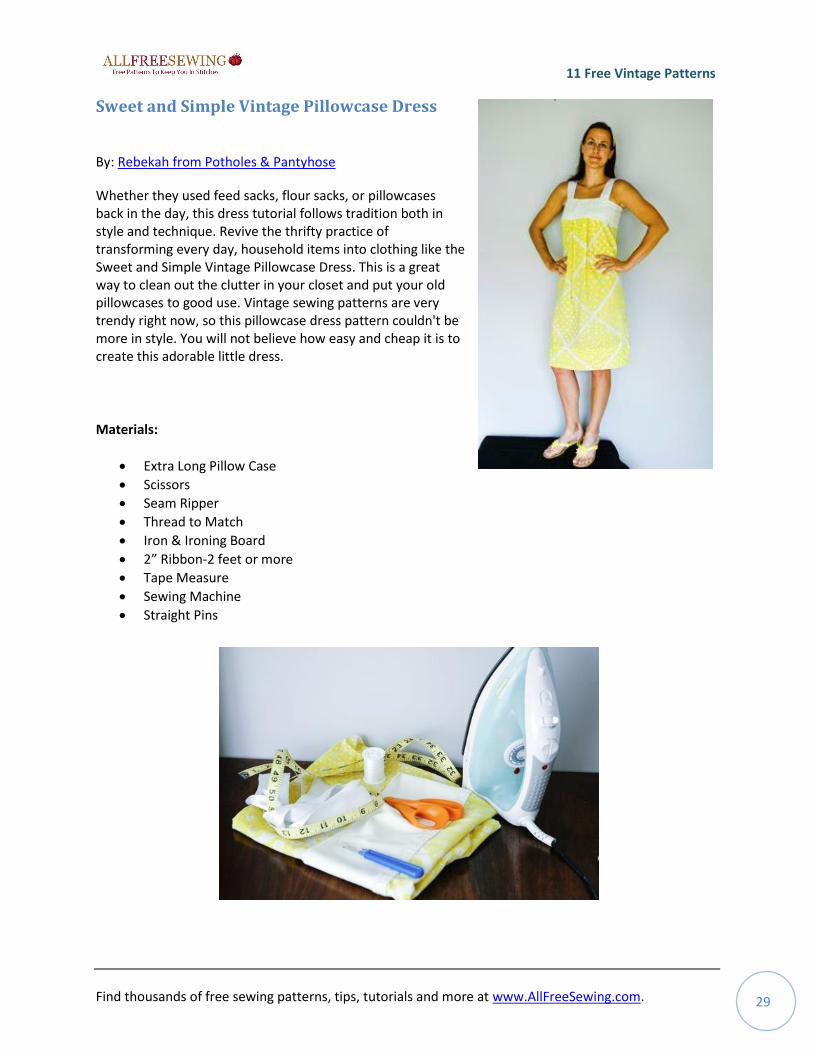
Sweet and Simple Vintage Pillowcase Dress
By: Rebekah from Potholes & Pantyhose
Whether they used feed sacks, flour sacks, or pillowcases back in the day, this dress tutorial follows tradition both in style and technique. Revive the thrifty practice of transforming every day, household items into clothing like the Sweet and Simple Vintage Pillowcase Dress. This is a great way to clean out the clutter in your closet and put your old pillowcases to good use. Vintage sewing patterns are very trendy right now, so this pillowcase dress pattern couldn't be more in style. You will not believe how easy and cheap it is to create this adorable little dress.
Materials:
Extra Long Pillow Case
Scissors
Seam Ripper
Thread to Match
Iron & Ironing Board
2” Ribbon-2 feet or more
Tape Measure
Sewing Machine
Straight Pins

11 Free Vintage Patterns
Find thousands of free sewing patterns, tips, tutorials and more at www.AllFreeSewing.com. 30
Directions: 1. First things first, cut the closed end (the bottom) of the pillow case off. This will be the bottom of your dress.
2. Fold the bottom of your pillow case up to your desired hem length. Here the hem lands at the top of the knee, take it in 4 ½”. Iron and pin your hem.
3. Sew up your hem, using a blind hem stitch.

11 Free Vintage Patterns
Find thousands of free sewing patterns, tips, tutorials and more at www.AllFreeSewing.com. 31
4. If you have excess material in your pillowcase, you can give your dress a pleat down the front, rather than cutting out the excess and installing a zipper. Measure out 3 ½” from the center on the left and the right, and pin where you want each pleat to begin.
5. Fold the 3 ½” of material under on each side and iron the pleat flat. Sew your pleat into place.
6. Using your 2” ribbon, measure an equal distance from the center of the dress on the front and the back and pin a strap on either side of the center, approximately 3 ½”. Here you could try your dress on and make sure the ribbon will cover your bra straps. Double check that the length is enough to go over your shoulders comfortably. Sew your straps into place.

11 Free Vintage Patterns
Find thousands of free sewing patterns, tips, tutorials and more at www.AllFreeSewing.com. 32
7. To add pleats on the left and right side of your spine, measure the center of the back of the dress, and mark about 3 ½” out on either side.
8. Start the pleat 4” down from the top of the dress. Begin the pleat width at 1/8” and expand it to be ½” at the small of your back, stopping just above your derriere.

11 Free Vintage Patterns
Find thousands of free sewing patterns, tips, tutorials and more at www.AllFreeSewing.com. 33
Here is the front of this cute little number:
And here is the back:

11 Free Vintage Patterns
Find thousands of free sewing patterns, tips, tutorials and more at www.AllFreeSewing.com. 34
Draped Maxi Dress
By: Sheila from Sew Petite Gal
Get incredibly vintage-appeal with this Draped Maxi Dress. Stunning in appearance, this DIY maxi dress has beautiful draping and requires minimal sewing. You can look like a Grecian goddess in this elegant gown. Wear this one shoulder frock on a formal evening out! When you are looking for long dresses for summer and need a classy look fast, turn to vintage sewing patterns like this marvelous maxi to add style and comfort to your summer nights. You will not regret making or wearing this vintage dress pattern. Materials:
2-3 yards of 60" Jersey (This tutorial uses a stretchy 100% Rayon from
Joann's)
Matching Thread
A Belt
Dress Form/Model (optional)
Directions:
1. On a dress form/model/yourself, center the fabric against the body vertically (the fold in the fabric
from being on the bolt should line up against your side from underarms to ankles) and tie the ends once.

11 Free Vintage Patterns
Find thousands of free sewing patterns, tips, tutorials and more at www.AllFreeSewing.com. 35
2. Tie it one more time so you wind up with kind of a fancy looking Danish.
3. Tuck the ends inside and pin. You'll hand tack these down when you're ready to sew.
4. Pin right underneath your underarms and also at your ankles.
5. Carefully cut excess fabric from the bottom at the length you want it (maxi, below knee, at knee, etc.)
but don't forget to leave a little excess for hemming.
6. Remove dress from dress form/model/self and sew down the side from where you pinned at the
underarm and ankles. Hem your dress.

11 Free Vintage Patterns
Find thousands of free sewing patterns, tips, tutorials and more at www.AllFreeSewing.com. 36
7. You're finished! The great thing about jersey is that it will not fray so you can leave the ends
unfinished if you prefer. Hence, the entire neckline has a raw edge. You'll most likely want to wear this
dress with a belt of some sort either at your waist line or right underneath your bust.

11 Free Vintage Patterns
Find thousands of free sewing patterns, tips, tutorials and more at www.AllFreeSewing.com. 37
Versatile Little Black Dress
By: Emma Jeffrey for Fiskars
Revered now as a staple for every woman's closet, there was a
time when the little black dress (the LBD) didn't exist. Celebrate
one of the twentieth century's greatest achievements by
making the Versatile Little Black Dress, and you'll never be in
need of a decent go-to dress. Wear it out for a night on the
town or dress it down for a work appropriate ensemble. No
matter where you wear LBD dress patterns for sewing, they are
sure to look sleek and flattering. Nothing can give you a
feminine flair quite like a great dress pattern.
Materials:
Dress pattern (This is Pussy Bow Dress pattern by Salme Patterns)
Fabric and Lining (see fabric requirements of packet)
Sewing Machine
Pins
Thread
Hand Sewing Needle
Directions:
1. Cut each pattern piece (except the collar) in the main fabric and the bodice and skirt pieces in the lining fabric.

11 Free Vintage Patterns
Find thousands of free sewing patterns, tips, tutorials and more at www.AllFreeSewing.com. 38
2. Sew the bodice darts in both the main and lining fabrics. Next, sew each bodice together at the side
seams, leaving the shoulder seams open. With the main bodice right sides out and lining bodice inside
out, insert the dress INTO the lining, matching the side seams. Double check that the right sides are
facing. Pin around the armholes and sew, stopping 3” away from the raw edge of the shoulder seam.
3. Clip the seam allowance around the curve of both armholes and turn the bodice right sides out, as it would be worn with the lining on the inside.
4. Working on the shoulder seams, pin the right sides of the lining fabric together and sew. Push the main fabric out of the way. Repeat for the main fabric, sewing together the shoulder seams closed, with right sides facing each other.

11 Free Vintage Patterns
Find thousands of free sewing patterns, tips, tutorials and more at www.AllFreeSewing.com. 39
5. Press the remaining raw edges of the armhole to the inside. You can now topstitch around each armhole or hand stitch the hole closed.
6. Sew the collar and attach it per the pattern directions. 7. Construct the skirt in both the main and lining fabrics and baste the two skirts together with long, loose stitches around the waist. With the bodice right sides out and the skirt inside out (with the lining on the outside), insert the bodice into the skirt, pin them around the waist and stitch them together.
8. For the elastic waist on the dress, sew a loop of elastic to the seam allowance at the waist. Sew through all the layers of lining and main fabrics.
9. To finish, hem the dress.
11 Free Vintage Patterns
Find thousands of free sewing patterns, tips, tutorials and more at www.AllFreeSewing.com. 40
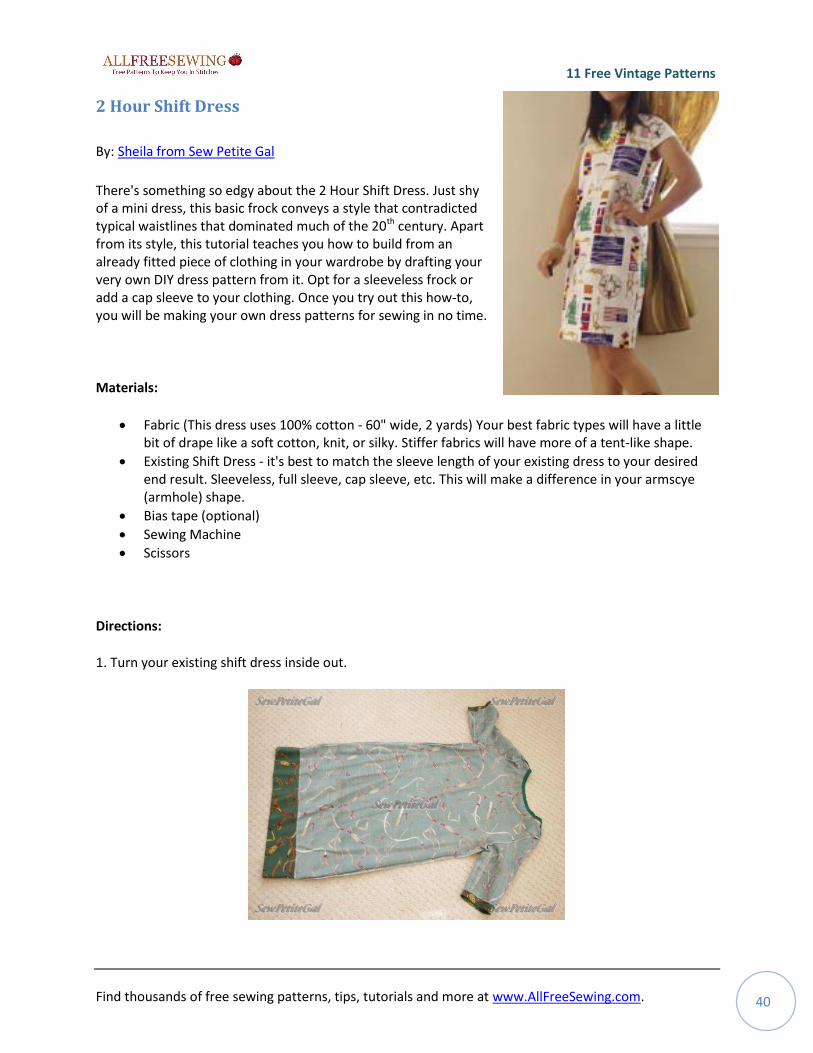
2 Hour Shift Dress
By: Sheila from Sew Petite Gal
There's something so edgy about the 2 Hour Shift Dress. Just shy of a mini dress, this basic frock conveys a style that contradicted typical waistlines that dominated much of the 20th century. Apart from its style, this tutorial teaches you how to build from an already fitted piece of clothing in your wardrobe by drafting your very own DIY dress pattern from it. Opt for a sleeveless frock or add a cap sleeve to your clothing. Once you try out this how-to, you will be making your own dress patterns for sewing in no time.
Materials:
Fabric (This dress uses 100% cotton - 60" wide, 2 yards) Your best fabric types will have a little bit of drape like a soft cotton, knit, or silky. Stiffer fabrics will have more of a tent-like shape.
Existing Shift Dress - it's best to match the sleeve length of your existing dress to your desired end result. Sleeveless, full sleeve, cap sleeve, etc. This will make a difference in your armscye (armhole) shape.
Bias tape (optional)
Sewing Machine
Scissors
Directions:
1. Turn your existing shift dress inside out.
11 Free Vintage Patterns
Find thousands of free sewing patterns, tips, tutorials and more at www.AllFreeSewing.com. 41
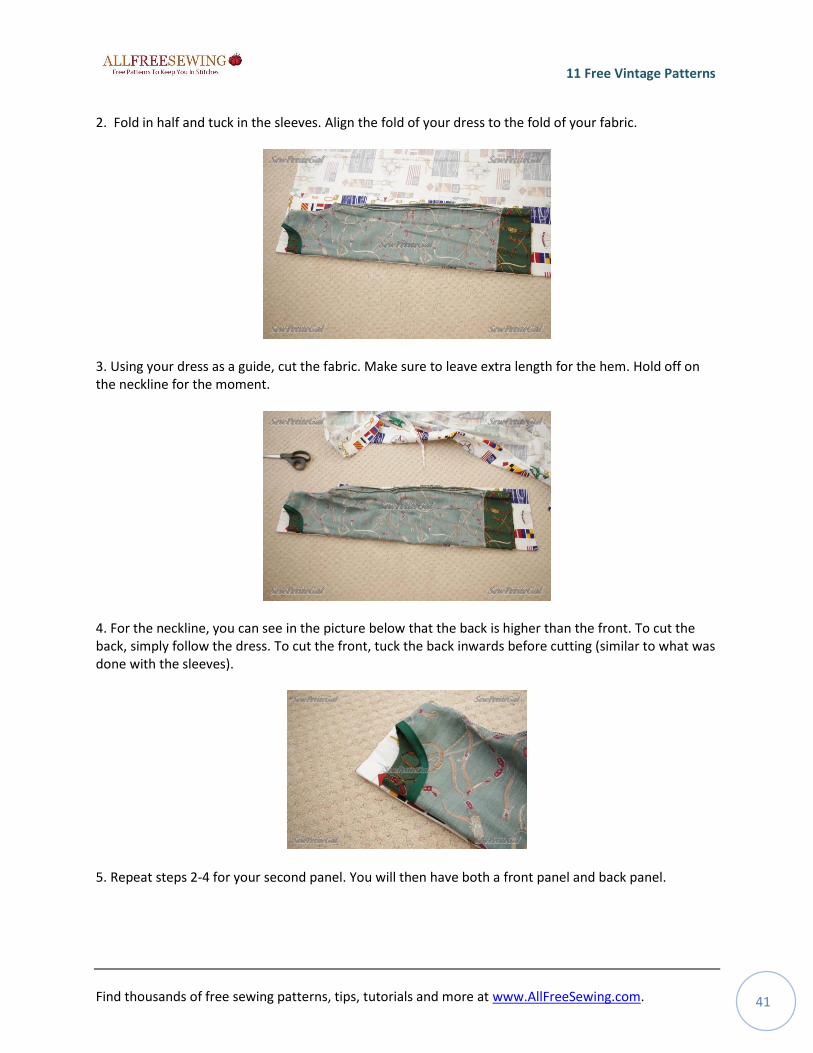
2. Fold in half and tuck in the sleeves. Align the fold of your dress to the fold of your fabric.
3. Using your dress as a guide, cut the fabric. Make sure to leave extra length for the hem. Hold off on the neckline for the moment.
4. For the neckline, you can see in the picture below that the back is higher than the front. To cut the back, simply follow the dress. To cut the front, tuck the back inwards before cutting (similar to what was done with the sleeves).
5. Repeat steps 2-4 for your second panel. You will then have both a front panel and back panel.

11 Free Vintage Patterns
Find thousands of free sewing patterns, tips, tutorials and more at www.AllFreeSewing.com. 42
6. With the right sides of the fabric facing each other, sew the shoulders together and then down each side. Note: If unsure of fit, first baste these using a long stitch, try on the dress, and then make any adjustments (example: slimming a side, making the neckline deeper, etc.) 7. If your shift dress is sleeveless, skip to step 16. 8. To make a simple cap sleeve, you're going to cut out two ovals approximately 9 x 10". The easiest way to do this is to draw a 9" line and intersect it at the middle with a 10" line. Using the resulting four points, connect them with curved lines as shown below:
9. Fold your ovals in half length-wise to make a taco-esque shape.

11 Free Vintage Patterns
Find thousands of free sewing patterns, tips, tutorials and more at www.AllFreeSewing.com. 43
10. To adjust the armscye for this sleeve type, you can use a sleeveless bodice as a guide to recut the rounder/deeper opening. 11. Align the center of your curved side with the shoulder seam. Pin in place.
What the other side looks like:
11 Free Vintage Patterns
Find thousands of free sewing patterns, tips, tutorials and more at www.AllFreeSewing.com. 44
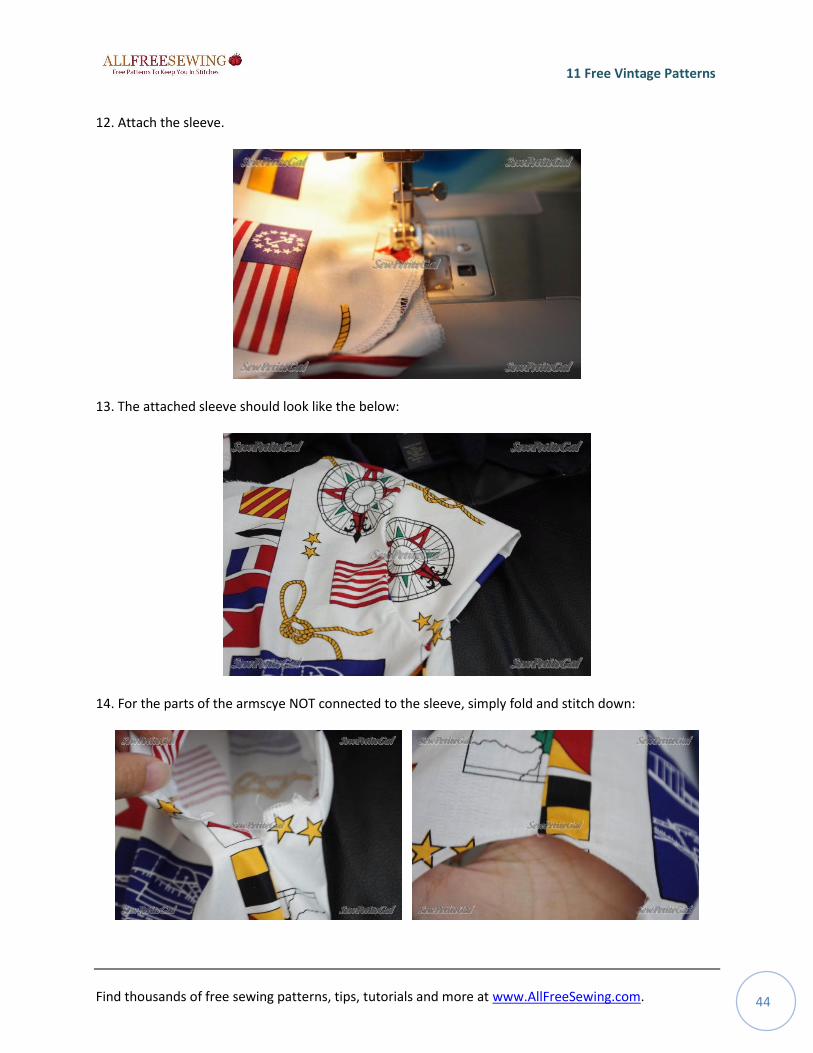
12. Attach the sleeve.
13. The attached sleeve should look like the below:
14. For the parts of the armscye NOT connected to the sleeve, simply fold and stitch down:

11 Free Vintage Patterns
Find thousands of free sewing patterns, tips, tutorials and more at www.AllFreeSewing.com. 45
15. Iron the sleeve. It should look like this:
16. To finish the neckline, you can use bias tape. 17. Hem to your desired length, iron your seams, and you're finished!

11 Free Vintage Patterns
Find thousands of free sewing patterns, tips, tutorials and more at www.AllFreeSewing.com. 46
Groovy Tops to Sew
The DIY Discotheque Top
By: Sheila from Sew Petite Gal
The DIY Discotheque Top takes you back in time to swinging clubs and cool cats. Learn how to sew retro-inspired clothing with bold prints, daring cuts, and a gold chain fastener. Sewing shirts with a specialized style like this halter adds an extra element to your wardrobe that basic pieces cannot compete with. Once you've carried out your free shirt sewing pattern through this tutorial, wear this cutting-edge design with your shoulders bare or pair it with a cute blazer for a night out. Materials:
Necklace
Fabric
General Sewing Supplies Directions: 1. Measure your chest and halve it. Add 4 inches to allow space for the gathers at the collar. (Ex. 36" chest measurement = 18" + 4" for a total of 22" for width) 2. Measure from the neck down to your hips (or wherever you want the hem to fall). Add 5".

11 Free Vintage Patterns
Find thousands of free sewing patterns, tips, tutorials and more at www.AllFreeSewing.com. 47
3. Cut out two rectangles using the measurements from the first two steps. 4. Fold ¼" in on the sides. Sew 14" from the top of your rectangle down the side. This gives you finished edges for your collar and armholes.
5. Repeat the process for the neckline.
6. You can adjust measurements here depending on how large or small you'd like your collar ruffle. The ones listed above are those used in this tutorial. 7. The second line depends on what you'd like to thread your collar with. Do the same thing for both rectangles. 8. Thread (You can really use anything - ribbon/sash/necklace) between the first and second sewn lines of each rectangle. Sew two bias pieces on the fold line.
11 Free Vintage Patterns
Find thousands of free sewing patterns, tips, tutorials and more at www.AllFreeSewing.com. 48
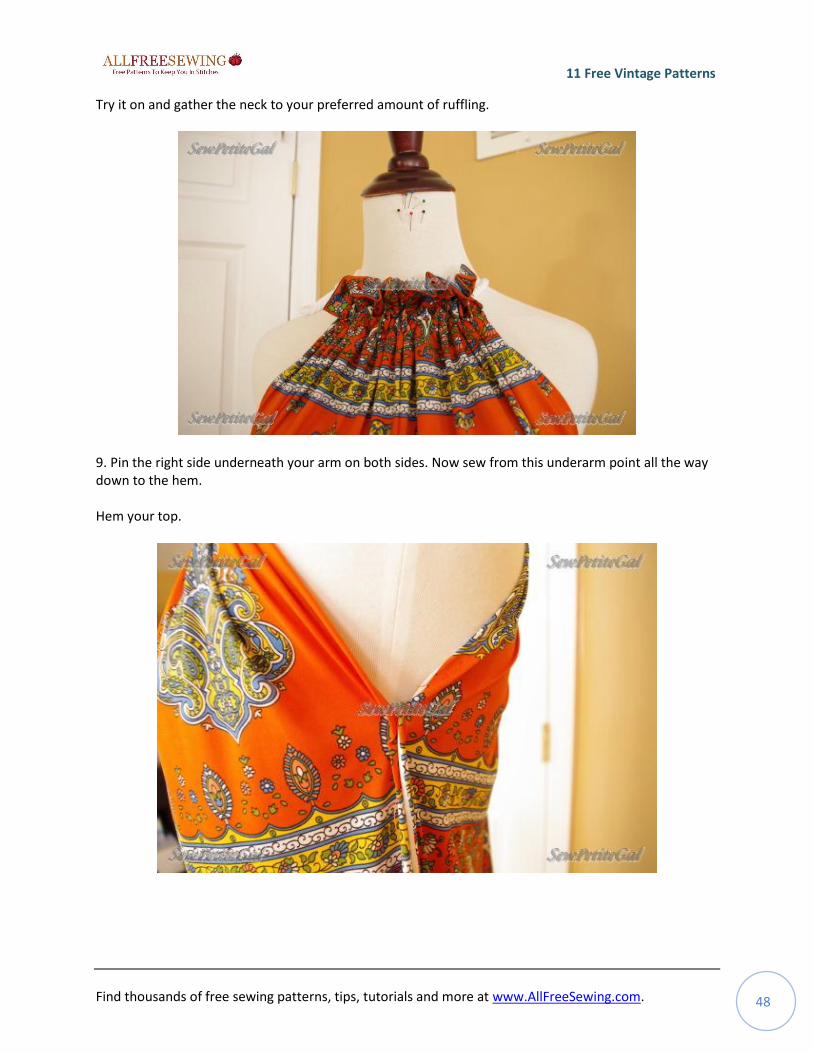
Try it on and gather the neck to your preferred amount of ruffling.
9. Pin the right side underneath your arm on both sides. Now sew from this underarm point all the way down to the hem. Hem your top.

11 Free Vintage Patterns
Find thousands of free sewing patterns, tips, tutorials and more at www.AllFreeSewing.com. 49
10. Now thread with your final material. This tutorial uses a gold chain link necklace.
11. You're finished!
11 Free Vintage Patterns
Find thousands of free sewing patterns, tips, tutorials and more at www.AllFreeSewing.com. 50
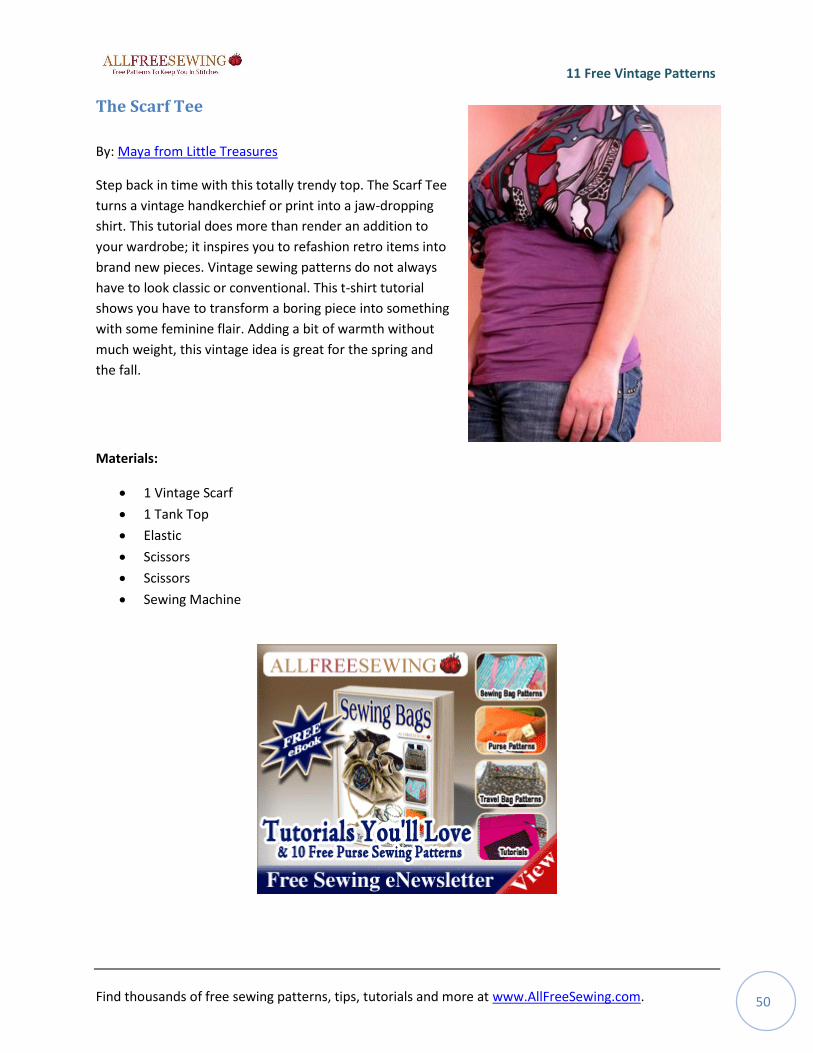
The Scarf Tee
By: Maya from Little Treasures
Step back in time with this totally trendy top. The Scarf Tee
turns a vintage handkerchief or print into a jaw-dropping
shirt. This tutorial does more than render an addition to
your wardrobe; it inspires you to refashion retro items into
brand new pieces. Vintage sewing patterns do not always
have to look classic or conventional. This t-shirt tutorial
shows you have to transform a boring piece into something
with some feminine flair. Adding a bit of warmth without
much weight, this vintage idea is great for the spring and
the fall.
Materials:
1 Vintage Scarf
1 Tank Top
Elastic
Scissors
Scissors
Sewing Machine

11 Free Vintage Patterns
Find thousands of free sewing patterns, tips, tutorials and more at www.AllFreeSewing.com. 51
Directions:
1. Cut off the upper part of the top and leave the piece aside for later.
2. Fold the scarf twice and mark it for cutting for the opening of the head. Do this twice to avoid a big
neckline gaping. It might be a good idea to try it a couple of times until you are satisfied with the
opening.

11 Free Vintage Patterns
Find thousands of free sewing patterns, tips, tutorials and more at www.AllFreeSewing.com. 52
3. This is what you'll have.
4. Shirr the edge of the scarf. Since the scarf was almost twice wider than the left over piece of the top,
this is a good way to narrow it a bit.
5. Join the two pieces. Sew them together right above the elastic all the way round.

11 Free Vintage Patterns
Find thousands of free sewing patterns, tips, tutorials and more at www.AllFreeSewing.com. 53
6. If you have cut-off straps from earlier you can use them to finish the neckline.

11 Free Vintage Patterns
Find thousands of free sewing patterns, tips, tutorials and more at www.AllFreeSewing.com. 54
Tweed-Front Sweater
By: Sheila from Sew Petite Gal
Every day, sewists far and wide revive vintage style
and smart spending by creating their own clothing.
The Tweed-Front Sweater involves both old-school
style in its textured front and thrifty sewing
techniques. Use an existing top to draft a simple shirt
pattern instead of purchasing one. From these
instructions you'll see how easy it is to sew a shirt
that is comprised of seemingly opposing fabrics that
work in harmony with each other.
Materials:
~1/2 Yard of Tweed
~1 Yard of Knit Fabric (stretchier is better!)
Bias Tape (use a matching color to bind your collar)
Existing Raglan Sleeve Top (that fits you well)
Please note:
Tweed is a very loosely woven textile and prone to fraying. Because of this, make sure to bind all edges with a serger and allow for more seam allowance. The last thing you want is for the stitching to come loose because the fraying has come up to it. Choose a stretchy knit for the remainder of your top. Just because you may have purchased the same fabric previously in a different color doesn’t the stretch is the same.
Cut your collar in a manner that accommodates the pullover nature of this top. Not a big deal if you have to cut a slit and add a button closure to fit your head, but it’s better to build this in.

11 Free Vintage Patterns
Find thousands of free sewing patterns, tips, tutorials and more at www.AllFreeSewing.com. 55
Directions: 1. Fold your raglan sleeve top in half vertically, and similarly fold your tweed fabric in half. Place your top on top of your fabric aligning the center folds.
2. Fold the sleeves down right along the line where the sleeves meet the bodice.

11 Free Vintage Patterns
Find thousands of free sewing patterns, tips, tutorials and more at www.AllFreeSewing.com. 56
3. Using your existing top as a template, cut your tweed fabric. Remember to cut ~0.5" larger to allow for your binding and seam allowance. It is much easier (and more economical) to slim something down than to recut.
4. Use your bodice front as a guide for the back and cut accordingly. Do not cut the collar, this can remain straight across.

11 Free Vintage Patterns
Find thousands of free sewing patterns, tips, tutorials and more at www.AllFreeSewing.com. 57
5. Now position your raglan sleeves similarly and fold the bodice at the line where the sleeve meets the
bodice. Cut four sleeve pieces.
6. Attach your sleeves to your bodice front and back
11 Free Vintage Patterns
Find thousands of free sewing patterns, tips, tutorials and more at www.AllFreeSewing.com. 58
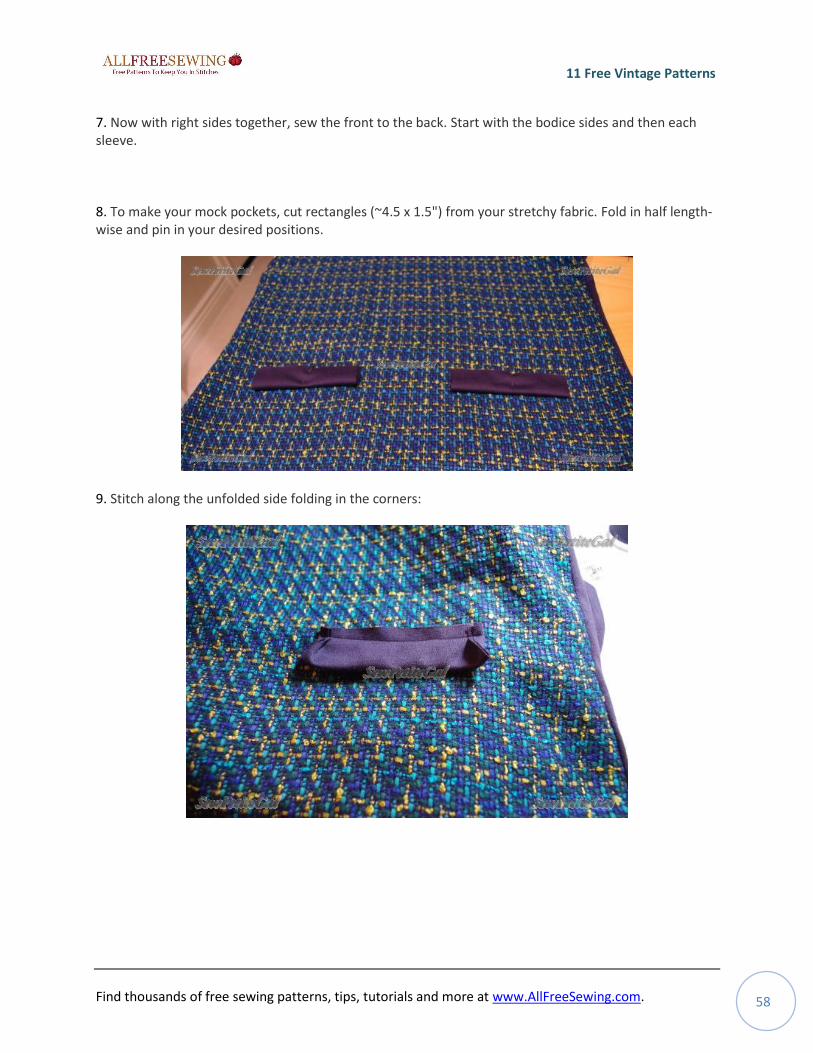
7. Now with right sides together, sew the front to the back. Start with the bodice sides and then each sleeve. 8. To make your mock pockets, cut rectangles (~4.5 x 1.5") from your stretchy fabric. Fold in half length-wise and pin in your desired positions.
9. Stitch along the unfolded side folding in the corners:

11 Free Vintage Patterns
Find thousands of free sewing patterns, tips, tutorials and more at www.AllFreeSewing.com. 59
10. Flip your "pockets" up and blind stitch along the sides of each.
11. Finish your collar with bias tape. 12. Hem and you're finished!

11 Free Vintage Patterns
Find thousands of free sewing patterns, tips, tutorials and more at www.AllFreeSewing.com. 60
Other Vintage-Inspired Patterns
Classic Skirt
By: Sheila from Sew Petite Gal
If you've ventured this far to learn how to sew a skirt, make it one that you like. The Classic Skirt has everything you need to achieve a timeless and sophisticated look. Making skirts this polished may seem like an impossible feat, but with a tutorial like this one skirt-making is an easy task. Learn how to sew a skirt that looks as polished as a store-bought piece with this vintage skirt pattern. With a slim fit and pockets, this skirt is as functional as it is cute. Materials:
1 Yard of Fabric
Interfacing Optional
Sewing Machine
General Sewing Supplies

11 Free Vintage Patterns
Find thousands of free sewing patterns, tips, tutorials and more at www.AllFreeSewing.com. 61
Directions:
1. First, cut your waistband and two skirt panels:
A. Waistband = waist measurement + 2" (length) X 3.5" (width - you can just this to whatever width
you prefer). Optional: To give your waistband structure (so it doesn't crease/wrinkle like crazy when
you sit), cut a piece of interfacing at the same length X half the width
B. Front and back skirt panels = each piece is (2 X waist measurement) X (desired length + 3")
For example, if your waist is 27" and you want the skirt length to be 20", your:
Waistband = 29" X 3.5"
Skirt panels + 54" X 23" each
Optional Waistband Interfacing = 29" X 1.75"

11 Free Vintage Patterns
Find thousands of free sewing patterns, tips, tutorials and more at www.AllFreeSewing.com. 62
2. If you'd like front pockets, fold your front panel in half and snip a small triangle at the top corner.
This triangle was ~2" at the top edge and ~5" down the side.
3. Cut two pocket rectangles to be a little bigger than your hand.
Using the triangles you cut above as a template, cut the exact same size triangles in your pocket
rectangle.
You can certainly round out the bottom of your pockets if you prefer.

11 Free Vintage Patterns
Find thousands of free sewing patterns, tips, tutorials and more at www.AllFreeSewing.com. 63
3. With the right sides of the fabric together, align the slanted edges of your pockets to your front panel
and sew at the dotted lines.
4. Flip pockets to the back so that only the skirt front is visible.
5. Fold pocket rectangles in half so that the uncut corner is now visible as the layer beneath the pocket
opening. Baste the top and sides where the blue dotted lines are.
6. Add a long stitch between the pockets of your front panel and all along the top of your back panel.
7. Pull the bobbin thread to gather the front panel and the back panel.

11 Free Vintage Patterns
Find thousands of free sewing patterns, tips, tutorials and more at www.AllFreeSewing.com. 64
8. Front panel top should now = ½ waist measurements + 0.5" for seam (14"). Back panel top should
now = ½ waist measurment + 1.5" for seam and zipper (15").
9. Lay the two panels on top of each other (right sides of fabric together) and sew down the sides. You
should now have a semblance of a skirt.

11 Free Vintage Patterns
Find thousands of free sewing patterns, tips, tutorials and more at www.AllFreeSewing.com. 65
10. Cut your back panel in half to accommodate your zipper. Alternatively, you can leave your back
panel intact if you decide to go with a side zip.
11. Beginning at the skirt back where the zipper will go, align the side and top edges of yoru waistband
to the skirt (always right sides of fabric together) and sew at the blue dotted line all the way around your
skirt.

11 Free Vintage Patterns
Find thousands of free sewing patterns, tips, tutorials and more at www.AllFreeSewing.com. 66
12. Insert the zipper. Fold over your waistband to the back and secure with a line of stitching right
beneath where you first attached your waistband. If you do it closely, this line of stitching should not be
noticeable. This will also enclose the raw edges of the top of your skirt.
12. Hem to your desired length.

11 Free Vintage Patterns
Find thousands of free sewing patterns, tips, tutorials and more at www.AllFreeSewing.com. 67
Flapper Feather Headband
By: Rachel from Sew Much Ado
At first glance, you probably didn’t expect to achieve this
Flapper Feather Headband without sewing. Put together
this number in a manner of minutes to top a gorgeous,
vintage-inspired ensemble. Finding DIY hair accessories
with the right amount of vintage flair can be hard! This DIY
headband, however, will have you dancing the Charleston
in no time. Don accessorizes that you would find in Daisy
Buchanan’s wardrobe when you make this easy hair craft.
Materials:
Two Feathers
Headband from the Dollar Store (this one is fabric covered)
One Large Rectangle of Black Felt
Glue Gun

11 Free Vintage Patterns
Find thousands of free sewing patterns, tips, tutorials and more at www.AllFreeSewing.com. 68
Directions:
1. Glue the large feather onto the headband and press it firmly in place.
2. To add some dimension, glue a complementary feather on top of the base layer feather.

11 Free Vintage Patterns
Find thousands of free sewing patterns, tips, tutorials and more at www.AllFreeSewing.com. 69
3. To hold everything in place, take the black piece of felt and glue that behind the feather, pinning the
headband inside.

11 Free Vintage Patterns
Find thousands of free sewing patterns, tips, tutorials and more at www.AllFreeSewing.com. 70
A Special Thanks to Our Contributors:
Emma Jeffrey for Fiskars Maya from Little Treasures
Rachel from Holy Craft Rebekah from Potholes & Pantyhose
Sheila from Sew Petite Gal Stacy from Stacy Sews and Schools
Sign up for our free sewing newsletter and receive more low-cost collections, free sewing projects, quick tips, home décor ideas, and more right in your inbox every week.