
1 Safety instructions - JUNG · Art. No. : DWPMK360AL Operating instructions 1 Safety instructions...
18
Motion and presence detector Light Management Motion and presence detector Art. No. : DWPMK360WW Motion and presence detector Art. No. : DWPMK360AL Operating instructions 1 Safety instructions Electrical devices may only be mounted and connected by electrically skilled persons. Serious injuries, fire or property damage possible. Please read and follow manual fully. Danger of electric shock. Device is not suitable for disconnection from supply voltage. Danger of electric shock. Always disconnect before carrying out work on the devise or load. In so doing, take all the circuit breakers into account, which support dangerous voltages to the device and or load. Do not press on the sensor window. Device can be damaged. Keep button cells out of reach of children! If button cells are swallowed, get medical help immediately. Risk of explosion! Do not throw batteries into fire. Risk of explosion! Do not recharge batteries. The device is not suitable for use as a burglar alarm or other alarm. These instructions are an integral part of the product, and must remain with the end customer. 2 Device components Figure 1 (1) Connection box (2) Sensor top (3) Brightness sensor (4) Sensor window with red and blue display LED (5) Decor ring (6) Push-on cover 1/18 82593213 J0082593213 12.01.2017
Transcript of 1 Safety instructions - JUNG · Art. No. : DWPMK360AL Operating instructions 1 Safety instructions...

Motion and presence detectorLight Management
Motion and presence detectorArt. No. : DWPMK360WWMotion and presence detectorArt. No. : DWPMK360AL
Operating instructions
1 Safety instructionsElectrical devices may only be mounted and connected by electrically skilled persons.
Serious injuries, fire or property damage possible. Please read and follow manual fully.Danger of electric shock. Device is not suitable for disconnection from supply voltage.Danger of electric shock. Always disconnect before carrying out work on the devise orload. In so doing, take all the circuit breakers into account, which support dangerousvoltages to the device and or load.Do not press on the sensor window. Device can be damaged.Keep button cells out of reach of children! If button cells are swallowed, get medical helpimmediately.Risk of explosion! Do not throw batteries into fire.Risk of explosion! Do not recharge batteries.The device is not suitable for use as a burglar alarm or other alarm.These instructions are an integral part of the product, and must remain with the endcustomer.
2 Device components
Figure 1
(1) Connection box(2) Sensor top(3) Brightness sensor(4) Sensor window with red and blue display LED(5) Decor ring(6) Push-on cover
1/1882593213J0082593213 12.01.2017

Figure 2
(7) IR end customer remote control, included in the scope of delivery(8) IR installation engineer remote control (see Accessories)
3 FunctionIntended use- Automatic switching of lighting depending on the heat motion and ambient brightness.- Indoor ceiling mounting, surface-mountedProduct characteristics- 2-point light control- Functions settable with IR remote controls- Restriction of the detection field by switching off individual sensors or push-on cover.- Operation with IR remote control, 2-wire extension or installation button- Teach function for adjustment of the brightness threshold, in combination with IR remote
controls- Switch-off warning- Short-time operation, e.g. to activate acoustic signal encoders- Display LEDs- Presence simulation- Function as twilight switch- Dynamic run-on time- Extension of the detection area through parallel switching of multiple devicesi The extension of the detection area with 3-wire extensions is not possible.
Automatic operation
The device detects heat motions of people, animals and objects.- The light is switched on if a person enters the detection area and the brightness is below
the set threshold.The run-on time restarts with each detected motion.
- The light is switched off when it is no longer required because: No more movement is detected in the detection area and the run-on time has elapsed orthe ambient light is too bright.The switch-off brightness is calculated from the set brightness threshold and the connectedlight.To avoid brief shading from causing switch-off, switch-off only takes place when the setrun-on time has elapsed. The run-on time does not restart on movement detection for aslong as the switch-off brightness is exceeded.
i The minimum switch-off brightness is 100 lux, even if a lower value is set.
2/1882593213J0082593213 12.01.2017
Light Management
Motion and presence detector

To avoid any switch-on caused by a cooling illuminant, no movement signals are evaluated fora brief lockout time after switching off. The motion detector adjusts itself to the ambientconditions to keep the time as short as possible.
Short time operationIf movement occurs, then a short pulse of approx. 0.5 seconds is triggered according to thebrightness. The pulse is cyclically repeated as long as motions are detected.
Switch-off warningIf the switch-off warning is active, the light is not switched off immediately after the run-on timehas elapsed. Triple flashing at an interval of 10 seconds shows that the light will be switched offsoon. The run-on time is thereby prolonged by approx. 30 seconds. If movement is detectedduring the switch-off prewarning, then the run-on time is restarted and the light remains on.
Dynamic run-on timeThe function determines a run-on time within specified limits automatically and dynamically fromdetected movements. In so doing, the run-on time is increased if presence continues ordecreased if absence is detected.
Presence simulationIn automatic operation, the motion detector continuously saves times for which the lighting wasswitched on. A maximum of 60 switching operations are saved over a period of 24 hours. Ifmore switching operations take place, the oldest ones are overwritten respectively. If thepresence simulation is activated, the motion detector switches the lighting at the saved timesaccording to the brightness. Switch-off takes place after the run-on time has elapsed. Detectedmotions prolong the run-on time or the light is switched on depending on brightness. Times arenot saved.
Function as twilight switchThe function is active as soon as all the PIR sensors have been switched off (seeCommissioning). The light is switched according to the brightness. Motions are not evaluated- The light is switched on if the brightness is below the set threshold for 4 minutes.- The light is switched off when the switch-off brightness (see Automatic mode) is exceeded
for 4 minutes.i Switch-on and switch-off of the light via 2-wire extensions or installation buttons is not
possible. The Continuous on/off and on/off for 2 hours functions cannot be used.
Behaviour after mains returnAfter mains return, the device performs a self-test for a maximum of 20 seconds. After the self-test has been completed, the device is ready for operation. The device switches the lightaccording to the settings made.
The following applies during the self-test:- The red and blue display LEDs (4) light up.- The device cannot be operated or set using an IR remote control.- Movements are not detected.- The device can be switched via 2-wire extensions or installation buttons.
4 OperationSpecial functions can be switched and settings adjusted using the supplied IR remote control.i Special functions can restrict operation via the 2-wire extension inserts or installation
buttons.i If multiple devices are within the range of the IR remote control, then align it so that only
the device to be operated can receive the signals.
LED displayBehind the sensor window (4) are a red and a yellow LED (Figure 1) for indicating differentstates of operation.
Red LED Blue LED Signalling
3/1882593213J0082593213 12.01.2017
Light Management
Motion and presence detector

Off On Light switched on continuously
On Off Light switched off continuouslyor twilight button functionactivated
Flashing slowly Off Presence simulation switchedon
Flashing Off Receipt of IR signals
Off Flashing IR signal detected
Button assignment of the end user IR remote control
Button Functionů Pressing for less than 0.4 seconds
Switching on automatic mode
ůActuation of between 1 and 4 seconds
In automatic mode: Switch-on for the durationof the run-on time
Ű Pressing for less than 0.4 seconds
Continuous on
ű Pressing for less than 0.4 seconds
Continuous off
2 h On Pressing for less than 0.4 seconds
On for 2 hours
2 h Off Pressing for less than 0.4 seconds
Off for 2 hours
Ų Pressing for less than 10 seconds
In the next 10 seconds, the brightnessthreshold can be changed incrementally usingthe Ű or ű buttons.
Ų Pressing for longer than 10 seconds
Saving the current ambient brightness as thebrightness threshold
Set 2 Pressing for longer than 10 seconds
Activating the settings saved by the installationengineer
ų Pressing for longer than 10 seconds
Switching the presence simulation on or off
Time Pressing for less than 10 seconds
In the next 10 seconds, the run-on time can bechanged incrementally using the Ű orű buttons.
Switching on light for the duration of the run-on timeA 2-wire extension or an installation button is connected.i In short-time operation, cyclic pulses take place whilst the 2-wire extension at top or bottom
or installation button is pressed.i Alternatively, press the ů button of the IR remote control for between
1 and 4 seconds. In short-time operation, there is a single pulse after releasing the button.Light is switched off.Motion detector operationo Press the 2-wire extension or installation button for less than 0.4 seconds.i If the 2-wire extension or the installation button is pressed again after switch-on, then the
run-on time is restarted.Presence detector operation
4/1882593213J0082593213 12.01.2017
Light Management
Motion and presence detector

o Press the top or full-surface of the 2-wire extension or installation button for less than0.4 seconds.Light is switched on depending on brightness and motion. Movements are evaluatedaccording to the brightness and prolong the run-on time.
Switching the light off for a period of 3 minutesi This function can only be used in presence detector operation.A 2-wire extension or an installation button is connected.Light is switched on.o Press the bottom 2-wire extension or installation button.
The light is switched off for the period of 3 minutes. When movements are detected, thetime is restarted.
Switch on the light for 2 hoursMotions are not evaluated during this time. It is not possible to switch off via a 2-wire extensionor installation button.o Press 2 h On button of the IR remote control.
Light is switched on for 2 hours. The motion detector is in automatic operation again afterthe 2 hours have elapsed.
i The time is restarted if actuation is repeated.i Automatic operation is switched on again using the ů button.
Switch on the light continuouslyMotions are not evaluated during this time. It is not possible to switch off via a 2-wire extensionor installation button.o Press the Ű button for shorter than 0.4 seconds.
Light is switched on continuously. The blue LED lights up.i Automatic operation is switched on again using the ů button.
Switch off the light for 2 hoursMotions are not evaluated during this time. It is not possible to switch on via a 2-wire extensionor installation button.o Press the 2 h Off button.
Light is switched off for 2 hours. The device is in automatic operation again after the timehas elapsed.
i The time is restarted if actuation is repeated.i Automatic operation is switched on again using the ů button.
Switch off the light continuouslyMotions are not evaluated It is not possible to switch on via a 2-wire extension insert orinstallation button.o Press the ű button for shorter than 0.4 seconds.
Light is switched off continuously. The red LED lights up.i Automatic operation is switched on again using the ů button.
Adjusting the switch-on brightnessThe switch-on brightness is set during commissioning. The switch-on brightness can beadjusted at a later time using the supplied IR remote control.o Press Ų button briefly.o Within 10 seconds, press the Ű or ű button briefly.
Each button press extends or shortens the brightness threshold by 10 % of the set value,but by at least 1 lux.
5/1882593213J0082593213 12.01.2017
Light Management
Motion and presence detector

Saving the current brightness as the switch-on brightnesso Press the Ų button for longer than 10 seconds.
The current brightness is saved as the switch-on brightness.
Adjusting the run-on timeThe run-on time is set during commissioning. The run-on time can be adjusted at a later timeusing the supplied IR remote control.o Press Time button briefly.o Within 10 seconds, press the Ű or ű button briefly.
Each button press extends or shortens the run-on time by 10 % of the set value, but by atleast 1 Lux.
Recalling saved settingsDuring commissioning, the installation engineer can save the settings made (see Savingsettings). These can be recalled if, for example, changes made later are no longer required.o Press the Set 2 button for longer than 10 seconds.
Settings saved by the installation engineer are active again.
Switching the presence simulation on or offo Press the ų button for longer than 10 seconds.
The presence simulation is switched on or off alternately. If the function is switched on, thered LED flashes slowly.
i The function cannot be activated until 24 hours after first commissioning.
5 Information for electrically skilled personsDANGER!Electrical shock when live parts are touched.Electrical shocks can be fatal.Before carrying out work on the device or load, disengage all thecorresponding circuit breakers. Cover up live parts in the working environment.
5.1 Fitting and electrical connectionDetection field and range
Figure 3: Tangential and radial direction of motion
6/1882593213J0082593213 12.01.2017
Light Management
Motion and presence detector

The device has a detection area of 360°. The diameter of the detection area depends on theinstallation height and the direction of motions of persons in the detection area (figure 4).The detection area becomes larger the greater the installation height, while the detectiondensity and sensitivity are reduced at the same time.
Figure 4: Detection range depending on the direction of movement
Diameter of detection area for direction of movement
Installationheight
1: 2: 3: 4:
2.20 m 14.5 m 11.5 m 8 m 6 m
2.50 m 16.5 m 13 m 10 m 7 m
3.00 m 20 m 16 m 12 m 8 m
3.50 m 23 m 18.5 m 14 m 9 m
4.00 m 26 m 17 m 14.5 m*) – *)
5.00 m 28 m 18 m 15 m*) – *)
6.00 m 29 m 19 m – *) – *)
1: Range for tangential movement on the ground2: Range for radial movement on the ground3: Range for typical movements at desks, e.g. torso movement4: Range of fine detection at desks, e.g. mouse movements*) When used as a presence detector: Installation height should not be more than 3.5 m,
otherwise fine detection is not possible.
Selecting the installation locationFor use as a presence detector, the device is installed, for example, above a workplace andmonitors the surface below it. For use as a motion detector, the device is installed, for example,in the hallway.o Select a vibration-free installation location. Vibrations can lead to unwanted switching.o Avoid interference sources in the detection area. Interference sources, e.g. heaters,
ventilation, air conditioners, and cooling light bulbs can lead to unwanted detections.
7/1882593213J0082593213 12.01.2017
Light Management
Motion and presence detector

i The detection area can be limited in order to minimize the influence of interferencesources. For this, use the push-on cover (see Limiting the detection area with the push-oncover) or switch off individual sensors (see Limiting the detection area).
Aligning the device The device has three independent PIR sensors for motion detection(figure 5).
Figure 5: Detection field areas A, B and C, installation height 2.50 m
Figure 6: Arrangement of the areas A, B and C
o Align the connection box (1) in such a way that the areas A, B and C match the structuralconditions. The arrangement is clearly evident under the decor ring (figure 6).
8/1882593213J0082593213 12.01.2017
Light Management
Motion and presence detector

Preparations for installation
Figure 7: Fitting
(1) Connection box(2) Sensor top(5) Decor ring(9) Fastening pins(10) Screwso Pull off the decor ring (5) (figure 7).o Loosen the screws (10) (figure 7).
Installing the connection box
Figure 8: Connection box
(11) Fastening holes(12) Cable entry, surface-mounted(13) Thin points for optional cable entries
9/1882593213J0082593213 12.01.2017
Light Management
Motion and presence detector

o Align the device (for the position of areas A, B, C, see Aligning the device) - the brightnesssensor should, if possible, be located on the side away from the window. This reduces theeffects of scattered light.
o For an additional flush-mounted cable entry or surface-mounted cable entry, break out theappropriate thin point (13) (figure 8).
o Fastening the connection box (1) through holes (11) (figure 8).i Alternatively, the device can also be mounted on a 60 mm appliance box. The screws are
not included in the scope of delivery.
Connecting the device
Figure 9: Connection diagram, single device
Figure 10: Connection diagram, parallel circuit for expanding the detection area
Max. power cable length 100 m. This takes into account all the connecting cables between thedevices and lamps.Do not connect more than five devices in parallel.Connect all devices to the same outer conductor.Set all the devices to the same device function (motion detector or presence detector).i The connection in parallel does not increase maximum connected load.
10/1882593213J0082593213 12.01.2017
Light Management
Motion and presence detector
o Connect the sensor top according to the connection diagram (figure 9) or switch the sensortops according to the circuit diagram (figure 10).
o If multiple miniature circuit breakers supply dangerous voltages to the device or load,couple the miniature circuit breakers or label them with a warning, to ensure disconnectionis guaranteed.
Connection assignment
black, BK, L External conductor
brown, BR, ↓ Switched external conductor
blue, BU, N Neutral conductor
grey, GY, 1 Installation button connection
PE Earth conductor
o Optionally, connect the installation button (14) (figure 9) or (figure 10). This is onlynecessary if manual operation is also desired.
i Lit installation buttons may only be connected if they have an N terminal.i In the case of single devices, a 2-wire extension can be used as an alternative to the
installation button (14).o Screw the sensor top (2) to connection box (1) with screws (10) and mounting pins (9)
(figure 7).
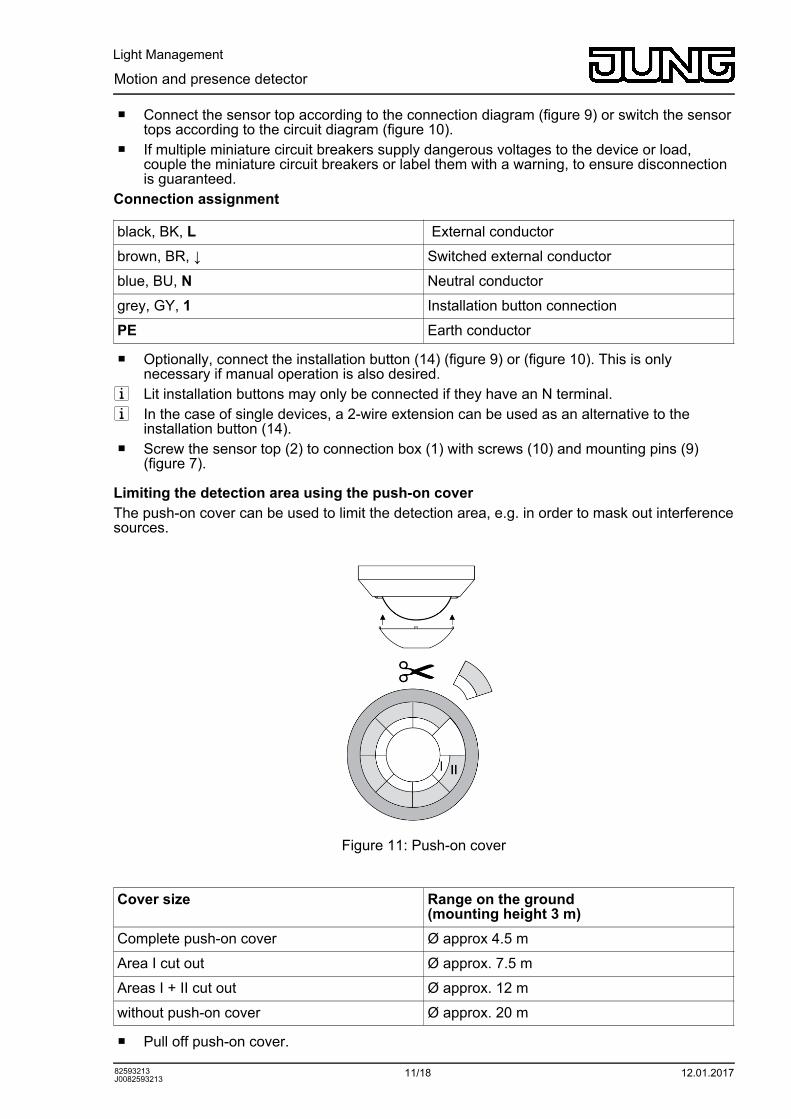
Limiting the detection area using the push-on coverThe push-on cover can be used to limit the detection area, e.g. in order to mask out interferencesources.
Figure 11: Push-on cover
Cover size Range on the ground(mounting height 3 m)
Complete push-on cover Ø approx 4.5 m
Area I cut out Ø approx. 7.5 m
Areas I + II cut out Ø approx. 12 m
without push-on cover Ø approx. 20 m
o Pull off push-on cover.
11/1882593213J0082593213 12.01.2017
Light Management
Motion and presence detector

o Using scissors, cut out push-on cover along the marked lines as required.o Push on push-on cover.i Alternatively, the detection area can also be limited by switching off individual sensors (see
Commissioning).
5.2 CommissioningInsert battery into IR remote controli To avoid contact problems, keep the contacts of batteries and device free of grease.
CAUTION!Risk of chemical burns.Batteries can burst and leak.Replace batteries only with an identical or equivalent type.
o Insert the supplied battery with correct polarity (see IR remote control imprint)The operation and necessary settings are carried out using the IR remote control for theinstallation engineer (see Accessories).i If multiple devices are within the range of the IR remote control, then align it so that only
the device to be operated can receive the signals.Button assignment of the installation engineer IR remote control
Button Function1 s Ů Short time operation
30 s Ů, 2 min Ů, 5 min Ů, 30 min Ů Set run-on time
ũ Pressing for longer than 10 seconds
Saving ambient brightness as brightnessthreshold
Ê, Ŧ, ŧ, Ũ Setting the brightness threshold
0-1 hŮ Setting individual run-on time
Dyn.Ů Pressing for longer than 10 seconds Switching on the dynamic run-on time
PIR A, PIR B, PIR C, PIR A-C Pressing forlonger than 10 seconds
Switching the PIR sensors on/off
PIR A, PIR B, PIR C Pressing for less than 10 seconds
In the next 5 seconds, use the 25 %, 50 %, 75% and 100 % buttons to set the sensitivity ofthe appropriate PIR sensor
25 %, 50 %, 75 %, 100 % Setting the sensitivity
Ū Pressing for longer than 10 seconds
Switching on the Presence detector devicefunction
ū Pressing for longer than 10 seconds
Switching on the Motion detector devicefunction
Ŭ No function is saved for this device
Test 100 h Pressing for less than 10 seconds
Switch on test operation
Test 100 h Pressing for longer than 10 seconds
On for 100 hours
Set 1 Pressing for longer than 10 seconds
Save any changes made for later recall usingthe Set 2 button of the end customer IRremote control
12/1882593213J0082593213 12.01.2017
Light Management
Motion and presence detector

ŭ Pressing for longer than 10 seconds
Switch on/off switch-off warning
Prog Func No function is saved for this device
ResetActuation of between 4 seconds and10 seconds
Switching off the functions: Dynamic run-ontime, switch-off prewarning, on for 100 hours,test operation
Reset Pressing for longer than 10 seconds
Restoring to factory settings
Switching on a device functionThe device can work either as a motion detector or presence detector.o Press the ū or Ū button.
The device works either as a motion detector or presence detector.i When changing the device function, the settings of the previous device function are saved
and reactivated on changing again.
Setting the sensitivityThe sensitivity can be set individually for each PIR sensor.o Press the PIR A, PIR B or PIR C for less than 10 seconds.o Within 5 seconds, press the 25 %, 50 %, 75 % or 100 % button.
Sensitivity is set.
Limiting the detection areaThe detection area of the motion detector can be limited by switching off one or two PIRsensors. Since the detection areas of the PIR sensors overlap, there is no distinct demarcationof the blocked out detection area. If all the PIR sensors have been switched off, then the deviceworks as a twilight switch.o Press the PIR A, PIR B or PIR C button for longer than 10 seconds.
The appropriate PIR sensor is switched off and the detection area is limited.i By pressing the PIR A-C button all the PIR sensors are switched on again at 100 %
sensitivity. Individual PIR sensors can be switched off by setting a sensitivity for the PIRsensor.
Setting the switch-on brightnessOne of four predefined brightness thresholds (see table) or one individual brightness thresholdcan be set (see Saving current brightness as the switch-on brightness). If the device is set as amotion detector, then the brightness is measured on the device. If the device is set as apresence detector, then the brightness is measured on the work surface.o Press the appropriate button (see table).Brightness thresholds
Icon Device function, motiondetector
Device function, presencedetector
Ê 5 lux 200 lux
Ŧ 10 lux 500 lux
ŧ 150 lux * 1000 lux
Ũ Brightness-independent - dayoperation
Brightness-independent - dayoperation
* Setting for stairways according to DIN EN12464-1, 2003-03
13/1882593213J0082593213 12.01.2017
Light Management
Motion and presence detector

Saving the current brightness as the switch-on brightnessThe Teach function can be used to save the current brightness as a switch-on brightness.i Do not shade the device during the measuring process.o Create the desired lighting situation, e.g. switch light on or off.o Press the ũ button for longer than 10 seconds.
The Teach function is activated, the current brightness is saved as the switch-onbrightness and is used after a maximum of 3 minutes.
i If a value greater than 2000 lux is saved, the motion detector switches to day operationindependent of the brightness.
Setting fixed run-on timeo Press 30 s Ů, 2 min Ů, 5 min Ů or 30 min Ůbutton.i If the run-on time is shortened, then it only becomes active after the device has switched
off once. To cancel a running run-on time, set the special function Continuous onfor example and then switch back to Automatic operation (see Operation).
Setting individual run-on timeThe individual run-on time can be set within a range of 10 seconds to 60 minutes. One of thefixed run-on times can be set again at any time.o Press 0-1 h Ů button.
Run-on time starts.o When the required run-on time is reached, press 0-1 h Ů button.
The device saves the run-on time.i If the run-on time is shortened, then it only becomes active after the device has switched
off once. To cancel a running run-on time, set the special function Continuous onfor example and then switch back to Automatic operation (see Operation).
Setting the dynamic run-on timeThe device adapts the run-on time to the motion situation.o Press the Dyn. Ů button for longer than 10 seconds.
The dynamic run-on time is activated.i To switch off the function, press the Reset button for between 4 and 10 seconds
Switching on short time operationo Press 1 s Ů button.i No individual or dynamic run-on time can be set in short time operation.i To switch off short-time operation, set a fixed or individual run-on time.
Switching on switch-off warningSwitch-off warning is switched off.o Press the ŭ button for longer than 10 seconds.
Switch-off warning is switched on. If pressed again, the switch-off warning is switched offagain.
i The function is also switched off if the Reset button is pressed for between 4 and10 seconds.
Switching on the function as a twilight switchAll the PIR sensors must have been switched off for the device to work as a twilight switch.o Press the PIR A, PIR B and PIR C buttons for longer than 10 seconds.
The device works as a twilight switch as soon as the last PIR sensor has been switchedoff. The red LED lights up.
i If day operation is set as the switch-on brightness, the light remains off continuously.i It is not possible to switch via a 2-wire extension or installation button.
14/1882593213J0082593213 12.01.2017
Light Management
Motion and presence detector

Switch on test operationThe test operation is used for testing the detection area. In test operation, the device operatesindependently of the brightness. All the other settings remain unchanged. Detected motions aresignalled by the blue status LED.o Press the Test 100 h button for between 4 and 10 seconds.
Test operation is switched on for 5 minutes.i By pressing the ů button of the IR remote control for end customers, you can
switch to automatic operation at any time (see Operation).i The function is also switched off if the Reset button is pressed for between 4 and
10 seconds.
Switch On for 100 hThis function is used to burn in fluorescent lamps.o Press the Test 100 h button for longer than 10 seconds.
The lamps are switched on for 100 hours. The device is switched back to automaticoperation again after the time has elapsed.
i During the 100 hours, no switching is possible via 2-wire extension, installation button or IRremote control, movement signals are not evaluated.
i To switch off the function, press the Reset button for between 4 and 10 seconds.
Saving settingsSave the settings so that, if necessary, the end customer can recall them using the Set 2button. No values are saved in the as-delivered state.o Press the Set 1 button for longer than 10 seconds.
The following settings are saved: Device function, sensitivity of PIR A-C, detection angle,switch-on brightness, run-on time, dynamic run-on time, short-time operation, switch-offprewarning. Previously saved values are overwritten.
Restoring the device to factory settingso Press the Reset button for longer than 10 seconds.
Function ValueDevice function Motion detector
Operating mode Automatic operation
Sensitivity of PIR A-C 100 %
Detection angle 360°, PIR A-C switched on
Switch-on brightness 10 lux
Run-on time 2 minutes
Dynamic run-on time switched-off
Short time operation switched-off
Switch-off warning switched-off
Presence simulation switched-off
Test operation switched-off
i If the Reset button is pressed for between 4 and 10 seconds, only a few functions areterminated (see button assignment of Installation engineer IR remote control).
6 Appendix
15/1882593213J0082593213 12.01.2017
Light Management
Motion and presence detector

Remove empty batteries immediately and dispose of in an environmentally friendlymanner. Do not throw batteries into household waste. Consult your local authoritiesabout environmentally friendly disposal. According to statutory provisions, the endconsumer is obligated to return used batteries.
6.1 Technical dataRated voltage AC 110 ... 230 V ~Mains frequency 50 / 60 HzAmbient temperature -5 ... +45 °CStandby power max. 0.3 WCircuit breaker max. 16 AContact type εDetection angle 360 °Dimensions Ø×H 103×66 mmInstallation height 3 mDetection area Ø approx. 20 mSensitivity 25 ... 100 %Brightness setting approx. 5 ... 2000 lx (and day operation)Run-on time approx. 10 s ... 30 minShort time operationpulse duration approx. 0.5 spulse stop approx. 3 sSwitching current at 35 °COhmic 16 A (AC1)Fluorescent lamps 4 AXMinimum switching current AC 100 mAConnected load at AC 230 V~ and 35 °CIncandescent lamps 2300 WHV halogen lamps 2000 WElectronic transformers 1500 WInductive transformers 1000 VAHV-LED lamps typ. 400 WCompact fl lamp. typ. 400 WFluorescent lamps, uncompensated 920 VACapacitive load 690 VA (560 µF)Connected load at AC 110 V~ and 35 °CIncandescent lamps 1150 WHV halogen lamps 1000 WTronic transformers 750 WInductive transformers 500 VAHV-LED lamps typ. 200 WCompact fl lamp. typ. 200 WFluorescent lamps, uncompensated 460 VACapacitive load 345 VA (560 µF)Connectionsingle stranded 1.0 ... 2.5 mm²finely stranded with tin-plated conductor ends 0.75 ... 1.5 mm²Number of extension unitsUnlit push-buttons unlimitedExtension insert, 2-wire unlimitedTotal length of extension unit cable max. 100 mTotal length power cable max. 100 mIR remote controlBattery type 1×lithium CR 2025
6.2 TroubleshootingDevice does not switch onCause 1: The ambient brightness is greater than the set brightness value.
Set brightness value.
16/1882593213J0082593213 12.01.2017
Light Management
Motion and presence detector

Cause 2: Device does not detect any motions.Increase sensitivity.Switch on all sensors.
Cause 3: Off for 2 hours or Continuous off is activatedSwitch on automatic mode.
Device switches on without motionsCause 1: Presence simulation is activated. Device switches at saved times.
Switch the presence simulation off.Cause 2: Interference sources in the detection area.
Remove interference sources if possible.Reduce sensitivity.Limit detection area.
Device constantly switches on and off during motionCause 1: Short-time operation is switched on.
Set a longer run-on time.
Device switches off despite motionCause 1: The device does not detect any motion.
Increase sensitivity.Cause 2: Detection area is limited because a sensor was switched off.
Switch on all sensors.Cause 3: Detection area is limited by push-on cover.
Check the push-on cover.
Device does not switch offCause 1: Interference sources in the detection area, device detects motions constantly.
Remove interference sources if possible.Reduce sensitivity.Limit detection area.
Cause 2: On for 2 hours, Continuous on or On for 100 hours is activated.Switch on automatic mode.
The device does not respond to IR remote control, red LED does not flash.Cause 1: IR remote control out of range.
Go closer to the motion detector.Cause 2: Battery in IR remote control is empty.
Change battery (see back of the IR remote control)
The device does not respond to IR remote control, red LED flashes, blue LED does notCause: Device is receiving an IR signal. Function or setting cannot be executed.
6.3 AccessoriesIR remote control for electrician Art. No. DWPMFBIRI
6.4 WarrantyThe warranty follows about the specialty store in between the legal framework as provided forby law.
17/1882593213J0082593213 12.01.2017
Light Management
Motion and presence detector

ALBRECHT JUNG GMBH & CO. KGVolmestraße 158579 SchalksmühleGERMANY
Telefon: +49 2355 806-0Telefax: +49 2355 [email protected]
18/1882593213J0082593213 12.01.2017
Light Management
Motion and presence detector