
079813gb - Newappliances MANUA… · A # ˛ ˇ # # . Plug the dryer into the power supply socket. /...
48
EN 1 Contents Important information, 2-3 Installation, 4 Where to install the tumble dryer Ventilation Electrical connections Preliminary information Description of the tumble dryer, 5-6 Features Control panel How to carry out a drying cycle, 7 Starting and selecting a programme Programmes and options, 8-9-10 Programme chart Special programmes Options Opening the door Laundry, 11-12 Sorting laundry Care labels Special items Drying times Warnings and suggestions, 13 General safety Information on recycling and disposal Saving energy and respecting the environment Care and maintenance, 14 Disconnecting the power supply Cleaning the filter after each cycle Checking the drum after each cycle Emptying the water container after each cycle Cleaning the condenser unit Cleaning the tumble dryer Troubleshooting, 15 Assistance, 16 Spare parts IDCA G35 Instruction manual TUMBLE DRYER English,1 EN This symbol reminds you to read this instruction manual. Keep this manual at hand for immediate reference whenever necessary. Always store this manual close to the tumble dryer and remember to pass it on to any new owners when selling or transferring the appliance, so they may familiarise with the warnings and suggestions herein contained. Read these instructions carefully: the following pages contain important information on installation and useful suggestions for operating the appliance. ÅËËÇÍÉÊÁ,33 GR Português,17 PT
Transcript of 079813gb - Newappliances MANUA… · A # ˛ ˇ # # . Plug the dryer into the power supply socket. /...

��
�
�������
��� ��������� �����������
�������������Where to install the tumble dryerVentilationElectrical connectionsPreliminary information
��� ���������������������� �� ���� FeaturesControl panel
!�"������ ��������� ���#��������$Starting and selecting a programme
% �# �����������������&�'��(Programme chartSpecial programmesOptionsOpening the door
)���� ��������Sorting laundryCare labelsSpecial itemsDrying times
*� ���#������##���������General safetyInformation on recycling and disposalSaving energy and respecting the environment
�� ���������������������Disconnecting the power supplyCleaning the filter after each cycleChecking the drum after each cycleEmptying the water container after each cycleCleaning the condenser unitCleaning the tumble dryer
+ �����������#����
,��������� Spare parts
��,�-��
�� �������������+./0)�� �12�1
��#�����
��
� This symbol reminds you to read this instruction
manual.
� Keep this manual at hand for immediate reference
whenever necessary. Always store this manual close to the
tumble dryer and remember to pass it on to any new owners
when selling or transferring the appliance, so they may
familiarise with the warnings and suggestions herein
contained.
� Read these instructions carefully: the following pages
contain important information on installation and useful
suggestions for operating the appliance.
���������
-1
%� ��#�3��$
%+

�
��
��� ��������� ������
+����� ������������������ �� �� �������������������������������"��#� ������������������� ����� ����������� �������4
5���������� �6��)�,������������������������������������ ����� ������� ���#������7
Step 1Open the dryer door by pressingit as shown in the picture.
Step 2Pull out the filter (using twofingers).
Step 3Clean off any fluff build-up on theinternal surface of the filter net.
Step 4Replace the filter – never operatethe dryer without the filter inplace.
5���� �������������������� ����� ������� ���#�������������� ������ ���#��� �� ���������������������8�����#� ����� ������������������ ����� #�7
*��� ��������� �6�����������"��� ��������� ����� ������ ���#������7
Step 1Pull the water container towardsyou and remove it completelyfrom the dryer.
Step 2Empty all the water in the watercontainer.
Step 3Replace the water containermaking sure that it is securelyfixed.
5���� ���������������"��� ��������� ������������������"��#4��+���� �� �����������#�9������������������������������������������������ ���#������:7��+���;������"��� ��������� <�)�����#���������#�������������"��� ��������� �������7
5�����#��������*��� ��������� *��������� �� ����� ������"��� �"����������������������� �����"��� ��������� ����������������������� ����7�+���������������������������"������8������"����������� ��#������ ��������������������������� ���#�� �����������������7

��
�
������� �������� ���=��������������������� �������������� �����������������7
Step 1Open the condenser cover- grip the handle and pulltowards you.
Step 2Remove the condenser byturning the 3 catches, then pullthe condenser towards you. (It isnormal for some residual waterto be left in the tubes).
Step 3Clean the condenser with runningwater over the rear side toremove any fluff deposits.
Step 4Replace the condenser unit;make sure that the unit issecurely in place, that all 3catches are fixed and that theposition arrows on the front endof the condenser are pointingupwards.
5���� ���������������������� ��������������� ����� ���������������� �� 7

�
��*�� ������������������������ ��
• Install the dryer far from gasranges, stoves, radiators orhobs, as flames may damage it.If the dryer is installed below aworktop, ensure there are 10mm between the upper panel ofthe dryer and any objectsabove it, and 15 mm betweenthe sides of the machine andthe walls or furniture unitsadjacent to it. This ensuresadequate air circulation.
>����������
• The room must be adequately ventilated while the dryer isrunning. Make sure that the dryer is installed in a room free ofhumidity and with adequate air circulation. The flow of airaround the dryer is essential to allow water to condenseduring drying; the dryer will not function properly if it is placedin an enclosed space or inside a cabinet.
� Some condensation may form if the dryer is used in a smallor cold room.
� We do not recommend installing the dryer in a cupboard;moreover, never install the machine behind a lockable, slidingor hinged door located on the opposite side of the dryerdoor.
*��� �� ����#�
If your dryer is installed next to a drain the water can beplumbed into this drain. This does away with the need toempty the water container. If the dryer is stacked onto orinstalled next to a washing machine it can share the samedrain. The height of the drain must be less than 3' (1 m)from the bottom of the dryer.Remove existing hose from position shown in picture �and fit a suitable length of hose and connect as shown in picture �.
� ������������������ ������� ���������� �������
������������������������������ ���� ��
����� ���������������
Before plugging the appliance into the socket, check thefollowing:• Make sure your hands are dry.• The socket must have an earth connection.• The socket must be able to withstand the machine’smaximum power output as indicated on the data plate (seeDescription of the tumble dryer).• The power supply voltage must fall within the valuesindicated on the data plate (see Description of the tumbledryer).• The socket must be compatible with the machine’s plug. Ifnot, either the socket or the plug must be replaced.� Do not use extension cords.� The tumble dryer must not be installed in outdoor spaces,even if sheltered. It may be very dangerous to expose thisappliance to rain and thunderstorms.� Once dryer installation is complete, the electric cord andplug must be at hand.� The electric cord must not be bent or crushed.� If the plug to be replaced is of the moulded-on type, itmust be disposed of in a safe way. DO NOT leave it where itcan be plugged into a socket and cause electric shocks.{}� The electric cord must be regularly checked and replacedwith a cord specifically designed for this dryer; it must thenbe installed by an authorised technician only (seeAssistance). New or longer electric cords are supplied byauthorised dealers at a supplementary cost.������������������������������� ����������� ������
� � ������������������� ���
����������� ����� �������� ����������� ����� �������
��������������������
% ������� �� ���� ������Once the tumble dryer is installed, clean the inside of thedrum before operating it and remove any dirt accumulatedduring transportation.
Picture�� Picture �
����������

��
�
�� ���button
!��� "����buttonand indicator light
" #����������� ���� �
"��������
$ ����������%� ��
���&
������ ������'���������
$ �������� ���������%�����
���&
(����
��������#����
��� ��������������������� ��
?�����#��������
���� ��������
5���� �
���� ���buttonsand indicator
lights
'���#������� ����������indicator lights
�����������indicator lights
� ����)!����
*����

��
?�@?55@1����������Pressing the button normally will cause the machine to switch on or off. If the button is pressed for 3 seconds while the dryer is infunction, the machine will switch off and the running cycle will reset.
% �# ��������������8���Allows for setting the programme: turn until the indicator points towards the desired programme (see Starting and selecting aprogramme).
?������ ������Allow for selecting the options available for the selected programme. The relative indicator lights turn on when the option has beenselected (see Programmes and options).
A+,1+@%,.A������������� �������� � ��#��When the green light flashes slowly, press the button to start the programme. When the cycle is under way, the indicator light remainson. To put the programme into pause mode, press the button again; the indicator light will turn orange and start flashing again.To resume the programme from the point it was interrupted, press the button again (see Start and programme selection).
������� ���#��
+�����������,�������� ���#���
The indicator lights provide important information. They indicate the following:
The “Empty water container” indicator light signals that the water container must be emptied.If the water container fills during the course of the programme, the LED lights up. The dryer automatically starts a cold air cycle and theSTART/PAUSE LED flashes orange. Press the START/PAUSE button to resume the cycle from the point it was interrupted.
In order to avoid this procedure, always empty the water container after using the tumble dryer (see Care and maintenance).
Before each programme, the “Clean filter” indicator light signals that it is essential to clean the filter each time before using the tumbledryer (see Care and maintenance).
The “Clean condenser unit” indicator light signals that it is essential to clean the condenser regularly (see Care and maintenance).
+'���#�������,�������� ���#���
The indicator light signals that the drying phase is running.
The indicator light signals that the cooling phase is running.
The -*'�indicator light signals that the programme has ended.
+'���������,�������� ���#��
If the ”Delay start” option has been activated (see “Programmes and options”), after the programme has started, the indicatorlight corresponding to the chosen delay time will start flashing:
As time passes, the remaining delay will be displayed and the corresponding indicator light will flash:
Once the set delay time ends, the flashing LED will turn off and the set programme will start.

��
$
A�� ���#������������#���� �# ����
.� Plug the dryer into the power supply socket.
/� Select the programme according to the type of laundry (see Laundry).
0� Open the door, ensure that the filter is clean and securely placed and that the water container is empty and correctly slotted (seeCare and maintenance).
1� Load the machine, making sure that no piece of laundry gets between the door and the relative seal. Close the door.
2� Press the ON/OFF button to start the machine.
3� After consulting the programme chart and the indications for each type of fabric (see Laundry), turn the Programme selectionknob towards the programme corresponding to the type of laundry to be dried (see Programmes and options).��Warning: If the position of the programme selection knob changes after pressing the START/PAUSE button, the selectedprogramme will NOT be modified. To modify the programme, press the START/PAUSE button to put the programme in pausemode (the indicator light flashes orange), then select a new programme and the relative options. Press the START/PAUSE buttonto start the new programme.
4� If necessary, set the time of the delayed start and any other options (see Programmes and options).
5��Press the START/PAUSE button to start the drying cycle.Laundry can be checked while the drying programme runs and any garments already dry can be removed, while drying continuesfor the remaining items. After closing the door, press the START/PAUSE button to resume machine operation.
6� The final COLD DRYING phase (i.e. the fabrics are cooled) activates during the last few minutes of the drying programme; alwaysallow this phase to terminate.
.7� When the -*'�indicator light turns on, the programme has ended. Open the door, remove the laundry then clean the filter andreplace it. Empty the water container and put it back in its slot (see Care and maintenance).If the “Post anti-crease” option was selected and laundry is not removed immediately, the drum will rotate garments at intervals for10 hours or until the door is opened.
..��Disconnect the dryer from the power supply.
A�����������
This tumble dryer, in compliance with new energy saving regulations, is fitted with an automatic standby system which is enabledafter about 30 minutes if no activity is detected. Press the ?��?55 button briefly and wait for the machine to start up again.
!�"������ �������� ���#������

&
��
% �# �������� �
A������@A�� �@%� �����% �# ����
-� ������" #�����
This programme is ideal for safely drying small loads in a short time, thereby optimising energy consumption. Suitable for loads ofup to /�kg, it lasts about 37 minutes. The programme may last longer depending on the size and density of the load and on thespin speed used during the wash cycleWe recommend checking whether garments are labelled with the symbol and to turn them inside out before drying them.
� ��" #�����
This programme is specific for items that withstand tumble drying and are labelled with the symbol. It is suitable for loads of upto .�kg (about 3 jerseys). We recommend turning the garments inside out before drying them. This programme lasts about 37
minutes, although it may last longer depending on the size and density of the load and on the spin speed used during the washcycle. Garments dried with this programme are usually ready to be worn, although the edges of heavier garments may be slightlydamp. Leave them to dry naturally, as an additional drying process may damage them.� Unlike other materials, the shrinking process in wool is irreversible, i.e. the garment does not resume its original dimension andshape.� This programme is not suited for acrylic items.
% �# ���������������
Programme Max. load (kg)
Compatible options Cycle
duration
Daily
1 Ready to wear Max. Pre anti-crease – Post anti-crease – Delay start 160’
2 Cotton Cupboard dry Max. Pre anti-crease – Post anti-crease – Delay start 145’
3 Cotton Iron dry Max. Pre anti-crease – Post anti-crease – Delay start 108’
4 Synthetics Cupboard dry 3 Pre anti-crease – Post anti-crease – Delay start 65’
5 Synthetics Iron dry 3 Pre anti-crease – Post anti-crease – Delay start 55’
Special
6 Eco Time 2 Pre anti-crease – Post anti-crease – Delay start 60’
7 Wool 1 - 60’
Sport
8 Sport Intensive 4 Pre anti-crease – Post anti-crease – Delay start 80’
9 Sport Light 4 Pre anti-crease – Post anti-crease – Delay start 70’
10 Special Shoes 2 pairs - 100’
Partial Refresh - - 20’
Timed drying
30 - 60 - 90 - 120 - 150 minutes - All option are available

��
'
!� ��8���������" #�����
This programme is designed for safely drying garments such as tracksuits and shorts bearing the symbol. It is ideal for clotheswhich do not need to be dried fully. Suitable for loads of up to 1�kg, it lasts about 57�������, although it may last longerdepending on the size and density of the load and of the spin speed used during the wash cycle. We suggest turning garmentsinside out before drying them.
!� ��9�#���" #������
This programme is designed for safely drying garments such as tracksuits and shorts bearing the� symbol. It is ideal for thosegarments that do not need to be dried fully or which have to be ironed. Suitable for loads of up to 1�kg, it lasts about 47�������,although it may last longer depending on the size and density of the load and of the spin speed used during the washing cycle. Wesuggest turning garments inside out before drying them.
!� ��!� ���" #�����
This programme is specific for drying sports shoes of sizes 04:13. The shoes must have been previously washed and spun at aminimum spin speed of 177��� ��� ��.A specific shoe rack is provided and must be used, otherwise the dryer will be damaged if shoes are dried in the drum. Remove thefilter from its holder on the front part of the dryer and position the shoe rack.Place shoelaces inside the shoes then load with the tips of the shoes facing downwards and the soles frontwards.Drying times vary according to the shape and type of the shoe. If the shoes are not completely dry at the end of the programme,restart the programme.� Do not dry shoes that have gel or flashing lights inside them. Only dry shoes made of synthetic material or rope. Once theprogramme ends, remove the shoe rack and replace the filter into its holder.
;������
A short programme suitable for refreshing fibres and garments through the emission of cool air. It lasts about /7�minutes.� As this is not a drying programme, it is not to be used for garments that are still wet.
����������#�������(30’ - 60’ - 90’ - 120’ - 150’)This programme can be used instead of the automatic programmes when you desire setting a time for the drying cycle. It is idealfor drying damp laundry with the low heat setting or for small loads.The duration of the timed drying cycle to be selected depends on the size of the load and on the fabric to be dried (see Table).The cold drying cycle runs during the final 10 minutes of the programme.� For large loads, select the High Heat option if available.
Load Fabric 1 kg 2 kg 3 kg 4 - 5 kg 6 – 8 kg
Cotton – high heat
30 or 60 minutes
30 or 60 minutes
60 or 90 minutes
60 or 90 minutes
120 or 150 minutes
Synthetics – low heat
30 or 60 minutes
30 or 60 minutes
60 or 90 minutes
- -
Acrylics – low heat
30 or 60 minutes
60 or 90 minutes - - -

�(
��
?�����The options allow for customising the selected programme according to one’s own needs.
'����������
The start of some programmes (see Programmes and options) may be delayed up to 6 hours. Press the button repeatedly toenter the desired delay time. Before setting a delayed start, make sure that the water container is empty and that the filter is clean.
" �������:$�����
When this option is selected, the drum rotates garments at intervals after the cold drying cycle has ended, in order to avoidcreases forming on garments if they cannot be immediately removed at the end of the programme. During this phase, the indicatorlight is turned on.
"������:$�����
When this option is selected in addition to the “Delay start” option, the drum rotates garments at intervals during the delay periodto avoid creases forming.
<�#��<����
When a drying time is selected, pressing this button sets high heat drying and the indicator light above the button lights up. Thetimed programmes are pre-set to low heat.
� Not all options are available on all programmes (see Programmes and options).
?�����#��������
If the door is opened (or the START/PAUSE button is pressed) while a programme is running, the dryer stops and the followingmay occur:• The START/PAUSE button flashes orange.• When a delayed start is running, the delay countdown continues. It is necessary to press the START/PAUSE button to resumethe “Delay start” programme. One of the “Delay start” indicator light flashes to signal the delay time entered.• It is necessary to press the START/PAUSE button to resume the programme. The progress indicator lights signal the runningphase and the START/PAUSE indicator light stops flashing and turns green.• During the post anti-crease phase, the programme ends. Pressing the START/PAUSE button reactivates a new programme fromthe beginning.• By turning the Programme selection knob, a new programme is selected and the START/PAUSE indicator light flashes green.This procedure can be used to select the Cold drying programme to cool garments if they are judged to be dry enough.Press the START/PAUSE button to start the new programme.
* ��= In the event of a power cut, turn the power switch off and remove the plug; when the electricity supply returns, press theSTART/PAUSE button to resume the programme.

��
��
A� ���#������ �
B�Check the symbols on the care labels of the variousgarments to verify whether the garments can be safelytumble dried.
• Sort laundry according to the type of fabric.• Empty all pockets and check for loose buttons.• Close zips and hooks and fasten belts and strings without
tightening them.• Wring out garments to remove the maximum amount of
water possible.
� Do not load the dryer when garments are dripping wet.
��>����� �����?��
Do not overload the drum.The following values indicate the weight of dry garments:Natural fibres: maximum 5�kgSynthetic fibres: maximum 0�kg
� Do not overload the dryer as this may result is reduceddrying performance.
�����������#���
�* ��=�.��#�@�.777�#
When mixing synthetic fibres with cotton garments, thelatter may still be damp at the end of the drying cycle. If thishappens, simply put them through a short drying cycle.Note: when setting the duration of the drying cycle,remember that the cold drying phase runs during the last 10minutes, during which the dryer does not dry the garments.
�� �������
Always check the care labels, especially when placinggarments in the tumble dryer for the first time. Below are themost commonly used symbols:
May be tumble dried.
Do not tumble dry.
Tumble dry – high heat.
Tumble dry – low heat.
8������ ����������� �����������#=
• Items containing rubber parts or similar materials, orplastic film covering (pillows, cushions or PVC sportsjackets), any type of inflammable object or objectscontaining inflammable substances (used towelscontaining hairspray).
• Glass fibres (certain types of draperies).
• Items which have been previously dry cleaned.
• Items marked with the ITLC symbol (“Special garments”), which may be washed using special household
products. Follow instructions carefully.
• Large bulky items (duvets, sleeping bags, pillows,cushions, large bedcovers, etc.) that expand when driedand hamper air circulation inside the tumble dryer.
)���� �
A������
Blouse
Dress
Jeans
10 Nappie
Shirt
T-shirt
CottonOther
CottonOther
CottonOther
150 g100 g
500 g350 g
700 g
1,000 g
300 g200 g
125 g
< ��� ��� �����
Duvet cover(double bed)
Large tablecloth
Small tablecloth
Tea cloth
Bath towel
Hand towel
CottonOther
1,500 g1,000 g
700 g
250 g
100 g
700 g
350 g
Double bedsheet
500 g
350 gSingle bed sheet

��
��A�����������
����������������� ���= acrylic items (Acilian, Courtelle,Orion, Dralon) must be dried with great care at low heat.Avoid drying for long periods.
$������ ���������#������= read the drying instructionssupplied by the manufacturer.
!�������#������= do not dry together with non-starched items. Remove the maximum amount of starchsolution possible before placing these items in the dryer. Donot over-dry: starch turns powdery leaving garments limp –this defeats its purpose.
� ���#�����
Drying times are approximate and may vary depending onthe following:
• Amount of water retained by items after the spin cycle:towels and delicate items retain a lot of water.
• Fabrics: items of the same fabric, but with different textureand thickness may have different drying times.
• Amount of laundry: single items and small loads may takelonger to dry.
• Drying: if items are to be ironed, they can be removedfrom the dryer while still slightly damp. Items that requirecomplete drying can be left longer.
• Heat setting.
• Temperature of the room: the lower the temperature ofthe room, the longer it will take for the dryer to dryclothing.
• Bulk: certain bulky items require special care during thedrying process. We suggest removing these items andreplacing them in the dryer once they have been shakenout: repeat this procedure several times during the courseof the drying cycle.
� Do not over-dry items.All fabrics contain natural dampness which helps to keepthem soft and fluffy.
The drying times provided refer to the automatic Cupboarddry programmes.The weight refers to dry items.
,���������� ���#�����
$ �� �High heat
Drying times after 800-1000 rpm wash cycles
Half load Full load
1 kg 2 kg 3 kg 4 kg 5 kg 6 kg 7 kg 8 kg30 - 40minutes
40 - 55minutes
55 - 70minutes
70 - 80minutes
80 - 90minutes
95 - 120minutes
120 - 140minutes
130 - 150minutes
!���������Low heat
Drying times after wash cycles at lower speeds
Half load Full load
1 kg 2 kg 3 kg
40 - 50 minutes 50 - 70 minutes 70 - 90 minutes
�������Low heat
Drying times after wash cycles at lower speeds
Half load Full load
1 kg 2 kg
40 - 60 minutes 55 - 75 minutes

��
��
� This appliance was designed and manufactured incompliance with current international safety standards. Thefollowing information is provided for safety reasons andmust be read carefully.
-��� ��������
• The final part of a tumble dryer cycle occurs without heat(cooling cycle) to ensure that the laundry is not damageddue to excessive temperatures.
• This tumble dryer must not be used by persons (includingchildren) with physical, sensory or mental impairments orwith little experience and knowledge of the appliance,unless they are supervised or have been adequatelyinstructed on its use by the person responsible for theirsafety.
• This tumble dryer is designed for domestic and non-professional use.
• Do not touch the appliance while barefoot or with wethands or feet.
• Unplug the appliance by pulling on the plug, not the cord.• Do not allow children near the appliance while it is in
function. After use, switch the appliance off and unplug it.Keep the appliance door closed to prevent children usingit as a toy.
• Children must be supervised to ensure that they do notplay with the appliance.
• The appliance must be correctly installed and receiveadequate ventilation. The air intake on the front part ofthe dryer and the air vents on the rear must never beobstructed (see Installation).
• Never use the dryer on carpeting with high pile as thismay prevent air from entering the dryer from the base.
• Check whether the dryer is empty before loading it.• The rear part of the dryer may become very hot:
do not touch it while the appliance is in function.• Do not use the dryer unless the filter, water container and
condenser are properly positioned (see Maintenance).• Do not use liquid fabric softener in the dryer; add it to the
final rinse of the wash cycle.• Do not overload the dryer (see Laundry for the maximum
load sizes).• Do not add items that are dripping wet.• Tumble dry items only if they have been washed with
water and detergent, and have been rinsed and putthrough a spin cycle. Drying items that have NOT beenwashed with water may cause the risk of fire.
• Always read the instructions on the care label carefully(see Laundry).
• Do not tumble dry items that have been treated withchemical products.
• Never tumble dry items that are contaminated withinflammable substances (cooking oil, acetone, alcohol,petrol, kerosene, stain removers, turpentine, waxes, waxremovers and hairspray), unless they have been washedin hot water with an extra amount of detergent.
• Do not tumble dry rubber, rubber-backed articles andgarments, cushions with foam rubber padding, latexfoam, rubber, plastic, shower caps, water-resistantfabrics, nappy pants or liners, polyethylene and paper.
• Remove all objects from pockets, particularly lighters(risk of explosion).
• Do not tumble dry large, excessively bulky items.• Do not tumble dry acrylic fibres at high temperatures.• Complete each programme with the relative cold drying
phase.• Do not switch the tumble dryer off if items that are still
warm are inside it.• Clean the filter after each use (see Care and maintenance).• Empty the water container and put it back in place after
each use (see Care and maintenance).• Clean the condenser unit regularly (see Care and maintenance).• Do not allow lint to build up around the tumble dryer.• Avoid climbing on the top of the dryer as this may
damage the appliance.• Always comply with electrical regulations and
requirements (see Installation).• Always purchase original accessories and spare parts
(see Assistance).� WARNING: Never stop the dryer before the end of thedrying cycle unless all items have been quickly removed andhung in order to dispel heat.
��� ���������� �������#�����������As part of our continual commitment towards environmentalprotection, we reserve the right to use recycled qualitycomponents to reduce costs for our customers and tominimise materials wastage.• Disposing of the packaging materials: follow local
regulations to allow for recycling of packaging materials.• In order to minimise the risk of injury to children, remove
the door and plug, then cut the power supply cord flushwith the appliance. Dispose of these parts separately toprevent the appliance from being connected to a powersupply socket.
��������������������������������European Directive 2002/96/EC concerning WasteElectrical and Electronic Equipment (WEEE) statesthat household appliances should not be disposed ofusing the normal solid urban waste cycle. Exhausted
appliances should be collected separately in order tooptimise the cost of re-using and recycling materialscomprising the machine, while preventing potential damageto public health and the environment. The crossed-outwheeled bin symbol appears on all products to remindowners of the obligations regarding separate wastecollection.Owners should contact their local authorities or appliancedealers for further information concerning the correctdisposal of household appliances.
A�=��#���� #������ �������#������=� ������• Wring out items before tumble drying them to remove the
maximum amount of water possible (if they are previouslywashed in a washing machine, select a spin cycle). Thisensures that energy is saved during tumble drying.
• Always use the tumble dryer at full load to save energy:single items and small loads may take longer to dry.
• Clean the filter at the end of each cycle to reduce energyconsumption costs (see Maintenance).
*� ���#�����##�����

��
�������������#�������"� ������
� Disconnect the dryer when not in use or during cleaningand maintenance operations.
�������#���������� ����� �����������The filter is a fundamental component of the dryer: itsfunction is to collect lint and fluff that form during drying.Clean the filter once drying is completed, by rinsing it underrunning water or cleaning it with a vacuum cleaner. Should thefilter become clogged, the flow of air inside the dryer will beseriously hampered: drying times becomes longer and moreenergy is consumed. Moreover, the dryer may becomedamaged.The filter is located in front of the dryer seal (see Picture).Removing the filter:
1. Pull the filter’s plastichandle upwards (seePicture).2. Clean the fluff off the filterand replace it correctly.Ensure that the filter isplaced flush with the dryerseal.
� Do not use the dryerunless the filter has beenreplaced in its holder.
����8��#������ ������� �����������Rotate the drum manually to remove smaller items(handkerchiefs) that could have been left inside the dryer.�������#������ ��� Avoid using abrasives, steel wool or stainless steelcleaning agents to clean the drum.A coloured film may appear on the stainless steel drumsurface: it may be caused by a combination of water and/orcleaning agents such as wash-softeners. This coloured filmdoes not affect the dryer’s performance.
�������#�����"��� ��������� ����� ����������Remove the water container and empty it into a sink orother suitable drain outlet, then replace it correctly.Always check the water container and empty it beforestarting a new drying cycle.
�������#������������ �����• Remove the condenser unit regularly (monthly) and clean
off any fluff deposits from the plates by rinsing it with coldwater running on the rear end of the condenser.
Removing the condenser:1. Disconnect the dryer from the power supply and open the
door.2. Open the condenser cover (see Picture), unlock the three
catches by turning them 90° anti-clockwise, then pull onthe grip to remove the condenser.
3. Clean the surface of the seals and replace the unit with thearrows pointing upwards, while making sure that thecatches are securely fixed.
�������#������������� �� • The external metal and plastic parts and the rubber parts
can be cleaned with the aid of a damp cloth.• Clean the front air intake grille regularly (every 6 months)
with a vacuum cleaner to remove any lint, fluff or dustdeposits. Furthermore, remove any lint deposits from thefront part of the condenser and from the filter area, using avacuum cleaner every so often.
� Do not use solvents or abrasives.� The dryer uses ball bearing components that do notrequire lubrication.� Have the dryer checked regularly by authorised technicalpersonnel in order to ensure that the electrical andmechanical parts work safely (see Assistance).
����� ������
$ ����������
$ �������� ��$������
(����
<�����
���������
���
;��
( ��
$ ����������
�� �����������������

��
��
+ �����������#
%�����������@�A�������4
• The plug has not been inserted far enough into the socket to make contact.• There has been a power cut.• The fuse has burned out. Try connecting another appliance to the same socket.• If an extension cord is used, try connecting the dryer plug directly into the socket.• The door has not been closed properly.• The programme has not been set correctly (see How to carry out a drying cycle).• The START/PAUSE button has not been pressed (see How to carry out a drying cycle).
• A delayed start time has been set (see Programmes and options).• The START/PAUSE button has been pressed; a short delay follows before the
dryer starts running. Wait for the drying cycle to start; do not press the START/PAUSE button otherwise the dryer switches to the pause mode and the dryingcycle will not start.
• The filter has not been cleaned (see Care and maintenance).• The water container must be emptied? The “Empty water container” indicator light
flashes (see Care and maintenance).• The condenser needs to be cleaned (see Care and maintenance).• The heat setting is not suited to the type of fabric to be dried (see Programmes and
options).• An incorrect drying time was selected for the type of load (see Laundry).• The air intake grille or the rear air vents are clogged up (see Installation, and Care
and maintenance).• The items are too wet (see Laundry).• The dryer is overloaded (see Laundry).
• The water container was probably not emptied before starting the programme. Donot wait for the signal for emptying the water container, but always check andempty it before starting a new drying programme (see Description of the tumbledryer).
• It is normal: the “Empty water container” indicator light flashes when the watercontainer is full. If the indicator light is on but is not flashing, it only signals that thewater container must be emptied (see Description of the tumble dryer).
� For safety reasons, the dryer programmes last a maximum of 4 hours. If anautomatic programme has not detected the final dampness level required in thisinterval, the dryer completes the programme and stops. Check the above pointsand repeat the programme; if the items are still damp, contact the TechnicalAssistance Centre (see Assistance).
• Switch the appliance off and unplug it, then clean the filter and condenser (see “Careand Maintenance”). Reinsert the plug, switch the appliance on and start anotherprogramme.If the problem persists, contact the Technical Assistance Service.
• This is normal, especially if the dryer has not been used for a long time. If the noisepersists during the entire cycle, contact the Technical Assistance Centre.
If you feel that the dryer is not working properly, consult the following troubleshooting suggestions before contacting the TechnicalAssistance Centre (see Assistance).
% �����4
+���� �� ����������� �7
+���� ���#����������������� �7
� ���#������� ���������#7
+���;������"��� ��������� <�������� � ��#��� ����������� ���� �� ��������� �����#��� ����� �����7
+���;������"��� ��������� <�������� ���#����������������"��� �������� � ����������7
+���� �# ���������������������������� ������� ������C������7
+���;?�����<�����;A+,1+@%,.A�<��������� ���#����������������������;/����������<�� ;� ���#�����<� �������� � ��#���� �� ���"������� ������#7
+���� �� ���������� ��#������� ���"�������������� �����7

�
��
0��� �����������#� ����+���������,���������� �4
• Follow the troubleshooting guide to check whetherproblems can be solved personally (see Troubleshooting).• If not, switch the dryer off and contact the TechnicalAssistance Centre closest to you.
% �=�������������"��#������"�������������#����+��������� ,����������� �4
• name, address and postal code• telephone number• type of malfunction• date of purchase• the appliance model (Mod.)• the dryer’s serial number (S/N)This information can be found on the data plate locatedbehind the door.
A�� ���� �
This dryer is a complex machine. Attempting to repair itpersonally or with the aid unqualified personnel may putthe safety of people at risk, damage the machine orinvalidate the spare parts guarantee.Always contact a qualified technician when experiencingproblems with this machine. The spare parts weredesigned exclusively for this machine and should not beused for any other purpose.
����� ���=��� �# ����
• recommended programmes for the EN61121 comparative test.
Programme (EN61121) Programme to be selected Load size
Cotton drying cycle Cotton $�� ����� 8 kg
Cotton drying ironing Cotton 8 ���� 8 kg
Easy care fabric Synthetic $�� ����� 3 kg
��* ��=���������� ����� ������������ ������� #����� ��� ���
�+������������������ ��������������"��#������� ����=�4
���(( @'�@���9)�"�>����#���� ����=�:�� &'@�� @����� '�@��@����� '�@ &@���� 9����� ���#������ �������������� �� ����=�:7
,������

%+
�$
%� ��#�3
D�����
��� ��EF������ ��������&��'
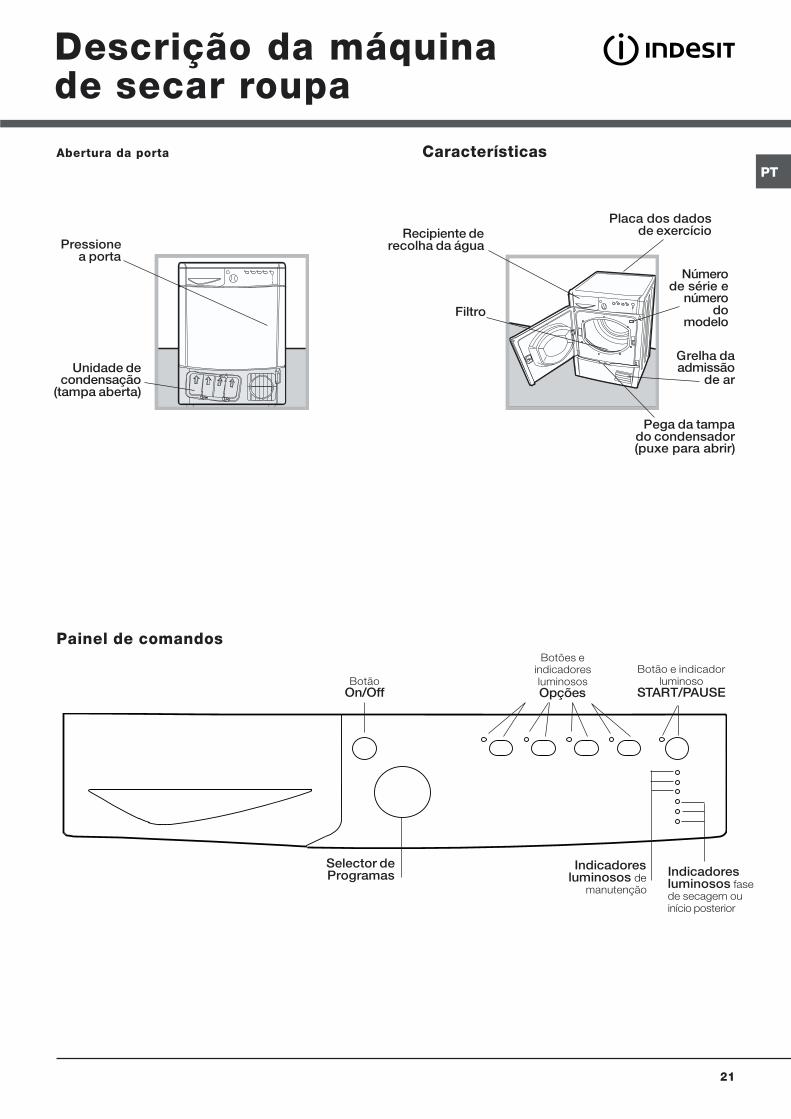
�����EG����(Onde instalar a máquina de secar roupaVentilaçãoLigação eléctricaInformações preliminares
��� �EG������HI���������� � �����������CaracterísticasPainel de comandos
������������ ��������#������Início e escolha do programa
% �# ��������EF���������� Tabela dos programasProgramas especiaisOpçõesAbertura da porta
1�������$��&Triagem da roupaEtiquetas de manutençãoPeças especiaisTempos de secagem
,�=� �3��������#��F����'Segurança geralInformações sobre a reciclagem e a eliminaçãoEconomia energética e respeito pelo meio ambiente
�����������������EG����(Interrupção da alimentação eléctricaLimpeza do filtro no fim de cada cicloControlo do tambor no fim de cada cicloEsvaziamento do recipiente de recolha da água no fimde cada cicloLimpeza da unidade de condensaçãoLimpeza da máquina de secar roupa
% ������������EF�����
,��3��������Peças de reposição
%+
��,�-��
/JK.�,����A��,1�1?.%,
�� �EF���� ���������L�EG�
M Este símbolo serve para lembrar-te de ler este
manual de instruções.
M Mantenha o presente manual num local acessível para
poder consultá-lo facilmente sempre que necessário.
Mantenha sempre o manual junto da máquina de secar
roupa. Se a máquina for vendida ou cedida a outras
pessoas, faça-a acompanhar deste manual, para que os
novos proprietários possam conhecer as advertências e
sugestões relacionadas com a utilização da mesma.
M Leia com atenção estas instruções: as páginas seguintes
contém informações importantes sobre a instalação e
sugestões úteis sobre o funcionamento do
electrodoméstico.

�&
%+
��� ��EF������ �����
%� ���������������������������������HI���������� � ������� ��������EG���N�����H �� ������ ����I���������������EG�� �#��� �������������C�4
5��� ��������G��6�O�����AAJ1?������ ������G�I�������������������� ����������������������������#��7
Fase 1Abra a porta da máquina desecar roupa pressionando-acomo indicado na figura.
Fase 2Extraia o filtro (com dois dedos).
Fase 3Limpe eventuais depósitos decotão da superfície interna darede do filtro.
Fase 4Reinstale o filtro – Não liguenunca a máquina de secar roupasem ter colocado o filtro.
,���������������L��������� ����������������������������#������������3������� �����������������HI������I������� ����������������� �������I���������������������������� ��������� ����������#��7
1������������� ����������H#���6�O�����H ���=�L�� ��� ������������� ����������H#�����������������������������#��7
Fase 1Puxe o recipiente de recolha daágua em direcção a si e retire-ocompletamente da máquina desecar roupa.
Fase 2Esvazie toda a água contida norecipiente.
Fase 3Reinstale o recipiente de recolhada água, certificando-se de quefica completamente inserido narespectiva posição.
?��G���=�L����������� ������������� ���������H#������������ 4��,��� �#�������I��������������HI�����9��I���� �������I����� ����������������P��������������������������#��:7��?��������� ���������;�=�L�� � ���������<������������ ���=�� �I����� ������������H�����7
�� �#������������������� ����������H#��K���������HI����������� � �����N���=���� ������������� ����������H#����G����������� ���������I���������������G�����=� ��� �#���7������� �EG�������� ���� ����������������������#��7�.���=�L��������������� �#��������������� ���������H#������������������7

%+
�'
.�����������������EG����O�����H �������� �����G�������������� ����������7
Fase 1Abra a tampa do condensador- Segure a pega e puxe-a na suadirecção.
Fase 2Retire o condensador rodandoas 3 molas e, em seguida, puxeo condensador na sua direcção.(É possível que exista água nostubos: é normal).
Fase 3Limpe o condensador comágua, fazendo-a escorrer pelaparte posterior para removereventuais depósitos de cotão.
Fase 4Reinstale a unidade decondensação. Certifique-se deque o grupo fica completamenteinserido na respectiva posição,que as 3 molas ficam bem fixas eque as setas de posicionamentona parte da frente docondensador ficam orientadaspara cima.
,���������������L�������������� ���������� �����=� ���� ����������HI����������� � ����7

�(
%+
?���������� ����HI����������� ����Q• As chamas podem danificar amáquina de secar roupa, quedeve pois ser instalada numlocal afastado de fogões a gás,aquecedores, radiadores ouplacas de cozinha.Se o electrodoméstico forinstalado sob uma banca, énecessário deixar um espaçode 10 mm entre o painelsuperior do electrodoméstico eoutros objectos colocados sobre o mesmo, e um espaçode 15 mm entre os lados do electrodoméstico e as paredesou os móveis vizinhos. Deste modo, fica garantida umacirculação do ar adequada.
>������EG�• Quando a máquina de secar roupa estiver activa, deveexistir ventilação suficiente. Certifique-se de que instala amáquina de secar roupa num local sem humidade e comcirculação do ar adequada. O fluxo de ar em torno damáquina de secar é fundamental para permitir acondensação da água produzida durante a lavagem. Amáquina de secar roupa não funciona correctamente seestiver instalada num espaço fechado ou no interior de ummóvel.M Se a máquina de secar roupa for utilizada numa divisãopequena ou fria, é possível que se forme uma pequenaquantidade de condensados.M Não é aconselhável instalar a máquina de secar roupa numarmário. O electrodoméstico não deve nunca ser instaladopor trás de uma porta de fechar à chave, de uma porta decorrer nem de uma porta com dobradiças do lado opostoao da porta da máquina de secar roupa.
���� #�����H#��
Se a máquina for colocada junto de um tubo de descarga, épossível fazer defluir a água condensada directamente semter de utilizar o recipiente de recolha da água. Neste caso,deixa de ser necessário esvaziar o recipiente de recolha daágua no fim de cada ciclo.Se a máquina de secar roupa for instalada por cima ou aolado de uma máquina de lavar roupa, pode partilhar amesma conduta de descarga. Basta desligar o tuboindicado na figura ��e ligá-lo à conduta de descarga.Se a conduta de descarga estiver a uma distância superiorao comprimento do tubo, para efectuar a ligação, é possíveladquirir e ligar um tubo de diâmetro idêntico e com ocomprimento necessário.Para instalar o novo tubo, basta substituir o existenteconforme indicado na figura � inserindo-o na mesmaposição.M ��� �������������#������������.�����������>��������������� ���� �����B������������� ���M '�� ����������������� ����B������������� �����������:��������� ��� ���������#���C ����B� ��� ������ ��� �
)�#�EG����N�� ���Antes de introduzir a ficha na tomada eléctrica, verifique oseguinte:• Certifique-se de que tem as mãos secas.• A tomada deve estar equipada com ligação à terra.• A tomada deve ter capacidade para suportar a potênciamáxima prevista para a máquina, indicada na placa dosdados de exercício (consulte Descrição da máquina desecar roupa).• A tensão de alimentação deve estar compreendida entreos valores indicados na placa dos dados de exercício(consulte Descrição da máquina de secar roupa).• A tomada deve ser compatível com o tipo de ficha damáquina de secar roupa. Caso contrário, substitua atomada ou a ficha.M Não utilize extensões.M A máquina de secar roupa não pode ser instalada emambientes externos, mesmo que abrigados. Na verdade,pode ser muito perigoso expor este electrodoméstico àchuva ou a tempestades.M Após a instalação da máquina de secar, o cabo eléctrico ea ficha devem ser mantidos ao alcance da mão.M O cabo eléctrico não deve ser dobrado nem esmagado.M Se a ficha a substituir é do tipo incorporado, é necessárioeliminá-la de forma segura. NÃO a deixe onde possa serinserida numa tomada, podendo provocar choqueseléctricos.M O cabo eléctrico deve ser controlado periodicamente esubstituído utilizando um cabo específico para esta máquinade secar roupa, podendo ser instalado unicamente portécnicos autorizados (consulte Assistência). Os caboseléctricos novos ou mais compridos são fornecidos porrevendedores autorizados por um custo adicional.M �������������C ������� �������?��������C ����D�������������#���M -����� �����E������������������F��������GH���������� ������������������������������ .
��� ��EF��� ������� �Depois de instalada a máquina de secar roupa, antes de acolocar em funcionamento, limpe o interior do tambor eretire a sujidade que se possa ter acumulado durante otransporte.
5�#7�, 5�#7�0
�����EG�
%+
��
Botão�� ���
Botão e indicadorluminoso
!��;� "�I!-
!����� ���" #����
"���� ����� ��
I���������� ������GC
%�����������&
;�������������� �������B#�
"������ ����� �����>��J��
"�#����������� �� ������� %�>���������&
(���
A�������������C
����
��� �EG������HI���������� � ����
,�� �� ������� ��
%����������������
�� ���� R����
Botões eindicadoresluminosos��GH��
*E�� ����K����
�E�� �
� ���
8������ ������ � ��fasede secagem ouinício posterior
8������ ������ � ��de
manutenção

��
%+
0��G��?�@?55@1���Uma pressão normal do botão liga ou desliga o aparelho. Se a máquina de secar roupa estiver funcionando, uma pressãoprolongada por aproximadamente 3 segundos fará desligar o aparelho e restabelecer o ciclo em curso.
A������ ����% �# ���Consente configurar o programa: rode até que o indicador fique direccionado para o programa pretendido (consulte Início eEscolha do programa).
0��F����EF�Permitem escolher as opções disponíveis para o programa seleccionado. Os indicadores luminosos acendem-se para indicar quea opção foi seleccionada (consulte Programas e opções).
0��G������������ ���������A+,1+@%,.A�Quando o indicador luminoso verde piscar lentamente, prima o botão para iniciar o programa. Quando o ciclo tiver sido iniciado, oindicador luminoso de sinalização mantém-se sempre aceso. Para colocar o programa em pausa, prima novamente o botão; oindicador luminoso fica de cor laranja e começa novamente a piscar.Para reiniciar o programa do ponto em que havia sido interrompido, prima novamente o botão (veja Início e Escolha doprograma).
������� �� �������
8������ ������� � �����������GC
Os indicadores luminosos fornecem informações importantes. Vejamos o que significam:
O indicador luminoso “esvaziar recipiente” indica que é necessário esvaziar o recipiente de recolha da água.Se o recipiente encher durante a realização do programa, o led irá acender-se. A máquina de secar roupa automaticamente iráiniciar o ciclo de ar frio e o led START/PAUSE ficará intermitente na cor âmbar. Para reiniciar o ciclo a partir do ponto em que foiinterrompido, prima novamente o botão START/PAUSE.
Para evitar este procedimento, esvazie sempre o recipiente de recolha da água antes de cada utilização da máquina de secarroupa (consulte Manutenção).
O indicador luminoso Limpeza do filtro antes de cada programa lembra que é fundamental limpar o filtro cada vez antes deutilizar a máquina de secar roupa (consulte Manutenção).
O indicador luminoso Limpeza do condensador lembra que é fundamental limpar o condensador em intervalos regulares(consulte Manutenção).
8������ ������� � ��L(������������#��L
O Indicador luminoso indica que está em acto a fase de secagem.
O Indicador luminoso indica que está em acto a fase de arrefecimento.
O Indicador luminoso -*'�indica o fim do programa.
8������ ��� ���� � �� +8�J�� � � ���� ,Se tiver sido activada a função “Início posterior” (veja “Programas e opções”) depois de ter iniciado o programa,começará a lampejar o indicador luminoso relativo ao atraso seleccionado.
Com o passar do tempo será mostrado a atraso restante, mediante o respectivo indicador luminoso acesointermitente:
Depois de ter passado o tempo de atraso seleccionado, começará o programa estabelecido.

%+
��
�R����������������� �# ���
.� Introduza a ficha da máquina de secar roupa na tomada de alimentação eléctrica.
/� Seleccione a roupa em função do tipo de roupa (consulte Roupa).
0� Abra a porta e certifique-se de que o filtro está limpo e em posição, e que o recipiente de recolha da água está vazio eposicionado correctamente (consulte Manutenção).
1� Carregue a máquina tendo o cuidado de não deixar nenhuma peça de roupa entre a porta e o respectivo vedante. Feche a porta.
2� Carregue no botão ON/OFF para ligar a máquina.
3� Rode o botão de selecção dos Programas até quando o indicador estiver no programa correspondente ao tipo de tecido quese pretende secar, verificando a tabela dos programas (consulte Programas e opções) e as indicações para cada tipo de tecido(consulte Roupa Branca).M�Atenção: se, depois de ter premido o botão de START/PAUSE, alterar a posição do selector dos programas, a nova posiçãoNÃO altera o programa seleccionado. Para alterar o programa, prima o botão START/PAUSE para colocar o programa em pausa(o indicador luminoso fica laranja intermitente), escolha o novo programa e as respectivas opções. Prima o botão de START/PAUSE para iniciar o novo programa.
4� Se necessário, defina o tempo de retardamento e as outras opções (consulte Programas e opções).
5��Para iniciar, prima o botão START/PAUSE.Durante o programa de secagem, é possível controlar a roupa e retirar as peças que já estão secas, deixando as outras no interiorda máquina. Depois de ter voltado a fechar a porta, prima START/PAUSE para recolocar a máquina em funcionamento.
6� Durante os últimos minutos dos programas de secagem, antes do fim do programa, é iniciada a fase final de SECAGEM A FRIO(os tecidos são arrefecidos); é necessário deixar sempre terminar esta fase.
.7� A ligação do indicador luminoso -*'�indica que o programa terminou. Abra a porta, retire a roupa, limpe o filtro e volte acolocá-lo no respectivo lugar. Esvazie o recipiente de recolha da água e volte a colocá-lo no respectivo lugar (consulteManutenção).Se tiver sido seleccionada a opção “Pós anti-dobras” e a roupa não for retirada imediatamente, as peças de roupa rodam emintervalos regulares durante 10 horas ou até que seja aberta porta.
..��Desligue a máquina de secar roupa da rede eléctrica.
/�������������A�������
Esta máquina de secar roupa, em conformidade com as novas normas sobre a economia energética, dispõe de um sistema dedesligação automática (stand by) que entra em função aproximadamente 30 minutos depois, no caso de inutilização. Carreguebrevemente no botão ?��?55 e aguarde até a reactivação da máquina.
������������ �������#��

��
%+
Programa Carga max. (Kg)
Opções compatíveis Duração do ciclo
Diários
1 Algodão Extra Máx. Pré anti-dobras – Pós anti-dobras e Início posterior. 160’
2 Algodão Armário Máx. Pré anti-dobras – Pós anti-dobras e Início posterior. 145’
3 Algodão Passar a ferro Máx. Pré anti-dobras – Pós anti-dobras e Início posterior. 108’
4 Sintéticos Armário 3 Pré anti-dobras – Pós anti-dobras e Início posterior. 65’
5 Sintéticos Passar a ferro 3 Pré anti-dobras – Pós anti-dobras e Início posterior. 55’
Especiais
6 Eco Time 2 Pré anti-dobras – Pós anti-dobras e Início posterior. 60’
7 Lã 1 - 60’
Desporto
8 Sport Intensive 4 Pré anti-dobras – Pós anti-dobras e Início posterior. 80’
9 Sport Light 4 Pré anti-dobras – Pós anti-dobras e Início posterior. 70’
10 Sport Shoes 2 pares. - 100’
Parciais
Arejar tecicos - - 20’
Tempos de secagem automática
30 - 60 - 90 - 120 - 150 minutos - Pré anti-dobras – Pós anti-dobras – Temperatura alta e Início posterior.
+���������� �# ���
% �# �����������@A�� �@%� ����
" #����-� ������
Este programa é ideal para secar com segurança pequenas quantidades de roupa em pouco tempo, optimizando o uso daenergia eléctrica. O programa pode ser utilizado para cargas de até /�kg, em aproximadamente 37 minutos. Este programa podedurar mais tempo, dependendo das dimensões e da densidade da carga e da velocidade de centrifugação usada na máquina delavar roupa.Aconselha-se verificar que as roupas tenham o símbolo e virá-las do avesso antes de secá-las.
" #����9C�
Este programa destina-se às peças de roupa que suportam a secagem em tambor, identificadas com o símbolo . Pode serutilizado para cargas de até.�kg (cerca de 3 blusões). É aconselhável colocar as peças do avesso antes da secagem. Esteprograma demora cerca de 37� minutos, mas pode durar mais tempo, dependendo das dimensões e da densidade da carga e davelocidade de centrifugação usada na máquina de lavar roupa. As cargas secas com este programa ficam normalmente prontas aserem usadas, mas nalgumas peças mais pesadas os rebordos podem ficar ligeiramente húmidos. Deixe-as secar naturalmentepara evitar que outro processo de secagem as possa danificar.M Ao contrário de outros materiais, o mecanismo de encolhimento da lã é irreversível, ou seja, a peça de roupa não recupera assuas dimensões e a sua forma original.M Este programa não é indicado para peças de roupa acrílica.
% �# ��������EF�

%+
��
" #����!� ��8���������
Este programa foi estudado para secar com segurança vestuário desportivo como fatos de treino, calções, com o símbolo . Idealpara as peças que precisam secar completamente. Pode ser usado para cargas de até 1� kg em aproximadamente 57����� �
minutos, mas pode durar mais tempo, dependendo das dimensões e da densidade da carga e da velocidade de centrifugaçãousada na máquina de lavar roupa. Aconselhamos virar do avesso as peças antes de iniciar a secagem.
" #����!� ��9�#���
Este programa foi estudado para secar com segurança vestuário desportivo como fatos de treino, calções, com o símbolo� Idealpara as peças que não precisam secar completamente ou que devem ser passadas a ferro. Pode ser usado para cargas de até 1kg em aproximadamente 47����� � minutos, mas pode durar mais tempo, dependendo das dimensões e da densidade da cargae da velocidade de centrifugação usada na máquina de lavar roupa. Aconselhamos virar do avesso as peças antes de iniciar asecagem.
" #����!� ��!� ���
Este é um programa para secar um par de sapatos desportivos do tamanho 04:13. Os sapatos deve ser lavados e centrifugadosa uma velocidade de centrifugação mínima de 177� ��GH��.Devem ser usadas com o específico separador para sapatos fornecido. Se secar os sapatos no tambor, a máquina de secarroupas será danificada. Remova o filtro da sua posição na parte anterior da máquina e posicione o separador.Coloque dentro os laços dos sapatos e os sapatos com as pontas para baixo e as solas na frente.Os tempos de secagem variam conforme o formato e o tipo de sapato. Se os sapatos não estiverem completamente secos nofim do programa, faça um novo ciclo.M Não seque sapatos que contenham gel ou luzes intermitentes. Seque somente sapatos feitos de material sintético ou pano. Nofim do programa, remova o separador para calçados e posicione novamente o filtro.
��M������� ��
Programa breve adapto para arejar as fibras e as roupas através da emissão de ar frio. Dura aproximadamente /7�minutos.M Este não é um programa de secagem, pelo que não deve ser utilizado com peças ainda molhadas.
" #�����������#������� �?����(30’ - 60’ - 90’ - 120’ - 150’)Se pretender definir o tempo da secagem é possível utilizar este programa, ao invés dos programas automáticos. Ideal par secara roupa húmida à baixa temperatura ou para pequenas cargas.O programa de secagem temporizada depende da carga e do tecido que se quer secar (consulte a tabela).Os últimos 10 minutos do programa são dedicados ao ciclo a frio.� Para grandes cargas, seleccione a opção Temperatura Alta, se disponível.
Carga Tecidos 1 kg 2 kg 3 kg 4 - 5 kg 6 – 8 kg
Algodão – Alta Temperatura
30 ou 60 minutos
30 ou 60 minutos
60 ou 90 minutos
60 ou 90 minutos
120 ou 150 minutos
Sintéticos – Baixa Temperatura
30 ou 60 minutos
30 ou 60 minutos
60 ou 90 minutos
- -
Acrílicos – Baixa Temperatura
30 ou 60 minutos
60 ou 90 minutos
- - -

�
%+
?�EF�As opções consentem personalizar o programa seleccionado conforme as próprias exigências.
8�J�� �� ���� �O início de alguns programas (consulte Programas e opções) pode ser retardado até 6� horas. Pressione várias vezes o botão atéalcançar o tempo de atraso de desejado. Antes de definir um início retardado, certifique-se de que o recipiente de recolha da águaestá vazio e que o filtro está limpo.
"N������:� ����Quando seleccionada, as peças de roupa rodam ocasionalmente após o fim da secagem e da secagem a frio para evitar aformação de vincos se não for possível retirar imediatamente a carga depois da conclusão do programa. Durante esta fase, oindicador luminoso mantém-se aceso.
"K�����:� ����Quando se selecciona o início retardado e esta opção, as peças de roupa rodam ocasionalmente durante o período deretardamento para ajudar a evitar a formação de vincos na roupa.
��������������Se for seleccionada uma secagem temporizada, ao pressionar este botão selecciona-se uma temperatura alta e o indicadorluminoso posicionado acima do botão acende-se. Os programas temporizados têm por configuração uma temperatura baixa.
M Nem todas as opções estão disponíveis para todos os programas (consulte Programas e opções).
,�� �� ������� ��
Se abrir a porta (ou premir o botão START/PAUSE) durante o funcionamento de um programa, a máquina de secar roupa páracom as seguintes consequências.• O indicador luminoso START/PAUSE pisca de cor laranja.• Durante o Início retardado, o retardamento continua a ser contado. É necessário premir o botão de START/PAUSE para retomaro programa de início retardado. Um dos indicadores luminosos do "Início posteior" fica intermitente para indicar a actual definiçãode retardamento.• É necessário premir o botão de START/PAUSE para retomar o programa. Os indicadores luminosos de avanço mostram oestado actual e o indicador luminoso START/PAUSE pára de piscar e fica verde.• Durante a fase de anti-dobras pós-secagem, o programa termina. Se premir o botão START/PAUSE, é reiniciado um novoprograma desde o início.• Girando o selector de Programas, selecciona-se um novo programa e o indicador luminoso START/PAUSE fica verdeintermitente. É possível utilizar este procedimento para seleccionar o programa Secagem a frio para arrefecer as peças de roupase se considerar que estão suficientemente secas.Prima o botão de START/PAUSE para iniciar o novo programa.
* ��= Em caso de corte de energia eléctrica, desligue a alimentação ou retire a ficha da tomada. Quando a energia forrestabelecida, prima o botão de START/PAUSE e o programa será retomado.

%+
�$
+ ��#������ ����B�Verifique os símbolos que constam das etiquetas das
diversas peças para se certificar de que podem sersubmetidas a secagem em tambor.
• Efectue a triagem da roupa consoante o tipo de tecido.• Esvazie os bolsos e verifique os botões.• Feche os fechos de correr e outros fechos e ate os cintos
e os laços sem apertar demasiado.• Torça as peças de roupa para eliminar a maior quantidade
de água possível.
M Não carregue a máquina de secar roupa com peças deroupa completamente cheias de água.
'�����H����B>����������#�Não exceda a capacidade máxima do tambor.Os valores seguintes referem-se ao peso das peças secas:Fibras naturais: máximo 5�kgFibras sintéticas: máximo 0�kg
M Para evitar uma diminuição no desempenho da máquina desecar roupa, não a sobrecarregue.
$�#�����
Nota: 1 kg = 1000 g
Se misturar peças de tecido sintético com peças dealgodão, é possível que estas últimas continuem húmidasno fim do ciclo de secagem. Neste caso, basta iniciar outrociclo de secagem breve.Nota: ao definir a duração da secagem, tenha em atençãoque os últimos 10 minutos dos programas são dedicados àfase de secagem a frio, durante a qual a máquina de secarroupa não seca a roupa.
���I���������������EG�Verifique as etiquetas das peças de roupa, especialmentequando é a primeira vez que as coloca na máquina de secarroupa. São indicados a seguir os símbolos mais comuns:
Pode colocar-se na máquina de secar.
Não colocar na máquina de secar
Secar a alta temperatura.
Secar a baixa temperatura.
"�G����C ����������F�����#���������� =• Peças com partes de borracha ou materiais semelhantes
ou com revestimentos de plástico (almofadas,travesseiros ou anoraques de PVC) e todo o tipo deobjectos inflamáveis ou contendo substâncias inflamáveis(toalhas com resíduos de laca para cabelo).
• Fibras de vidro (alguns tipos de cortinas).
• Peças lavadas a seco anteriormente.
• Peças com o código ITLC (“Peças especiais”) , quepodem ser limpas com produtos especiais de limpezadoméstica. Siga com atenção estas instruções.
• Peças demasiado volumosas (edredões, sacos-cama,almofadas, travesseiros, colchas grandes, etc.), que seexpandem durante a secagem e impedem a circulação doar na máquina de secar roupa.
1����
"�G��
Blusa
Vestido
Jeans
10 fraldas
Camisa
T-shirt
AlgodãoOutro
AlgodãoOutro
AlgodãoOutro
150 g100 g
500 g350 g
700 g
1.000 g
300 g200 g
125 g
; ��� �����
Capa de edredão(casal)
Toalha grande
Toalha pequena
Toalha de chá
Toalhão de banho
Toalha de rosto
AlgodãoOutro
1.500 g1.000 g
700 g
250 g
100 g
700 g
350 g
Lençol de camade casal
500 g
350 gLençol de camade solteiro

�&
%+
%�E���������
$ ��� ������ �����= as peças de acrílico (Acilian,Courtelle, Orion, Dralon) devem ser secas com extremocuidado a uma temperatura baixa. Não defina temposlongos de secagem.
"�G���� ����#��� �������� �= leia as instruções desecagem fornecidas pelo fabricante.
"�G�����# �����= não seque estas peças com outrasnão engomadas. Antes de colocar as peças na máquina desecar roupa, remova a maior quantidade de solução deengomagem possível. Não seque demasiado: o amidotransforma-se em pó deixando as peças macias, deixandoassim de preencher a sua função.
+�����������#��
Os tempos são aproximativos e podem variar consoante:
• A quantidade de água retida nas peças após acentrifugação: as toalhas e as peças delicadas retêmmuita água.
• Tecidos: as peças de roupa do mesmo tecido, mas comtrama e espessura diferentes, podem apresentar temposde secagem distintos.
• A quantidade de roupa: peças únicas e cargas pequenaspodem demorar mais tempo a secar.
• A secagem: se tiver de passar a ferro as peças de roupa,pode retirá-las da máquina quando ainda estão um poucohúmidas. Por seu turno, as peças de roupa que são parasecar completamente podem ficar na máquina durantemais tempo.
• A temperatura definida.
• A temperatura da divisão: quanto mais baixa for a tempe-ratura da divisão em que se encontra a máquina de secarroupa, mais tempo será necessário para secar as peçasde roupa.
• O volume: algumas peças volumosas requerem umaatenção especial durante o processo de secagem. Éaconselhável retirar essas peças, sacudi-las e colocá-lasnovamente na máquina: esta operação deve ser repetidavárias vezes durante o ciclo de secagem.
M Não seque demasiado as peças de roupa.Todos os tecidos contêm humidade natural que permiteconservar a suavidade e a leveza.
Os tempos fornecidos referem-se aos programasautomáticos de Secagem armário.Os pesos referem-se às peças secas.
+�����������#��������H����
��# �C Alta temperatura
Tempos de secagem após lavagens de 800-1000 rotações por minuto
Meia carga Plena carga
1 kg 2 kg 3 kg 4 kg 5 kg 6 kg 7 kg 8 kg30 - 40minutos
40 - 55minutos
55 - 70minutos
70 - 80minutos
80 - 90minutos
95 - 120minutos
120 - 140minutos
130 - 150minutos
!���K��� �Baixa temperatura
Tempos de secagem após lavagens com velocidades inferiores
Meia carga Plena carga
1 kg 2 kg 3 kg
40 - 50 minutos 50 - 70 minutos 70 - 90 minutos
��J��� �Baixa temperatura
Tempos de secagem após lavagens com velocidades inferiores
Meia carga Plena carga
1 kg 2 kg
40 - 60 minutos 55 - 75 minutos

%+
�'
M Este electrodoméstico foi concebido e fabricado emconformidade com as normas internacionais em matéria desegurança. Estas advertências são fornecidas por razões desegurança e devem ser observadas com atenção.
A�#� ��E��#� ��
• A parte final de um ciclo da máquina de enxugar roupa ocorresem calor (ciclo de arrefecimento) para garantir que a cargapermaneça a uma temperatura que não lhe cause danos.
• A presente máquina de secar roupa não deve ser utilizada porpessoas (incluindo crianças) com capacidades físicas,sensoriais ou mentais reduzidas ou sem experiência econhecimentos, salvo se supervisionadas ou se tiveremrecebido instruções sobre a utilização do dispositivo por partede uma pessoa responsável pela sua segurança.
• A presente máquina de secar roupa foi concebida para usodoméstico e não profissional.
• Não toque no electrodoméstico com os pés descalços nemcom as mãos ou os pés molhados.
• Desligue o electrodoméstico da rede de alimentaçãoeléctrica, puxando pela ficha e nunca pelo cabo.
• Não deixe que as crianças se aproximem doelectrodoméstico quando este está a funcionar. Após autilização, desligue a máquina de secar roupa e desligue aficha da rede de alimentação eléctrica. Mantenha a porta damáquina de secar roupa fechada para evitar que as criançasa utilizem nas suas brincadeiras.
• As crianças devem ser mantidas sob vigilância para evitar quebrinquem com a máquina.
• O electrodoméstico deve ser instalado correctamente e deve teruma ventilação adequada. A admissão de ar da parte da frenteda máquina de secar roupa e os respiradouros da parte posteriornão devem nunca ficar obstruídos (consulte Instalação).
• Nunca utilize a máquina de secar roupa sobre a alcatifa se aaltura do pêlo impedir a entrada do ar pela base da máquina.
• Certifique-se de que a máquina está vazia antes de a carregar.• A parte posterior da máquina de secar roupa pode ficar
muito quente:não toque nunca nela quando a máquina estiver afuncionar.
• Nunca utilize a máquina de secar roupa se o filtro, o recipien-te de recolha da água e o condensador não estiveremcorrectamente posicionados (consulte Manutenção).
• Não utilize amaciador líquido para tecidos na máquina desecar roupa, adicione-o antes no último enxaguamento dociclo de lavagem.
• Não sobrecarregue a máquina de secar roupa (consulteRoupa para as dimensões máximas de carga).
• Não introduza peças de roupa completamente molhadas.• Carregue na máquina apenas peças de roupa lavadas com água
e sabão, enxaguadas e centrifugadas. A secagem de peças queNÃO tenham sido lavadas com água constitui perigo de incêndio.
• Siga sempre com atenção todas as instruções indicadas nasetiquetas de lavagem (consulte Roupa).
• Não coloque peças de roupa que tenham sido tratadas comprodutos químicos.
• Nunca seque peças contaminadas com substânciasinflamáveis (óleo de cozinha, acetona, álcool, petróleo,querosene, substâncias para remoção de nódoas, terebintina,ceras, substâncias para remoção de cera e laca paracabelo), a não ser que tenham sido lavadas em água quentecom uma quantidade adicional de detergente.
• Não seque borracha, artigos e peças com base de borracha,travesseiros com enchimento em espuma de borracha,espuma de látex, borracha, plástico, toucas de banho,tecidos resistentes à água, calcinhas para usar com fraldasou revestimentos, polietileno e papel.
• Retire todos os objectos dos bolsos, especialmente osisqueiros (risco de explosão).
• Não carregue a máquina com peças grandes eexcessivamente volumosas.
• Não seque fibras acrílicas a altas temperaturas.• Complete todos os programas com a respectiva fase de
secagem a frio.• Não desligue a máquina de secar roupa quando contiver
ainda peças quentes.• Limpe o filtro após cada utilização (consulte Manutenção).• Esvazie o recipiente de recolha da água após cada utilização
(consulte Manutenção).• Limpe regularmente a unidade de condensação (consulte
Manutenção).• Evite a acumulação de resíduos de lã em torno da máquina
de secar roupa.• Não suba para o painel superior da máquina de secar roupa,
pois pode danificá-la.• Respeite sempre as normas e as características eléctricas
(consulte Instalação).• Adquira sempre acessórios e peças de reposição originais
(consulte Assistência).M ATENÇÃO: não pare nunca a máquina de secar roupa antesdo fim do ciclo de secagem, a não ser que todas as peçassejam removidas rapidamente e estendidas para dissipar o calor.
��� ��EF���� ���� ������#�������������EG��No âmbito do nosso constante empenhamento em defesa domeio ambiente, reservamo-nos o direito de utilizar componentesreciclados de qualidade para reduzir os custos do cliente eminimizar o desperdício de materiais.• Eliminação dos materiais de embalagem: siga as normas
locais para que a embalagem possa ser reciclada.• Para reduzir o risco de acidentes com crianças, retire a porta
e a ficha, e corte o cabo de alimentação rente ao aparelho.Elimine estes componentes separadamente para ter acerteza de que o electrodoméstico não volta a ser ligado auma tomada de corrente eléctrica.
����������������������� ����N����=����
A directiva Europeia 2002/96/CE relativa aos resíduos deequipamentos eléctricos e electrónicos (REEE) prevê queos electrodomésticos não devem ser eliminados nonormal fluxo dos resíduos sólidos urbanos. Os aparelhos
que deixaram de ser utilizados devem ser recolhidosseparadamente para optimizar a taxa de recuperação ereciclagem dos materiais que os compõem e impedir potenciaisdanos à saúde e ao meio ambiente. O símbolo do contentor delixo barrado com uma cruz está presente em todos os produtospara lembrar o dever de recolha selectiva.Para mais informações sobre o correcto desmantelamento doselectrodomésticos, contacte o serviço público especializado ouos revendedores.
������������ #N������� ������������������������• Antes de secar as peças de roupa, torça-as para eliminar a
maior quantidade de água possível (se antes utilizar umamáquina de lavar, defina um ciclo de centrifugação). Destemodo, pode economizar energia durante a secagem.
• Se utilizar sempre a máquina com carga plena, podeeconomizar energia: peças únicas e cargas pequenasdemoram mais tempo a secar.
• Limpe o filtro no fim de cada ciclo para controlar os custosrelacionados com o consumo energético (consulteManutenção).
,�=� �3��������#��F�

�(
%+
��� ��EG�������������EG����N�� ���
M Desligue a máquina de secar roupa quando não estiver afuncionar, bem como durante as operações de limpeza e demanutenção.
)����L��������� ����������������������O filtro é um componente fundamental para a secagem: asua função consiste em recolher os resíduos de lã e o cotãoque se formam durante a secagem.No fim da secagem, limpe o filtro enxaguando-o com águacorrente ou limpando-o com o aspirador. Se o filtro seobstruir, o fluxo de ar no interior da máquina de secar roupapode ficar seriamente comprometido: os tempos desecagem prolongam-se e o consumo de energia aumenta.Além disso, podem verificar-se danos na máquina de secarroupa.O filtro encontra-se em frente ao vedante da máquina desecar (consulte a figura).Remoção do filtro:
1. Puxe para cima a pega deplástico do filtro (consulte afigura).2. Remova os resíduos de lãdo filtro e volte a colocá-locorrectamente. Certifique-sede que o filtro fica bemencaixado, rente ao vedanteda máquina.M Não utilize a máquina desecar roupa sem antes terrecolocado o filtro norespectivo lugar.
���� ������������ ��������������������Rode manualmente o tambor para retirar as peças de roupamais pequenas (lenços) que possam ter ficado no interior damáquina.
)����L���������� M Para a limpeza do tambor, não utilize detergentesabrasivos, lã de aço ou agentes de limpeza para açoinoxidável.
Pode formar-se uma película colorida no tambor de açoinoxidável, fenómeno que pode ser causado por umacombinação de água e/ou de agentes de limpeza, como oamaciador de lavagem. Esta película colorida não afecta odesempenho da máquina de secar roupa.
�=�L����������� ������������ ����������H#�����������������������Retire o recipiente da máquina e esvazie-o num lavatório ounoutro recipiente de descarga adequado e, em seguida,reposicione-o correctamente.Verifique sempre o recipiente de recolha e esvazie-o antesdo início de um novo programa de secagem.
)����L�����������������������EG�• Retire periodicamente (todos os meses) a unidade de
condensação e limpe eventuais depósitos de cotão dasplacas, enxaguando-a com água fria da torneira a correrpela parte posterior do condensador.
Remoção do condensador:1. Desligue a máquina da rede eléctrica e abra a porta.2. Abra a tampa do condensador (consulte a figura),
desbloqueie os três fechos rodando-os 90° no sentidocontrário ao dos ponteiros do relógio e extraia ocondensador, puxando-o pela pega.
3. Limpe a superfície dos vedantes e reposicione a unidadecom as setas voltadas para cima, certificando-se de queos fechos estão bem fixos.
)����L������HI����������� � ����• As partes externas de metal e de plástico e as partes de
borracha podem ser limpas com um pano húmido.• Periodicamente (cada 6 meses), limpe com o aspirador a
grelha de admissão de ar dianteira e os respiradouros daparte posterior da máquina para remover eventuaisdepósitos de cotão, resíduos de lã e poeira. Além disso,remova os depósitos de cotão da parte da frente docondensador e das áreas do filtro, utilizandoocasionalmente o aspirador.
M Não utilize solventes nem abrasivos.M A máquina de secar roupa utiliza componentes de esferasque não necessitam de lubrificação.M Solicite um controlo regular da máquina de secar roupapor pessoal técnico autorizado para garantir a segurançados componentes eléctricos e mecânicos (consulteAssistência).
;�������������� ������B#�
I���������� ������GC
������� � ������� (��� �
(���
"�#�
������C ����
� ����
"���� ����
"����� ����
I���������� ������GC
�����������������EG�

%+
��
% ������������EF�
%�R=�������@�A���EF�4
• A ficha não ficou bem encaixada na tomada eléctrica para que possa fazer contacto.• Ocorreu um corte de corrente.• O fusível está queimado. Tente ligar outro electrodoméstico na mesma tomada.• Se utilizar uma extensão, tente inserir a ficha da máquina de secar roupa directamente na
tomada.• A porta não foi fechada correctamente.• O programa não foi definido correctamente (consulte Como efectuar uma secagem).• Não foi pressionado o botão START/PAUSE (consulte Como efectuar uma secagem).
• Foi definido um tempo de retardamento (consulte Programas e opções).• Foi premido o botão de START/PAUSE; Antes de iniciar a máquina de secar roupa, é
necessário aguardar um breve período de atraso. Aguarde o início da secagem, não voltea premir o botão deSTART/PAUSE: caso contrário, a máquina passa para o modo depausa e não inicia a secagem.
• O filtro não foi limpo (consulte Manutenção).• O recipiente de recolha da água deve ser esvaziado? O indicador luminoso “Esvaziar
recipiente” fica intermitente�(consulte Manutenção).• O condensador deve ser limpo (consulte Manutenção).• A temperatura definida não é adequada ao tipo de tecido que se pretende secar (consulte
Programas e opções).• Não foi seleccionado o tempo de secagem correcto para esta carga (consulte Roupa).• A grelha de admissão de ar ou os respiradouros da parte posterior estão obstruídos
(consulte Instalação e Manutenção).• As peças de roupa estão demasiado molhadas (consulte Roupa).• A máquina de secar roupa está sobrecarregada (consulte Roupa).
• É provável que o recipiente de recolha da água não tenha sido esvaziado no início doprograma. Não espere pelo sinal de esvaziamento da água. Verifique sempre o recipientee esvazie-o antes do início de um novo programa de secagem (consulte Descrição damáquina de secar roupa).
• É normal: o indicador luminoso “Esvaziar recipiente” fica intermitente quando o recipienteestá cheio. Se o indicador luminoso estiver aceso sem intermitência, indica apenas que orecipiente de recolha deve ser esvaziado (consulte Descrição da máquina de secarroupa).
M Por razões de segurança, os programas da máquina de secar roupa têm uma duraçãomáxima de 4 horas. Se um programa automático não tiver detectado a humidade finalnecessária dentro deste intervalo, a máquina de secar conclui o programa e pára.Verifique os pontos supramencionados e repita o programa. Se as peças de roupacontinuarem húmidas, contacte o Centro de Assistência (consulte Assistência).
• Desligue o aparelho e remova a ficha, limpe o filtro e o condensador (consulte"Cuidados e Manutenção"). Em seguida, encaixe novamente a ficha, ligue oelectrodoméstico e inicie outro programa. Se a anomalia persistir, contacte aAssistência Técnica.
• Isto é normal, sobretudo se a máquina de enxugar ficou inutilizada por algum tempo. Se oruído persistir durante todo o ciclo, contacte o centro de assistência técnica.
Se lhe parecer que a máquina de secar roupa não está a funcionar correctamente, antes de contactar o Centro de Assistência(consulte Assistência), consulte atentamente as seguintes sugestões para a resolução dos problemas.
% ������4
,��HI����������� � ������G��� ����7
?�������������#����G����������7
?�������������#���G�����#�7
?��������� ���������;�=�L�� ���������<����������� ��������������HI�������H����������� ��H�����������7
?��������� ���������;�=�L�� ���������<���H����������� ������������� ����������H#����G���H������7
?�� �# ������ �����������E���� �������G�������P�����I����� �=���7
?� �������� �� ����������S��EF�S������������� �����������SA+,1+@%,.A�S�������������� �������� ����S�������EG�S�������S���������#��S��������������C�7
,��HI����������C�#� �N� ��������� ���� �������������������������7

��
%+
,��������������� ������� �����,��3����4
• Siga o guia de resolução de problemas para tentarresolver a avaria pessoalmente (consulte Problemas esoluções).• Caso contrário, desligue a máquina e contacte o Centrode Assistência mais próximo de si.
������� ���������� �������� �����,��3����4
• Nome, endereço e código postal;• número de telefone;• tipo de avaria;• data de aquisição;• modelo do aparelho (Mod.);• número de série (S/N) da máquina de secar roupa.Estas informações encontram-se na etiqueta de dadossituada na parte posterior do óculo.
%�E����� ����EG�
Esta máquina de secar roupa é uma máquina complexa.Tentar repará-la pessoalmente ou por pessoal nãoqualificado pode colocar em risco a integridade física daspessoas, danificar a máquina e anular a garantia quecobre as peças de reposição.Em caso de problemas com o uso desta máquina,contacte sempre um técnico autorizado. As peças dereposição foram concebidas especificadamente para esteelectrodoméstico e não devem ser usadas para outrosfins.
% �# ��������� ���=�
• Programas recomendados para o teste comparativo da EN61121.
Programa (EN61121) Programa a seleccionar Dimensão da carga
Secagem algodão Algodão ��B� 8 kg
Algodão secagem passagem a ferro Algodão "����#������� 8 kg
Tecido fácil Sintéticos ��B� 3 kg
M�* ��=�������C �K�����������>����������� �GH������� #�������������� �����������������
���������� ����N�������H��������� ��������������#�������� ����=�����4
�� �(( @'�@���� 9�������=�� ��� ���C�� ���G�:T�� &'@�� @����� '�@��@����� '�@ &@���� 9���������������� ����� ���#�N����:7
,��3����

-1
��� ��
��� �������
������ ���������������� !"
�#����$��$���%
������������� ������������� �
��� ����
������ ����������
���������� ��������������
��� #���&���'�$��#�(�����'��)!*
�������� �� ��
������� � � ������
�(��+ ����#���� �����$��#�(����,
!������� �� � �� ����� ����������������
���#���������� �+'����������� -! .! /
�����������������������
! � ��������������
"����������
#�� �������������
0��'#�+��� !
" � �� ������������������
!� ����������������
! � ������ �$
����� ������%�����
���� +��� &$� ���� �'��+��1� ��� "
&�� ��������� �
������������ ������������������� ����� ����
!'� ��������������� ����� ���(������������� (��������
2�����+���� �$'��&��$��� %
)��� ��� �������� ��������� ������������
)��� ����� �����������������������������
*��� ��� ����������������������������
#�� ����������� �����������������������������������������
)��� ����������������������������
)��� ��������������������
���3&������� �4$� ��� )
5��$�&� 1��� *
��������� ��
-1
��,�-��
6+�#������&$��
�7�8�97�:�6
M� �+�����(���������������,� ����� �(�,� ���������
�� � �� ������ %�-
M�.��� ���������� ��������������� � �� ��%������
�������� ��� ��� ���(���������� ������� �����������-�.�
� ������������� � �� ������������������������-�/���
������������� �� �������������� ������ ����� ��
����������$���������������������%������������
�� � �� �$�%����������������� �� ���� ����� � ���
����,����� ������ ���� ��� ���� � � �������'� ��� ����
��������������������-
M�" �(������������ ���������� ��������0�� ������������������������ � ���� ������ ��������������� � �� ���
�������������� � ��� ���������'� ��� ������� ����������
� � ����� ������ ���� ��������-

��
-1
������ ��������������
8 ��� ��������$��� �&�� ��'�#�����'�$��#�(�����'���$'��4��($������� ��������';&$�������$��+ ����� �&��$'��&��$�����'���������� ��������(<
2�����# �����4+ �=��:����������;���>����������4+ ��'��������;��� �$��������������������;���4��$��#�?�����@
1����2
���'����������������
������������� �,���������
����������� ������������-
1����3
4��������������
5 ��� ���� %��������
�� ����6-
1����7
)����������� �����
������ �� ���� ����������
������ ����� ���� �����
��������������������-
1����8
!����������������������
������9�:����������� ���
����������������� �� ������
��� �� ����������������������
�����-
6������;�� $������'������'������������;���4��$��#�?������������>� �� ���� +�$� ��$��#�?��������������&�����'���� ������� $$������������$��$��#�(����� ��$'���?���������?�� ���� $$���������� �����������$��#�(��@
A������$'�#&����'�����4@�=��0����������;���4��$��#�?����������� �����+� �>�������+������$'�#&���'�����4@
1����2
+��(�'�������� �����������
����������������������
(����������������������
��������� �-
1����3
��� �������������������������
��������� ��-
1����7
!����������������������
�� ���������������������
�����(�(� ������� �� �
� �� ����������������������-
����������($����'�+�����'�$'�#&������4����������������$� <
!�7��$�������������;�����$������������&��B$'���?������������������������� �������3��#�����$���������'��4��'�$��#�?�����C@
!�7��DEF�GH+� �$���������$��G��(��>���
���� +��� ?������� ����+���������� �#�����@
2���($����'�$'$�&������$'�#&����'�����4
I�������$��#�(�&� ������ ��� ��4�# ������+�����$'�#&����'�����4�+���$'�#� ����� ��������(;�����$4$����@���+ ��#�$����'�&��������������$ ���� &$� �.&�/��4��'��$��#�?�����@����4�����(;�������$4$����$'�#� ������$����;���4��@

-1
"
0���+��$'��4��($���!����� ����#���������;���>����������4+ ���������$'��'��(�&���;���&��@
1����2
���'����������� ����
����������
;���������������(����
���(�'��������������������-
1����3
��� �������������������
��������������7��� �$������ �
���(�'���������������������
������������-�5:�������
���� � �������������������0
�������� ���� ���� ��6-
1����7
)������������������������
��������������������������
�����������������%������
�������� ����� �����
������ �� ���� ��-
1����8
!�������������������������
�����������<�������(�(� �
�� ����������� � �������
� �� �����������$��� ��� ����7
�� ����� �������������� ��� ���
(����������������������� �
��������������������
����������� �������������-
6������;�� $������'�$'��'��(�&�������������1��&$� ����(���3�3��$���$��#�(�&� �@

�
-1��'��#��;�$���� ����$��#�(�&� �
=�> �������������������'��������,�� ��������������� �$���������� ������������������ ��������,���������$����������$����� ���������� ����� �������-����������� ��������������� ���������������������������������������������� ���������������� %��2?�@@�����'��������������������������� ��������������� ���������� �� �������� ������������������������� ����� %���2A�@@����'�����������%������������ ��������������� ������ ��������������� ��� �%����������������-�:�����
������������ �����,��� �����������������������-
��� $���
=�B���������������� ����� ������������� �������� � ����������� ����-�4�(� ������� ����� ����������������� ����� %��� ������������� ������ ���� ������������������������-��������������� '������������������� �(�� ���� ������� ���������������������������������������������������� ��-+����������� �������� ��������������������������� %������ ���������������� ��������������-
J���������������� �� ��� ���� ��� ����� ��������������� �������������� ���������������������-
J�"������������ ���������������������������������������� -���� � ���������� �������������������� ����������������� ������������������������ ������� �$�������������������������������������������������������
���������������������������������-
H+� �$�����'�����4
������� ���������������������������������������� �������������������� ����������������������C������� ������� �� �������� ��� ���� ���������� ���������������������-�/������������������������ ���� ������������� �,��������� �����������������������������������-��������������� �������������������������������� ������������� ��,��� ����� ������������������ ���-����������������������������������������� ������� �����K��� ������������������������������� ��-��������� �����(������ �� ������ ������������������������$�� ���������������������������������������� ������������������������� ���� ���������� �������������������-& ������������������������������������������� �������������������� ��������������� ������ ������ �����L�� ������������������� �����-J������������ �������� ����(����2�@� ������������� ����������(�������������������-J�������������������������������� ��(�(� ������� ������������������� ����������� �� ���������� �������� ������-
����� �&�$4�+�$�
�� ��� ����������(���������������� �����,������'������������0=��4�(� ������� ���� �� ����� �������-=������,������� ����� ���� ������-=������,������� ������� ��������������� � �������� ������(��������� � ��� ������� ���$�������������� ������ ������������� ������ ������������� ��������������������������=������������������������� ������������ ��� ��� ������������ ������� ������� ��������������������� �������������� ���������������������������=������,������� ������� ����(����������������(����������������������-�/��� ������ �����������$����(����������� ����������������,���������(�������-J�:�� ��� ���� ������������� �-J�+����������� ����������������������������� %�����'���� ����$��������� ���������������-�������� $������������ �������� ���������������������������� �������������������(�� ������������� ��-J�:��������������������������������������������� �����%� ���� ����(���������� ������� ��� ���-J�+�������� ������%� ����������� ����� ��%�� �� ��������������%�� -J�������(������������� ������������� �������������������$������ �������� ����������������������-�:�.���������������������������������� �� ������ ����,��� ������������� �����������'��-J�+�������� ������%� ������� �������� ��� ���� �� ����� ������ ������� � ��� ���� %���������� � ������%� ��� ������������� ������$����������������������������������'��� �������������� � �����������������������+�������������������������� ������%� ������ ���� ����������'��� ����������������������������������������-J�6�����$��'�$�&������� ���� ���;���';4���������+������4��� �� ����������'���@J����������($����� 3�����$��� ����������������(��� �� �(�&$������������ + ��'������������#�@
���������� ������������������������������������������ �$��� ��������������� ������������������������ ��������������� ����������������(��� �����������������������������������������-
� �@�K � �@�L
�#����$��$�

-1
)
)����MNOMPP
)������� ����� �� �������
QRKSROTKUQV
�� �#������#������(�
���&$��� $��������
0���+�$'��4��($��
B����� ��� ���C
A������$'�#&���'�����4
� ����+���(�+�+����(�� ��'�#���
��3&���'������ �4���'$'��'��(�&�B���3&1��
# ���������1���C
2����
8�� �����'��+��&�
����
��� #���&���'$��#�(�����'
H�� #�������������
���������� � $����(�
W������� $� ��
)���� ���� �!��� �� ���D� ���
A5��767�7��
��+� �� ���(��� �������������%������������������!���������� ��� �����������
��+� �� ���(��� �
����������
�� ;���$� ���
�� �� ;���
������'

�&
-1
��'����MXOMYYOSEZE[
*�������� ������������������� ������(� ����(��� �������E��-���������������� ����� ������ �����������������������
�������� ���������7���������������(��� �������E����� ���������� ���������'�� '�������-
�� �#�������#������(�
!� ����� ����������������������0�����F����� � �������������������������������� �����������������������������
�������������������������� ��
��'�� ��+'�����&�(�
!� �������������� ���������� ��� ����������������� ������� �����������������-�+������ �� �������� �����(����� ����
��'������ ��������������� � ��� ���������� ���������������!��������� ��
��'������ ���+� �� ����(��� �QRKSROTKUQV
B����������� ������� �� �������� ����(��(��� �����$������������������� ������������������������������-�B�����
�������� � �'�� ���� $�������� �� �������� ��� ����������������� ���������������-�& ��������������������������������
������������������������-�+������ �� �������� ������ ���������� �%�������� ��� ,� ���� �������(��(��� -
& ����������������������������������������������������� �������$�������������������������������������������
���������������������� ��
��+� �� ����(��� �
��+� �� ����(��� ��$'��&��$��
+������ �� �������� ������ ���������� ��������������-�.��� ���������0
+������ �� �������� �G#�� ��������������H� ���� �� ��� � �� �,��� ������� ����������� ���������������������-
�������� ������,� �������'�� '������������������$����IJK����(� -�+����������� ����� ����������������������F� ��������
�� ����IJK�!))L.�/�/M��N/�/����(��(��� ���� ��-�& �����'�� ���� ���� ������������������������ �����������������
������OPQRPMSQTOU-
& ������������������������� �� ��������� �,��������������� ����������������������������� ��������������������
�����"����������
+������ �� �������� � ��� ����������������������,� ��� ���� �(�� ����������,������������������������ ����� ����
���������������������"����������
+������ �� �������� ������������ ���,� ��� ���� �(�� ����������,���������������������� �� ��������"����������
��+� �� ����(��� ��\2�$�(��$��#�?�����]
+��!��� �� �������� � ��� �� ��� ���� �����'�� '��������������%�����-
+��!��� �� �������� � ��� �� ��� ���� �����'�� '���������F�'��-
+������ �� �������� �VX^��� �� ��������������������������-
��+� �� ����(��� ��_������$���������� �&�'$����$�G
����������� ��������� �������V)�������������������W������# ���������������!��������� $�$��������� ���������
���������$����� �� �������(��(��� �������� �� �������� ����� �� ������������ ������������������0
:����������������� ����������� ���,��� �������� �����������������$�������� �� ������� �� �������� ���
���(��(��� -
���������������������� �������� ������������������� �� ������ �����������������-

-1
,
������$���� ��� �#&���'����#��������
.@�! ����������(�������������������������������� �����,������������-
/@�!� ��'�������������������(�����������������������������%�����!���
@����'����������� ��� �(�(� ������� ������������� ��������� �������$��� ��������� ��������������������� ��������
������������������������"����������
@�1���%��������� ��������� �������� ����������� �����������(������ �����'��������������� ������ �� ������ ��� ��-
)�������������-
"@������������������XYMXZZ�� �������������������� ����-
%@�/���F��������� ��������������������� � ������������������������������������������� ��� ���������������������
� ����������$����� �������������������������������������� ���������������!��������� ���� �� �������'� ��� �����
��������������������%�����!���
J������ �0���������������������������!))L.�/�/M��N/�/������������� ���������������������������'� $����������
"!.�����,� ������ �����������������-�& ���������'������������������ ��������������OPQRPMSQTOU�� �������������������
�������������5������� �� �������� ����(��(��� ���������6$��� ��'���������������������� �� ��� �� ���������������-�� ����
���������!))L.�/�/M��N/�/�� �����������������������������������-
)@���� �� ����������������� ����������������� ��� �������������� �� ������������������������� ��������������
!��������� ��
*@�& ����������'�������������������OPQRPMSQTOU-
)����������������������%���������������������'������������������ ����(������������� �������������������� ,��������
�������-������'��������������������$�� �����OPQRPMSQTOU�� ������������������������ ������������ ���-
,@�/����������������������������������������%�������� ������������������������������������ ��� ������ �������
/+!&.[:�+>/�!.�\N�][�5������������F� ���� 6-���� ���� ������������������������� %�� ������������-
.-@�+����������������� �� ������ ����VX^��� �� ��� ���������������������-����'������������$�(������������������$
������������������� �'���(���������������������-���� ���������� ������������������������ �'���(���������������
�����"����������
����� ������������������GS^_`� �������������H��� �������� ���������������������$������� ����������� ����������� �
2?�%�������� � �������'� ��������-
..@������������������������� ��������������� ��������-
7������Z[`NF�ab
+��/+!&.[+�]L>�����$������������� �������� ���'� ��� �������'� ��������������� ��$�� ���� ����������������������
�(��������5_`abK�cd6��������� ������ ��������������������7?�����%������������������� �����-�� ������� �� �����������
XY;XZZ���� ���� ������������������ ��������������� ���-
�(��+ ����#���� ����$��#�(��

�(
-1
���������(�����#������(�
���#��������� + ��OQcde[O��������'�
���#������Vfd�RghE���������������������� � ��� ���� �������������������� ��%�������������������������� ����$�(��� ����� %������� ����������� ��-�+��������������������� ��� ���� ���� ���������� � �/�ef$�����������%-������-�+��������������������� ������ ���� �������� ����������������� ��� ������ ��������������� ������� ��������������������������������� ����������� �-
��������� ��������'������������� ���������������(���� ���� ������������������������ �������������-
���#������0� �(���
�������� ���������������� � ���� ����� ���������� ���������������������������� ��� ����������������(���� -�:������� ��� ���� ���� ������������.�ef�5�������7������,��6-�/�������� ��������������,���������� ���� �������������-������������������ ��� ���� ���������%-������$���������������� ������ ���� �������������������� ��� ������ ���� ��������������������������� ������� ������������������������������ ������������ �-�+������������������������������������������ ����������� �������������$����������� ��������� ��� ��(�� ���������������������� ������%������-������������������%�������� ��$������������� �� ������ ������ �� ����������%������������������'����� �,�� ��������� �-J��������������������� ��$����� �� ��������� '����������� ������ ������� ����F ���$�������������� �������� ������ ��� ��� ��������� ������ ���� �� ���-J�+������������������������������ �� ���������� ������ �-
���#���������� +'���������
��������� ����� �������
(Kg) ����������� ������� ������
������
Standard (������)
1 �������������� �� ����������������–���-��������������������������������� 160’
2 ��������� �����!�� �� ����������������–���-��������������������������������� 145’
3 ���������"#��$����� �� ����������������–���-��������������������������������� 108’
4 ��������� �����!�� 3 ����������������–���-��������������������������������� 65’
5 ���������"#��$����� 3 ����������������–���-��������������������������������� 55’
Special (%#��)
6 Eco Time 2 ����������������–���-��������������������������������� 60’
7 ������ 1 - 60’
Sport
8 Sport Intensive 4 ����������������–���-��������������������������������� 80’
9 Sport Light 4 ����������������–���-��������������������������������� 70’
10 Sport Shoes 2 ����� - 100’
%!� ������ ����������� - - 20’
��������� ����$����� �
30 - 60 - 90 - 120 - 150 �� �� - ����������������–���-�������������–!"������������#���������������������
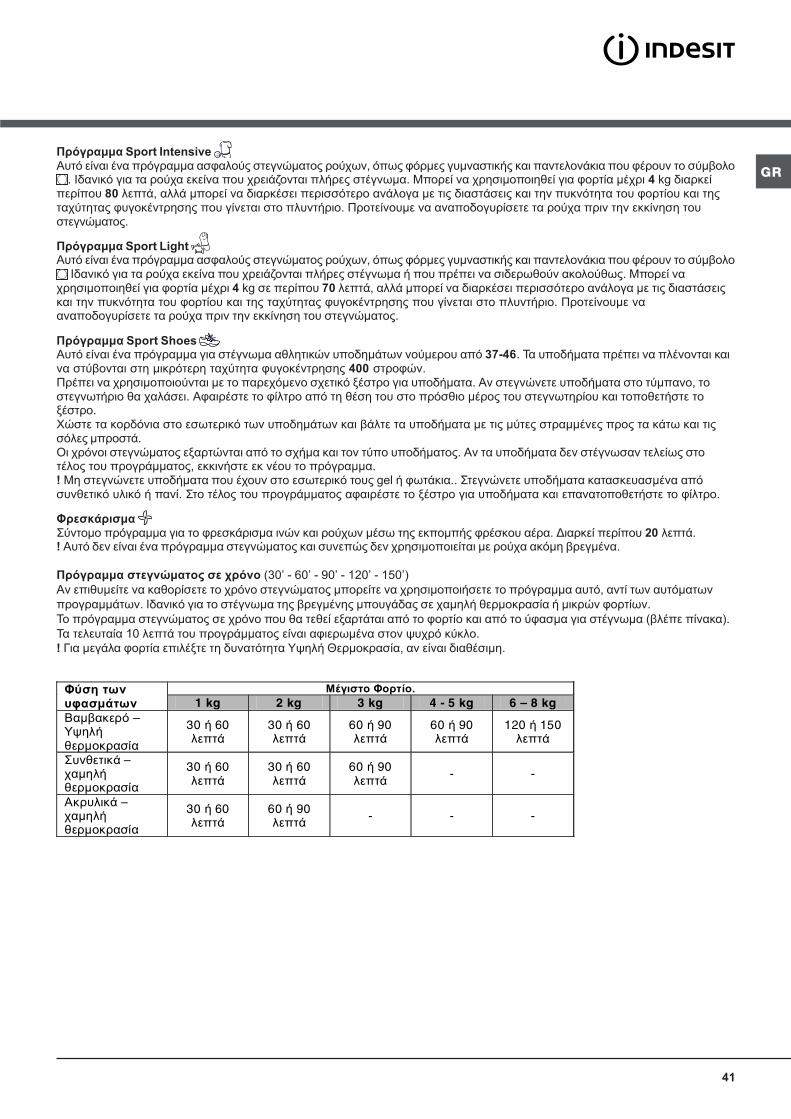
-1
.
���#������Qcde[�iN[ENZgjE��������� �����������������������������%��������� ��$�������������������� ������ ����������� �������������������(���-�L��� ���� �������� ������������ �� �,���� ����������������-�:�������� ��� ���� ���� ���������� � � �ef�� ����
�������*-������$���������������� ������ ���� �������������������� ��� ������ ���� ���������������������������� ������ ������������������������������ ������������ �-������������������������������������ ���� ����������������������%�����-
���#������Qcde[�kglm[��������� �����������������������������%��������� ��$�������������������� ������ ����������� �������������������(����L��� ���� �������� ������������ �� �,���� ���������������������������� ����� ����������������-�:�������
��� ���� ���� ���������� � � �ef�����������)-������$���������������� ������ ���� �������������������� ��� ������ ��� ���������������������������� ������� ������������������������������ ������������ �-����������������������������������� ���� �����������������������%�����-
���#������Qcde[�QmdEZ��������� ���������������� ��������������� �%��������������������������)! %-�+����������������� ������������ ��� ������(���� ������ ���������� �������������������� --������%�-����� ���� ��� ���� ����� ����������� ������� �� ���'������� �����������-���������%��������������������������$������������ ���� ����� -���� �������������������������������������� �������������������������� ��������������'�����-�%������������� ������������ �������������������� �(���������������������� ���������������������������������� �� ��������������-> � ���� ������%�������'���%��� ��������� ������ ��������������������-���������������������������������������������������������������$���� ��������������������������-J�:�������%�������������������� �������������� ��������fJI�������� �--�/����%�������������������������������������� ����� ��������-�/����������������������������� ���������'������� �������������� �������������������������-
2��$��� $���/������������������ ������������ ���� �%���� ���� ���������������������������������-�" ������������/-������-J������������� ��������������������%�������� ������%������ ��� ���� ��� ������� ��������(�������-
���#������$��#�?������$��������57?C�;�g?C�;�h?C�;�23?C�;�2A?C6
����� ��������������������� ����������%����������������� ��� ���� �����������������������$������������������
������������-�L��� ���� ������������������(���������������������� ������������������� ��%��������-
+�����������������%��������� ����������������'������ ���������������� ���������������� �����������5(����������6-
+�����������2?��������������������������� ��� �������������F� ��������-
J�& ����������������� ��'�����������������NF����i���������$������� �� ��� ��-
����� ������� ��� �&� �'����&� 1 kg 2 kg 3 kg 4 - 5 kg 6 – 8 kg ��������� – !"������������#�
30 � 60 �� ��
30 � 60 �� ��
60 � 90 �� ��
60 � 90 �� ��
120 � 150 �� ��
��������� – ������ ���������#�
30 � 60 �� ��
30 � 60 �� ��
60 � 90 �� ��
- -
$�������– ������ ���������#�
30 � 60 �� ��
60 � 90 �� �� - - -

��
-1
A'���������>L��������������� �������������'���������������� �������������������������(����� �������� ���������������-
������$���������� �&�'$����$��
������������ ������������������������� ���������������!��������� ���������������������� ��� � �,�%���-�� ����
������������������������ � �������� ���������� ����������������-��� ��������� ����������������������(�(� ����
�� ������ ������������������������� ���� ���� ��� ������������� ������-
0���!��� �$���(���
B������ ������ $������� ����������� ��� ��������������������������%�������� ��������F� �%������%������� ���������� ���
��� ���� �����������������������������������������������������������������������������������������
������������-�)������������������������ �� �������� ���� ���������-
�������� �$���(���
B������ ������� ������������������������� ������������������������� ����������� ��� ������������������
������������� ����������� ����� ���� �����������������-
5n�&�;�������$���
����� ��������������������� ����$�� �,���������������������� ������ �� �������������F������ �������� �� ��������
�����������������(� -�N����������������� ������ ����������� ������� �� ���������������-
J�"������ �� ��� ���������� �������������� �������������������������� ���������������!��������� �-����� ������������
������� �� ��� ����� ���������������$���� �� ���� ��������������� ���� ��� ���-�������������������� �� ��� ��
��������� ���������� ���� �� ���������� �������� �� �������� �������������������������������,��� �� �����
�� (�(������� ��������������� � ��� ����-
H�� #�������������
��������������������5��� �,���������������OPQRPMSQTOU6����������� ������������������������������������� ��������� ��� �� ������ ����������������� ��-=�+������ �� �������� �OPQRPMSQTOU����(��(��� ���� �%�����������-
• )��������������������������������������������� ,� ����������,��� -������ ����������������������OPQRPMSQTOU�� �������� �������������������������������������-�*�������������� �� �������� ������G!����������� ��� �����������H
���(��(��� ��� ������������� ���������� �����������������-=������ ����������������������OPQRPMSQTOU�� ��������� ����������������-�+������ �� �������� �����%������� ����������� ������������ �������� �� �������� �OPQRPMSQTOU��������� �������(��(��� ��� ������ ����� ��-=�)������������ ������������������������������������������������ %�� -�� �,���������������!������M������������������������������ ������������� �-=�/���������������� ��������������������� ������ ��������������������� �������� �� �������� �OPQRPMSQTOU����(��(��� ���� ��-�:���������� ��� ���� ���������� �� ����������� ������� ��'�����������������/����%���������F� �%�� �����F�'� ������ ������������� ���� ������%��������-� ��������������OPQRPMSQTOU�� �����������������������������������-
�����($�<�/������������ ��������������������� ���F�������������������(�������������������,�-�B������������
������������� ��������������OPQRPMSQTOU��� ������������������ ,� -

-1
A ��(� $�����������'#�+��
o�!���'���������(������ ���� ����������� ���������� ��� ���������'������������� �������������������������������������������-
=������������������������(����������������������-=�!����%����� ����������� �����'����������� �-=�)�������������������� ��������,�� ���� �������� ��,%����� ���������� �� ������������'���-
=�/�F��������� ��� �������������������������������������������������-
J�:�������%����������������� �������� �������������-
0�# $�����#�;���������':������%��������������������������� ���� ���� �������-> ����������� �������������� �����(��������������%���� ��-1�� �������0���� �����*�ef/���� �������0���� ������ef
J�& ����������(�����%��������� ���������������������$����������������%����-
2�������4��'
/������0�2�ef�j�2???�f
������� ������� ������� ����������������(��(�����$���������������������������F���������(����������������������������������%�����-�/����������������$������������ ������������������������������������%�����-��]�+�]�/�0���������� ���� ���� �������%������� ������F���� �������������2?�����������������������
�� ��%����� ���������������%���������F� �%$�������������������������������������� ������������%�� ������������-
�� ������$'��&��$��!���'���� ���� ������������� ��$�� � ���������������������� ����%�������������������� �-�/������� � ����������� ����� �����������(���0
:����������� �������������� �-
"�����������������%�� ������������� �
/����%��������F�������������-
/����%������� ���������������-
]�� �������������� ���������������������0=�]�� ��������� � �������� �� ��������������� ���� ��
������� ������������ ��5����������$���' ��� ���������������Skl6��� ���� �������������������������� ��������� �������������� � �������������������5������������������������������� %�6-
=�N��%�� ������5�� ����� ����� ������ �%�6-
=�]�� ��������������������������������������� ���-
=�]�� ������� �������� ����������� ���mPnl�5V! � ��
��� �W6� $��������������������,���� ����� � ��
���E������ � ����� �����-������������������� ��� ��������-
=�]�� ����������%���5����%����$����� � �������$����������$���' ��� �$�����������������$����-6$���������������������� ���%����� ��� ���������,��������������������������������������� �-
0��'#�+�
:�4��
��������
*�����
oJab_
2?������
������ ��
P;_pqr`
4��(�����
#���
4��(�����
#���
4��(�����
#���
2A?�f
2??�f
A??�f
7A?�f
s??�f
2-???�f
7??�f
3??�f
23A�f
�� � ��� �$�����'��
)�����������%�����
5� ���6
+����,����� ��� ������
+����,����� ��� � ���
�������� ����� ��
:������������ ��
�������
4��(�����
#���
/����� � � ���
/����� � ����
2-A??�f
2-???�f
s??�f
3A?�f
2??�f
s??�f
7A?�f
A??�f
7A?�f

��
-1
� + �����4��
)��(�������� ��������������(�� ��0�������� ������ �5QtqIqab$�l^ur`JIIJ$�Xrq^b$�vraI^b6������ ���������%��������'� ��� �������������� ���������������-�:����������������� ������������%�����-
]�� �������� %�� ������ ��0�� �(������ �������������%�������������� ���� ����������������������-
]�� �������� �����0����������%����������� ����������������������� �����-�������������������������������������� ������������������������ ��(����������� ��������������� �-�:�������%���������(�� ��-�������������� ����������������������� ��������� ������������ �����������-
W���� �$��#�?�����
> � ���� ���� �������� �� ����� ��������������'������(���0
=��������������������������������������������� ������������F ��0�� ������������ ��������������� ���������������������-
=��N�������0������� ��� ������������$������������'��� ��� ���� ������ ������������������ �,��� ������������%������� ������ ����-
=��������������������0�'� �� ������� ���� �� ��������������������� �������� �������� ������ ���������%����-
=��/�������0���������� ������� ����� ������������������(�������������� ����������� �����������(�������-�+���� ����������� ���������%�������������������$������$�������������� �������-
=��+��������������-
=��i���������������������0����� ������������� ���������������������������������(������ ������������ ���������� ��������� ��������� ���� �� �������������������� ��-
=��B����0��� ���������%������ ����� ����� � ������������������ �� ����������%�����-�/�������� ���(��,���������� ������$�������� ��,������ ����� ��������������������������� �0���� �� ��������������� �����������(����� ���� ����������������������������������%�����-
J�:�������%���������������� �-B������������������ � ������� ������������� ��� ���� �� ������ ������������������������� �������������-
> ������������ � ���� ����������� �������������������������/����%������� ����������-+��(�������������� ������� ��������-
W���� ��'������'�$��#�?�����
������������������� ��
������������ �������� �������� � ����������������� �� ��������
!"#$�%$&'"$ (����������
��)* +�)* ,�)* -�)* .�)* /�)* 0�)* ��)*
,����-������ -����..������ ..���0������� 0������������ �����1������� 1.����+�������
�+�����-������ �,�����.�������
��� ���2 �������� ��
������������ �������� �������� � ����2 ��������� 23�����
!"#$�%$&'"$ (����������
��)* +�)* ,�)*
-����.������� .����0������� 0����1�������
�������2 �������� ��
������������ �������� �������� � ����2 ��������� 23�����
!"#$�%$&'"$ (����������
��)* +�)*
-����/������� ..���0.������

-1
"
J������ �� � � ���� ������ ��� �������� � �� ������� ��
�������������������������������� ���������� ������� �
,�������������� ��-�������� ����� ���� ��� ������ ���� �� ������������������� ������ ������������ �������� ��-
8�� �&��$��� �
= �� ��� �������������������� ��������������������� � ���
���������5�������F�'��6�� ������'����� ������ �����������
� ����������� �����������������������(����� -
= +����������������� ����������� ���� ��� ���� ��� ����������5���������(��������������� � %������� ������� ���������
��� ���$�� ��� ����������� ������ �������� ����� ���%��$������
� ������ �������� ���� ������ ���������� �� ���������� ������������������������������������ ������������ ������-
= +����������������� ��� �� �������� ��� � ���� ������� ��
���������� ��-= :������,��������� � ���������� ��������������������������� �
������� ������������ �� ���������� ��(�������-
= ������������ ����� � ���������� ��������������� ����������������������(%��������(������ �� �������%� �-
= :���������������� � ��������� �,���������� � ���������� ��
������������������� ������-�:������� ����$�����(����������������� ���� ������������������������������������������-
.��������������������� ����� ���������������������� � ����
��� ���� ���������������� �������� �� -= +���� � ������� ������ �������� �� ������ ������������� ����
��,������������������� �-
= ��� � ���������� ���������������� ������������� �������� ������ ����� � �������������� ���-�������� ����������
���� �������������������������� �� ��'��� ��������������
��������� �������������������� �������������������= :�� ��� ���� ��������� ������������ ������ �����������
������������� ��� �F��� ���� �� ��� ��� � ���� �� ���� ��
��������,� ��������������������� �����������(�������������������-
= !���'������������������ ����� ���� ���� ���������%����-
= +�������������������������������������,����������0����������,����������������� ������� ������ ������-
= :�� ��� ���� ���������������� �������������$������ ��
��������� ���� ������ �� � �������������� ���� ��� � ����������������������"����������
= :�� ��� ���� ���� ������ ��� ����� � �� ��� ������������
��������� �$�������������������������������'�(�������������������������-
= :�����������%����������������� ��5����%�����!��������
������ �!�������� ��������������= :���(�,������� ���������(�������-
= 1���%����������������� ���������� ��������������������
������ $� '�(�������� �� � ����� �� �������-� +�� ����������� ��� ���� "!.��������� ��� ����� �������� ������
������ ��-
= ���������� ������ ������� ��� ����� � �� ������� ������������� ��� ���� ������� ��������� ���������� �������
%�����!���
= :���(�,������� �������������������� �� ������E����-= :�������%������������� �������������������������������5���
���,���$��������$�� ��������$�������� �$�����,��$�������� �
���� ������������ �������$� ���� $� ��� �$� ������ � �� ���������������������� %���� ������������ ������ �6$�������� ���
�������� ��� ,����� ����� ��� �������� ��������
���������� ���-= :�������%��������� �$������� ���� ��������� �� �������$
��' ��� �������� ���������������$��������������'$����� �$
����� ��$�������� ��� �������$��������������� �����������$(����� ������F������%������������ �$������ ���� ����
���-
= ��� ������������� ������������ ��������$�� � �����������
����������5������������'��6-
= :������%��������������� �$�����(�� ������%��-= :�������%���������� ������������F���������������-
= >������%���� ���� ���������� ��� ��� � �� ��� ����
�����%���������F� �%-= :���(������������������ ��������� � � �������,�������� �-
= )���,�������������������������� ����������"����������
= ��� �,��������� ����������������������������������� ���������"����������
= )���,���� ���� ��� ��� ������� ������������ ����
"���������-= ����������� ��� ����%������ ���� ��� ����� ���� ��
��������� �-
= :������(������������������������������������� �$�� �� ��������� ����� ����� ���-
= +��������������������������� ���������� ��� ������� �� ��
�����������������-= .������������������������� ����'��������� ���������� ��
�����&�'����������������-
J��]>/>��0������������������������������� ���� ��������������������������%������������� �������������� ����� ������
���������� ����%������ ��������������������������-
�����������# ����������4�($���� ���+ �;�$��/������� ���������� ��������������� ���� ��������������������� (���������� ������������� ��������� ��� ���� ����
��������������'����������� �������� ����������������������
������������� �������� ������������������������ �%�-= " ����������� �%������������0������������������� ����
����� �����$� %���� ��� ���������� ��� �������%����� ��
���������-= & ������� ���������������� ������������ � �$���� ���������
�������� ����(����$������ ����F���������%� ������������
���� ,�������������-�" ������������������� �� ����� ����(�(� ������� ���� � ���������� ��������������������������
������������������� �����,�-
A �;�$���(���� ?��� � ��?������� �?�$'$��'?�
��!�����E���>�����3??3MhgMlU�� ��������������������� �%�� �� � �������� �%�� ������%�� 5RQUU6$
���(���� � �� � � � � � ����� ������ ���� ��������� ���
����� ����� ������ ����������� ����������������%���� �%������� ������-�> ������ �����������������������
������������� � �� ����� �����(��� ����� ��� � ����������
������������ ������������������� �%������� �������������� �������������� ������ ����,�� ���� ������������� ������� (�����-
+�����(���� ���� � ����������� ���� ��� ���� � � ��� ���� ��
���E������ �������,� �� ����� ��%�� �� �� �������������-& ������ ���������������$�� ��������������������������
� � ��%�� ������ �%��������%�$� � � ���� � � �� �������� ��
���������� � ����� ����� �� ����� �� �������� �� ����������������-
�1� ������$������#� ����� �$�3�$�����'���� 3������= �� �������%����������� �$����F������� �����������������
���������������������������������5����� �� ��� ���� ����������� ������������������������������6-�:�����������
�������'� �������� ������� ������������������-
= ���� ���� %����������������������� ������������������'� �������� ������� �0�'� �� ������� ���� �� ���������
��� ���� ������� �������� ������ ����������%����-
= )���,������������������������������������� �%��������� �� ������ ��� ����������� ��,���� � ��� ���� ������ ���
����������������"���������-
���� +��� &$� ��� �'��+��1� �

�
-1
���$ ������������&������� ��4��4�����J������������������������� �������������� ������ ������$
��%���� ������� ��� ������������ ������� �����������-
��;�� $������'������'������������;��4��+����������� ������'�������(�� ���� �������������0��
�� �������������� ����������� ���� ���� ��� �� ���� ������
� ����,���� �����������������-/������������������%�������������,���������%����������
'�(��,��������������������� ������������������,��������
��������� ���������-�/�������������������������(���%�� $�������������������������� ��������������������
� ���(���������(���0�� � ���� ������%������������������
�������%���� ���� �������������� �-������$���������� �� �������,�� ���������������� �-
+��������(������ ����������������(��������������������
������������-������������������0
2-�+��(�'�������������������
����� �����(������������������������-
3-�)����������������������
���� ��� ������������������������-�4�(� ������� ���
������� � �� �� ��������
���� ,���������(�������������������-
J�:�� ��� ���� ���������������� �� ������ ������ �������� ���� �����������������������-
p�#������'���+�'������������;���4��/���F������������ � ������ ���� �������� ����������� �������
��� ��5�������� �6����������������������������������
������ ������������������-
��;�� $������'���+�'J�& ���������� ����������������� ��� ���� �������'��� ��$
������������������ ������ �����'������ ���(�-:��������� ���� ����� �� ����� ������ ����������������
���'������ ���(�$��� ������������������������
���������������������������������M�� ���� %�
���� ������������������� �������������-��� ����� ���
�� ������������� � ���������������� ���� ���� �����
�����������-
H+� �$�����'�+�����'�$'�#&����'����4������������;���4��4����������� ������������������� ���� ���� ���������������
� ������������������������������������������� ���$
����� ��������������������������-.������ ��������������� �������������� ���������� �,������ �
��������������������������������������������%�����-
��;�� $������������+���$'��4��($��= .������������������ �� ���5��������6����������
�������������� ��������,������������ ���������%������ ���� �������� ���������'��������������
������������(������������������������� � ��������
��������������������-����������������������0
2- ������������������������ ��������������� �����������
���'����������-3- ���'����������� ����������������������������$
'�������������������������������������������h?w
�� �����������$������ ��(�����������������������(%�����������������(�-
7- )���,���������� ���� �������� ��� %����
�������������������������������(�������������������������$�������(�(� � ��� ������������ ����������������-
��;�� $������'�$��#�(�����'= +���'���� ���������������������� ������ ����� ���
���� �� ����������������������,���� ����(�����������-
= ��� �� ���5����g������6��������,����������������� ����������������� ����� ������� ���������� �� ���'�����
������������������������������� �����������������
���� �������������������� ���� ��$��� %���� �������-�����$���� ������ ������������ �� ���� ���������
���� ������������������������� �������� � %�����
������� ��� ���� %��������� � �������������� ���������-J�:�� ��� ���� ����� ������������'��� ��-
J�+����������� �� ��� ���� ������� ����'����������������
��� �����������-J�x�������������� ������� ���������������������
�'��� ������������ � ��������� ���� ������'����� �����
������ ������������ �%���� ��� �� �%�����%�������&�'���������������-
A�����$'�#&���'�����4
0���+�$'��4��($��
����� ���'$'��'��(�&����
2����
��3&
5��+��&����
���'���
��$(
���$; �
0���+�$'��4��($��
2�����+���� �$'��&��$�

-1
)
���3&������� �4$� �
� ;������� ��O��4$� �<
= +��(������������������������������� ����� �� ����,��� ��������� ������-
= *� ���� ��������������-= �������� �������-�"�� �������������������� ������������� ����������������� �
��,�-
= ��� ��� ���� ��� �� ��������������� ���������� ����������(����������������������C��������������,�-
= ���������������� ��������-
= +������������������������������������ � �!�����������������������-= "��������������������OPQRPMSQTOU������� � �!�����������������������-
= +���������� ����������������������� ���������������!��������� �-= �����������������OPQRPMSQTOU-��� ����������������������������������� ���
��� �������� ��������������������-���� ���������������'�����������%�����$����
� �,���������������������OPQRPMSQTOU0�������������������������������� �� ��� ��� ������������ �����'�� ��� ������������-
= +���������������������������"���������-= +���� ��������������������������� ������� ��� <�+������ �� �������� �V#�� ����
���������W����(��(��� ������"���������-
= >������������������ �������� ���������"���������-= ������������������������� ������������ ����������������������������������
����� ���������������!��������� �-
= "�������������������� �����������%������� ���������������������%�����!��-= ����� ����������� ����������� ��'��� ������������������ �(��������������
����������������"����������
= +����� ����� ������(�������������%�����!��-= +����������� ����� ��������������������%�����!��-
= +���� ����������������������� ��%��������� ���������������������������������-
:������ ������������������ �����������������$���������� ��������������� ����� ��������� �,������ ������������������������������������������%����������
��������������������������-
= !�� ���� ���� ��0�������� �� �������� �V#�� ��������������W�������(��(��� ��������
�� ������ �������-����������� �� �������� ���� ����������������������(��(��� ������,� ������������ ����������� ����������������� ���������������������������
J�& �������������������������������������������������� ����� ����� ����� ���� ��8��%�-��������������������������������������F��������� ������ ��������������
����������� ���������������$������������� ���������%�� ���������������� ��������� -
!���'����������������������� ��������(����������������-���������� ����� ������������� �� ��������������)�������� � ����������� '��������&�'����������������-
= /(������������������ �(���������(����$�������������������� ��������������������()�����!������"��������*�-�)���� �$��������������������(����$����F������
� � ���������� ������������� ���� ������������������������-
��������������� ���� $�������������N������ '�-
= �������� ���� ���� ��$� ������������������� ������ ��� ���� ������ ������ �� ����-
��������(����� ���� ���C��������� ���� ������������$��� �� ��������������������
�� � ���������� '��-
/���������������� ���������������� ������������� ������������ ������������$��� ���������������������� � ��������� '���!��������������������(����������������� ���� ����������������'� ��� ��������������������(�������-
���3���<
7��$��#�(�&� ��+���1�� ��� @
6��4����$��#�?������+������ ���@
6 ������ �$��#�?���������� ���#�� @
7����+� �� ����(��� �\H+� �$��������$��]����3�$3&�� �������$��#�(�&� ������ �$��� ��'�#�������#�������@
7����+� �� ����(��� ��\H+� �$��������$��]����� ���������������+������$'�#&����'�����4�+������� #�����@
7�����#��������� ?�� ��� ������4������ ���� $$������'#������������3�������@
7����+� �� ����(��� ���(�_+'�����&�(�G��� ������+� �� ���(��� �_QRKSROTKUQVG����3�$3&��'��� �������������(��� �����_$'��&��$���G�&��(��\��$�(�$��#�?�����]����3�'��$��;���@
7��$��#�(�&� ������ �;��'3?+���$����?��������� ��'�#���@

��
��
����������� �� ������������� ��������
���������������� ����������������������������� ����������������������������������������������������� �������������������� ������������������������������������������������������������������������
��������������� ������ �� ������������ ��������
��!������ ��"����������#� ��������$ ��� �����"������$��� ����� ���������������� ������������������ ����������������������%&'( ) ��������"���������%*+,)������������� -����������������������������������������������������������������
������������
.���������������������������"����#��� �/��
�����������������������������������
���"���������������� ��������������"�
���������������0������������������������
���������1����������������������������
����������������������������$�
������������������������#������������
���������������"���������������
������ �������#���� �.��������������#���
�# ���������������������������������������#�
���������#�����
����������������������
��2��������������������������������������3,45565
2��������� %3,45565) 2������������������� !����� ������
���������������$� 7�������� ������ 8�9:
7���������������� ������� 7���������������� 8�9:
;������������������ �� ���"���� ������� <�9:
!������ ������"������������������������������������������������������������������ ������������������
�#�����$ ������������������� � ��������� $������������������%&��
'�())*+,-+%&��.�� �����/��������� ��0'�1,+22*+%&�3�,(+24+%&�3�,2+*1+%&��.#��������������� ��5��"����06
7�� �������������������������� �������������


![THE OZONE LAUNDRY HANDBOOK Rice HAND BOOK.pdf · chapter of the Ozone Laundry Handbook. Economic Benefits of Ozone Laundry Systems – Handbook Chapter 2 [2]](https://static.fdocuments.net/doc/165x107/5aa892f57f8b9a6c188bb5f2/the-ozone-laundry-rice-hand-bookpdfchapter-of-the-ozone-laundry-handbook-economic.jpg)


