
- documents.dgs.ca.gov website update (new... · Web viewNon-technical staff uses an application...
78
Content Management System (CMS) Training with DotNetNuke (DNN) Instructions for DGS Internet Web Authors Version 3.1 May 12, 2010 Department of General Services Information Technology Services Division OTR Web and Application Technologies
Transcript of - documents.dgs.ca.gov website update (new... · Web viewNon-technical staff uses an application...
Content Management System (CMS)Training with DotNetNuke (DNN)
Instructions for DGS Internet Web Authors
Version 3.1May 12, 2010
Department of General ServicesInformation Technology Services DivisionOTR Web and Application Technologies

Table of Contents
Topics PagePurpose 3Definitions 3Login Process 4DNN Edit Mode Screen 5
Task 1 – Create a New Web Page 6Advance Settings 8Back to DNN Edit Mode Screen 10
Task 2 – Add a Module 11Select a Pane 12
Task 3 – Add Content 15
Task 4 – Edit an Existing Web Page 18List of Existing Web Pages 19Edit the Content of a Module 20
Task 5 – Edit Pages with the DNN Editor 21
Task 6 – Add Links to a Web Page I. Link to a DNN Web Page 22II. Link to a web Page Outside of DGS 23III. Link to a document in Documents Server 24IV. Link Requesting an Email Message 26Create Deep Anchors 27
Task 7 – Add Graphics to a Web Page 30
Task 8 – Add an Announcement to ‘What’s New’ 32
Task 9 – Add Menus to a Web PageAccordion Menu 37Vertical Tabs Menu 41
Task 10 – Can your Customers View Your Documents? 52Set Windows Explorer to Display Extensions 53View File Details 54Clear your Browser’s Cache Frequently 55
Task 11 – Post to the Internet Documents Server 57Map a Drive 58
Content Management System Training with DotNetNuke 2
Content Management System Training with DotNetNuke
Web Page Maintenance:1. Either technical staff creates, edits, and posts all web related content, or2. Non-technical staff uses an application that accepts web content onto a
web template so that creating and editing web content is as simple as using a word processor. That application is a Content Management System.
Definitions: A Content Management System (CMS) is an application that allows a
technical staff to code the look and feel of a web page so that non-technical individuals can readily create and edit web pages without concerning themselves with the code that generates the web page.
DotNetNuke (DNN) is a CMS application that stores web page information on a database, and then generates the web page based on the settings originally established by the technical staff for portal, skins, panes, and modules. DNN web pages exhibit an aspx extension.
A CMS Author is a member of a Division or program who is trained to create and edit web pages for that Division or program. Access rights to DNN and the Documents Server are granted after the CMS Author is trained on CMS-DNN.
A Web Page can either be a Parent Page or a Child Page, depending on whether it is higher or lower on a hierarchy of pages that can best be thought of a relationship similar to an ancestor and a descendant.
A Portal is equivalent to an area in DNN that we can designate as covering one DGS Division or mayor program.
A Skin is a template or framework of sections on a web page that allows segments of code to be inserted or deleted from a web page without affecting the integrity of the rest of the web page.
A Pane is a physical section of a web page such as a column or a header section.
A Module is a portion of a Pane where content can be added or deleted by the CMS Author without affecting the code of the rest of the web page. This is similar to a Placeholder in other CMS applications. One Pane may hold multiple Modules.
Content Management System Training with DotNetNuke 3

Login Process
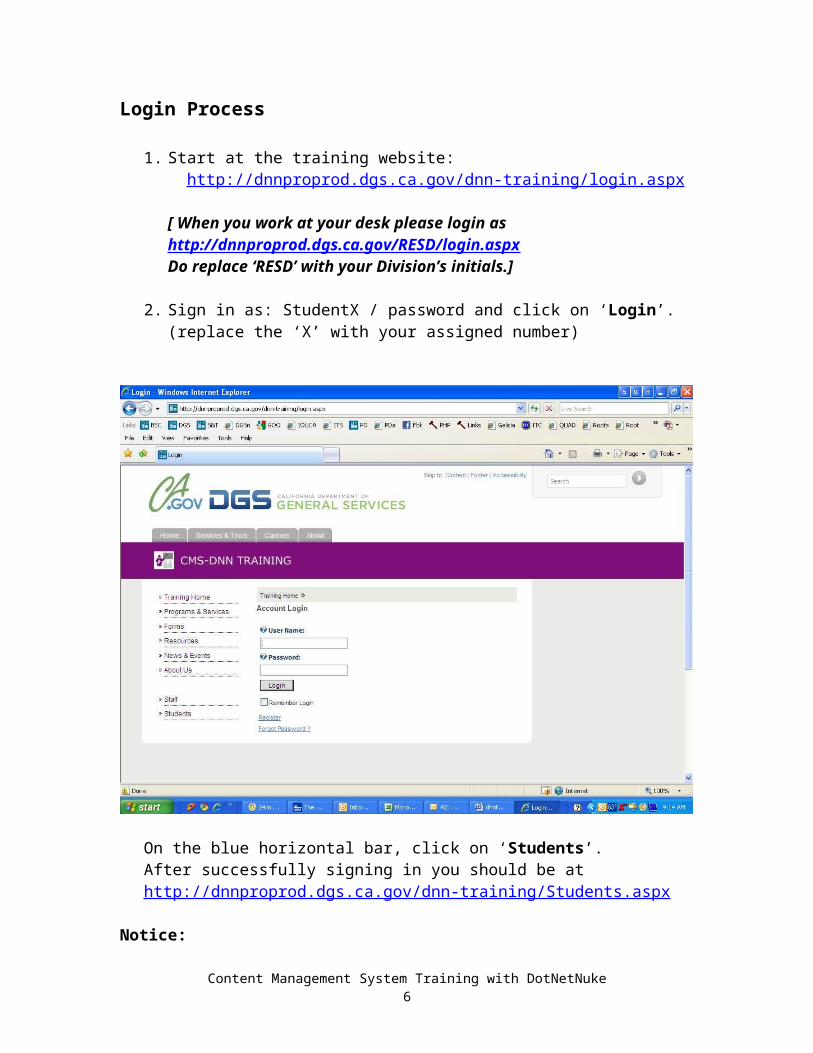
1. Start at the training website: http://dnnproprod.dgs.ca.gov/dnn-training/login.aspx
[ When you work at your desk please login ashttp://dnnproprod.dgs.ca.gov/RESD/login.aspxDo replace ‘RESD’ with your Division’s initials.]
2. Sign in as: StudentX / password and click on ‘Login’.(replace the ‘X’ with your assigned number)
On the blue horizontal bar, click on ‘Students’.After successfully signing in you should be athttp://dnnproprod.dgs.ca.gov/dnn-training/Students.aspx
Notice: URLs in the browser’s address box are not case-sensitive, and All web pages will exhibit an .aspx extension in DNN (no longer.htm).
Content Management System Training with DotNetNuke 4

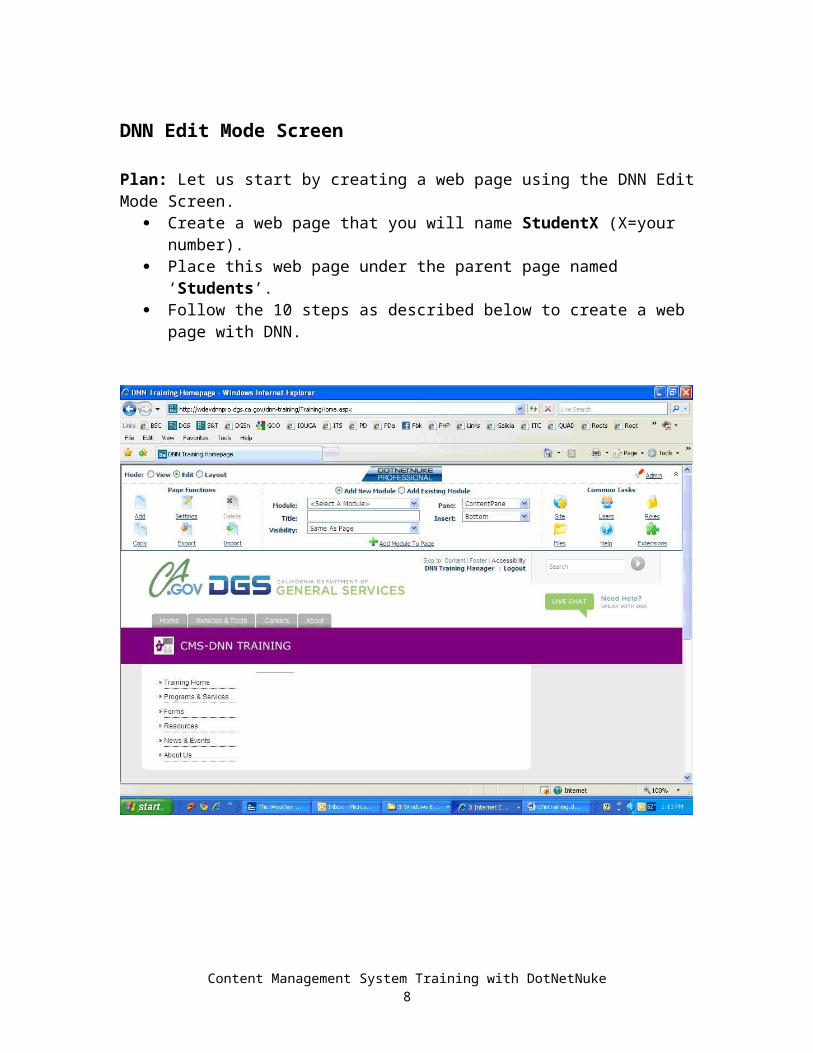
DNN Edit Mode Screen
Plan: Let us start by creating a web page using the DNN Edit Mode Screen. Create a web page that you will name StudentX (X=your number). Place this web page under the parent page named ‘Students’. Follow the 10 steps as described below to create a web page with DNN.
Content Management System Training with DotNetNuke 5
Task 1Create a New Page (10 easy steps)
Click on ‘Mode’ = ‘Edit’ on upper left hand cornerClick on ‘Add’ on ‘Page Functions’
Under ‘Page Details’ enter 1. ‘Page Name’ for the filename (no blank spaces or punctuation marks), 2. ‘Page Title’ for the browser’s blue bar (good English grammar), 3. ‘Description’, and 4. ‘Keywords’ for tabs as used by DNN.5. Select the ‘Parent Page’ (Students).
Content Management System Training with DotNetNuke 6

Before or After
Select whether your new page will be entered ‘Before’ or ‘After’ an existing page; or at the end of this grouping.
(Leave ‘Parent Page’ as ‘non-specified’ if you were to want your page to be a parent page at the same level as ‘Students’.)
6. Click ‘All Users’ = ‘View’; ‘Full Control’ for ‘Admin Authors’ and for ‘Content Authors’.
Remove the module’s name from your page:While here, click on ‘Page Settings’ and make sure that ‘Display Container’ and ‘Allow Print’ are unchecked. This will remove the module name from your page. The module’s name will still be visible under the edit mode.
Content Management System Training with DotNetNuke 7
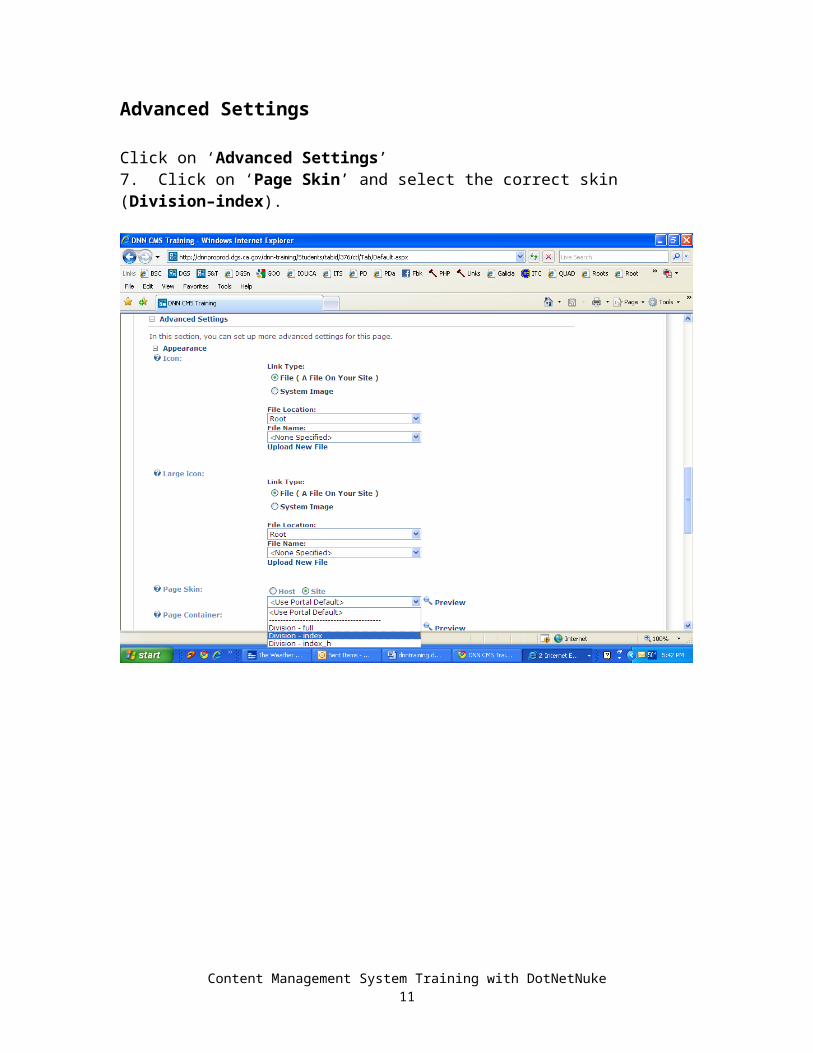
Advanced Settings
Click on ‘Advanced Settings’ 7. Click on ‘Page Skin’ and select the correct skin (Division–index).
Content Management System Training with DotNetNuke 8

Time Span for Displaying Your Page
8. ‘Start Date’ - You can set the date to start displaying your page, if not immediately.
9. ‘End Date’ - You can set the date for your page to expire, if it needs to expire at a certain date.
10. Click on ‘Update’ at the bottom of this large screen.
Content Management System Training with DotNetNuke 9

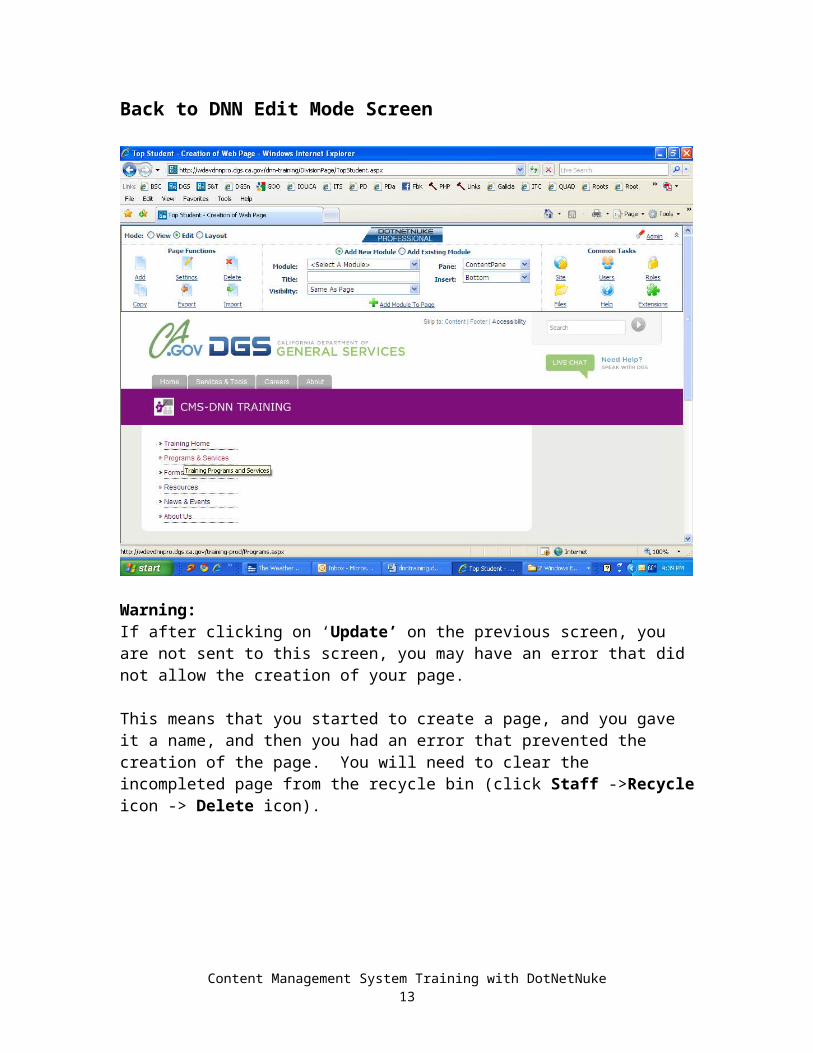
Back to DNN Edit Mode Screen
Warning:If after clicking on ‘Update’ on the previous screen, you are not sent to this screen, you may have an error that did not allow the creation of your page.
This means that you started to create a page, and you gave it a name, and then you had an error that prevented the creation of the page. You will need to clear the incompleted page from the recycle bin (click Staff ->Recycle icon -> Delete icon).
Content Management System Training with DotNetNuke 10
Task 2Add a Module
Let us add a module on the center of the web page so that you can later add your page content.
Make sure that the radio button ‘Add New Module’ is selected at the center of the top of your screen.
Click on ‘Select A Module’ and select ‘HTMLPro’
Enter the Module ‘Title’ (e.g., ‘Center1’, it is just a location id).
‘Visibility’ will allow you to control whether you want the page to be visible1. immediately to everyone (‘Same As Page’) which is most common, or2. for editorial review only (‘Page Editors Only’).
Content Management System Training with DotNetNuke 11

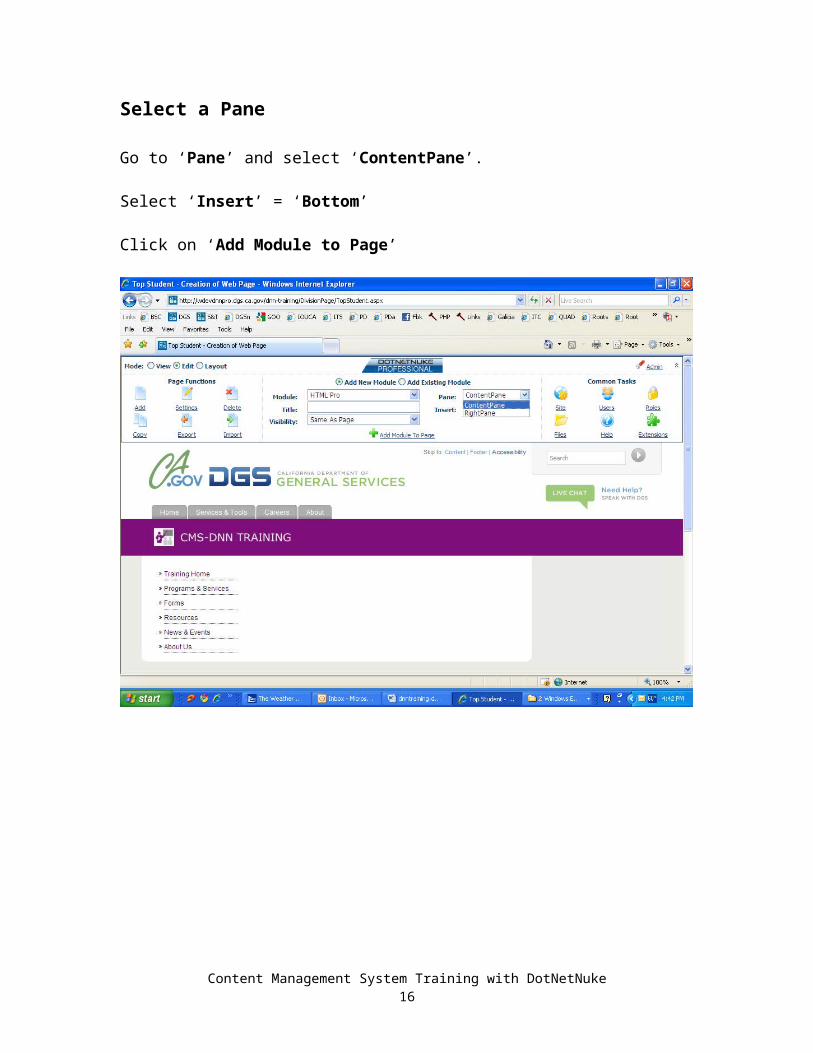
Select a Pane
Go to ‘Pane’ and select ‘ContentPane’.
Select ‘Insert’ = ‘Bottom’
Click on ‘Add Module to Page’
Content Management System Training with DotNetNuke 12
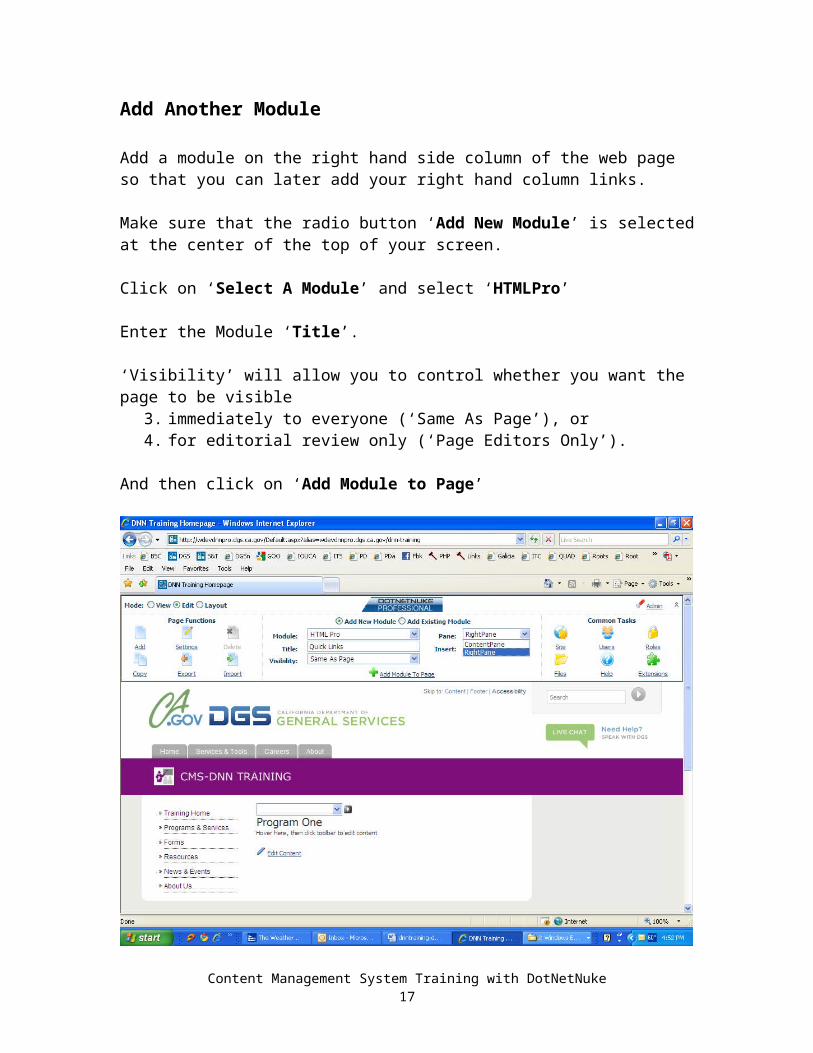
Add Another Module
Add a module on the right hand side column of the web page so that you can later add your right hand column links.
Make sure that the radio button ‘Add New Module’ is selected at the center of the top of your screen.
Click on ‘Select A Module’ and select ‘HTMLPro’
Enter the Module ‘Title’.
‘Visibility’ will allow you to control whether you want the page to be visible3. immediately to everyone (‘Same As Page’), or4. for editorial review only (‘Page Editors Only’).
And then click on ‘Add Module to Page’
Content Management System Training with DotNetNuke 13

Page with Two Modules
You now have a new page with a module (placeholder) in the center and another one on the right hand column.
You will be able to cut and paste (or type) content into either module (placeholder).
Content Management System Training with DotNetNuke 14

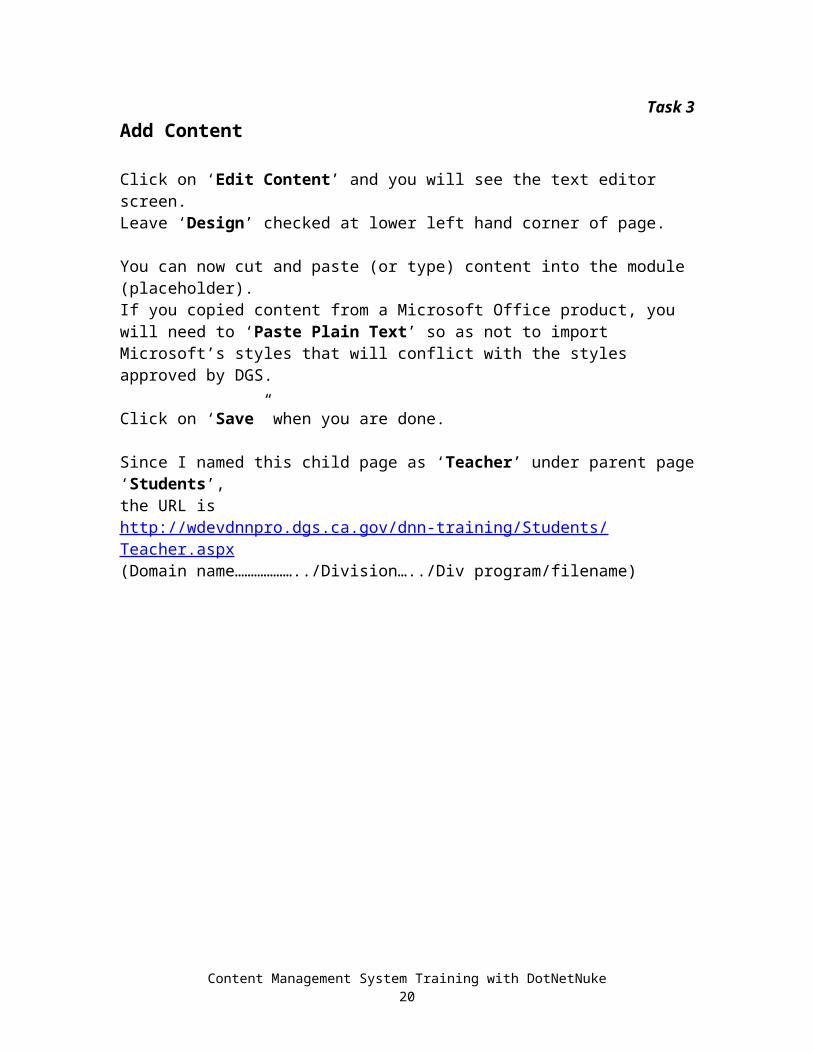
Task 3Add Content
Click on ‘Edit Content’ and you will see the text editor screen.Leave ‘Design’ checked at lower left hand corner of page.
You can now cut and paste (or type) content into the module (placeholder).If you copied content from a Microsoft Office product, you will need to ‘Paste Plain Text’ so as not to import Microsoft’s styles that will conflict with the styles approved by DGS. Click on ‘Save” when you are done.
Since I named this child page as ‘Teacher’ under parent page ‘Students’, the URL is http://wdevdnnpro.dgs.ca.gov/dnn-training/Students/Teacher.aspx(Domain name………………../Division…../Div program/filename)
Content Management System Training with DotNetNuke 15
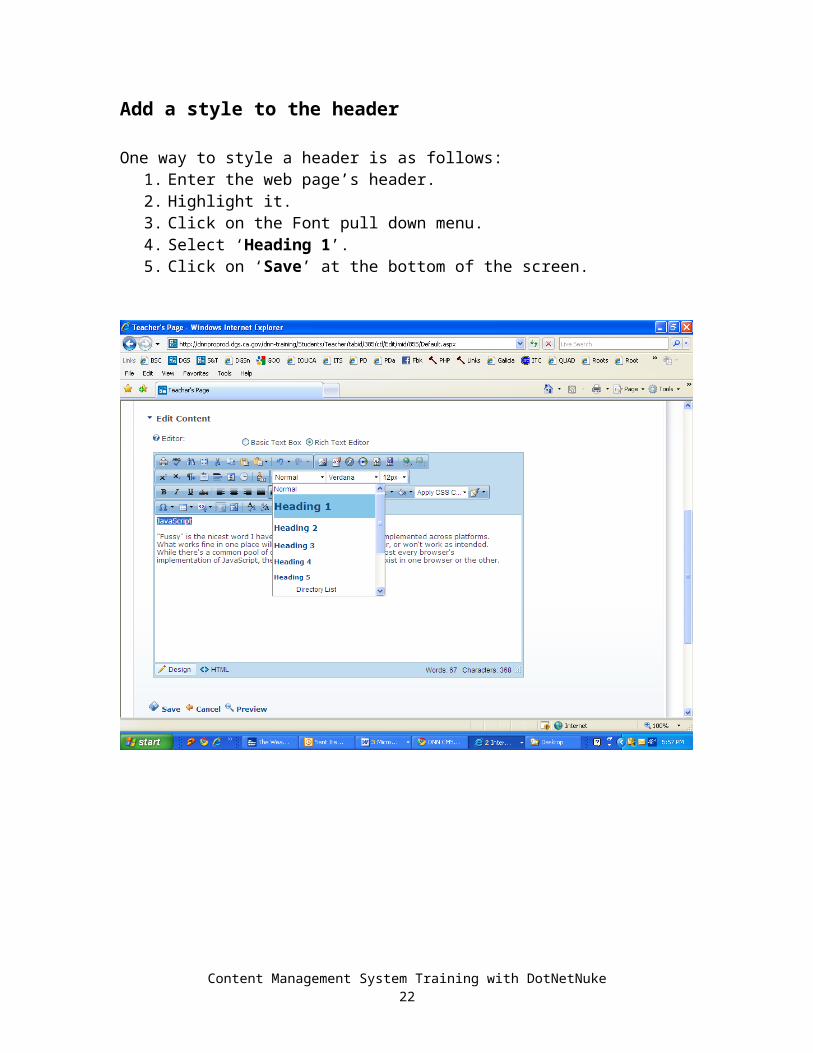
Add a style to the header
One way to style a header is as follows:1. Enter the web page’s header. 2. Highlight it. 3. Click on the Font pull down menu. 4. Select ‘Heading 1’. 5. Click on ‘Save’ at the bottom of the screen.
Content Management System Training with DotNetNuke 16
Completed New Web Page
Your page is now complete.
It is a child page named Teacher.aspx under the parent page named Students.aspx.
Content Management System Training with DotNetNuke 17
Task 4Edit an Existing Page
Click on ‘Staff” on the left hand navigation bar.You will get a screen with large icons as below.
Notice there is an icon for the ‘Recycle Bin’. We will refer to it later.
Click on the ‘Pages” icon.
Content Management System Training with DotNetNuke 18

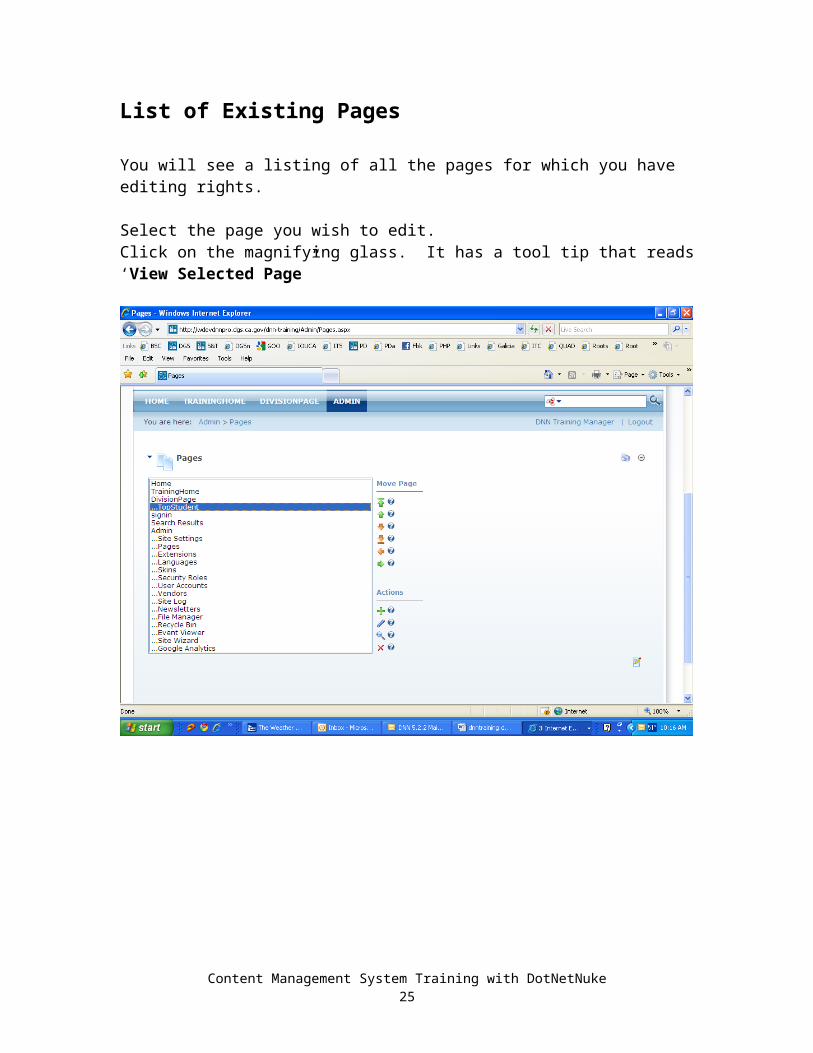
List of Existing Pages
You will see a listing of all the pages for which you have editing rights.
Select the page you wish to edit.Click on the magnifying glass. It has a tool tip that reads ‘View Selected Page”
Content Management System Training with DotNetNuke 19
Edit the Content of a Module
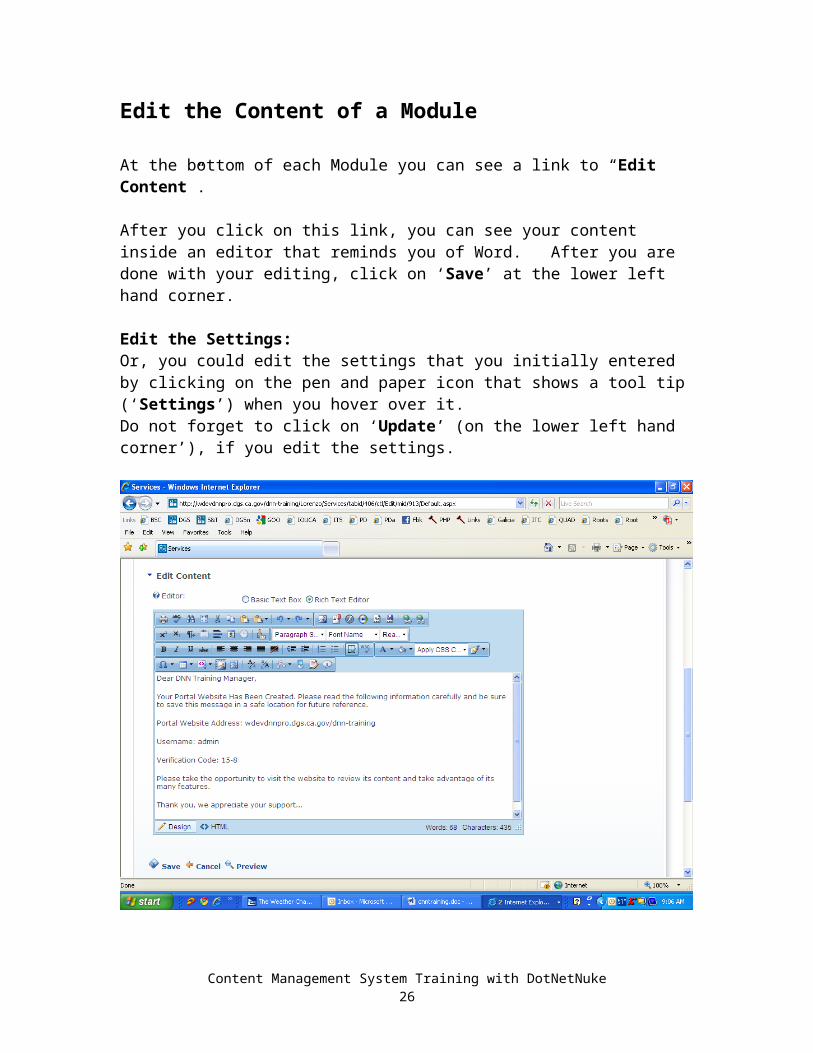
At the bottom of each Module you can see a link to “Edit Content”.
After you click on this link, you can see your content inside an editor that reminds you of Word. After you are done with your editing, click on ‘Save’ at the lower left hand corner.
Edit the Settings:Or, you could edit the settings that you initially entered by clicking on the pen and paper icon that shows a tool tip (‘Settings’) when you hover over it.Do not forget to click on ‘Update’ (on the lower left hand corner’), if you edit the settings.
Content Management System Training with DotNetNuke 20

Task 6DNN Editor
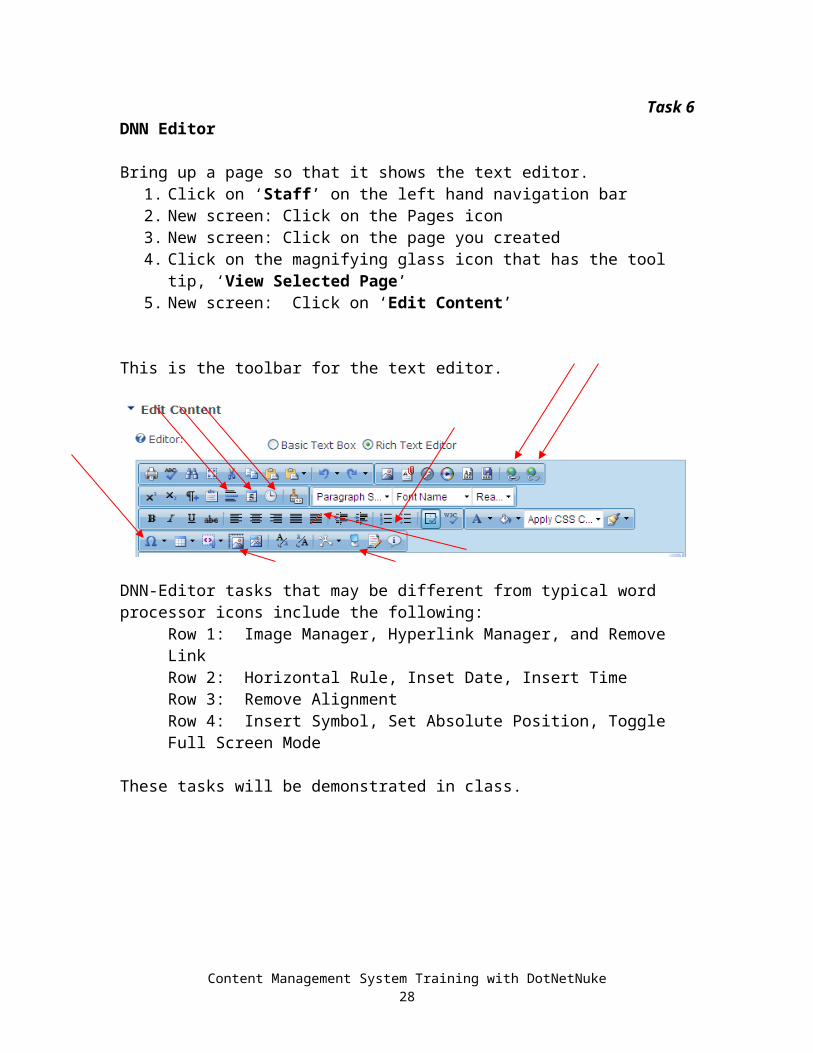
Bring up a page so that it shows the text editor.1. Click on ‘Staff’ on the left hand navigation bar2. New screen: Click on the Pages icon3. New screen: Click on the page you created4. Click on the magnifying glass icon that has the tool tip, ‘View Selected
Page’5. New screen: Click on ‘Edit Content’
This is the toolbar for the text editor.
DNN-Editor tasks that may be different from typical word processor icons include the following:
Row 1: Image Manager, Hyperlink Manager, and Remove LinkRow 2: Horizontal Rule, Inset Date, Insert TimeRow 3: Remove AlignmentRow 4: Insert Symbol, Set Absolute Position, Toggle Full Screen Mode
These tasks will be demonstrated in class.
Content Management System Training with DotNetNuke 21
Task 7Add Links on a DNN Web Page
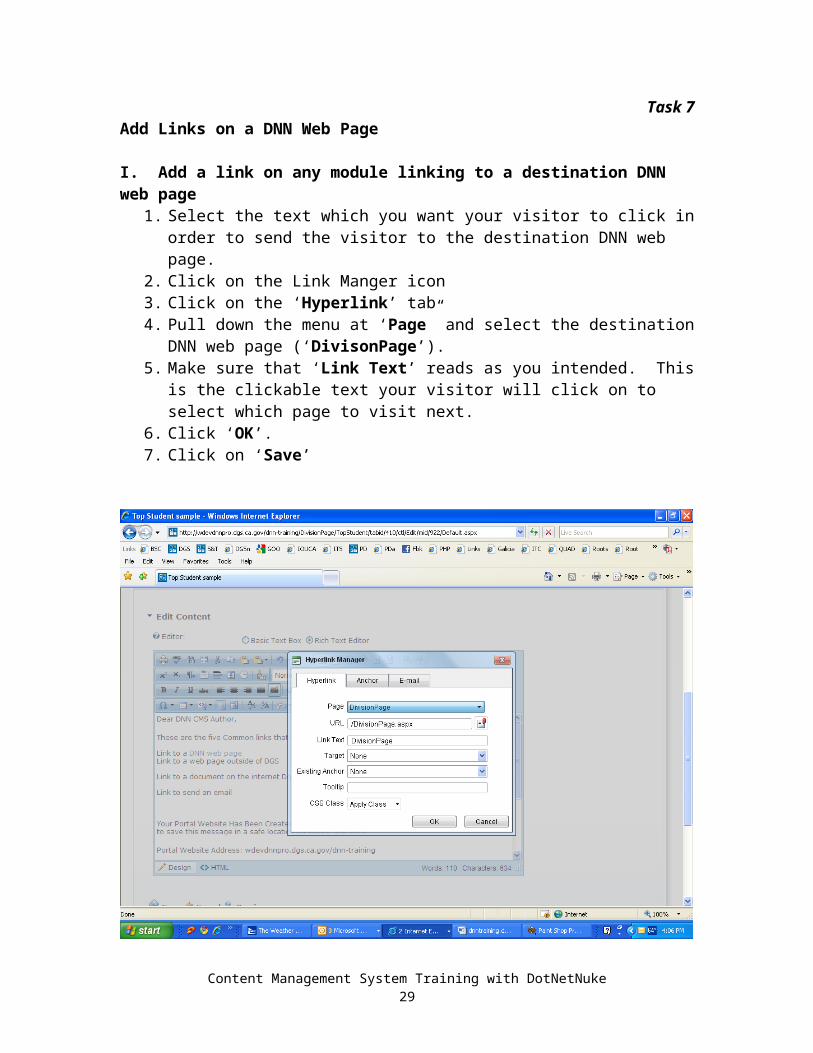
I. Add a link on any module linking to a destination DNN web page1. Select the text which you want your visitor to click in order to send the
visitor to the destination DNN web page.2. Click on the Link Manger icon3. Click on the ‘Hyperlink’ tab4. Pull down the menu at ‘Page” and select the destination DNN web page
(‘DivisonPage’).5. Make sure that ‘Link Text’ reads as you intended. This is the clickable
text your visitor will click on to select which page to visit next. 6. Click ‘OK’.7. Click on ‘Save’
Content Management System Training with DotNetNuke 22

II. Add a link on any module to a web page outside of DGS
1. Select the text which you want your visitor to click in order to send the visitor to the web page outside of DGS.
2. Click on the Link Manger icon3. Click on the ‘Hyperlink’ tab4. Type in the ‘URL’ of the web page that is outside DGS, such as
…http://www.google.com.5. Make sure that ‘Link Text’ reads as you intended. This is the clickable
text your visitor will click on to select which page to visit next. 6. Click ‘OK’.7. Click on ‘Save’
Content Management System Training with DotNetNuke 23

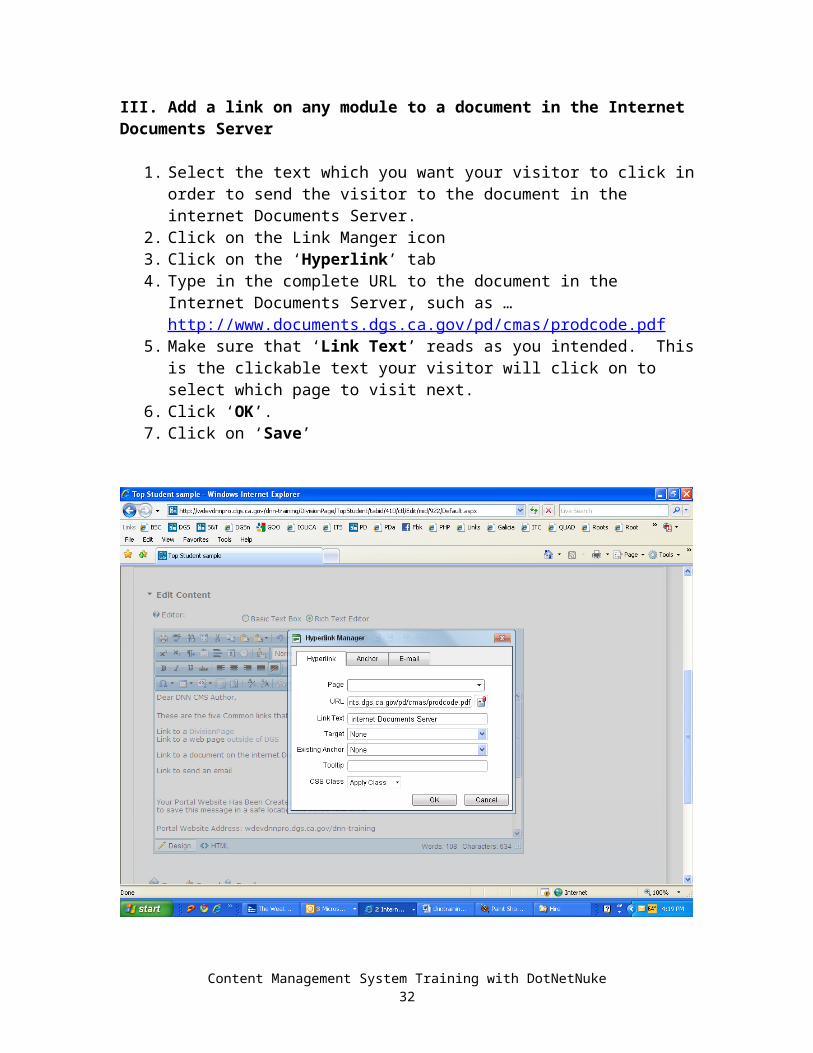
III. Add a link on any module to a document in the Internet Documents Server
1. Select the text which you want your visitor to click in order to send the visitor to the document in the internet Documents Server.
2. Click on the Link Manger icon3. Click on the ‘Hyperlink’ tab4. Type in the complete URL to the document in the Internet Documents
Server, such as … http://www.documents.dgs.ca.gov/pd/cmas/prodcode.pdf
5. Make sure that ‘Link Text’ reads as you intended. This is the clickable text your visitor will click on to select which page to visit next.
6. Click ‘OK’.7. Click on ‘Save’
Content Management System Training with DotNetNuke 24
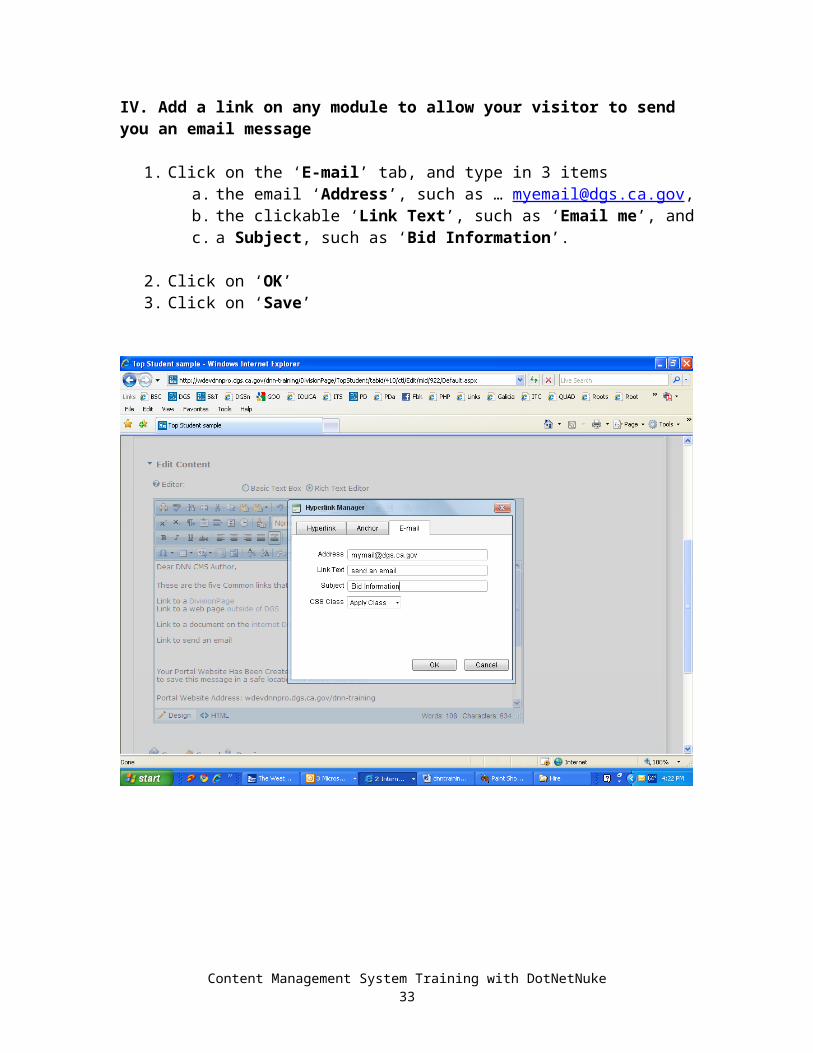
IV. Add a link on any module to allow your visitor to send you an email message
1. Click on the ‘E-mail’ tab, and type in 3 itemsa. the email ‘Address’, such as … [email protected], b. the clickable ‘Link Text’, such as ‘Email me’, andc. a Subject, such as ‘Bid Information’.
2. Click on ‘OK’3. Click on ‘Save’
Content Management System Training with DotNetNuke 25
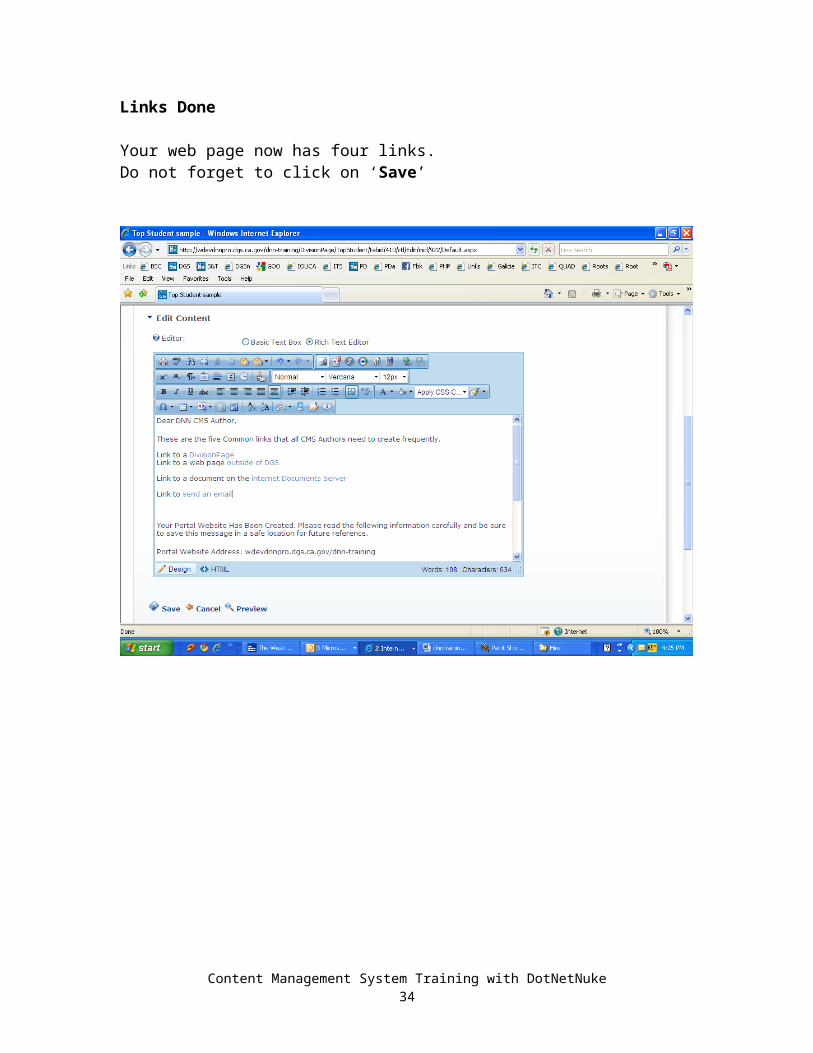
Links Done
Your web page now has four links.Do not forget to click on ‘Save’
Content Management System Training with DotNetNuke 26
Deep Anchors
Often you will need to link from the top of a page to one of several sections below on the same page. These links are called ‘Deep Anchors’.
Let us say that you want to click on ‘Multicolumn’ at the top of the page, and want to jump to the paragraph on ‘Multicolumn Documents’ below.
This takes 2 steps: Set up the ‘Deep Anchor’ and then create a hyperlink.
Content Management System Training with DotNetNuke 27
Set up the ‘Deep Anchor’.
1. Click the cursor on the spot where you want the page to jump to (such as ‘Multicolumn Document’ paragraph).
2. Click on the Hyperlink Management icon.3. Select the “Anchor” tab.4. Enter a ‘Name’ for that spot, such as “multi”.
Content Management System Training with DotNetNuke 28
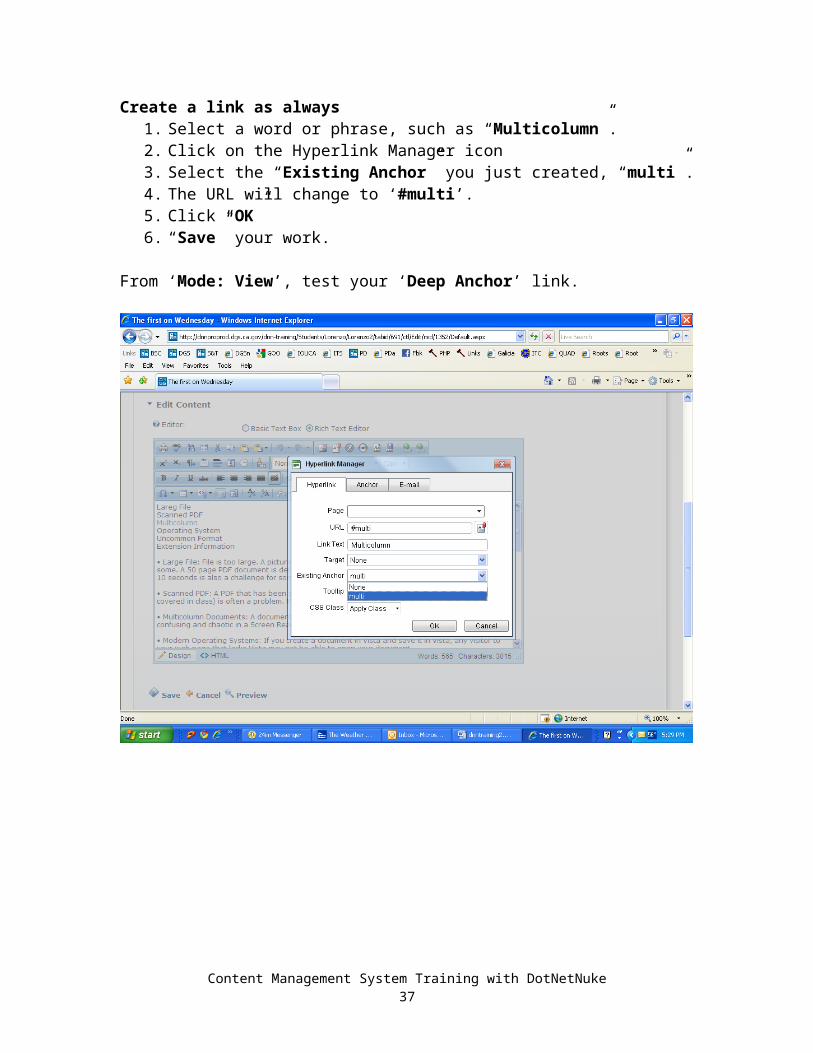
Create a link as always1. Select a word or phrase, such as “Multicolumn”.2. Click on the Hyperlink Manager icon3. Select the “Existing Anchor” you just created, “multi”.4. The URL will change to ‘#multi’.5. Click “OK”6. “Save” your work.
From ‘Mode: View’, test your ‘Deep Anchor’ link.
Content Management System Training with DotNetNuke 29

Task 8Add a graphic to any module on a web page
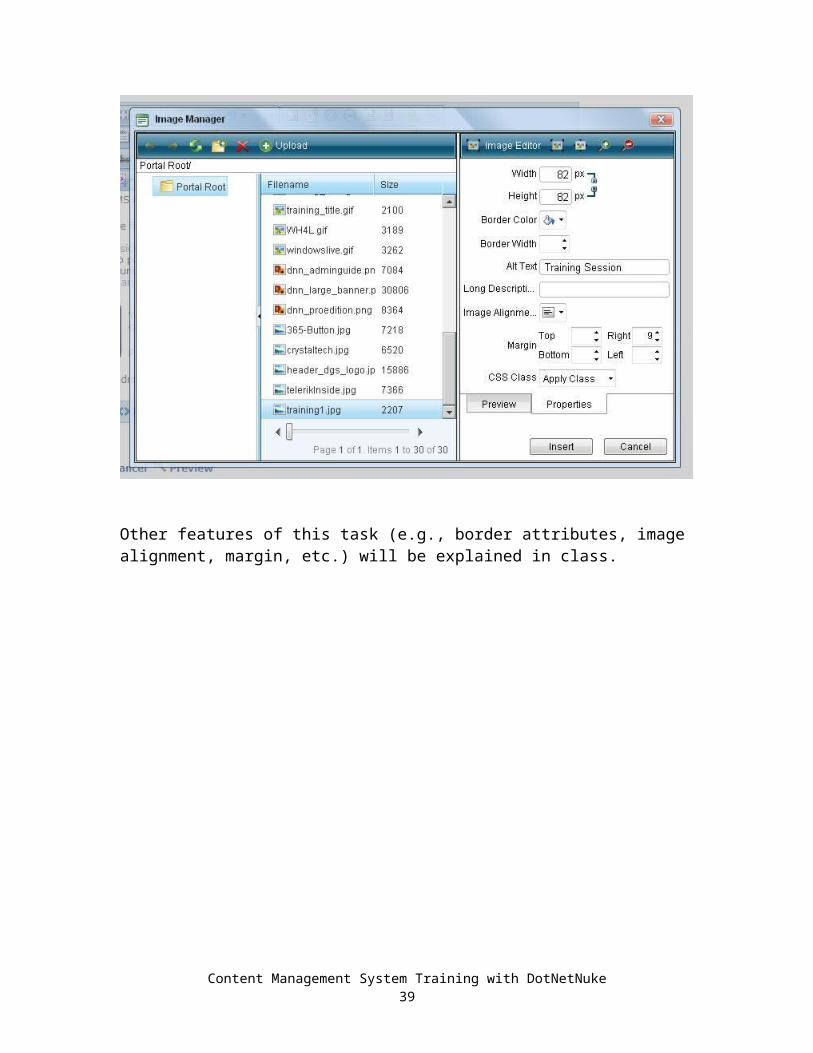
1. While in the DNN text editor, click on the ‘Image Manager’ icon.
2. The middle column lists all the available graphics. Notice their extensions and their sizes. If you select an image that is either a jpg or a gif, and is less than 1 megabyte, the chances are extremely high that all your visitors can see the image. Otherwise, some of your visitors may not be able to view the image. (Your PC will show bmp files only at your desk.)
3. On the right hand column, click on the ‘Properties’ tab. Fill in the ‘Alt Text’ with an alternative text that describes this image for the visually impaired visitor. This is not an option. It is a State requirement.
4. Click on ‘Insert’5. Click on ‘Save’
Other features of this task (e.g., border attributes, image alignment, margin, etc.) will be explained in class.
Content Management System Training with DotNetNuke 30

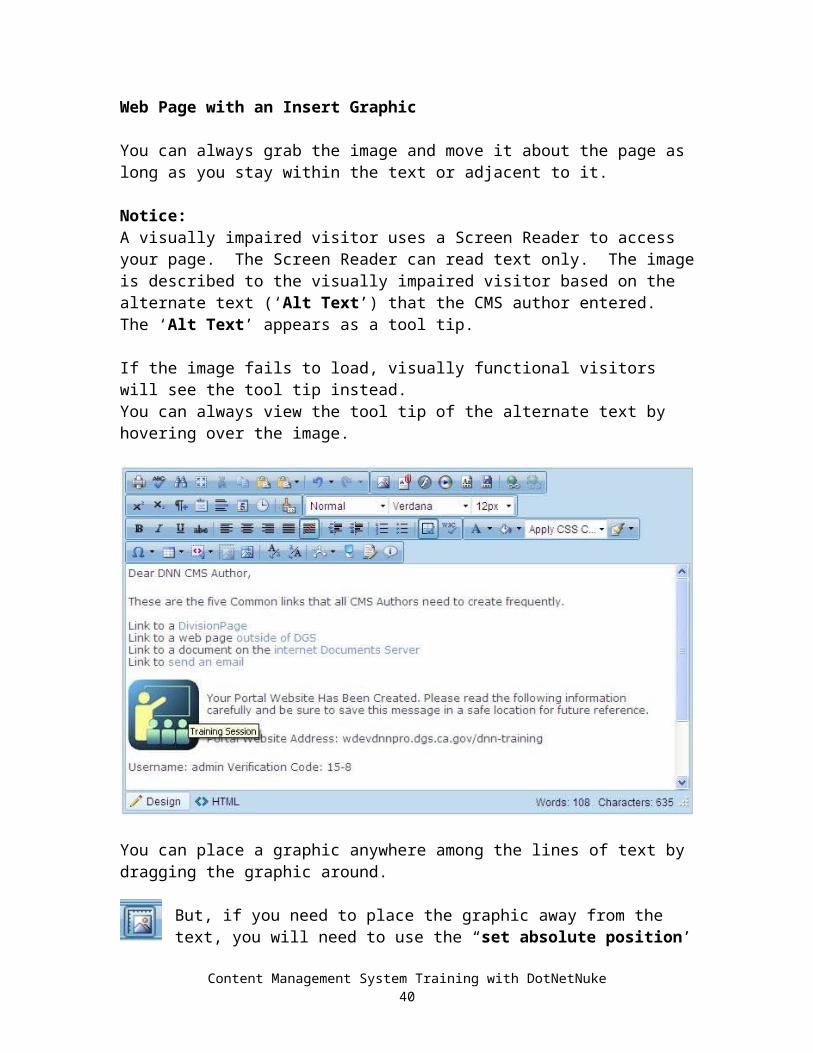
Web Page with an Insert Graphic
You can always grab the image and move it about the page as long as you stay within the text or adjacent to it.
Notice:A visually impaired visitor uses a Screen Reader to access your page. The Screen Reader can read text only. The image is described to the visually impaired visitor based on the alternate text (‘Alt Text’) that the CMS author entered. The ‘Alt Text’ appears as a tool tip.
If the image fails to load, visually functional visitors will see the tool tip instead.You can always view the tool tip of the alternate text by hovering over the image.
You can place a graphic anywhere among the lines of text by dragging the graphic around.
But, if you need to place the graphic away from the text, you will need to use the “set absolute position’ button. Select the graphic, click on the toolbar icon, and then drag and drop the graphic where you want it to
display.
Content Management System Training with DotNetNuke 31
Task 9Add an Announcement to ‘What’s New’
In most of your web pages you will have a section called ‘What’s New’ at the top of the right hand column. It contains links to the announcements that you enter. A summary page offers a short description and a link to the actual announcement. The process of adding an announcement to the ‘What’s New’ section of a web page takes 3 short steps.
1. Create the announcement as a web page with all its necessary content.2. Add a summary announcement entry on the ‘NewsEvents’ page.3. Export your new announcement to the ‘What’s New’ section.
Step 1. Create the announcement as a web page with all its necessary content. You create this page the way you create any web page. Let us use the web page you already created today.
Step 2. Add a summary announcement entry on the ‘NewsEvents’ page. Click ‘NewsEvents’ on the left navigation bar.(Or, from the ‘edit’ mode screen, click on ‘Staff’ and select ‘pages’ as you have done before. Click on ‘NewsEvents’ on the left hand list. Click on the icon with the tooltip that reads ‘view selected page’.)
Content Management System Training with DotNetNuke 32
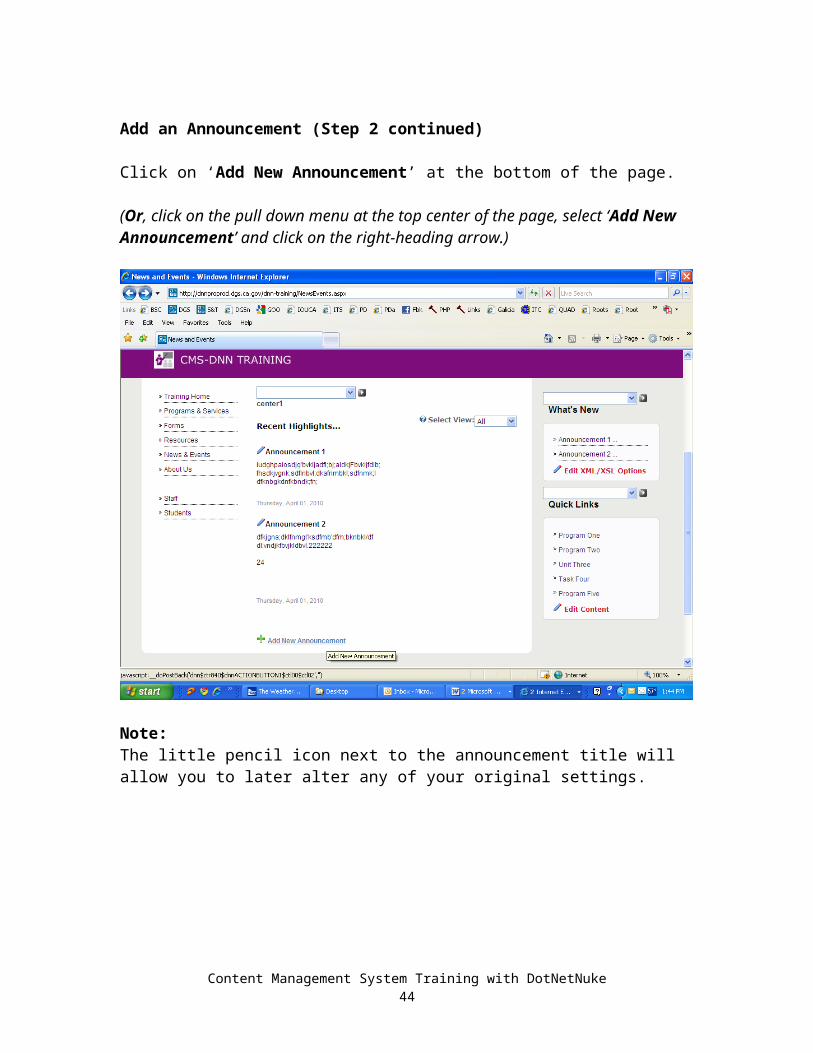
Add an Announcement (Step 2 continued)
Click on ‘Add New Announcement’ at the bottom of the page.
(Or, click on the pull down menu at the top center of the page, select ‘Add New Announcement’ and click on the right-heading arrow.)
Note:The little pencil icon next to the announcement title will allow you to later alter any of your original settings.
Content Management System Training with DotNetNuke 33
Add an Announcement (Step 2 continued)
Enter the ‘Title’ of the announcement. (It will also serve as a link to your announcement web page.)
Leave ‘Image’ as ‘Link Type: None’. Select ‘Basic Text Box’ and enter a short summary of your
announcement.
Content Management System Training with DotNetNuke 34

Add an Announcement (Step 2 continued)
Leave ‘Render Mode:’ as ‘Text’ At ‘Link’ set ‘Link Type:’ as ‘Page’ Wait a second, and then you will able to select a page from the list on the
‘Select A Web Page From Your Site:’ pull down menu. The link will open your original announcement web page.
Select the page you created in class because we need to use it as the announcement page.
Click on ‘Update’.
If it were relevant to your announcement, you could set the ‘Publish Date:’ and the ‘Expire Date:’ as well as the ‘View Order:’. Your announcements will be listed by highest view order number (absent that information, by most recent publish date).
Content Management System Training with DotNetNuke 35

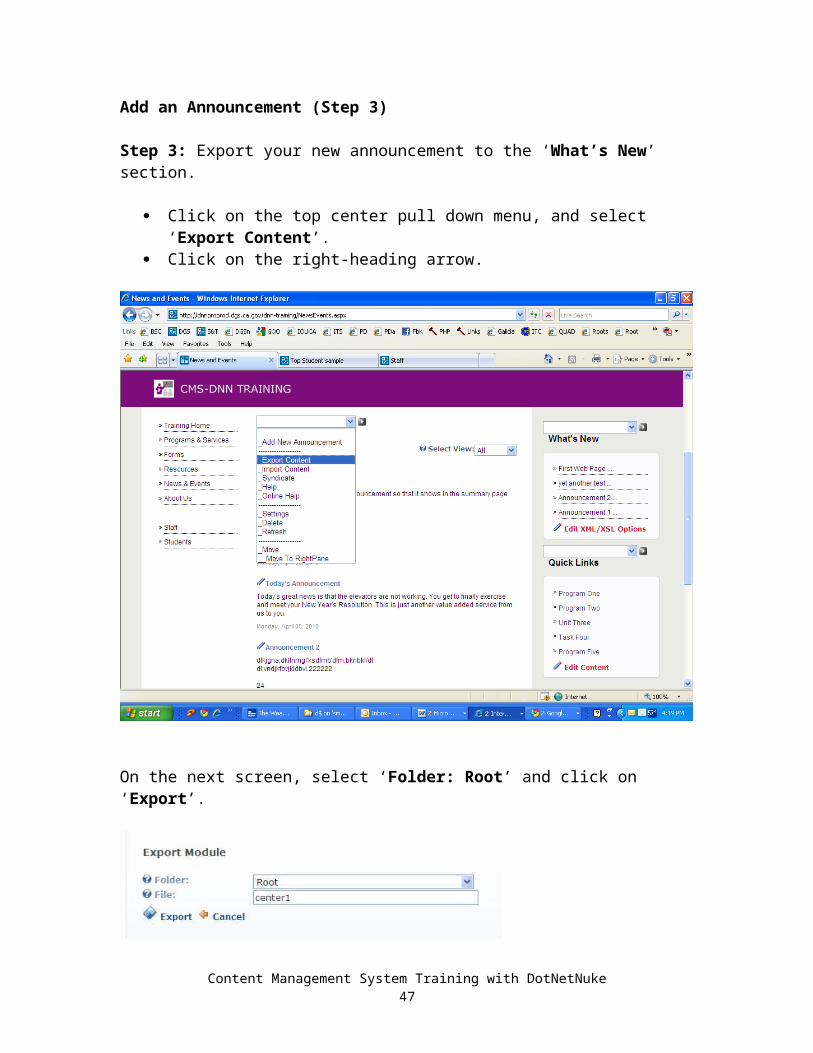
Add an Announcement (Step 3)
Step 3: Export your new announcement to the ‘What’s New’ section.
Click on the top center pull down menu, and select ‘Export Content’. Click on the right-heading arrow.
On the next screen, select ‘Folder: Root’ and click on ‘Export’.
Check the ‘What’s New’ section of your web pages to assure that the steps were successful.
Content Management System Training with DotNetNuke 36
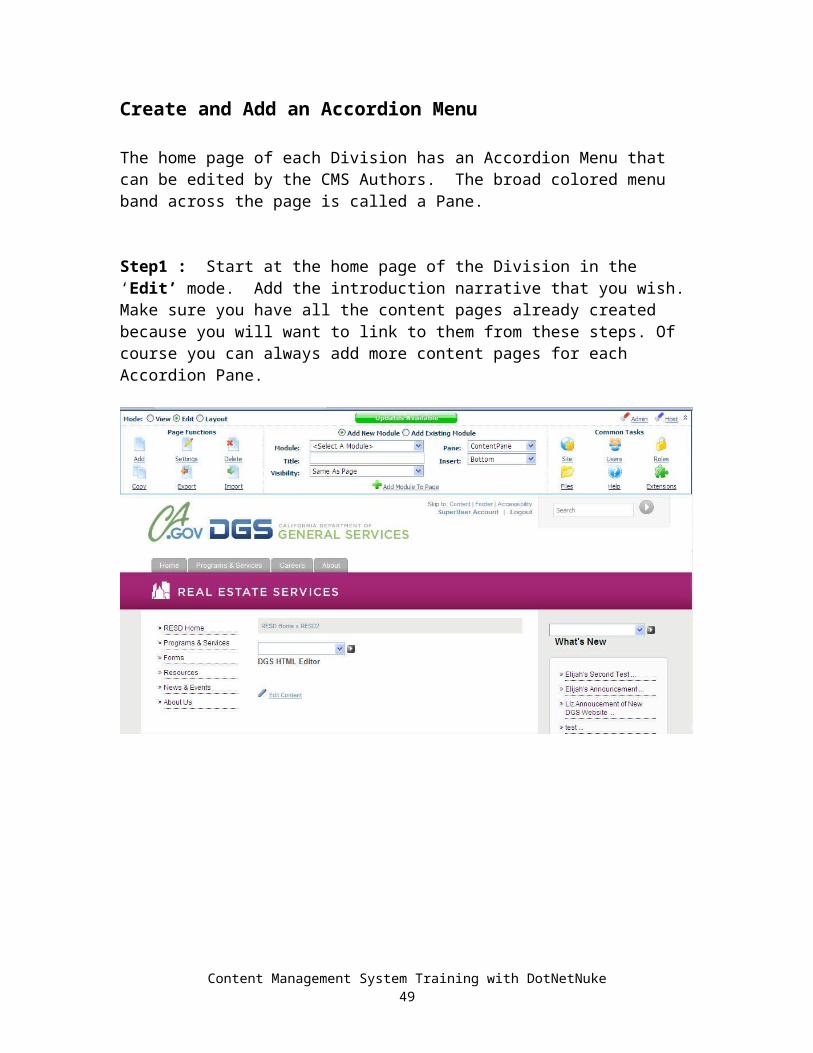
Create and Add an Accordion Menu
The home page of each Division has an Accordion Menu that can be edited by the CMS Authors. The broad colored menu band across the page is called a Pane.
Step1 : Start at the home page of the Division in the ‘Edit’ mode. Add the introduction narrative that you wish. Make sure you have all the content pages already created because you will want to link to them from these steps. Of course you can always add more content pages for each Accordion Pane.
Content Management System Training with DotNetNuke 37
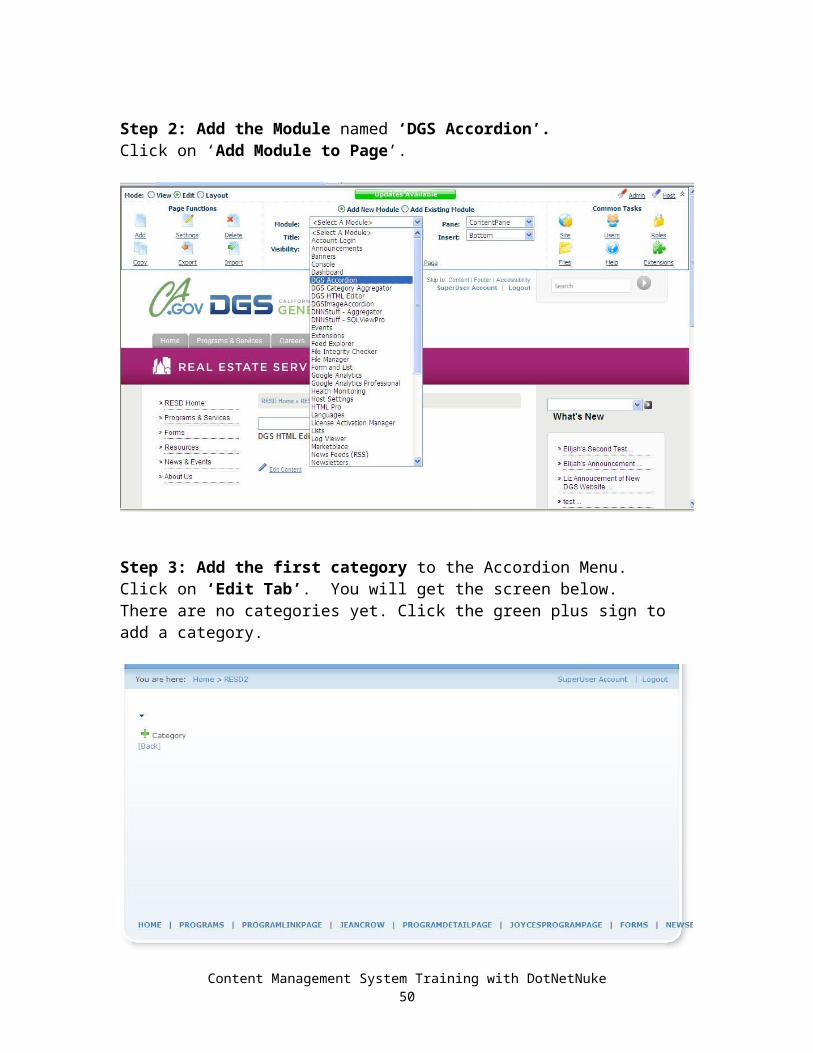
Step 2: Add the Module named ‘DGS Accordion’. Click on ‘Add Module to Page’.
Step 3: Add the first category to the Accordion Menu. Click on ‘Edit Tab’. You will get the screen below. There are no categories yet. Click the green plus sign to add a category.
Content Management System Training with DotNetNuke 38
Step 4: Add the Details for the Category
a. Enter the ‘Name’ of the Category. This will appear on the Accordion Pane (the broad colored band across the page).
b. Add a description in the editor, as well as approved images, and all desired links.
c. Save by clicking on the Floppy Disk icon.
You will then see the screen below.
Content Management System Training with DotNetNuke 39
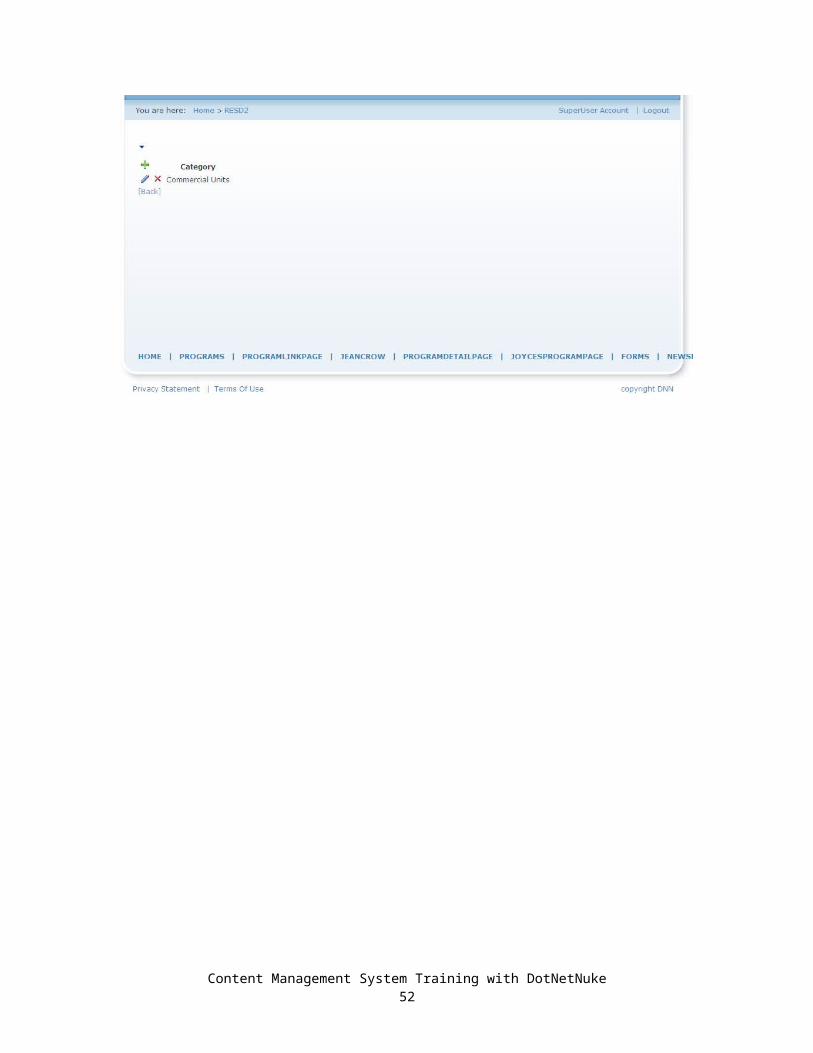
Step 5: Add a second Accordion PaneClick on the Green Plus next to the word ‘Category’ and follow the same steps as before.
Notice that you can rearrange the sequence of the individual Accordion Panes by moving the category up or down with the colored arrows.
Click on ‘Back’ to see your results.
Finally: As you click on an Accordion Pane it expands. As you click on another Accordion Pane, the last one contracts and the selected one expands.
Content Management System Training with DotNetNuke 40

Create or Add Vertical Tabs to a Vertical Tabs Menu
The Programs and Services page of each Division has a Vertical Tabs Menu that can be edited by the CMS Authors. When one clicks on a tab, a section to the right of it will list the pages associated with that tab.
Step 1: You should already have a ‘Programs & Services’ page. If not, then create it as you have created pages before. See page 6 of this manual. Use the ‘DGS Keyword Aggregator’ module.
Step 2: You will then create the tabs for the Vertical Tab Menu.
Step 3: Then, associate each content page with the desired vertical tab.
2.1 Create the tabs for the Vertical Tab Menu
After you have the ‘DGS Keyword Module’ on your page, click on ‘Edit Content’.On the next screen click on the green plus sign to add a tab.
2.2 Now label your first tab the way you will identify it later. For example, lets add a tab called ‘K-12’ on the ‘Programs&Services’ page.In the ‘keyword’, this labeling is case sensitive, and when you refer to it, you must spell it exactly every time (or the matching of a content page to a tab will fail).
Content Management System Training with DotNetNuke 41

2.3 Add a second tab to the Vertical Tab Menu.Make sure you match the case and the future spelling of what you enter in the ‘keyword’ section.
Click on the floppy disk icon to save your work. Click [Back] to return to the ‘Programs & Services’ page to view your work.
We now have two tabs in the Vertical Tab menu.
Notice the empty box to the right of the tabs. Our next step is to associate content pages to each tab so that when the customer clicks on a tab, the customer will see a list of content pages related to that tab.
Content Management System Training with DotNetNuke 42
3.1 Create and Associate Content Pages to Each Tab
Let us create 3 content pages for each tab as follows:K-12 CertificationGreening Your SchoolProject Tracking
SustainabilityArchitectureGreen School GuideSolar
Create the content pages as usual, but to associate a content page with a tab, you have to enter very specific content on the ‘keyword’ section.
What you enter on the ‘keyword’ section of each content page must match identically with what you entered on the ‘keyword’ section of the tab in order to associate your content page with the tab.
Remember:Within each new page, follow these instructions in the “keywords” field: Keywords Format: #PageName$Category^Order number in the tab
Definitions:PageName = Name of page where the tabs will be, i.e. ‘Programs&Services’Category = Name of Tab (Use normal spacing as you would in the title)Order number in the tab = position you would like this page to show up on the category. It is recommended that you number these in sequences of 10 (10, 20, 30, etc.) so if you later want to add one in the middle you don’t need to renumber.
Content Management System Training with DotNetNuke 43
3.2 Create or Associate the K-12 Tab Pages:
First page under K-12:
Certification (I want this one to be first): #Programs$K-12^10
Content Management System Training with DotNetNuke 44

Second page under K-12:
Greening your school (I want this one to be third): #Programs$K-12^30
Content Management System Training with DotNetNuke 45

Third page under K-12:
Project Tracking (I want this one to be second): #Programs$K-12^20
Content Management System Training with DotNetNuke 46
3.3 Create or Associate the Sustainability Tab Pages: First page under Sustainability:
Architecture (I want this one to be second): #Programs$Sustainability^20
Content Management System Training with DotNetNuke 47

Second page under Sustainability:
Green School Guide (I want this one to be third): #Programs$Sustainability^30
Content Management System Training with DotNetNuke 48
Third page under Sustainability:
Solar (I want this one to be first): #Programs$Sustainability^10
Content Management System Training with DotNetNuke 49
3.4 Add Another Page after You Have Completed Your Vertical Tab Menu
If you wanted to add a page to the Sustainability tab at a later time and you wanted it to display between Solar and Architecture you could label it
#Programs$ Sustainability^12.
Content Management System Training with DotNetNuke 50

Our final Vertical Tab Menu
Notice that we do have a Vertical Tab Menu with 2 tabs (‘K-12’ and ‘Sustainability’).
When we click on the ‘K-12’ tab we see a listing of 3 pages – each with a title; a synopsis; and a link (‘Read More’) to open the content page.
If we click on ‘Sustainability’, we will see its 3 pages listed in a similar fashion.
Content Management System Training with DotNetNuke 51
Task 10Can your Customers View Your Documents?
Not every file or document you post can be downloaded, accessed, or read by the visitors to your web page. Certain visitors struggle with obstacles that we create for them. Our goal is to reach as close to 100% of our customers as possible. If we exclude 10% of our customers, we have excluded too many.
Large File: File is too large. A picture that is larger than 1 megabyte will start to be a problem for some. A 50 page PDF document is definitely a problem for many. A video clip that lasts more than 10 seconds is also a challenge for some.
Scanned PDF: A PDF that has been scanned as an image rather than OCR-enabled (topic will be covered in class) is often a problem. Most of the vendor generated PDFs are of this kind.
Multicolumn Documents: A document that has more than one column in a page can sound confusing and chaotic in a Screen Reader.
Modern Operating Systems: If you create a document in Vista and save it in Vista, any visitor to your web page that lacks Vista may not be able to open your document.
Uncommon Formats: Many visitors do not have certain applications we commonly use at DGS, for instance, Microsoft Publisher, Visio, Project Manager, and more.
Extension Information: If you look at the extension of the document you wish to post you can tell what application created it. You will then know if your customers might have that application or not. But most DGS PC s are set by default to hide this information. You need to reset your Window Explorer to unhide this information. (Please see the next page dealing with ‘Set Windows Explorer to Display Extensions’.)
Content Management System Training with DotNetNuke 52

Set Windows Explorer to Display Extensions
We want to bring up ‘Windows Explorer’, not ‘My Documents’. On the lower left hand corner of your keyboard is a key that looks like a flying window. Hold that key down and strike the letter ‘E’.
In ‘Windows Explorer’, under ‘Tools’ click ‘Folder Options’. Click the ‘View’ tab, and uncheck ‘Hide extensions for known file
types’. Click ‘Apply to All Folders’, and then click ‘Yes’. You may need to click ‘Yes’ one more time.
You will now be able to see the filenames with their corresponding extensions.
Content Management System Training with DotNetNuke 53

View the File Details
Back at the ‘Windows Explorer’, click on ‘View’ and then click on ‘Details’.
Notice that you now have four columns on the right hand side. 1. file name with its extension, 2. file size, 3. file type (format), and 4. date modified.
Most of the frustration that CMS Authors have with posting documents from the internet Documents Server comes from not paying attention to these file details. Common errors can be avoided by verifying the file name, the correct extension (format), the correct size, and the correct modification date before posting, overlaying, or deleting any file.
Content Management System Training with DotNetNuke 54

Task 11Clear Your Cache Frequently
This is what a CMS author does in order to update a web page.1. Click to the web page, or enter its URL in the browser’s ‘address’ box.2. Make the edits through the Content Management System.3. Save and follow the necessary closing steps.
Depending on how the CMS author’s PC is configured, this will work every time. However, it is common for these steps to not be enough. Here is why.
When someone attempts to open a web page, or a document in the Documents Server, the PC executes the following steps.
1. The browser uses the URL to locate the web page or the document in a server.
2. This requires a great deal of physical work, so in case the web page or document is called up again, the PC needs a faster and less physically involved retrieval process. PC’s Solution: Keeps a copy (of whatever it retrieves) in a fast memory area of the PC’s central processing unit called ‘cache’.
3. The next time that same web page or document is called up, the PC will first check ‘cache’. If the document is there, the PC will retrieve that older document, …and not the newer copy on the server!
4. But when a CMS Author updates a document, it is not saved in ‘cache’. It is saved on the server.
5. So when the CMS Author calls up the newly edited file a second time, the CMS Author will receive the old version from ‘cache’, and not the newly saved version from the server.
This is the cause of a great deal of unnecessary frustration. Your solution is to frequently clear ‘cache’, forcing the PC to always retrieve the server version – namely, the latest version of a document.
Content Management System Training with DotNetNuke 55

Steps for Clearing Cache
1. From your browser, click on ‘Tool’ and then on ‘Internet Options’.2. You will see the image below. Depending on your browser version, this
may look slightly different but the wording is almost the same. Click on the ‘General’ tab.
3. Click on a button that says at least ‘Delete temporary files’. If you have not done this in several days, this step could take several minutes.
4. ‘Ok’ your way back to the browser.5. On your browser, click on the ‘Refresh’ icon. It is usually 2 green arrows
in a circle.
Now when you call up a web page or document from the server, you will receive the latest version, not the outdated ‘cache’ version.
Content Management System Training with DotNetNuke 56

Internet Documents Server
DNN handles all web pages exhibiting an aspx extension. However, most web pages link to Word, Excel, PowerPoint, PDF, etc. documents. These must be posted to the internet Documents Server. These are associated with content on a web page but these are not web pages.
Map a DriveIn order to manually upload a document (e.g., PDF, DOC, XLS, PPT, etc.) to the internet Documents Server, you need to create a connection between your PC and that server. This is called mapping a drive.
Open Window Explorer by holding down the flying-window key on your keyboard (lower left corner), and then striking the letter ‘E’. (Get it, ‘Windows’ ‘Explorer’?)
Click on ‘Tools’, and then on ‘Map Network Device’
(Your internet web page should not link to a document on the intranet Documents Server, \\smf00miis002\XXXIntra$.)
Content Management System Training with DotNetNuke 57

Map a Drive to the Internet Server
1. Select a Drive letter by opening the pull down menu next to the word ‘Drive:’.
2. Enter the internet server name: \\smf00miis045\ OPSC -InterDocs$ next to the word ‘Folder:’ Change the ‘OPSC’ to match your division’s initials.
3. Check the box for ‘Reconnect at logon’.4. Click on ‘Finish’
If everything worked, you should see a screen full of little yellow folders.You are now ready to copy and paste any Word, Excel, PowerPoint, etc. document from your PC (or from your unit’s shared area) onto the internet Documents Server that the public can access.
Documents posted on the internet Documents Server will have this URL:http://www.documents.dgs.ca.gov/OPSC/folder-path/filename.extYou will need to replace the following:
1. ‘OPSC’ with your division’s initials,2. ‘folder-path’ with the actual list of folders you drill down through,3. ‘filename.ext’ with the actual name and extension you gave the file.
Content Management System Training with DotNetNuke 58


![[XLS] · Web viewNon-Profit - Think Tanks Associate Director ... Big Data Labs Summer Intern ... IBM International Opportunities in Russia](https://static.fdocuments.net/doc/165x107/5ac25fb97f8b9a357e8dd5bc/xls-viewnon-profit-think-tanks-associate-director-big-data-labs-summer-intern.jpg)


