westcreek.azurewebsites.netwestcreek.azurewebsites.net/.../2016/09/CS700NVIDIA.docx · Web viewVDI...
57
VDI best practices for configuring CS700 for accelerated graphics WS460c hardware BIOS settings WS460c Graphics Server Blade video modes Starting with the Gen9 WS460c, the graphics modes have changed. There are now only two video modes: Add-in Video Enabled, Embedded Video Disabled In this mode, only the add-in cards are enabled and the embedded GPU is disabled. This has the same functionality and purpose as “User” mode in Gen8 and G6 WS460c blades. For Gen9 WS460c blades, this is the primary production mode when the following operating systems are installed: Microsoft® Windows® 7 or 8.1 on bare metal Linux® on bare metal Both Add-in and Embedded Video Enabled In this mode, all cards are enabled and seen by the operating system. This is the same functionality and purpose as “Setup” mode in Gen8 and G6 WS460c systems. For the Gen9 WS460c this is the primary production mode when the following operating systems are installed: Microsoft Windows Server® 2012 R2 VMware vSphere ESXi Citrix® XenServer
Transcript of westcreek.azurewebsites.netwestcreek.azurewebsites.net/.../2016/09/CS700NVIDIA.docx · Web viewVDI...
VDI best practices for configuring CS700 for accelerated graphicsWS460c hardware BIOS settingsWS460c Graphics Server Blade video modesStarting with the Gen9 WS460c, the graphics modes have changed. There are now only two video modes:Add-in Video Enabled, Embedded Video Disabled
In this mode, only the add-in cards are enabled and the embedded GPU is disabled. This has the same functionality and purpose as “User” mode in Gen8 and G6 WS460c blades.
For Gen9 WS460c blades, this is the primary production mode when the following operating systems are installed:Microsoft® Windows® 7 or 8.1 on bare metalLinux® on bare metal
Both Add-in and Embedded Video EnabledIn this mode, all cards are enabled and seen by the operating system. This is the same
functionality and purpose as “Setup” mode in Gen8 and G6 WS460c systems.For the Gen9 WS460c this is the primary production mode when the following operating
systems are installed:Microsoft Windows Server® 2012 R2VMware vSphere ESXiCitrix® XenServer
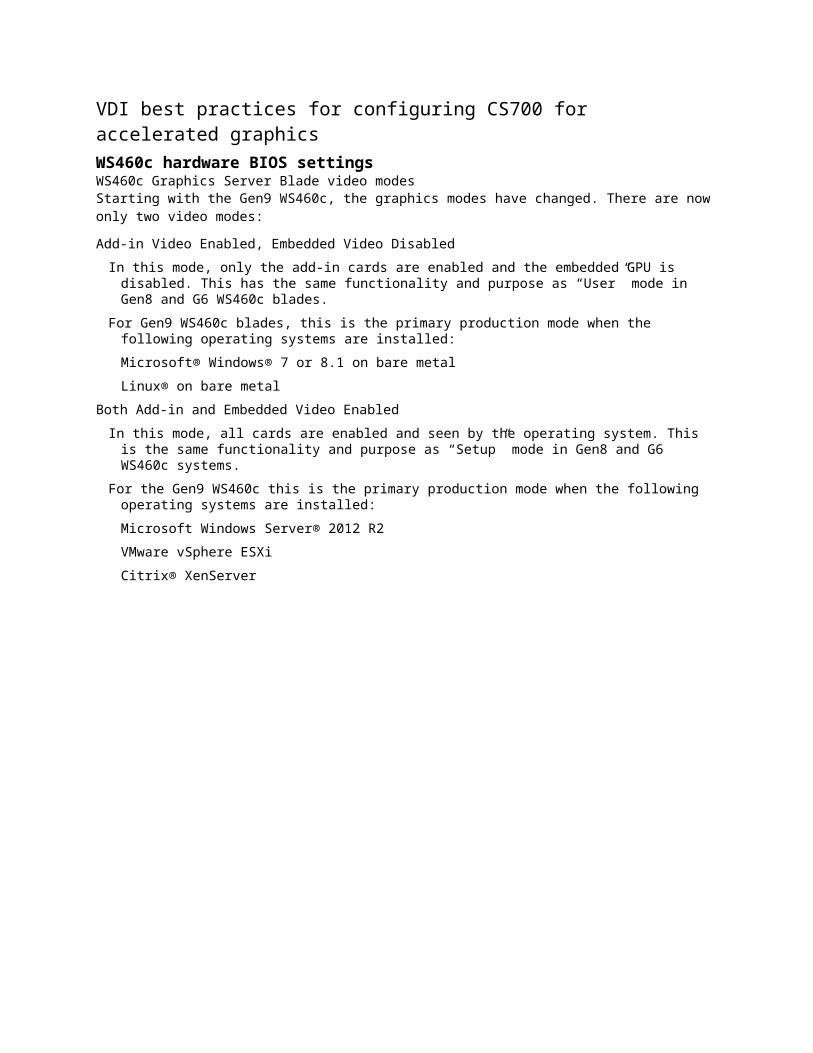
Video mode changes are made via RBSU (ROM Based System Utilities) via F9 and choosing “Advanced Options”.
Figure 6: RBSU access via System Utilities
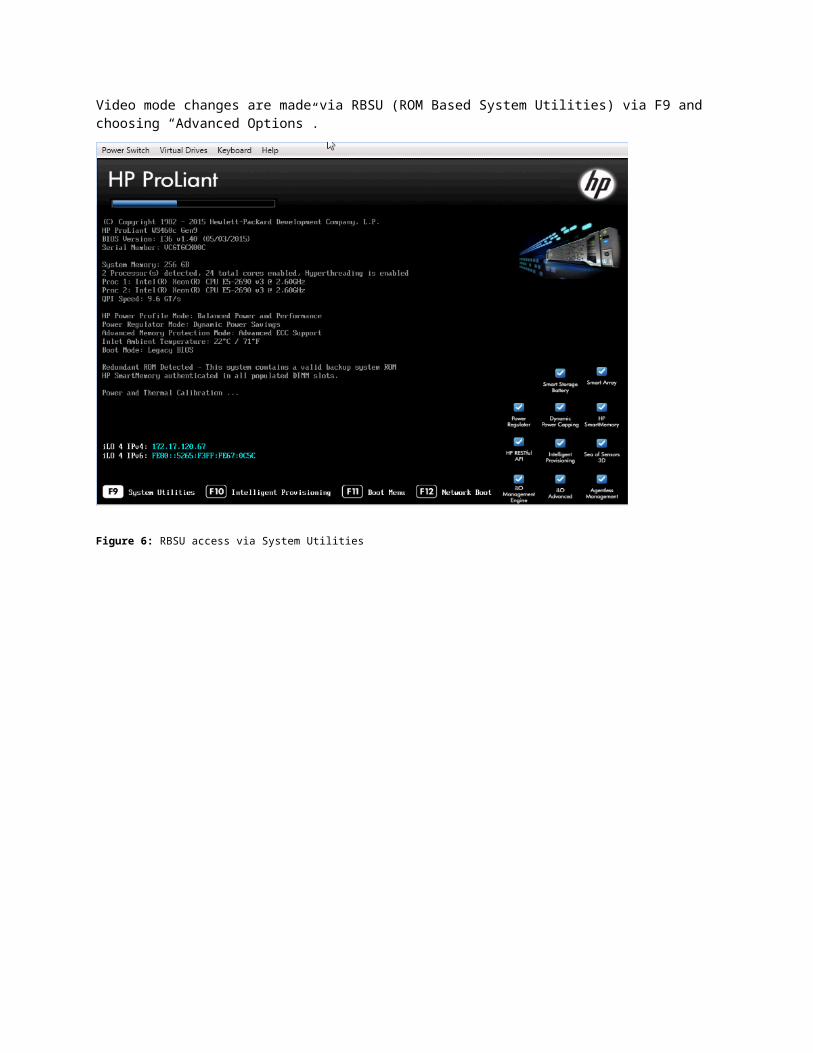
If the customer’s environment allows it, it is recommended to use the “Both Add-in and Embedded Video Enabled” option for ESXi console access via iLO when needed.
Figure 7: Changing Video Options
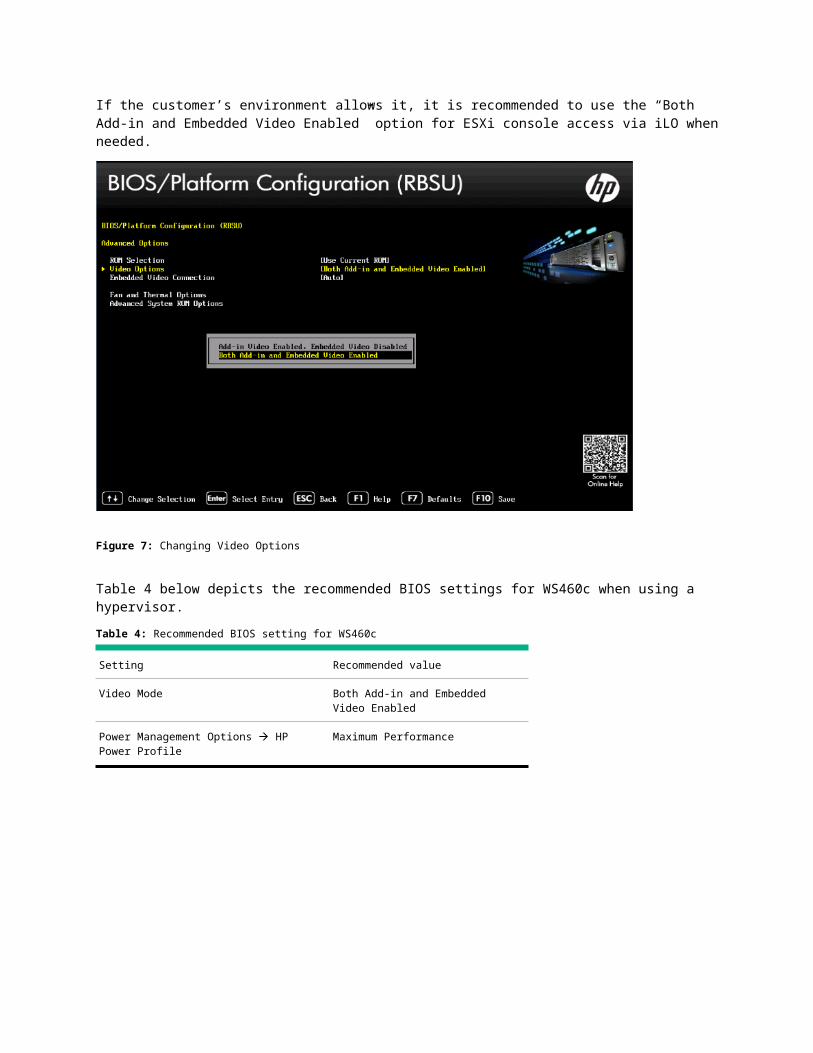
Table 4 below depicts the recommended BIOS settings for WS460c when using a hypervisor.Table 4: Recommended BIOS setting for WS460c
Setting Recommended value
Video Mode Both Add-in and Embedded Video Enabled
Power Management Options HP Power Profile
Maximum Performance
Setting up VMware vSphere 6 for vGPUNVIDIA GRID vGPU enables multiple virtual machines (VMs) to have simultaneous, direct access to a single physical GPU. To take advantage of this functionality you must use vSphere 6.x or above. It is highly recommended that you follow VMware best practices to upgrade your environment to vSphere 6.x. VMware vSphere 6.x upgrade best practices can be found at the following URL: http://kb. vmware .com/kb/2109712 The general requirements for deploying a vGPU solution on vSphere are listed below.VMware vSphere 6
Custom HPE and VMware ESXi 6.x image *VMware vCenter 6 Windows or OVA applianceVMware Horizon 6.1
NVIDIA vGPU softwareNVIDIA vGPU manager VIB **NVIDIA WDDM guest driver (32-bit and 64-bit versions)NVIDIA GPU configuration utility for Tesla M6 only (Windows and Linux available)NVIDIA GRID License server software for Tesla M6 only
Guest Operating SystemWindows 7 SP1 Professional or Enterprise or Windows 8
Licenses:VMware vSphere 6VMware Horizon 6.1Microsoft (as required)NVIDIA GRID Tesla license for M6 only
Notes* HPE and VMware custom ESXi image contains appropriate HPE drivers to run on HPE ProLiant servers. More information can be found at HPE ProLiant servers with VMware.** The vGPU Manager VIB is loaded similar to a driver in the vSphere hypervisor, and is then managed by the vCenter Server.
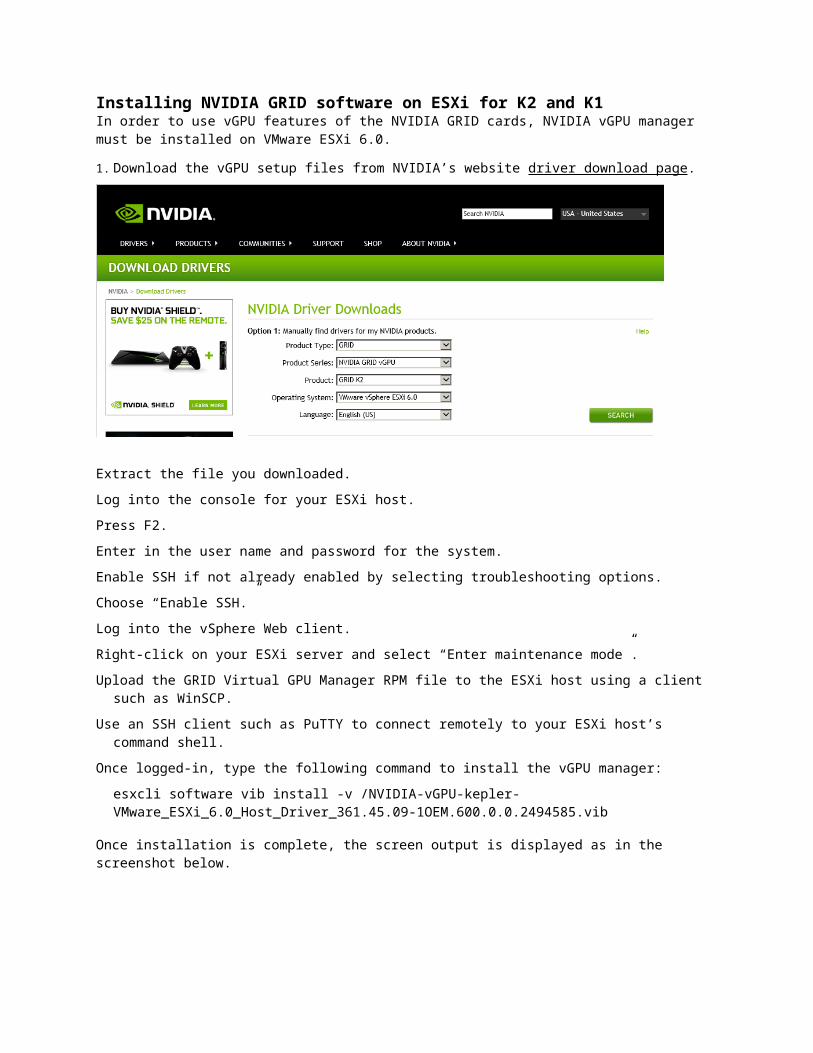
Installing NVIDIA GRID software on ESXi for K2 and K1In order to use vGPU features of the NVIDIA GRID cards, NVIDIA vGPU manager must be installed on VMware ESXi 6.0.1. Download the vGPU setup files from NVIDIA’s website driver download page.
Extract the file you downloaded.Log into the console for your ESXi host.Press F2.Enter in the user name and password for the system.Enable SSH if not already enabled by selecting troubleshooting options.Choose “Enable SSH.”Log into the vSphere Web client.Right-click on your ESXi server and select “Enter maintenance mode”. Upload the GRID Virtual GPU Manager RPM file to the ESXi host using a client such as
WinSCP. Use an SSH client such as PuTTY to connect remotely to your ESXi host’s command shell.Once logged-in, type the following command to install the vGPU manager:
esxcli software vib install -v /NVIDIA-vGPU-kepler-VMware_ESXi_6.0_Host_Driver_361.45.09-1OEM.600.0.0.2494585.vib
Once installation is complete, the screen output is displayed as in the screenshot below.
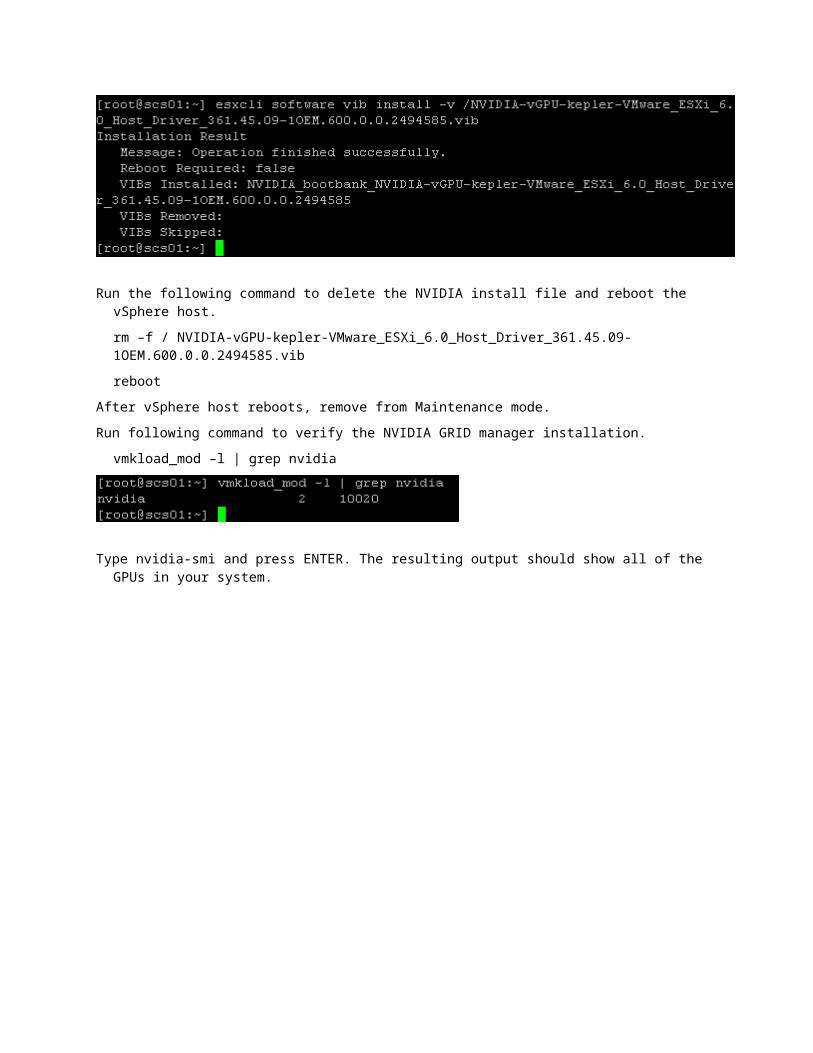
Run the following command to delete the NVIDIA install file and reboot the vSphere host.rm –f / NVIDIA-vGPU-kepler-VMware_ESXi_6.0_Host_Driver_361.45.09-1OEM.600.0.0.2494585.vibreboot
After vSphere host reboots, remove from Maintenance mode.Run following command to verify the NVIDIA GRID manager installation.
vmkload_mod –l | grep nvidia
Type nvidia-smi and press ENTER. The resulting output should show all of the GPUs in your system.
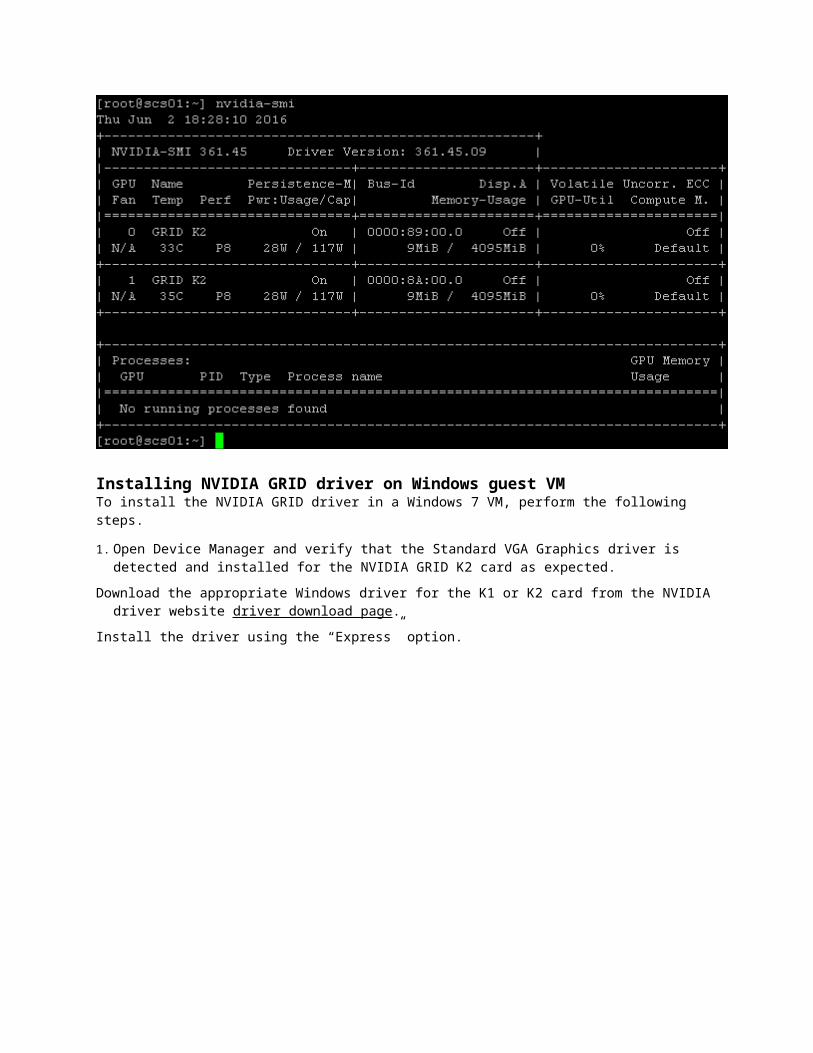
Installing NVIDIA GRID driver on Windows guest VMTo install the NVIDIA GRID driver in a Windows 7 VM, perform the following steps.1. Open Device Manager and verify that the Standard VGA Graphics driver is detected and
installed for the NVIDIA GRID K2 card as expected.Download the appropriate Windows driver for the K1 or K2 card from the NVIDIA driver
website driver download page.Install the driver using the “Express” option.
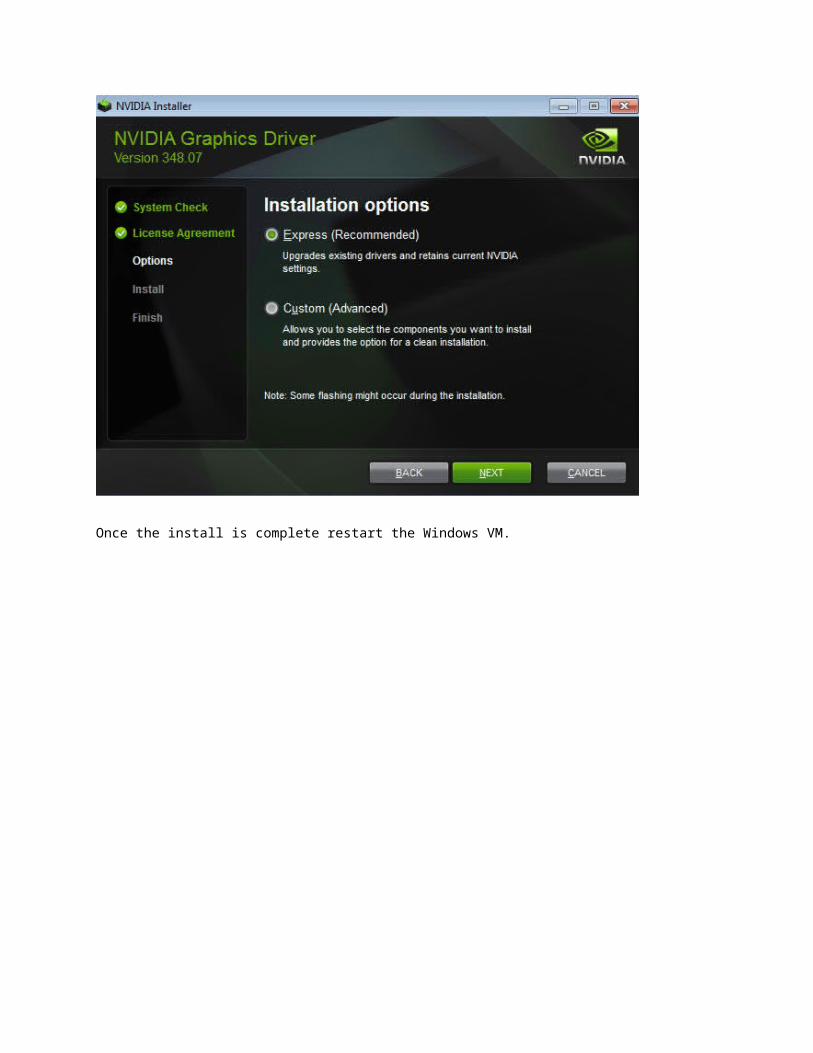
Once the install is complete restart the Windows VM.
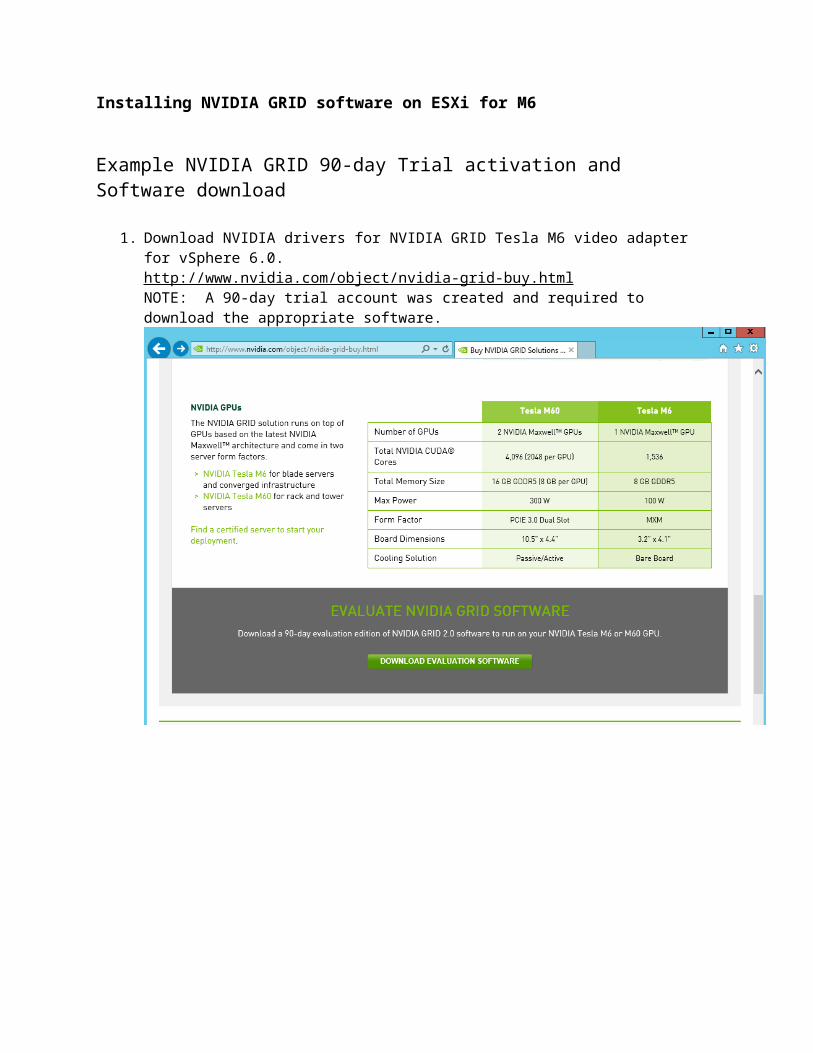
Installing NVIDIA GRID software on ESXi for M6
Example NVIDIA GRID 90-day Trial activation and Software download
1. Download NVIDIA drivers for NVIDIA GRID Tesla M6 video adapter for vSphere 6.0.http://www.nvidia.com/object/nvidia-grid-buy.htmlNOTE: A 90-day trial account was created and required to download the appropriate software.

2. Click on the Software Download button.

3. Fill in the License Key Registration information and click the Submit My Registration Information.

4. Click the SET PASSWORD link to set a new username and password.
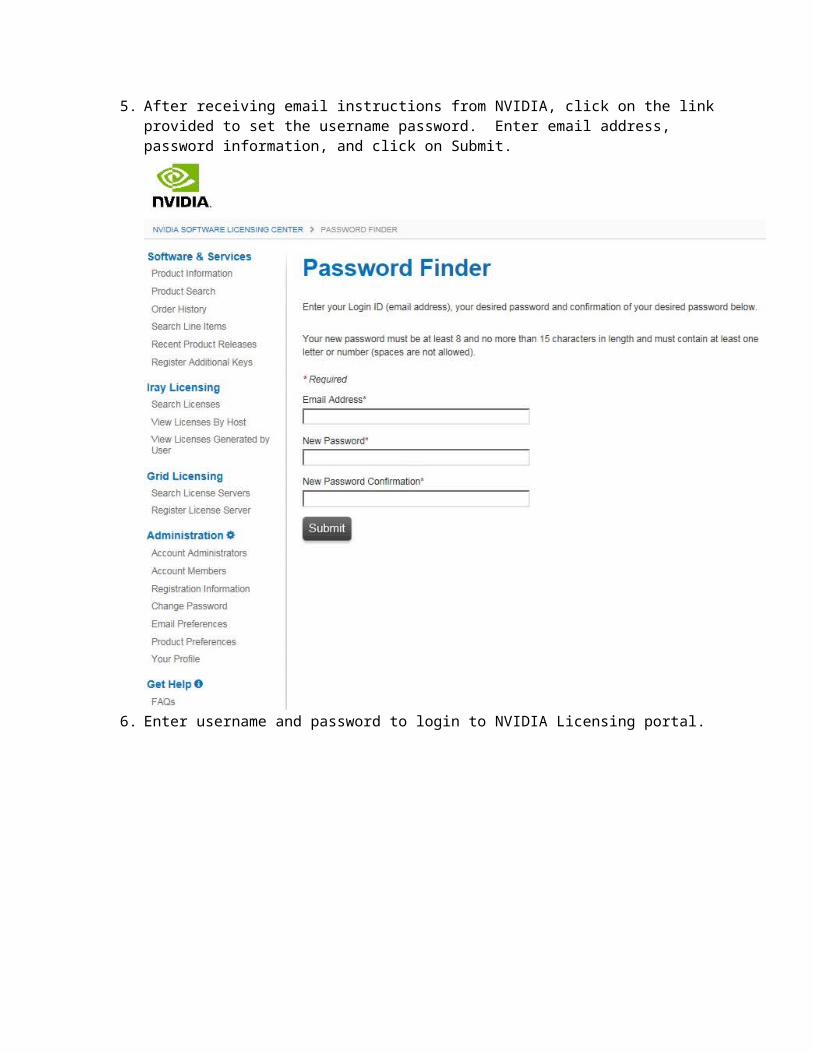
5. After receiving email instructions from NVIDIA, click on the link provided to set the username password. Enter email address, password information, and click on Submit.
6. Enter username and password to login to NVIDIA Licensing portal.

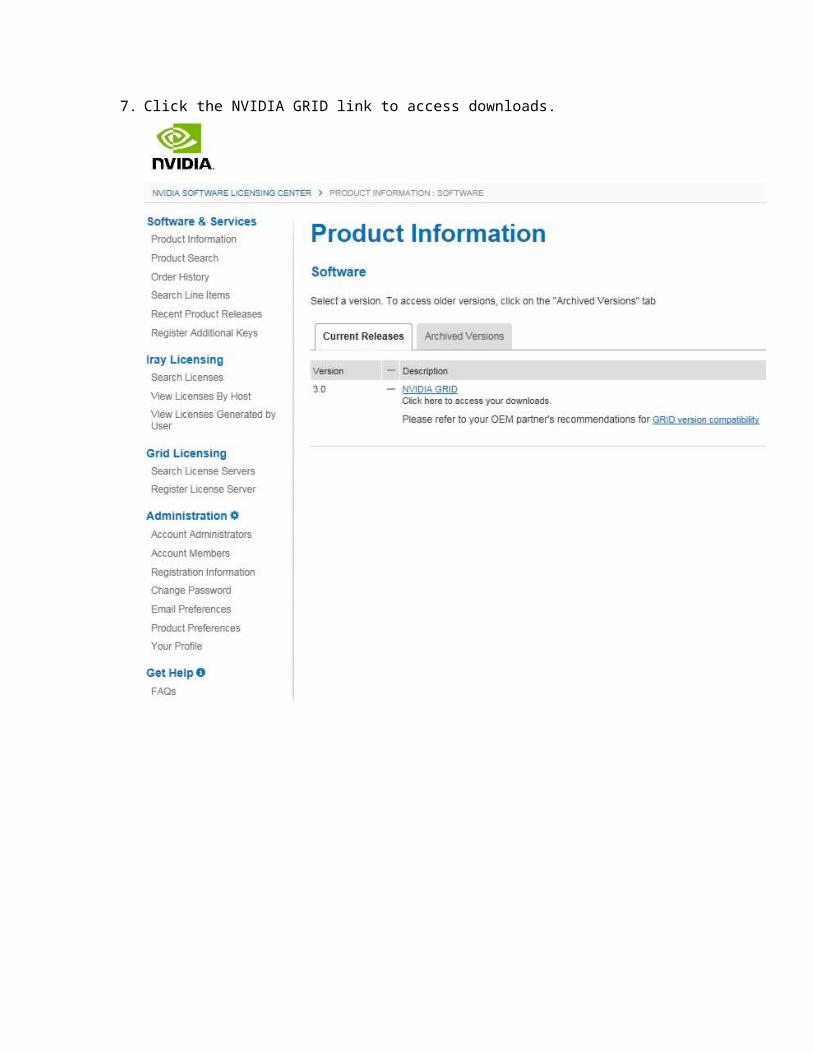
7. Click the NVIDIA GRID link to access downloads.
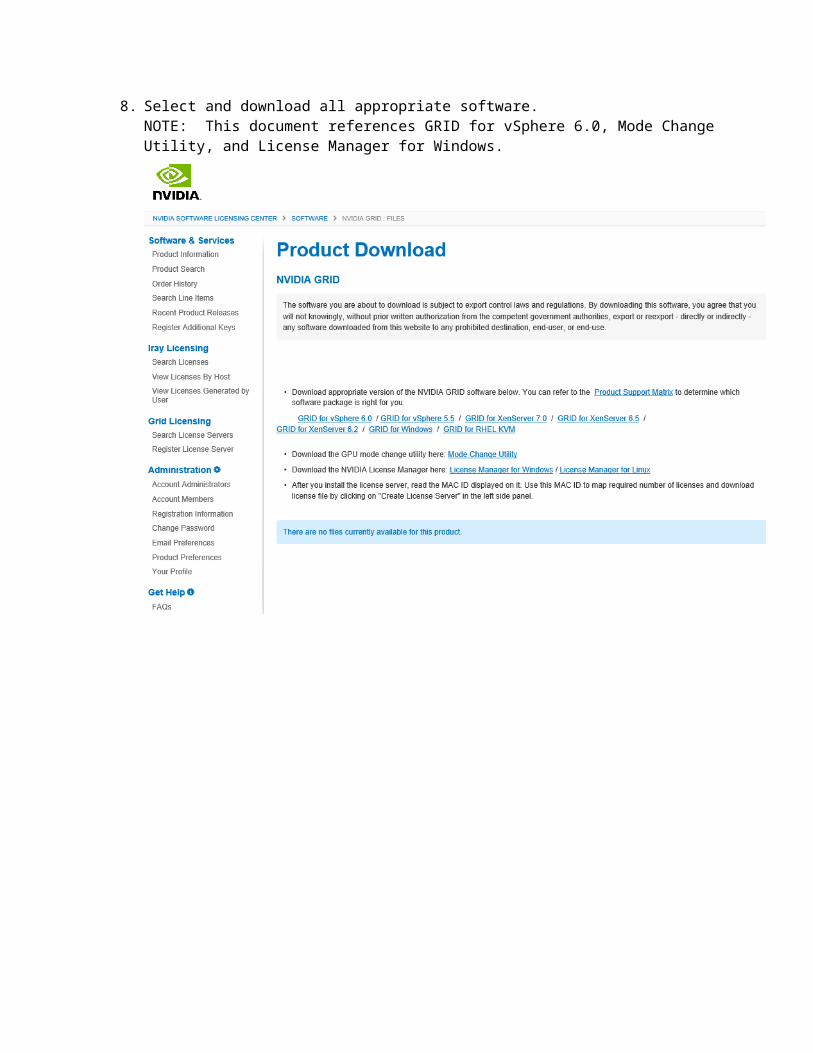
8. Select and download all appropriate software.NOTE: This document references GRID for vSphere 6.0, Mode Change Utility, and License Manager for Windows.
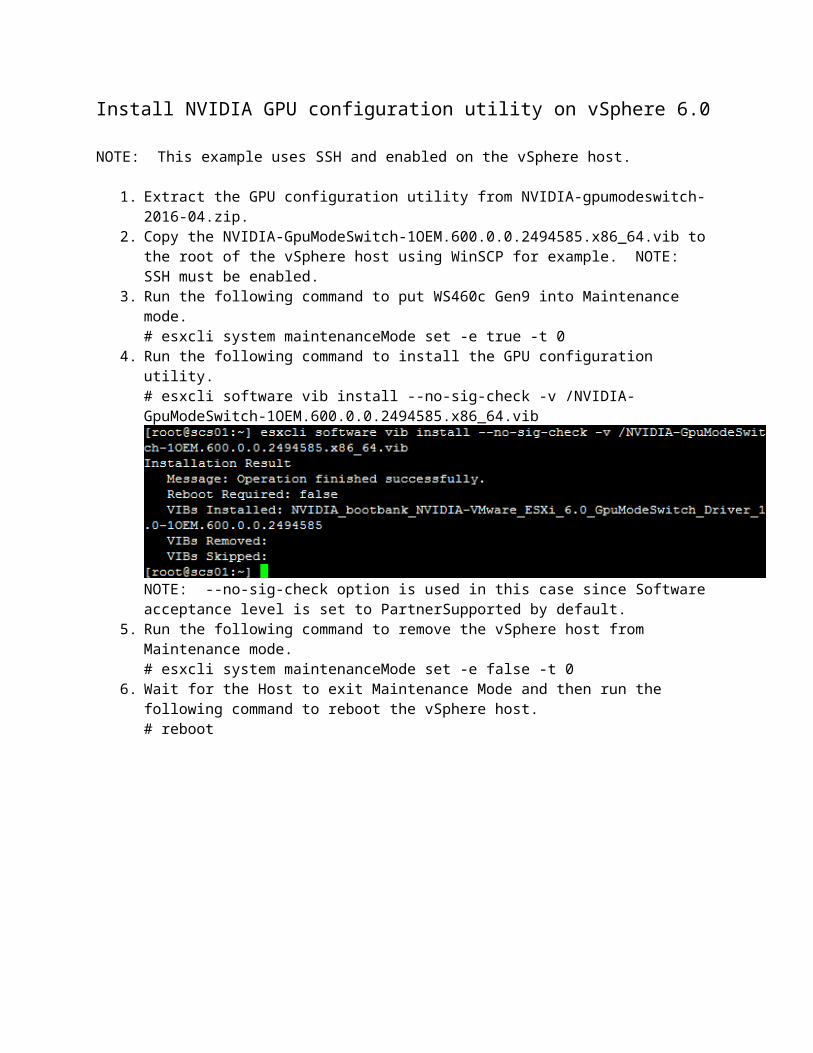
Install NVIDIA GPU configuration utility on vSphere 6.0
NOTE: This example uses SSH and enabled on the vSphere host.
1. Extract the GPU configuration utility from NVIDIA-gpumodeswitch-2016-04.zip.2. Copy the NVIDIA-GpuModeSwitch-1OEM.600.0.0.2494585.x86_64.vib to the root of the
vSphere host using WinSCP for example. NOTE: SSH must be enabled.3. Run the following command to put WS460c Gen9 into Maintenance mode.
# esxcli system maintenanceMode set -e true -t 04. Run the following command to install the GPU configuration utility.
# esxcli software vib install --no-sig-check -v /NVIDIA-GpuModeSwitch-1OEM.600.0.0.2494585.x86_64.vib
NOTE: --no-sig-check option is used in this case since Software acceptance level is set to PartnerSupported by default.
5. Run the following command to remove the vSphere host from Maintenance mode.# esxcli system maintenanceMode set -e false -t 0
6. Wait for the Host to exit Maintenance Mode and then run the following command to reboot the vSphere host.# reboot
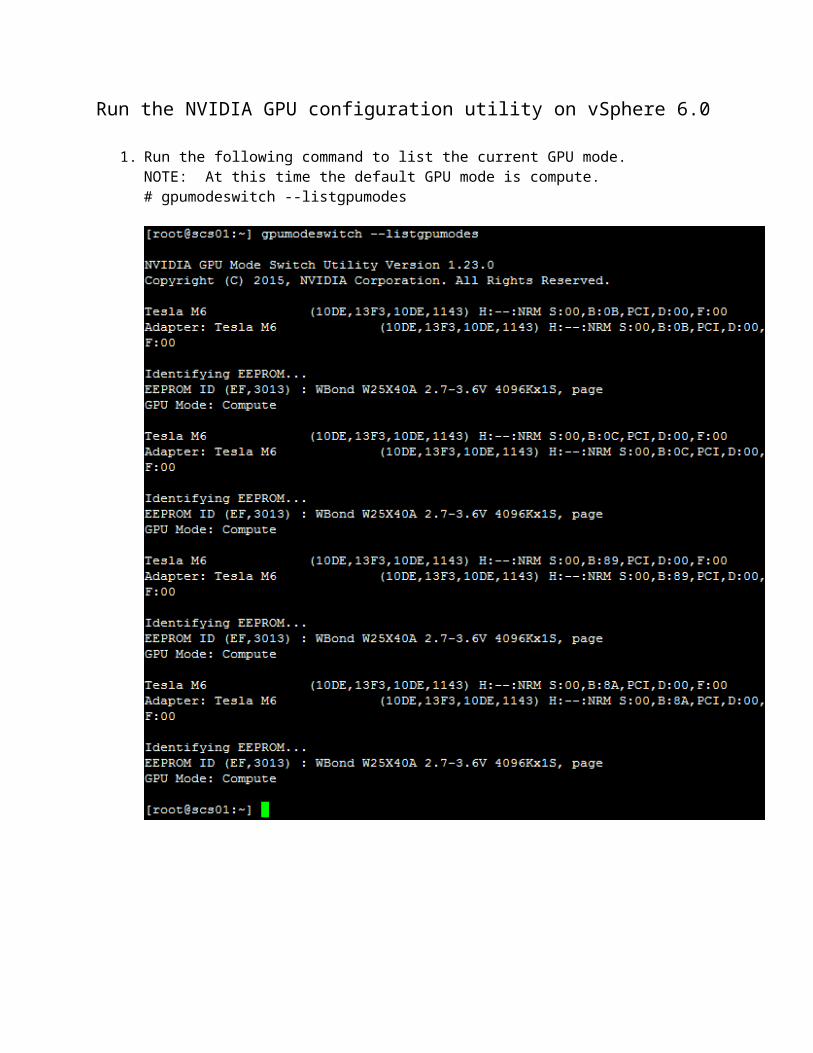
Run the NVIDIA GPU configuration utility on vSphere 6.0
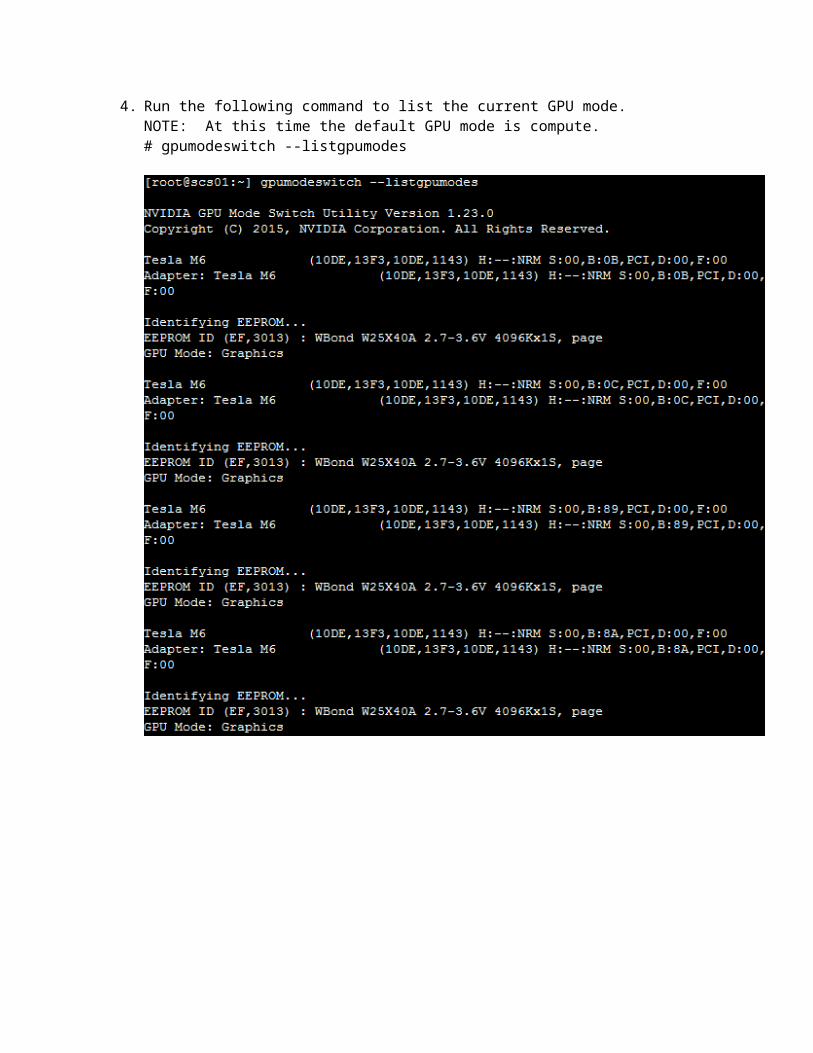
1. Run the following command to list the current GPU mode.NOTE: At this time the default GPU mode is compute.# gpumodeswitch --listgpumodes
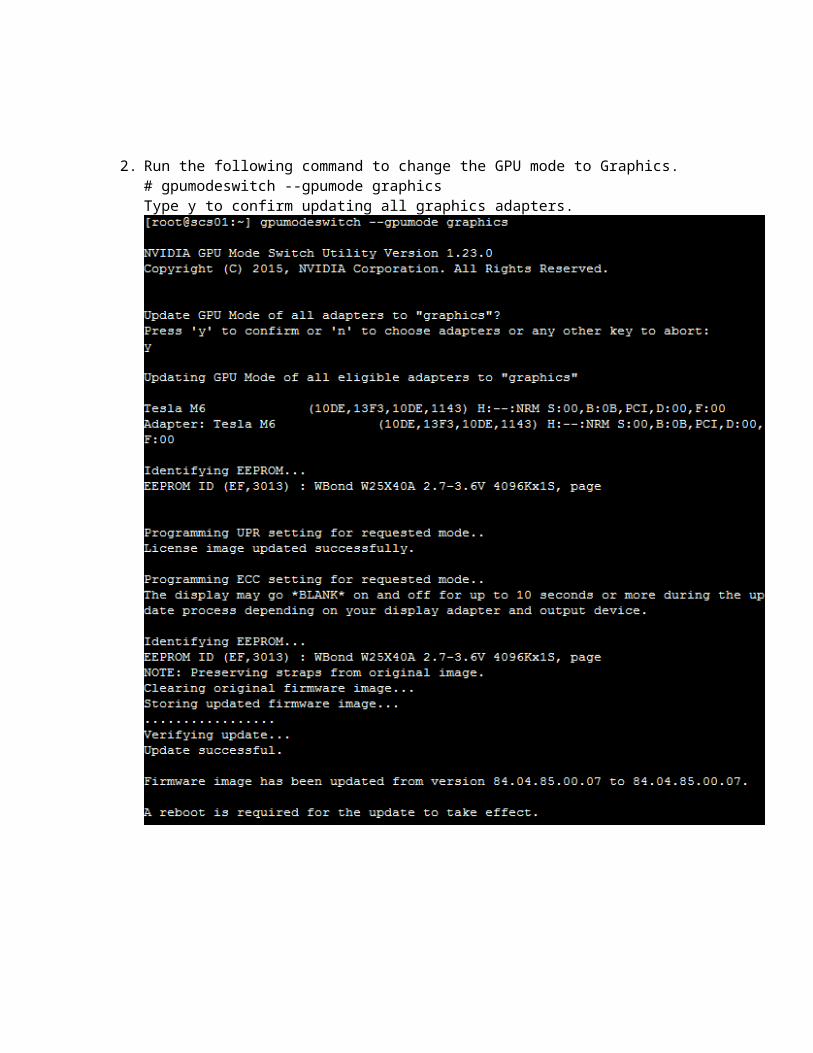
2. Run the following command to change the GPU mode to Graphics.# gpumodeswitch --gpumode graphicsType y to confirm updating all graphics adapters.
3. Run the following command to reboot the vSphere host.# reboot
4. Run the following command to list the current GPU mode.NOTE: At this time the default GPU mode is compute.# gpumodeswitch --listgpumodes
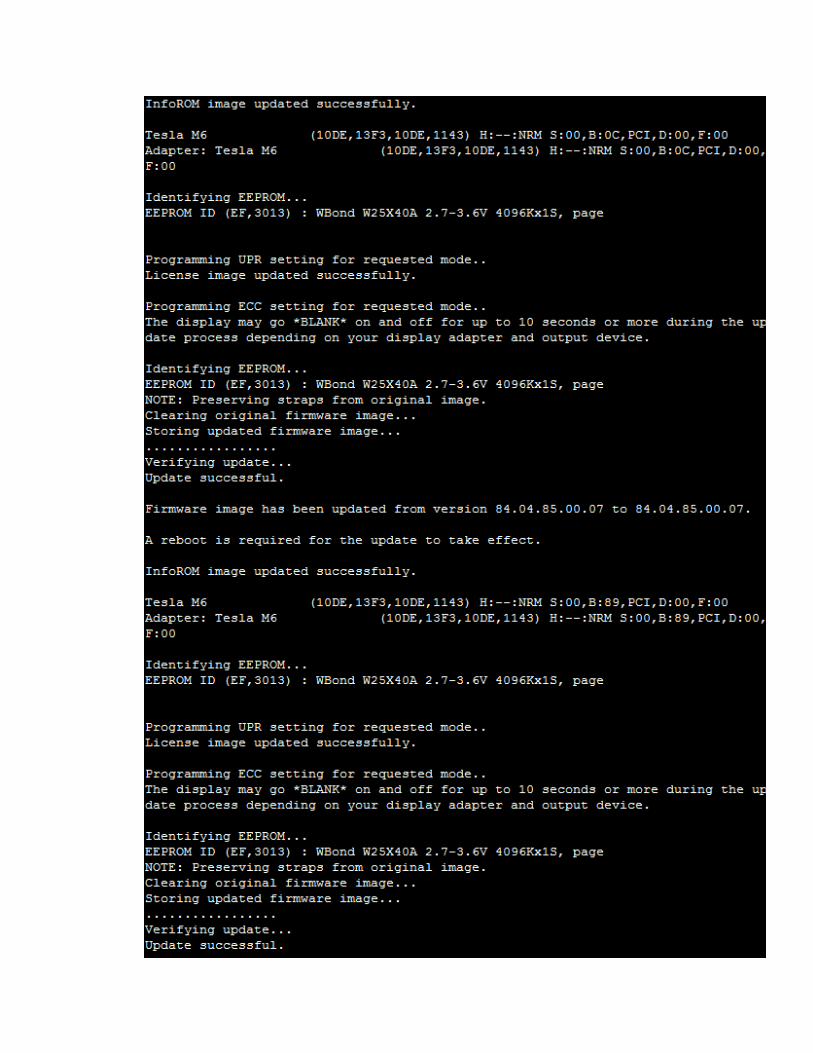
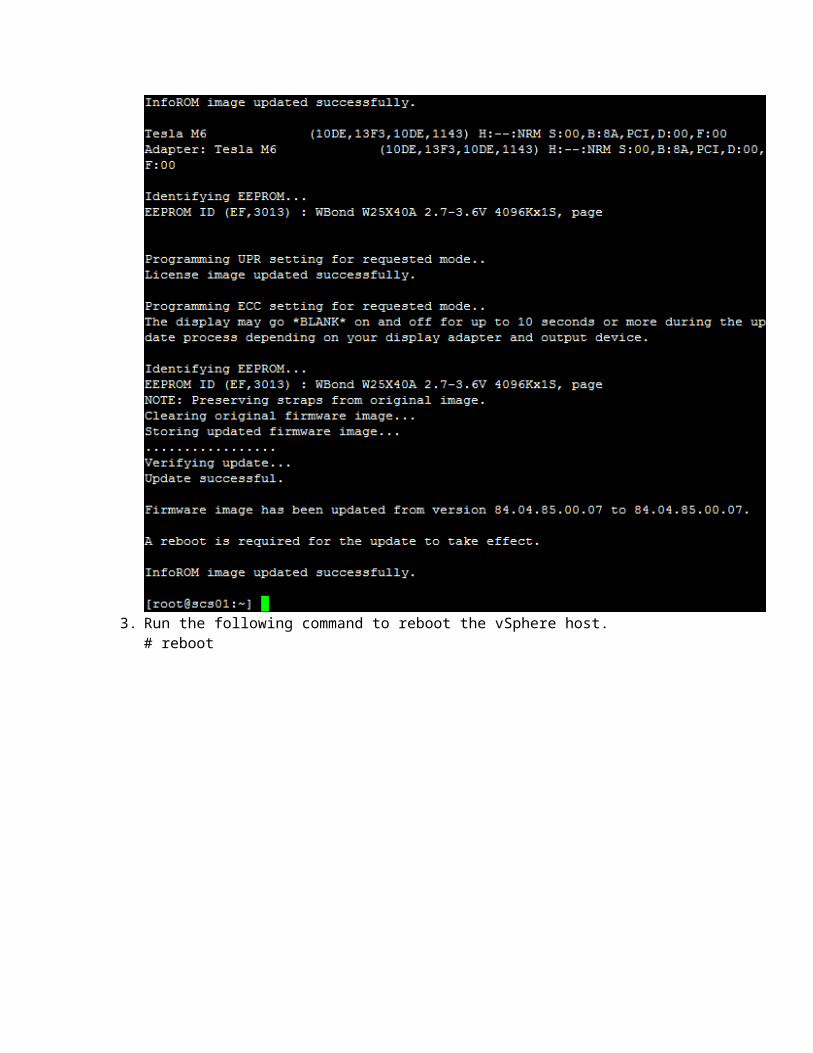
Install NVIDIA GRID M6 Manager Software on vSphere 6.0
1. Extract the NVIDIA driver software from NVIDIA-GRID-vSphere-6.0-361.40-362.13.zip.2. Copy the NVIDIA-vGPU-VMware_ESXi_6.0_Host_Driver_361.40-
1OEM.600.0.0.2494585.vib to the root of the vSphere host using WinSCP for example. NOTE: SSH must be enabled.
3. Run the following command to put WS460c Gen9 into Maintenance mode.# esxcli system maintenanceMode set -e true -t 0
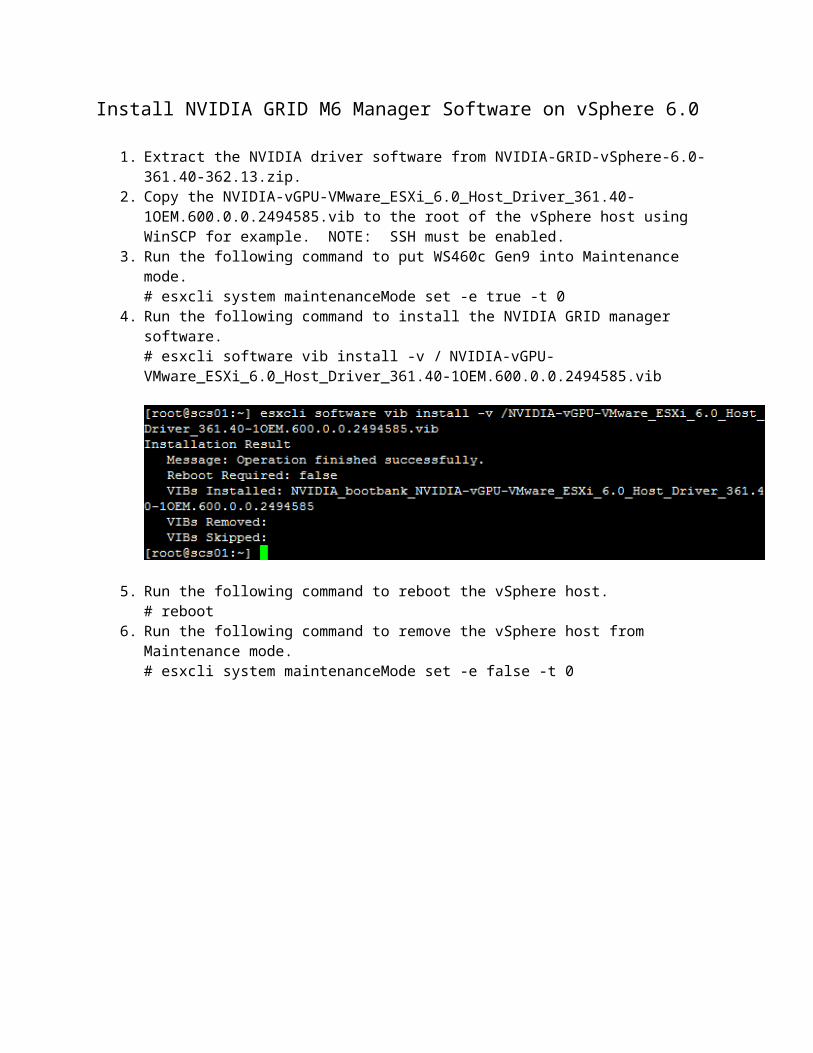
4. Run the following command to install the NVIDIA GRID manager software.# esxcli software vib install -v / NVIDIA-vGPU-VMware_ESXi_6.0_Host_Driver_361.40-1OEM.600.0.0.2494585.vib
5. Run the following command to reboot the vSphere host.# reboot
6. Run the following command to remove the vSphere host from Maintenance mode.# esxcli system maintenanceMode set -e false -t 0
7. Run the following command to verify NVIDIA GRID Tesla M6 video adapters.# nvidia-smi

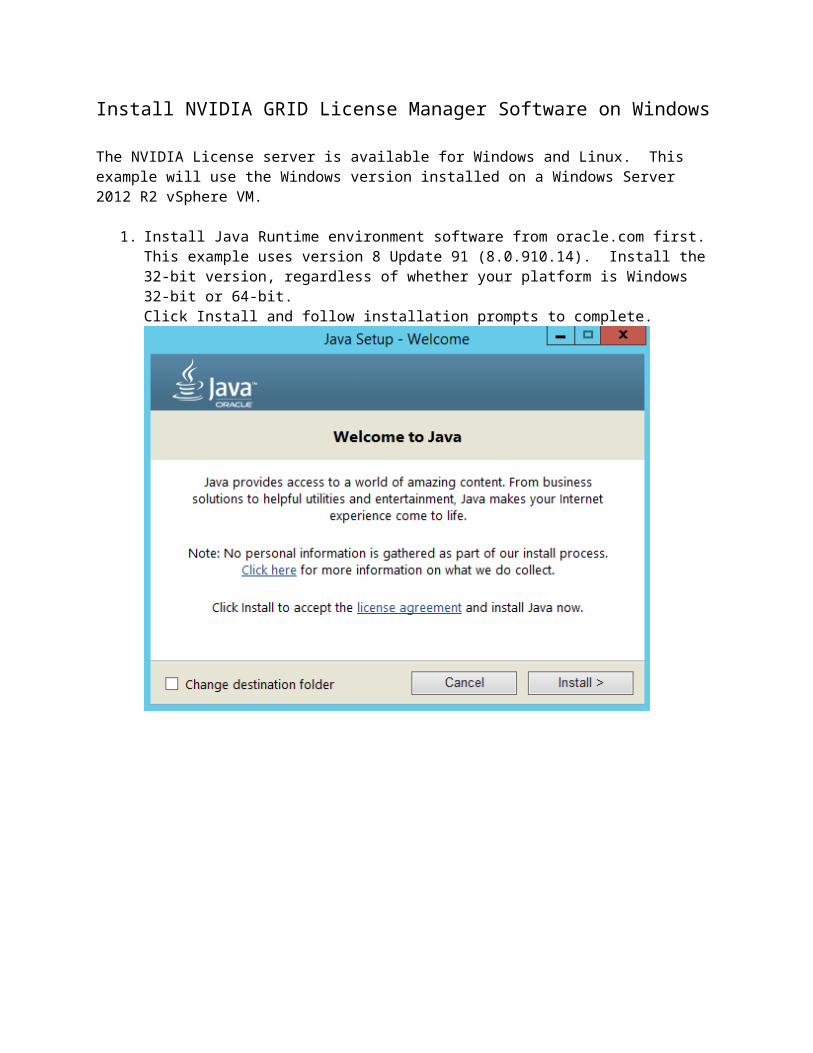
Install NVIDIA GRID License Manager Software on Windows
The NVIDIA License server is available for Windows and Linux. This example will use the Windows version installed on a Windows Server 2012 R2 vSphere VM.
1. Install Java Runtime environment software from oracle.com first. This example uses version 8 Update 91 (8.0.910.14). Install the 32-bit version, regardless of whether your platform is Windows 32-bit or 64-bit.Click Install and follow installation prompts to complete.
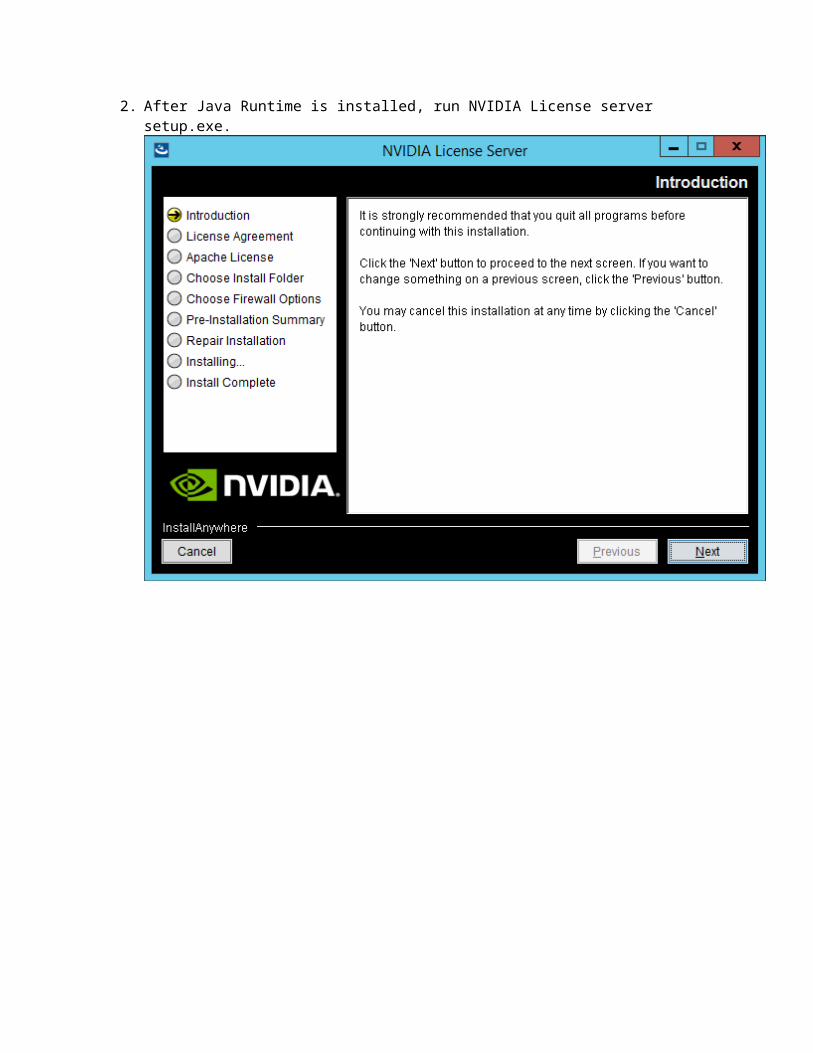
2. After Java Runtime is installed, run NVIDIA License server setup.exe.
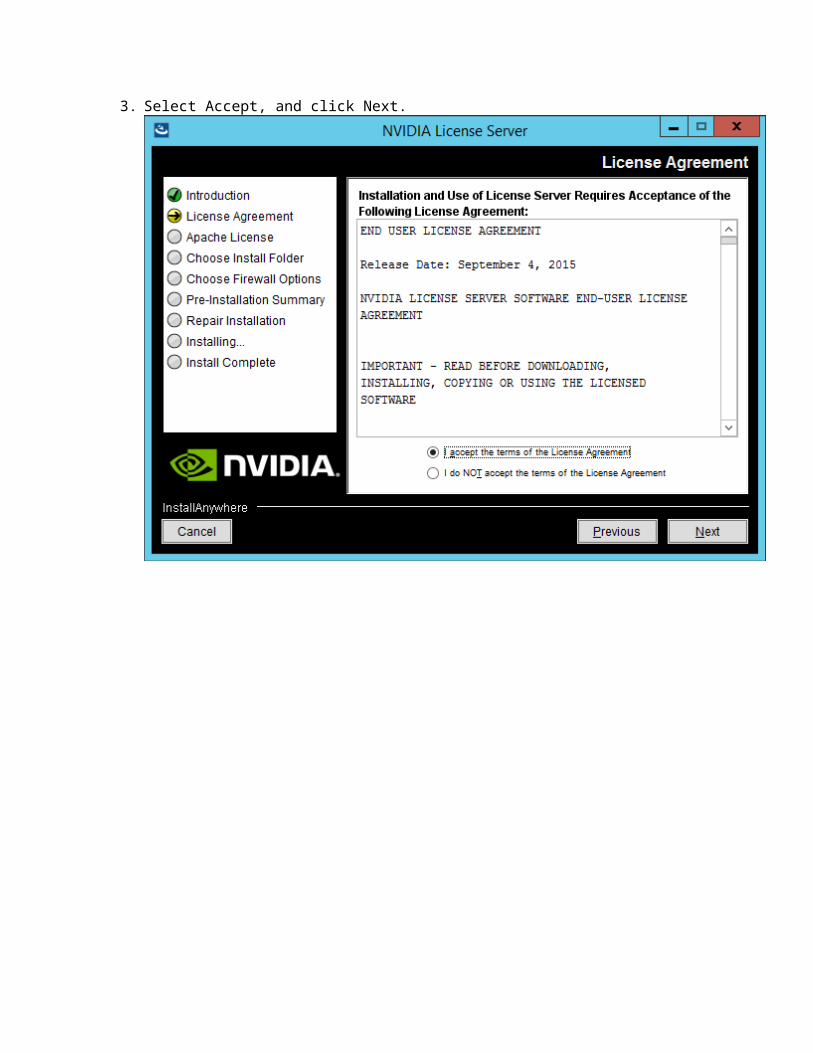
3. Select Accept, and click Next.
4. Select Accept, and click Next.

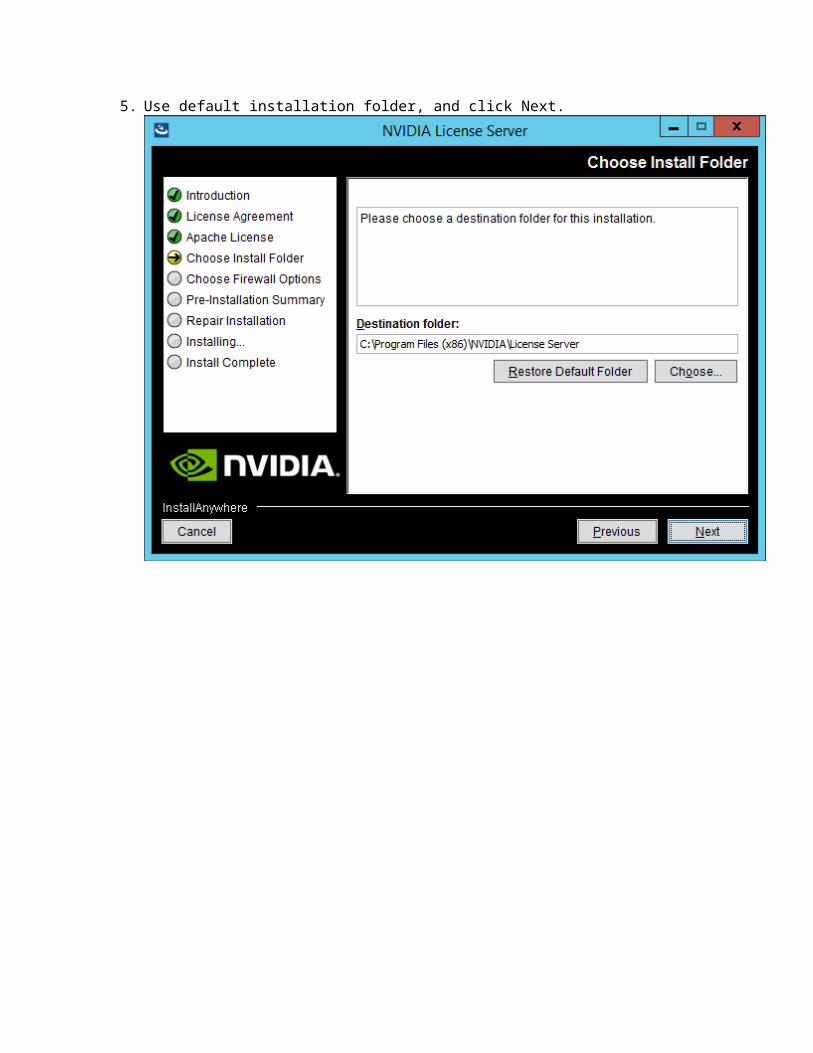
5. Use default installation folder, and click Next.
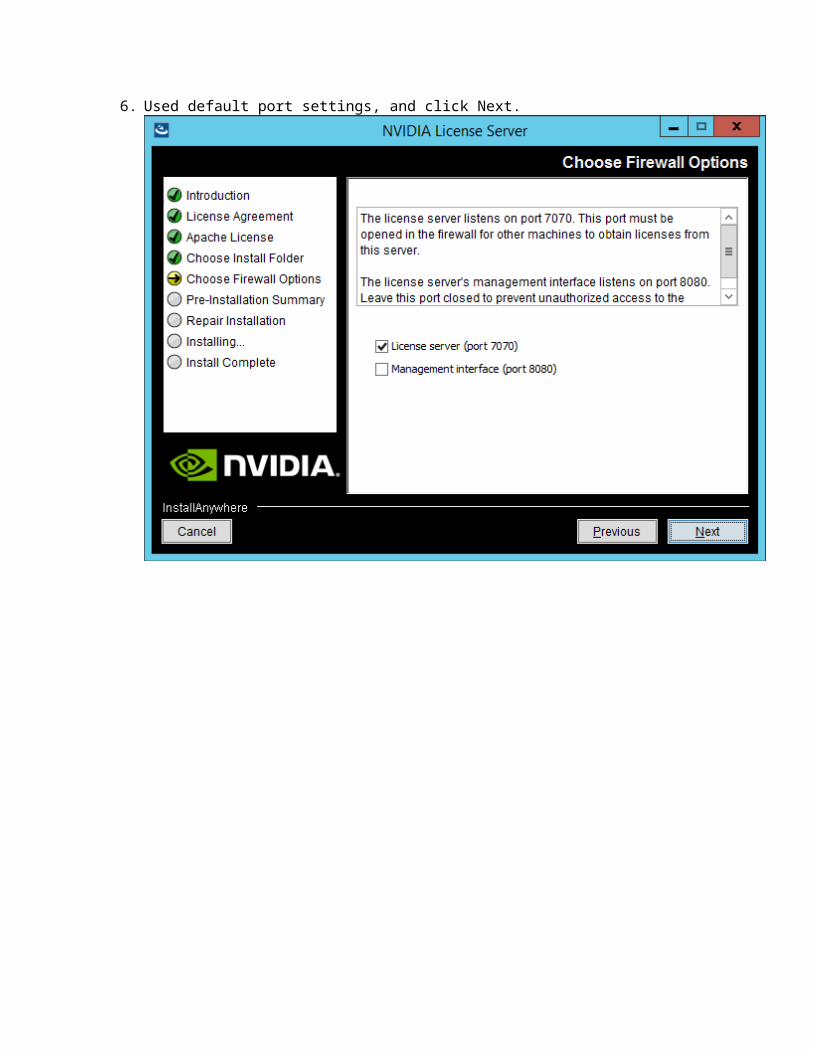
6. Used default port settings, and click Next.
7. Click Install.

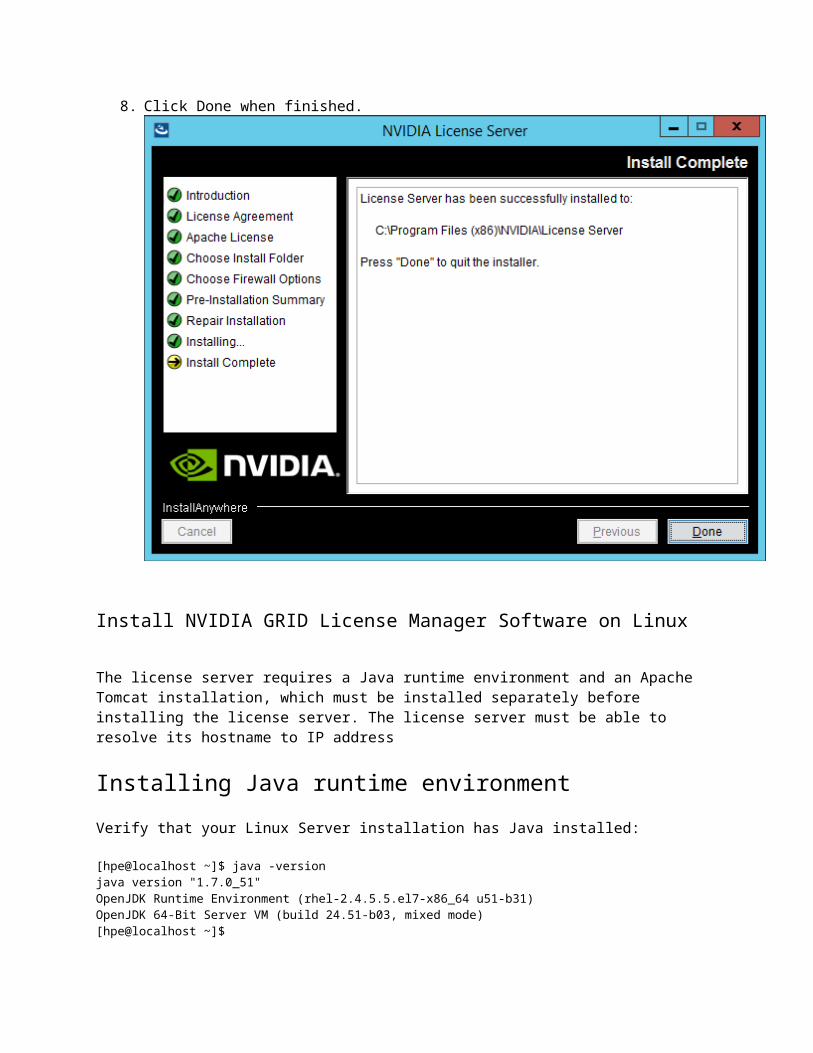
8. Click Done when finished.
Install NVIDIA GRID License Manager Software on Linux
The license server requires a Java runtime environment and an Apache Tomcat installation, which must be installed separately before installing the license server. The license server must be able to resolve its hostname to IP address
Installing Java runtime environment Verify that your Linux Server installation has Java installed:
[hpe@localhost ~]$ java -version java version "1.7.0_51" OpenJDK Runtime Environment (rhel-2.4.5.5.el7-x86_64 u51-b31) OpenJDK 64-Bit Server VM (build 24.51-b03, mixed mode) [hpe@localhost ~]$
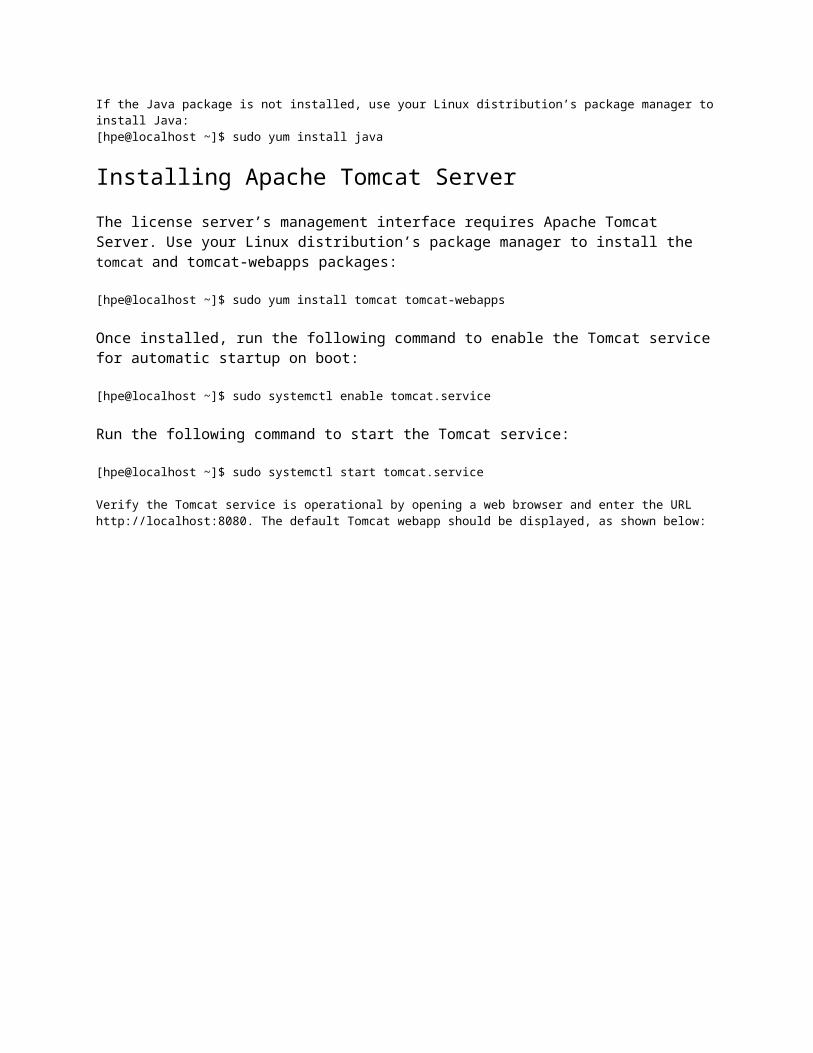
If the Java package is not installed, use your Linux distribution’s package manager to install Java:[hpe@localhost ~]$ sudo yum install java
Installing Apache Tomcat Server
The license server’s management interface requires Apache Tomcat Server. Use your Linux distribution’s package manager to install the tomcat and tomcat-webapps packages:
[hpe@localhost ~]$ sudo yum install tomcat tomcat-webapps
Once installed, run the following command to enable the Tomcat service for automatic startup on boot:
[hpe@localhost ~]$ sudo systemctl enable tomcat.service
Run the following command to start the Tomcat service:
[hpe@localhost ~]$ sudo systemctl start tomcat.service
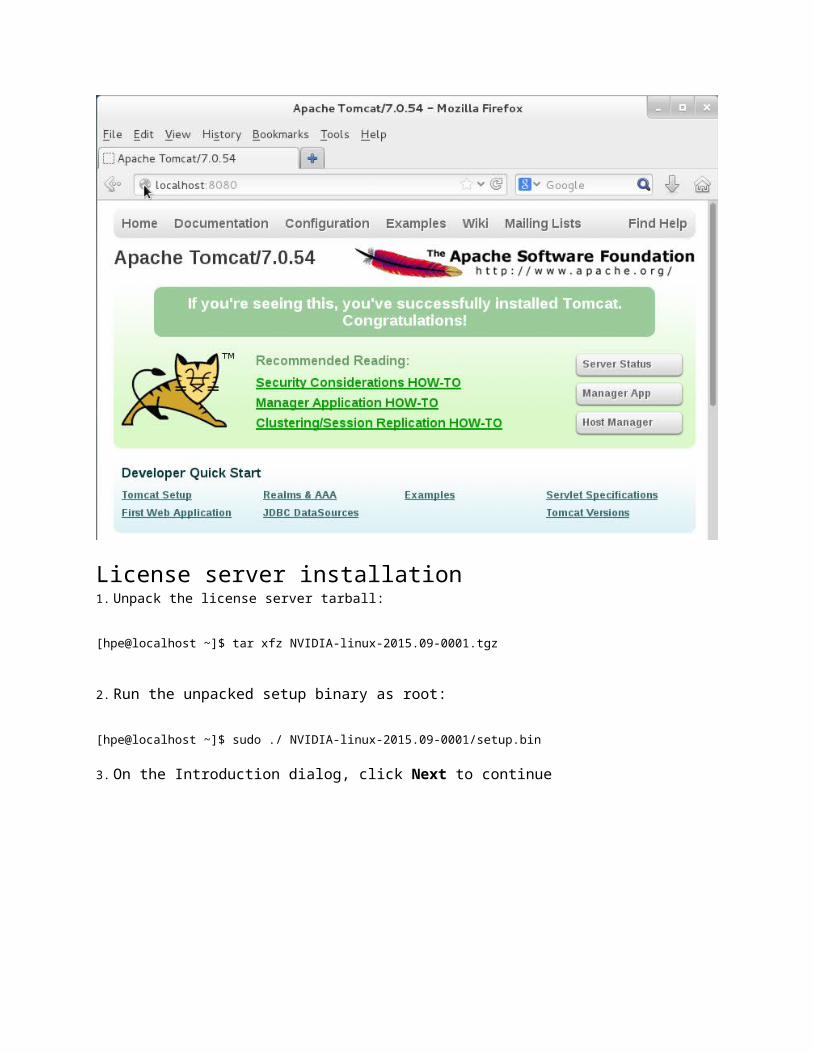
Verify the Tomcat service is operational by opening a web browser and enter the URL http://localhost:8080. The default Tomcat webapp should be displayed, as shown below:
License server installation 1. Unpack the license server tarball:
[hpe@localhost ~]$ tar xfz NVIDIA-linux-2015.09-0001.tgz
2. Run the unpacked setup binary as root:
[hpe@localhost ~]$ sudo ./ NVIDIA-linux-2015.09-0001/setup.bin
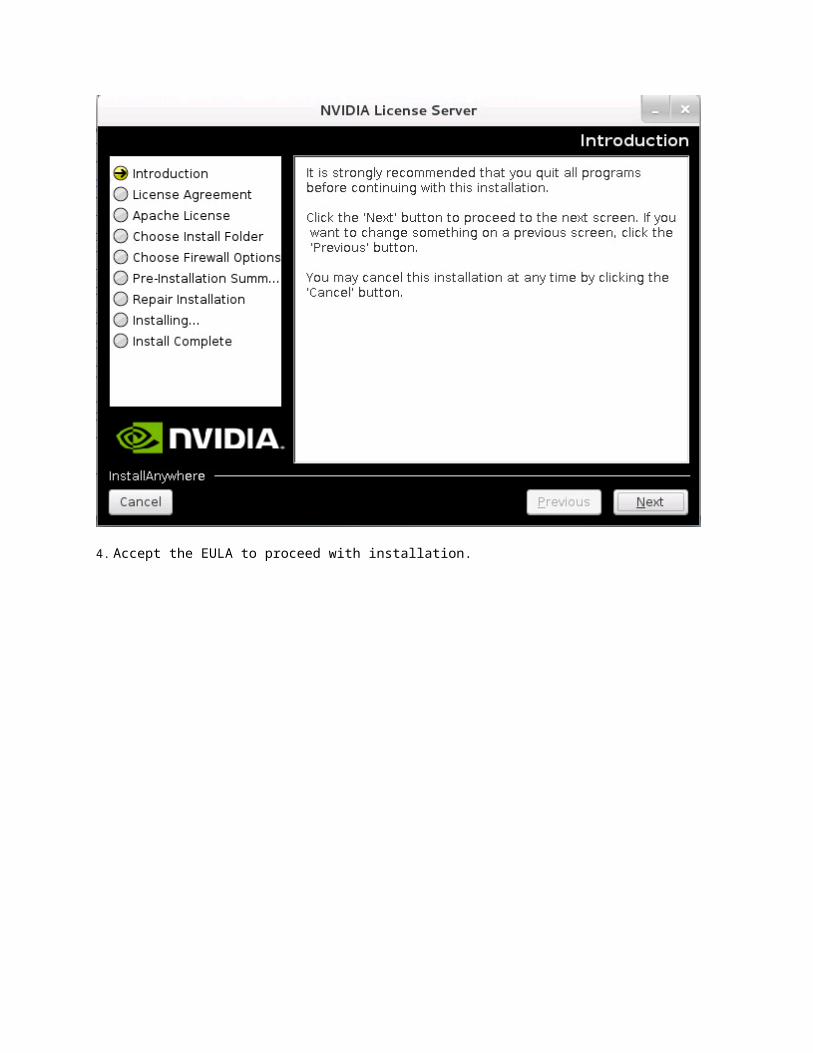
3. On the Introduction dialog, click Next to continue
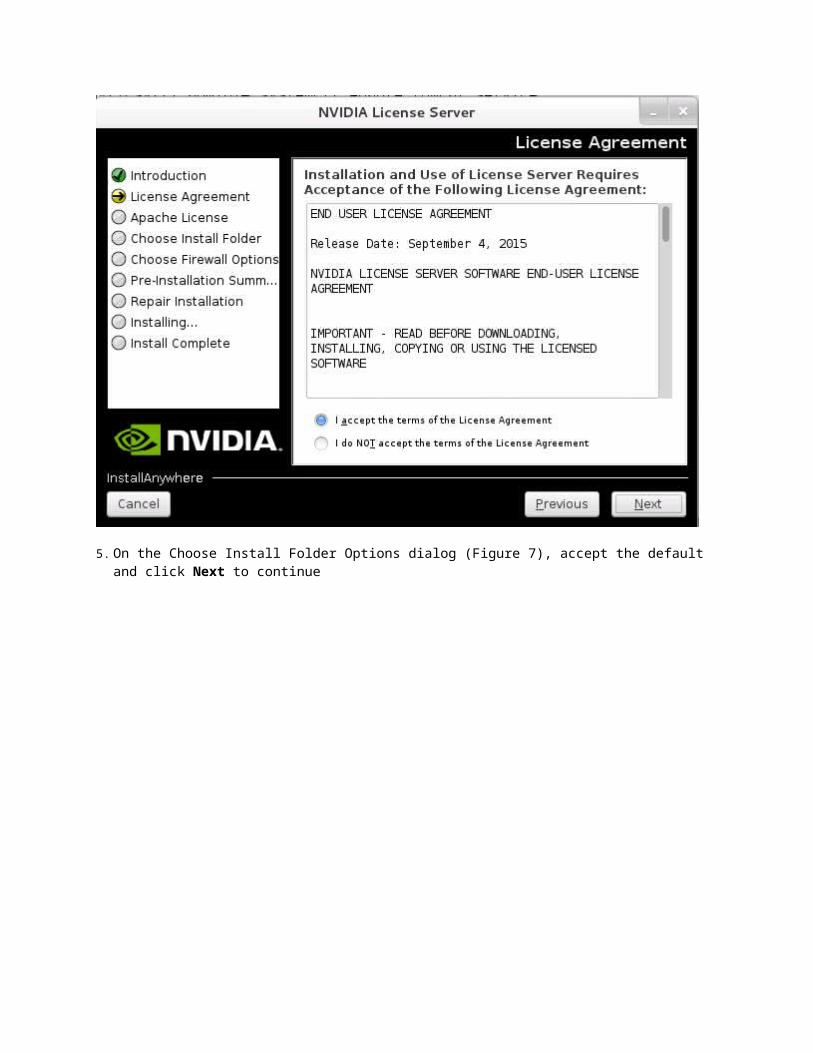
4. Accept the EULA to proceed with installation.
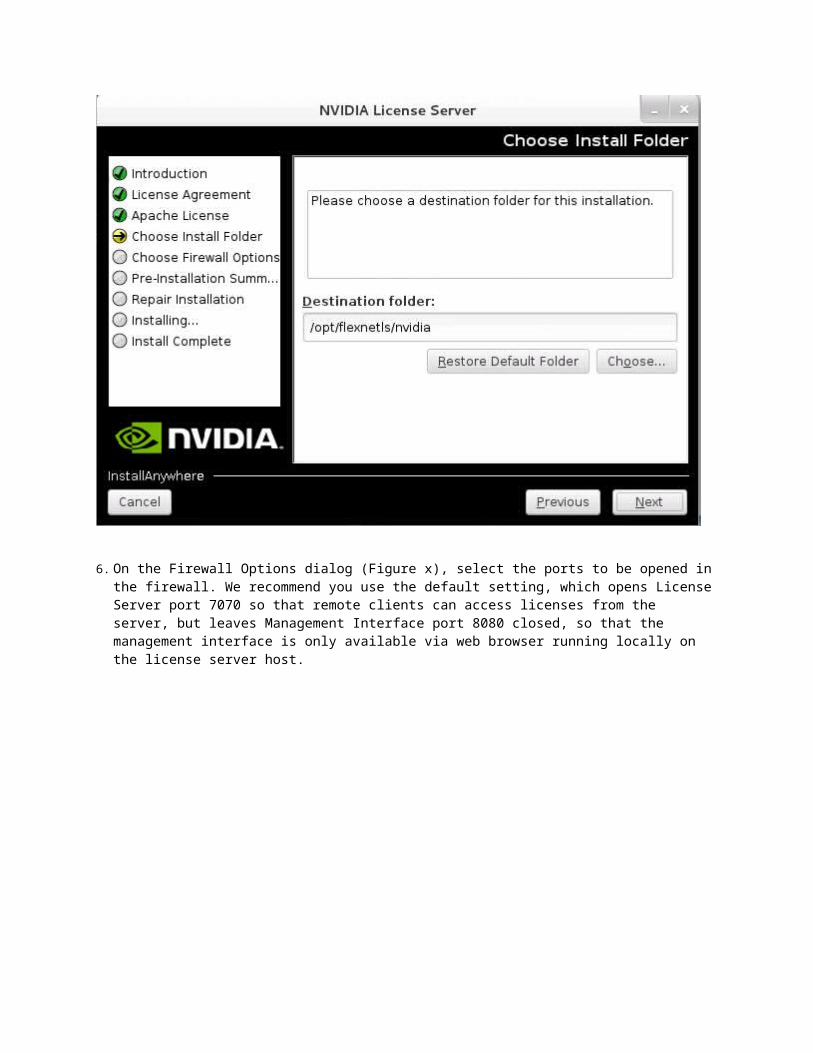
5. On the Choose Install Folder Options dialog (Figure 7), accept the default and click Next to continue
6. On the Firewall Options dialog (Figure x), select the ports to be opened in the firewall. We recommend you use the default setting, which opens License Server port 7070 so that remote clients can access licenses from the server, but leaves Management Interface port 8080 closed, so that the management interface is only available via web browser running locally on the license server host.
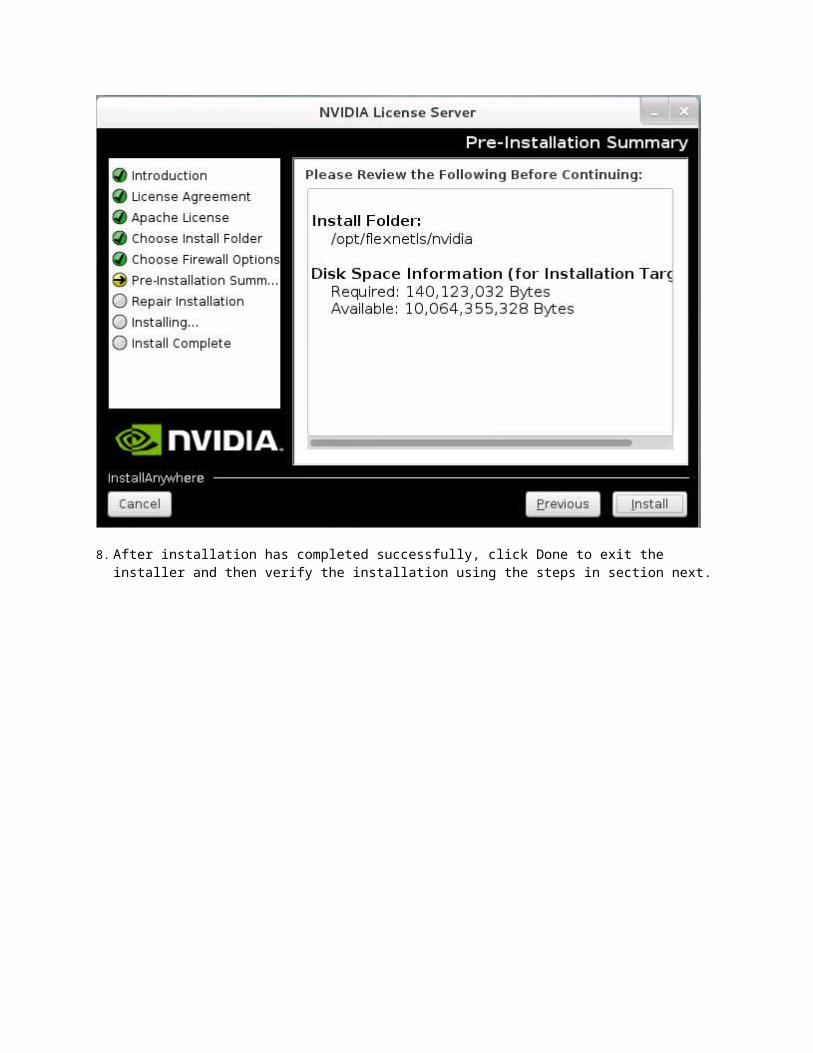
7. On the Pre-Installation Summary dialog (Figure x), click Install
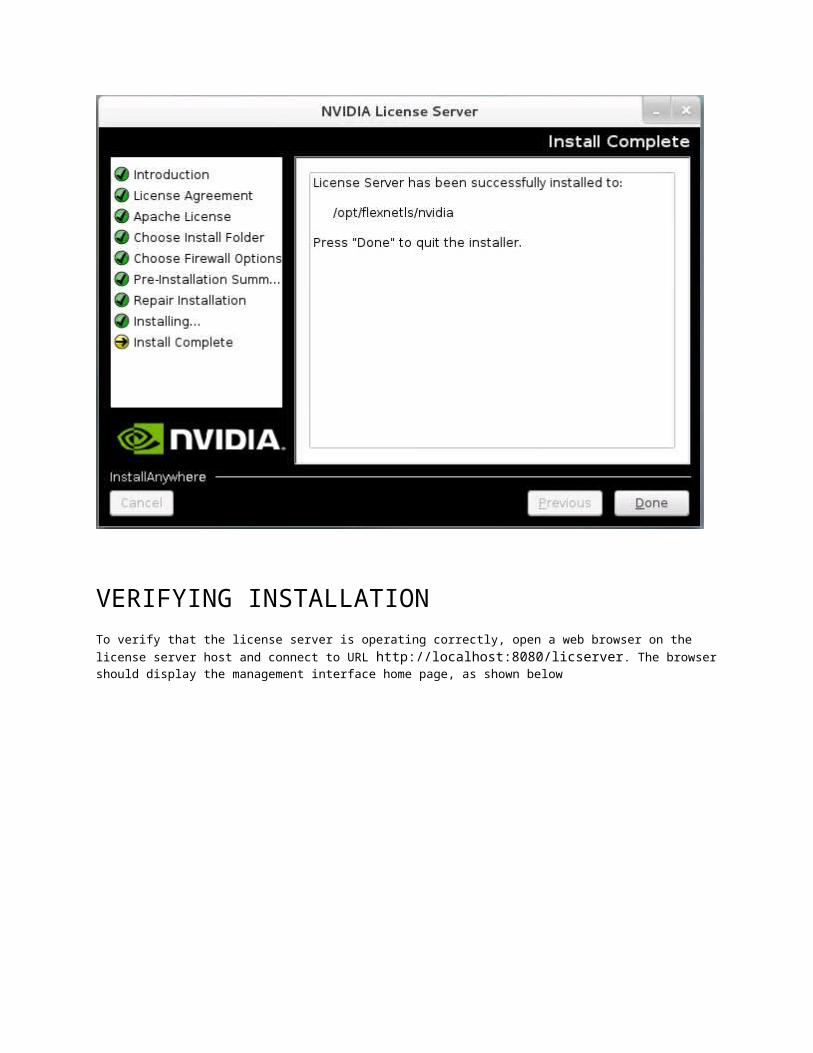
8. After installation has completed successfully, click Done to exit the installer and then verify the installation using the steps in section next.

VERIFYING INSTALLATION To verify that the license server is operating correctly, open a web browser on the license server host and connect to URL http://localhost:8080/licserver. The browser should display the management interface home page, as shown below
Configure NVIDIA License Manager Software
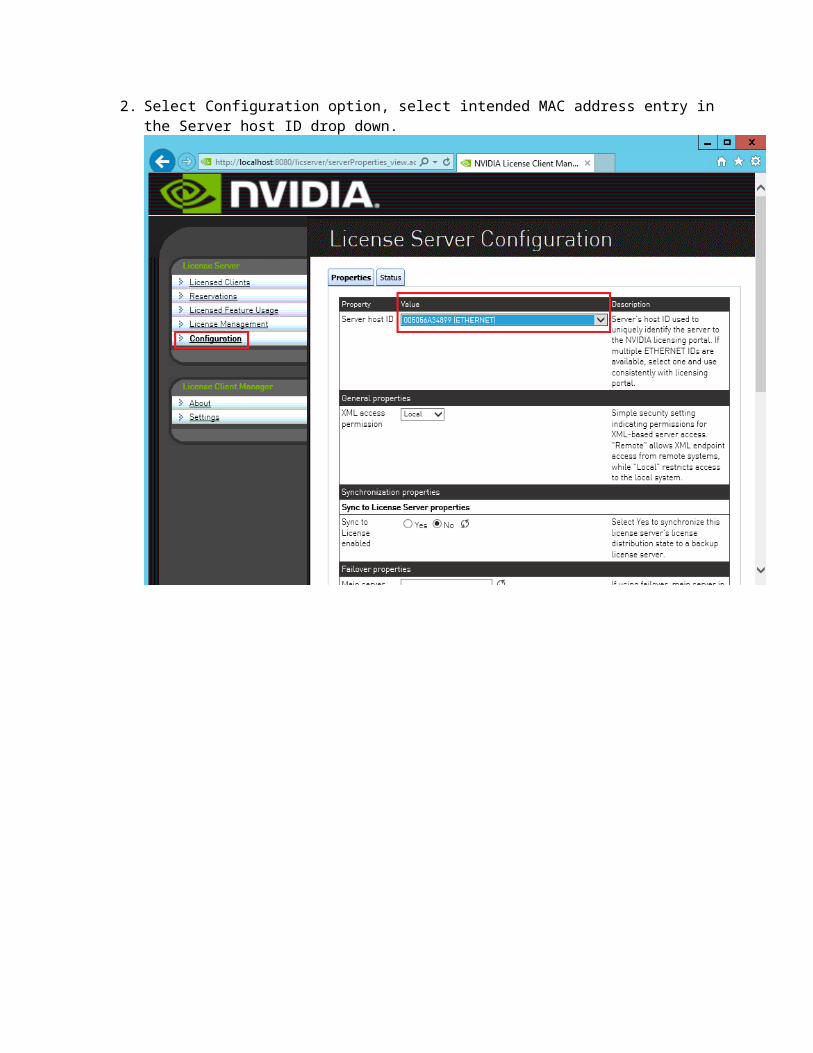
1. Navigate browser to the following URL and verify that NVIDIA License Server console is displayed. http://localhost:8080/licserver/
2. Select Configuration option, select intended MAC address entry in the Server host ID drop down.

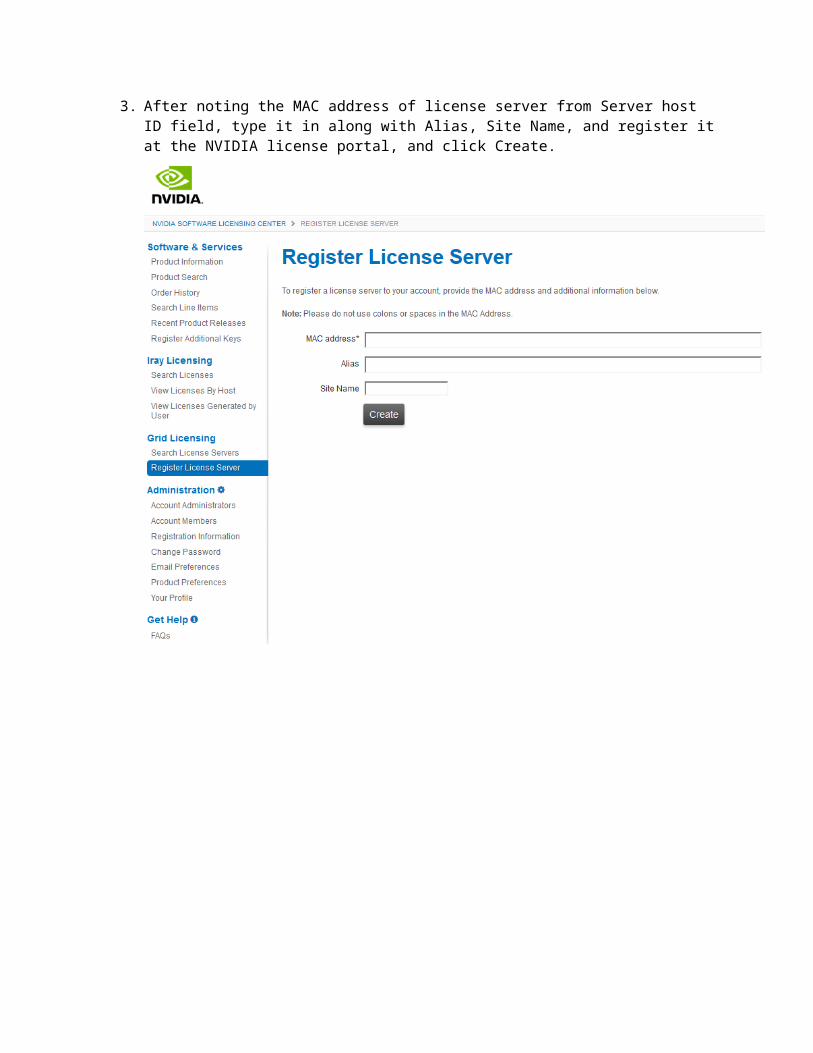
3. After noting the MAC address of license server from Server host ID field, type it in along with Alias, Site Name, and register it at the NVIDIA license portal, and click Create.

4. After registering server, click Map Add-Ons.
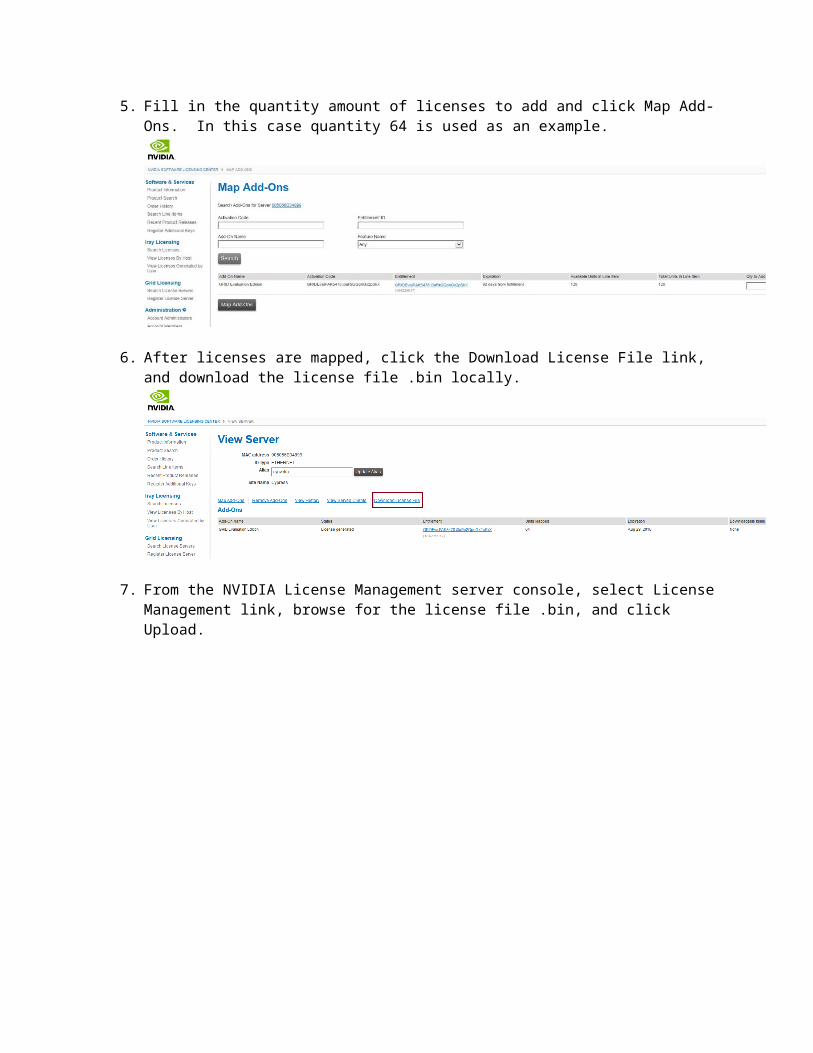
5. Fill in the quantity amount of licenses to add and click Map Add-Ons. In this case quantity 64 is used as an example.
6. After licenses are mapped, click the Download License File link, and download the license file .bin locally.
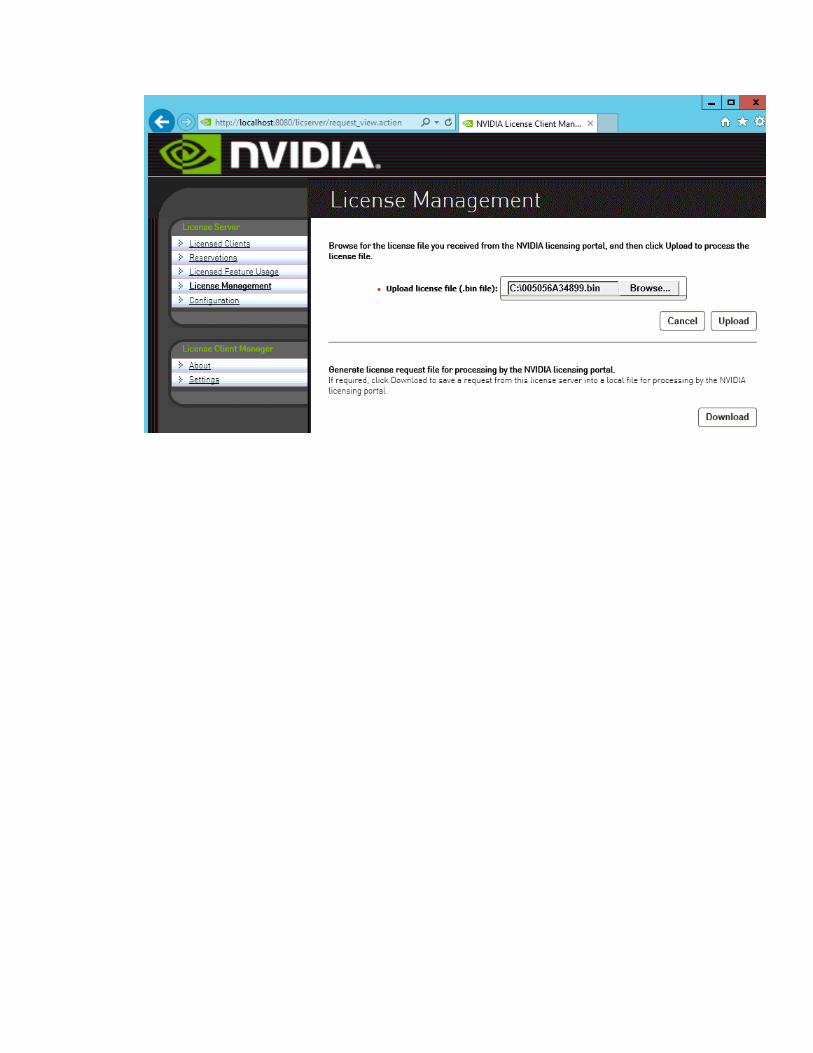
7. From the NVIDIA License Management server console, select License Management link, browse for the license file .bin, and click Upload.
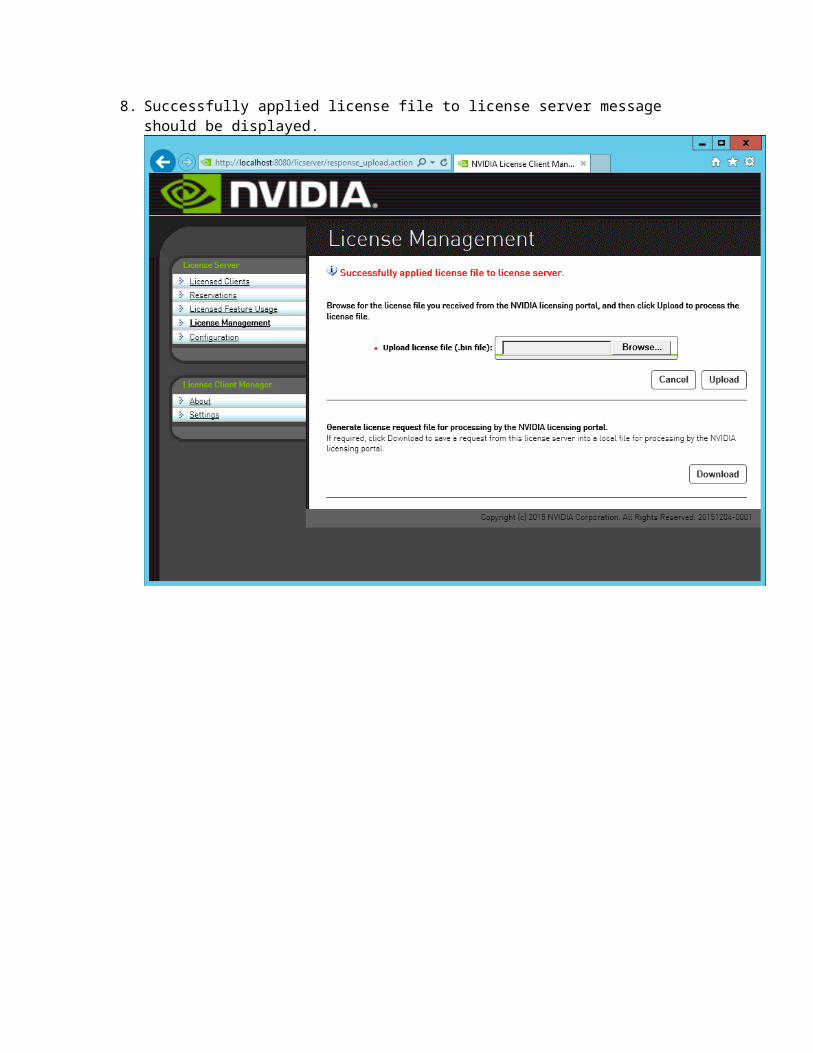
8. Successfully applied license file to license server message should be displayed.

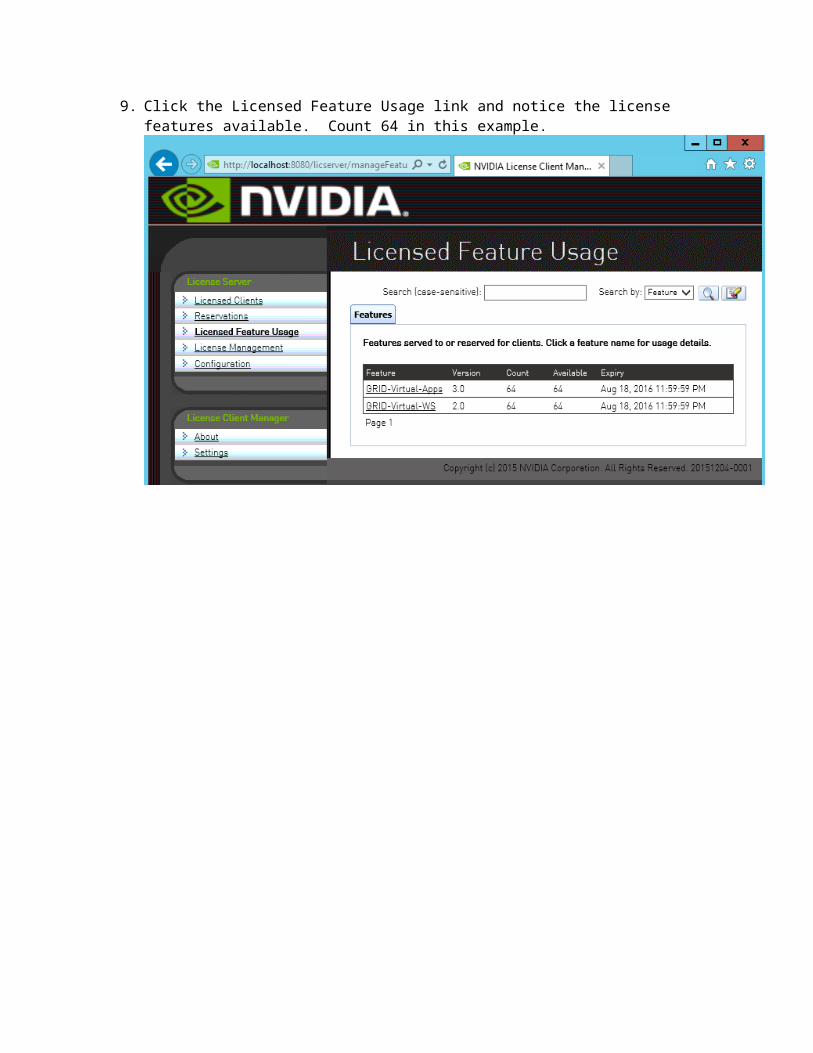
9. Click the Licensed Feature Usage link and notice the license features available. Count 64 in this example.
Configure vSphere 6.0 Host with NVIDIA GRID vGPU profile and Display driver installation
NOTE: In this case Windows 7 x64 SP1 VM is used as an example1. Navigate to the vSphere Web Client, select intended VM, open VM settings, and select
Shared PCI Device from the New device menu.
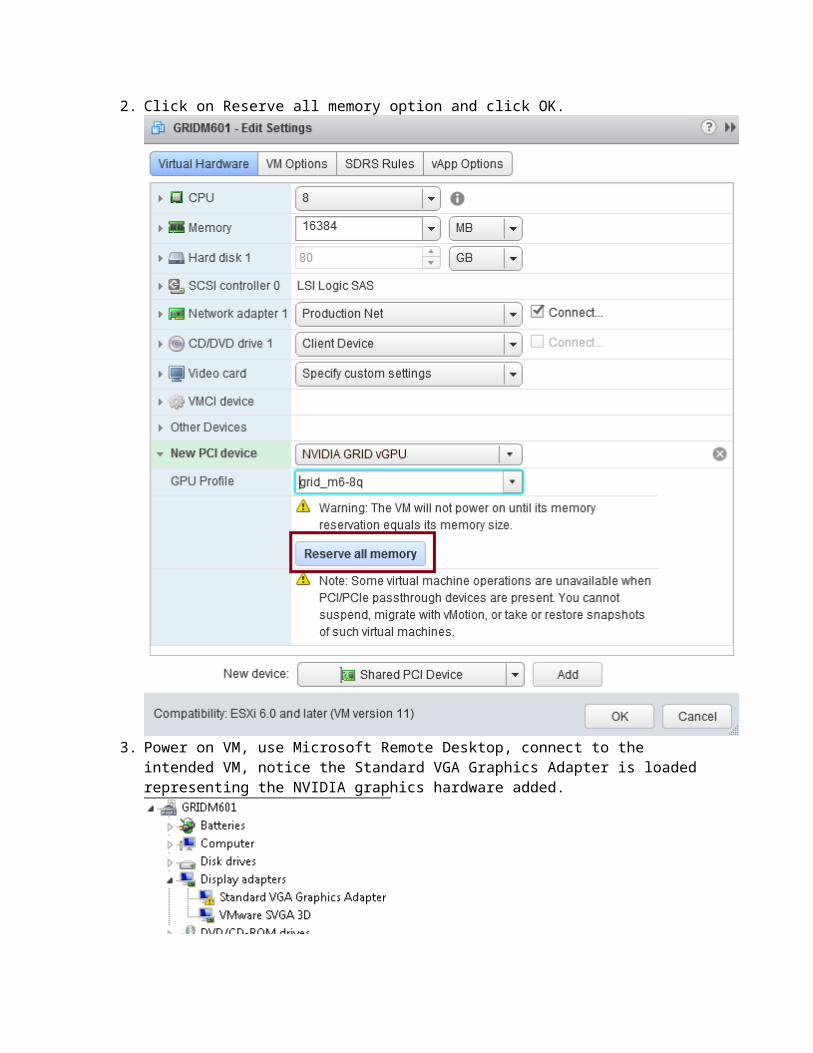
2. Click on Reserve all memory option and click OK.
3. Power on VM, use Microsoft Remote Desktop, connect to the intended VM, notice the Standard VGA Graphics Adapter is loaded representing the NVIDIA graphics hardware added.
4. Run the NVIDIA Display driver installation package, and click OK.
5. Click Agree and Continue at NVIDIA software license agreement.
6. Select Express and click Next to continue.

7. NVIDIA Graphics driver installing.
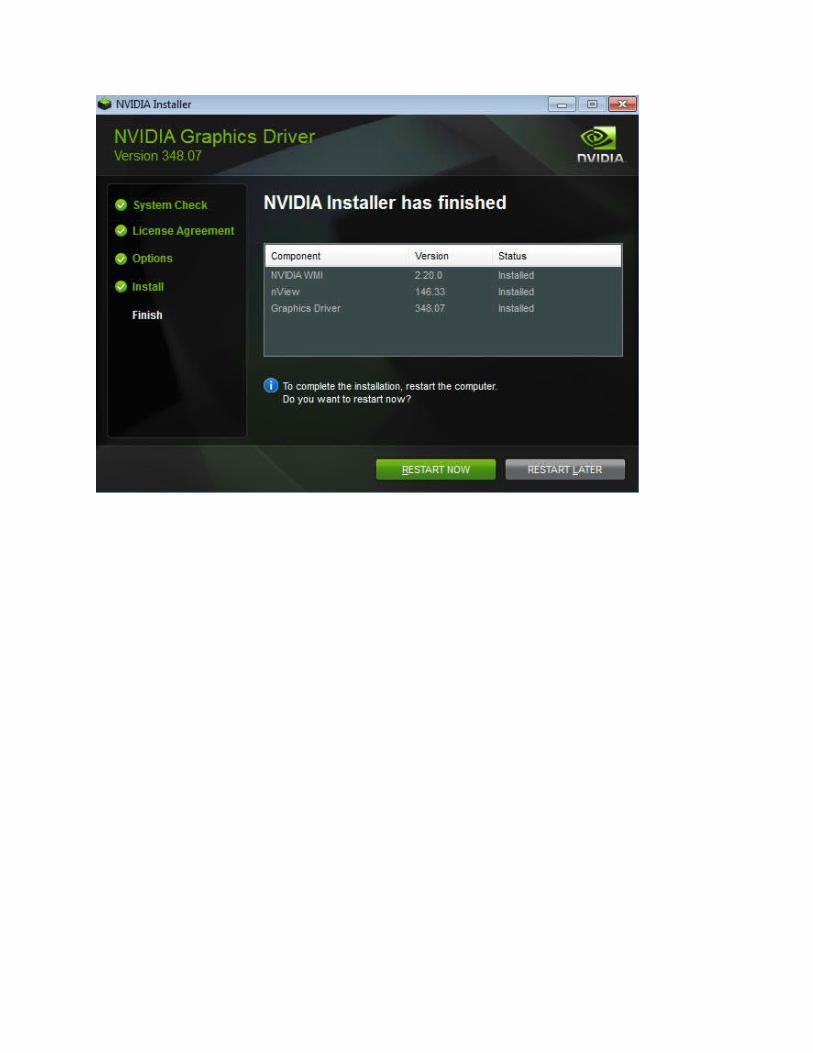
8. Click Restart Now when the NVIDIA display driver has finished.
9. After restarting notice that the NVIDIA GRID driver is installed with appropriate graphics profile indicated in Device Manager.
Summary HPE ProLiant WS460c Gen9 Graphics Server Blade along with NVIDIA GRID meets the challenge of desktop and application virtualization and enables a rich user experience for high-end graphics users while being cost effective and scalable. Workstation class users can now take advantage of high-end 3D graphics applications in a virtualized environment irrespective of their location.