Novell Identity Manager Driver for UserNovell novdocx (en) 10 March 2008
140
Novell www.novell.com novdocx (en) 10 March 2008 Novell Identity Manager Driver 3.5.1 for User Management of SAP Software Guide Identity Manager Driver for User Management of SAP* Software 3.5.1 September 28, 2007 DRIVER GUIDE
Transcript of Novell Identity Manager Driver for UserNovell novdocx (en) 10 March 2008

n
Novell Identity Manager Driver 3.5.1 for User Management of SAP Software GuideNovell
ovdocx (en) 10 March 2008
w w w . n o v e l l . c o m
Identity Manager Driver for User Management of SAP* Software
3 . 5 . 1S e p t e m b e r 2 8 , 2 0 0 7
D R I V E R G U I D E
2 Novell
novdocx (en) 10 March 2008
Legal Notices
Novell, Inc. makes no representations or warranties with respect to the contents or use of this documentation, and specifically disclaims any express or implied warranties of merchantability or fitness for any particular purpose. Further, Novell, Inc. reserves the right to revise this publication and to make changes to its content, at any time, without obligation to notify any person or entity of such revisions or changes.
Further, Novell, Inc. makes no representations or warranties with respect to any software, and specifically disclaims any express or implied warranties of merchantability or fitness for any particular purpose. Further, Novell, Inc. reserves the right to make changes to any and all parts of Novell software, at any time, without any obligation to notify any person or entity of such changes.
You may not use, export, or re-export this product in violation of any applicable laws or regulations including, without limitation, U.S. export regulations or the laws of the country in which you reside.
Copyright © 2005-2007 Novell, Inc. All rights reserved. No part of this publication may be reproduced, photocopied, stored on a retrieval system, or transmitted without the express written consent of the publisher.
Novell, Inc. has intellectual property rights relating to technology embodied in the product that is described in this document. In particular, and without limitation, these intellectual property rights may include one or more of the U.S. patents listed at http://www.novell.com/company/legal/patents/ and one or more additional patents or pending patent applications in the U.S. and in other countries.
Novell, Inc.404 Wyman Street, Suite 500Waltham, MA 02451U.S.A.www.novell.com
Online Documentation: To access the online documentation for this and other Novell products, and to get updates, see www.novell.com/documentation.
Identity Manager Driver 3.5.1 for User Management of SAP Software Guide

novdocx (en) 10 March 2008
Novell Trademarks
DirXML is a registered trademark of Novell, Inc. in the United States and other countries.eDirectory is a trademark of Novell, Inc.Novell is a registered trademark of Novell, Inc. in the United States and other countries.
Third-Party Materials
All third-party trademarks are the property of their respective owners.
3

4 Novell
novdocx (en) 10 March 2008
Identity Manager Driver 3.5.1 for User Management of SAP Software Guide

Contents
novdocx (en) 10 March 2008
About This Guide 9
1 Introducing the Identity Manager Driver for User Management of SAP Software 111.1 Understanding Driver Concepts . . . . . . . . . . . . . . . . . . . . . . . . . . . . . . . . . . . . . . . . . . . . . . . . 11
1.1.1 Publisher Channel . . . . . . . . . . . . . . . . . . . . . . . . . . . . . . . . . . . . . . . . . . . . . . . . . . . 111.1.2 Subscriber Channel . . . . . . . . . . . . . . . . . . . . . . . . . . . . . . . . . . . . . . . . . . . . . . . . . . 141.1.3 Attribute Mapping from the SAP User Management Database to the Identity Vault . 141.1.4 Associations. . . . . . . . . . . . . . . . . . . . . . . . . . . . . . . . . . . . . . . . . . . . . . . . . . . . . . . . 15
1.2 Understanding Driver Components . . . . . . . . . . . . . . . . . . . . . . . . . . . . . . . . . . . . . . . . . . . . . 161.2.1 Driver Configurations . . . . . . . . . . . . . . . . . . . . . . . . . . . . . . . . . . . . . . . . . . . . . . . . . 161.2.2 Driver Shim . . . . . . . . . . . . . . . . . . . . . . . . . . . . . . . . . . . . . . . . . . . . . . . . . . . . . . . . 161.2.3 SAP User Java Connector Test Utility . . . . . . . . . . . . . . . . . . . . . . . . . . . . . . . . . . . . 16
1.3 New Features. . . . . . . . . . . . . . . . . . . . . . . . . . . . . . . . . . . . . . . . . . . . . . . . . . . . . . . . . . . . . . 16
2 Installing the Driver 172.1 Driver Prerequisites . . . . . . . . . . . . . . . . . . . . . . . . . . . . . . . . . . . . . . . . . . . . . . . . . . . . . . . . . 172.2 Planning for Installation . . . . . . . . . . . . . . . . . . . . . . . . . . . . . . . . . . . . . . . . . . . . . . . . . . . . . . 172.3 Installing the Driver . . . . . . . . . . . . . . . . . . . . . . . . . . . . . . . . . . . . . . . . . . . . . . . . . . . . . . . . . 18
2.3.1 Installing the Driver Locally . . . . . . . . . . . . . . . . . . . . . . . . . . . . . . . . . . . . . . . . . . . . 182.3.2 Installing the Driver Remotely . . . . . . . . . . . . . . . . . . . . . . . . . . . . . . . . . . . . . . . . . . 18
2.4 Importing the Driver . . . . . . . . . . . . . . . . . . . . . . . . . . . . . . . . . . . . . . . . . . . . . . . . . . . . . . . . . 182.4.1 Importing the Driver Configuration File in Designer . . . . . . . . . . . . . . . . . . . . . . . . . . 182.4.2 Importing the Driver Configuration File in iManager . . . . . . . . . . . . . . . . . . . . . . . . . 192.4.3 Configuration Information . . . . . . . . . . . . . . . . . . . . . . . . . . . . . . . . . . . . . . . . . . . . . 192.4.4 Extending the Schema. . . . . . . . . . . . . . . . . . . . . . . . . . . . . . . . . . . . . . . . . . . . . . . . 22
3 Upgrading the Driver 253.1 Upgrading the Driver in Designer . . . . . . . . . . . . . . . . . . . . . . . . . . . . . . . . . . . . . . . . . . . . . . . 253.2 Upgrading the Driver in iManager . . . . . . . . . . . . . . . . . . . . . . . . . . . . . . . . . . . . . . . . . . . . . . 28
4 Activating the Driver 29
5 Understanding ALE Technologies 315.1 Application Link Enabling Technology . . . . . . . . . . . . . . . . . . . . . . . . . . . . . . . . . . . . . . . . . . . 31
5.1.1 Clients and Logical Systems . . . . . . . . . . . . . . . . . . . . . . . . . . . . . . . . . . . . . . . . . . . 315.1.2 Message Type . . . . . . . . . . . . . . . . . . . . . . . . . . . . . . . . . . . . . . . . . . . . . . . . . . . . . . 315.1.3 IDoc Type . . . . . . . . . . . . . . . . . . . . . . . . . . . . . . . . . . . . . . . . . . . . . . . . . . . . . . . . . 325.1.4 Distribution Model . . . . . . . . . . . . . . . . . . . . . . . . . . . . . . . . . . . . . . . . . . . . . . . . . . . 325.1.5 Partner Profiles . . . . . . . . . . . . . . . . . . . . . . . . . . . . . . . . . . . . . . . . . . . . . . . . . . . . . 325.1.6 Port . . . . . . . . . . . . . . . . . . . . . . . . . . . . . . . . . . . . . . . . . . . . . . . . . . . . . . . . . . . . . . 325.1.7 Port Definition . . . . . . . . . . . . . . . . . . . . . . . . . . . . . . . . . . . . . . . . . . . . . . . . . . . . . . 325.1.8 File Port . . . . . . . . . . . . . . . . . . . . . . . . . . . . . . . . . . . . . . . . . . . . . . . . . . . . . . . . . . . 325.1.9 TRFC Port . . . . . . . . . . . . . . . . . . . . . . . . . . . . . . . . . . . . . . . . . . . . . . . . . . . . . . . . . 335.1.10 CUA . . . . . . . . . . . . . . . . . . . . . . . . . . . . . . . . . . . . . . . . . . . . . . . . . . . . . . . . . . . . . . 33
Contents 5
6 Novell
novdocx (en) 10 March 2008
6 Configuring the SAP System 356.1 Configuring the SAP System . . . . . . . . . . . . . . . . . . . . . . . . . . . . . . . . . . . . . . . . . . . . . . . . . . 35
6.1.1 Defining Sending and Receiving Systems. . . . . . . . . . . . . . . . . . . . . . . . . . . . . . . . . 356.1.2 Creating a Distribution Model . . . . . . . . . . . . . . . . . . . . . . . . . . . . . . . . . . . . . . . . . . 366.1.3 Creating a Port Definition. . . . . . . . . . . . . . . . . . . . . . . . . . . . . . . . . . . . . . . . . . . . . . 376.1.4 Partner Profiles . . . . . . . . . . . . . . . . . . . . . . . . . . . . . . . . . . . . . . . . . . . . . . . . . . . . . 396.1.5 Activating Central User Administration . . . . . . . . . . . . . . . . . . . . . . . . . . . . . . . . . . . 406.1.6 Create a Communication (CPIC) User . . . . . . . . . . . . . . . . . . . . . . . . . . . . . . . . . . . 40
7 Using the SAP Java Connector Test Utility 417.1 About the Utility . . . . . . . . . . . . . . . . . . . . . . . . . . . . . . . . . . . . . . . . . . . . . . . . . . . . . . . . . . . . 41
7.1.1 Utility Prerequisites . . . . . . . . . . . . . . . . . . . . . . . . . . . . . . . . . . . . . . . . . . . . . . . . . . 417.1.2 Components . . . . . . . . . . . . . . . . . . . . . . . . . . . . . . . . . . . . . . . . . . . . . . . . . . . . . . . 427.1.3 Running and Evaluating the Test. . . . . . . . . . . . . . . . . . . . . . . . . . . . . . . . . . . . . . . . 427.1.4 Understanding Test Error Messages . . . . . . . . . . . . . . . . . . . . . . . . . . . . . . . . . . . . . 44
8 Understanding the Default Driver Configuration 498.1 Using Policies. . . . . . . . . . . . . . . . . . . . . . . . . . . . . . . . . . . . . . . . . . . . . . . . . . . . . . . . . . . . . . 49
8.1.1 Modifying Policies and the Filter . . . . . . . . . . . . . . . . . . . . . . . . . . . . . . . . . . . . . . . . 498.2 Obtaining Company Address Data for User Objects . . . . . . . . . . . . . . . . . . . . . . . . . . . . . . . . 60
9 Using the Driver in a Central User Administration Environment 639.1 Configuring the Driver as a CUA Child System . . . . . . . . . . . . . . . . . . . . . . . . . . . . . . . . . . . . 659.2 Using the Driver to Provision a CUA Landscape . . . . . . . . . . . . . . . . . . . . . . . . . . . . . . . . . . . 679.3 User Classification Settings (Licensing) . . . . . . . . . . . . . . . . . . . . . . . . . . . . . . . . . . . . . . . . . . 689.4 Important CUA Integration Notes . . . . . . . . . . . . . . . . . . . . . . . . . . . . . . . . . . . . . . . . . . . . . . . 69
10 Managing the Driver 7110.1 Starting, Stopping, or Restarting the Driver . . . . . . . . . . . . . . . . . . . . . . . . . . . . . . . . . . . . . . . 71
10.1.1 Starting the Driver in Designer. . . . . . . . . . . . . . . . . . . . . . . . . . . . . . . . . . . . . . . . . . 7110.1.2 Starting the Driver in iManager . . . . . . . . . . . . . . . . . . . . . . . . . . . . . . . . . . . . . . . . . 7110.1.3 Stopping the Driver in Designer . . . . . . . . . . . . . . . . . . . . . . . . . . . . . . . . . . . . . . . . . 7110.1.4 Stopping the Driver in iManager . . . . . . . . . . . . . . . . . . . . . . . . . . . . . . . . . . . . . . . . 7110.1.5 Restarting the Driver in Designer. . . . . . . . . . . . . . . . . . . . . . . . . . . . . . . . . . . . . . . . 7210.1.6 Restarting the Driver in iManager . . . . . . . . . . . . . . . . . . . . . . . . . . . . . . . . . . . . . . . 72
10.2 Using the DirXML Command Line Utility . . . . . . . . . . . . . . . . . . . . . . . . . . . . . . . . . . . . . . . . . 7210.3 Viewing Driver Versioning Information . . . . . . . . . . . . . . . . . . . . . . . . . . . . . . . . . . . . . . . . . . . 72
10.3.1 Viewing a Hierarchical Display of Versioning Information . . . . . . . . . . . . . . . . . . . . . 7210.3.2 Viewing the Versioning Information as a Text File. . . . . . . . . . . . . . . . . . . . . . . . . . . 7410.3.3 Saving Versioning Information. . . . . . . . . . . . . . . . . . . . . . . . . . . . . . . . . . . . . . . . . . 76
10.4 Reassociating a Driver Set Object with a Server Object . . . . . . . . . . . . . . . . . . . . . . . . . . . . . 7710.5 Changing the Driver Configuration. . . . . . . . . . . . . . . . . . . . . . . . . . . . . . . . . . . . . . . . . . . . . . 7810.6 Storing Driver Passwords Securely with Named Passwords . . . . . . . . . . . . . . . . . . . . . . . . . . 78
10.6.1 Using Designer to Configure Named Passwords . . . . . . . . . . . . . . . . . . . . . . . . . . . 7910.6.2 Using iManager to Configure Named Passwords . . . . . . . . . . . . . . . . . . . . . . . . . . . 7910.6.3 Using Named Passwords in Driver Policies. . . . . . . . . . . . . . . . . . . . . . . . . . . . . . . . 8010.6.4 Using the DirXML Command Line Utility to Configure Named Passwords . . . . . . . . 81
10.7 Adding a Driver Heartbeat . . . . . . . . . . . . . . . . . . . . . . . . . . . . . . . . . . . . . . . . . . . . . . . . . . . . 85
Identity Manager Driver 3.5.1 for User Management of SAP Software Guide

novdocx (en) 10 March 2008
11 Synchronizing Objects 8711.1 What Is Synchronization? . . . . . . . . . . . . . . . . . . . . . . . . . . . . . . . . . . . . . . . . . . . . . . . . . . . . 8711.2 When Is Synchronization Done? . . . . . . . . . . . . . . . . . . . . . . . . . . . . . . . . . . . . . . . . . . . . . . . 8711.3 How Does the Metadirectory Engine Decide Which Object to Synchronize? . . . . . . . . . . . . . 8811.4 How Does Synchronization Work?. . . . . . . . . . . . . . . . . . . . . . . . . . . . . . . . . . . . . . . . . . . . . . 89
11.4.1 Scenario One. . . . . . . . . . . . . . . . . . . . . . . . . . . . . . . . . . . . . . . . . . . . . . . . . . . . . . . 8911.4.2 Scenario Two. . . . . . . . . . . . . . . . . . . . . . . . . . . . . . . . . . . . . . . . . . . . . . . . . . . . . . . 9111.4.3 Scenario Three . . . . . . . . . . . . . . . . . . . . . . . . . . . . . . . . . . . . . . . . . . . . . . . . . . . . . 92
12 Troubleshooting the Driver 9512.1 Troubleshooting Driver Processes . . . . . . . . . . . . . . . . . . . . . . . . . . . . . . . . . . . . . . . . . . . . . . 95
12.1.1 Viewing Driver Processes . . . . . . . . . . . . . . . . . . . . . . . . . . . . . . . . . . . . . . . . . . . . . 9512.2 Driver Load Errors . . . . . . . . . . . . . . . . . . . . . . . . . . . . . . . . . . . . . . . . . . . . . . . . . . . . . . . . . 101
12.2.1java.lang.ClassNotFoundException:com.novell.nds.dirxml.driver.sapusershim.SAPDriver Shim. . . . . . . . . . . . . . . . . . . . . . . . . . . . . . . . . . . . . . . . . . . . . . . . . . . . . . . . . . 101
12.3 Other Driver Errors. . . . . . . . . . . . . . . . . . . . . . . . . . . . . . . . . . . . . . . . . . . . . . . . . . . . . . . . . 10112.3.1 com/sap/mw/jco/JCO. . . . . . . . . . . . . . . . . . . . . . . . . . . . . . . . . . . . . . . . . . . . . . . . 10112.3.2 no jRFC12 in java.library.path . . . . . . . . . . . . . . . . . . . . . . . . . . . . . . . . . . . . . . . . . 10212.3.3 /usr/jdk1.3.1/lib/sparc/libjRFC12.so:<classpath info>:fatal librfccm.so:open failed: No
such file or directory. . . . . . . . . . . . . . . . . . . . . . . . . . . . . . . . . . . . . . . . . . . . . . . . . 10212.3.4 com.novell.nds.dirxml.engine.VRDException . . . . . . . . . . . . . . . . . . . . . . . . . . . . . 10212.3.5 Error connecting to SAP host . . . . . . . . . . . . . . . . . . . . . . . . . . . . . . . . . . . . . . . . . 10212.3.6 nsap-pub-directory parameter is not a directory . . . . . . . . . . . . . . . . . . . . . . . . . . . 10212.3.7 No connection to remote loader. . . . . . . . . . . . . . . . . . . . . . . . . . . . . . . . . . . . . . . . 10212.3.8 Authentication handshake failed, Remote Loader message: “Invalid loader pa
ssword.” . . . . . . . . . . . . . . . . . . . . . . . . . . . . . . . . . . . . . . . . . . . . . . . . . . . . . . . . . . 10212.3.9 Authentication handshake failed: Received invalid driver object password. . . . . . . 10312.3.10 IDoc File or IDoc TRFC Documents Not Generated when a SAP User Is Created or
Modified . . . . . . . . . . . . . . . . . . . . . . . . . . . . . . . . . . . . . . . . . . . . . . . . . . . . . . . . . 10312.3.11 Users Created in SAP Cannot Log On to the SAP System (CUA in Use) . . . . . . . . 10312.3.12 The Driver Does Not Recognize IDocs in the Directory. . . . . . . . . . . . . . . . . . . . . . 10312.3.13 IDocs Are Not Written to the Driver (TRFC Port Configuration). . . . . . . . . . . . . . . . 10312.3.14 The Driver Does Not Authenticate to SAP. . . . . . . . . . . . . . . . . . . . . . . . . . . . . . . . 10412.3.15 JCO Installation and Configuration Errors . . . . . . . . . . . . . . . . . . . . . . . . . . . . . . . 10412.3.16 Error When Mapping Drives to the IDoc Directory . . . . . . . . . . . . . . . . . . . . . . . . . 104
13 Backing Up the Driver 10513.1 Exporting the Driver in Designer . . . . . . . . . . . . . . . . . . . . . . . . . . . . . . . . . . . . . . . . . . . . . . 10513.2 Exporting the Driver in iManager . . . . . . . . . . . . . . . . . . . . . . . . . . . . . . . . . . . . . . . . . . . . . . 105
14 Security: Best Practices 107
A DirXML Command Line Utility 109A.1 Interactive Mode. . . . . . . . . . . . . . . . . . . . . . . . . . . . . . . . . . . . . . . . . . . . . . . . . . . . . . . . . . . 109A.2 Command Line Mode. . . . . . . . . . . . . . . . . . . . . . . . . . . . . . . . . . . . . . . . . . . . . . . . . . . . . . . 118
7

8 Novell
novdocx (en) 10 March 2008
B Example XML Document Received from the Driver 123
C Structured Format Examples 125
D Configuration and Deployment Notes 127D.1 SAP Object Types . . . . . . . . . . . . . . . . . . . . . . . . . . . . . . . . . . . . . . . . . . . . . . . . . . . . . . . . . 127D.2 User Types: LOGONDATA:USTYP . . . . . . . . . . . . . . . . . . . . . . . . . . . . . . . . . . . . . . . . . . . . 127D.3 Output Controller Options . . . . . . . . . . . . . . . . . . . . . . . . . . . . . . . . . . . . . . . . . . . . . . . . . . . 127D.4 Communication Types: ADDCOMREM:COMM TYPE. . . . . . . . . . . . . . . . . . . . . . . . . . . . . . 128D.5 Date Formats: DEFAULTS:DATAFM. . . . . . . . . . . . . . . . . . . . . . . . . . . . . . . . . . . . . . . . . . . 128D.6 Decimal Formats: DEFAULTS:DCPFM . . . . . . . . . . . . . . . . . . . . . . . . . . . . . . . . . . . . . . . . . 128D.7 Computer Aided Test (CATT): DEFAULTS:CATTKENNZ . . . . . . . . . . . . . . . . . . . . . . . . . . . 128D.8 Communication Comment Type to Table Mappings . . . . . . . . . . . . . . . . . . . . . . . . . . . . . . . 129D.9 Language Codes . . . . . . . . . . . . . . . . . . . . . . . . . . . . . . . . . . . . . . . . . . . . . . . . . . . . . . . . . . 129D.10 Configuration Parameters . . . . . . . . . . . . . . . . . . . . . . . . . . . . . . . . . . . . . . . . . . . . . . . . . . . 130D.11 Design Comments and Notes . . . . . . . . . . . . . . . . . . . . . . . . . . . . . . . . . . . . . . . . . . . . . . . . 130
E Using Wildcard Search Capabilities 135
F Setting and Clearing Granular Locks 137F.1 Examples . . . . . . . . . . . . . . . . . . . . . . . . . . . . . . . . . . . . . . . . . . . . . . . . . . . . . . . . . . . . . . . . 137
G Driver BAPIs 139
Identity Manager Driver 3.5.1 for User Management of SAP Software Guide

novdocx (en) 10 March 2008
About This Guide
Audience
This manual is for Novell® Identity Manager administrators, SAP developers and administrators, and others who implement the Identity Manager Driver 1.0 for User Management of SAP Software.
The guide contains the following sections:
Chapter 1, “Introducing the Identity Manager Driver for User Management of SAP Software,” on page 11Chapter 2, “Installing the Driver,” on page 17Chapter 5, “Understanding ALE Technologies,” on page 31Chapter 6, “Configuring the SAP System,” on page 35Chapter 7, “Using the SAP Java Connector Test Utility,” on page 41Chapter 8, “Understanding the Default Driver Configuration,” on page 49Chapter 9, “Using the Driver in a Central User Administration Environment,” on page 63Chapter 12, “Troubleshooting the Driver,” on page 95Appendix B, “Example XML Document Received from the Driver,” on page 123Appendix C, “Structured Format Examples,” on page 125Appendix D, “Configuration and Deployment Notes,” on page 127Appendix E, “Using Wildcard Search Capabilities,” on page 135
Feedback
We want to hear your comments and suggestions about this manual and the other documentation included with Novell Identity Manager. Please use the User Comments feature at the bottom of each page of the online documentation, or go to http://www.novell.com/documentation/feedback.html and enter your comments there.
Documentation Updates
For the most recent version of this document, see the Drivers Documentation Web site (http://www.novell.com/documentation/idm35drivers/index.html).
Additional Documentation
For documentation on using Identity Manager and the other drivers, see the Identity Manager Documentation Web site (http://www.novell.com/documentation/idm35).
Documentation Conventions
In this documentation, a greater-than symbol (>) is used to separate actions within a step and items within a cross-reference path.
A trademark symbol (®, ™, etc.) denotes a Novell® trademark. An asterisk (*) denotes a third-party trademark.
About This Guide 9

10 Novell
novdocx (en) 10 March 2008
Identity Manager Driver 3.5.1 for User Management of SAP Software Guide

1novdocx (en) 10 M
arch 2008
1Introducing the Identity Manager Driver for User Management of SAP Software
The Identity Manager Driver 1.0 for User Management of SAP Software, subsequently referred to as the driver, creates an automated link between the Identity Vault and SAP User Management systems (BASIS or Web Application Server.) This technology enables data flow within a business enterprise based on its own unique requirements, and eliminates the labor-intensive and error-prone practice of re-entering the same data into multiple databases. As User object records are added, modified, deactivated (disabled), or deleted in SAP or the Identity Vault, network tasks associated with these events can be processed automatically.
The driver allows administrators to propagate User data between SAP systems and other business applications and databases without the need for custom integration solutions. Administrators can decide what data will be shared and how data will be presented within their enterprises.
In this section:
Section 1.1, “Understanding Driver Concepts,” on page 11Section 1.2, “Understanding Driver Components,” on page 16Section 1.3, “New Features,” on page 16
1.1 Understanding Driver ConceptsThe driver is a bidirectional synchronization product between SAP R/3 and Enterprise R/3 systems and the Identity Vault. This framework uses XML and XSLT to provide data and event transformation capabilities that convert Identity Vault data and events into SAP data and vice-versa.
The Identity Vault acts as a hub, with other applications and directories publishing their changes to it. The Identity Vault then sends changes to the applications and directories that have subscribed for them. This results in two main flows of data: the Publisher channel and the Subscriber channel.
1.1.1 Publisher ChannelThe SAP system publishes User object information in the form of USERCLONE IDocs using Application Link Enabling (ALE) and Central User Administration (CUA) technology. If desired and properly configured, the SAP system can propagate all Add, Delete, Lock, Unlock, and Modify User event data to the Identity Vault. The driver consumes the IDoc data and converts it into XML format. For more information on how the driver handles IDoc processing, refer to “IDoc Consumption by the Driver” on page 13.
The Publisher channel then submits XML-formatted documents to the Metadirectory engine for publication into the Identity Vault. By using Identity Manager and other IDM drivers, the data can be shared with other business applications and directories. These other applications can add additional data, which in turn can be transferred back into the SAP User records using the standard SAP Business Application Programming Interface (BAPI).
Introducing the Identity Manager Driver for User Management of SAP Software 11

12 Novell
novdocx (en) 10 March 2008
Depending on the ALE port configuration you choose, the Publisher channel either polls the SAP database for changes via a file port or it receives the data via a TRFC connection.
The following diagram illustrates the file port configuration. With the file port configuration, the entire IDoc is stored on the SAP host system.
Figure 1-1 Publishing Data to the Identity Vault using the File Port Configuration
The following diagram illustrates the TRFC port configuration. When using the TRFC configuration, a minimal “trigger” IDoc is stored on the driver host system. The driver handles the parsing of the IDoc data and uses the information to read the current User object. The driver then parses the appropriate data fields specified by the driver configuration, and provides secure transport of the data to the Identity Vault. Only data elements specifically selected by the system administrator are transported from the SAP host system to the Identity Vault.
Publisher Channel: File Port Configuration
Publishing SAP Data to Other Applications
SAP Basis
or SAP WAS
Central User
Administration
(CUA)
SAP HOST
The driver adds
or updates the
data in the
Identity Vault.
XML Doc
SAP is configured
to publish to
the external client
via File Port.
USERCLONE IDocs
C:/IDOCS/0_400_n
SSL
connection
Identity
Vault
Metadirectory
Engine
Remote Loader
Service
IDM HOST
IDM
Remote
Loader
IDM
Driver
The driver is
configured to
poll the IDOC
directory on
intervals for
docs pertaining
to the specific
client number.
The driver filters and
converts relevant data
into XML format.
IDOCs are posted to
the host file system
with client number
references.
Identity Manager Driver 3.5.1 for User Management of SAP Software Guide

novdocx (en) 10 March 2008
Figure 1-2 Publishing Data to the Identity Vault using the TRFC Configuration
IDoc Consumption by the Driver
The driver consumes only Output IDoc files with the client number that is specified by the driver configuration, thus ensuring the privacy of other IDocs that might be generated by another driver configuration or ALE integration. Only the IDoc attributes that have been specified in the driver Publisher filter are published to the Identity Vault.
The format of a successfully published IDoc file is:<(I)nput or (O)utput>_<client number>_<consecutive IDoc number>
For example:O_300_0000000000001001
After the IDoc has been processed and specified attributes have been published, the filename of the IDoc file is modified to reflect the status of the publication processes. The following table lists the IDoc status and corresponding extension:
You should determine what action is required, if any, after IDoc publication is complete.
IDoc Status Filename Extension
Processing but not published .proc
Processed successfully and published .done
Processed with an error or warning .fail or .warn
Processed and retained for future-dated processing
.futr
Processed with corrupt or illegitimate data .bad
Publisher Channel: TRFC Configuration
Publishing SAP Data to Other Applications
SAP Basis
or SAP WAS
Central User
Administration
(CUA)
The driver adds
or updates the
data in the
Identity Vault.IDM
Remote
Loader
IDM
Driver
TRFC
Server
XML Doc
USERCLONE IDocs
SSL
connection
Identity
Vault
Metadirectory
Engine
Remote Loader
Service
IDM HOST
SAP is configured
to publish to the
external client
via TRFC Port.
The driver is configured
to receive IDocs via the
SAP Gateway. The driver
can run on the SAP host
or remotely.
The driver filters and
converts relevant data
into XML format.
SAP HOST
Introducing the Identity Manager Driver for User Management of SAP Software 13
14 Novell
novdocx (en) 10 March 2008
NOTE: Removing the filename extension makes the IDoc available for re-processing.
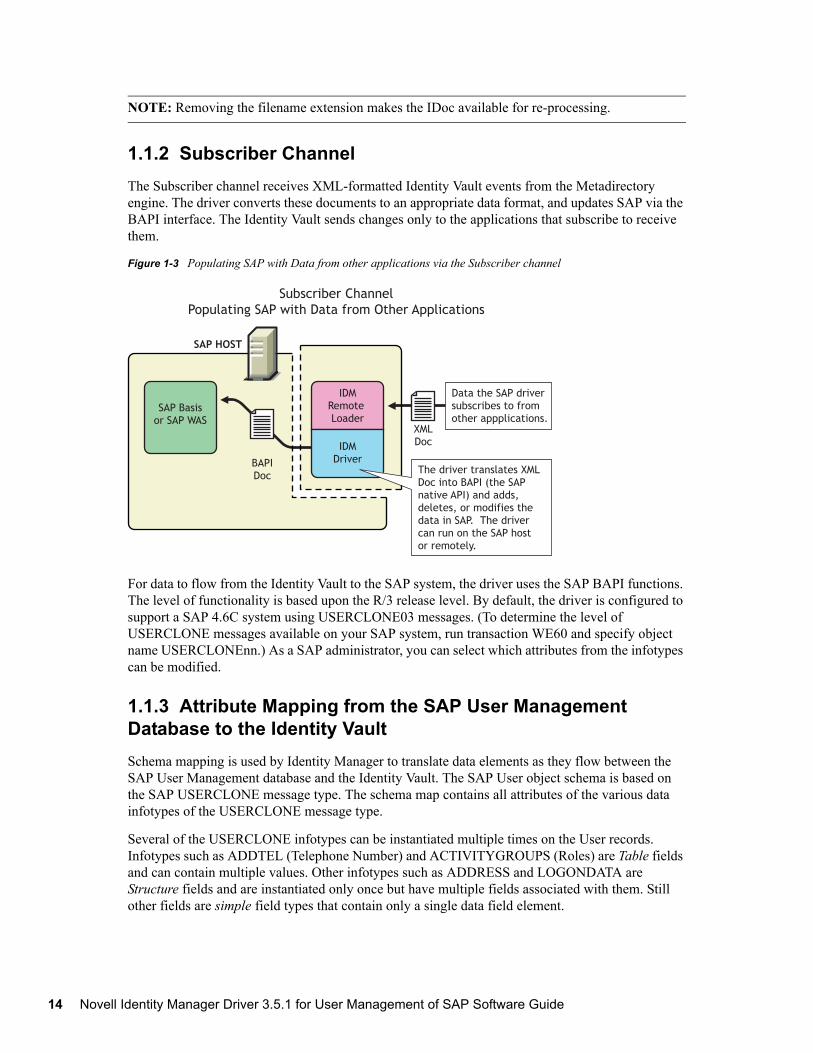
1.1.2 Subscriber ChannelThe Subscriber channel receives XML-formatted Identity Vault events from the Metadirectory engine. The driver converts these documents to an appropriate data format, and updates SAP via the BAPI interface. The Identity Vault sends changes only to the applications that subscribe to receive them.
Figure 1-3 Populating SAP with Data from other applications via the Subscriber channel
For data to flow from the Identity Vault to the SAP system, the driver uses the SAP BAPI functions. The level of functionality is based upon the R/3 release level. By default, the driver is configured to support a SAP 4.6C system using USERCLONE03 messages. (To determine the level of USERCLONE messages available on your SAP system, run transaction WE60 and specify object name USERCLONEnn.) As a SAP administrator, you can select which attributes from the infotypes can be modified.
1.1.3 Attribute Mapping from the SAP User Management Database to the Identity VaultSchema mapping is used by Identity Manager to translate data elements as they flow between the SAP User Management database and the Identity Vault. The SAP User object schema is based on the SAP USERCLONE message type. The schema map contains all attributes of the various data infotypes of the USERCLONE message type.
Several of the USERCLONE infotypes can be instantiated multiple times on the User records. Infotypes such as ADDTEL (Telephone Number) and ACTIVITYGROUPS (Roles) are Table fields and can contain multiple values. Other infotypes such as ADDRESS and LOGONDATA are Structure fields and are instantiated only once but have multiple fields associated with them. Still other fields are simple field types that contain only a single data field element.
Subscriber Channel
Populating SAP with Data from Other Applications
SAP Basis
or SAP WAS
IDM
Remote
Loader
IDM
DriverBAPI
Doc
SAP HOST
Data the SAP driver
subscribes to from
other appplications.XML
Doc
The driver translates XML
Doc into BAPI (the SAP
native API) and adds,
deletes, or modifies the
data in SAP. The driver
can run on the SAP host
or remotely.
Identity Manager Driver 3.5.1 for User Management of SAP Software Guide

novdocx (en) 10 March 2008
The Identity Vault (eDirectory) system administrator can configure the driver to receive any of these various data fields, and can also configure the driver to handle the data in multiple ways. The Schema Map represents the data elements that can be synchronized in the SAP system.
The map elements have the following format:<Table or Structure Name>:<Field> // Field
or<Table Name> // Map to entire table or structure
Below are a few examples of maps between SAP User attributes and eDirectory attributes.
The driver can synchronize multiple-instance data (such as TELEPHONE), but it cannot guarantee the specification of a primary value. It is also possible to specify only the Table name in a schema mapping. This is useful if you want to synchronize all data fields in a Table to the Identity Vault. You must use policies to parse desired fields from the Table data. Refer to Appendix B, “Example XML Document Received from the Driver,” on page 123 to see how various formats are represented in modify events.
1.1.4 AssociationsAssociations are created between SAP and Identity Vault objects during the synchronization process. For the SAP User object, a unique 12-character name (per client) must be created. However, the Identity Vault and other applications do not need to share this same unique ID. Identity Manager allows the various naming policies in an organization to be applied to objects by using the DirXML-Association attribute.
The DirXML-Association attribute is multivalued. Therefore, if Identity Manager is being used to synchronize an object among multiple applications, all of the object’s unique IDs (or associations) can be stored in this attribute on the Identity Vault object.
The unique ID association links objects in SAP to their objects in the Identity Vault. When an Add or Matching event occurs, the association is made. This association allows the driver to perform subsequent tasks on the appropriate object.
eDirectory Attribute SAP User Attribute
Given Name ADDRESS:FIRSTNAME
Surname ADDRESS:LASTNAME
sapRoles ACTIVITYGROUPS:AGR_NAME
buildingName ADDRESS:BUILDING_P
floor ADDRESS:FLOOR_P
Internet EMail Address ADDSMTP:E_MAIL
OU ADDRESS:DEPARTMENT
Pager ADDPAG:PAGER
sapAlias ALIAS:USERALIAS
DirXML-sapLocRoles LOCACTIVITYGROUPS
Introducing the Identity Manager Driver for User Management of SAP Software 15

16 Novell
novdocx (en) 10 March 2008
The DirXML-Associations field is stored on the Identity Vault object on the Identity Manager property page.
1.2 Understanding Driver ComponentsThis sections contains information about the following driver components.
“Driver Configurations” on page 16“Driver Shim” on page 16“SAP User Java Connector Test Utility” on page 16
1.2.1 Driver ConfigurationsAfter you install Identity Manager and the driver, you create one or more Driver objects. Each Driver object represents an instance of the Identity Manager Driver for User Management of SAP Software. The driver configuration file gets you up and running with a minimum of customization by letting you create a Driver object with preconfigured policies, filters, and driver parameters.
The driver configuration file is named SAPUser-IDM3_5_0-V1.xml.
1.2.2 Driver ShimThe driver shim, sometimes referred to as the connector, handles communication between the SAP User database and the Metadirectory engine.
1.2.3 SAP User Java Connector Test UtilityIn order to use the driver, you must download the SAP JCO and install it. The SAP User Java* Connector (JCO) Test utility enables you to check for JCO installation and configuration issues prior to configuring the driver. You can use the JCO test utility to validate correct installation of the JCO client and configuration issues prior to configuring the driver.
You can use the JCO test utility to validate correct installation of the JCO client and connectivity to the SAP host system, as well as testing for accessibility of the User Management BAPIs used by the driver. For more information, refer to Chapter 7, “Using the SAP Java Connector Test Utility,” on page 41.
1.3 New FeaturesAdded a new appendix explaining how to set and clear granular locks. For more information, see Appendix F, “Setting and Clearing Granular Locks,” on page 137.Added a new appendix listings the BAPIs for the driver. For more information, see Appendix G, “Driver BAPIs,” on page 139.For more information about the new features of Identity Manager, refer to the Identity Manager Installation Guide (http://www.novell.com/documentation/idm35/).
Identity Manager Driver 3.5.1 for User Management of SAP Software Guide

2novdocx (en) 10 M
arch 2008
2Installing the Driver
As part of the driver installation and configuration, you should complete the following tasks:
“Planning for Installation” on page 17“Importing the Driver” on page 18
These tasks are explained in detail in this section. After you finish installing the driver, proceed to Chapter 5, “Understanding ALE Technologies,” on page 31 to learn more about the SAP system configuration requirements.
2.1 Driver PrerequisitesThe driver requires the following prerequisites. Ensure that you meet these criteria before you install the driver.
Novell® Identity Manager 3.5.1.The host system where the driver shim is running must have the SAP Java Connector (JCO) client technology version 1.1x or 2.x installed to provide connectivity to the SAP system. This client is freely available to SAP customers and developer partners through SAP, and is provided for most popular server operating systems. You can download the JCO from the SAP Connectors site (http://service.sap.com/connectors).
JDK*/JRE 1.3.1 or later.SAP R/3 version 4.5B or later.
2.2 Planning for InstallationBefore you install and use the driver, you should determine which kind of installation you want to use: local or remote.
When to Use a Local Installation
A local installation installs the driver on the same host computer where you have Identity Manager installed.
When to Use a Remote Installation
A remote installation installs the driver on a different computer than the one where Identity Manager and eDirectoryTM are installed, or it allows the driver to run in its own process space on the same computer. Remote installations can use SSL encryption to ensure data privacy between the driver and the Metadirectory engine. You should use this configuration when it is not possible or desirable to run the driver on the same host with eDirectory and Identity Manager.
Installing the Driver 17

18 Novell
novdocx (en) 10 March 2008
2.3 Installing the DriverThere are two different ways to install the driver:
Section 2.3.1, “Installing the Driver Locally,” on page 18Section 2.3.2, “Installing the Driver Remotely,” on page 18
2.3.1 Installing the Driver LocallyIf you are going to install the driver locally, the server that runs the driver is required to have the following installed:
eDirectoryTM 8.73 SP8 or above, or 8.8 SP1 or aboveSAP R/3 version 4.5B or later.
The SAP User driver is installed during the installation of Identity Manager. See “Installing Identity Manager” in theIdentity Manager 3.5.1 Installation Guide for the installation instructions.
2.3.2 Installing the Driver RemotelyIf you do not want to install eDirectory and Identity Manager on the server that has the SAP User application installed on it, use the Remote Loader service. The Remote Loader service is installed and then connects to the server running Identity Manager. For installation instructions see, “Deciding Whether to Use the Remote Loader” in the Novell Identity Manager 3.5.1 Administration Guide.
2.4 Importing the DriverAfter the driver is installed, it must be imported and configured. You can import the driver through Designer or iManager.
Section 2.4.1, “Importing the Driver Configuration File in Designer,” on page 18Section 2.4.2, “Importing the Driver Configuration File in iManager,” on page 19Section 2.4.3, “Configuration Information,” on page 19Section 2.4.4, “Extending the Schema,” on page 22
2.4.1 Importing the Driver Configuration File in DesignerDesigner allows you to import the basic driver configuration file for the SAP User application. This file creates and configures the objects and policies needed to make the driver work properly. The following instructions explain how to create the driver and import the driver’s configuration.
There are many different ways of importing the driver configuration file. This procedure only documents one way.
1 Open a project in Designer. In the Modeler, right-click the driver set and select New > Driver.2 From the drop-down list, select SAP User Management, then click Run.3 Configure the driver by filling in the fields. Specify information for your environment. For
information on the settings, see Section 2.4.3, “Configuration Information,” on page 19.
Identity Manager Driver 3.5.1 for User Management of SAP Software Guide

novdocx (en) 10 March 2008
4 After specifying parameters, click Finish to import the driver.5 After the driver is imported, customize and test the driver.6 After the driver is fully tested, deploy the driver into the Identity Vault. See “Deploying a
Driver to an Identity Vault” in the Designer 2.1 for Identity Manager 3.5.1.
2.4.2 Importing the Driver Configuration File in iManagerThe Create Driver Wizard helps you import the basic driver configuration file. This file creates and configures the objects and policies needed to make the driver work properly.
The following instructions explain how to create the driver and import the driver’s configuration.
1 In Novell iManager, click Identity Manager Utilities > Import Configurations.2 Select a driver set, then click Next.
If you place this driver in a new driver set, you must specify a driver set name, context, and associated server.
3 Select how you want the driver configurations sorted:All configurationsIdentity Manager 3.5 configurationsIdentity Manager 3.0 configurationsConfigurations not associated with an IDM version
4 Select SAP User Management, then click Next.5 Specify the driver’s parameters (refer to Section 2.4.3, “Configuration Information,” on
page 19 for details), then click Next to import the driver.6 Define security equivalences using a user object that has the rights that the driver needs to have
on the server, then click OK.The tendency is to use the Admin user object for this task. However, you might want to create a DriversUser (for example) and assign security equivalence to that user. Whatever rights that the driver needs to have on the server, the DriversUser object must have the same security rights.
7 Identify all objects that represent administrative roles and exclude them from replication, then click OK.Exclude the security-equivalence object (for example, DriversUser) that you specified in Step 6. If you delete the security-equivalence object, you have removed the rights from the driver, and the driver can’t make changes to Identity Manager.
8 Review the driver objects in the Summary page, then click Finish.
2.4.3 Configuration InformationAs you import the driver configuration file, you will be prompted for the following information, depending on the configuration selections you made.
Parameter Name Parameter Description
Driver name The actual name you want to use for the driver.
Installing the Driver 19

20 Novell
novdocx (en) 10 March 2008
SAP Application Server
The host name or IP address for connecting to the appropriate SAP application server. This is referred to as the “Application Server” in the SAP logon properties.
SAP System Number
The SAP system number of the SAP application server. This is referred to as the “System Number” in the SAP logon properties. The default value is 00.
SAP Client Number
The client number to be used on the SAP application server. This is referred to as the “Client” in the SAP logon screen.
SAP Session Language Code
The language code this driver will use for the SAP session. This is referred to as the “Language” in the SAP logon screen.
SAP User ID The ID of the user this driver will use for the SAP system logon. This is referred to as the “User” in the SAP logon screen.
SAP User Password
The User password this driver will use for the SAP system logon. This is referred to as the “Password” in the SAP logon screen.
Publisher Channel Enabled
Select whether or not you want to enable the driver’s Publisher channel.
User Object Container (Conditional)
The name of the eDirectory Organizational Unit object where Users from the SAP system will be placed. This is only used if the Publisher channel is enabled.
Publisher Channel Port Type (Conditional)
Set to TRFC if the driver will instantiate a JCO Server to receive data distribution broadcasts from the SAP ALE system. Set to FILE if the driver will consume text file IDocs distributed by the SAP ALE system. This is only used if the Publisher channel is enabled.
Publisher IDoc File Directory (Conditional)
The file system location where the SAP User IDoc files are placed by the SAP ALE system (FILE port configuration) or by the driver (TRFC configuration.) This setting is only used if the Publisher channel is enabled.
SAP Gateway ID (Conditional)
If the Publisher channel port type is TRFC, this parameter specifies the gateway that distributes User data to the driver. This setting is only used if the Publisher channel port type is TRFC.
The default form of this parameter is sapgw<SAP System Number>. The default value is sapgw00.
TRFC Program ID (Conditional)
If the Publisher channel port type is TRFC, this parameter identifies the JCO server program in the driver for the SAP gateway. This setting is only used if the Publisher channel port type is TRFC.
The program ID is a case-sensitive text identifier.
Install Driver as Remote/Local
Configure the driver for use with the Remote Loader service by selecting the Remote option, or select Local to configure the driver for local use. If Local is selected, you can skip the remaining parameters.
Remote Host Name and Port (Conditional)
Specify the host name or IP address and port number for where the Remote Loader service has been installed and is running for this driver. The default port is 8090.
This setting is only used if you are using the Remote Loader to run the driver.
Driver Password (Conditional)
The driver object password is used by the Remote Loader to authenticate itself to the Identity Manager server. It must be the same password that is specified as the driver object password on the Remote Loader.
This setting is only used if you are using the Remote Loader to run the driver.
Parameter Name Parameter Description
Identity Manager Driver 3.5.1 for User Management of SAP Software Guide

novdocx (en) 10 March 2008
The following additional driver parameters are set to default values during the import process, but they can be modified in iManager (by clicking the Driver Configuration tab on the driver object.)
Remote Password (Conditional)
The Remote Loader password is used to control access to the Remote Loader instance. It must be the same password that is specified as the Remote Loader password on the Identity Manager Remote Loader.
This setting is only used if you are using the Remote Loader to run the driver.
Parameter name Parameter Description
Character Set Encoding
The code for the character set to translate IDoc byte-string data into Unicode* strings. An empty value causes the driver to use the host JVM* default.
Publish all Communication Table Values
Set this to Publish Primary if only the primary value of Communicate tables should be synchronized.
or
Set this to Publish All if all values should be synchronized.
Publish Company Address Data
By default, an SAP User record does not include Company Address information. That data is kept in a related table. Use this parameter to specify if you want the driver to retrieve the data from the appropriate company record. Regardless of the option you specify, Company Address information cannot be updated in SAP.
Set this to Include Company Address to populate User Company Address information for the Publisher and Subscriber channel queries.
or
Set this to Ignore Company Address if you do not want this functionality.
Communication Table Comments
The communication table comment is a text comment the driver adds to all Communication table entries added by the Subscriber channel. This is a useful method for determining where an entry originated from when viewing values via the SAP GUI. Leaving this field blank provides no comment to the table entries.
Require User to Change Set Passwords
This parameter specifies the methodology used by the driver to set User account passwords. Passwords can be set by the driver's administrative User account or by the affected User's account (this sets a password on new accounts or modifies passwords for existing Users.)
Select Change Required if passwords must be changed immediately at the user’s next login.
or
Select No Change Required if you do not want user’s to change passwords immediately at login.
Parameter Name Parameter Description
Installing the Driver 21

22 Novell
novdocx (en) 10 March 2008
2.4.4 Extending the SchemaIf you want to use the default configuration, you need to extend the eDirectory schema. This provides greater abilities to administrate the User Management functions of SAP R/3 and Enterprise
(Conditional) Password Set Method
If you select the No Change Required option above, you should specify a Password Set Method: Administrator Set or User Set.
Administrator Set: Passwords are set by the driver's administrative User account. This method is depricated and does not comply with SAP security best practices. The method works only for SAP systems that are version 4.6c or older.
User Set: Passwords are supplied by the affected users. The following parameters must be set if you select User Set:
Default Reset Password: This parameter specifies a default password reset value. It is set during password changes if the User-supplied password is not accepted by the SAP server. There is an 8-character size limit for this value. (SAP 7.0 does not require an 8-character size limit on passwords.)
Force Passwords to Uppercase: This option defines if passwords are forced to uppercase. Uppercase is the default value, however, SAP 7.0 allows for mixed-case passwords.
Poll Interval (seconds)
Specifies how often the Publisher channel polls for unprocessed IDocs. The default value is 10 seconds.
Future-dated Event Handling Option
The behavior of this option is based on the values of the User record’s Logon Data “Valid From” date (LOGONDATA:GLTGV) when IDocs are processed by the Publisher channel. This field does not need to be in the Publisher filter for this processing to occur.
There are four possible values for this parameter:
0 - Indicates that all attributes are processed by the driver when the IDoc is available. No future-dated processing is performed.
1 - Indicates that only attributes that have a current or past time stamp are processed by the driver when the IDoc is available. Future-dated infotype attributes are cached in a .futr file to be processed at a future date.
2 - Indicates that the driver blends options 1 and 2. All attributes are processed, with a time stamp, at the time the IDoc is available. All future-dated infotype attributes are cached in a .futr file to be processed at a future date.
3 - Indicates that the driver processes all events at the time the IDoc is made available. All future-dated infotype attributes are cached in a .futr file to be processed again on the next calendar day. This continues until the attributes are sent for a final time on the future date.
Generate TRFC Trace Files
If a TRFC port is configured for use by the Publisher channel, this option allows the driver to turn on the SAP JCO tracing capability.
Enter Disable if you do not desire this functionality, or enter Enable to activate it.
Trace files are generated in either the Identity Manager or Remote Loader root directory and are identified by a .trc extension. The default value is Disabled.
Parameter name Parameter Description
Identity Manager Driver 3.5.1 for User Management of SAP Software Guide

novdocx (en) 10 March 2008
R/3 systems. We recommend applying a set of schema extensions to the eDirectory tree that will synchronize with the SAP system.
During SAP’s development of their own LDAP-based User Administration utilities, a standard set of schema extensions was developed for use with Novell eDirectory. These extensions are contained in the R3-Novell-Ldif-Schema-extension.ldif file. This file is designed to be applied to eDirectory by using the Novell Import Conversion Export (ICE) utility.
In addition to the ldif-format schema extension file, the schema extensions are also available in the sapuser.sch file (the eDirectory standard).
NOTE: Starting with version 1.0.5 of the driver, the sapUsername attribute is no longer a required attribute of the sapAddOnUM auxiliary class in the sapuser.sch file. Because the R3-Novell-Ldif-Schema-extension.ldif file was created by SAP, this attribute remains a required attribute in that file. It is recommended that sapuser.sch should be used for all new deployments requiring schema extension.
IMPORTANT: If you are upgrading an existing driver deployment, the sapuserupgrade.sch or sapuserupgrade.ldif files contain only the updated schema for new functionality provided with driver version 1.0.5 and later.
If you want to extend the schema using the LDIF file, the following instructions help you use the ICE utility. For additional information, refer to the Import Conversion Export utility documentation (http://www.novell.com/documentation).
1 Open the NDS Import/Export Wizard.2 Select Import LDIF File, then click Next.3 Browse to R3-Novell-Ldif-Schema-extension.ldif, then click Next.4 Fill in the appropriate LDAP connection information for the Novell LDAP service, then click
Next.5 Click Finish to begin the extension process.
Installing the Driver 23

24 Novell
novdocx (en) 10 March 2008
Identity Manager Driver 3.5.1 for User Management of SAP Software Guide

3novdocx (en) 10 M
arch 2008
3Upgrading the Driver
If you have been using a previous version of the driver, follow these instructions instead of the ones in Chapter 2, “Installing the Driver,” on page 17.
Identity Manager 3.5 contains a new architecture for how policies reference one another. To take advantage of this new architecture, the driver configuration file provided for SAP must be upgraded. For more information on the new architecture, see “Upgrading Identity Manager Policies” in the Understanding Policies for Identity Manager 3.5.1. You can upgrade the driver in Designer or iManager.
If you are upgrading from Identity Manager 3.5.0 to Identity Manager 3.5.1, the following information does not apply.
Section 3.1, “Upgrading the Driver in Designer,” on page 25Section 3.2, “Upgrading the Driver in iManager,” on page 28
3.1 Upgrading the Driver in Designer1 Make sure you have updated your driver with all the patches for the version you are currently
running.
We recommend this step for all drivers, to help minimize upgrade issues.2 Back up the driver. See Chapter 13, “Backing Up the Driver,” on page 105 for instruction on
how to back up the driver.3 Install Designer version 2.0 or above, then launch Designer.
If you had a project open in Designer when you upgraded Designer, proceed to Step 4. If you didn’t have a project open in Designer when you upgraded Designer, skip to Step 5.
4 If you had a project open when upgrading Designer, the following warning message is displayed. Read the warning message, then click OK.
Designer closes the project to preform the upgrade.5 In the Project view, double-click System Model to open and convert the project.
Upgrading the Driver 25

26 Novell
novdocx (en) 10 March 2008
6 Read the Project Converter message explaining that the project is backed up, converted to the new format, changes logged to a file, and the new project is opened, then click Next.
7 Specify the name of the backup project name, then click Next.
Identity Manager Driver 3.5.1 for User Management of SAP Software Guide
novdocx (en) 10 March 2008
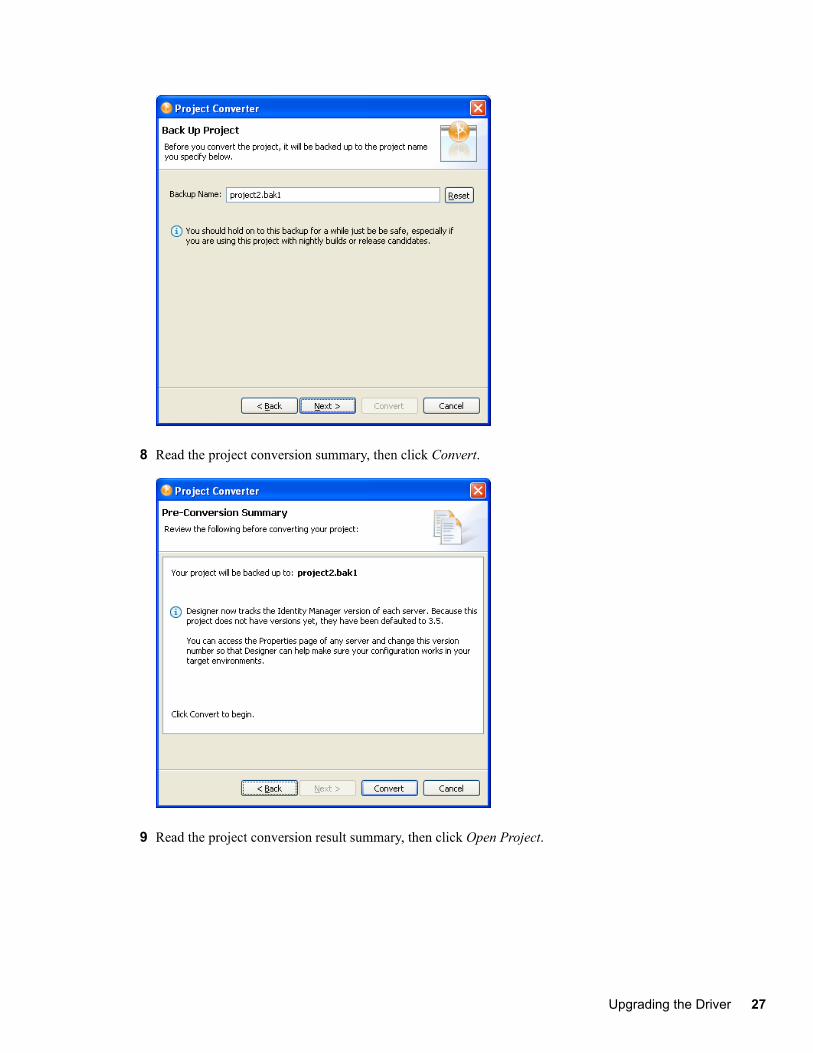
8 Read the project conversion summary, then click Convert.
9 Read the project conversion result summary, then click Open Project.
Upgrading the Driver 27

28 Novell
novdocx (en) 10 March 2008
If you want to view the log file that is generated, click View Log.
3.2 Upgrading the Driver in iManager1 Make sure you have updated your driver with all the patches for the version you are currently
running.
We recommend this step for all drivers, to help minimize upgrade issues.2 Back up the driver. See Chapter 13, “Backing Up the Driver,” on page 105 for instruction on
how to back up the driver.3 Verify that Identity Manager 3.5.1 has be installed and you have the current plug-ins installed,
then launch iManager.4 Click Identity Manager > Identity Manager Overview.5 Click Search to find the Driver Set object, then click the driver you want to upgrade.6 Read the message that is displayed, then click OK.
7 If there is more than one driver to upgrade, repeat Step 2 through Step 6.
Identity Manager Driver 3.5.1 for User Management of SAP Software Guide

4novdocx (en) 10 M
arch 2008
4Activating the Driver
Novell® Identity Manager, Integration Modules, and the Provisioning Module must be activated within 90 days of installation, or they shut down. At any time during the 90 days, or afterward, you can choose to activate Identity Manager products.
To activate the driver, see “Activating Novell Identity Manager Products” in the Identity Manager 3.5.1 Installation Guide.
Activating the Driver 29

30 Novell
novdocx (en) 10 March 2008
Identity Manager Driver 3.5.1 for User Management of SAP Software Guide
5novdocx (en) 10 M
arch 2008
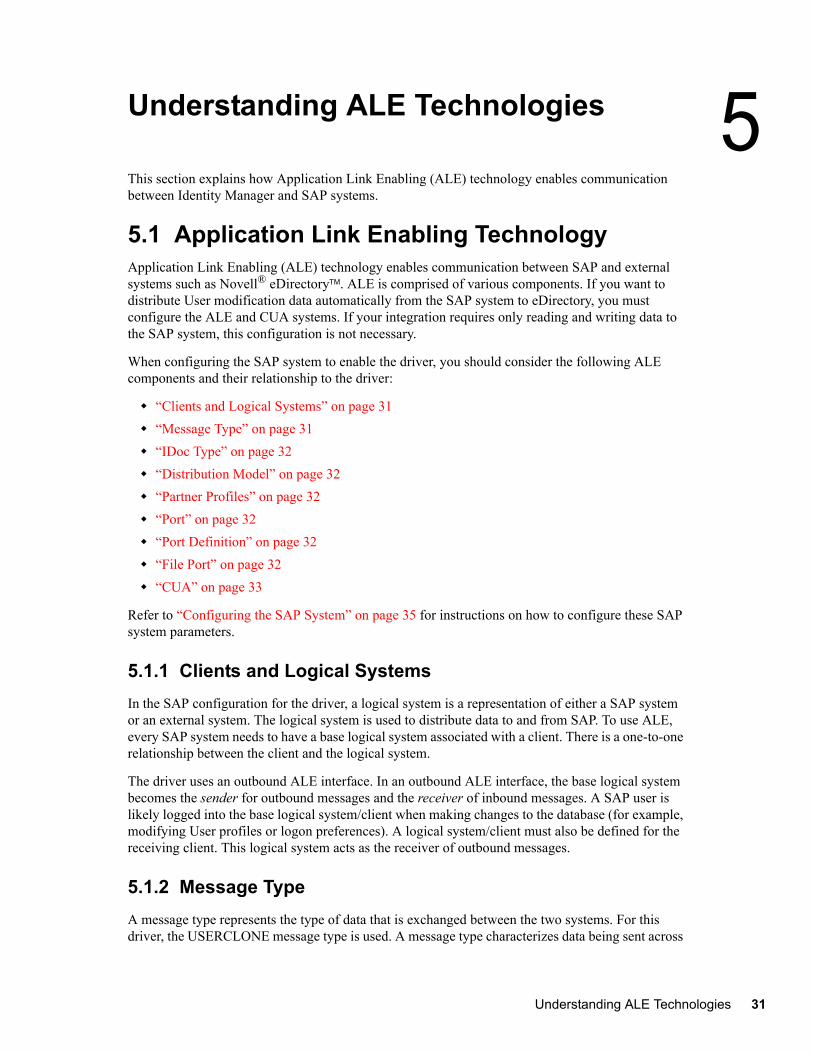
5Understanding ALE Technologies
This section explains how Application Link Enabling (ALE) technology enables communication between Identity Manager and SAP systems.
5.1 Application Link Enabling TechnologyApplication Link Enabling (ALE) technology enables communication between SAP and external systems such as Novell® eDirectoryTM. ALE is comprised of various components. If you want to distribute User modification data automatically from the SAP system to eDirectory, you must configure the ALE and CUA systems. If your integration requires only reading and writing data to the SAP system, this configuration is not necessary.
When configuring the SAP system to enable the driver, you should consider the following ALE components and their relationship to the driver:
“Clients and Logical Systems” on page 31“Message Type” on page 31“IDoc Type” on page 32“Distribution Model” on page 32“Partner Profiles” on page 32“Port” on page 32“Port Definition” on page 32“File Port” on page 32“CUA” on page 33
Refer to “Configuring the SAP System” on page 35 for instructions on how to configure these SAP system parameters.
5.1.1 Clients and Logical SystemsIn the SAP configuration for the driver, a logical system is a representation of either a SAP system or an external system. The logical system is used to distribute data to and from SAP. To use ALE, every SAP system needs to have a base logical system associated with a client. There is a one-to-one relationship between the client and the logical system.
The driver uses an outbound ALE interface. In an outbound ALE interface, the base logical system becomes the sender for outbound messages and the receiver of inbound messages. A SAP user is likely logged into the base logical system/client when making changes to the database (for example, modifying User profiles or logon preferences). A logical system/client must also be defined for the receiving client. This logical system acts as the receiver of outbound messages.
5.1.2 Message TypeA message type represents the type of data that is exchanged between the two systems. For this driver, the USERCLONE message type is used. A message type characterizes data being sent across
Understanding ALE Technologies 31

32 Novell
novdocx (en) 10 March 2008
the systems and relates to the structure of the data, also known as an IDoc type (for example, USERCLONE03).
5.1.3 IDoc TypeIntermediate Document (IDoc) Type represents the structure of the data associated with a message type. ALE technology uses IDocs to exchange data between logical systems. An IDoc is an object with the data of a specific message type in it. IDocs consist of three record types:
The control recordThe data recordThe status record
The control record contains information about the IDoc, such as what IDoc type it is, the message type, the sending and receiving systems, or the direction.
The data record contains the application data. Data records consist of several fields that describe the content of the specific object.
The status record contains data on the state of the processing of the IDoc.
5.1.4 Distribution ModelThe distribution model is a tool that stores information about the flow of message types between systems. A distribution model must be configured when setting up the driver. After the two logical systems have been defined and you have a general understanding of message types and IDocs, you can configure your distribution model.
The distribution model determines what message types can be sent from a logical system to another logical system.
5.1.5 Partner ProfilesPartner profiles specify the components used in an outbound process. Some of these components include the IDoc type, message type, IDoc size, mode, and the person to be notified in case of errors.
5.1.6 PortA port is the communication link between the two logical systems.
5.1.7 Port DefinitionA port definition is used in an outbound process to define how documents are transferred to the destination system.
5.1.8 File PortA file port can be used in the integration solution. IDocs are transferred to a file in a specified file system location accessible by the SAP host system.
Identity Manager Driver 3.5.1 for User Management of SAP Software Guide

novdocx (en) 10 March 2008
5.1.9 TRFC PortA Transactional Remote Function Call (TRFC) can be used in the integration solution. IDocs are transferred to a specified application process (such as the driver) via the SAP Gateway.
5.1.10 CUACentral User Administration (CUA) is a process provided by SAP to distribute and manage User object data between a Central SAP logical system and one or more Client logical systems. The client logical systems might be SAP or external systems. The base technology used for the CUA is ALE.
Understanding ALE Technologies 33

34 Novell
novdocx (en) 10 March 2008
Identity Manager Driver 3.5.1 for User Management of SAP Software Guide

6novdocx (en) 10 M
arch 2008
6Configuring the SAP System
You must configure the SAP system parameters to enable Application Link Enabling (ALE) and Central User Administration (CUA) processing of USERCLONE IDocs if you want to publish real-time changes of SAP User data to the Identity Vault. Novell® follows SAP’s general guidelines for configuring BAPI (Business Application and Programming Interface) and ALE technologies for this integration solution.
NOTE: You must ensure that the SAP system administrator has sufficient rights to configure the distribution model and distribute user data via ALE.
6.1 Configuring the SAP SystemAs part of configuring the SAP system, you should complete the following steps in this order:
1. “Defining Sending and Receiving Systems” on page 352. “Creating a Logical System” on page 363. “Assigning a Client to the Logical System” on page 36 4. “Creating a Distribution Model” on page 365. “Creating a Port Definition” on page 376. “Partner Profiles” on page 397. “Modify Port Definition” on page 398. “Activating Central User Administration” on page 409. “Create a Communication (CPIC) User” on page 40
NOTE: The following instructions are for SAP version 4.6C. If you are using a previous version of SAP, the configuration process is the same; however, the SAP interface will be different.
6.1.1 Defining Sending and Receiving SystemsThe sending and receiving systems must be defined for messaging. In order to distribute data between systems you must first define both the sending and receiving systems as unique logical systems.
For this particular solution, we recommend defining two logical systems. One logical system represents the driver and acts as the receiver system. The other logical system represents the SAP system and acts as the sender system. Because only one of these clients is used as a data source (that is, the client/logical system where SAP User data is stored and “actions” occur), there is no need to assign a client to the receiving logical system.
NOTE: Depending on your current SAP environment, you might not need to create a logical system. You might only need to modify an existing Distribution Model by adding the USERCLONE message type to a previously configured Model View. For more information, see “Creating a Distribution Model” on page 36.
Configuring the SAP System 35

36 Novell
novdocx (en) 10 March 2008
It is important, however, that you follow SAP’s recommendations for logical systems and configuring your ALE network. The following instructions assume that you are creating new logical systems and a new model view.
Creating a Logical System
1 In SAP, type transaction code BD54.2 Click New Entries.3 Type an easily identifiable name to represent the SAP sender system. SAP recommends the
following format for logical systems representing R/3 clients: systemIDCLNTclient number (such as ADMCLNT100).
4 Type a description for the logical system (such as Central System for SAP User Distribution).5 Add a second logical system name to represent the Identity Manager external receiver system
(such as DRVCLNT100).6 Type a description for the logical system (such as IDM User Management Integration).7 Save your entries.
Assigning a Client to the Logical System
1 In SAP, type transaction code SCC4.2 Click Table View > Display > Change to switch from display to change mode.3 Select the client from which you want User information distributed (such as 100).4 Click Goto > Details > Client Details.5 In the Logical System field, browse to the sender logical system you want to assign to this
client (such as ADMCLNT100).6 Save your entry.
6.1.2 Creating a Distribution ModelThe distribution model contains essential information about message flow. The model view defines the systems that will communicate with each other and the messages that will flow between them. The distribution model forms the basis of distribution and controls it directly.
To create a distribution model:
1 Verify that you are logged on to the sending system/client.2 In SAP, type transaction code BD64. Ensure that you are in Change mode (click Table View >
Display > Change.)3 Click Edit > Model View > Create.4 Type the short text to describe the distribution model (such as Client 100 Distribution to IDM). 5 Type the technical name for the model (such as SAP2IDM).6 Accept the default Start and End dates or specify valid values. Click the check mark icon to
save your entry.7 Select the view you created, then click Add BAPI.
Identity Manager Driver 3.5.1 for User Management of SAP Software Guide

novdocx (en) 10 March 2008
8 In the Sender/Client field, type the name of the sender logical system (such as ADMCLNT100).
9 In the Receiver/Client field, add the name of the receiver logical system (such as DRVCLNT100).
10 In the Obj. Name/Interface field, add the USER object name.
NOTE: Ensure that you add the USER object name with all capital letters.
11 In the Method field, add Clone.12 Click the check mark icon to save the BAPI.13 Select the SAP2IDM model view.14 Click Add BAPI.15 Define the sender (logical system ADMCLNT100).16 Define the receiver (logical system DRVCLNT100).17 In the Obj. Name/Interface field, add the UserCompany object name.18 In the Method field, add Clone.19 Click the check mark icon to save your BAPI entries.20 Save the Distribution Model entries.
6.1.3 Creating a Port DefinitionThe port is the communication channel to which IDocs are sent. The port describes the technical link between the sending and receiving systems.
“TRFC Port Definition” on page 37“File Port Definition” on page 38
TRFC Port Definition
The driver can be configured to support a connection via a TRFC port or to consume IDocs distributed via a File port. The default driver configuration assumes that you use the TRFC port configuration.
Create RFC Destination
NOTE: If you are distributing data to multiple drivers, each driver must have a unique RFC destination and program ID.
1 In SAP, type transaction code SM59.2 Click the Create icon.3 Name the RFC destinations (use the driver’s logical system name, for example,
DRVCLNT100.)4 Select T as the connection type (for a TCP/IP connection.)5 Add a description for the destination (such as JCO Server in IDM User Driver.)6 Save your entry.
Configuring the SAP System 37

38 Novell
novdocx (en) 10 March 2008
7 Select the option for Registration or Registered Server Program. Type the program ID to be used for the driver. In the default driver configuration, this value is set to IDMUser100.
8 (Conditional) If the SAP server is configured to use a Unicode database, complete the following steps:8a Select the Special Options tab.8b Select Unicode.
9 Save your entry.
TRFC Port Definition
NOTE: If you are distributing data to multiple drivers, each driver must have a unique TRFC port.
1 In SAP, type transaction code WE21.2 Select Transactional RFC, then click the Create icon. 3 Select Own Port Option Name.
3a Type a port name (such as IDMPORT).3b Type a description for the port definition (such as Port to IDM User Driver).3c Select a version (such as IDoc record types SAP release 4.X)3d Specify the RFC destination. This is the name of the RFC destination representing the
driver (such as DRVCLNT100.)4 Save your entries.
File Port Definition
NOTE: If you are distributing data to multiple drivers, each driver must have a unique file port.
1 In SAP, type transaction code WE21.2 Select File, then click the Create icon.
2a Type a port name (such as IDMFILE).2b Type a port description (such as File Port to IDM User Driver).2c Select a version (such as SAP release 4.X).
3 Define the outbound file:3a Select the physical directory. This is the directory where you want IDocs placed. You
might need to create this directory.Type the directory where the outbound files are written, for example: \\sapdev\nov\sys\global\sapndsconnector.
3b Type the function module. This names the IDoc file in a specific format. Use the following: EDI_PATH_CREATE_CLIENT_DOCNUM.
4 Save your changes.
NOTE: You do not need to configure the other three tabs for the port properties (outbound:trigger, inbound file, and status file).
Identity Manager Driver 3.5.1 for User Management of SAP Software Guide
novdocx (en) 10 March 2008
6.1.4 Partner ProfilesThe system automatically generates a partner profile or you can manually maintain the profile.
NOTE: If you are using an existing distribution model and partner profile, you do not need to automatically generate a partner profile. Instead, you can modify it to include the USERCLONE BAPI.
1 In SAP, type transaction code BD82.2 Select the Model View. This should be the Model View previously created in “Creating a
Distribution Model” on page 36.3 Ensure that the Transfer IDoc Immediately and Trigger Immediately option buttons are
selected.4 Click the Execute icon.
NOTE: When the status screen appears, ignore any red error or warning messages related to the driver’s logical system.
Modify Port Definition
The port definition might have been generated incorrectly. For your system to work properly, you might need to modify the port definition.
1 In SAP, type transaction code WE20.2 Select Partner Type LS.3 Select your receiver logical system (such as DRVCLNT100).4 Click the Create Outbound Parameter icon, then select message type USERCLONE. 5 Modify the receiver port so it is the file or TRFC port name you created earlier (such as
IDMPORT or IDMFILE).6 Under Output Mode, select Transfer IDoc Immediately to send IDocs immediately after they
are created.7 In the IDoc Type section, select the Basic type and the appropriate USERCLONE:
For SAP 4.5, select USERCLONE01For SAP 4.6a, select USERCLONE02For SAP 4.6c, select USERCLONE03For SAP 6.10, select USERCLONE04For SAP 6.20 or greater, select USERCLONE05
8 Save your entries.
NOTE: The following procedures are only necessary if you want to distribute company address data.
9 Click the Create Outbound Parameter icon, then select message type CCLONE.10 Modify the receiver port so it is the file or TRFC port name you created earlier (such as
IDMPORT or IDMFILE.)11 (Conditional) If you are using a TRFC port, modify the packet size. Select Packet Size = 1.
Configuring the SAP System 39

40 Novell
novdocx (en) 10 March 2008
12 Under Output Mode, select Transfer IDoc Immediately to send IDocs immediately after they are created.
13 In the IDoc type section, select Basic type and the appropriate CCLONE. (For all SAP versions, select CCLONE01.)
14 Save your entries.
6.1.5 Activating Central User AdministrationCentral User Administration (CUA) is the process that activates the distribution model.
1 In SAP, type transaction code SCUA.2 In the Maintain System Landscape dialog box, select the distribution Model View previously
created (such as SAP2IDM). 3 Save your entry.
You might see a message stating “Unable to distribute the system landscape to system IDMDRV.” This is an informative message and is not an error or issue of concern.
On some versions of SAP, all systems in the distribution, including the IDM driver, must be accessible during this step. If a TRFC port is being used for the driver Publisher channel, the driver should be running to ensure connectivity and completion of the CUA configuration.
6.1.6 Create a Communication (CPIC) UserUsers are client-independent. For each client that will be using the driver, a system user with CPIC access must be created.
1 In SAP, type transaction code SU01.2 From User Maintenance, enter a username in the User dialog box (such as IDM_CPIC), then
click the Create icon.3 Click the Address tab, then type data in the last name fields (Last_IDM).4 Click the Logon Data tab, then define the initial password and set the user type to CPIC
(Communication).5 Click the Profiles tab, then add the S_A.CPIC profile. The driver must also have sufficient
rights to perform required operations, which might include SAP_ALL and SAP_NEW depending on your company’s system security policy.
NOTE: We recommend using the most restrictive rights possible.
6 Click the Systems tab. Add the logical name of the sender system (such as ADMCLNT100). This enables the CPIC user to authenticate to the client system.
7 Click Save.
NOTE: Initially, you can create a dialog user to test your SAP system configuration. If there are processing problems, you can analyze the dialog user in the debugger. You should also log into the SAP system once to set this user’s password. After the system is tested and works properly, you should switch to a CPIC user for security measures.
Identity Manager Driver 3.5.1 for User Management of SAP Software Guide

7novdocx (en) 10 M
arch 2008
7Using the SAP Java Connector Test Utility
The driver uses the SAP Java Connector (JCO) and Business Application Programming Interface (BAPI) technologies to connect to and integrate data with the Identity Vault. The SAP JCO is a SAP client that creates service connections to a SAP R/3 system. After the driver is connected to the R/3 system, it calls methods on business objects within the R/3 system via BAPI.
The SAP Java Connector Test utility enables you to check for JCO installation and configuration issues prior to configuring the driver. Use the JCO Test utility to validate installation and connectivity to the SAP JCO client, as well as testing for accessibility to the BAPIs used by the driver.
Ensure that you are using JDK/JRE version 1.3.1 or later.
The following instructions apply to JCO versions 1.1.x and 2.x.
In this section:
“About the Utility” on page 41“Running and Evaluating the Test” on page 42“Understanding Test Error Messages” on page 44
7.1 About the UtilityThe JCO Test utility completes the following checks:
Ensures that the jco.jar or sapjco.jar file, which contains the exported JCO interface, is present.Ensures that the JCO native support libraries are properly installed.Ensures that connection parameters to the SAP target system are correct.Ensures that the authentication parameters to the SAP target system are correct.Ensures that the selected language code is valid.Ensures that the BAPIs used by the driver are present as expected for the version of the SAP target system.
7.1.1 Utility PrerequisitesBefore you run the JCO Test utility, you must install the SAP JCO client for the desired platform. The JCO can only be obtained from the SAP Service Marketplace Web site (http://www.sap-ag.de/services). The download is free to any SAP software customer or development partner, but you are required to log in.
In order to configure the driver, you must first download the SAP JCO and install it. For installation instructions, refer to the documentation accompanying the SAP JCO.
Using the SAP Java Connector Test Utility 41

42 Novell
novdocx (en) 10 March 2008
Follow the installation instructions for your platform. Each installation requires you to set one or two environment variables, such as CLASSPATH for the sapjco.jar file location. For the UNIX* platforms, set either the LD_LIBRARY_PATH or LIBPATH variables for the location of native support libraries. Ensure that these variables are set in the shell environment to run this test and for the subsequent use of the Identity Manager Driver for User Management of SAP Software.
You must also make sure that you have your PATH environment variable set to include the path to your Java executable file. For Win32 platforms, the environment variables are set via the System configuration in the Control Panel. On UNIX systems, edit the appropriate .profile or .bash_profile to include and export these path variables.
7.1.2 ComponentsThe JCO Test utility consists of the UserJCOTest.class file. The format of an execution batch or script file varies, depending on the platform on which the JCO client has been installed.
The basic content of the file includes a path to the Java executable (or just java if your PATH is appropriately configured), and the name of the UserJCOTest.class file. A sample UNIX script file and Win32 batch file are listed below, where sapjco.jar is in the executable directory of the UserJCOTest.class file and the batch file:Win32 jcotest.bat filejava -classpath %CLASSPATH%;. UserJCOTest
Unix jcotest filejava UserJCOTest
You must use proper slash notation when specifying pathnames, and you must use the proper classpath delimiter for the platform. You must also remember that the name of the sapjco.jar file is case-sensitive on UNIX platforms and that the name of the test class, UserJCOTest, must be specified with proper case for any platform.
7.1.3 Running and Evaluating the Test
Running the Test
To run the JCO Test utility on a Win32 platform:
1 From Windows Explorer, double-click UserJCOTest.bat.orFrom a command prompt, run the UserJCOTest.bat script.
To run the JCO Test utility on a UNIX platform:
1 From your preferred shell, run the userjcotest script file.
NOTE: It is possible that when you run the test program, an error message appears before any test output is displayed. This indicates an improper installation of the JCO client components. The error messages are documented for each platform in “Understanding Test Error Messages” on page 44.
Identity Manager Driver 3.5.1 for User Management of SAP Software Guide

novdocx (en) 10 March 2008
Evaluating the Test
If the JCO client is installed properly, the following output is displayed:
**The SAP JCO client installation has been verified to be correct.
Version of the JCO-library: version informationInput SAP Server Connection Information----------------------------------------
You then receive a series of prompts for connection and authentication information. All data must be provided unless a default value, identified by [] delimiters, is provided. Failure to fill in a response value to each prompt ends the test. Enter the following when prompted:
Application server name or IP addressSystem number [00]Client numberUserUser passwordLanguage code [EN]
The values you provide are the same values that could be used to authenticate via the SAPGUI client. Based on the validity of the input, the test either displays error messages with solution suggestions or runs to completion. At the end of the test, a status message displays. If the test indicates full functionality as required by the driver, the following status message appears (it describes valid values that can be used as the configuration parameters for the driver):**All expected platform support is verified correct.JCO Test Summary----------------Full JCO/BAPI Functionality has been verified.The following parameters may be used for driver configuration
Authentication ID: UsernameAuthentication Context: SAP Host Name/IP AddressApplication Password: User passwordSAP System Number: System NumberSAP User Client Number: Client NumberSAP User Language: Language Code
If the test indicates that the functionality required by the driver is not available, the following status message is displayed:**There are <number> required BAPI functions NOT supported on this platform.
JCO Test Summary----------------JCO/BAPI functionality issues have been detected that will prevent proper driver functionality.
Using the SAP Java Connector Test Utility 43

44 Novell
novdocx (en) 10 March 2008
Post-Test Procedures
After the JCO Test utility has successfully passed all tests, you can then begin to configure the driver. Make sure that the sapjco.jar file is copied to the location where the sapusershim.jar file has been installed.
On UNIX systems, ensure that the environment variables used for the successful completion of the User JCO Test are also in the environment of the driver. If these conditions are met, there should be no driver errors that are related to the JCO.
7.1.4 Understanding Test Error MessagesUse the information in this section to analyze error messages that might display during the User JCO Test. Some errors are applicable to all platforms, and other errors are platform-specific.
The test has been run on the platforms listed below. Other UNIX platforms supported by the JCO are configured in a similar manner and errors generated by improper JCO installation and configuration should be similar to the errors described below. Because of periodic modifications of the JCO, messages might not be exactly as shown.
“General Errors” on page 44“Errors on Win32 Systems” on page 45“Errors on IBM-AIX Systems” on page 45“Errors on Solaris Systems” on page 46“Errors on HP-UX Systems” on page 46
General Errors
Error Message Problem
Error connecting to SAP host: com.sap.mw.jco.JCO$Exception: (102)
RFC_ERROR_COMMUNICATION: Connect to SAP gateway failed....Check values of Application Server Name/IP Address and System Number
This indicates that one or both of the values entered for the Application Server Name or IP Address and System Number are incorrect.
Verify that these values are consistent with the information found in the Properties page of the SAP Logon dialog box used to connect to the SAP R/3 system.
Error authenticating to SAP host: com.sap.mw.jco.JCO$Exception: (103)
RFC_ERROR_LOGON_FAILURE: You are not authorized to logon to the target system (error code 1).
The authentication credentials are not valid. Verify that the values for Client Number, User, and User Password are correct.
Error connecting to SAP host: com.sap.mw.jco.JCO$Exception: (101) RFC_ERROR_PROGRAM: Language ’<value>’ not availableCheck value of Language Code
The language code selected is not valid or is not installed on the SAP R/3 system.
Identity Manager Driver 3.5.1 for User Management of SAP Software Guide

novdocx (en) 10 March 2008
Errors on Win32 Systems
Errors on IBM-AIX Systems
Error Message Problem
'userjcotest' is not recognized as an internal or external command, operable program, or batch file.
The userjcotest.bat batch file is not present.
Exception in thread “main” java.lang.NoClassDefFoundError: com/sap/mw/jco/JCO$AbapExceptionor Exception in thread “main” java.lang.NoClassDefFoundError: com/sap/mw/jco/JCO$Exception
The sapjco.jar file is not in the location specified in the userjcotest.bat batch file.
Exception while initializing JCO client.java.lang. UnsatisfiedLinkError: no jRFC12 in java.library.path.
Verify proper installation of JCO Native support libraries packaged with JCO client.
The jRFC12.dll file that shipped with the JCO client is not installed or is installed in an incorrect location. The default location for jRFC12.dll and libRfc32.dll is /winnt/system32.
Exception while initializing JCO client.java.lang.UnsatisfiedLinkError: C:\WINNT\system32\jrfc12.dll: Can’t find dependent libraries.
Verify proper installation of JCO Native support libraries packaged with JCO client.
The librfc32.dll file shipped with the JCO client is not installed or is installed in an incorrect location. The default location for jRFC12.dll and libRfc32.dll is /winnt/system32.
Error Message Problem
ksh: userjcotest: not found. The userjcotest script file is not present in the directory.
Exception in thread “main” java.lang.NoClassDefFoundError: com/sap/mw/jco/JCO$AbapExceptionorException in thread “main” java.lang.NoClassDefFoundError: com/sap/mw/jco/JCO$Exception
The sapjco.jar file is not in the location specified in the jcotest script file or the case specified for sapjco.jar does not match the actual filename.
Exception while initializing JCO client.java.lang.UnsatisfiedLinkError: no jRFC12 (libjRFC12.a or .so) in java.library.pathVerify proper installation of JCO Native support libraries packaged with JCO client.
The libjRFC12.so file that shipped with the JCO client is not installed or is installed in an incorrect location. You must configure a LIBPATH environment variable to specify the location in which the file resides.
Exception while initializing JCO client.java.lang.UnsatisfiedLinkError: <path>/libjRFC12.so: A file or directory in the path name does not exist.
Verify proper installation of JCO Native support libraries packaged with JCO client.
The librfccm.so file shipped with the JCO client is not installed or is installed in an incorrect location. You must copy the file to the same location as libjRFC12.so or configure the LIBPATH environment variable to specify the location in which the file resides.
Using the SAP Java Connector Test Utility 45

46 Novell
novdocx (en) 10 March 2008
Errors on Solaris Systems
Errors on HP-UX Systems
Error Message Problem
ksh: userjcotest: not found.orbash: userjcotest: command not found
The userjcotest script file is not present in the directory.
Exception in thread “main” java.lang.NoClassDefFoundError: com/sap/mw/jco/JCO$AbapExceptionorException in thread “main” java.lang.NoClassDefFoundError: com/sap/mw/jco/JCO$Exception
The sapjco.jar file is not in the location specified in the jcotest script file or the case specified for sapjco.jar does not match the actual filename.
Exception while initializing JCO client.java.lang.UnsatisfiedLinkError: no jRFC12 in java.library.pathVerify proper installation of JCO Native support libraries packaged with JCO client.
The libjRFC12.so shipped with the JCO client is not installed or is installed in an incorrect location. You must configure a LD_LIBRARY_PATH environment variable to specify the location in which the file resides.
Exception while initializing JCO client.java.lang.UnsatisfiedLinkError: <path>/libjRFC12.so: ld.so.1: <search-path>: fatal: librfccm.so: open failed: No such file or directoryVerify proper installation of JCO Native support libraries packaged with JCO client.
The librfccm.so file shipped with the JCO client is not installed or installed in incorrect location. You must copy the file to the same location as libjRFC12.so or configure the LD_LIBRARY_PATH environment variable to specify the location in which the file resides.
Error Message Problem
ksh: userjcotest: not found.orbash: userjcotest: command not found
The userjcotest script file is not present in the directory.
Exception in thread “main” java.lang.NoClassDefFoundError: com/sap/mw/jco/JCO$AbapExceptionorException in thread “main” java.lang.NoClassDefFoundError: com/sap/mw/jco/JCO$Exception
The sapjco.jar file is not in the location specified in the jcotest script file or the case specified for sapjco.jar does not match the actual filename.
Exception while initializing JCO client.java.lang.ExceptionInInitializerError: JCO.classInitialize(): Could not load middleware layer ’com.sap.mw.jco.rfc.MiddlewareRFCno sapjcorfc in java.library.pathVerify proper installation of JCO Native support libraries packaged with JCO client.
The libjRFC12.sl file shipped with the JCO client is not installed or is installed in an incorrect location. You must configure a SHLIB_PATH environment variable to specify the location in which the file resides.
Exception while initializing JCO client.java.lang.ExceptionInInitializerError: JCO.classInitialize(): Could not load middleware layer ’com.sap.mw.jco.rfc.MiddlewareRFC . . .Verify proper installation of JCO Native support libraries packaged with JCO client.
The librfccm.sl file shipped with the JCO client is not installed or is installed in an incorrect location. You must copy the file to the same location as libjRFC12.sl or configure the SHLIB_PATH environment variable to specify the location in which the file resides.
Identity Manager Driver 3.5.1 for User Management of SAP Software Guide

novdocx (en) 10 March 2008
Errors on Linux Systems
Error Message Problem
ksh: userjcotest: not found.orbash: jcotest: command not found
The userjcotest script file is not present in the directory.
Exception in thread “main” java.lang.NoClassDefFoundError: com/sap/mw/jco/JCO$AbapExceptionorException in thread “main” java.lang.NoClassDefFoundError: com/sap/mw/jco/JCO$Exception
The sapjco.jar file is not in the location specified in the jcotest script file or the case specified for sapjco.jar does not match the actual filename.
Exception while initializing JCO client.java.lang.ExceptionInInitializerError: JCO.classInitialize(): Could not load middleware layer ’com.sap.mw.jco.rfc.MiddlewareRFCno jRFC12 in java.library.pathVerify proper installation of JCO Native support libraries packaged with JCO client.
The libjRFC12.so file shipped with the JCO client is not installed or is installed in an incorrect location. You must configure a LD_LIBRARY_PATH environment variable to specify the location in which the file resides
Exception while initializing JCO client.java.lang.ExceptionInInitializerError: JCO.classInitialize(): Could not load middleware layer ’com.sap.mw.jco.rfc.MiddlewareRFC<path>/libjRFC12.so: librfccm.so: cannot open shared object file: No such file or directoryVerify proper installation of JCO Native support libraries packaged with JCO client.
The librfccm.so file shipped with the JCO client is not installed or is installed in an incorrect location. You must copy the file to the same location as libjRFC12.so or configure the LD_LIBRARY_PATH environment variable to specify the location in which the file resides.
Using the SAP Java Connector Test Utility 47

48 Novell
novdocx (en) 10 March 2008
Identity Manager Driver 3.5.1 for User Management of SAP Software Guide

8novdocx (en) 10 M
arch 2008
8Understanding the Default Driver Configuration
This section explains how the default driver configuration uses policies and filter. You can use this overview as a basis to create your own policies and filters for specific business implementations.
8.1 Using PoliciesPolicies are highly configurable for use within any business environment.
The default driver is configured to be primarily a Subscriber channel driver. This means the primary purpose is to create SAP User accounts using information collected in the Identity Vault. The default configuration does allow basic bidirectional User create, delete, and modify functionality.
8.1.1 Modifying Policies and the FilterYou must modify policies and the filter to work with your specific business environment. We recommend that you make modifications in this order:
1. Modify the Filter (publish and subscribe options) to include additional attributes you want synchronized.
2. Modify the Mapping policy to include all attributes specified in the Subscriber and Publisher channel filters.
3. Modify the InputTransform policy4. Modify the OutputTransform policy5. Modify the Publisher policies6. Modify the Subscriber policies
Setting the Filter: Publish Options
Setting attributes in the filter to “publish” specifies which classes and attributes are published from the SAP system to eDirectory.
The default driver configuration publishes the following User class attributes in the filter.
Understanding the Default Driver Configuration 49

50 Novell
novdocx (en) 10 March 2008
Setting the Filter: Subscription Options
Setting attributes in the filter to “subscribe” specifies which classes and attributes are synchronized from eDirectory to the SAP system.
The default driver configuration subscribes to the following User class attributes in the filter:
Class Attributes
User DirXML-sapLocRoles
DirXML-sapLocProfiles
Given Name
Surname
sapProfiles
sapRoles
sapUsername
Class Attributes
User buildingName
costCenter
firstPrefix
floor
Full Name
Given Name
Initials
Internet Email Address
Login Disabled
OU
pager
sapGroups
sapProfiles
sapRoles
Surname
Telephone Number
Title
Identity Manager Driver 3.5.1 for User Management of SAP Software Guide

novdocx (en) 10 March 2008
The Schema Mapping Policy
The Schema Mapping policy is referenced by the driver object and applies to both the Subscriber and Publisher channel. The purpose of the Schema Mapping policy is to map schema names (particularly attribute names and class names) between eDirectory and the SAP User database. Any modification or removal of existing entries in the Schema Mapping policy could destroy the default configuration and policies processing behavior. Adding new attribute mappings is discretionary.
NOTE: The Application Schema definition in the default driver configuration is from a SAP R/3 version 4.7 system with Web Application Server version 6.40. If the target SAP system is a different version, the actual User object schema might be different. Refresh application schema using the iManager Schema Mapping editor to obtain the actual schema of the target server.
The following class mapping is included with the default driver configuration:
The User class is configured to synchronize bidirectionally between SAP and eDirectory. A change made in one system will transfer to the other system.
All attributes in the Publisher and Subscriber filters should be mapped unless they are used only for policy processing.
SAP User field values can be arranged in three types:
Simple fields: These values are not grouped with other fields. The syntax in the schema map is <field name>.Structure fields: These values are grouped with other pieces of data that describe a larger collection of single-instance data. The syntax for these fields in the schema map is <structure name>:<field name>. For example, ADDRESS:TELEPHONE.Table fields: These values are similar to Structure fields, but there can be multiple instances of the structured data. The syntax for these fields in the schema map is <table name>:<field name>. For example, ADDTEL:TELEPHONE.
The following table includes common attribute mappings for the User class and their descriptions, assuming that only the primary piece of structure communication data is required (such as ADDTEL:TELEPHONE). If fields of a table are to be mapped, you should specify only the Table name in the mapping (such as LOCACTIVITYGROUPS). If you do this, the driver generates all table field values in structured format. For more information, see Appendix C, “Structured Format Examples,” on page 125. On the Publisher channel, the structured data must be transformed to string format.
The Schema Mapping policy is highly dependent on the extension of the standard eDirectory schema. The extensions used by the driver come in the form of an LDIF file created by SAP for use with the SAP directory interfaces for user management. A Novell-standard .sch version of the file is also provided. These files are included with the driver. Refer to “Extending the Schema” on page 22 for more information.
The default mappings for the driver are as follows:
eDirectory Class SAP Class SAP Description
User US USER
Understanding the Default Driver Configuration 51

52 Novell
novdocx (en) 10 March 2008
eDirectory Attribute SAP User Field Description SAP User Field(s)
DirXML-sapLocRoles Role for specified CUA logical system
LOCACTIVITYGROUPS:SUBSYSTEM
LOCACTIVITYGROUPS:AGR_NAME
DirXML-sapLocProfiles Profile for specified CUA logical system
LOCPROFILES:SUBSYSTEM
LOCPROFILES:PROFILE
DirXML-sapVClass License type classification UCLASS:LIC_TYPE
DirXML-sapLocVClass License type classification for specified CUA Logical System
UCLASSSYS:RCVSYSTEMUCLASSSYS:LIC_TYPE
birthName Name of person at birth ADDRESS:BIRTH_NAME
buildingName Building (number or code) ADDRESS:BUILDING_P
commType Communication type (key) (Central address management)
ADDRESS:COMM_TYPE
company Company address, cross-system key
COMPANY:COMPANY
costCenter Cost center DEFAULTS:KOSTL
Facsimile Telephone Number
Fax number: dialing code+number
ADDFAX:FAX
firstPrefix Name prefix ADDRESS:PREFIX1
floor Floor in building ADDRESS:FLOOR_P
Full Name Complete personal name ADDRESS:FULLNAME
Given Name First name ADDRESS:FIRSTNAME
inHouseMail Int. mail postal code ADDRESS:INHOUSE_ML
Initials Middle Initial or personal initials ADDRESS:INITIALS
InitialsSig Short name for correspondence ADDRESS:INITS_SIG
Internet EMail Address Internet mail (SMTP) address ADDSMPT:E_MAIL
Login Disabled Lock User account LOCKUSER
The LOCKUSER attribute does not actually exist in SAP. This pseudo-attribute is used by the driver to determine when to call USER_LOCK and USER_UNLOCK BAPI functions.
middleName Middle name or second forename of a person
ADDRESS:MIDDLENAME
nickname Nickname or name used ADDRESS:NICKNAME
OU Department ADDRESS:DEPARTMENT
pager Pager number ADDPAG:PAGER
personalTitle Title text ADDRESS:TITLE_P
Identity Manager Driver 3.5.1 for User Management of SAP Software Guide

novdocx (en) 10 March 2008
roomNumber Room or apartment number ADDRESS:ROOM_NO_P
sapAlias Internet user alias ALIAS:USERALIAS
sapCATT CATT: Test status DEFAULTS:CATTKENNZ
sapClass User group in user master maintenance
LOGONDATA:CLASS
sapDateFormat Date format DEFAULTS:DATFM
sapDecimalFormat Decimal Notation DEFAULTS:DCPFM
sapGroups User group in user master maintenance
GROUPS:USERGROUP
sapLoginLanguage Language DEFAULTS:LANGU
sapParameters Get/Set parameter ID and parameter values
PARAMETER:PAR10
sapPrintParam1 Print parameter 1 DEFAULTS:SPLG
sapPrintParam2 Print parameter 2 DEFAULTS:SPDB
sapPrintParam3 Print parameter 3 DEFAULTS:SPDA
sapProfiles Profile name PROFILES:BAPIPROF
sapRefUser User name in user master record REF_USER:REF_USER
sapRoles Role Name ACTIVITYGROUPS:AGR_NAME
sapSncGuiFlag Unsecure communication permitted flag
SNC:GUIFLAG
sapSncName Secure network communication printable name
SNC:PNAME
sapSpool Spool: Output device DEFAULTS:SPLD
sapStartMenu Start Menu DEFAULTS:START_MENU
sapTimeZone Time zone LOGONDATA:TZONE
sapUsername User Name USERNAME:BAPIBNAME
sapUserType User Type LOGONDATA:USTYP
sapValidFrom User valid from LOGONDATA:GLTGV
sapValidTo User valid to LOGONDATA:GLTGB
secondName Second surname of a person LOGONDATA: SECONDNAME
secondPrefix Name prefix ADDRESS:PREFIX2
Surname Last name ADDRESS:LASTNAME
Telephone Number Telephone no.: dialing code+number
ADDTEL:TELEPHONE
telexNumber Telex Number ADDTLX:TELEX_NO
eDirectory Attribute SAP User Field Description SAP User Field(s)
Understanding the Default Driver Configuration 53

54 Novell
novdocx (en) 10 March 2008
Adding the Organizational Role Class
The SAP User driver can be queried for ACTIVITYGROUP objects and all other PDOBJECTS in the SAP User database so that they may be synchronized into eDirectory, and used by the administrator through a browse interface. To do this, the default class mapping must be manually changed to the following:
The following sections explain what you need to do, to allow support for querying of the Organizational Role class:
“Editing the Global Configuration Values” on page 54“Adding a New Placement Rule” on page 55“Modifying the XSLT” on page 56“Adding the Organizational Role Class to the Driver Filter” on page 56“Migrating Data into the Identity Vault” on page 57
Editing the Global Configuration Values
To edit the Global Configuration Values (GCV), follow these steps:
1 In iManager, browse to the driver, and click the upper right corner of the driver icon.2 Select the Edit Properties link.
The Driver Configuration window is displayed.3 Click the Global Config Values tab.
A list of the existing GCV values is displayed.4 Click the Edit XML tab to open the XML Editor window. 5 Select the Enable XML Editing checkbox and add the following XML code: <definition display-name="Organizational Role Placement" dn-space="dirxml" dn-type="slash" name="sap-pdobject-placement" type="dn"> <description> The name of the Organizational Role object under which published SAP Organizational Roles will be placed. </description><value> </value></definition>
Title Function ADDRESS:FUNCTION
titleAcademic1 Academic title: written form ADDRESS:TITLE_ACA1
titleAcademic2 Academic title: written form ADDRESS:TITLE_ACA2
eDirectory Class SAP User Field Description SAP User Field(s)
Organizational Role PDOBJECT Organizational Role
eDirectory Attribute SAP User Field Description SAP User Field(s)
Identity Manager Driver 3.5.1 for User Management of SAP Software Guide

novdocx (en) 10 March 2008
6 Click Apply and OK to save the changes.The updated GCV is now displayed in the list.
7 Browse and select the container in eDirectory you want to place Organizational Role in.8 Click Apply and OK.
Adding a New Placement Rule
A new rule is required in the placement policy, to place the Organizational Role object in. Follow these steps to create the new rule:
1 In iManager, click on the driver icon.
The Identity Manager Overview screen is displayed.2 In the publisher channel, click on the Placement Policies icon.
The Publisher Placement policy window is displayed.3 Click the existing default publisher placement policy.
The Policy Rules screen is displayed.4 Click the Edit XML tab.
The XML Editor window is displayed.5 Select the Enable XML Editing checkbox and add the following XML code:
<rule> <description>Organizational Role Placement</description> <conditions> <or> <if-class-name op="equal"> Organizational Role </if-class-name> </or> <or> <if-op-attr name="CN" op="available"/> </or> </conditions> <actions> <do-set-op-dest-dn> <arg-dn> <token-global-variable name="sap-pdobject-placement"/> <token-text xml:space="preserve">\</token-text> <token-escape-for-dest-dn> <token-op-attr name="CN"/> </token-escape-for-dest-dn> </arg-dn> </do-set-op-dest-dn> </actions></rule>
6 Click Apply and OK, to save the changes.7 Click Close to close the Publisher Placement Policy window.
Understanding the Default Driver Configuration 55

56 Novell
novdocx (en) 10 March 2008
Modifying the XSLT
The XSLT file must be modified so that it triggers events only for the USER class. To modify the XSLT file, follow these steps:
1 From the Identity Manager Driver Overview page, click on the Creation Policies icon on the publisher channel of the driver.
The Publisher Creation Policy window is displayed.2 Click the Generate User Name Style Sheet link.
The XML Editor window is displayed.3 Search for the following XML code:<xsl:template match="add">
Replace it with the following code: <xsl:template match="add[@class-name='User']">
4 Click Apply and OK to save the changes .5 Click Close, to close the Publisher Placement Policy window.
Adding the Organizational Role Class to the Driver Filter
To add the Organizational Role class, and to change the default class mapping, follow these steps:
1 From the Identity Manager Driver Overview page, click the ‘Driver Filter’ icon in the publisher channel.
2 Click the Add Class tab.A pop-up window is displayed.
3 Click the Show All Classes link.A list of the available classes is displayed in alphabetical order.
4 Scroll down to the class Organizational Role, and click on it.5 In the Application Name field on the right, browse and select the SAP User class PDOBJECT
that will be mapped to Organizational Role. 6 Click Apply to confirm the mapping.7 From the filter window, select Organizational Role, and click on the Add Attribute tab.
A list of the available attributes is displayed.8 Select the CN attribute and click OK.9 In theApplication Name field on the right, browse and select the SAP attribute
OBJECTS:EXT_OBJ_ID10 Select Organizational Role again and click the Add Attribute tab.11 Select the Description attribute and click OK.12 In the Application Name field on your right, browse and select the OBJECTS:LONG_TEXT
attribute.13 Click Apply.14 In the Filter window, select the Organizational Role class. 15 In the text field on the right, delete PDOBJECT and replace it with AG.
Identity Manager Driver 3.5.1 for User Management of SAP Software Guide

novdocx (en) 10 March 2008
16 Click Apply to save the changes.17 Click Organizational Role and select the Synchronize option in the publisher channel.18 Click the CN attribute and select the Synchronize option in the publisher channel.19 Click the Description attribute and select the Synchronize option in the publisher channel.20 Click Apply and OK to save the changes, and close the Filter window.
Migrating Data into the Identity Vault
To migrate ACTIVITYGROUP objects into the Identity Vault, ensure that the driver is running and follow these steps:
1 From the Identiy Manager Driver Overview window, click on Migrate>Migrate into Identity Vault.
The Migrate Data into the Identity Vault window is displayed.2 To migrate a single ACTIVITYGROUP object, follow these steps:
2a Click the Edit List tab.The Edit Migration Criteria dialog box is displayed.
2b Select the Organizational Role class from the list on the left side of the window. 2c Select the CN attribute and click OK.
The Attribute Value dialog box is displayed.2d Enter a valid value for the CN attribute and click OK..
Example of a valid attribute: SAP_ESSUSER2e Click OK to confirm the entered value, and close the dialog box. 2f Click OK again in the Migrate Data into the Identity Vault window, to start the migration.
You will see that the Success box is now checked, indicating that migration has started.3 To migrate all ACTIVITYGROUP objects, follow these steps:
3a Click the Edit List tab.The Edit Migration Criteria dialog box is displayed.
3b Select the Organizational Role class from the list, and click OK.3c Click OK again in the Migrate Data into the Identity Vault window, to start the migration.
NOTE: To verify that the objects you selected have been migrated successfully, you can browse to the container that you specified in the Organizational Role placement policy. Successful migration can also be verified by looking at the DSTRACE window.
The Input Transform Policy
You modify the Input Transform policy to implement your specific business rules. The Input Transform policy is applied to affect a transformation of the data received from the driver shim.
The policy is applied as the first step of processing an XML document received from the driver shim. The Input Transform policy converts the syntax of the SAP attributes into the syntax for eDirectory.
Understanding the Default Driver Configuration 57

58 Novell
novdocx (en) 10 March 2008
The default driver configuration includes two rules that perform the following functions:
Transforming LOCACTIVITYGROUPS from structured format to string format.Transforming LOCPROFILES from structured format to string format.
Modifying the Output Transform Policy
You modify the Output Transform policy to implement your specific business rules. The Output Transformation policy is referenced by the driver object and applies to both the Subscriber channel and to the Publisher channel. The purpose of the Output Transformation policy is to perform any final transformation necessary on XML documents sent to the driver by Identity Manager.
The default driver configuration:
Transforms LOCACTIVITYGROUPS from string format to structured format.Transforms LOCPROFILES from string format to structured format.Adds the driver’s LOCACTIVITYGROUPS attribute to Modify events with the from-merge attribute set.Transforms the pseudo-attribute LOCKUSER value from a true/false format to a 1/0 format.Transforms ADDFAX:FAX values from structured format to string format.Adds USERNAME:BAPIBNAME to the Queries style sheet (invokes the driver’s wildcard search functionality; see Appendix E, “Using Wildcard Search Capabilities,” on page 135.)
The Publisher Placement Policy
The Publisher Placement policy is applied to an Add Object event document to determine the placement of the new object in the hierarchical structure of eDirectory.
The Placement policy places all User objects in an eDirectory container that you specify during installation. You can also modify this location by using the Publisher User Placement Global Configuration Variable (GCV.)
The default driver configuration:
Appends <remove-association> to Delete events; it’s used in conjunction with the Publisher Command Transformation policy.
The Publisher Matching Policy
The Publisher Matching policy is applied to a Modify Object event document. Matching policies establish links between an existing entry in eDirectory and an existing entry in the SAP system. The Matching policy attempts to find an existing object that matches the object generating the event by the criteria specified in the policy.
The default driver checks for matches based on the sapUsername attribute. A fallback policy is also provided that checks for matches on the Given Name and Surname attributes.
The Publisher Create Policy
The Publisher Create policy is applied when a new object is to be added to eDirectory. The default driver configuration:
Creates a User object (Surname and Given Name attributes are required)
Identity Manager Driver 3.5.1 for User Management of SAP Software Guide

novdocx (en) 10 March 2008
Generates a unique CN based on Given Name and Surname attributesSets the initial account password on creation. Allows an administrator or user to reset or change passwords.
The Subscriber Matching Policy
The Subscriber Matching policy is applied to a Modify Object event document. Matching policies establish links between an existing entry in the Identity Vault and an existing entry in the SAP system. The Matching policy attempts to find an existing object that matches the object generating the event by the criteria specified in the policy.
The default driver checks for matches based on the values of the Given Name, Surname, and sapUsername attributes.
If you do not have an association in your query, the SAP system performs a full table scan of the user table. This might cause a long delay in receiving a reply from the matching query.
If the specified user name is known in SAP, adding an association value reduces the query to a single object. You can use the following Output Transformation policy to add the association.<rule><description>Add association value to matching queries</description><conditions><and><if-operation op="equal">query</if-operation><if-xpath op="not-true">association</if-xpath><if-xpathop="true">search-attr[@attr-name="USERNAME:BAPIBNAME"]/value</if-xpath></and></conditions><actions><do-append-xml-element expression="." name="association"/><do-append-xml-text expression="association"><arg-string><token-text xml:space="preserve">USd</token-text><token-upper-case><token-xpathexpression='search-attr[@attr-name="USERNAME:BAPIBNAME"]/value/text()'/></token-upper-case></arg-string></do-append-xml-text></actions></rule>
The Subscriber Create Policy
The Subscriber Create policy is applied when you want to add a new object to eDirectory. The default driver configuration:
Ensures that the Surname and Given Name attributes are present.Generates an unique CN based on the Given name and Surname attributes.Appends the sapUserType attribute with a value of A.
Understanding the Default Driver Configuration 59

60 Novell
novdocx (en) 10 March 2008
Sets the initial password (the driver can also set and manage persistent passwords in the SAP system.)Sets a default sapRoles value of SAP_ESSUSER.Sets a default sapProfiles value of SAP_NEW.Adds the following sample DirXML-sapLocRole values: DRVCLNT100:, ADMCLNT100:SAP_EMPLOYEE, and ADMCLNT500:SAP_ESSUSER.Adds the following sample DirXML-sapLocProfiles values: DRVCLNT100:, ADMCLNT100:SAP_ALL, and ADMCLNT500:SAP_NEW.
8.2 Obtaining Company Address Data for User ObjectsThere are several attributes of the SAP User object that are associated with the Company Address object assigned to the User. These attributes, by default, are never populated in BAPI or IDoc distributions of User data from the SAP application server. These fields also cannot be read from the User object in SAP. Company Address data is maintained in a table of related records of the ADDRESSORG type. The driver can retrieve this data from the ADDRESSORG table if desired.
The driver parameter to publish Company Address data <nsap-use-addressorg> is set to 1 by default. Setting the value to 1 retrieves the data from the ADDRESSORG table if attributes in the table exist in the Publisher filter, or if the attributes are in <read-attr> elements of a query document. Although this data can be retrieved from the SAP system, ADDRESSORG data cannot be added, modified, or removed from the SAP system via the driver. If the value of this parameter is set to 0, the company address fields are retrieved from the User object itself. As previously mentioned, by default, these fields won’t contain any data.
To fully implement the address retrieval functionality, you must configure the driver to receive events when the ADDRESSORG table is modified. By receiving these events, the driver obtains a list of all User objects assigned to the modified ADDRESSORG table and issues modify events with the changed data for each affected user.
To generate ADDRESSORG modify events, you need to modify the ALE distribution model on the SAP application server to include the distribution of the Company Clone (CCLONE) BAPI. Refer to “Creating a Distribution Model” on page 36 and “Modify Port Definition” on page 39 for more information.
The following User object fields might be affected by this functionality.
NAME HOUSE_NO2
NAME_2 STR_SUPPL1
NAME_3 STR_SUPPL2
NAME_4 STR_SUPPL3
C_O_NAME BUILDING
CITY DISTRICT
CITY_NO FLOOR
DISTRICT ROOM_NO
Identity Manager Driver 3.5.1 for User Management of SAP Software Guide

novdocx (en) 10 March 2008
DISTRICT_NO COUNTRY
POSTL_COD1 COUNTRYIOS
POSTL_COD2 LOCATION
POSTL_COD3 LANGU_ISO
PO_BOX REGION
PO_BOX_CIT SORT1
PBOXCIT_NO TIME_ZONE
DELIV_DIS TAXJURCODE
TRANSPZONE STR_ABBR
STREET HOUSE_NO
STREET_NO
Understanding the Default Driver Configuration 61

62 Novell
novdocx (en) 10 March 2008
Identity Manager Driver 3.5.1 for User Management of SAP Software Guide

9novdocx (en) 10 M
arch 2008
9Using the Driver in a Central User Administration Environment
Section 9.1, “Configuring the Driver as a CUA Child System,” on page 65Section 9.2, “Using the Driver to Provision a CUA Landscape,” on page 67Section 9.3, “User Classification Settings (Licensing),” on page 68Section 9.4, “Important CUA Integration Notes,” on page 69
This section provides a description of how the driver can integrate into a Central User Administration (CUA) environment. It is not intended to be a CUA configuration or administration guide. Refer to the SAP documentation and SAP help, support, and tips Web sites and journals for authoritative sources of standard CUA information.
The driver is designed to perform User management and synchronization with any SAP Application Server. However, the most value can be derived from the driver when it is used in a CUA environment. CUA is the standard User data distribution technology provided by SAP. It is used to distribute data between logical systems on one or more application servers. In a typical CUA landscape, there is one logical system designated as the “Central” system. The Central system administrator has the capability to distribute User account information and access rights to the other "Child" logical systems in the landscape. There are many variations, however, of the flow of User account information, including configurations where the Child systems can locally administrate some of the User account information and distribute it back to the Central system. This information focuses primarily on using the driver in a basic CUA landscape where User account information is distributed one-way from the Central system to the Child logical systems.
The User Maintenance transaction in SAP is SU01. The major difference between the maintenance options in a CUA environment and a non-CUA environment is the existence of the Systems tab. The entries under this tab indicate which logical systems to which the User account information should be distributed. The following illustration shows a User that is distributed to logical systems ADMCLNT100 and DRVCLNT100.
Using the Driver in a Central User Administration Environment 63

64 Novell
novdocx (en) 10 March 2008
Figure 9-1 User distribution to logical systems ADMCLNT100 and DRVCLNT100
Another difference can be seen when the Central system has been configured to maintain Role and Profile information on a Global level, which means the Central system administrator can set Role and Profile values for all logical systems in the CUA landscape. When the Global level is selected (via transaction SCUM), the Roles and Profiles for a User account are displayed with the logical system to which they are assigned. The following illustration shows a User assigned the default SAP Employee Self-Service role on logical system ADMCLNT100.
Identity Manager Driver 3.5.1 for User Management of SAP Software Guide

novdocx (en) 10 March 2008
Figure 9-2 A User with the default SAP Employee Self-Service role on logical system ADMCLNT100
9.1 Configuring the Driver as a CUA Child SystemThe driver’s Publisher channel functionality requires that the driver be configured as a Child logical system in a CUA environment. The configuration documentation describes a configuration as illustrated below.
Figure 9-3 CUA child system configuration
In this configuration, the driver acts as an administrative client to perform User administration, such as User account creation, password set, and role administration, etc., in the CUA Central logical system ADMCLNT100. The Central system is configured to distribute the User account information
JCO Client
JCO Server
(DRVCLNT100)
Central Logical
System
(ADMCLNT100)
Assigned to SAP
Client 100
SAP Application Server
Using the Driver in a Central User Administration Environment 65

66 Novell
novdocx (en) 10 March 2008
to the CUA Child logical system DRVCLNT100 that represents the driver. As can be seen from the diagram, the driver acts as both a SAP Client and a Server to obtain full bidirectional synchronization functionality.
After the systems are configured for synchronization, you must set the data attributes that will trigger synchronization. In order to synchronize a User object, you must create a User in SAP Client 100, allow the user to login, and establish synchronization back to the driver.
Surname and Password are required attributes for User creationSet ADMCLNT100 in the Systems tab to allow new User to login to Client 100.Set DRVCLNT100 in the Systems tab to establish data distribution back to the driver.
Setting attributes and passwords has been part of the driver functionality since its creation. As of version 1.0.5, you can now set the Systems tab on the Central system using BAPIs for setting Local ActivityGroups (Roles) and Local Profiles. These BAPIs allow the driver to set specified Roles and Profiles on specified logical systems in the CUA landscape. Because there are two component parameters required for each Local Role and Local Profile, the default configuration use a colon “:” delimited string syntax for the Identity Vault values. The form for these values is <Logical System Name>:<Role or Profile Name>. These values are transformed to and from the SAP structured syntax by the default InputTransform and OutputTransform policies.
If you want to set the Systems tab for a logical system without setting a Local Role or Local Profile (this should always be done for the driver where SAP Roles and Profiles have no meaning), the string value should be set without the Role or Profile Name component.
A new field named FORCE_SYSTEM_ASSIGNMENT is available in newer versions of SAP in the BAPI_USER_CREATE1 function. The driver tries to use this for the Systems tab assignment on the Connected SAP System.
The following example shows a Create style sheet template for the setting of only the Systems tab for logical systems ADMCLNT100 and DRVCLNT100. Note that the attr-name used is DirXML-sapLocRoles. For this purpose, the DirXML-sapLocProfiles attribute could also be used. (In Identity Manager 3, this policy is implemented through Policy Builder.)<xsl:template name="add-systems-tab"><!--
Sample CUA distribution settings.- Central SAP system is ADMCLNT100- Driver’s logical system is DRVCLNT100
--> <add-attr attr-name="DirXML-sapLocRoles">
<!-- In a CUA environment, set driver’s LS name with a blank role. This allows the driver to receive events from SAP. --> <value> <xsl:value-of select="’DRVCLNT100:’"/> </value> <!-- Setting the target LS name with a blank CUA role allows the User object to log on to the target child system but receive no rights -->
Identity Manager Driver 3.5.1 for User Management of SAP Software Guide

novdocx (en) 10 March 2008
<value> <xsl:value-of select="’ADMCLNT100:’"/> </value>
</add-attr></xsl:template>
9.2 Using the Driver to Provision a CUA LandscapeThe previous example showed a simple CUA environment where the Central system only distributed User data only to the driver’s logical system. This is not a typical environment. In most CUA environments, a Central system distributes data to SAP Child logical systems on multiple application servers. A small example of a typical CUA landscape looks more like this:
Figure 9-4 A central system distributing data to SAP child logical systems on multiple application servers
As with the previous example, the driver can set the distribution of User account information to the additional CUA Child systems by setting the Systems tab for them. However, the real power of the driver is realized when you use access controls to the various SAP clients based on the driver’s policies. For example, all employees can receive employee Self-Service rights on the HR system, but an employee identified as an HR Administrator could also be granted rights to the HR administration functions. The following example shows a Create Stylesheet template for the setting of the Systems tab for logical system ADMCLNT100 and DRVCLNT100, setting the SAP_ESSUSER Role on logical system HR1CLNT100, and setting the SAP_ALL Profile on logical system ADMCLNT500. (In Identity Manager 3, this policy is implemented through Policy Builder.)<xsl:template name="add-cua-auths">
<!-- Sample CUA distribution settings. - Central SAP system is ADMCLNT100 - Child SAP systems are: ADMCLNT500 and HR1CLNT100 - Driver’s logical system is DRVCLNT100 --> <add-attr attr-name="DirXML-sapLocRoles">
JCO Client
JCO Server
(DRVCLNT100)
Central Logical
System
(ADMCLNT100)
Assigned to SAP
Client 100
SAP Application Server
(ADM)
Child Logical
System
(HR1CLNT100)
Assigned to SAP
Client 100
SAP Application Server
(HR1)
Child Logical
System
(ADMCLNT500)
Assigned to SAP
Client 500
Using the Driver in a Central User Administration Environment 67

68 Novell
novdocx (en) 10 March 2008
<!-- In a CUA environment, set driver’s LS name with a blank role. This allows the driver to receive events from SAP.
--> <value>
<xsl:value-of select="’DRVCLNT100:’"/> </value> <!-- Setting the target LS name with a blank CUA role
allows the User object to log on to the target child system but receive no rights.
--> <value>
<xsl:value-of select="’ADMCLNT100:’"/> </value> <!-- The third value shows how to set a ’real’ CUA role
for a child logical system. This causes distribution from the Central system to the child system and sets the Employee Self-Service role.
--> <value>
<xsl:value-ofselect="’HRCLNT100:SAP_ESSUSER’"/>
</value> </add-attr><!--Example of setting a ’real’ CUA profile.-->
<add-attr attr-name="DirXML-sapLocProfiles"> <value>
<xsl:value-of select="’ADMCLNT500:SAP_ALL’"/>
</value> </add-attr>
</xsl:template>
9.3 User Classification Settings (Licensing)Beginning with version SAP R/3 version 4.7, SAP added the ability to set licensing information on User records. In a CUA environment, this information is set using table UCLASSSYS. There can be a maximum of 1 license type set for each client system in the CUA landscape. The primary data field for licensing in the LIC_TYPE field. This is a two-character code indicating the type of license utilized by the SAP User. Because the license is a system dependent value, you must also set the RCVSYSTEM field to a valid logical system name. You can only set a license value for logical systems specified in the Systems tab of the User record. It is not necessary or possible to set license values for the driver’s logical system. The following example shows a Create Stylesheet template for the setting of a sample Employee license value for a User of logical system ADMCLNT100. (In Identity Manager 3, this policy is implemented through Policy Builder.)<xsl:template name="add-license">
<!-- - Sample Setting of User Classification (License) Table
Identity Manager Driver 3.5.1 for User Management of SAP Software Guide

novdocx (en) 10 March 2008
UCLASSSYS - Central SAP system is ADMCLNT100, License Type = 54 -->
<add-attr attr-name="DirXML-sapLocUClass"> <value>
<xsl:value-of select="’ADMCLNT100:52’"/> </value> </add-attr>
</xsl:template>
NOTE: The data sent to the driver must be in a structured format. The default Input Transformation and Output Transformation policies handle the required syntax conversions of UCLASSSYS similar to the way they handle LOCPROFILES and LOCACTIVITYGROUPS.
9.4 Important CUA Integration NotesThe BAPIs utilized to perform the CUA integration are documented as being available for SAP version 4.0A in the SAP system documentation. Novell® has successfully tested this functionality for SAP R/3 version 4.6C and later. This includes all versions of SAP Web Application Server. For 4.6C systems, the BAPIs are not documented by SAP in the system documentation and support might not be available.Password distribution to the CUA Central system can be performed for all initial set and reset operations. However, passwords provisioned to CUA Child systems from the Central system can only be initially set. Password change/reset operations cannot be distributed to Child systems. This is a SAP-designed restriction and is not a limitation of the methodology used by the driver. SAP has determined that setting a single password across systems via CUA violates client system administrative authority and security, so they recommend the use of Single Sign-On (SSO) products to perform this task. Refer to SAP’s documentation related to Password Change for more explicit information on this restriction.User Classification (Licensing) table entries may only be made to systems listed in the Systems tab on the User record. If Central Licensing values are to be set while adding Users to the CUA Central System, make sure all targeted client systems are also available by setting a DirXML-sapLocRoles or DirXML-sapLocProfiles value for them in the Add event.
Using the Driver in a Central User Administration Environment 69

70 Novell
novdocx (en) 10 March 2008
Identity Manager Driver 3.5.1 for User Management of SAP Software Guide

10novdocx (en) 10 M
arch 2008
10Managing the Driver
The driver can be managed through Designer, iManager, or the DirXML® Command Line utility.
Section 10.1, “Starting, Stopping, or Restarting the Driver,” on page 71Section 10.2, “Using the DirXML Command Line Utility,” on page 72Section 10.3, “Viewing Driver Versioning Information,” on page 72Section 10.4, “Reassociating a Driver Set Object with a Server Object,” on page 77Section 10.5, “Changing the Driver Configuration,” on page 78Section 10.6, “Storing Driver Passwords Securely with Named Passwords,” on page 78Section 10.7, “Adding a Driver Heartbeat,” on page 85
10.1 Starting, Stopping, or Restarting the DriverSection 10.1.1, “Starting the Driver in Designer,” on page 71Section 10.1.2, “Starting the Driver in iManager,” on page 71Section 10.1.3, “Stopping the Driver in Designer,” on page 71Section 10.1.4, “Stopping the Driver in iManager,” on page 71Section 10.1.5, “Restarting the Driver in Designer,” on page 72Section 10.1.6, “Restarting the Driver in iManager,” on page 72
10.1.1 Starting the Driver in Designer1 Open a project in the Modeler, then right-click the driver line.2 Select Live > Start Driver.
10.1.2 Starting the Driver in iManager1 In iManager, click Identity Manager > Identity Manager Overview.2 Browse to the driver set where the driver exists, then click Search.3 Click the upper right corner of the driver icon, then click Start driver.
10.1.3 Stopping the Driver in Designer1 Open a project in the Modeler, then right-click the driver line.2 Select Live > Stop Driver.
10.1.4 Stopping the Driver in iManager1 In iManager, click Identity Manager > Identity Manager Overview.2 Browse to the driver set where the driver exists, then click Search.
Managing the Driver 71

72 Novell
novdocx (en) 10 March 2008
3 Click the upper right corner of the driver icon, then click Stop driver.
10.1.5 Restarting the Driver in Designer1 Open a project in the Modeler, then right-click the driver line.2 Select Live > Restart Driver.
10.1.6 Restarting the Driver in iManager1 In iManager, click Identity Manager > Identity Manager Overview.2 Browse to the driver set where the driver exists, then click Search.3 Click the upper right corner of the driver icon, then click Restart driver.
10.2 Using the DirXML Command Line UtilityThe DirXML Command Line utility provides command line access to manage the driver. This utility is not a replacement for iManager or Designer. The primary use of this utility is to allow you to create platform-specific scripts to manage the driver.
For example, you could create a shell script on Linux to check the status of the driver. See Appendix A, “DirXML Command Line Utility,” on page 109 for detailed information about the DirXML Command Line utility. For daily tasks, use iManager or Designer.
10.3 Viewing Driver Versioning InformationThe Versioning Discovery tool only exists in iManager.
Section 10.3.1, “Viewing a Hierarchical Display of Versioning Information,” on page 72Section 10.3.2, “Viewing the Versioning Information as a Text File,” on page 74Section 10.3.3, “Saving Versioning Information,” on page 76
10.3.1 Viewing a Hierarchical Display of Versioning Information1 To find your Driver Set object in iManager, click Identity Manager > Identity Manager
Overview, then click Search.2 In the Identity Manager Overview, click Information.
Identity Manager Driver 3.5.1 for User Management of SAP Software Guide

novdocx (en) 10 March 2008
You can also select Identity Manager Utilities > Versions Discovery, browse to and select the Driver Set object, then click OK.
3 View a top-level or unexpanded display of versioning information.
The unexpanded hierarchical view displays the following:The eDirectoryTM tree that you are authenticated toThe Driver Set object that you selectedServers that are associated with the Driver Set objectIf the Driver Set object is associated with two or more servers, you can view Identity Manager information on each server.Drivers
4 View versioning information related to servers by expanding the server icon.
Managing the Driver 73
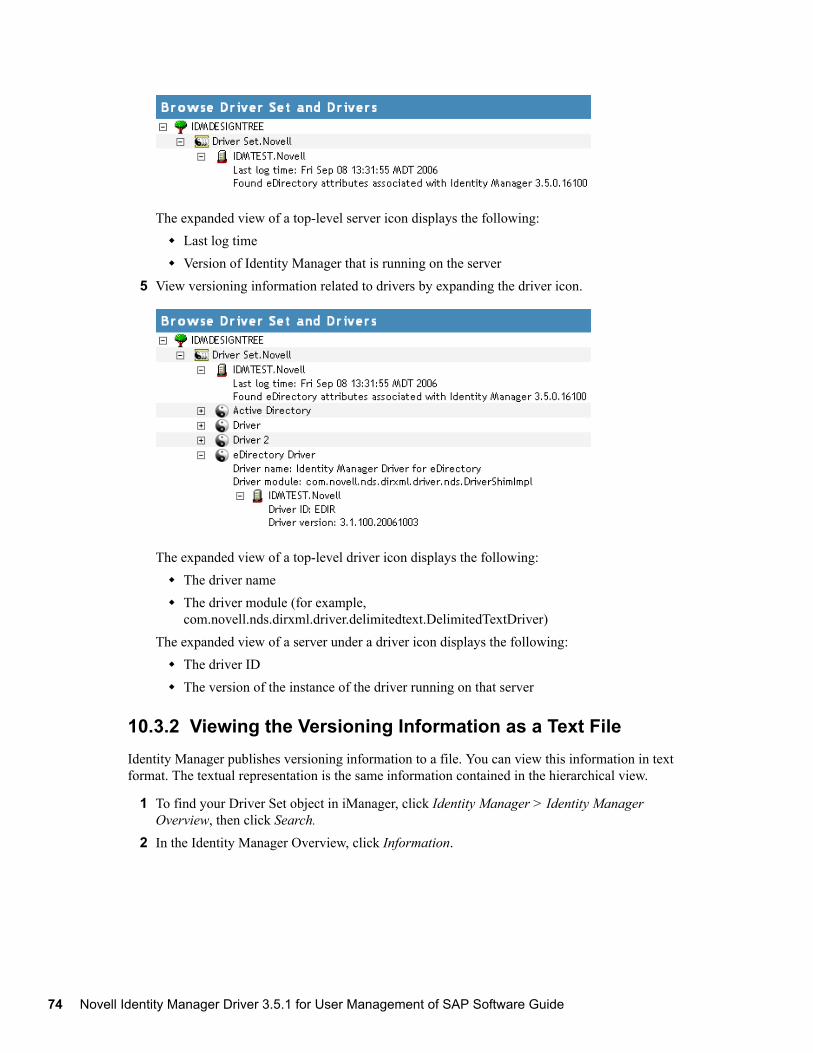
74 Novell
novdocx (en) 10 March 2008
The expanded view of a top-level server icon displays the following:Last log timeVersion of Identity Manager that is running on the server
5 View versioning information related to drivers by expanding the driver icon.
The expanded view of a top-level driver icon displays the following:The driver name The driver module (for example, com.novell.nds.dirxml.driver.delimitedtext.DelimitedTextDriver)
The expanded view of a server under a driver icon displays the following:The driver ID The version of the instance of the driver running on that server
10.3.2 Viewing the Versioning Information as a Text FileIdentity Manager publishes versioning information to a file. You can view this information in text format. The textual representation is the same information contained in the hierarchical view.
1 To find your Driver Set object in iManager, click Identity Manager > Identity Manager Overview, then click Search.
2 In the Identity Manager Overview, click Information.
Identity Manager Driver 3.5.1 for User Management of SAP Software Guide

novdocx (en) 10 March 2008
You can also select Identity Manager Utilities > Versioning Discovery, browse to and select the Driver Set object, then click Information.
3 In the Versioning Discovery Tool dialog box, click View.
The information is displayed as a text file in the Report Viewer window.
Managing the Driver 75

76 Novell
novdocx (en) 10 March 2008
10.3.3 Saving Versioning InformationYou can save versioning information to a text file on your local or network drive.
1 To find the Driver Set object in iManager, click Identity Manager > Identity Manager Overview, then click Search.
2 In the Identity Manager Overview, click Information.
Identity Manager Driver 3.5.1 for User Management of SAP Software Guide

novdocx (en) 10 March 2008
You can also select Identity Manager Utilities > Versioning Discovery, browse to and select the Driver Set object, then click Information.
3 In the Versioning Discovery Tool dialog box, click Save As.
4 In the File Download dialog box, click Save.5 Navigate to the desired directory, type a filename, then click Save.
Identity Manager saves the data to a text file.
10.4 Reassociating a Driver Set Object with a Server ObjectThe driver set object should always be associated with a server object. If the driver set is not associated with a server object, none of the drivers in the driver set can start.
Managing the Driver 77

78 Novell
novdocx (en) 10 March 2008
If the link between the driver set object and the server object becomes invalid, you see one of the following conditions:
When upgrading eDirectory your Identity Manager server, you get the error UniqueSPIException error -783.No server is listed next to the driver set in the Identity Manager Overview window.A server is listed next to the driver set in the Identity Manager Overview window, but the name is garbled text.
To resolve this issue, disassociate the driver set object and the server object, then reassociate them.
1 In iManager click Identity Manager > Identity Manager Overview, then click Search to find the driver set object that the driver should be associated with.
2 Click the Remove server icon, then click OK.3 Click the Add server icon, then browse to and select the server object.4 Click OK.
10.5 Changing the Driver ConfigurationIf you need to change the driver configuration, Identity Manager allows you to make the change through iManager or Designer.
To change the driver configuration in iManager:
1 Click Identity Manager > Identity Manager Overview, then click Search to search for the driver set that is associated with the driver.
2 Browse to the driver, then click the upper right corner of the driver icon.3 Click Edit Properties.
To change the driver configuration in Designer:
1 Open a project in the Modeler, then right-click the driver line and select Properties.
10.6 Storing Driver Passwords Securely with Named PasswordsIdentity Manager allows you to store multiple passwords securely for a particular driver. This functionality is referred to as Named Passwords. Each different password is accessed by a key, or name.
You can also use the Named Passwords feature to store other pieces of information securely, such as a user name.
To use a Named Password in a driver policy, you refer to it by the name of the password, instead of using the actual password, and the Metadirectory engine sends the password to the driver. The method described in this section for storing and retrieving Named Passwords can be used with any driver without making changes to the driver shim.
Section 10.6.1, “Using Designer to Configure Named Passwords,” on page 79Section 10.6.2, “Using iManager to Configure Named Passwords,” on page 79
Identity Manager Driver 3.5.1 for User Management of SAP Software Guide

novdocx (en) 10 March 2008
Section 10.6.3, “Using Named Passwords in Driver Policies,” on page 80Section 10.6.4, “Using the DirXML Command Line Utility to Configure Named Passwords,” on page 81
10.6.1 Using Designer to Configure Named Passwords1 Right-click the driver object, then select Properties.2 Select Named Password, then click New.
3 Specify the Name of the Named Password.4 Specify the Display name of the Named Password.5 Specify the Named Password, then re-enter the password.6 Click OK twice.
10.6.2 Using iManager to Configure Named Passwords1 Click Identity Manager > Identity Manager Overview, then click Search to search for the
driver set that is associated with the driver.2 In the Identity Manager Overview, click the upper right corner of the driver icon, then click
Edit properties.3 On the Modify Object page on the Identity Manager tab, click Named Passwords.
The Named Passwords page appears, listing the current Named Passwords for this driver. If you have not set up any Named Passwords, the list is empty.
Managing the Driver 79

80 Novell
novdocx (en) 10 March 2008
4 To add a Named Password, click Add, complete the fields, then click OK.
5 Specify a name, display name and a password, then click OK twice.You can use this feature to store other kinds of information securely, such as a username.
6 Click OK to restart the driver and have the changes take effect.7 To remove a Named Password, select the password name, then click Remove.
The password is removed without prompting you to confirm the action.
10.6.3 Using Named Passwords in Driver Policies“Using the Policy Builder” on page 81
Identity Manager Driver 3.5.1 for User Management of SAP Software Guide

novdocx (en) 10 March 2008
“Using XSLT” on page 81
Using the Policy Builder
Policy Builder allows you to make a call to a Named Password. Create a new rule and select Named Password as the condition, then set an action depending upon if the Named Password is available or not available.
1 In Designer, launch Policy Builder, right-click, then click New > Rule.2 Specify the name of the rule, then click Next.3 Select the condition structure, then click Next.4 Select named password for the Condition.5 Browse to and select the Named Password that is stored on the driver.
In this example, it is userinfo.6 Select whether the Operator is available or not available.7 Select an action for the Do field.
In this example, the action is veto.
The example indicates that if the userinfo Named Password is not available, then the event is vetoed.
Figure 10-1 A Policy Using Named Passwords
Using XSLT
The following example shows how a Named Password can be referenced in a driver policy on the Subscriber channel in XSLT:<xsl:value-of select=”query:getNamedPassword($srcQueryProcessor,'mynamedpassword')”xmlns:query=”http://www.novell.com/java/com.novell.nds.dirxml.driver.XdsQueryProcessor/>
10.6.4 Using the DirXML Command Line Utility to Configure Named Passwords
“Creating a Named Password in the DirXML Command Line Utility” on page 81“Using the DirXML Command Line Utility to Remove a Named Password” on page 83
Creating a Named Password in the DirXML Command Line Utility
1 Run the DirXML Command Line utility.
Managing the Driver 81

82 Novell
novdocx (en) 10 March 2008
For information, see Appendix A, “DirXML Command Line Utility,” on page 109.2 Enter your username and password.
The following list of options appears.DirXML commands 1: Start driver 2: Stop driver 3: Driver operations... 4: Driver set operations... 5: Log events operations... 6: Get DirXML version 7: Job operations...99: QuitEnter choice:
3 Enter 3 for driver operations.A numbered list of drivers appears.
4 Enter the number for the driver you want to add a Named Password to.The following list of options appears.Select a driver operation for:driver_name 1: Start driver 2: Stop driver 3: Get driver state 4: Get driver start option 5: Set driver start option 6: Resync driver 7: Migrate from application into DirXML 8: Submit XDS command document to driver 9: Submit XDS event document to driver10: Queue event for driver11: Check object password12: Initialize new driver object13: Passwords operations14: Cache operations99: ExitEnter choice:
5 Enter 13 for password operations.The following list of options appears.Select a password operation 1: Set shim password 2: Reset shim password 3: Set Remote Loader password 4: Clear Remote Loader password 5: Set named password 6: Clear named password(s) 7: List named passwords 8: Get passwords state99: ExitEnter choice:
Identity Manager Driver 3.5.1 for User Management of SAP Software Guide

novdocx (en) 10 March 2008
6 Enter 5 to set a new Named Password.The following prompt appears:Enter password name:
7 Enter the name by which you want to refer to the Named Password.8 Enter the actual password that you want to secure at the following prompt:Enter password:
The characters you type for the password are not displayed.9 Confirm the password by entering it again at the following prompt:Confirm password:
10 After you enter and confirm the password, you are returned to the password operations menu.11 After completing this procedure, you can use the 99 option twice to exit the menu and quit the
DirXML Command Line Utility.
Using the DirXML Command Line Utility to Remove a Named Password
This option is useful if you no longer need Named Passwords that you previously created.
1 Run the DirXML Command Line utility.
For information, see Appendix A, “DirXML Command Line Utility,” on page 109.2 Enter your username and password.
The following list of options appears.DirXML commands 1: Start driver 2: Stop driver 3: Driver operations... 4: Driver set operations... 5: Log events operations... 6: Get DirXML version 7: Job operations99: QuitEnter choice:
3 Enter 3 for driver operations.A numbered list of drivers appears.
4 Enter the number for the driver you want to remove Named Passwords from.The following list of options appears.Select a driver operation for:driver_name 1: Start driver 2: Stop driver 3: Get driver state 4: Get driver start option 5: Set driver start option 6: Resync driver 7: Migrate from application into DirXML 8: Submit XDS command document to driver 9: Submit XDS event document to driver
Managing the Driver 83

84 Novell
novdocx (en) 10 March 2008
10: Queue event for driver11: Check object password12: Initialize new driver object13: Passwords operations14: Cache operations99: ExitEnter choice:
5 Enter 13 for password operations.The following list of options appears.Select a password operation 1: Set shim password 2: Reset shim password 3: Set Remote Loader password 4: Clear Remote Loader passwor 5: Set named password 6: Clear named password(s) 7: List named passwords 8: Get passwords state99: ExitEnter choice:
6 (Optional) Enter 7 to see the list of existing Named Passwords.The list of existing Named Passwords is displayed.This step can help you make sure you are removing the correct password.
7 Enter 6 to remove one or more Named Passwords.8 Enter No to remove a single Named Password at the following prompt:Do you want to clear all named passwords? (yes/no):
9 Enter the name of the Named Password you want to remove at the following prompt:Enter password name:
After you enter the name of the Named Password you want to remove, you are returned to the password operations menu:Select a password operation 1: Set shim password 2: Reset shim password 3: Set Remote Loader password 4: Clear Remote Loader password 5: Set named password 6: Clear named password(s) 7: List named passwords 8: Get passwords state99: ExitEnter choice:
10 (Optional) Enter 7 to see the list of existing Named Passwords.This step lets you verify that you have removed the correct password.
11 After completing this procedure, you can use the 99 option twice to exit the menu and quit the DirXML Command Line utility.
Identity Manager Driver 3.5.1 for User Management of SAP Software Guide

novdocx (en) 10 March 2008
10.7 Adding a Driver HeartbeatThe driver heartbeat is a feature of the Identity Manager drivers that ship with Identity Manager 2 and later. Its use is optional. The driver heartbeat is configured by using a driver parameter with a time interval specified. If a heartbeat parameter exists and has an interval value other than 0, the driver sends a heartbeat document to the Metadirectory engine if there is no communication on the Publisher channel for the specified interval of time.
The intent of the driver heartbeat is to give you a trigger to allow you to initiate an action at regular intervals, if the driver does not communicate on the Publisher channel as often as you want the action to occur. To take advantage of the heartbeat, you must customize your driver configuration or other tools. The Metadirectory engine accepts the heartbeat document but does not take any action because of it.
For most drivers, a driver parameter for heartbeat is not used in the sample configurations, but you can add it.
A custom driver that is not provided with Identity Manager can also provide a heartbeat document, if the driver developer has written the driver to support it.
To configure the heartbeat:
1 In iManager, click Identity Manager > Identity Manager Overview. 2 Browse to and select your driver set object, then click Search.3 In the Identity Manager Overview, click the upper right corner of the driver icon, then click
Edit properties.4 On the Identity Manager tab, click Driver Configuration, scroll to Driver Parameters, then
look for Heart Beat or a similar display name.If a driver parameter already exists for heartbeat, you can change the interval and save the changes, and configuration is then complete. The value of the interval cannot be less than 1. A value of 0 means the feature is turned off.The unit of time is usually minutes; however, some drivers might choose to implement it differently, such as using seconds.
5 If a driver parameter does not exist for heartbeat, click Edit XML.6 Add a driver parameter entry like the following example, as a child of <publisher-options>.<pub-heartbeat-interval display-name="Heart Beat">10</pub-heartbeat-interval>
If the driver does not produce a heartbeat document after being restarted, check the placement of the driver parameter in the XML.
7 Save the changes, and make sure the driver is stopped and restarted.
After you have added the driver parameter, you can edit the time interval by using the graphical view. Another option is to create a reference to a global configuration value (GCV) for the time interval. Like other global configuration values, the driver heartbeat can be set at the driver set level instead of on each individual driver object. If a driver does not have a particular global configuration value, and the driver set object does have it, the driver inherits the value from the driver set object.
Managing the Driver 85

86 Novell
novdocx (en) 10 March 2008
Identity Manager Driver 3.5.1 for User Management of SAP Software Guide

11novdocx (en) 10 M
arch 2008
11Synchronizing Objects
This section explains driver and object synchronization in DirXML® 1.1a, Identity Manager 2.0, and Identity Manager 3.x. Driver synchronization was not available for DirXML 1.0 and DirXML 1.1.
After the driver is created, instead of waiting for objects to be modified or created, the data between the two connected systems can be sent through the synchronization process.
Section 11.1, “What Is Synchronization?,” on page 87Section 11.2, “When Is Synchronization Done?,” on page 87Section 11.3, “How Does the Metadirectory Engine Decide Which Object to Synchronize?,” on page 88Section 11.4, “How Does Synchronization Work?,” on page 89
11.1 What Is Synchronization?The actions commonly referred to as “synchronization” in Identity Manager refer to several different but related actions:
Synchronization (or merging) of attribute values of an object in the Identity Vault with the corresponding attribute values of an associated object in a connected system. Migration of all Identity Vault objects and classes that are included in the filter on the Subscriber channel. Generation of the list of objects to submit to the driver’s Subscriber channel for synchronization or migration in response to a user request (a manual synchronization). Generation of the list of objects to submit to the driver’s Subscriber channel for synchronization or migration in response to enabling a formerly disabled driver, or in response to a cache error.
11.2 When Is Synchronization Done?The Metadirectory engine performs object synchronization or merging in the following circumstances:
A <sync> event element is submitted on the Subscriber or Publisher channel.A <sync> event element is submitted on the Subscriber channel in the following circumstances:
The state of the object’s association value is set to “manual” or “migrate.” (This causes an eDirectoryTM event, which in turn causes the Identity Manager caching system to queue an object synchronization command in the affected driver’s cache.) An object synchronization command is read from the driver’s cache.
A <sync> event element is submitted on the Publisher channel in the following circumstances:
A driver submits a <sync> event element. No known driver currently does this.
Synchronizing Objects 87

88 Novell
novdocx (en) 10 March 2008
The Metadirectory engine submits a <sync> event element for each object found as the result of a migrate-into-NDS query. These <sync> events are submitted using the Subscriber thread, but are processed using the Publisher channel filter and policies.
An <add> event (real or synthetic) is submitted on a channel and the channel Matching policy finds a matching object in the target system. An <add> event with an association is submitted on the Subscriber channel. This normally occurs only in exceptional cases, such as the bulk load of objects into eDirectory with DirXML-Associations attribute values. An <add> event is submitted on the Publisher channel and an object is found in eDirectory that already has the association value reported with the <add> event.
The Metadirectory engine generates synchronization requests for zero or more objects in the following cases:
The user issues a manual driver synchronization request. This corresponds to the Resync button in the Driver Set property page in ConsoleOne®, or to the Synchronize button on the iManager Identity Manager Driver Overview page.The Metadirectory engine encounters an error with the driver’s cache and cannot recover from the cache error. The driver’s cache is deleted and the engine generates object synchronization commands as detailed in Section 11.3, “How Does the Metadirectory Engine Decide Which Object to Synchronize?,” on page 88.
11.3 How Does the Metadirectory Engine Decide Which Object to Synchronize?The Metadirectory engine processes both manually initiated and automatically initiated synchronization requests in the same manner. The only difference in the processing of manually initiated versus automatically initiated driver synchronization requests is the starting filter time used to filter objects being considered for synchronization.
The starting filter time is used to filter objects that have modification or creation times that are older than the starting time specified in the synchronization request.
For automatically initiated driver synchronization, the starting filter time is obtained from the time stamps of cached eDirectory events. In particular, the starting filter time is the earliest time for the cached events that haven’t yet been successfully processed by the driver’s Subscriber channel.
For manually initiated driver synchronization, the default starting filter time is the earliest time in the eDirectory database. In Identity Manager 2 and Identity Manager 3, an explicit starting filter time can also be set. In DirXML 1.1a there is no facility to set the starting filter time value for synchronization when manually initiating driver synchronization.
The Metadirectory engine creates a list of objects to be synchronized on the Subscriber channel in the following manner:
1. It finds all objects that: Have an entry modification time stamp greater than or equal to the starting filter timeandExist in the filter on the Subscriber channel.
Identity Manager Driver 3.5.1 for User Management of SAP Software Guide

novdocx (en) 10 March 2008
2. It finds all objects that have an entry creation time stamp greater than or equal to the starting filter time.
3. It adds a synchronize object command to the driver cache for each unique object found that has an entry modification time stamp greater than or equal to the starting filter time and all objects and classes that are in the Subscriber filter channel in the driver being synchronized.
11.4 How Does Synchronization Work?After the Metadirectory engine determines that an object is to be synchronized, the following processes occur:
1. Each system (the Identity Vault and the connected system) is queried for all attribute values in the appropriate filters.
eDirectory is queried for all values in the Subscriber filter, and for values that are marked for synchronization in Identity Manager 2.x and Identity Manager 3.x. The connected system is queried for all values in the Publisher filter, and for values that are marked for synchronization in Identity Manager 2.x and Identity Manager 3.x.
2. The returned attribute values are compared and modification lists are prepared for the Identity Vault and the connected system according to Table 11-1 on page 90, Table 11-2 on page 91, and Table 11-3 on page 93.In the tables the following pseudo-equations are used:
“Left = Right” indicates that the left side receives all values from the right side. “Left = Right[1]” indicates that the left side receives one value from the right side. If there is more than one value, it is indeterminate. “Left += Right” indicates that the left side adds the right side values to the left side’s existing values. “Left = Left + Right” indicates that the left sides receives the union of the values of the left and right sides.
There are three different combinations of selected items in the filter, and each one creates a different output.
Section 11.4.1, “Scenario One,” on page 89Section 11.4.2, “Scenario Two,” on page 91Section 11.4.3, “Scenario Three,” on page 92
11.4.1 Scenario OneThe attribute is set to Synchronize on the Publisher and Subscriber channels, and the merge authority is set to Default.
Synchronizing Objects 89

90 Novell
novdocx (en) 10 March 2008
Figure 11-1 Scenario One
The following table contains the values that the Metadirectory engine synchronizes when the attribute is sent through a filter that is set to the configuration for Scenario One. The table shows different outputs depending upon whether the attribute comes from the Identity Vault or the Application, if the attribute is single-valued or multi-valued, and if the attribute is empty or non-empty.
Table 11-1 Output of Scenario One
Identity Vaultsingle-valuedempty
Identity Vaultsingle-valuednon-empty
Identity Vaultmulti-valuedempty
Identity Vaultmulti-valuednon-empty
Applicationsingle-valued empty
No change App = Identity Vault No change App = Identity Vault[1]
Applicationsingle-valued non-empty
Identity Vault = App App = Identity Vault Identity Vault = App Identity Vault + = App
Applicationmulti-valued empty
No change App = Identity Vault No change App = Identity Vault
Applicationmulti-valuednon-empty
Identity Vault = App[1]
App + = Identity Vault
Identity Vault = App App = App + Identity Vault
Identity Vault = App + Identity Vault
Identity Manager Driver 3.5.1 for User Management of SAP Software Guide

novdocx (en) 10 March 2008
11.4.2 Scenario TwoThe attribute is set to Synchronize only on the Subscriber channel, or it is set to Synchronize on both the Subscriber and Publisher channels. The merge authority is set to Identity Vault.
Figure 11-2 Scenario Two
The following table contains the values that the Metadirectory engine synchronizes when the attribute is sent through a filter that is set to the configuration for Scenario Two. The table shows different outputs depending upon whether the attribute comes from the Identity Vault or the Application, if the attribute is single-valued or multi-valued, and if the attribute is empty or non-empty.
Table 11-2 Output of Scenario Two
Identity Vaultsingle-valuedempty
Identity Vaultsingle-valuednon-empty
Identity Vaultmulti-valuedempty
Identity Vaultmulti-valuednon-empty
Applicationsingle-valuedempty
No change App = Identity Vault No change App = Identity Vault[1]
Applicationsingle-valuedempty
App = empty App = Identity Vault Identity Vault = App App = Identity Vault[1]
Applicationmulti-valuedempty
No change App = Identity Vault No change App = Identity Vault
Synchronizing Objects 91

92 Novell
novdocx (en) 10 March 2008
11.4.3 Scenario ThreeThe attribute is set to Synchronize on the Publisher channel or the merge authority is set to Application.
Figure 11-3 Scenario Three
The following table contains the values that the Metadirectory engine synchronizes when the attribute is sent through a filter that is set to the configuration for Scenario Three. The table shows different outputs depending upon whether the attribute comes from the Identity Vault or the Application, if the attribute is single-valued or multi-valued, and if the attribute is empty or non-empty.
Applicationmulti-valuednon-empty
App = empty App = Identity Vault App = empty App = Identity Vault
Identity Vaultsingle-valuedempty
Identity Vaultsingle-valuednon-empty
Identity Vaultmulti-valuedempty
Identity Vaultmulti-valuednon-empty
Identity Manager Driver 3.5.1 for User Management of SAP Software Guide

novdocx (en) 10 March 2008
Table 11-3 Output of Scenario Three
Identity Vaultsingle-valuedempty
Identity Vaultsingle-valuednon-empty
Identity Vaultmulti-valuedempty
Identity Vaultmulti-valuednon-empty
Applicationsingle-valuedempty
No change Identity Vault = empty
No change Identity Vault = empty
Applicationsingle-valuednon-empty
Identity Vault = App Identity Vault = App Identity Vault = App Identity Vault = App
Applicationmulti-valuedempty
No change Identity Vault = empty
No change Identity Vault = empty
Applicationmulti-valued non-empty
Identity Vault = App[1]
Identity Vault = App[1]
Identity Vault = App Identity Vault = App
Synchronizing Objects 93

94 Novell
novdocx (en) 10 March 2008
Identity Manager Driver 3.5.1 for User Management of SAP Software Guide

12novdocx (en) 10 M
arch 2008
12Troubleshooting the Driver
This section contains potential problems and error codes you might encounter while configuring or using the driver.
Section 12.1, “Troubleshooting Driver Processes,” on page 95Section 12.2, “Driver Load Errors,” on page 101Section 12.3, “Other Driver Errors,” on page 101
12.1 Troubleshooting Driver ProcessesViewing driver processes is necessary to analyze unexpected behavior. To view the driver processing events, use DSTRACE. You should only use it during testing and troubleshooting the driver. Running DSTRACE while the drivers are in production increases the utilization on the Identity Manager server and can cause events to process very slowly.
12.1.1 Viewing Driver ProcessesIn order to see the driver processes in DSTRACE, values are added to the driver set and the driver objects. You can do this in Designer and iManager.
“Adding Trace Levels in Designer” on page 95“Adding Trace Levels in iManager” on page 97“Capturing Driver Processes to a File” on page 97
Adding Trace Levels in Designer
You can add trace levels to the driver set object or to each driver object.
“Driver Set” on page 95“Driver” on page 96
Driver Set
1 In an open project in Designer, select the driver set object in the Outline view.
2 Right-click and select Properties, then click 5. Trace.3 Set the parameters for tracing, then click OK.
Troubleshooting the Driver 95

96 Novell
novdocx (en) 10 March 2008
If you set the trace level on the driver set object, all drivers appear in the DSTRACE logs.
Driver
1 In an open project in Designer, select the driver object in the Outline view.2 Right-click and select Properties, then click 8. Trace.3 Set the parameters for tracing, then click OK.
Parameter Description
Driver trace level As the driver object trace level increases, the amount of information displayed in DSTRACE increases.
Trace level 1 shows errors, but not the cause of the errors. If you want to see password synchronization information, set the trace level to 5.
XSL trace level DSTRACE displays XSL events. Set this trace level only when troubleshooting XSL style sheets. If you do not want to see XSL information, set the level to zero.
Java debug port Allows developers to attach a Java* debugger.
Java trace file When a value is set in this field, all Java information for the driver set object is written to a file. The value for this field is the path for that file.
As long as the file is specified, Java information is written to this file. If you do not need to debug Java, leave this field blank.
Trace file size limit Allows you to set a limit for the Java trace file. If you set the file size to Unlimited, the file grows in size until there is no disk space left.
Parameter Description
Trace level As the driver object trace level increases, the amount of information displayed in DSTRACE increases.
Trace level 1 shows errors, but not the cause of the errors. If you want to see password synchronization information, set the trace level to 5.
if you select Use setting from Driver Set, the value is taken from the driver set object.
Trace file Specify a filename and location for where the Identity Manager information is written for the selected driver.
if you select Use setting from Driver Set, the value is taken from the driver set object.
Trace file size limit Allows you to set a limit for the Java trace file. If you set the file size to Unlimited, the file grows in size until there is no disk space left.
If you select Use setting from Driver Set, the value is taken from the driver set object.
Trace name The driver trace messages are prepended with the value entered instead of the driver name. Use this option if the driver name is very long.
Identity Manager Driver 3.5.1 for User Management of SAP Software Guide

novdocx (en) 10 March 2008
If you set the parameters only on the driver object, only information for that driver appears in the DSTRACE log.
Adding Trace Levels in iManager
You can add trace levels to the driver set object or to each driver object.
“Driver Set” on page 97“Driver” on page 97
Driver Set
1 In iManager, select Identity Manager > Identity Manager Overview.2 Browse to the driver set object, then click Search.3 Click the driver set name.
4 Select the Misc tab for the driver set object.5 Set the parameters for tracing, then click OK.
Driver
1 In iManager, select Identity Manager > Identity Manager Overview.2 Browse to the driver set object where the driver object resides, then click Search.3 Click the upper right corner of the driver object, then click Edit properties.4 Select the Misc tab for the driver object.5 Set the parameters for tracing, then click OK.
The option Use setting from Driver Set does not exist in iManager.
Capturing Driver Processes to a File
You can save driver processes to a file by using the parameter on the driver object or by using DSTRACE. The parameter on the driver object is the Trace file parameter, under the MISC tab.
Troubleshooting the Driver 97

98 Novell
novdocx (en) 10 March 2008
The driver processed that are captured through DSTRACE are the processes that occur on the Identity Manager engine. If you use the Remote Loader, you need to capture a trace on the Remote Loader at the same time as you are capturing the trace on the Identity Manager engine.
The following methods helps you capture and save Identity Manager processes through DSTRACE on different platforms.
“NetWare” on page 98“Windows” on page 98“UNIX” on page 99“iMonitor” on page 99“Remote Loader” on page 100
NetWare
Use dstrace.nlm to display trace messages on the system console or trace messages to a file (sys:\system\dstrace.log). Use dstrace.nlm to display the trace messages to a screen labeled DSTrace Console.
1 Enter dstrace.nlm at the server console to load dstrace.nlm into memory.2 Enter dstrace screen on at the server console to allow trace messages to appear on the DSTrace Console screen.
3 Enter dstrace file on at the server console to capture trace messages sent to the DSTrace Console to the dstrace.log file.
4 (Optional) Enter dstrace -all at the server console to make it easier to read the trace log.5 Enter dstrace +dxml dstrace +dvrs at the server console to display Identity Manager
events.6 Enter dstrace +tags dstrace +time at the server console to display message tags and
time stamps.7 Toggle to the DSTrace Console screen and watch for the event to pass.8 Toggle back to the server console.9 Enter dstrace file off at the server console.
This stops capturing trace messages to the log file. It also stops logging information into the file.
10 Open the dstrace.log in a text editor and search for the event or the object you modified.
Windows
1 Open the Control Panel > NDS Services > dstrace.dlm, then click Start to display the NDS Server Trace utility window.
2 Click Edit > Options, then click Clear All to clear all of the default flags.3 Select DirXML and DirXML Drivers.4 Click OK.5 Click File > New.6 Specify the filename and location where you want the DSTRACE information saved, then click
Open.
Identity Manager Driver 3.5.1 for User Management of SAP Software Guide

novdocx (en) 10 March 2008
7 Wait for the event to occur.8 Click File > Close.
This stops the information from being written to the log file.9 Open the file in a text editor and search for the event or the object you modified.
UNIX
1 Enter ndstrace to start the ndstrace utility.2 Enter set ndstrace=nodebug to turn off all trace flags currently set.3 Enter set ndstrace on to display trace messages to the console.4 Enter set ndstrace file on to capture trace messages to the ndstrace.log file in
the directory where eDirectory is installed. By default it is /var/nds.5 Enter set ndstrace=+dxml to display the Identity Manager events.6 Enter set ndstrace=+dvrs to display the Identity Manager driver events.7 Wait for the event to occur.8 Enter set ndstrace file off to stop logging information to the file.9 Enter exit to quite the ndstrace utility.
10 Open the file in a text editor. Search for the event or the object that was modified.
iMonitor
iMonitor allows you to get DSTRACE information from a Web browser. It does not matter where Identity Manager is running. The following files run iMonitor:
ndsimon.nlm runs on NetWare®.ndsimon.dlm runs on Windows.ndsimonitor runs on UNIX.
1 Access iMonitor from http://server_ip:8008/nds.
Port 8008 is the default.2 Specify a username and password with administrative rights, then click Login.3 Select Trace Configuration on the left side.4 Click Clear All.5 Select DirXML and DirXML Drivers.6 Click Trace On.7 Select Trace History on the left side.8 Click the document with the Modification Time of Current to see a live trace.9 Change the Refresh Interval if you want to see information more often.
10 Select Trace Configuration on the left side, then click Trace Off to turn the tracing off.11 Select Trace History to view the trace history.
The files are distinguished by their time stamp.
Troubleshooting the Driver 99

100 Novell
novdocx (en) 10 March 2008
If you need a copy of the HTML file, the default location is:
NetWare: sys:\system\ndsimon\dstrace*.htmWindows: Drive_letter:\novell\nds\ndsimon\dstrace\*.htmUNIX: /var/nds/dstrace/*.htm
Remote Loader
You can capture the events that occur on the machine by running the Remote Loader service.
1 Launch the Remote Loader Console by clicking the icon.2 Select the driver instance, then click Edit.3 Set the Trace Level to 3 or above.4 Specify a location and file for the trace file.5 Specify the amount of disk space that the file is allowed.6 Click OK, twice to save the changes.
You can also enable tracing from the command line by using the switches in table Table 12-1. For more information, see “Configuring the Remote Loader ” in the Novell Identity Manager 3.5.1 Administration Guide.
Table 12-1 Command Line Tracing Switches
Option Short Name Parameter Description
-trace -t integer Specifies the trace level. This is only used when hosting an application shim. Trace levels correspond to those used on the Identity Manager server.
Example: -trace 3 or -t3
-tracefile -tf filename Specifies a file to write trace messages to. Trace messages are written to the file if the trace level is greater than zero. Trace messages are written to the file even if the trace window is not open.
Example: -tracefile c:\temp\trace.txt or -tf c:\temp\trace.txt
Identity Manager Driver 3.5.1 for User Management of SAP Software Guide

novdocx (en) 10 March 2008
12.2 Driver Load ErrorsIf the driver does not load, check DSTrace for the following error messages:
12.2.1 java.lang.ClassNotFoundException:com.novell.nds.dirxml.driver.sapusershim.SAPDriver ShimThis is a fatal error that occurs when sapusershim.jar is not installed properly. Ensure that the file is in the proper location for either a local or Remote Loader configuration.
java.lang.ClassNotFoundException:com.novell.nds.dirxml.drivers.sapusershim.SAPDriver Shim
This is a fatal error that occurs when the class name for the sapusershim.jar is incorrect. You should ensure that the Java class name is set on the Driver Module tab in a local installation and that the -class parameter is set in a Remote Loader configuration.
The proper class name is com.novell.nds.dirxml.driver.sapusershim.SAPDriverShim
12.3 Other Driver ErrorsYou might see the following driver errors in the DSTrace utility. An explanation of the error is given along with recommended solutions.
12.3.1 com/sap/mw/jco/JCOThis error occurs when the SAP Java Connector jco.jar file or sapjco.jar or the JCO native support libraries are not present or are improperly located.
Make sure the proper platform version of jco.jar or sapjco.jar is located in the same directory as sapusershim.jar.
-tracefilemax -tfm size Specifies the approximate maximum size that trace file data can occupy on disk. If you specify this option, there is a trace file with the name specified using the tracefile option and up to 9 additional “roll-over” files. The roll-over files are named using the base of the main trace filename plus “_n”, where n is 1 through 9.
The size parameter is the number of bytes. Specify the size by using the suffixes K, M, or G for kilobytes, megabytes, or gigabytes.
If the trace file data is larger than the specified maximum when the Remote Loader is started, the trace file data remains larger than the specified maximum until roll-over is completed through all 10 files.
Example: -tracefilemax 1000M or -tfm 1000M
Option Short Name Parameter Description
Troubleshooting the Driver 101

102 Novell
novdocx (en) 10 March 2008
Also check the JCO native support libraries to make sure they are present and properly configured. Use the JCO installation instructions for the appropriate platform.
12.3.2 no jRFC12 in java.library.pathThis error occurs when the SAP Java Connector (JCO) native RFC12 support library is not present or is located improperly. Make sure the JCO native support libraries are present and configured properly. Use the JCO installation instructions for the appropriate platform.
12.3.3 /usr/jdk1.3.1/lib/sparc/libjRFC12.so:<classpath info>:fatal librfccm.so:open failed: No such file or directoryThis error occurs when the SAP Java Connector (JCO) native RFC support library librfccm.so is not present or is improperly located. This sample error is from a Solaris* system.
Make sure the JCO native support libraries are present and properly configured. Follow the JCO installation instructions for the appropriate platform.
12.3.4 com.novell.nds.dirxml.engine.VRDExceptionThis error occurs when the SAP Java Connector (JCO) components cannot be located.This error generally occurs if the driver or Remote Loader has not been restarted after the JCO has been configured. Restart Novell® eDirectoryTM if you are using a local configuration or restart the remote loader for a remote configuration.
12.3.5 Error connecting to SAP hostThis error occurs when the SAP authentication or connection information is not configured properly. Ensure that the values for Authentication and Driver Parameters are correct for authentication to the SAP host system.
12.3.6 nsap-pub-directory parameter is not a directoryThis error occurs when the Publisher IDoc Directory parameter in the Publisher Settings of the Driver Parameters does not specify a valid file system location. Ensure that this parameter specifies the directory on the SAP system configured in the SAP ALE subsystem for IDoc file output.
12.3.7 No connection to remote loaderThis error occurs when the Remote Loader connection parameter information is incorrect. Configure the proper connection information for the remote connection to the system where the Remote Loader is running.
12.3.8 Authentication handshake failed, Remote Loader message: “Invalid loader password.”This error occurs when the Remote Loader password configured on the remote system does not match the Remote Loader password on the Driver object.
Identity Manager Driver 3.5.1 for User Management of SAP Software Guide

novdocx (en) 10 March 2008
Set matching passwords for both remote loaders. In iManager, ensure that both the application password and Remote Loader passwords are set at the same time.
12.3.9 Authentication handshake failed: Received invalid driver object passwordThis error occurs when the driver password configured on the remote system does not match the Driver object password on the Driver object. To correct this, you should set both Driver object passwords identically.
12.3.10 IDoc File or IDoc TRFC Documents Not Generated when a SAP User Is Created or Modified You should ensure that the ALE and CUA processes are configured properly, and that you have correctly entered the data.
User data is distributed to the driver only if CUA has been properly configured and if the logical system representing the driver has been selected for distribution under the Systems tab in the SAP User Maintenance dialog box.
12.3.11 Users Created in SAP Cannot Log On to the SAP System (CUA in Use)When creating users in the CUA central system, you must associate User objects with the client systems to which they authenticate. This occurs in the default policies when you set a value for the driver’s logical system in the DirXML-sapLocRoles or DirXML-sapLocProfiles attribute.
12.3.12 The Driver Does Not Recognize IDocs in the DirectoryYou should first test the ALE and CUA interface. Refer to your SAP documentation for more information.
If the IDoc interface fails:
Using transaction WE21, ensure that the file port is configured properly. You should validate the path to the directory and make sure the Transfer IDoc Immediately radio button is selected.Using transaction WE20, ensure that the appropriate file port is selected in the Partner Profile. Also, verify that it is on the outbound parameters of the receiving system.
If the IDoc interface succeeds:
Ensure that the correct distribution model has been selected using transaction SCUA. Ensure that the proper User field data distribution is configured using transaction SCUM.
12.3.13 IDocs Are Not Written to the Driver (TRFC Port Configuration)You should first test the ALE and CUA interface. Refer to your SAP documentation for more information.
Troubleshooting the Driver 103

104 Novell
novdocx (en) 10 March 2008
If the IDoc distribution succeeds but data is not received:
Verify that the driver is configured to receive data from the correct SAP Gateway.Verify that the driver Program ID is unique.Using transaction WE21, verify that the SAP port configuration is configured to distribute to the logical system representing the driver.
If the IDoc interface succeeds:
Ensure that the correct distribution model has been selected using transaction SCUA. Ensure that the proper User field data distribution is configured using transaction SCUM.
12.3.14 The Driver Does Not Authenticate to SAPYou should first ensure that you have configured all of the driver parameters and that the proper passwords have been entered. If the SAP system is the central system of a CUA configuration, make sure the User object used for authentication is properly associated with the client logical system. See “Users Created in SAP Cannot Log On to the SAP System (CUA in Use)” on page 103.
If you are running the driver remotely, make sure that the Remote Loader has been started before you start the driver.
12.3.15 JCO Installation and Configuration Errors For detailed instructions on using the JCO Test utility and analyzing error messages, refer to “Using the SAP Java Connector Test Utility” on page 41.
12.3.16 Error When Mapping Drives to the IDoc Directory You might see the following error in DSTrace if the IDoc directory parameter specifies an invalid local file system container or if it specifies a mapped drive on a remote system.*** NDS Trace Utility - BEGIN Logging *** Fri Sep 13 15:45:59 2005
DirXML Log Event ------------------- Driver = \FLIBBLE_TREE\n\Driver Set\SAP-UM Channel = publisher Status = fatal Message = <description>SAP Document Poller initialization failed: com.novell.nds.dirxml.driver.sapusershim.SAPDocumentPollerInitFailure: Specified Publisher IDoc Directory is invalid.</description>
*** NDS Trace Utility - END Logging *** Fri Sep 13 15:46:31 2005
This error occurs because the Windows operating system service controls the rights of the local system, not the rights of a user. Thus, the local Windows system does not have rights to access any file resources outside of its own system, including the IDoc directory.
Identity Manager Driver 3.5.1 for User Management of SAP Software Guide

13novdocx (en) 10 M
arch 2008
13Backing Up the Driver
You can use Designer or iManager to create an XML file of the driver. The file contains all of the information entered into the driver during configuration. If the driver becomes corrupted, the exported file can be imported to restore the configuration information.
IMPORTANT: If the driver has been deleted, all of the associations on the objects are purged. When the XML file is imported again, new associations are created through the migration process.
Not all server-specific information stored on the driver is contained in the XML file. Make sure this information is documented through the Doc Gen process in Designer. See “Documenting Projects” in the Designer 2.1 for Identity Manager 3.5.1.
Section 13.1, “Exporting the Driver in Designer,” on page 105Section 13.2, “Exporting the Driver in iManager,” on page 105
13.1 Exporting the Driver in Designer1 Open a project in Designer, then right-click the driver object.2 Select Export to Configuration File.3 Specify a unique name for the configuration file, browse to location where it should be saved,
then click Save.4 Click OK in the Export Configuration Results window.
13.2 Exporting the Driver in iManager1 In iManager, select Identity Manager > Identity Manager Overview.2 Browse to and select the driver set object, then click Search.3 Click the driver icon.4 Select Export in the Identity Manager Driver Overview window.5 Browse to and select the driver object you want to export, then click Next.6 Select Export all policies, linked to the configuration or not or select Only export policies that
are linked to the configuration, depending upon the information you want to have stored in the XML file.
7 Click Next.8 Click Save As, then click Save.9 Browse and select a location to save the XML file, then click Save.
10 Click Finish.
Backing Up the Driver 105

106 Novell
novdocx (en) 10 March 2008
Identity Manager Driver 3.5.1 for User Management of SAP Software Guide

14novdocx (en) 10 M
arch 2008
14Security: Best Practices
For information on how to secure the driver and the information it is synchronizing, see “Security: Best Practices” in the Novell Identity Manager 3.5.1 Administration Guide.
Security: Best Practices 107

108 Novell
novdocx (en) 10 March 2008
Identity Manager Driver 3.5.1 for User Management of SAP Software Guide

Anovdocx (en) 10 M
arch 2008
ADirXML Command Line Utility
The DirXML® Command Line utility allows you to use a command line interface to manage the driver. You can create scripts to manage the driver with the commands.
The utility and scripts are installed on all platforms during the Identity Manager installation. The utility is installed to the following locations:
Windows: \Novell\Nds\dxcmd.batNetWare®: sys:\system\dxcmd.ncf UNIX: /usr/bin/dxcmd
There are two different methods for using the DirXML Command Line utility:
Section A.1, “Interactive Mode,” on page 109Section A.2, “Command Line Mode,” on page 118
A.1 Interactive ModeThe interactive mode provides a text interface to control and use the DirXML Command Line utility.
1 At the console, enter dxcmd.2 Enter the name of a user with sufficient rights to the Identity Manager objects, such as
admin.novell.3 Enter the user’s password.
4 Enter the number of the command you want to perform.Table A-1 on page 110 contains the list of options and what functionality is available.
5 Enter 99 to quit the utility.
NOTE: If you are running eDirectoryTM 8.8 on UNIX or Linux*, you must specify the -host and -port parameters. For example, dxcmd -host 10.0.0.1 -port 524. If the parameters are not specified, a jclient error occurs.novell.jclient.JCException: connect (to address) 111 UNKNOWN ERROR
DirXML Command Line Utility 109

110 Novell
novdocx (en) 10 March 2008
By default, eDirectory 8.8 is not listening to localhost. The DirXML Command Line utility needs to resolve the server IP address or hostname and the port to be able to authenticate.
Table A-1 Interactive Mode Options
Figure A-1 Driver Options
Option Description
1: Start Driver Starts the driver. If there is more than one driver, each driver is listed with a number. Enter the number of the driver to start the driver.
2: Stop Driver Stops the driver. If there is more than one driver, each driver is listed with a number. Enter the number of the driver to stop the driver.
3: Driver operations Lists the operations available for the driver. If there is more than one driver, each driver is listed with a number. Enter the number of the driver to see the operations available. See Table A-2 on page 111 for a list of operations.
4: Driver set operations Lists the operations available for the driver set.
1: Associate driver set with server
2: Disassociate driver set from server
99: Exit
5: Log events operations Lists the operations available for logging events through Novell® Audit. See Table A-5 on page 115 for a description of these options.
6: Get DirXML version Lists the version of the Identity Manager installed.
7: Job operations Manages jobs created for Identity Manager.1
99: Quit Exits the DirXML Command Line utility
Identity Manager Driver 3.5.1 for User Management of SAP Software Guide

novdocx (en) 10 March 2008
Table A-2 Driver Options
Options Description
1: Start driver Starts the driver.
2: Stop driver Stops the driver.
3: Get driver state Lists the state of the driver.
0 - Driver is stopped
1 - Driver is starting
2 - Driver is running
3 - Driver is stopping
4: Get driver start option Lists the current driver start option.
1 - Disabled
2 - Manual
3 - Auto
5: Set driver start option Changes the start option of the driver.
1 - Disabled
2 - Manual
3 - Auto
99 - Exit
6: Resync driver Forces a resynchronization of the driver. It prompts for a time delay: Do you want to specify a minimum time for resync? (yes/no).
If you enter Yes, specify the date and time you want the resynchronization to occur: Enter a date/time (format 9/27/05 3:27 PM).
If you enter No, the resynchronization occurs immediately.
7: Migrate from application into DirXML Processes an XML document that contains a query command: Enter filename of XDS query document:
Create the XML document that contains a query command by using the Novell nds.dtd (http://developer.novell.com/ndk/doc/dirxml/dirxmlbk/ref/ndsdtd/query.html).
Examples:
NetWare: sys:\files\query.xml
Windows: c:\files\query.xml
Linux: /files/query.xml
DirXML Command Line Utility 111

112 Novell
novdocx (en) 10 March 2008
8: Submit XDS command document to driver Processes an XDS command document:
Enter filename of XDS command document:
Examples:
NetWare: sys:\files\user.xml
Windows: c:\files\user.xml
Linux: /files/user.xml
Enter name of file for response:
Examples:
NetWare: sys:\files\user.log
Windows: c:\files\user.log
Linux: /files/user.log
9: Submit XDS event document to driver Processes an XDS event document:
Enter filename of XDS event document:
Examples:
NetWare: sys:\files\add.xml
Windows: c:\files\add.xml
Linux: /files/add.xml
10: Queue event for driver Adds and event to the driver queue
Enter filename of XDS event document:
Examples:
NetWare: sys:\files\add.xml
Windows: c:\files\add.xml
Linux: /files/add.xml
11: Check object password Validates that an object’s password in the connected system is associated with a driver. It matches the object’s eDirectory password (Distribution Password, used with Universal Password).
Enter user name:
12: Initialize new driver object Performs an internal initialization of data on a new Driver object. This is only for testing purposes.
13: Password operations There are nine Password options. See Table A-3 on page 113 for a description of these options.
14: Cache operations There are five Cache operations. See Table A-4 on page 114 for a descriptions of these options.
Options Description
Identity Manager Driver 3.5.1 for User Management of SAP Software Guide

novdocx (en) 10 March 2008
Figure A-2 Password Operations
Table A-3 Password Operations
99: Exit Exits the driver options.
Operation Description
1: Set shim password Sets the application password. This is the password of the user account you are using to authenticate into the connected system with.
2: Clear shim password Clears the application password.
3: Set Remote Loader password The Remote Loader password is used to control access to the Remote Loader instance.
Enter the Remote Loader password, then confirm the password by typing it again.
4: Clear Remote Loader password Clears the Remote Loader password so no Remote Loader password is set on the Driver object.
5: Set named password Allows you to store a password or other pieces of security information on the driver. See Section 10.6, “Storing Driver Passwords Securely with Named Passwords,” on page 78 for more information.
There are four prompts to fill in:
Enter password name:
Enter password description:
Enter password:
Confirm password:
Options Description
DirXML Command Line Utility 113
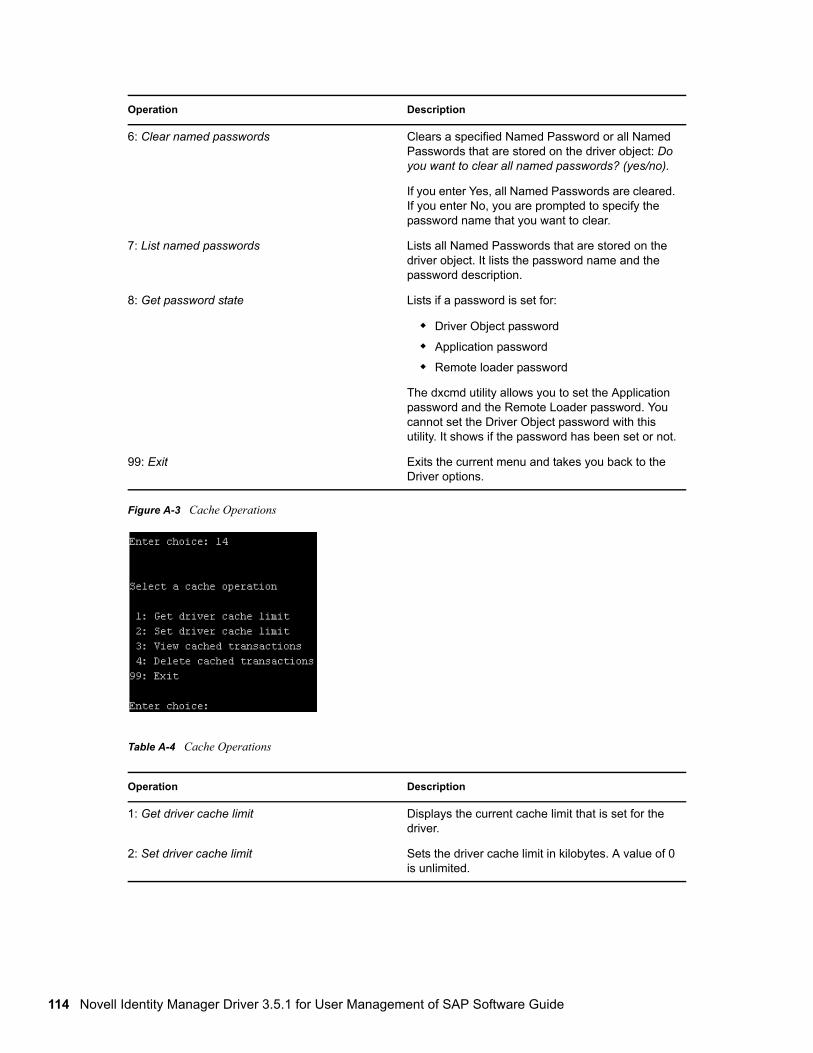
114 Novell
novdocx (en) 10 March 2008
Figure A-3 Cache Operations
Table A-4 Cache Operations
6: Clear named passwords Clears a specified Named Password or all Named Passwords that are stored on the driver object: Do you want to clear all named passwords? (yes/no).
If you enter Yes, all Named Passwords are cleared. If you enter No, you are prompted to specify the password name that you want to clear.
7: List named passwords Lists all Named Passwords that are stored on the driver object. It lists the password name and the password description.
8: Get password state Lists if a password is set for:
Driver Object password
Application password
Remote loader password
The dxcmd utility allows you to set the Application password and the Remote Loader password. You cannot set the Driver Object password with this utility. It shows if the password has been set or not.
99: Exit Exits the current menu and takes you back to the Driver options.
Operation Description
1: Get driver cache limit Displays the current cache limit that is set for the driver.
2: Set driver cache limit Sets the driver cache limit in kilobytes. A value of 0 is unlimited.
Operation Description
Identity Manager Driver 3.5.1 for User Management of SAP Software Guide

novdocx (en) 10 March 2008
Figure A-4 Log Event Operations
Table A-5 Log Events Operations
3: View cached transactions A text file is created with the events that are stored in cache. You can select the number of transactions to view.
Enter option token (default=0):
Enter maximum transactions records to return (default=1):
Enter name of file for response:
4: Delete cached transactions Deletes the transactions stored in cache.
Enter position token (default=0):
Enter event-id value of first transaction record to delete (optional):
Enter number of transaction records to delete (default=1):
99: Exit Exits the current menu and takes you back to the Driver options.
Operation Description
1: Set driver set log events Allows you to log driver set events through Novell Audit. There are 49 items you can select to log. See Table A-6 on page 116 for a list of these options.
Type the number of the item you want to log. After the items are selected, enter 99 to accept the selections.
2: Reset driver set log events Resets all of the log event options.
3: Set driver log events Allows you to log driver events through Novell Audit. There are 49 items to select to log. See Table A-6 on page 116 for a list of these options.
Type the number of the item you want to log. After the items are selected, enter 99 to accept the selections.
Operation Description
DirXML Command Line Utility 115
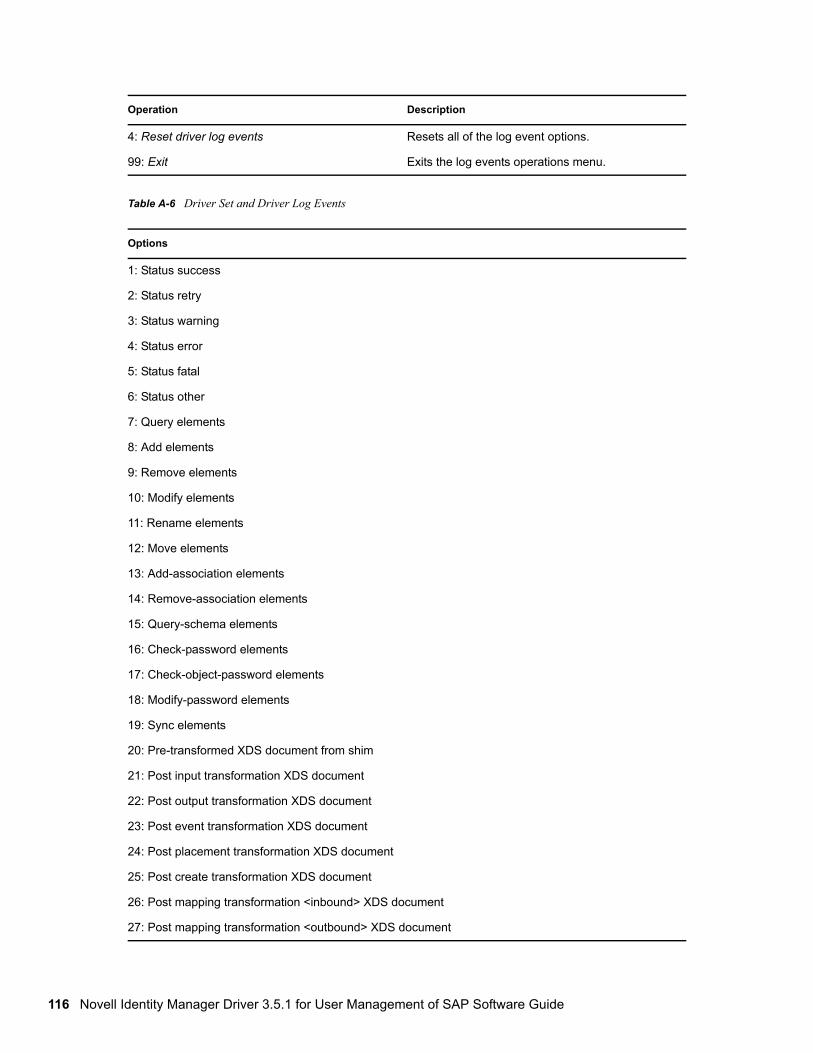
116 Novell
novdocx (en) 10 March 2008
Table A-6 Driver Set and Driver Log Events
4: Reset driver log events Resets all of the log event options.
99: Exit Exits the log events operations menu.
Options
1: Status success
2: Status retry
3: Status warning
4: Status error
5: Status fatal
6: Status other
7: Query elements
8: Add elements
9: Remove elements
10: Modify elements
11: Rename elements
12: Move elements
13: Add-association elements
14: Remove-association elements
15: Query-schema elements
16: Check-password elements
17: Check-object-password elements
18: Modify-password elements
19: Sync elements
20: Pre-transformed XDS document from shim
21: Post input transformation XDS document
22: Post output transformation XDS document
23: Post event transformation XDS document
24: Post placement transformation XDS document
25: Post create transformation XDS document
26: Post mapping transformation <inbound> XDS document
27: Post mapping transformation <outbound> XDS document
Operation Description
Identity Manager Driver 3.5.1 for User Management of SAP Software Guide

novdocx (en) 10 March 2008
28: Post matching transformation XDS document
29: Post command transformation XDS document
30: Post-filtered XDS document <Publisher>
31: User agent XDS command document
32: Driver resync request
33: Driver migrate from application
34: Driver start
35: Driver stop
36: Password sync
37: Password request
38: Engine error
39: Engine warning
40: Add attribute
41: Clear attribute
42: Add value
43: Remove value
44: Merge entire
45: Get named password
46: Reset Attributes
47: Add Value - Add Entry
48: Set SSO Credential
49: Clear SSO Credential
50: Set SSO Passphrase
51: User defined IDs
99: Accept checked items
Options
DirXML Command Line Utility 117

118 Novell
novdocx (en) 10 March 2008
Table A-7 Enter Table Title Here
A.2 Command Line ModeThe command line mode allows you to use script or batch files. Table A-8 on page 118 lists the different options that are available.
To use the command line options, decide which items you want to use and string them together.
Example: dxcmd -user admin.headquarters -host 10.0.0.1 -password n0vell -start test.driverset.headquarters
This example command starts the driver.
Table A-8 Command Line Options
Options Description
1: Get available job definitions Allows you to select an existing job.
Enter the job number:
Do you want to filter the job definitions by containment? Enter Yes or No
Enter name of the file for response:
Examples:
NetWare: sys:\files\user.log
Windows: c:\files\user.log
Linux: /files/user.log
2: Operations on specific job object Allows you to perform operations for a specific job.
Option Description
Configuration
-user <user name> Specify the name of a user with administrative rights to the drivers you want to test.
-host <name or IP address> Specify the IP address of the server where the driver is installed.
-password <user password> Specify the password of the user specified above.
-port <port number> Specify a port number, if the default port is not used.
-q <quiet mode> Displays very little information when a command is executed.
-v <verbose mode> Displays detailed information when a command is executed.
Identity Manager Driver 3.5.1 for User Management of SAP Software Guide

novdocx (en) 10 March 2008
-s <stdout> Writes the results of the dxcmd command to stdout.
-? <show this message> Displays the help menu.
-help <show this message> Displays the help menu.
Actions
-start <driver dn> Starts the driver.
-stop <driver dn> Stops the driver.
-getstate <driver dn> Shows the state of the driver as running or stopped.
-getstartoption <driver dn> Shows the startup option of the driver.
-setstartoption <driver dn> <disabled|manual|auto> <resync|noresync>
Sets how the driver starts if the server is rebooted. Sets whether the objects are to be resynchronized when the driver restarts.
-getcachelimit <driver dn> Lists the cache limit set for the driver.
-setcachelimit <driver dn> <0 or positive integer> Sets the cache limit for the driver.
-migrateapp <driver dn> <filename> Processes an XML document that contains a query command.
Create the XML document that contains a query command by using the Novell nds.dtd (http://www.novell.com/documentation/idm35/index.html?page=/documentation/idm35/policy_dtd/data/dtdndsoverview.html#dtdndsoverview).
-setshimpassword <driver dn> <password> Sets the application password. This is the password of the user account you are using to authenticate into the connected system with.
-clearshimpassword <driver dn> <password> Clears the application password.
-setremoteloaderpassword <driver dn> <password>
Sets the Remote Loader password.
The Remote Loader password is used to control access to the Remote Loader instance.
<clearremoteloaderpassword <driver dn> Clears the Remote Loader password.
Option Description
DirXML Command Line Utility 119

120 Novell
novdocx (en) 10 March 2008
-sendcommand <driver dn> <input filename> <output filename>
Processes an XDS command document.
Specify the XDS command document as the input file.
Examples:
NetWare: sys:\files\user.xml
Windows: c:\files\user.xml
Linux: /files/user.log
Specify the output filename to see the results.
Examples:
NetWare: sys:\files\user.log
Windows: c:\files\user.log
Linux: /files/user.log
-sendevent <driver dn> <input filename> Submits a document to the driver’s Subscriber channel, bypassing the driver cache. The document is processed ahead of anything that might be in the cache at the time of the submission. It also means that the submission fails if the driver is not running.
-queueevent <driver dn> <input filename> Submits a document to the driver’s Subscriber channel by queuing the document in the driver cache. The document gets processed after anything that might be in the cache at the time of the submission. The submission won’t fail if the driver isn’t running.
-setlogevents <dn> <integer ...> Sets Novell Audit log events on the driver. The integer is the option of the item to log. See Table A-6 on page 116 for the list of the integers to enter.
-clearlogevents <dn> Clears all Novell Audit log events that are set on the driver.
-setdriverset <driver set dn> Associates a driver set with the server.
-cleardriverset Clears the driver set association from the server.
-getversion Shows the version of Identity Manager that is installed.
-initdriver object <dn> Performs an internal initialization of data on a new Driver object. This is only for testing purposes.
-setnamedpassword <driver dn> <name> <password> [description]
Sets Named Passwords on the driver object. You specify the name, the password, and the description of the Named Password.
-clearnamedpassword <driver dn> <name> Clears a specified Named Password.
-startjob <job dn> Starts the specified job.
Option Description
Identity Manager Driver 3.5.1 for User Management of SAP Software Guide

novdocx (en) 10 March 2008
If a command line is executed successfully, it returns a zero. If the command line returns anything other than zero, it is an error. For example 0 means success, and -641 means invalid operation. -641 is an eDirectory error code. Table A-9 on page 121 contains other values for specific command line options.
Table A-9 Command Line Option Values
-abortjob <job dn> Aborts the specified job.
-getjobrunningstate <job dn> Returns the specified job’s running state.
-getjobenabledstate <job dn> Returns the specified job’s enabled state.
-getjobnextruntime <job dn> Returns the specified job’s next run time.
-updatejob <job dn> Updates the specified job.
-clearallnamedpaswords <driver dn> Clears all Named Passwords set on a specific driver.
Command Line Option Values
-getstate 0- stopped
1- starting
2- running
3- shutting down
11- get schema
Anything else that is returned is an error.
-getstartoption 0- disabled
1- manual
2- auto
Anything else that is returned is an error.
-getcachelimit 0- unlimited
Anything else that is returned is an error.
-getjobrunningstate 0- stopped
1- running
Anything else that is returned is an error.
-getjobenabledstate 0- disabled
1- enabled
2- configuration error
Anything else that is returned is an error.
Option Description
DirXML Command Line Utility 121

122 Novell
novdocx (en) 10 March 2008
-getjobnextruntime Return is the next scheduled time for the job in eDirectory time format (number of seconds since 00:00:00 Jan 1, 1970UTC).
Command Line Option Values
Identity Manager Driver 3.5.1 for User Management of SAP Software Guide

Bnovdocx (en) 10 M
arch 2008
BExample XML Document Received from the Driver
The following example is a typical XML document received from the default driver configuration.<nds dtdversion=”1.0” ndsversion=”8.5”> <source> <product build="20050509_1030" instance="SAP-USER-REMOTE-46C" version="1.0">Identity Manager Driver for User Management of SAP Software</product><contact>Novell, Inc.</contact> </source> <input xmlns:sapshim="http://www.novell.com/dirxml/drivers/sapusershim"> <modify class-name="US" event-id="O_001_0000000000216097" src-dn="SSAMPLE" timestamp="20030509"> <association>USdJSMITH</association> <modify-attr attr-name="PROFILES:BAPIPROF"> <remove-all-values/> </modify-attr> <modify-attr attr-name="USERNAME:BAPIBNAME"> <remove-all-values/> </modify-attr> <modify-attr attr-name="ACTIVITYGROUPS:AGR_NAME"> <remove-all-values/> </modify-attr> <modify-attr attr-name="PROFILES:BAPIPROF"> <add-value> <value>SAP_ALL</value> <value>SAP_NEW</value> </add-value> </modify-attr> <modify-attr attr-name="USERNAME:BAPIBNAME"> <add-value> <value>JSMITH</value> </add-value> </modify-attr> <modify-attr attr-name="ACTIVITYGROUPS:AGR_NAME"> <add-value> <value>SAP_EMPLOYEE</value> </add-value> </modify-attr> </modify> </input></nds>
Example XML Document Received from the Driver 123

124 Novell
novdocx (en) 10 March 2008
Some characteristics to note:
All XML documents received from the SAP system are translated into <modify> documents. This translation occurs because it is not possible to determine whether the object described by the document has been modified or is new. Additional modification or translation of the document is accomplished through policies and the Metadirectory engine.The <modify> element contains the classname of the object described in the SAP namespace (that is, US=User). The event-id attribute contains the IDoc number from which the data is derived. The src-dn attribute contains the SAP Object name value. The timestamp attribute contains the date that the IDoc was processed by the driver.The <association> element data always contains the format “USdSAPobjectID”. User names in SAP are always uppercase.The <modify-attr> element contains the attr-name described in SAP format (Structure or Table name:Attribute Name).Because multivalue attributes cannot be consistently mapped across systems, the <remove-all-values> element is used prior to all <add-value> tags on Publisher channel documents. This instructs the Metadirectory engine to remove all existing values for the attribute prior to assigning the new values. If this functionality is not desired, one of the policies may be used to modify the document.All values are in a string format.All values for DirXML-locSapRoles and DirXML-locSapProfiles require that you set two fields in SAP. In order to map from a single string value to a structured format, default policies use a colon “:” delimiter in the Identity Vault values (such as ADMCLNT100:SAP_ESSUSER), which are then transformed to (or from) the SAP structured format. “The Schema Mapping Policy” on page 51 indicates the structure components to set for these values.
Identity Manager Driver 3.5.1 for User Management of SAP Software Guide

Cnovdocx (en) 10 M
arch 2008
CStructured Format Examples
// Single value field //<modify-attr attr-name="LOCKUSER"> <add-value> <value>1</value> </add-value></modify-attr>//// Single field from Structure//<modify-attr attr-name="ADDRESS:E_MAIL"> <add-value> <value>[email protected]</value> </add-value></modify-attr>//// Single field, multi-values from Table//<modify-attr attr-name="ACTIVITYGROUPS:AGR_NAME"> <add-value> <value>SAP_ESSUSER</value> <value>SAP_EMPLOYEE</value> </add-value></modify-attr>//// All fields, multi-values from Table//<modify-attr attr-name="LOCACTIVITYGROUPS"> <add-value> <value type="structured"> <component name="FROM_DAT">2005-04-01</component> <component name="TO_DAT">9999-12-31</component> <component name="ORG_FLAG"></component> <component name="AGR_NAME">SAP_ESSUSER</component> <component name="SUBSYSTEM">ADMCLNT500</component> <component name="AGR_TEXT"></component> </value> <value type="structured"> <component name="FROM_DAT">2005-04-01</component> <component name="TO_DAT">9999-12-31</component> <component name="ORG_FLAG"></component> <component name="AGR_NAME">SAP_EMPLOYEE</component> <component name="SUBSYSTEM">ADMCLNT100</component> <component name="AGR_TEXT"></component> </value> </add-value></modify-attr>
Structured Format Examples 125

126 Novell
novdocx (en) 10 March 2008
Identity Manager Driver 3.5.1 for User Management of SAP Software Guide

Dnovdocx (en) 10 M
arch 2008
DConfiguration and Deployment Notes
The following information can be valuable when modifying the driver configuration or when trying to understand SAP system behavior. Many of these notes relate to data value restrictions on the User record. You should investigate the system configuration thoroughly, because some values might have been modified or extended by the SAP administrator.
D.1 SAP Object Types The following SAP object types of interest might be referenced in <query> operations to SAP.
Table D-1 SAP Object Types
D.2 User Types: LOGONDATA:USTYPA - DialogC - Communication (CPIC)B - System (BDC)S - ServiceL - Reference
D.3 Output Controller OptionsTable D-2 Output Controller Options
USER Object Type: US
Activity Groups Object Type: AG
Standard Roles Object Type: AC
Company Object Type: U
User Groups Object Type: UG
G - Output immediately DEFAULTS: SPDB
H - Don’t output immediately DEFAULTS: SPDB
D - Delete after output DEFAULTS: SPDA
K - Don’t delete after output DEFAULTS: SPDA
Configuration and Deployment Notes 127

128 Novell
novdocx (en) 10 March 2008
D.4 Communication Types: ADDCOMREM:COMM TYPE
INT - EMail Address type (SMTP)LET - Letter (Standard Post)PAG - PagerFAX - FacsimilePRT - PrinterRML - Remote MailTEL - TelephoneTLX - TelexTTX - TeletexSSF - Secure Store and Forward
D.5 Date Formats: DEFAULTS:DATAFM1. DD.MM.YYYY2. MM/DD/YYYY3. MM-DD-YYYY4. YYYY.MM.DD5. YYYY/MM/DD6. YYYY-MM-DD
D.6 Decimal Formats: DEFAULTS:DCPFM“X” - The decimal divider is a dot, and the thousands divider is a comma (NN,NNN.NN)“Y” - The decimal divider is a comma, and the thousands divider is a blank (NNN NNN,NN)“ “ - The decimal divider is a comma, and the thousands divider is a dot (NN.NNN,NN)
D.7 Computer Aided Test (CATT): DEFAULTS:CATTKENNZ
“X” - CATT: Test status set“ ” - CATT: Test status not set“.” - CATT: CATT status set
Identity Manager Driver 3.5.1 for User Management of SAP Software Guide

novdocx (en) 10 March 2008
D.8 Communication Comment Type to Table MappingsTable D-3 Communication Comment Type to Table Mappings
D.9 Language Codes
Table: ADDTEL Comment Type: TEL Key Field: TELEPHONE
Table: ADDFAX Comment Type: FAX Key Field: FAX
Table: ADDPAG Comment Type: PAG Key Field: PAGER
Table: ADDSMTP Comment Type: INT Key Field: E_MAIL
Table: ADDTTX Comment Type: TTX Key Field: TELETEX
Table: ADDPRT Comment Type: PRT Key Field: PRINT_DEST
Table: ADDTLX Comment Type: TLX Key Field: TELEX_NO
Table: ADDRML Comment Type: RML Key Field: R_MAIL
Table: ADDURI Comment Type: URI Key Field: URI
Language Two-Letter Code One-Letter Code
Afrikaans AF a
Arabic AR A
Bulgarian BG W
Czech CS C
Danish DA K
German DE D
Greek EL G
English EN E
Spanish ES S
Estonian ET 9
Finnish FI U
French FR F
Hebrew HE B
Croatian HR 6
Hungarian HU H
Indonesian ID i
Italian IT I
Configuration and Deployment Notes 129

130 Novell
novdocx (en) 10 March 2008
D.10 Configuration ParametersComment text for configuration parameters is limited to a maximum length of 50 bytes.
D.11 Design Comments and NotesWhen specifying either USER or COMPANY names in BAPI calls, the name field must be in all-caps format, even if the naming field is not specified as such.
NOTE: The ADMIN_SET mode is deprecated prior to R/3 4.7. You need to USER_SET mode with SAP 4.7 and above.
In BAPI_USER_CHANGE (ADDRESS table)
The COMM-TYPE attribute in SAP has defined, acceptable values. Invalid input generates an exception and an error message stating, “The communication type <commType> is not
Japanese JA J
Korean KO 3
Lithuanian LT X
Latvian LV Y
Malaysian MS 7
Dutch NL N
Norwegian NO O
Polish PL L
Portuguese PT P
Romanian RO 4
Russian RU R
Slovak SK Q
Slovene SL 5
Serbian SR 0 (zero)
Swedish SV V
Thai TH 2
Turkish TR T
Ukrainian UK 8
Customer Reserve Z1 Z
Chinese Traditional ZF M
Chinese ZH 1
Language Two-Letter Code One-Letter Code
Identity Manager Driver 3.5.1 for User Management of SAP Software Guide

novdocx (en) 10 March 2008
defined.” Valid fields are the abbreviations for the supported communication types on the SAP Host.The TITLE_ACA1 and TITLE_ACA2 attributes have predefined, acceptable values. Invalid input results in the value in SAP being set to a null string (“ ”).The PREFIX1 and PREFIX2 attributes have predefined, acceptable values. Invalid input results in the value in SAP being set to a null string (“ ”).The TEL1_NUMBR is linked to the primary, or Standard, Telephone number in the Telephone communication table.
In BAPI_USER_CHANGE (ADDFAX table)
The Facsimile Telephone Number attribute in eDirectory is a structured attribute. An output transformation converts it to a single attribute format.
In BAPI_USER_CHANGE (ADDTEL table)
Must have a CONSNUMBER (either the number of the one you wish to change or a new, non-000 number.)The STD_NO field must be set to X if you are synchronizing a single field or if the number is the only number present.The primary data field is TELEPHONE.
In BAPI_USER_CHANGE (ADDTLX table)
By default, this table is mapped to the Organizational Person; telexNumber attribute. This syntax is OCTET_STRING, which is encoded by Identity Manager into Base64 string encoding. A Java function is provided in the driver sapusershim.jar file that can decode this into the proper string format in the Output Transformation prior to submission to SAP. If you are using the driver on a remote system, place the driver shim in the same file system container with the Identity Manager library in the Input Transformation for the Publisher channel.The primary data field is TELEX_NO.Other rules apply as described for the ADDTEL table.
In BAPI_USER_CHANGE (ADDFAX table)
The primary data field is FAX.Other rules apply as described for the ADDTEL table.
In BAPI_USER_CHANGE (GROUPS table)
The USERGROUP is the only field in this table.
In BAPI_USER_CHANGE (ALIAS structure)
The USERALIAS is the only field in this table.The SAP system guarantees that alias names are unique among all users. If an alias value is already assigned to another user, the modification fails.
Configuration and Deployment Notes 131

132 Novell
novdocx (en) 10 March 2008
In BAPI_USER_CHANGE (REF_USER structure)
The REF_USER is the only field in this table. The value specified as REF_USER must be an existing User object on the SAP client, and the Reference User’s type flag must be set to Reference (User Type L)
In BAPI_USER_CHANGE (DEFAULTS structure)
The SPDB field can only be populated with a G (GO or Output Immediately), or an H (Hold output), or a null string “ ”, which sets the value to H. All other values generate an error message. This field is case sensitive.The SPDA field can only be populated with a D (Delete after print), or a K (Keep), or a null string “ ”, which sets the value to K. All other values generate an error message. This field is case sensitive.The KOSTL (Cost center) field is automatically truncated to 8 bytes by the SAP system.The SPLG field does not appear to be utilized at all. Any value is accepted but does not relate to any attribute shown in the SAP GUI.The START_MENU field can be set to any value up to 30 characters whether or not a valid menu exists for the value being set.The SPLD (Output Controller) field accepts only a null string value (“ ”) or a valid output device that is available via the SAP GUI drop-down list for this field. Invalid selections return an error.The LANGU field must be set to one of the one-letter language codes defined in Section D.9, “Language Codes,” on page 129 or to a null string (“ ”). The null string defaults to the language of the SAP system default language. This field is case sensitive. Non-defined fields result in an error.
In BAPI_USER_CHANGE (LOGONDATA structure)
The USTYP field only accepts the valid User Types defined in Section D.2, “User Types: LOGONDATA:USTYP,” on page 127 or a null string (“ ”). Other input generates an exception and error message stating “Invalid user type<type>.”The TZONE field accepts only valid, selectable fields from the SAP GUI drop-down list. Invalid input generates an exception and an error message stating “Invalid time zone.” The Time Zone setting is displayed under the Defaults tab in the SAP client Display User dialog box.The CLASS field represents the User’s User Group for Authorization Check setting. Only fields that are selectable from the SAP GUI drop-down list are accepted. Invalid input generates an exception and error message stating “User group <class> does not exist.”The GLTGV (Validity Begin Date) and GLTGB (Validity End Date) values exist as a set of data.The Begin Date must always be less than the End date.Invalid date input generates an exception and an error message stating “Invalid time interval: Begin date after end date.”
Identity Manager Driver 3.5.1 for User Management of SAP Software Guide

novdocx (en) 10 March 2008
In BAPI_USER_CHANGE (GROUPS table)
Only valid groups that exist in the SAP User Groups table can be added to a user. Invalid input generates an exception and an error message stating “User group<name> does not exist.”
In BAPI_USER_CHANGE (ADDCOMREM table)
The LANGU and LANGU_ISO fields are set with the driver’s language parameter value.
Configuration and Deployment Notes 133

134 Novell
novdocx (en) 10 March 2008
Identity Manager Driver 3.5.1 for User Management of SAP Software Guide

Enovdocx (en) 10 M
arch 2008
EUsing Wildcard Search Capabilities
Releases of this driver prior to version 1.0.5 had issues related to the implementation of the default Subscriber Matching policy. This policy issues a query to the SAP server for matches of the “Given Name” and “Surname” attributes (mapped to ADDRESS:FIRSTNAME and ADDRESS:LASTNAME) prior to processing the creation of a new User object. The following XDS query illustrates the output of this policy.<nds dtdversion="1.1" ndsversion="8.6"> <source> <product version="1.1.2">DirXML</product> <contact>Novell, Inc.</contact> </source> <input> <query class-name="US" event-id="0"> <search-class class-name="US"/> <search-attr attr-name="ADDRESS:LASTNAME"> <value timestamp="1114621366#3" type="string">Smith</value> </search-attr> <search-attr attr-name="ADDRESS:FIRSTNAME"> <value timestamp="1114621375#1" type="string">Joe</value> </search-attr> <read-attr/> </query> </input></nds>
This is a problem because SAP does not provide the capability to Search for a User account based on attribute values. Therefore, the driver needs to obtain a list of all User objects, then read each object, compare their FIRSTNAME and LASTNAME attributes to the search values, and return a list of matching objects. In a database with hundreds or thousands of User objects, this process takes a very long time.
To alleviate this problem, starting with version 1.0.5, the driver now has the capability to use a wildcard syntax for queries that contain the User name field (USERNAME:BAPIBNAME). This allows you to write policies that take advantage of the known account naming policies of the SAP system to reduce the number of objects that need to be read and compared during matching operations.
For example, the default Subscriber Create rule uses the first initial of the Given Name attribute value appended with the Surname attribute value to create a proposed account name. A new User with Given Name “John” and Surname “Smith” generates a proposed SAP User account name of JSMITH. Any duplicates of this proposed name are appended with numeric values (ie. JSMITH1, JSMITH2, etc.) The default Output Transformation policy now contains a template that takes advantage of the USERNAME:BAPIBNAME wildcard capabilities of the driver and appends this additional search attribute to the query. When the driver receives a query containing a USERNAME:BAPIBNAME search attribute, it determines if the value is a wildcard or a literal value. Any value that is contained within single-quote characters is evaluated for wildcard syntax. If the single quote characters do not exist, the driver attempts to read the specified User object.
Using Wildcard Search Capabilities 135

136 Novell
novdocx (en) 10 March 2008
The supported variations of the wildcard syntax are:
“Starts-with” syntax (ie. JSmith*) - This restricts attribute matching to User account names starting with JSMITH.“Ends-with” syntax (ie. *ith) - This restricts attribute matching to User account names ending with ITH.“Contains” syntax (ie. *SMIT*) - This restricts attribute matching to User account names containing SMIT.
When the list of objects to be matched has been restricted, the remaining search attributes are used to determine a match.
The output from the default Output Transform policy converts the Matching Rule query shown above to the following query. It should be noted that this policy will only be applied to queries that do not already contain a USERNAME:BAPIBNAME search attribute.<nds dtdversion="1.1" ndsversion="8.6"> <source> <product version="1.1.2">DirXML</product> <contact>Novell, Inc.</contact> </source> <input> <query class-name="US" event-id="0"> <search-class class-name="US"/> <search-attr attr-name="ADDRESS:LASTNAME"> <value timestamp="1114621366#3" type="string">Smith</value> </search-attr> <search-attr attr-name="ADDRESS:FIRSTNAME"> <value timestamp="1114621375#1" type="string">Joe</value> </search-attr> <read-attr/> <search-attr attr-name="USERNAME:BAPIBNAME"> <value>’JSmith*’</value> </search-attr> </query> </input></nds>
With this query, the driver searches only User objects whose name starts with JSMITH for matching ADDRESS:LASTNAME value “Smith” and matching ADDRESS:FIRSTNAME value “Joe.”
Identity Manager Driver 3.5.1 for User Management of SAP Software Guide

Fnovdocx (en) 10 M
arch 2008
FSetting and Clearing Granular Locks
This functionality is available for SAP systems that support the concept of granular locks via the SUSR_BAPI_USER_LOCK and SUSR_BAPI_USER_UNLOCK functions. These locks relate to the account locking mechanisms that are available from the Central System of an SAP Central User Administration (CUA) environment.
This functionality is only available through the SAP User Management driver if the BAPI functions are configured to be a Remote-Enabled Module. This is done via an attribute setting in the SAP Function Builder transaction (SE37) and must be performed by an authorized administrator.
The driver can set or clear the supported lock types by using two pseudo-attributes called SETGRANULARLOCKS and CLEARGRANULARLOCKS.
The supported lock types for SETGRANULARLOCKS are:
LOCK_LOCAL
LOCK_GLOBAL
The supported lock types for CLEARGRANULARLOCKS are:
LOCK_LOCAL
LOCK_GLOBAL
LOCK_WRONG_LOGON
To set or clear a particular lock, simply use a value of X or x for the desired lock type value. Any unspecified lock type sets to a value of ‘ ’, which implies the lock type is not set or cleared.
NOTE: It is not valid to use these pseudo-attributes in a <remove-value> element.
F.1 Examples//// Example - Set Local Lock on User//<modify-attr attr-name="SETGRANULARLOCKS">
<add-value><value type="structured">
<component name="LOCK_LOCAL">X</component></value>
</add-value></modify-attr>
//// Example - Set Local and Global Locks on User
Setting and Clearing Granular Locks 137

138 Novell
novdocx (en) 10 March 2008
//<modify-attr attr-name="SETGRANULARLOCKS">
<add-value><value type="structured">
<component name="LOCK_LOCAL">X</component><component name="LOCK_GLOBAL">X</component>
</value></add-value>
</modify-attr>
//// Example - Clear Local and Wrong Logon Locks on User//<modify-attr attr-name="CLEARGRANULARLOCKS">
<add-value><value type="structured">
<component name="LOCK_LOCAL">X</component><component name="LOCK_WRONG_LOGON">X</component>
</value></add-value>
</modify-attr>
Identity Manager Driver 3.5.1 for User Management of SAP Software Guide

Gnovdocx (en) 10 M
arch 2008
GDriver BAPIs
Table G-1 contains a list of the BAPIs used by the driver.
Table G-1 Driver BAPIs
BAPI Name Description
BAPI_PDOTYPES_GET_DETAILEDLIST Used to obtain lists and minimal detailed information for SAP USER objects and other specified business object types.
BAPI_USER_ACTGROUPS_ASSIGN Used to assign the Activity Groups (Roles) to SAP USER objects in a non-CUA landscape.
BAPI_USER_ACTGROUPS_DELETE Used to delete the Activity Groups (Roles) from SAP USER objects in a non-CUA landscape.
BAPI_USER_PROFILES_ASSIGN Used to assign Profiles to SAP USER objects in a non-CUA landscape.
BAPI_USER_PROFILES_DELETE Used to delete Profiles from SAP USER objects in a non-CUA landscape.
BAPI_USER_CHANGE Used to modify SAP USER object attributes (fields, structures, and general tables) and non-persistent passwords.
BAPI_USER_CREATE1 Used to create a new SAP USER object.
BAPI_USER_DELETE Used to delete an SAP USER object.
BAPI_USER_GETDETAIL Used to read the current data field values, structures, and general table attributes of an SAP USER object.
BAPI_ADDRESSORG_GETDETAIL Used to read the Company Address attributes of an SAP USER object.
BAPI_USER_LOCK Used to lock an SAP USER object account. On a CUA Central system this is a global lock. On a CUA Child system or on a non-CUA system, this is a local lock.
BAPI_USER_UNLOCK Used to unlock an SAP USER object account. On a CUA Central system this is a global lock. On a CUA Child system or on a non-CUA system this is a local lock.
Driver BAPIs 139

140 Novell
novdocx (en) 10 March 2008
SUSR_BAPI_USER_LOCK Used to set granular locks on an SAP USER object account. The granular lock types available are LOCK_LOCAL and LOCK_GLOBAL.
By default, this BAPI is not a Remote-Enabled Module and is thus not accessible to the driver. An ABAP developer must modify the Processing Type attribute of the BAPI on the target SAP system. This is accomplished via the SAP Function Builder (Transaction SE37).
SUSR_BAPI_USER_UNLOCK Used to clear granular locks on an SAP USER object account. The granular lock types available are LOCK_LOCAL, LOCK_GLOBAL, and LOCK_WRONG_LOGON.
By default, this BAPI is not a Remote-Enabled Module and is thus not accessible to the driver. An ABAP developer must modify the Processing Type attribute of the BAPI on the target SAP system. This is accomplished via the SAP Function Builder (Transaction SE37).
SUSR_USER_CHANGE_PASSWORD_RFC Used to set a persistent password for an SAP USER object.
BAPI_USER_LOCACTGROUPS_ASSIGN Used to assign client-specific Activity Groups (Roles) to SAP USER objects in a CUA landscape.
BAPI_USER_LOCACTGROUPS_READ Used to read the current client-specific Activity Groups (Roles) assignments of SAP USER objects in a CUA landscape.
BAPI_USER_LOCACTGROUPS_DELETE Used to delete the client-specific Activity Groups (Roles) assignments from SAP USER objects in a CUA landscape.
BAPI_USER_LOCPROFILES_ASSIGN Used to assign client-specific Profiles to SAP USER objects in a CUA landscape.
BAPI_USER_LOCPROFILES_READ Used to read the current client-specific Profile assignments of SAP USER objects in a CUA landscape.
BAPI_USER_LOCPROFILES_DELETE Used to delete the client-specific Profile assignments from SAP USER objects in a CUA landscape.
BAPI_USER_CLONE Sent from the SAP ALE subsystem to communicate SAP-initiated changes of USER objects to the driver Publisher channel.
BAPI_COMPANY_CLONE Sent from the SAP ALE subsystem to communicate SAP-initiated changes of Company Address information to the driver Publisher channel.
BAPI Name Description
Identity Manager Driver 3.5.1 for User Management of SAP Software Guide