Instructables.com - Hand Blown Glass Ornaments
18
http://www.instructables.com/id/Hand-Blown-Glass-Ornaments/ Home Sign Up! Explore Community Submit All Art Craft Food Games Green Home Kids Life Music Offbeat Outdoors Pets Photo Ride Science Tech Hand Blown Glass Ornaments by StumpChunkman on November 6, 2009 Table of Contents License: Attribution Non-commercial Share Alike (by-nc-sa) . . . . . . . . . . . . . . . . . . . . . . . . . . . . . . . . . . . . . . . . . . . . . . . . . . . . . . . . . . . . . . . . . . . . . . . . . . . . . 2 Intro: Hand Blown Glass Ornaments . . . . . . . . . . . . . . . . . . . . . . . . . . . . . . . . . . . . . . . . . . . . . . . . . . . . . . . . . . . . . . . . . . . . . . . . . . . . . . . . . . . . . . . . . . . . . . 2 step 1: Materials . . . . . . . . . . . . . . . . . . . . . . . . . . . . . . . . . . . . . . . . . . . . . . . . . . . . . . . . . . . . . . . . . . . . . . . . . . . . . . . . . . . . . . . . . . . . . . . . . . . . . . . . . . . . . 2 step 2: Preperations... . . . . . . . . . . . . . . . . . . . . . . . . . . . . . . . . . . . . . . . . . . . . . . . . . . . . . . . . . . . . . . . . . . . . . . . . . . . . . . . . . . . . . . . . . . . . . . . . . . . . . . . . . 5 step 3: Get a pipe. Gather some glass! . . . . . . . . . . . . . . . . . . . . . . . . . . . . . . . . . . . . . . . . . . . . . . . . . . . . . . . . . . . . . . . . . . . . . . . . . . . . . . . . . . . . . . . . . . . . . 6 step 4: Add color! . . . . . . . . . . . . . . . . . . . . . . . . . . . . . . . . . . . . . . . . . . . . . . . . . . . . . . . . . . . . . . . . . . . . . . . . . . . . . . . . . . . . . . . . . . . . . . . . . . . . . . . . . . . . . 8 step 5: Shape your glass in preperation to pop a bubble! . . . . . . . . . . . . . . . . . . . . . . . . . . . . . . . . . . . . . . . . . . . . . . . . . . . . . . . . . . . . . . . . . . . . . . . . . . . . . . . 9 step 6: Pop that bubble! . . . . . . . . . . . . . . . . . . . . . . . . . . . . . . . . . . . . . . . . . . . . . . . . . . . . . . . . . . . . . . . . . . . . . . . . . . . . . . . . . . . . . . . . . . . . . . . . . . . . . . . . 10 step 7: Shape Your Ornament . . . . . . . . . . . . . . . . . . . . . . . . . . . . . . . . . . . . . . . . . . . . . . . . . . . . . . . . . . . . . . . . . . . . . . . . . . . . . . . . . . . . . . . . . . . . . . . . . . . 11 step 8: Knock it off and add a bit (Part One) . . . . . . . . . . . . . . . . . . . . . . . . . . . . . . . . . . . . . . . . . . . . . . . . . . . . . . . . . . . . . . . . . . . . . . . . . . . . . . . . . . . . . . . . . 13 step 9: Knock it off and add a bit (Part Two) . . . . . . . . . . . . . . . . . . . . . . . . . . . . . . . . . . . . . . . . . . . . . . . . . . . . . . . . . . . . . . . . . . . . . . . . . . . . . . . . . . . . . . . . . 14 step 10: Put it away and bask in your glory! . . . . . . . . . . . . . . . . . . . . . . . . . . . . . . . . . . . . . . . . . . . . . . . . . . . . . . . . . . . . . . . . . . . . . . . . . . . . . . . . . . . . . . . . . 16 Related Instructables . . . . . . . . . . . . . . . . . . . . . . . . . . . . . . . . . . . . . . . . . . . . . . . . . . . . . . . . . . . . . . . . . . . . . . . . . . . . . . . . . . . . . . . . . . . . . . . . . . . . . . . . . . . 17 Advertisements . . . . . . . . . . . . . . . . . . . . . . . . . . . . . . . . . . . . . . . . . . . . . . . . . . . . . . . . . . . . . . . . . . . . . . . . . . . . . . . . . . . . . . . . . . . . . . . . . . . . . . . . . . . . . . . 17 Comments . . . . . . . . . . . . . . . . . . . . . . . . . . . . . . . . . . . . . . . . . . . . . . . . . . . . . . . . . . . . . . . . . . . . . . . . . . . . . . . . . . . . . . . . . . . . . . . . . . . . . . . . . . . . . . . . . . . 17
Transcript of Instructables.com - Hand Blown Glass Ornaments

http://www.instructables.com/id/Hand-Blown-Glass-Ornaments/
Home Sign Up! Explore Community Submit
All Art Craft Food Games Green Home Kids Life Music Offbeat Outdoors Pets Photo Ride Science Tech
Hand Blown Glass Ornamentsby StumpChunkman on November 6, 2009
Table of Contents
License: Attribution Non-commercial Share Alike (by-nc-sa) . . . . . . . . . . . . . . . . . . . . . . . . . . . . . . . . . . . . . . . . . . . . . . . . . . . . . . . . . . . . . . . . . . . . . . . . . . . . . 2
Intro: Hand Blown Glass Ornaments . . . . . . . . . . . . . . . . . . . . . . . . . . . . . . . . . . . . . . . . . . . . . . . . . . . . . . . . . . . . . . . . . . . . . . . . . . . . . . . . . . . . . . . . . . . . . . 2
step 1: Materials . . . . . . . . . . . . . . . . . . . . . . . . . . . . . . . . . . . . . . . . . . . . . . . . . . . . . . . . . . . . . . . . . . . . . . . . . . . . . . . . . . . . . . . . . . . . . . . . . . . . . . . . . . . . . 2
step 2: Preperations... . . . . . . . . . . . . . . . . . . . . . . . . . . . . . . . . . . . . . . . . . . . . . . . . . . . . . . . . . . . . . . . . . . . . . . . . . . . . . . . . . . . . . . . . . . . . . . . . . . . . . . . . . 5
step 3: Get a pipe. Gather some glass! . . . . . . . . . . . . . . . . . . . . . . . . . . . . . . . . . . . . . . . . . . . . . . . . . . . . . . . . . . . . . . . . . . . . . . . . . . . . . . . . . . . . . . . . . . . . . 6
step 4: Add color! . . . . . . . . . . . . . . . . . . . . . . . . . . . . . . . . . . . . . . . . . . . . . . . . . . . . . . . . . . . . . . . . . . . . . . . . . . . . . . . . . . . . . . . . . . . . . . . . . . . . . . . . . . . . . 8
step 5: Shape your glass in preperation to pop a bubble! . . . . . . . . . . . . . . . . . . . . . . . . . . . . . . . . . . . . . . . . . . . . . . . . . . . . . . . . . . . . . . . . . . . . . . . . . . . . . . . 9
step 6: Pop that bubble! . . . . . . . . . . . . . . . . . . . . . . . . . . . . . . . . . . . . . . . . . . . . . . . . . . . . . . . . . . . . . . . . . . . . . . . . . . . . . . . . . . . . . . . . . . . . . . . . . . . . . . . . 10
step 7: Shape Your Ornament . . . . . . . . . . . . . . . . . . . . . . . . . . . . . . . . . . . . . . . . . . . . . . . . . . . . . . . . . . . . . . . . . . . . . . . . . . . . . . . . . . . . . . . . . . . . . . . . . . . 11
step 8: Knock it off and add a bit (Part One) . . . . . . . . . . . . . . . . . . . . . . . . . . . . . . . . . . . . . . . . . . . . . . . . . . . . . . . . . . . . . . . . . . . . . . . . . . . . . . . . . . . . . . . . . 13
step 9: Knock it off and add a bit (Part Two) . . . . . . . . . . . . . . . . . . . . . . . . . . . . . . . . . . . . . . . . . . . . . . . . . . . . . . . . . . . . . . . . . . . . . . . . . . . . . . . . . . . . . . . . . 14
step 10: Put it away and bask in your glory! . . . . . . . . . . . . . . . . . . . . . . . . . . . . . . . . . . . . . . . . . . . . . . . . . . . . . . . . . . . . . . . . . . . . . . . . . . . . . . . . . . . . . . . . . 16
Related Instructables . . . . . . . . . . . . . . . . . . . . . . . . . . . . . . . . . . . . . . . . . . . . . . . . . . . . . . . . . . . . . . . . . . . . . . . . . . . . . . . . . . . . . . . . . . . . . . . . . . . . . . . . . . . 17
Advertisements . . . . . . . . . . . . . . . . . . . . . . . . . . . . . . . . . . . . . . . . . . . . . . . . . . . . . . . . . . . . . . . . . . . . . . . . . . . . . . . . . . . . . . . . . . . . . . . . . . . . . . . . . . . . . . . 17
Comments . . . . . . . . . . . . . . . . . . . . . . . . . . . . . . . . . . . . . . . . . . . . . . . . . . . . . . . . . . . . . . . . . . . . . . . . . . . . . . . . . . . . . . . . . . . . . . . . . . . . . . . . . . . . . . . . . . . 17

http://www.instructables.com/id/Hand-Blown-Glass-Ornaments/
License: Attribution Non-commercial Share Alike (by-nc-sa)
Intro: Hand Blown Glass OrnamentsI've been blowing glass for a very short amount of time, and figured it would be nice to show a simple tutorial on making something easy like a Christmas ornament, thatyou can give to anyone you wanted.
I'm currently taking this glass blowing class at San Francisco State University, it's offered as part of their ' extended learning' program (which means you have to pay for itseparate from university fees (i.e. they make more money from it), and it also allows you to take classes while not being a member of the student body(which is reallycool)).
The most difficult part of learning how to, and actually blowing glass is finding a place to do it. You can look in the yellow pages, search google or try putting your zipcode into this search in order to try to find hot shops in your local area. There's usually someone blowing glass in most major cities (and quite a few non-major ones).
When you find a place with the tools, contact them and see how much it would cost to stop by and use their equipment. Several places I've seen only require you take abasic class at their centers in order to come back and rent shop time.
step 1: MaterialsFirst and foremost, you're going to need a glass furnace. If you have this, you can find a work around for pretty much every other tool (except for a blow pipe), but withoutmolten glass, there is no blowing of glass.
The second most important thing you need is a blowing pipe. You can see punties and blow pipes in one of the images below, punties don't have a hole through thecenter of the pipe while blow pipes too.
Other tools that will come in handy:Annealer (an oven to cool off the glass)Gloryhole (for warming up the glass if it gets cool, you can use the furnace if you don't have one)JacksTweezersSheersDiamond SheersWood Blocks (Not needed, but used for shaping the glass into a spherical design. This can also be accomplished on a marver, with jacks or just by holding the blow pipecorrectly while rotating it)Marver (Not really needed. For our purposes, we placed the Frit on the marver to pick it up.)Frex (Also called ceramic blanket)(If you'd prefer not to use this, find a similar materical that won't absorb the heat from your piece and also won't catch fire, like Kevlar)Mold (for support)Frit (powdered colored glass)Ornament holder (a stick with a piece of wire sticking off the end of it, for picking up the ornament)Sunglasses (looking at bright lights hurts the eyes)
All of these tools can help, but depending on what you're doing, and what designs you want to give your ornament, you may not need to use all of them.

http://www.instructables.com/id/Hand-Blown-Glass-Ornaments/
Image Notes1. Diamond Shears2. Shears3. Tweezers4. Molds5. Frex6. Stool7. Have all your tools at the ready before you get to this stage.
Image Notes1. Tools all ready to go and together for when I need them.2. Ornament holder, waiting for his time to shine!3. Everything is right next to the annealer in order to speed up the process.
Image Notes1. Blow Pipes2. Punty Rods
Image Notes1. Buckets of water, containing wood blocks2. Workbench3. Tools

http://www.instructables.com/id/Hand-Blown-Glass-Ornaments/
Image Notes1. Glory Hole2. Pipe Holder to keep your hands cool (and away from the Glory Hole)3. Blast Shield (Keeps a lot of the heat from the glory hole away from you)
Image Notes1. Furnace
Image Notes1. Marver
Image Notes1. Annealer2. Annealer
Image Notes1. Opened annealer
Image Notes1. Mold!

http://www.instructables.com/id/Hand-Blown-Glass-Ornaments/
2. A bunch of Frex in a box.
Image Notes1. Hollowed out space where the ornament will sit snugly.2. Frex!3. Mold!
Image Notes1. Ornament holder. Note piece of wire sticking off the end of the piece ofwood.
Image Notes1. Piece of wire sticking off the end of the wood keeps your hands clear of burningwhen placing things into the annealer.
Image Notes1. Frit
step 2: Preperations...Before you start gathering glass and blowing into glass, there's a few things you're going to want to set up first.
One is the frex/mold combo. When working with frex, make sure you wash your hands immediately after use. It's very bad for just about everything. On that note, frit isalso very bad (it's powdered glass), you don't want to breathe it in or get it on yourself. Make sure your area is well ventilated, and take proper care whenever usinghazardous materials. It's good practice to wear a respirator when setting up your frit and frex.
First you want to set a stool, or other higher up object near the annealer for you to work at before you put your piece away. Second, you want to line that mold with thefrex so that when you tap your ornament off it rests ever so gently in the frex.
Frex doesn't soak up any heat from the glass, or cool the glass off in any spots, which lets you add some final detail to your ornament, without it breaking from atemperature difference.

http://www.instructables.com/id/Hand-Blown-Glass-Ornaments/
Image Notes1. Hollowed out space where the ornament will sit snugly.2. Frex!3. Mold!
Image Notes1. Mold.2. Mold.3. Mold!4. Yet another mold (the one that seemed best to suit my needs).
Image Notes1. Mold!2. A bunch of Frex in a box.
Image Notes1. Starting to form the Frex around the Mold.
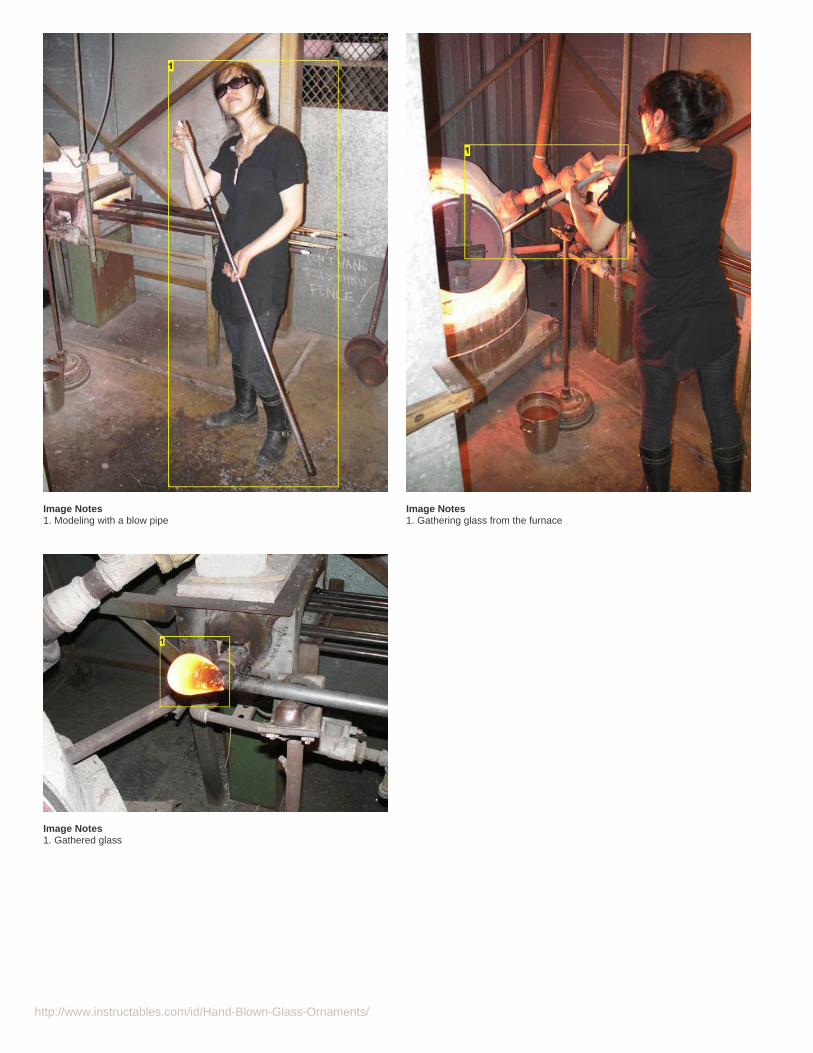
step 3: Get a pipe. Gather some glass!Once you've managed to acquire all the tools, the most difficult part of this instructable is finished. From here on out, everything is pretty easy.
note: Whenever holding a blowpipe or punty you should always be rotating it in your hand. When you stop rotating the pipe, the glass starts to tip to one side. The onlyway to keep everything on center and uniform is to rotate your pipe, constantly!
Grab a blow pipe off a pipe warmer. Molten glass doesn't want to stick to cold metal. If you don't have a pipe warmer, let the tip of the pipe sit in the door of the furnacefor about a minute (until it starts to glow red). Warm metal + molten glass = what we want at this stage.
Place your blow pipe into the furnace horizontally, so the end of the pipe is about in the middle of the furnace. As you slide the pipe into the furnace, move your handsback to the far opposite end of the pipe. Slowly lower the tip of your pipe toward the molten glass while looking for a reflection on the surface of the glass.
The light is so bright in the furnace it's going to be really difficult to tell where the glass is. By looking directly below your pipe for it's reflection you have a much easiertime of figuring out exactly where it is.
As you start to dip the tip of the pipe into the glass, (make sure you're spinning the pipe!), stop lowering it when the glass covers around an inch of the tip of your pipe. Turn your pipe for two full rotations, and the tip your pipe back horizontal (never stop spinning).
Once you're horizontal, you can start backing your pipe back out. Close the door when you've made it out of the furnace, and congratulate yourself on a good gather.
http://www.instructables.com/id/Hand-Blown-Glass-Ornaments/
Image Notes1. Modeling with a blow pipe
Image Notes1. Gathering glass from the furnace
Image Notes1. Gathered glass

http://www.instructables.com/id/Hand-Blown-Glass-Ornaments/
step 4: Add color!When gathering frit (your powdered color), you want to make sure you have an even rotation of your pipe, and tap onto the color at even intervals.
When you've got enough frit on your glass, place the glass tip into the glory hole in order to heat the frit up to the same temperature as the molten glass.
Once your frit and your glass are together and the same temperature, it's time to move on!
Image Notes1. Reheating the glass in the Glory Hole

http://www.instructables.com/id/Hand-Blown-Glass-Ornaments/
Image Notes1. Another shot of reheating the glass.
step 5: Shape your glass in preperation to pop a bubble!Now that you have your glass, with a color, it's time to put a bubble in it, but first, we have to make sure everything is centered. If anything is off center, the bubble isliable to blow out in all manner of awkward or distorted shapes. The goal in blowing this out is to have a nice smooth circle we can use to shape the final object from. Since our final goal was a circle, this made it a bit easier.
Shape your glass so that the molten blob is even all around the pipe. and the portion that is hanging off the end of the pipe is centered. Like checking pool stick on a pooltable for straightness, you can lay your blow pipe on pipe rollers or a marver (with the glass hanging off the end of the table) and roll it, while watching the tip to see if itwaves up and down as you spin it. If the tip waves, things aren't on center. (it's a good practice to do this before you start working to ensure the pipe you're working withis straight). If you roll your pipe, and the glass hanging off the end rolls even, everything is lined up properly.
To get the piece in shape here, a wood block was used. Wood blocks remain in water when not in use. Leaving them out of the water causes warping.
Sitting at the work bench, rolling your pipe steadily, take a wood block out of your bucket of water with your right hand (dump out any water in the block - you want itdamp, not pooling). Roll pipe with your left hand (if you're left handed you might have to rearrange the glass shop as most are made for right handed people). Place thewood block horizontally next to your piece, lining it up before you make contact.
When you're ready, apply a soft, even pressure with the wood block on the glass. Keep the glass centered on the wood block, and the wood block horizontal, alwaysrolling the pipe. As you roll, move the wood block with the pipe. If done right, you'll have a nice rounded smoothed piece of glass. Don't push to hard your you'll push allyour glass back on the pipe, and you don't want that.
If your glass loses too much heat while you're blocking, take it back to the glory hole and heat it back up!

http://www.instructables.com/id/Hand-Blown-Glass-Ornaments/
Image Notes1. Wood block being used to shape the glass2. Glass
Image Notes1. Glass shaped with the wood block
step 6: Pop that bubble!Now that everything is on center and evenly distributed, it's time to pop a bubble in your glass.
This will take some practice. The easiest way to practice is to clog your pipe first.
To clog your pipe, dip it into glass, and dip your glass into water. The glass will harden on the inside of the pipe and you'll no longer be able to blow through it (this isfixable). With the pipe clogged, you can see if you're blowing correctly.
To practice blowing into the clogged blow pipe, hold pipe with one hand near the opposite end of where the glass will be gathered, in a way that you'll be able to put yourthumb over the end to trap air inside when you need to. Place the other hand halfway down the pipe to support it (this hand will be used to rotate the pipe while you'reblowing).
Have your thumb ready to cover the only hole that air can escape from on the pipe. Blow into that hole with some force, and cover it up with your thumb fast enough totrap air inside (this is the part that needs practice). It might be easiest to place your thumb in your mouth while blowing, and cover the pipe mid-exhale. To see if you didit correctly, place the end of the pipe with your thumb covering it next to your ear. While it's next to your ear, let off your thumb. You should hear an expelling of air fromthe pipe. If there's no exhalation of air, you need to keep practicing.
To pop your bubble, follow the same steps as in practice, but this time it's way more important to make sure you're spinning your pipe constantly, or you're bubble isgoing to be off center and awkward.
While you're thumb is capping the end of the pipe, keep an eye on your gather! You're bubble is going to show up on the other side soon, and if it blows out too much,you're going to have to start over. It's better to do less then more, you can always blow more air in later. When you see the bubble start to form, stop capping the end ofthe pipe. That is to say, take your thumb off the end of the pipe as soon as you start to see a bubble.
Congrats, you've popped a bubble!
Image Notes1. Blowing into the pipe, about the cap the end with her thumb.2. Resting the punty for ease of use
http://www.instructables.com/id/Hand-Blown-Glass-Ornaments/
Image Notes1. Watching the glass for the bubble to form. When it gets where she wants, she'lltake her thumb off the other end.2. This end is capped with her thumb. The air she trapped inside will try to find away out, and the only way left is through the glass.3. Bubble forming in the glass.
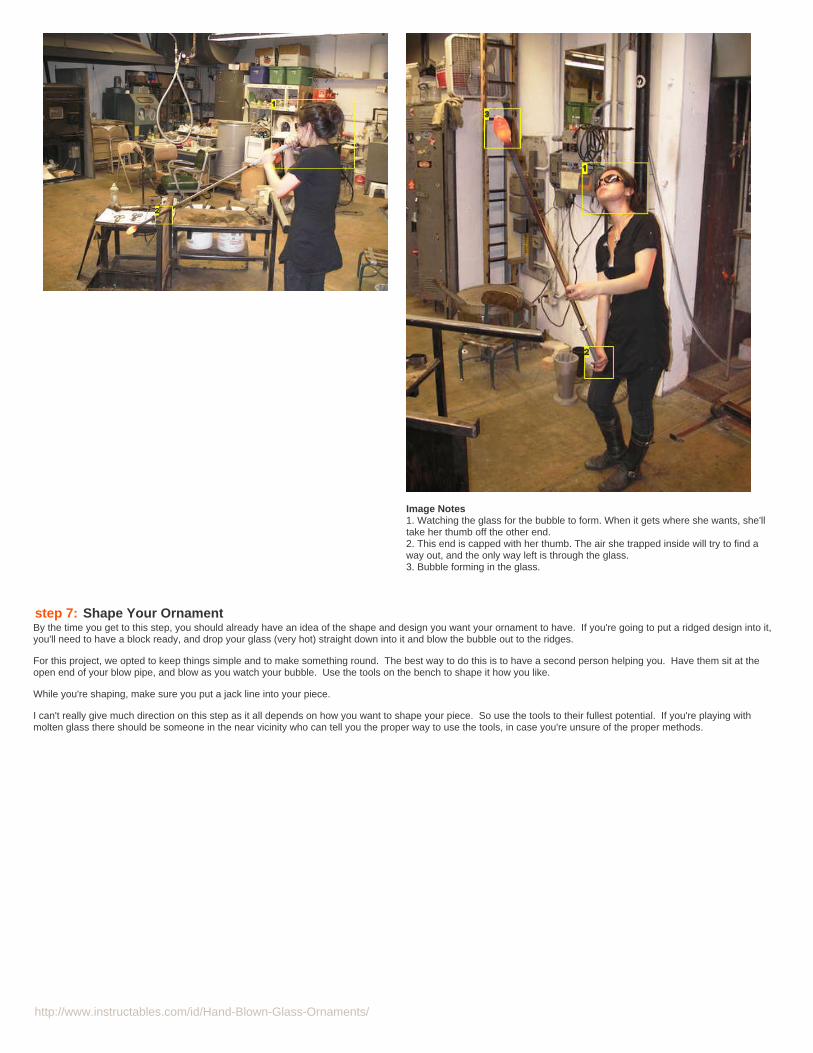
step 7: Shape Your OrnamentBy the time you get to this step, you should already have an idea of the shape and design you want your ornament to have. If you're going to put a ridged design into it,you'll need to have a block ready, and drop your glass (very hot) straight down into it and blow the bubble out to the ridges.
For this project, we opted to keep things simple and to make something round. The best way to do this is to have a second person helping you. Have them sit at theopen end of your blow pipe, and blow as you watch your bubble. Use the tools on the bench to shape it how you like.
While you're shaping, make sure you put a jack line into your piece.
I can't really give much direction on this step as it all depends on how you want to shape your piece. So use the tools to their fullest potential. If you're playing withmolten glass there should be someone in the near vicinity who can tell you the proper way to use the tools, in case you're unsure of the proper methods.

http://www.instructables.com/id/Hand-Blown-Glass-Ornaments/
Image Notes1. A good jack line2. Final ornament shape3. Jacks
Image Notes1. Ready to blow at a moments notice, and keeping an eye on his partner in caseanything comes up2. Using a block to get the desired shape she wants3. Keeping a close eye on her piece to make sure nothing goes out of whack4. Always rotating! Nice even rotations.
Image Notes1. Sadly I wasn't able to take pictures of myself blowing, so this is a differentpiece, however the directions apply to any piece you're making.2. Making sure nothing blows out.3. Blowing. While paying attention to partner and piece. Ready to blow harder,softer or stop as soon as needed.4. Always rotating!
Image Notes1. Shaping the bottom of the piece with the back of the jacks. Cools the piecewhile the sides blow out. (again, this picture is of a different piece, so differenttechniques are being employed).2. Always rotating.3. Still blowing because she hasn't told him to stop.

http://www.instructables.com/id/Hand-Blown-Glass-Ornaments/
Image Notes1. Ornament with jack line being finished2. The jack line gets put in with the jacks
Image Notes1. Final adjustments, ensuring the shape is perfect, the jack line is straight andeverything is how she wants it.
step 8: Knock it off and add a bit (Part One)This step happens in two parts.
First you have to knock your ornament off into the prepared mold.At the same time, someone should be gathering glass to bring you a bit.(A bit is simple glass gathered on the end of a punty rod, brought straight from the furnace to the person working.) On occasion the person may request shaping it acertain way before you bring it. If you shape it, make sure you reheat it, bits should always be brought very, very hot.
There's two easy ways to knock off your ornament.1) You can use the diamond sheers. While holding your blow pipe vertically, with the piece facing down over your prepared frax. Place the diamond shears around thejack line on the piece and close until it hits the glass. Open them up a bit, turn the pipe a bit, and close again until it hits the glass. Keep repeating this process until theshears have touched 360 degrees around the jack line. Then take the diamond sheers off, and use the back end of them to smack the rod of the blow pipe. This shouldknock off your piece.
2) You can also use the tweezers. Gather some water in your tweezers, and put a few drops on your jack line (ensure you don't get any water on your ornament or it willbe ruined). Place your blow vertically, so the ornament is directly over your frax. With the back end of your tweezers, tap the blow pipe lightly and the ornament shouldpop off onto its frax blanket.
The point of what you're doing here is making a temperature difference. The diamond shears are so cold that when you touch your piece with them, it creates a fracturepoint on that line because it was cooled to fast. By doing this all the way around the jack line, you've created a stress fracture entirely around your piece exactly whereyou want it to be. The water works on the same principle, but is much more effective, so you should be more cautious when using it (you'll be able to see your piececracking when pouring water on it).

http://www.instructables.com/id/Hand-Blown-Glass-Ornaments/
Image Notes1. Holding the blow pipe vertically above the frex. Getting ready to tap on the pipe in this area to knock the ornament off into the frex below.2. Ornament ready to fall below into the frex.3. The tool to put the ornament away when it's finished. Have everything ready to go so you're not wasting time looking for things while you're glass is cooling.
step 9: Knock it off and add a bit (Part Two)With that finished, you're ready to add your bit.
If you don't all ready have them in hand, grab whatever tools you're using. I find either a combination of diamond shears and tweezers or shears and tweezers to be themost useful. Work with whatever you're most comfortable with.
Get down eye level with your piece, and have your partner hold the punty vertically over your piece. Grab the punty with the tweezers and pull it down so that the glasscoming off the end touches your piece where it broke off the blow pipe (The goal of this is to cover up the sharp corners that were left when you knocked the piece off,and giving you a loop to hang the ornament from the tree).
Let the glass completely cover the jagged part of your ornament and then pull the punty up away from your piece. You might have to hold your piece down with theshears or diamond cutters while pulling the punty away.
With the punty a few inches away from your piece (find the distance that works best for you...not too far, not too close), you want to grab the glass (closer to yourornament then the punty) with the shears or or diamond shears and pull it up and stick it to the glass on the punty. If you touch hot glass to other hot glass it will stickquite well. Since we don't want too fat a loop we need to thin out the amount of glass that is currently attached to our ornament. The way you do this, is to grab the hotglass near the ornament and pull it up and stick it to the glass by the punty. Continue to do this until the glass on your ornament is pretty thin and you think it would makea nice loop.
Use the shears or diamond shears to cut the glass, and have the person with the punty move away. Grab near the end of the glass with the tweezers and loop it aroundand touch the end of the glass with the hot glass toward the base. This should create a small hoop that you'll be able to tie string to, attach a metal hook to, or usewhatever other means you like to attach it to your tree.

http://www.instructables.com/id/Hand-Blown-Glass-Ornaments/
Image Notes1. Diamond Shears2. Shears3. Tweezers4. Molds5. Frex6. Stool7. Have all your tools at the ready before you get to this stage.
Image Notes1. Punty held vertically over ornament.2. Shears being used to hold the punty (when using shears, you should alwaysgrab the glass at the end of the pipe in order not to dull the shears - with diamondshears and tweezers, you can hold the pipe away from the glass).3. Tweezers holding down the ornament, while pipe is being pulled away.4. Bit placed on open end of ornament.
Image Notes1. Rotated around to touch back on itself. when down right, there will be no sharpedges for anyone to catch themselves on.2. Tweezers

http://www.instructables.com/id/Hand-Blown-Glass-Ornaments/
Image Notes1. Snipped the bit when the glass was thin enough coming off the ornament.2. Next, this will be rotated around to touch below...3. The tip above will be rotated around and touched down here at the base.
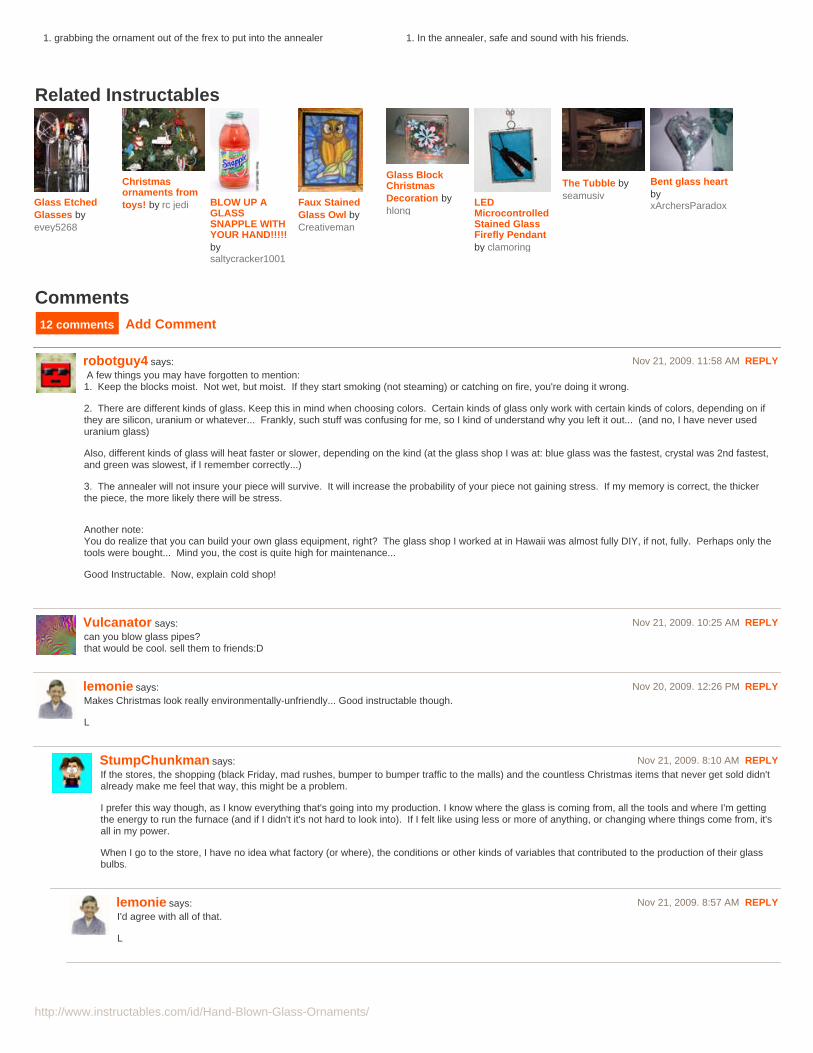
step 10: Put it away and bask in your glory!Your ornament is finished! But in order for it to last, you need to put it into an annealer.
The annealer will cool your piece slowly. If you cool it too quickly (by leaving it sitting too long at room temperature), you'll create stress fractures throughout your piece.While it might stay together if you don't put it in the annealer, it will be far more fragile, and the slightest thing could cause it to explode at a moments notice.
So grab your stick tool and hook the loop on the ornament. Open (or have someone open) the annealer door, and gently place your ornament inside. Once inside, closethe door. Once the annealer temperature is sent down, you'll have your very own hand made glass ornament!
There are many videos on youtube and other sites of glass blowing being performed. If it sounds interesting, I suggest checking them out, and searching your local areato see if there are any glass shops you could check out. A lot of places have live demonstrations you can sit in and watch as some amazing things are made (hopefully,they give you ideas of things that you can incorporate into your own work)!
Image Notes Image Notes
http://www.instructables.com/id/Hand-Blown-Glass-Ornaments/
1. grabbing the ornament out of the frex to put into the annealer 1. In the annealer, safe and sound with his friends.
Related Instructables
Glass EtchedGlasses byevey5268
Christmasornaments fromtoys! by rc jedi BLOW UP A
GLASSSNAPPLE WITHYOUR HAND!!!!!bysaltycracker1001
Faux StainedGlass Owl byCreativeman
Glass BlockChristmasDecoration byhlong
LEDMicrocontrolledStained GlassFirefly Pendantby clamoring
The Tubble byseamusiv
Bent glass heartbyxArchersParadox
Advertisements
Comments12 comments Add Comment
robotguy4 says: Nov 21, 2009. 11:58 AM REPLY A few things you may have forgotten to mention:1. Keep the blocks moist. Not wet, but moist. If they start smoking (not steaming) or catching on fire, you're doing it wrong.
2. There are different kinds of glass. Keep this in mind when choosing colors. Certain kinds of glass only work with certain kinds of colors, depending on ifthey are silicon, uranium or whatever... Frankly, such stuff was confusing for me, so I kind of understand why you left it out... (and no, I have never useduranium glass)
Also, different kinds of glass will heat faster or slower, depending on the kind (at the glass shop I was at: blue glass was the fastest, crystal was 2nd fastest,and green was slowest, if I remember correctly...)
3. The annealer will not insure your piece will survive. It will increase the probability of your piece not gaining stress. If my memory is correct, the thickerthe piece, the more likely there will be stress.
Another note:You do realize that you can build your own glass equipment, right? The glass shop I worked at in Hawaii was almost fully DIY, if not, fully. Perhaps only thetools were bought... Mind you, the cost is quite high for maintenance...
Good Instructable. Now, explain cold shop!
Vulcanator says: Nov 21, 2009. 10:25 AM REPLYcan you blow glass pipes?that would be cool. sell them to friends:D
lemonie says: Nov 20, 2009. 12:26 PM REPLYMakes Christmas look really environmentally-unfriendly... Good instructable though.
L
StumpChunkman says: Nov 21, 2009. 8:10 AM REPLYIf the stores, the shopping (black Friday, mad rushes, bumper to bumper traffic to the malls) and the countless Christmas items that never get sold didn'talready make me feel that way, this might be a problem.
I prefer this way though, as I know everything that's going into my production. I know where the glass is coming from, all the tools and where I'm gettingthe energy to run the furnace (and if I didn't it's not hard to look into). If I felt like using less or more of anything, or changing where things come from, it'sall in my power.
When I go to the store, I have no idea what factory (or where), the conditions or other kinds of variables that contributed to the production of their glassbulbs.
lemonie says: Nov 21, 2009. 8:57 AM REPLYI'd agree with all of that.
L
http://www.instructables.com/id/Glass-Block-Chistmas-Decoration/?utm_source=pdf&utm_campaign=related
http://www.instructables.com/id/Glass-Block-Chistmas-Decoration/?utm_source=pdf&utm_campaign=related
http://www.instructables.com/id/Glass-Block-Chistmas-Decoration/?utm_source=pdf&utm_campaign=related

http://www.instructables.com/id/Hand-Blown-Glass-Ornaments/
rimar2000 says: Nov 19, 2009. 7:05 PM REPLYNice work.
What is frex?
StumpChunkman says: Nov 19, 2009. 10:25 PM REPLYI think it might be the slang term (or possibly a proprietary term?) for ceramic blanket. Since everyone in my class calls it that though, it's all I really knowit by.
Here's a link to more details about it though.
rimar2000 says: Nov 20, 2009. 3:26 AM REPLYThanks, very much. We the not-Anglophone have these questions.
kelseymh says: Nov 19, 2009. 4:00 PM REPLYThose studio pictures look vaguely familiar. Did you do this at Public Glass?
You might consider adding links to a few "well known" public glass-blowing facilities, or/and solicit links from the community. At least, tell us where you didyour project :-)
StumpChunkman says: Nov 19, 2009. 4:49 PM REPLYOkay, I added a link in the intro step to where a blow. Public Glass was a good guess!
I thought about adding links to places, but depending on where you live, it's really give and take as to what's nearby, and trying to add links for all themajor cities seemed a bit...much.
I'm not sure if there's a good reference library online with that kind of information, seems like it's something that should be out there. I'll ask around inclass and see if anyone knows of any good places.
kelseymh says: Nov 19, 2009. 4:55 PM REPLYSend them here: http://www.glassblower.info/
Google Is Your Friend :-) That was the third hit putting in "glass blowing" as my search (the first hit was the Wikipedia article :-/).
StumpChunkman says: Nov 19, 2009. 11:58 PM REPLYI searched their site a ton before I gave up and click on the FAQ link. That was the only place I was able to find information about other glassshops. Seems like a really good search, just wish I would have thought to click that link sooner. I didn't want to link their page cause it seemedlike they had a limited amount of information (just a few states). That search seems really good though. Thanks! (and added)