
ゲームツクール!第11回 エディター拡張してみよう
28
ゲゲゲゲゲゲゲ ! ゲ 11 ゲ ゲゲゲゲゲゲゲゲゲゲゲゲ 2015 年 6 年 11 年 FAG Studio
-
date post
30-Jul-2015 -
Category
Technology
-
view
101 -
download
0
Transcript of ゲームツクール!第11回 エディター拡張してみよう
ゲームツクール !第 11回エディタ拡張に入門しよう
2015年 6月 11日FAG Studio
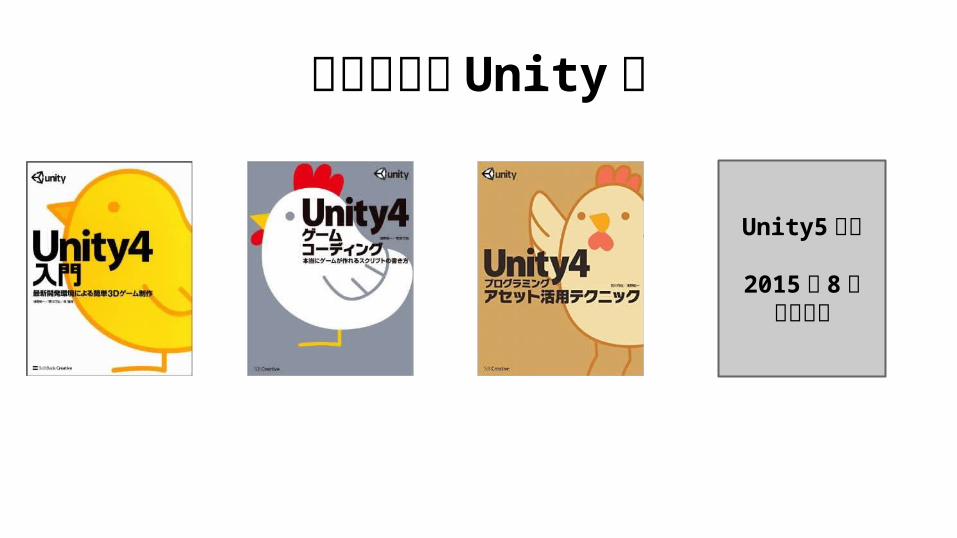
おすすめのUnity本
Unity5入門
2015年 8月発売予定

Unity5入門について
・ Unity5から新しくなった内容に完全対応!!!!
・「はじめて Unityを触る人」を想定してステップバイス テップでゲームを作っていきます。
・Mecanim,uGUIなどのポイントとなる Unityの機能も しっかり解説。
そもそもエディター拡張とは?
Unityでは、通常のデフォルトのエディターを拡張して、自分 (制作 )にあったエディターに拡張することができます。
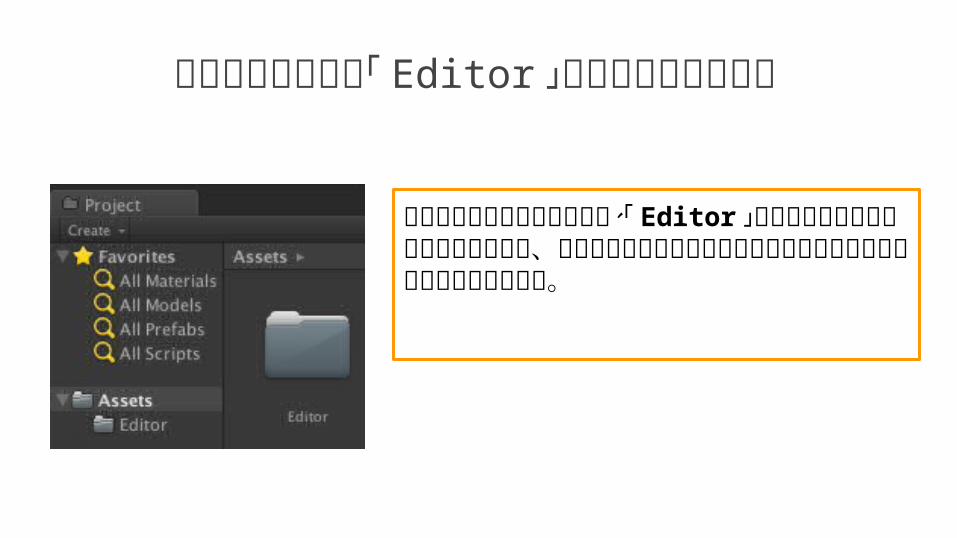
エディター拡張は「 Editor」フォルダーに入れる
エディター拡張をする際には、「 Editor」という特別な名前のフォルダーを作り、その中にエディター拡張用のスクリプトを書いていくようになります。
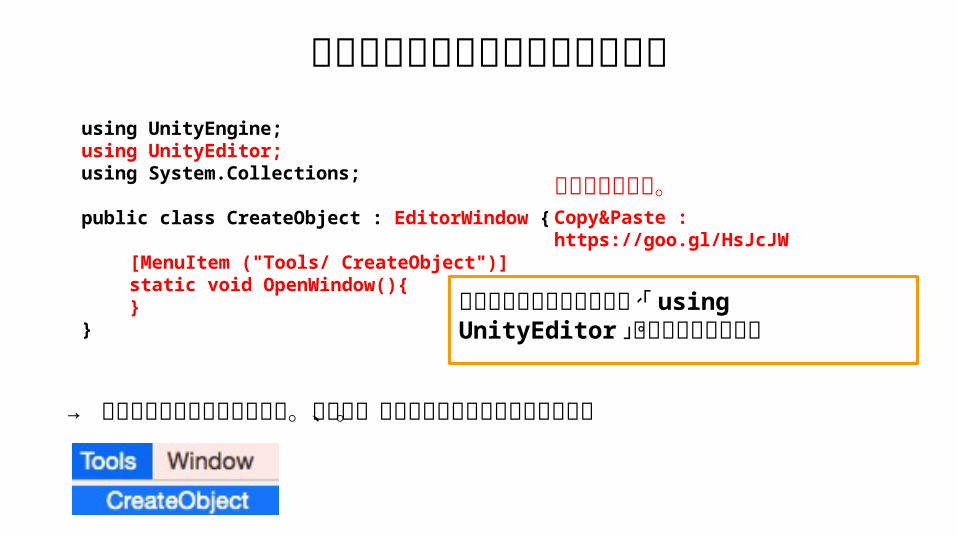
using UnityEngine;using UnityEditor;using System.Collections;
public class CreateObject : EditorWindow {
[MenuItem ("Tools/ CreateObject")] static void OpenWindow(){}
}
→ メニューにこのように出ます。ただし、クリックしても何も起きません。
メニュー欄にメニューを作ります
エディター拡張する際には、「 using UnityEditor」が必須になります。
赤字を追記する。Copy&Paste : https://goo.gl/HsJcJW
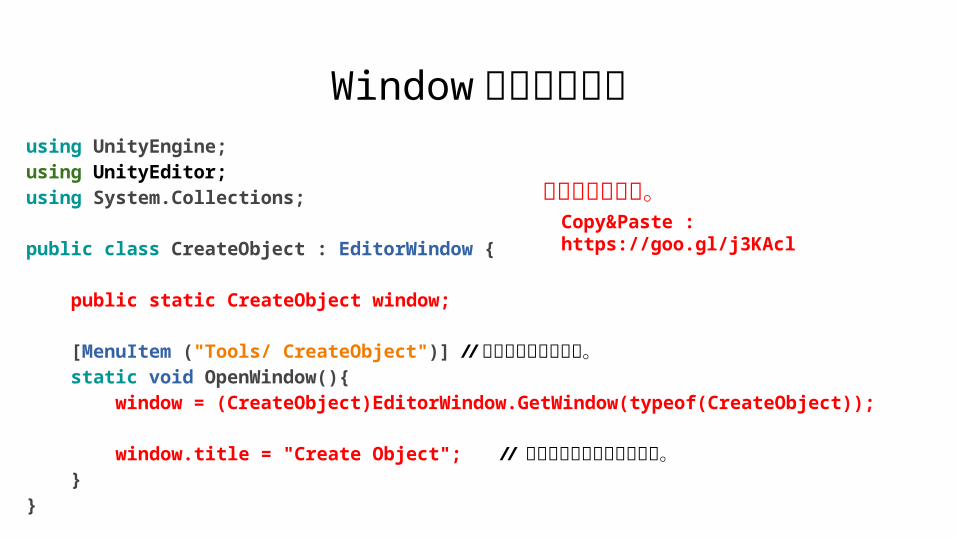
Windowを作成しますusing UnityEngine;using UnityEditor;using System.Collections;
public class CreateObject : EditorWindow {
public static CreateObject window;
[MenuItem ("Tools/ CreateObject")] //メニュー項目を作る。 static void OpenWindow(){ window = (CreateObject)EditorWindow.GetWindow(typeof(CreateObject)); //ウィンドウを作
る。 window.title = "Create Object"; // ウィンドウ名を設定します。 }}
赤字を追記する。Copy&Paste : https://goo.gl/j3KAcl

エディターを作成していきますusing UnityEngine;using UnityEditor;using System.Collections;
public class CreateObject : EditorWindow {
public static CreateObject window;
[MenuItem ("Tools/ CreateObject")] static void OpenWindow(){ window = (CreateObject)EditorWindow.GetWindow(typeof(CreateObject)); window.title = "Create Object";
} void OnGUI(){ //OnGUI関数の中に書いていきます。 }}
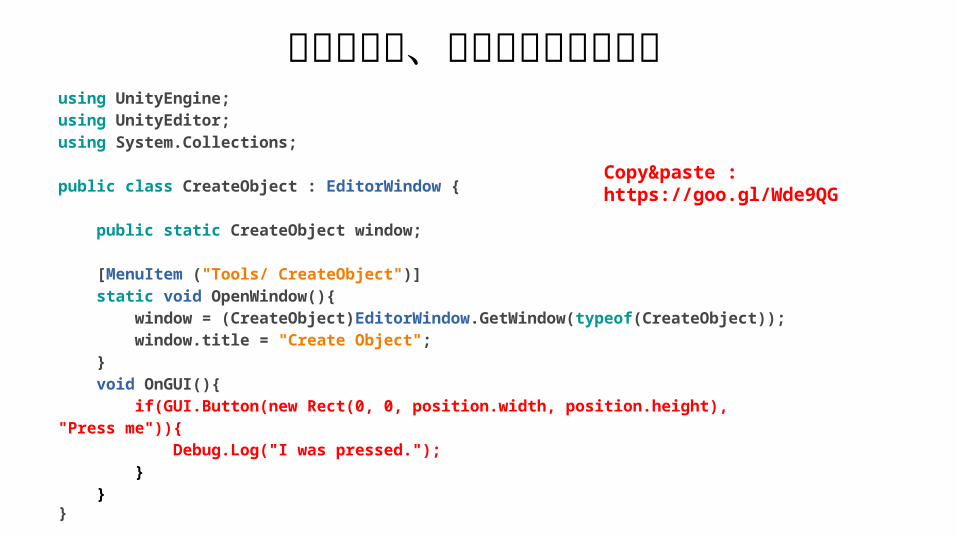
とりあえず、ログを出してみようusing UnityEngine;using UnityEditor;using System.Collections;
public class CreateObject : EditorWindow {
public static CreateObject window;
[MenuItem ("Tools/ CreateObject")] static void OpenWindow(){ window = (CreateObject)EditorWindow.GetWindow(typeof(CreateObject)); window.title = "Create Object"; } void OnGUI(){ if(GUI.Button(new Rect(0, 0, position.width, position.height), "Press me")){ Debug.Log("I was pressed."); } } }
Copy&paste : https://goo.gl/Wde9QG
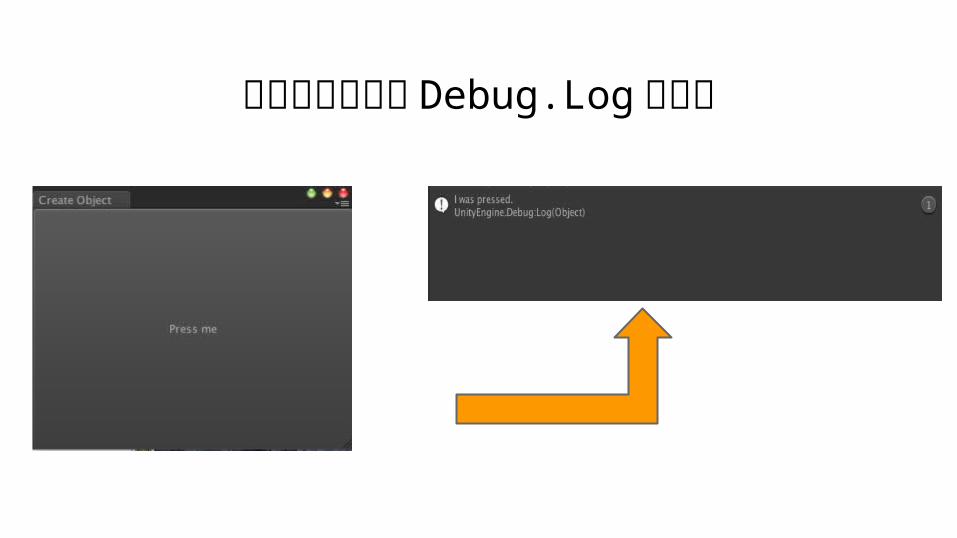
クリックすると Debug.Log出ます
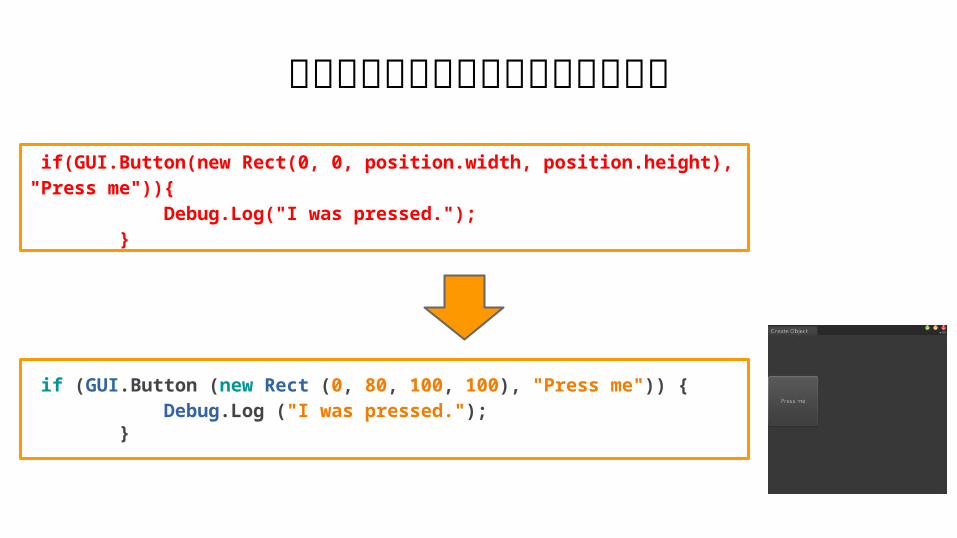
ボタンの位置や大きさを調整します
if (GUI.Button (new Rect (0, 80, 100, 100), "Press me")) { Debug.Log ("I was pressed."); }
if(GUI.Button(new Rect(0, 0, position.width, position.height), "Press me")){ Debug.Log("I was pressed."); }
using UnityEngine;using UnityEditor;using System.Collections;
public class CreateObject : EditorWindow { public static CreateObject window; private GameObject cube;
[MenuItem ("Tools/ CreateObject")] static void OpenWindow(){ window = (CreateObject)EditorWindow.GetWindow(typeof(CreateObject)); window.title = "Create Object"; }
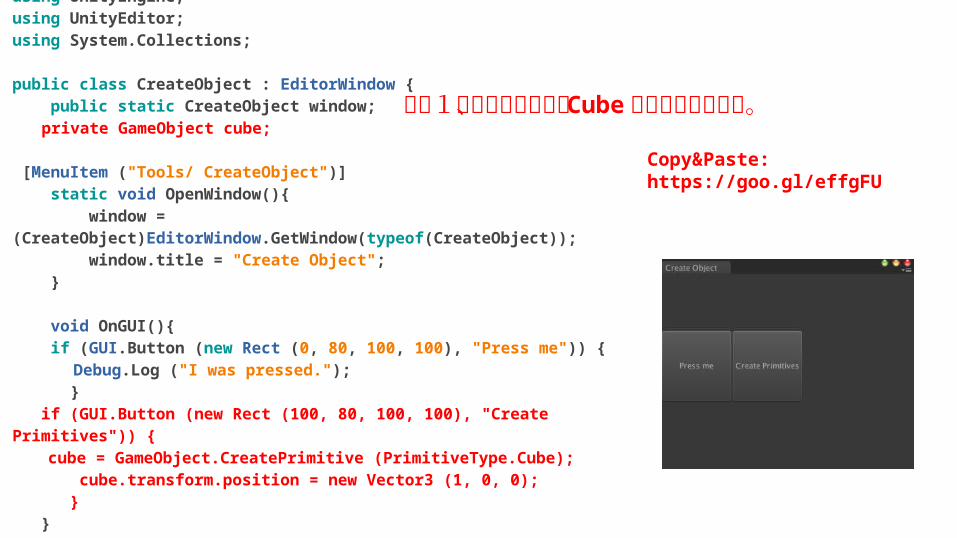
void OnGUI(){ if (GUI.Button (new Rect (0, 80, 100, 100), "Press me")) { Debug.Log ("I was pressed."); } if (GUI.Button (new Rect (100, 80, 100, 100), "Create Primitives")) { cube = GameObject.CreatePrimitive (PrimitiveType.Cube); cube.transform.position = new Vector3 (1, 0, 0); } }}
もう1つボタンを作り、 Cubeが出るようにする。
Copy&Paste: https://goo.gl/effgFU
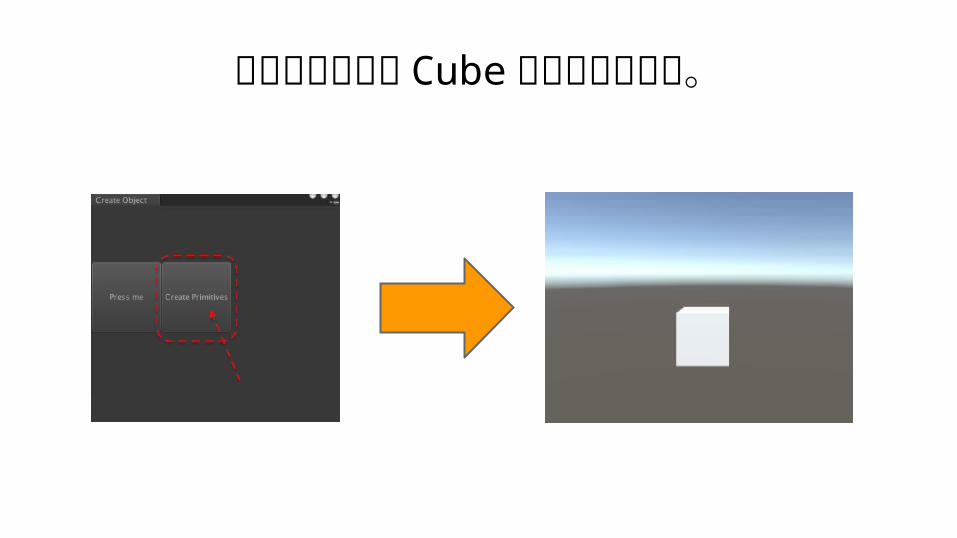
クリックすると Cubeが生成されます。
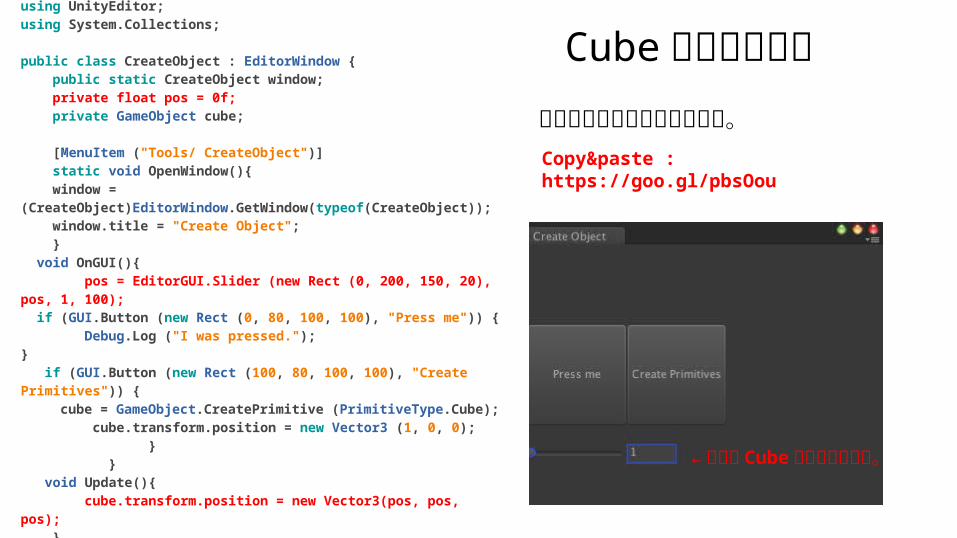
Cubeを移動させるusing UnityEngine;using UnityEditor;using System.Collections;
public class CreateObject : EditorWindow { public static CreateObject window; private float pos = 0f; private GameObject cube;
[MenuItem ("Tools/ CreateObject")] static void OpenWindow(){ window = (CreateObject)EditorWindow.GetWindow(typeof(CreateObject)); window.title = "Create Object"; } void OnGUI(){ pos = EditorGUI.Slider (new Rect (0, 200, 150, 20), pos, 1, 100); if (GUI.Button (new Rect (0, 80, 100, 100), "Press me")) { Debug.Log ("I was pressed.");} if (GUI.Button (new Rect (100, 80, 100, 100), "Create Primitives")) { cube = GameObject.CreatePrimitive (PrimitiveType.Cube); cube.transform.position = new Vector3 (1, 0, 0); } } void Update(){ cube.transform.position = new Vector3(pos, pos, pos); }}
←これで Cubeを移動させます。
スライダーが出るようにする。
Copy&paste : https://goo.gl/pbsOou
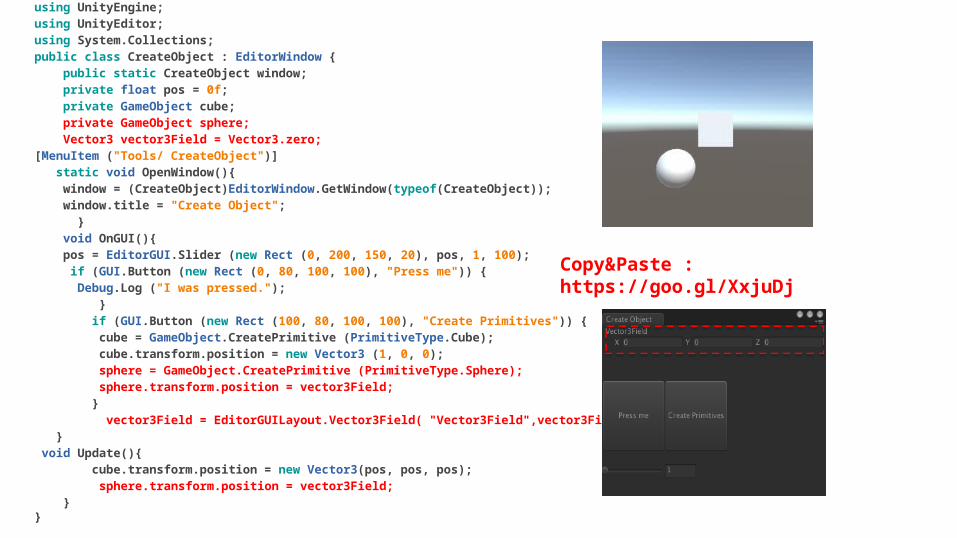
using UnityEngine;using UnityEditor;using System.Collections;public class CreateObject : EditorWindow { public static CreateObject window; private float pos = 0f; private GameObject cube; private GameObject sphere; Vector3 vector3Field = Vector3.zero;[MenuItem ("Tools/ CreateObject")] static void OpenWindow(){ window = (CreateObject)EditorWindow.GetWindow(typeof(CreateObject)); window.title = "Create Object"; } void OnGUI(){ pos = EditorGUI.Slider (new Rect (0, 200, 150, 20), pos, 1, 100); if (GUI.Button (new Rect (0, 80, 100, 100), "Press me")) { Debug.Log ("I was pressed."); } if (GUI.Button (new Rect (100, 80, 100, 100), "Create Primitives")) { cube = GameObject.CreatePrimitive (PrimitiveType.Cube); cube.transform.position = new Vector3 (1, 0, 0); sphere = GameObject.CreatePrimitive (PrimitiveType.Sphere); sphere.transform.position = vector3Field; } vector3Field = EditorGUILayout.Vector3Field( "Vector3Field",vector3Field ); } void Update(){ cube.transform.position = new Vector3(pos, pos, pos); sphere.transform.position = vector3Field; }}
Copy&Paste : https://goo.gl/XxjuDj
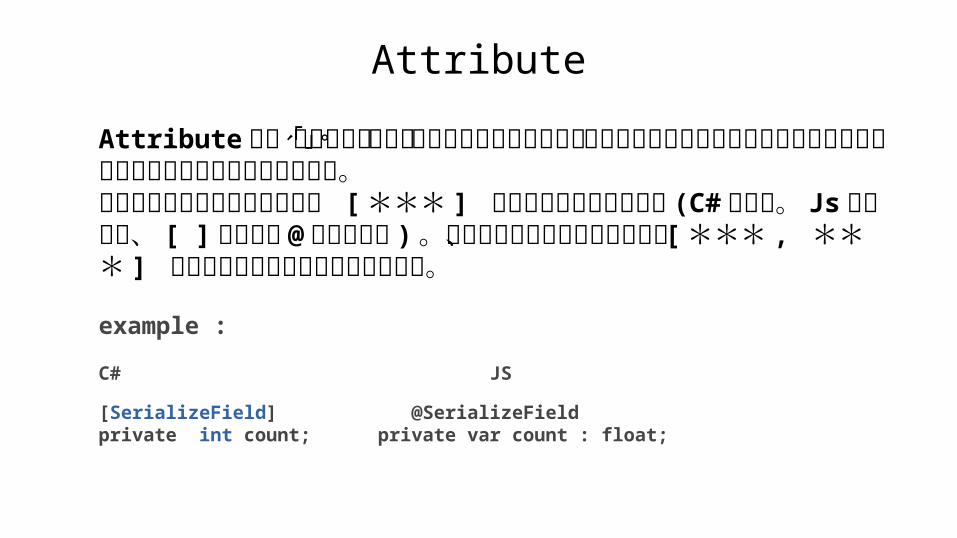
Attribute
Attributeとは、日本語で「属性」という意味になります。クラスや変数に属性を追加することで特別な挙動を追加することができます。
属性は変数やクラスの定義前に [*** ] のような形で記述します (C#の場合。 Jsの場合は、 [ ]ではなく@を付けます )。複数の属性を設定したい場合、 [*** , *** ] のようにカンマで区切り記述します。
example :
C# JS
[SerializeField] @SerializeFieldprivate int count; private var count : float;
Attribute
Attributeとは、日本語で「属性」という意味になります。クラスや変数に属性を追加することで特別な挙動を追加することができます。
属性は変数やクラスの定義前に [*** ] のような形で記述します。複数の属性を設定したい場合、 [*** , *** ] のようにカンマで区切り記述します。
example :
[SerializeField]private int count;
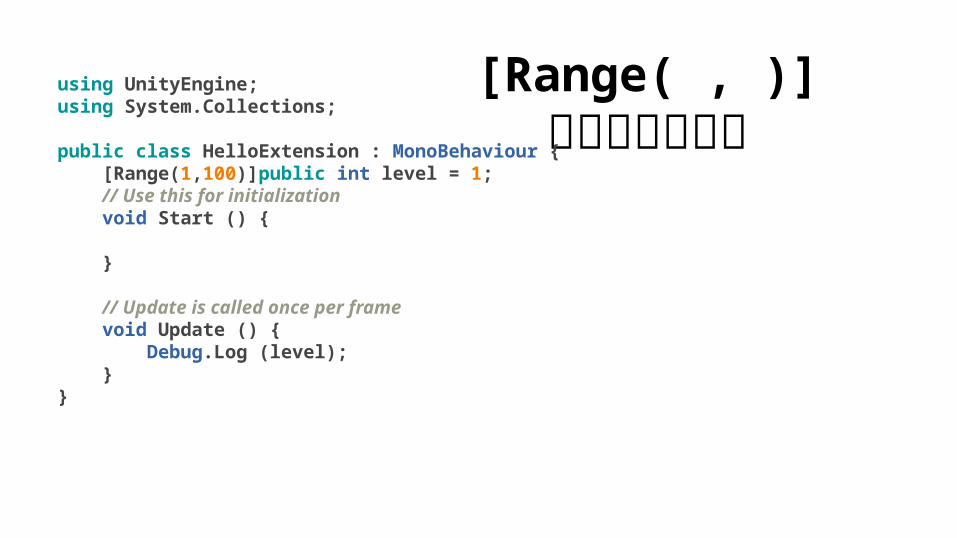
[Range( , )]範囲を制限する
using UnityEngine;using System.Collections;
public class HelloExtension : MonoBehaviour { [Range(1,100)]public int level = 1; // Use this for initialization void Start () { } // Update is called once per frame void Update () { Debug.Log (level); }}

こんな感じになります
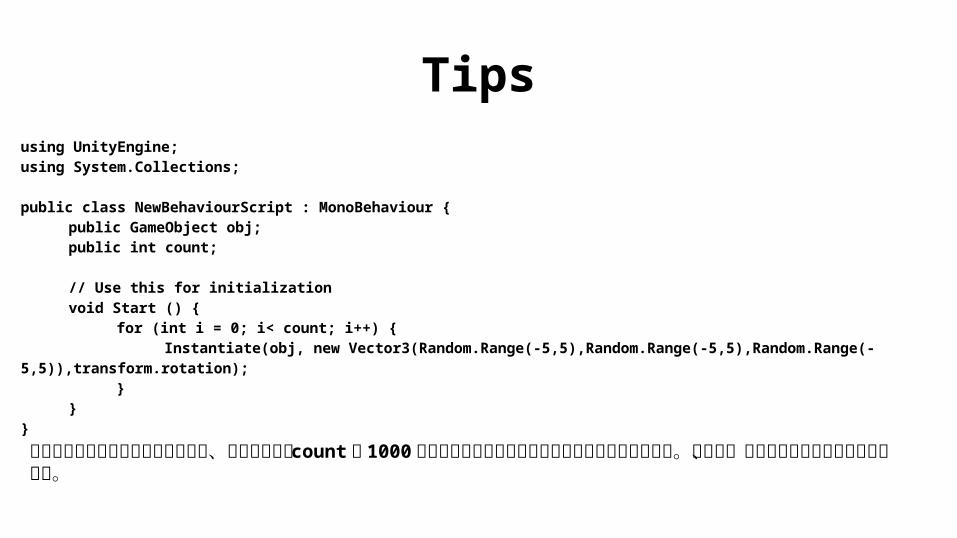
Tipsusing UnityEngine;using System.Collections;
public class NewBehaviourScript : MonoBehaviour {public GameObject obj;public int count;
// Use this for initializationvoid Start () {
for (int i = 0; i< count; i++) {Instantiate(obj, new Vector3(Random.Range(-5,5),Random.Range(-5,5),Random.Range(-
5,5)),transform.rotation);}
}}
値の範囲を指定する必要があるのは、例えば上記の countに 1000など入れてしまうと処理落ちする場合がありますね。しかし、値の範囲を設定すれば安全ですね。
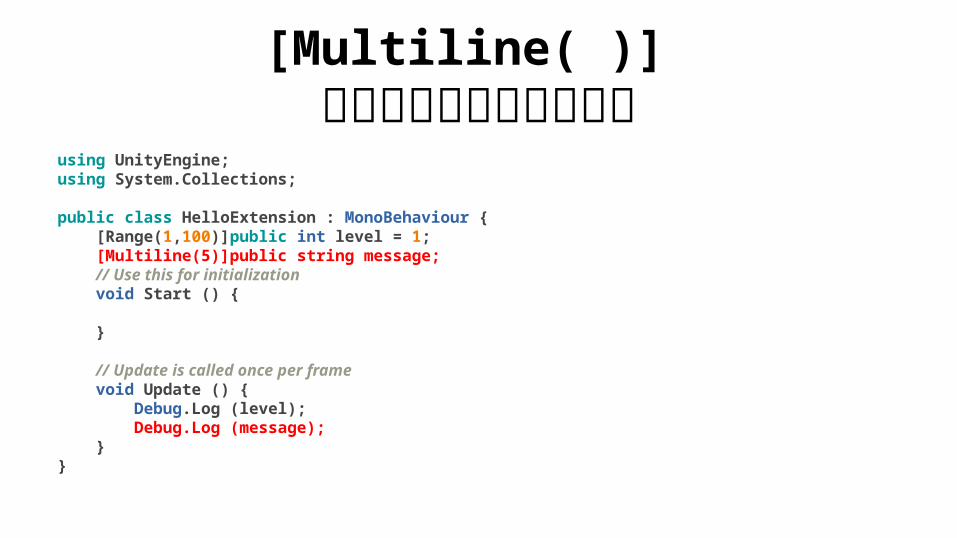
[Multiline( )] 入力用のスペースを作る
using UnityEngine;using System.Collections;
public class HelloExtension : MonoBehaviour { [Range(1,100)]public int level = 1; [Multiline(5)]public string message; // Use this for initialization void Start () { } // Update is called once per frame void Update () { Debug.Log (level); Debug.Log (message); }}
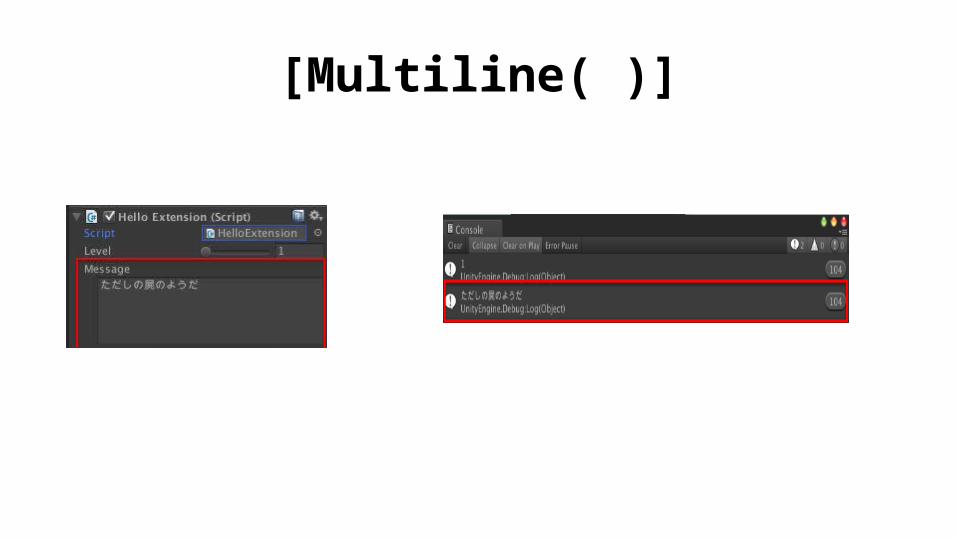
[Multiline( )]
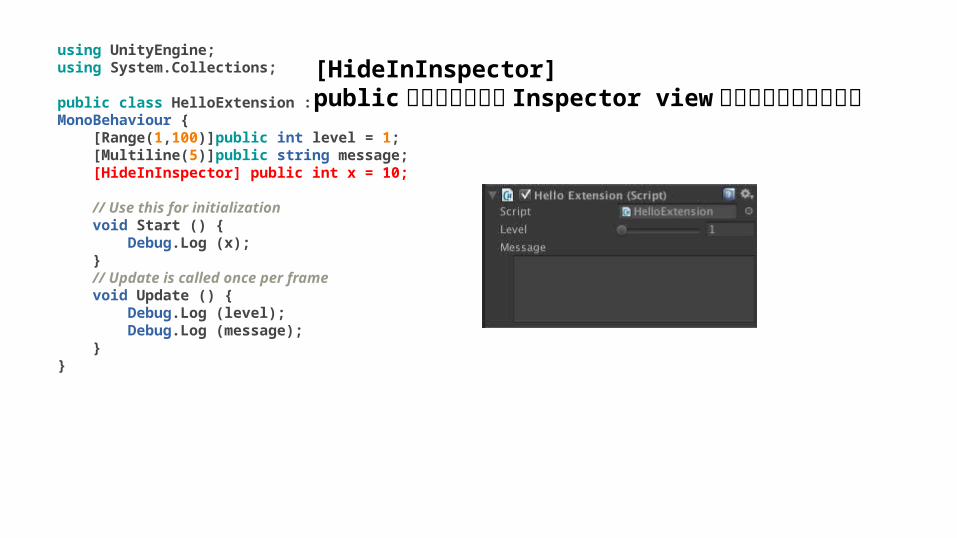
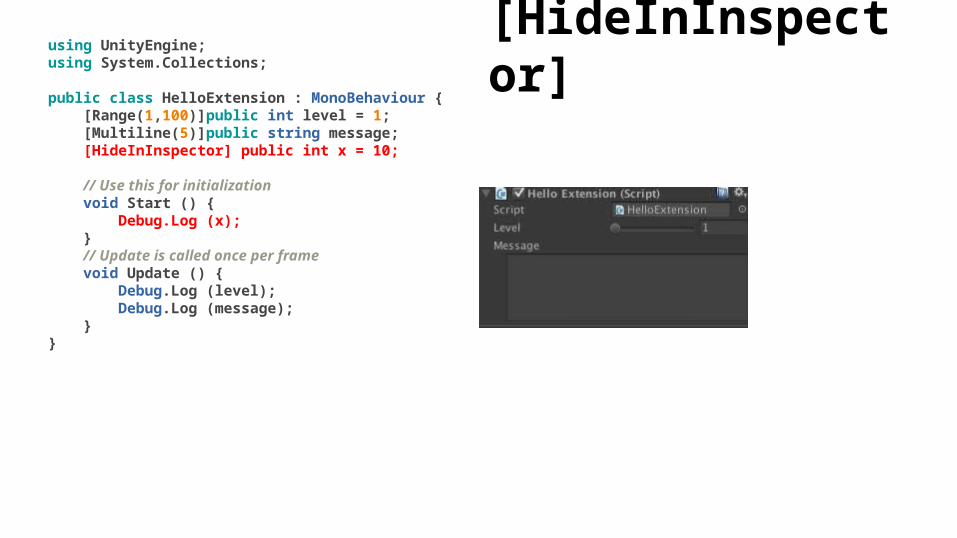
[HideInInspector]publicにした変数でも Inspector viewから変更できなくする
using UnityEngine;using System.Collections;
public class HelloExtension : MonoBehaviour { [Range(1,100)]public int level = 1; [Multiline(5)]public string message; [HideInInspector] public int x = 10;
// Use this for initialization void Start () { Debug.Log (x); } // Update is called once per frame void Update () { Debug.Log (level); Debug.Log (message); }}
[HideInInspector]using UnityEngine;using System.Collections;
public class HelloExtension : MonoBehaviour { [Range(1,100)]public int level = 1; [Multiline(5)]public string message; [HideInInspector] public int x = 10;
// Use this for initialization void Start () { Debug.Log (x); } // Update is called once per frame void Update () { Debug.Log (level); Debug.Log (message); }}
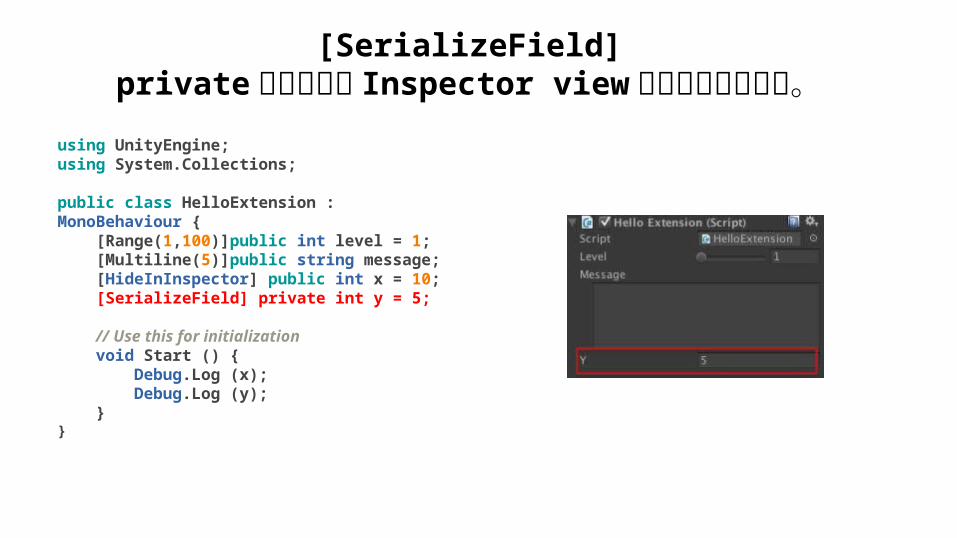
[SerializeField] privateの変数でも Inspector view から変更できます。
using UnityEngine;using System.Collections;
public class HelloExtension : MonoBehaviour { [Range(1,100)]public int level = 1; [Multiline(5)]public string message; [HideInInspector] public int x = 10; [SerializeField] private int y = 5;
// Use this for initialization void Start () { Debug.Log (x); Debug.Log (y); }}

[Space( )]スペースを作るusing UnityEngine;using System.Collections;
public class HelloExtension : MonoBehaviour { [Range(1,100)]public int level = 1; [Multiline(5)]public string message; [HideInInspector] public int x = 10; [SerializeField] private int y = 5; [Space(10.0f)]public float figure = 30; // Use this for initialization void Start () { Debug.Log (x); Debug.Log (y); } // Update is called once per frame void Update () { Debug.Log (level); Debug.Log (message); }}
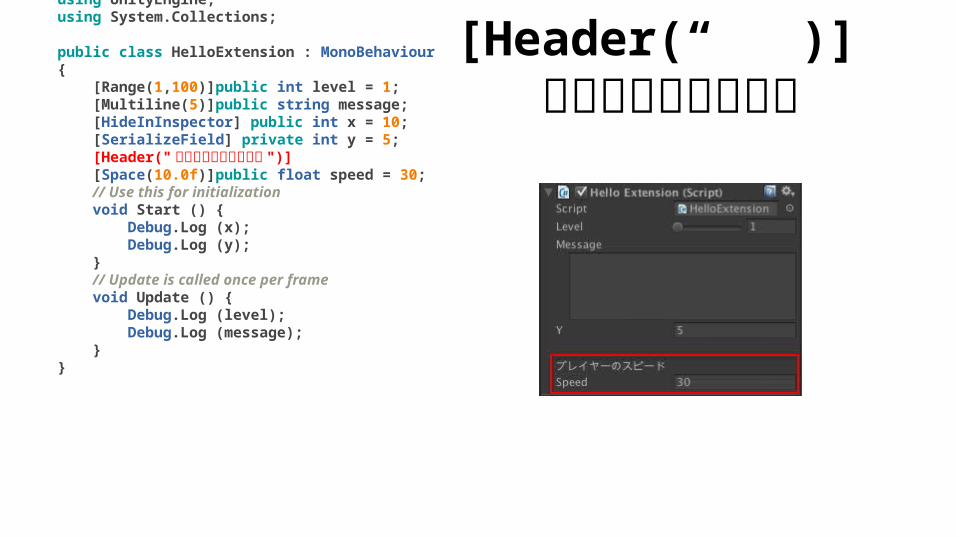
[Header(“ ”)] ヘッダー追加します
using UnityEngine;using System.Collections;
public class HelloExtension : MonoBehaviour { [Range(1,100)]public int level = 1; [Multiline(5)]public string message; [HideInInspector] public int x = 10; [SerializeField] private int y = 5; [Header("プレイヤーのスピード ")] [Space(10.0f)]public float speed = 30; // Use this for initialization void Start () { Debug.Log (x); Debug.Log (y); } // Update is called once per frame void Update () { Debug.Log (level); Debug.Log (message); }}

[TooltipAttribute("String")]ポインターを上に持ってくると表示されます。
using UnityEngine;using System.Collections;
public class HelloExtension : MonoBehaviour {[Range(1,100)]public int level = 1; [Multiline(5)]public string message; [HideInInspector] public int x = 10;[SerializeField] private int y = 5;[Header("プレイヤーのスピード ")] [Space(10.0f)]public float speed = 30; [SerializeField, TooltipAttribute("プレイヤーのライフ ")] int health;


![[2011/01/19]Chrome拡張でBeat Amazon! (in TechTalk)](https://static.fdocuments.net/doc/165x107/55614f75d8b42a780d8b4dbc/20110119chromebeat-amazon-in-techtalk.jpg)